The Record Password Strength score represents the percentage of record passwords, across all record passwords for all users, that are strong, medium, or weak. This score is calculated by adding all user's individual Record Password Strength, and then dividing it by the total number of records.
For each user, the Record Password Strength is calculated by the taking the number of strong, medium, or weak passwords and dividing it by the total number of records.
For example, if a user's vault has 10 total records where:
6 of the records have a strong password
3 of the records have a medium password
1 of the record has a weak password
The Record Password Strength score for this user will be as follows:
Strong passwords: 6/10 = 0.6 = 60%
Medium passwords: 3/10 = 0.3 = 30%
Weak passwords: 1/10 = 0.1 = 10%
Unique Record Passwords
The Unique Record Passwords score represents the percentage of record passwords, across all record passwords for all users, that are Unique or Reused. This score is calculated by adding all user's individual unique password score, and then dividing it by the total number of records.
For each user, the Unique Passwords Record Score is calculated by taking the number of unique passwords in the user's vault and dividing it by the total number of records.
For example, if a user's vault has 10 total records where:
6 of the records have a unique password
2 of the records share the same password
2 of the records share the same password
There are 6 unique passwords, 1 unique password that is shared between 2 records, and another unique password that is shared between 2 records. Thus, there are a total of 8 unique passwords. The Unique Passwords Record Score for this user will be as follows:
Unique passwords: 8/10 = 0.8 = 80%
Reused passwords: 2/10 = 0.2 = 20%
Two-Factor Authentication
The Two-Factor Authentication score represents the percentage of users that have enabled Two-Factor Authentication. This score is calculated by adding all the Two-Factor Authentication scores of all users and then dividing it by the number of total users.
For each user, the Two-Factor Authentication score will be one of the following values depending on whether the user has Two-Factor Authentication On or Off:
0% if Two-Factor Authentication is Off
100% if Two-Factor Authentication is On
Master Password Strength
The Master Password Strength is not displayed on neither the Vault Clients nor Admin Console. Instead, the Master Password Strength is displayed upon Account Creation:
Strong Master Password
For each user, the Master Password will be 100% if the Master Password's strength is Strong, and 0% otherwise.
For the overall Security Audit Score calculation, the average Master Password across all users is used.
Security Audit Score
The Security Audit Score represents the Overall Average Security Score across all your users in your organization.
For each user, the Average Security Score is calculated by taking the average of the user's score from the following categories:
Security Score Category
Values used to Calculate Average Security Score
The Strong password % is used
The Unique password % is used
If Two-Factor Authentication is On, 100% is used, if Off 0% is used
User's Average Security Score is calculated as follows:
User's Average Security Score = (% of Strong Password Strength + % of Unique Password + Two-Factor Authentication + Master Password Strength)/4
For example, if a user has the following scores:
Strong Password Strength = 60%
Unique Record Passwords = 80%
Two Factor Authentication is Off = 0%
Master Password Strength = 100%
The Average Security Score for the above user would be the sum of all the category scores divided by 4:
460%+80%+0%+100%=40.6+0.8+0+1=0.6=60%
FAQ
I have 0 Records, why is my Security Audit Score not 0?
Since the following variables affect the Security Audit Score:
Record Password Strength
Unique Record Passwords
Master Password Strength
Two-Factor Authentication
if the user has 0 records, this disqualifies the Record Password Strength and Unique Record Passwords variables, but the calculation of the Security Audit Score still takes the Master Password Strength and Two-Factor Authentication into consideration.
Why is my Security Audit Score negative?
Across the various Keeper Vault Clients, user's Security Scores are independently calculated which may rarely cause the overall Security Audit Scores to be negative. If the Keeper Admin Console displays negative scores, visit the following page to correct this issue.
If Master Password strength is strong, 100% is used, otherwise 0% used.
Keeper is the leading cybersecurity platform for preventing password-related data breaches and cyberthreats.
Congratulations on your decision to deploy Keeper to protect your organization. This guide will provide valuable information on how to onboard your users, deploy the application to end-user devices and manage the platform.
Platform Overview
Keeper's platform provides the following high level capabilities:
Password & Passkey Management
Privileged Access Management
Endpoint Privilege Management
Secrets Management
Database Management
Zero-Trust Network Access
Secure Vendor Access
OT Security
Connection Management
Remote Browser Isolation
Admin Console
Control Plane
About this Guide
This Keeper Enterprise guide covers the deployment of the core password management platform to your users. Additional guides and documentation of advanced privileged access capabilities are covered in later sections.
Keeper’s platform:
Provides each employee with a secure, encrypted digital vault in which to store their passwords, passkeys, files and other sensitive data. Employees can access their vault from any device and from all web browsers, automatically generate unique, complex passwords for all their accounts, and automatically fill their login credentials into all of their sites and apps.
Provides IT administrators complete visibility into employee password practices, enabling them to monitor password use and enforce password security policies across the entire organization, including password complexity requirements, two-factor authentication (2FA), role-based access control (RBAC), and other security policies.
Provides DevOps and engineering teams with a fully managed cloud-based, zero-knowledge Secrets Management platform for securing infrastructure secrets such as privileged accounts, API keys, database passwords, access keys, certificates and any type of confidential data.
Start Your Trial
Creating a trial of Keeper Business and MSP
Keeper Security provides customers with a fully functional trial version that provides all of the capabilities available in the Keeper platform including:
Password Management
Secrets Management
Privileged Access Management
Provides modern privilege access through connection management, OT security, secure vendor access, zero-trust network access and remote browser isolation with session management, monitoring and recording.
(3) Fill out the form using your Business email address, and click Start Free Trial.
Start Free Trial
(4) On the next screen, you'll create your account (or if you're using an existing Keeper personal email address, you can select "Use an Existing Account").
Important: At this step, please ensure that you select your desired Geographic Data Center location.
Signup for US, EU, AU, CA, JP data center locations are available.
US GovCloud (FedRAMP Compliant) region is available on request.
The choices available are US, EU, AU, CA, JP. Contact us for GovCloud public sector signup.
If you select the wrong data center region, please contact support to delete your trial and start over.
(5) Select your Administrator account Master Password.
Keeper Master Password
Ensure you select a strong Master Password that is only used for managing Keeper. If you forget your Master Password, Keeper support cannot perform a password reset due to our Zero Knowledge architecture. We recommend activating Account Recovery (via a recovery phrase) after logging in and visiting the Settings screen.
(6) After verifying your email address and selecting a Master Password, you will be logged into the Keeper Admin Console. Click on "Admin" to add users and begin your configuration.
Admin Setup
(7) Click on "Add Users" to invite other users for your trial, or to set up additional admin accounts. Users who are manually invited will login with a self-selected Master Password.
Add Users
(8) Proceed through this Enterprise Guide to learn about best practices for deploying Keeper, Single Sign On ("SSO") integration, Role enforcement policies, Teams, Advanced Administration and other important topics.
PAM Resource Sharing
Sharing access to servers, databases, workloads and web applications with Keeper
Managing PAM Resources with Sharing
Overview
Keeper Vault uses Shared Folders as the access control mechanism for all KeeperPAM-managed resources. These PAM resources can be organized within shared folders in the same way as standard Keeper records.
A significant advantage of the KeeperPAM architecture is that it enables resource access sharing without revealing the actual credentials to users. This zero-knowledge approach maintains security while providing necessary access.
Types of PAM Resources
Shared Folders can contain various types of PAM resources:
PAM Machine - For server and endpoint connections
PAM Database - For database system access
PAM Directory - For directory service management
The share receipient can then initiate a zero-trust privileged session to the target system, without having access to the underlying credentials.
Implementing Least Privilege
For optimal security through least privilege principles, we suggest maintaining PAM Users in a dedicated shared folder separate from other resources. This separation helps limit access to sensitive underlying credentials.
The recommended configuration includes:
A shared folder for infrastructure components (Machines, Databases, etc.)
A separate shared folder specifically for PAM User credentials
When you utilize Keeper's or Gateway wizard, this separation happens automatically, establishing the recommended security structure from the beginning.
Security Benefits
This organizational approach provides several advantages:
Credentials remain protected even when resource access is shared
Administration is streamlined through the familiar Keeper interface
Access permissions can be precisely configured at the folder level
Complete audit trails track all resource access activity
For more information:
KeeperPAM
Microsoft AD FS Provisioning
Keeper supports SAML 2.0 Authentication and SCIM provisioning with Microsoft AD FS
Keeper integrates with Microsoft AD FS for real-time user authentication, provisioning and de-provisioning.
View the full SSO Connect setup guides:
SSO Connect Cloud with Microsoft AD FS:
SSO Connect On-Prem:
Event Descriptions
Details on what triggers each event
A list of all available events captured by the Keeper Advanced Reporting and Alert Module are provided in the chart below. The Event Code is utilized in the user interface and within the Keeper Commander CLI command parameters. The "Message" field is utilized for the Alerting module.
Within each event, there may be additional attributes such as Record UID, Shared Folder UID, Team UID, Username, etc. These attributes will appear within the event description and they are also provided to the 3rd party SIEM provider in the format as specified by the destination.
Edge Settings Policy
Configuration settings for Edge Browser Extension
The behavior and settings of the Microsoft Edge extension can be customized through the ExtensionSettings policy on Microsoft Windows devices.
Please see the below link to learn about the various settings can be applied:
Chrome Settings Policy
Configuration settings for Chrome Browser Extension
The behavior and settings of the Chrome extension can be customized through the ExtensionSettings policy on Windows, Mac and Linux.
Please see the below link to learn about the various settings can be applied:
Exabeam (LogRhythm)
Integrating Keeper SIEM push to Exabeam
Overview
Keeper supports event streaming into Exabeam (formerly LogRhythm) deployments. External logging is real-time, and new events will appear almost immediately. Setup instructions are below.
Exabeam uses a standard "Syslog" push capability over TCP.
Ports
TCP Ports 514 and 6514 (TLS)
Google Security Operations (Chronicle)
Integrating Keeper SIEM push to Google Security Operations (formerly Chronicle)
Overview
Keeper supports event streaming into Google Security Operations, formerly known as Google Chronicle. External logging is real-time, and new events will appear almost immediately. Setup instructions are below.
Payload Format
Pipe-delimited, e.g. "audit_event=login|[email protected]|..."
Important: Ensure that the endpoint is using a valid signed SSL certificate that has a domain matching the subject name in the certificate. The certificate must also include the full certificate chain from your CA. Keeper's systems will refuse to connect to a self-signed certificate.
Also, ensure that your Exabeam server allows traffic from Keeper servers. See Firewall Configuration page.
Create an API Key
Go to the Google Cloud console and select the project associated to your Google Security Operations (Chronicle) environment.
Select APIs & Services > Credentials and create a new Credential > API Key.
After creating the API key, edit the key and apply restrictions.
Ensure that the API key is restricted to "Chronicle API" capabilities only.
Save this API key for step 3 below.
API Key
2
Create a Feed
From your Google Security Operations tenant:
Go to Settings > Feeds > Add Feed
Select Source Type of "Webhook" and then select Log Type of "Keeper Enterprise Security"
Select Next and then Submit.
When prompted, generate the Secret Key and save it for the step 3.
Also, copy the Feed Endpoint and save this for step 3.
3
Activate Integration
From the Keeper Admin Console, go to Reporting & Alerts > External Logging
Select Google Security Operations
Provide API Key from step 1, Feed Endpoint and Feed Secret Key from Step 2.
Click Test and then Save.
Setup Complete!
When SIEM logs are sent from Keeper to Google, the data will begin to populate within 15 minutes.
LDAP Provisioning
Keeper AD Bridge supports automatic provisioning of nodes, roles, teams and users from any LDAP service.
The Keeper Bridge is an enterprise-class service application that supports the ability to automatically sync Nodes, Users, Roles and Teams to your Keeper Enterprise account from an LDAP service. To activate and install the Keeper Bridge, follow the below steps:
Create a Node (under the root node) to sync with your Active Directory.
Visit the Provisioning tab and select Add Method and then select LDAP Sync.
Download the Keeper Bridge and proceed with setup.
For detailed Bridge setup and install instructions see our .
The Keeper Bridge does not authenticate users into their vault with their LDAP password. For seamless user authentication, consider our add-on as described in the next section which authenticates against Active Directory via AD FS.
Automated Team provisioning requires the Keeper Administrator to authenticate on the Keeper Bridge. The Bridge will poll for users who have created their Keeper account after invitation, then the Bridge will encrypt the Team Key with the user's public key, and distribute the Team Key to the user. Once any member of the team logs into the Vault, all members of that team are approved.
Once the Keeper Bridge is syncing, we recommend not making manual user or team changes directly on the Admin Console. Delegate all user and team provisioning to the bridge through the LDAP Directory. Role enforcement policy changes should still be made on the Admin Console
Forcefield
Deploying the Forcefield endpoint protection software to users
The installation of the standalone version of Keeper Forcefield is available through an MSI installer based on the architecture.
Business customers can install the MSI on end-user machines using your preferred deployment method, whether it’s Intune, an RMM tool, or Group Policy. Each solution supports silent installation of MSI packages and can push the software to your target devices automatically. Just follow your standard process for deploying software across your environment.
Silent Installation / Uninstallation
Install:
Uninstall:
To log installation or uninstallation:
Launch on Start Up
You can launch the Keeper Password Manager automatically when you start your computer.
Windows
To set Keeper Password Manager app to launch at start up, go to Start > Run and type shell:startup
Open the Startup Folder
Your startup folder will be shown. Place a shortcut Keeper Desktop into this folder. Now Keeper will launch automatically on startup.
Mac
From Settings, go to General > Login Items
Click the Plus (+), go to Applications, and select Keeper Password Manager
Now Keeper will launch when you start your mac.
CrowdStrike Falcon Next-Gen SIEM
Integrating Keeper SIEM push to Crowdstrike Falcon Next-Gen SIEM
Overview
Keeper supports event streaming into CrowdStrike Next-Gen SIEM. External logging is real-time, and new events will appear almost immediately. Setup instructions are below.
1
Add the Data Connector
From the CrowdStrike dashboard, visit the Data onboarding > Data Connectors screen.
Select "+ Add connection" and search for Keeper
Click "Configure", assign a name, and then "Create connection".
2
Create the API Key
From the Data Connector screen, in the Keeper row click the overflow menu and then "Generate API Key".
3
Activate the Integration
From the Keeper Admin Console, go to Reporting & Alerts > External Logging
Setup Complete!
When SIEM logs are sent from Keeper to CrowdStrike, the data will begin to populate in the "Third Party" source within a few minutes.
Datadog
Integrating Keeper SIEM push to Datadog
Overview
Keeper supports event streaming into Datadog deployments. External logging is real-time, and new events will appear almost immediately. Setup instructions are below.
Datadog Integration Settings
The Datadog integration requires two fields:
URL (For example: datadoghq.com or datadoghq.eu)
API Key
To retrieve an API Key, please follow the below instructions
In the Datadog interface, go to Organization Settings > API Keys
Create a new API key
Ensure that your API Key matches up with the destination server where your Datadog environment is hosted.
Devo
Integrating Keeper SIEM push to Devo
Overview
Keeper supports event streaming into Devo deployments. External logging is real-time, and new events will appear almost immediately. Setup instructions are below.
Devo Integration Settings
Devo uses a standard "Syslog" push capability over TCP.
Payload Format
Pipe-delimited, e.g. "audit_event=login|[email protected]|..."
Important: Ensure that the endpoint is using a valid signed SSL certificate. Keeper's systems will refuse to connect to an invalid or self-signed endpoint.
Also, ensure that your Devo server allows traffic from Keeper servers. See page.
Elastic
Integrating Keeper SIEM push to Elastic
Overview
Keeper supports event streaming into Elastic deployments. External logging is real-time, and new events will appear almost immediately. Setup instructions are below.
Elastic Integration Settings
Elastic integration uses a TCP push to the destination endpoint. The fields required are:
Host (e.g. mycompany.gcp.cloud.us.io:9243)
Search Index (e.g. keeper)
API Key
Please refer to the Elastic documentation for generating an API key:
Important: Ensure that the endpoint is using a valid signed SSL certificate that has a domain matching the subject name in the certificate. The certificate must also include the full certificate chain from your CA. Keeper's systems will refuse to connect to a self-signed certificate.
Also, ensure that your Elastic server allows traffic from Keeper servers. See page.
Troubleshooting
If Keeper is unable to connect to your Elastic instance, please check the following:
In the host field, do not type http or https
Make sure to include the port
If you are using a "Space", add the space name to the end of the Host field after the port. For example: example-elastic01.us-east.found.io:9243/s/spacename
Sharing
Business users can securely share their records and folders with co-workers, contractors and partners across all devices
Overview
Sharing Keeper records is a secure and powerful feature of the platform. Keeper offers various easy-to-use sharing capabilities with role-based enforcement policies to solve the most common use cases.
Types of Sharing
- easily share a single record with another Keeper user and choose from various permission types to control access.
- share multiple records in a folder to a specific set of users or Keeper Teams.
- share access to a zero-trust privileged session without sharing access to credentials
Jamf Pro Policy Deployment - Chrome
Deploying Custom Configuration Profiles using Jamf Pro
Deploying Google Chrome PLIST (.plist) Policy using Jamf Pro
This is a general overview of how to deploy Google Chrome's .plist configuration profile, to computers within your organization, using Jamf Pro.
Upload Created PLIST File
Upload the manually created Google Chrome PLIST file that defines the properties for the preference domain you specify in Jamf Pro.
Log in to Jamf Pro.
Click Computers at the top of the page.
Click Configuration Profiles.
Note: If the PLIST file contains formatting errors, follow the instructions to remediate the issue.
10. Click the Scope tab, and then configure the scope of the configuration profile.
11. Click Save.
IE11 Trusted Sites
Policy Requirements for IE11 Trusted Sites
IE11 - Trusted Sites Policy
Customers who login to Keeper with SSO, or customers who are on corporate networks that deploy group policies for Internet Explorer, ensure that the following entries exist in your Trusted Sites settings under Tools > Internet Options > Security.
US / Global Customers (USA East/West):
keepersecurity.com
*.keepersecurity.com
EU Data Center Customers (Ireland, London, Frankfurt):
keepersecurity.eu
*.keepersecurity.eu
AU Data Center Customers (Sydney):
keepersecurity.com.au
*.keepersecurity.com.au
CA Data Center Customers (Canada):
keepersecurity.ca
*.keepersecurity.ca
JP Data Center Customers (Tokyo):
keepersecurity.jp
*.keepersecurity.jp
GovCloud Data Center (US):
keepersecurity.us
*.keepersecurity.us
Enterprise customers must push group policies to end-users with these Trusted Sites in order to fully function with SSO and other critical features.
Mac
Deploying KeeperFill to macOS devices using device management platforms
MDM Deployment for macOS
Follow these steps to deploy KeeperFill to all Mac devices in your organization using your preferred device management platform.
To set up KeeperFill on Mac, you create configuration files in MCX Property List (.plist) format. When you deploy the configuration files to the device using your preferred mobile device management (MDM) tool, the settings are applied.
These procedures are a General Guide and assume that you have already deployed the Chrome Browser within your organization.
Overview of steps
Use your preferred editor to create the Keeper .plist policy file.
Set up KeeperFill browser extensions.
Push the configuration files to all macOS devices in your organization using your preferred mobile device management (MDM) tool.
Windows
Deploying KeeperFill to Windows devices using device management platforms
There are many options to deploy the Keeper Browser Extension (KeeperFill) to browsers on Windows machines including Group Policy, SCCM and Intune.
Choose Keeper Password Manager and once it's in the list, click into it
Check the box for "Update Automatically" and click "Distribute"
Check all three boxes listed below and click "Distribute"
SSO / SAML Authentication
Federate login to Keeper with any SAML 2.0 compatible identity provider (IdP)
Overview
Keeper integrates with any SAML 2.0 compatible identity provider such as Entra ID, Okta, Google Workspace, Duo, OneLogin, Ping Identity, JumpCloud and more.
We offer two different SSO implementations: SSO Connect Cloud and SSO Connect On-Prem. Both implementations provide Zero Knowledge encryption with seamless authentication for end-users. We recommend SSO Connect Cloud for most customers.
SSO Connect Cloud
Keeper SSO Connect Cloud is the latest Cloud-based architecture which can be configured with your identity provider to authenticate and provision users in a matter of minutes. To read the SSO Connect Cloud setup guide, see the link below:
SSO Connect On-Prem
SSO Connect On-Prem is a self-hosted integration that requires either a Windows or Linux hosted application server. To read about the SSO Connect On-Prem configuration, see the link below:
Security Keys
Additional information regarding FIDO2 Security Keys in Keeper
Keeper Administrators can enforce the use of FIDO2 security keys, and require that a security key can be used as the only 2FA method. Security Keys can be enforced for any type of account, including Master Password-based login and SSO login.
Administrators can also require the use of PIN associated with the hardware key.
Screenshot below:
Two-Factor Authentication Enforcement
Important Notes Regarding Security Key Enforcement
Enforcing the use of a FIDO2 hardware security key has several implications for users which admins need to be aware of.
Support for enforcing a FIDO2 Security Key can vary based on the device operating system and device firmware capabilities. Ensure you are using the latest operating system and Keeper version.
Keeper supports both plug-in and NFC keys on mobile devices. Documentation and support for security keys is available on our end-user guide for and .
Troubleshooting Keeper with Security Keys on iOS is
Linux
Deploying KeeperFill to Linux devices using device management platforms
Set up KeeperFill on Linux
Follow these steps to deploy KeeperFill to all Linux devices in your organization using your preferred deployment tool or script.
To set up KeeperFill on Linux, you create configuration files in JavaScript Object Notation (.json) format.
These procedures are a General Guide and assume that you have already deployed the Chrome Browser within your organization.
Overview of steps
Use your preferred editor to create the Keeper JSON policy file.
Set up KeeperFill browser extensions.
Push the configuration files to all Linux PCs in your organization using your preferred deployment tool or script.
Resources
Resources for getting started with Keeper Business and Enterprise edition
Getting Started
The following links will get you up and running with Keeper.
Domain Reservation
Reserve the use of domains for privacy and security
About Domain Reservation
Keeper's Cloud architecture is Zero Knowledge ().
For security reasons, Keeper's Enterprise tenants are restricted to inviting and creating end-user accounts within reserved email domains. When you sign up for a Keeper Business or Enterprise account, we recommend that you use a business email domain, e.g. mycompany.com.
If you sign up for the Enterprise account using @mycompany.com for your email address, this domain will be reserved to your tenant.
Simple Provisioning through the Admin Console
Provision users and create teams from the Keeper Admin Console.
Addition of Users
To add users manually through the user interface, follow these steps.
Login to the .
SSO JIT (Just-in-Time) Provisioning
Keeper supports just-in-time automatic provisioning and seamless authentication with any identity provider
Overview of SSO - JIT Provisioning and Authentication
Keeper SSO Connect® Cloud leverages Keeper’s zero-knowledge security architecture to securely and seamlessly authenticate users into their Keeper Vault and dynamically provision user vaults to the platform. Keeper supports all popular SSO IdP platforms such as Okta, Microsoft Entra ID / Azure AD, Google Workspace, Centrify, Duo, OneLogin, Ping Identity, JumpCloud and many more.
Keeper supports both IdP-initiated login flows and SP-initiated flows. Just-in-time provisioning allows admins to quickly and easily roll out Keeper to users using a few simple steps:
Email Auto-Provisioning
Basic provisioning of users based on email address
Overview
To facilitate the onboarding of Keeper to users based on their email address domain and a Master Password, use the Email Provisioning method. This can be used for organizations that are deploying Keeper to a large number of users (such as a university) where the admin is not explicitly inviting the user to sign up.
For example, anyone with the email address containing the domain acme.edu, can be automatically provisioned to a particular node and role within the Acme EDU Keeper Enterprise account upon creating their vault.
Virtual Machine Persistence
Persisting KeeperFill settings on virtualized desktops
Overview
Some customers virtualize their workforce desktops with tools like VMware or Citrix. For the KeeperFill extension to function properly on such desktops, certain directories may need to be persisted.
This applies to the extensions for Chrome and Edge. For each, three directories within the user's home directory must be persisted, as listed below.
Storing Two-Factor Codes
Keeper provides encrypted 2FA code storage for websites and applications.
Storing 2FA Codes in Keeper
Keeper has developed a fully-integrated security layer that adds two-factor codes directly in vault records. A Keeper user simply adds the two-factor code into the vault record field and then it will automatically be filled when logging in via the Web Vault or Browser Extension.
The Keeper vault is also capable of storing and managing TOTP / 2FA codes for 3rd party applications.
Google Workspace Provisioning
Keeper supports SAML 2.0 Authentication and SCIM provisioning with the Google Workspace platform.
Keeper Enterprise is available for Google Workspace with automated user provisioning using the SCIM (System for Cross-Domain Identity Management) protocol. SCIM is an open standard that enables automated user provisioning between identity providers (like Google Workspace) and service providers (like Keeper).
IMPORTANT: If you want your users to authenticate via SAML 2.0 with Google Workspace, you must first configure and install Keeper SSO Connect.
View the full SSO Connect Cloud setup guide:
Email Address Changes
Best practices for handling end-user email changes in bulk
Handling Email Changes for SSO Users
Organizations may need to migrate users to a new email domain, such as during a merger or acquisition. For users authenticating via Single Sign-On (SSO), their email address serves as the primary identifier in both the Identity Provider (IdP) and Keeper. If the email addresses do not match, authentication will fail. To prevent disruptions, email changes must be properly coordinated between both systems.
SCIM Overview
Companies utilizing Google Workspace for their identity services can easily deploy Keeper’s EPM solution to their users without the need to manually provision users. Keeper has developed a tight integration with Google Workspace and Google Cloud to automatically provision users and teams from Google to Keeper. In the integration, admins can select which groups and users are provisioned to Keeper.
In addition to provisioning and de-provisioning users, Keeper Enterprise provides zero-knowledge, SAML 2.0 compliant authentication with Google for seamless and frictionless access.
Integration of Keeper Enterprise into Google Workspace enables organizations of any size to secure their passwords and confidential information within an encrypted vault. By including Keeper Enterprise in their SSO implementation, organizations fill critical security and functionality gaps that are essential from a cybersecurity perspective which includes:
Protects and generates strong passwords for any non-SAML application or website
Implements zero-knowledge security architecture with full end-to-end encryption
Stores SSH keys, digital certificates and any other confidential information
Enforces password compliance and policy-based access controls across the entire organization – all employees on all their devices for every website, application and system.
Manages shared passwords for financial, business, social media or any other critical service
Keeper is available for all Google Workspace Education, Business and Enterprise customers.
SSO and SCIM Setup and Configuration
Google Workspace supports the following integrations with Keeper:
SSO authentication with SAML 2.0
Automatic User Provisioning with SCIM
User and Team provisioning with Google Cloud Functions and Cloud Scheduler
Some directory paths refer to an <Extension-ID>. Where the ID is referred to, you can opt to persist the entire parent directory, or you can find the ID in the table below.
For Chrome, the ID may be either of the Chrome IDs listed. For Edge, the ID may be either of the Edge IDs listed; or, if you installed on Edge using the Chrome Web store, the ID will be one of the two Chrome IDs.
Browser
Extension ID
Edge
lfochlioelphaglamdcakfjemolpichk
OR
mpfckamfocjknfipmpjdkkebpnieooca
Chrome / Edge
bfogiafebfohielmmehodmfbbebbbpei
OR
kbedblbpfmeicfpadihimgombbafaeeh
Edge Locations
The following three directories should be persisted when using the Edge extension.
One-Time Share - provides time-limited secure sharing of a record to anyone, even if they don't have a Keeper account. This is a useful feature for sharing information with contractors or new employees during their onboarding process.
Share Admin - role-based permission that gives administrators elevated access rights over your organization's shared folders and shared records.
Time-Limited Access - securely share credentials or secrets with other Keeper users on a temporary basis, automatically revoking access at a specified time.
Self-Destructing Records - One-time share records that automatically delete from both sides when shared and viewed.
Use the General payload to configure basic settings, including the level at which to apply the profile and the distribution method.
Click the Application & Custom Settings payload, and then click Upload.
Click Add.
Enter com.google.Chrome in the Preference Domain field.
To upload the custom PLIST file choose Upload File, enter the preference domain for which you want to set properties. Click Upload PLIST File, and then choose the com.google.Chrome.plist file previously created.
Keeper's architecture requires a domain to be reserved before it can be used by the Enterprise. This serves several purposes:
Ensures that end-users cannot create "rogue" accounts without being explicitly invited or provisioned by the Enterprise Admin.
Reduces administrative burden in locating free or personal accounts associated with a domain
Prevents a malicious actor from creating a Keeper account with a domain reserved by an Enterprise customer.
If you require additional email domains (e.g. us.company1.com and eu.company2.com), please open a support ticket with the Keeper team and we will assist you in reserving the domain. Alternatively, the new Keeper Commander CLI supports domain reservation through realtime DNS validation.
Reserve your Domains
If you own a set of domains that your users will use for logging in, be sure to contact your Keeper account manager to request domain reservation for all of your domains. We can lock the domains to your preferred region to ensure that users don't sign up in the wrong geographic data center.
Personal Domains
Keeper maintains a list of "personal" domains, for example gmail.com and yahoo.com which cannot be reserved and allow the general public to create Keeper accounts with those domains, with a verified email.
If you would like to allow end-users to create personal or Enterprise accounts with your reserved domain outside of your enterprise tenant, please contact the Keeper support team and we can unlock this domain for you.
Domain Aliases
Organizations have the option to add a “corporate alias” to their account. For example, in situations where an organization domain change occurs, our team can easily transition your users to the new domain without any interruption in service. Please contact Keeper's support team to add a domain alias to your account.
Domain Reservation and Just-In-Time provisioning
If you are using Keeper SSO Connect Cloud or Keeper SSO Connect On-Prem, you can enable Just-In-Time Provisioning. If Just-In-Time provisioning is enabled, you can automatically route users to the identity provider when the user types in their email and clicks "Next" from the Vault login screen. This applies to all devices including Web Vault, Desktop App, Browser Extensions, iOS and Android apps.
If you would like to ensure that new users who access the vault are automatically routed to your SSO based on the email domain, please contact support and we will assist in setting up the routing.
Domain Reservation and Just-In-Time Provisioning
Domain Routing
Customers who attempt to login or provision accounts from a different region may or may not automatically get routed to the proper region where their tenant is hosted. If the routing is not occurring, please open a support ticket.
Select the Node that the user will belong to. By default, the top level root node is selected.
From the Users Tab, select the + Add Users button.
Enter the Name and Email of the user and then click Add.
The user will receive an email to create their vault with a Master Password or SSO, depending on what node they are located in.
Adding a User
Bulk User Import
You can also import many users at once via a comma-delimited text file (.csv).
Preparing a file for Bulk User Import
The file format for a CSV file upload is 3 columns: Email Address, Name, Role.
The Role field is optional. Keeper recommends you create a default, "General Employee" role and all users imported will be automatically applied to that role, for example:
Default Role Setting
Example File (using Excel)
Sample Import File (using Excel)
Convert the file to .csv by selecting File > Save As... > (.csv)
Save File as .csv
A few important notes about preparing a CSV file for user importing:
Ensure that the file does not contain a header row.
Only roles without Admin Permissions can be imported. Any row containing a Role that has Administrative Permissions will be skipped.
Don't populate a default role in the column. This is not necessary and will generate error messages. Simply leave the Role blank to inherit the default role.
If you include a Role name, make sure it matches the exact spelling in the Admin Console.
Performing Bulk User Import
From the Admin Console, select Admin > Users.
Select the + Add Users.
Drag and drop a prepared CSV file with 3 columns: Name, Email and Optional Role.
Import Users
After dragging and dropping the file, you will be asked to review the changes. Note the default role will appear empty. Click Add to complete the import.
Configure the SAML 2.0 connection with "Enable Just-In-Time Provisioning" selected
Assign your users to the Keeper application in your identity provider
Direct your users to simply login to Keeper with their email address or SSO domain.
If your domain is reserved to your Keeper tenant, users will be automatically routed through your identity provider as seen in the below screenshots.
Provisioning with JIT - Starting from the Keeper Vault
Any user who is provisioned through JIT will be assigned to the default role enforcement policies for the node which they are provisioned in.
The user's vault will be immediately provisioned and the user will be walked through the onboarding process which can include importing passwords, installing the KeeperFill browser extension and setting up two-factor authentication.
The exact steps of the onboarding process depend on the user's assigned role enforcement policy. Onboarding can also be disabled completely.
New User Onboarding
After the onboarding is complete, users can begin using Keeper and managing their vault.
Onboarding Completed
For a full step by step guide on setting up your SSO Connect Cloud environment, see the SSO Connect Cloud guide.
Email provisioning is only recommended for users setting up a Master Password authentication method. SSO-enabled nodes do not require an email provisioning method.
(2) If you don't already have a Node created for this provisioning method, please create one by clicking "Add Node". Provisioning is not permitted in the root node.
(3) In the new node, click on Provisioning>Add Method
(4) Select Email Auto-Provisioning then Next
Email Auto-Provisioning
(5) Choose a method of domain name ownership. You can use DNS lookup or HTML file upload.
(6) Once verification is complete, the status will show the email domain.
Inviting Users
When using the email provisioning method, the easiest way to invite users to sign up is to provide them a link to the vault:
Users simply click "Set up now" and use your company email to create your vault.
EnterYour Email Address
The user types in their email and clicks "Next".
User will set a Master Password.
Master Password
After the user confirms their email with a verification code, the user will be provisioned to the specified Node and Default Role in the Admin Console.
Email Verification
Advantages of Storing Two-Factor Codes in Keeper
Keeper two-factor codes are more secure than using SMS text messages.
Two-factor codes stored in Keeper are protected with strong Zero-Knowledge encryption.
They can be auto-filled quickly while logging in to a site, saving time and reducing friction.
Keeper records are securely backed up so if you lose a device you don’t have to reset all the codes.
Keeper records are shareable. If you have multiple people that need to log in with the same credentials, they won’t need to track down the person who has the only device containing the code.
See the Video Demo below of Two-Factor Codes Integration:
Two-Factor codes can be filled directly with the Keeper Browser Extension.
Fill Two-Factor Code
Alternatively, Two-Factor codes can be filled in any login screen using the Right Click menu.
Right Click Menu
Setup and Configuration
To add a Two-Factor Code, you can use the Web Vault, Desktop App or mobile apps.
From the Desktop App, click on "Add Two-Factor Code". There are 3 ways to input the code:
Scan (Desktop App Only)
Upload a QR code image (.jpg, .png, etc)
Manual Entry (advanced)
The "Scan" feature on the Keeper Desktop application lets you drag a small scanner window on top of the target QR code. This is useful when setting up applications on the desktop computer.
It's also very easy and straightforward to use the Keeper mobile app on iOS or Android to add a Two-Factor code. Tap on "Add Two-Factor Code" from the record edit screen and use the device camera.
Keeper TOTP Codes
Recommended Process for Administrators
To ensure a seamless transition when updating user email addresses in bulk, Keeper recommends using Keeper Commander (CLI Tool) before making changes in the IdP. This approach maintains authentication continuity and minimizes user impact.
Updating User Emails with Keeper Commander
Reserve the New Email Domain
Ensure the new domain is reserved for your enterprise. If not, contact Keeper Support to enable it before proceeding.
This command updates the primary email while retaining the old email as an alias.
Reference:
Batch Processing for Multiple Users
Create a batch file with multiple commands for bulk updates.
Test with one user before applying changes to all.
Sync Keeper SSO Connect (If Applicable)
If using Keeper SSO Connect On-Prem, sync the SSO Connect server to apply the updates.
Update Emails in the IdP
Once emails are updated in Keeper, proceed with updating them in the IdP.
Alternative Process: User Updates Their Own Email
Users can manually update their Keeper email, but this must be coordinated to avoid authentication issues. Before proceeding, ensure that role-based enforcement does not prevent email changes.
Steps for Users to Update Their Email
Log in to Keeper using the current email address.
Administrator updates the email in the IdP.
User updates email in Keeper:
Navigate to Settings > General > Email Address - Reset Now.
A confirmation email will be sent to the new email address.
Click the link in the email to confirm the update.
Sync Keeper SSO Connect (If Applicable)
Bulk Email Changes
If multiple users require email updates, please contact Keeper Support for assistance in coordinating these updates efficiently.
(2) In the portal, navigate to Devices > Configuration.
(3) Select Manage Devices > Configuration
(4) On the Policies tab, click Create > New Policy.
(5) Under Platform, select Windows 10 and later.
(6) Under Profile Type, choose Settings Catalog, then click Create.
(7) Enter a Name for the configuration profile and an optional Description, then click Next.
(8) In the Configuration Settings tab, select + Add settings.
(9) Search for "Google Chrome", then select "Google Chrome Extensions" and then select "Configure the list of force-installed apps and extensions" below. Then select Next to continue.
(10) In the "Configuration Settings" tab, enable the "Configure the list of force-installed apps and extensions" option then paste the following on one line:
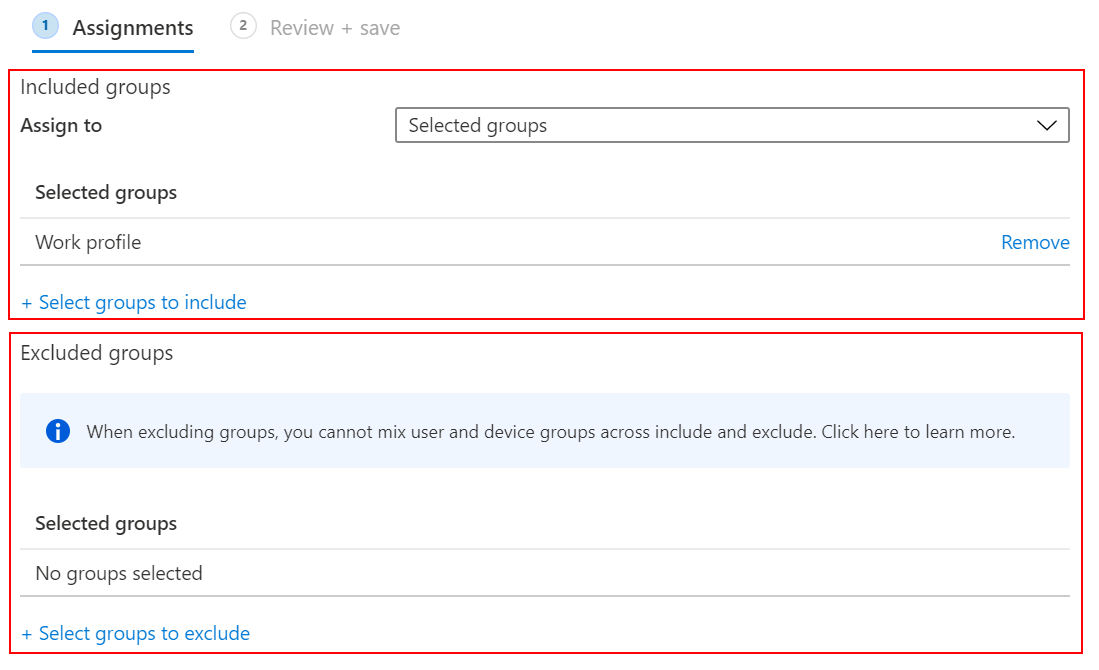
(11) Review the Scope tags and Assignments settings tabs to assign the appropriate groups, then click Create to finalize. Ensure that "All Users" or specific groups are assigned.
(12) Navigate back to “Devices | Configuration” > Hit Refresh
(13) Your newly created policy will appear
The policy is now active. If a plan member has not yet enrolled with Intune, they will be prompted to do so upon signing in to a managed device. Once enrolled, the Keeper browser extension will be installed automatically.
Pinning the Extension
To pin the Chrome extension on the user's browser:
(1) Click on the policy you created under Devices | Configuration
(2) Under the "Configuration settings" select "Edit"
(3) Click + Add setting then search for "Google Chrome" settings and select "Google Chrome Extensions" then select "Extension management settings" in the subcategory below.
(4) After selecting this option, close the window and under the "Configuration settings" tab, activate the setting "Configure extension management settings" and paste the below JSON into the box:
(5) Select "Review + Save" and save the settings.
End-User Guides
Links to end-user guides for mobile and desktop devices.
End-User Guides
Once you've deployed Keeper to your users, they can reference our many end-user guides listed below for step-by-step instructions for Keeper's web, desktop and mobile applications.
iPhone and iPad application including setup.
Android phone and tablet user guide including setup.
Keeper Web Vault and native Desktop app for Mac, PC, Linux.
KeeperFill browser extensions for all web browsers including Chrome, Edge, Firefox, Safari, Brave and Opera.
End-user guide specifically for users who login with a Master Password.
End-user guide specifically for users who login with SSO solutions such as Azure.
Native application autofill, auto-type keystroke automation and shortcut filling.
Native secure messaging application for iOS, Android, Mac and PC.
Guide focused on the various ways to share content in Keeper.
Usage guide on record templates and custom fields.
A series of guides for migrating existing passwords from CSV files, or from other products such as 1Password, LastPass, KeePass, Dashlane, Bitwarden and many more.
This is a guide to managing Passkeys in your vault. Passkeys are FIDO credentials that replace passwords with cryptographic key pairs for phishing-resistant sign-in security.
Enterprise End-User Welcome Video
This video provides a general overview of the Keeper platform for new end-users.
Keeper 101 Video Series
Additional videos for getting started with Keeper are available at the page below:
Co-branded Documentation
Do you require any additional documentation or user guides with your branding? Let us know. Email: .
Optional Deployment Tasks
Other Policy Driven Deployment Tasks
Prevent Installation of Untrusted Extensions
As a general security practice, we recommend that Enterprise customers limit the ability of end-users to install unapproved 3rd party browser extensions. Browser extensions with elevated permissions could have the ability to access any information within any website or browser-based application. Please refer to your device management software to ensure that Keeper is allowed, and unapproved extensions are blocked or removed.
Preloading Password Importer Tool
The Keeper Password Importer tool is typically downloaded by the user during account creation on the Web Vault. If you do not permit the installation of applications on end-user devices, you can preload the app using the binaries located below:
Password Importer (Windows):
Password Importer (Mac):
Disabling Built-In Browser Password Managers
Often times, Enterprise customers would like to automatically disable the less secure, built-in password saving features of web browsers. There are several methods of managing this as described in this section.
Chrome for Enterprise
Google provides .adm and .admx files (.admx is a newer .xml file type) to make it easier to manage the Chrome browser using Group Policy. In G Suite and Chrome Enterprise environments, it is enabled via the Google Cloud platform using one of the below methods:
– Google provides adm and admx files that are incorporated into a GPO
– pushed via MDM tools (JAMF, etc...)
– pushed via MDM tools (Ivanti, etc...)
Mozilla Firefox for Enterprise
Similar to Chrome, Mozilla provides .adm and .admx files to manage Firefox using Group Policy. Mac-based systems are provided a .pkg file and are managed via JAMF, etc. Linux users are provided a policies.json file.
Microsoft Edge for Business
Edge for Business is now available for Windows and Mac. Group policy is managed through .adm and .admx files on Windows, and .plist on Mac.
Internet Explorer Mode for Edge
The new Edge for Business now supports "Internet Explorer Mode". We recommend using this mode for any IE browser requirements within your organization.
Legacy Internet Explorer
If legacy Internet Explorer is absolutely required by your users, management of password saving features can be disabled under traditional GPO found under:
User Configuration > Policies > Administrative Templates > Windows Components > Internet Explorer
Then disable “Turn on the auto-complete feature for user names and passwords.”
Intune - Edge
Deploy the Keeper browser extension to Microsoft Edge using Microsoft Intune
Overview
These step by step instructions allow you to deploy the Keeper Microsoft Edge extension to users through Intune.
(2) In the portal, navigate to Devices > Configuration.
(3) Select Manage Devices > Configuration
(4) On the Policies tab, click Create > New Policy.
(5) Under Platform, select Windows 10 and later.
(6) Under Profile Type, choose Settings catalog, then click Create.
(7) Enter a Name for the configuration profile and an optional Description, then click Next.
(8) In the Configuration Settings tab, select + Add settings.
(9) Search for "Microsoft Edge\Extensions", then select "Control with extensions are installed silently" and select Next.
(10) In the "Configuration Settings" tab, enable the "Control with extensions are installed silently" option then paste the following on one line:
(11) Review the Scope tags and Assignments settings tabs to assign the appropriate groups, then click Create to finalize. Ensure that "All Users" or specific groups are assigned.
(12) Navigate back to “Devices | Configuration” > Hit Refresh
(13) Your newly created policy will appear
The policy is now active. If a plan member has not yet enrolled with Intune, they will be prompted to do so upon signing in to a managed device. Once enrolled, the Keeper browser extension will be installed automatically.
Pinning the Extension
To pin the Edge extension on the user's browser:
(1) Click on the policy you created under Devices | Configuration
(2) Under the "Configuration settings" select "Edit"
(3) Click + Add setting then select "Configure extension management settings" under the Microsoft Edge\Extensions picker.
(4) After selecting this option, close the window and under the "Configuration settings" tab, activate the setting "Configure extension management settings" and paste the below JSON into the box:
(5) Select "Review + Save" and save the settings.
Team and User Approvals
Manual and Automated approval of SCIM or Bridge-provisioned Users & Teams
The "Approval Queue" is where SCIM- and Bridge-provisioned Teams and Users live until an Admin or other team member performs the necessary approval. Approvals are required in the Keeper environment in order to share the necessary encryption keys (by encrypting the private keys with the public key of the Team or User).
Additionally, the Approval Queue is used for Keeper SSO Connect Cloud device approvals when the end-user clicks on "Request Admin Approval".
Keeper provides several methods of approvals, manual and automated.
Team and User Approval Process
New users added by identity providers using the SCIM protocol are created in the “invited” state and will receive an invite to join Keeper.
New teams created by the SCIM sync are created in the “pending” state and require final approval by a Keeper Administrator, another team member or automated methods.
Actions must be taken by either the Admin or using methods outlined below, because encryption keys must be generated and/or shared.
Approval Method 1: Admin Console Login
Team creation and team member assignments are completed automatically when any Administrator logs into the Keeper Admin Console. Approval is performed by encrypting the Team Key with the user's public key.
Approval Method 2: Vault Login
Team members approvals are completed automatically when any member of the team (including the Admin) log into the Keeper Web Vault or Desktop App. Approval is performed by encrypting the Team Key with the user's public key.
Approval Method 3: Keeper Automator
Keeper Automator is a container application that can be deployed as a standalone service to any cloud or on-prem environment.
Keeper Automator version 3.3+ supports automated team creation, team-user assignments and user approvals
Keeper Automator performs instant device approvals, team approvals and team-user assignments without the need for any manual actions by users.
See the setup instructions here:
Approval Method 4: Keeper Commander
Approvals can be automated or run manually via the Keeper command-line interface or SDK platform, Keeper Commander.
Download Keeper Commander here: .
team-approve approves queued teams and users that have been provisioned by SCIM or Active Directory Bridge.
Keeper Commander Parameters
--team approve teams only
--user approve team users only
--restrict-edit {on,off} disable record edits
device-approve approves SSO Cloud user devices.
--approve approve all devices
--trusted-ip approve devices that come from recognized IPs
--reload
See the setup instructions here:
PLIST (.plist) Policy Deployment
Deploying KeeperFill to Chrome via PLIST Policy
Deploying Keeper Chrome Browser Extension via PLIST Policy
Create a Keeper plist policy configuration file
If you currently do not have a Policy file created, please proceed to creating your Keeper plist policy file to your desired location, Ex: /tmp and name it com.google.Chrome.plist by selecting GO on the top Menu Bar of you MacOS Desktop and select Terminal to open a Terminal Console.
Copy and paste the contents below, into your Terminal, and hit Enter / Return. This will create your plist file within the /tmp directory and display that the file is there.
In your preferred file editor or basic file editor, copy, paste and save the contents, below, into the com.google.Chrome.plist file.
Deploying your PLIST Policy
There are multiple tools to deploy your PLIST policy. In the next set on instructions, we will walk through deploying your PLIST policy file via Jamf Pro, AirWatch and Microsoft Intune.
Implementation Overview
High level steps for successful rollout of Keeper Enterprise
For the most successful rollout of Keeper Enterprise, follow the steps below.
1
Create Enterprise Trial
If you haven't already, create a from our website or by . Be sure to allocate the necessary number of total users you expect to onboard.
Managed Service Provider (MSP) customers: Please sign up for the product trial. Keeper MSP is a specialized version of the Keeper Enterprise product. To jump to the Keeper MSP guide, .
Time-Limited Access
Time-Limited Access allows you to securely share records, folders and PAM resources with other Keeper users on a temporary basis.
Overview
Time-Limited Access allows you to securely share credentials, secrets or PAM Resources like machines, databases and directories - with other Keeper users on a temporary basis, automatically revoking access at a specified time. Time-Limited Access prevents long standing privileges and ensures that information is removed from the recipient’s vault, greatly reducing the risk of unauthorized access.
Self-Destructing Records
Self-Destructing Records allow you to share records with user's outside of Keeper, while automatically deleting the record from your vault and disabling the share link at specified time
Overview
Self-Destructing Records utilize Keeper’s existing One-Time Share technology which allows time-limited, secure sharing of a record to anyone, even if they don’t have a Keeper account.
Self-Destructing Records take our feature even further by automatically deleting the record from your vault once the share link is disabled and the recipient’s access is revoked. This reduces your workload to revoke record access and removing it from your vault at a later time.
Security Audit
Password security strength reporting in the Admin Console
End-User Security Audit
In each end-user's vault, the Security Audit screen provides information about the password strength and password reuse taking place. The calculation of password strength and reuse is performed continuously from the user's Vault on all platforms including Keeper Desktop, Web Vault, iOS and Android devices.
Keeper's Password 'strength' is a calculated score based on the complexity of the password, with a score rating between 0 and 100 according to the below metrics:
Integrating Keeper SIEM push to an Amazon S3 bucket endpoint
Overview
Keeper supports event streaming into an Amazon S3. Setup instructions are below.
Kandji
Deploying Keeper Browser Extension via Kandji
Deploying Keeper Browser Extension via Kandji Policy
First, create a .plist file to be converted
Record and File Sharing
Individual record and file sharing and ownership transfer in the Keeper Vault
Share a Record
A Keeper record can contain credentials, files, two-factor codes, privileged access capabilities, or any type of data. Keeper records can be shared individually with other users, or the records ownership can be transferred to other trusted users.
In the example below, the record contains a login/password, Passkey (for MFA), a file attachment and a two-factor code.
Click the Share button.
CloudGate Provisioning
Keeper supports SAML 2.0 Authentication and SCIM provisioning with CloudGate UNO
Overview
This guide covers CloudGate Automated Provisioning with SCIM which will update and deactivate Keeper user accounts as changes are made in CloudGate.
CLI Provisioning with Commander SDK
Keeper Commander is an open-source Python SDK which can perform many vault and administrative functions within the Keeper system.
Keeper supports API-based provisioning through the use of our Python-based Keeper Commander SDK. The Commander SDK can assist in the following use cases:
Command line access to your Keeper vault
Running reports
Microsoft Intune Policy Deployment - Chrome
Deploying Custom Configuration Profiles using Microsoft Intune
Deploying Google Chrome PLIST (.plist) Policy using Microsoft Intune
This is a general overview of how to deploy Google Chrome .plist configuration profile, to computers within your organization, using Microsoft Intune.
Custom Invite and Logo
Configure a custom invite email and logo before inviting users
Custom Email Invitations
Prior to adding users to Keeper we recommend uploading your company logo to the vault and customizing the email invitation that will invite your employees to create their Keeper Vault. These configurations are highly recommended as they have shown to help with quick user adoption of Keeper's software.
Commander's command-line interface and interactive shell is a powerful and convenient way to access and control your Keeper vault and perform many administrative operations. To see all available commands, just type:
Interactive Shell
To run a series of commands and stay logged in, you will enjoy using Commander's interactive shell.
Type h to display all commands and help information.
Keeper Command Reference
Commander has hundreds of features. Specifically with regards to User and Team provisioning, the following commands are relevant:
create-user
enterprise-info
enterprise-node
enterprise-user
enterprise-role
enterprise-team
enterprise-push
team-approve
transfer-user
scim
automator
There are two methods for creating user accounts with Commander:
Invite users to an enterprise with the enterprise-user --add command
Create new user accounts and vaults with the create-user command
For the full list of commands offered by Commander, visit:
After creating your trial, login to the Admin Console and go through the onboarding.
2
Schedule Training
Schedule a demo/training session by contacting the sales or support team. Keeper provides 1:1 admin training, end-user training, webinars and implementation support.
3
Provision to Users
Setup and configure your provisioning and authentication methods as described in the User and Team Provisioning section of this document. You can choose from many different provisioning methods such as:
Manual provisioning through the Keeper Admin Console
Active Directory provisioning with the Keeper Bridge service
Single Sign-On (SAML 2.0) with Just-In-Time (JIT) provisioning
SCIM automated provisioning
Email provisioning
Keeper Commander API / SDK provisioning
if you require assistance in configuring your environment.
4
Notify Users
Inform your users, stakeholders, DevOps and IT Admin teams that you have partnered with Keeper Security, the leading cybersecurity platform for preventing password-related data breaches and cyberthreats to implement a simple, employee-friendly password management application.
5
Deploy the Vault
Deploy the web vault, browser extensions and desktop application as described in our deployment guide or direct your users to install Keeper from our Download Page.
The Web Vault is available to Enterprise users at the URLs below:
Upon first login, the user is walked through a simple onboarding experience.
6
Attend Training Sessions
Users are invited to join a training session via Google Meet or the customer's preferred meeting platform. This training invite can be contained within the email invitation body content, or sent separately by the Admin to their users. Contact your Customer Success manager at [email protected] to start training your team.
We recommend that the Keeper Admin notifies users regarding the timeline in which built-in password manager saving will be disabled by GPO.
After the specified amount of time, the Keeper Admin should disable legacy built-in browser password managers, thus requiring and enforcing the use of Keeper on the browser.
Learn more about how to disable the built-in password manager.
9
Require Usage of Keeper
It's critical that all employees use Keeper to manage their passwords and to prevent sharing of information over insecure channels. Update your password policies and employee onboarding processes to ensure that Keeper is utilized. Sharing new employee onboarding records to the user's vault is a great way to encourage them to login and start using the platform. Your customer success manager can also assist you with strategies.
10
Protect Infrastructure
Once the Enterprise Password Manager has been deployed to all of your employees, reach out to your security, compliance and engineering teams to review the privileged access capabilities that Keeper offers.
KeeperPAM consolidates enterprise password management, secrets management, connection management, zero-trust network access, remote browser isolation and an cloud-based access control plane in one unified product.
Learn more about the advanced capabilities of KeeperPAM.
Revoked access at a specified time designated by the record owner, minimizing the workload on the owner to remove the share at a later time.
Enhances security as traditional short term sharing has been done in insecure ways like using sticky notes, text messages or instant messengers.
Simplified compliance with event tracking on all sharing activity, ensuring least privilege access is maintained.
When paired with or Keeper Secrets Manager (KSM) capabilities, users can schedule rotation of the shared credential upon the expiration of access, ensuring the recipient never has standing privilege.
Share a Record
Select the record from your vault and click Share, entering their email address or selecting it from your contacts list. Set their permission level and click Add.
Share a Record
Add User and Set Permissions
Select the “Permissions” dropdown and click Set Expiration. Here you can select one of the default expirations or click custom date and time to set your own. Next, check the box if you would like the record owner, such as yourself, or users with edit access to be notified via email when the recipient's record access expires. Click Done to save.
Permissions and Option to Add Expiration
Set Expiration and Email Notification
Access Expiration Applied to User
The recipient of a shared record with time-limited access may have "view" and "edit" permissions but will not be able to share the record. If "share" permissions are applied, the expiration will be removed.
Share a Folder
Open the shared folder from your vault and click the edit icon and from the “Users” tab, add the user or team you would like to share the folder with.
Edit Shared Folder
Set their permissions and from the dropdown menu click Set Expiration, following the same steps you would for a single record share (described above).
Permissions and Option to Add Expiration
Next, check the box if you would like users with "can manage records" permissions over the folder to be notified via email when the recipient's record access expires. Click Done to save.
Set Expiration and Email Notification
The recipient of a shared folder with time-limited access may have "can manage records" permissions, but the ability to "manage users" is restricted. If these permissions are applied, the expiration will be removed.
Sharing PAM Resources
When sharing access to PAM Resources (such as a Windows or Linux server), privileged sessions can be established to the target resource, without access to the credentials. When access is revoked, the session is terminated and session logs are created for the administrator.
KeeperPAM time-limited sessions
For more information about PAM sessions and permissions, see the KeeperPAM documentation.
Time-Limited Access With Keeper Commander
Manage time-limited access on records and folders programmatically using the Keeper Commander CLI and SDK. Relevant commands:
share-record with --expire-at and --expire-in switches
share-folder with --expire-at and --expire-in switches
Providing the most secure, encrypted method to send sensitive information to users outside of your organization without exposing sensitive information in plain text over email, text message or messaging.
Avoids the accumulation of unnecessary privileges within an organization over time.
Assurance that the details of a shared record remain with the recipient, on a single device.
Create a Self-Destructing Record
To create a Self-Destructing Record, create a new record as you normally would. Enter the record details and click Add Self-Destruct.
Add Self-Destruct to Record
From the menu that is now presented, select when you want the share link to expire.
Expiration Options
Once you've made your selection, click Save & Share to generate a One-Time Share link.
Save & Share Record
You have the option to copy the link directly, or send it in an invite or QR code format.
Copy OTS Link
The recipient of a Self-Destructing Record simply clicks on the provided link and is instantly presented with the shared record in their web browser. One-Time Share links are bound to a single device, further strengthening security and preventing unauthorized distribution or viewing on multiple devices. The link will expire at the specified time or once the recipient has viewed the record for five minutes, whichever comes first.
One-Time Share Link
Securely Share Files Using Self-Destruct
Keeper's Self-Destructing Records allow you to securely share records with file attachments that self-destruct at a specified time.
Create a record as you normally would and click Add Attachments to upload your file, or simply drag and drop the file directly into your vault.
Add Attachment to a Record
Click Add Self-Destruct, select when you want the share link to expire, then click Save & Share to generate a One-Time Share link.
Add Self-Destruct to a Record
Self-Destructing Record With File Attachment
The recipient of a Self-Destructing Record simply clicks on the provided link and is instantly presented with the shared record in their web browser. They can then click on the file to download it to their local device.
One-Time Share Link With File Attachment
Delete a Self-Destructing Record
You can delete a Self-Destructing Record at any time, thus disabling the share link by clicking Delete Now. Deleted Self-Destructing Records will appear in your vault's “Deleted Items” with the option to "Restore".
Option to Delete Self-Destructing Record
Self-Destructing Records With Keeper Commander
Manage self-destructing records programmatically using the Keeper Commander CLI and SDK. Relevant commands:
To preserve Zero Knowledge, the summary of each end-user Security Audit score is encrypted with the Enterprise Public Key, then stored encrypted in the Keeper Cloud.
When the Admin logs into the Admin Console, the Audit Data is decrypted locally on the Admin Console device and made available for administrators in an aggregated format from the Security Audit screen.
Admin Console Security Audit
The Security Audit screen provides summary and user-level security score information that includes:
Overall Security Score
Record Password Strength
Unique Record Passwords
Use of Two-Factor Authentication
For more information on how these scores are calculated, visit the following:
The Security Audit screen contains a table that displays the record password strength, unique record password count, and 2FA status for all users across the enterprise.
Security Audit - User Details Table
The table is sorted by default on the users’ overall Security Audit score, showing users with the lowest Security Audit score first. You can reverse this sort order or sort instead on the user's name, password strength, reused passwords, or two-factor method.
Additionally, you can filter the table on the following fields:
Record Password Strength: Strong, Medium, Fair, or Weak
Unique Record Password: Re-used or Unique
2FA: Text Message, Authenticator App (TOTP), Smartwatch (KeeperDNA), Security Keys, RSA SecurID, Duo Security, or No 2FA
Refreshing Security Audit Scores
Administrators can refresh the security scores on the UI without having to log out of the Console and log back in. The ability to refresh scores is useful when the admin is expecting users to log into their Vaults to have their latest security scores sync with the Console. When the user has logged into their Vault, the admin needs to simply click the Refresh Scores button to sync the latest scores to the Console.
Security Audit - Refresh Enterprise Scores
Resetting Security Audit Scores
Administrators can reset security scores from the UI if the scores have gotten out-of-sync with user Vaults. The administrator can either reset scores for the entire enterprise using the Reset Scores button on the Security Audit screen or for specific users. Please note that only Root Admins can reset the Security Audit score.
The Reset Scores button on the Security Audit screen will reset scores for the entire enterprise. Once the scores are reset, users will need to log in to their Vaults for the scores to sync to the Admin Console due to the constraints of Keeper’s Zero Knowledge architecture.
Security Audit - Reset Enterprise Scores
Alternatively, the administrator can navigate to the User Details modal and select Reset Security Score under User Actions to reset individual users' Security Audit scores. As is the case with performing an enterprise-wise score reset, once the scores are reset, the user will need to log in to their Vault for the scores to sync to the Admin Console due to the constraints of Keeper’s Zero Knowledge architecture.
Security Audit - Reset Single User Security Score
BreachWatch
In addition to Security Score, Keeper also provides a Dark Web scan summary of end-user passwords through the BreachWatch secure add-on.
BreachWatch Secure Add-On
BreachWatch alerts can be configured in the Advanced Reporting & Alerts module to alert users and Administrators when a password has been found on the dark web.
BreachWatch Reporting
Commander CLI
The Keeper Commander CLI provides direct access to the audit data and event data, with other advanced capabilities. For more information, see the Keeper Commander reference guide and reporting commands.
(1) In AWS, create an S3 bucket and of course ensure that all permissions are locked down.
(2) Create a user account without console access and assign a basic role policy which can only put files within the bucket. Example below.
(3) Generate Access Key and Secret Key, provide those to the Admin Console user interface along with the Bucket Name. You can select different time intervals for the file uploads. You can also select the file format which includes:
JSON
Syslog
CSV
Amazon S3 Integration Settings
For the Bucket Name, provide a full ARN that includes the region. For example:
arn:aws:s3:us-west-2::my-keeper-events
Files will be posted only when events occur during the interval. In the example below, the json files are posted every hour when there is activity in the system.
If you set the time frame to a "day", all events will accumulate until the day has ended (using UTC clock) and then a new file containing all day events will be added to your S3 bucket.
Convert Keepers .plist file to a .mobileconfig file
To enforce the Keeper Security Browser Extension using Kandji, you can create a custom configuration profile using Apple Configurator 2.
Steps to Create and Deploy the Configuration Profile
Kandji Configuration
First update the generic details of the profile on the General Tab. You do not need to amend the Identifier or UUID.
Note: If you do not want end users to be able to remove the profile, ensure that you tick Prevent users from removing this profile.
Edge
Using the search function in the top right find and add Microsoft Edge to your profile.
Chrome
Using the search function in the top right find and add Google Chrome to your profile.
Add Keeper ID (bfogiafebfohielmmehodmfbbebbbpei) this can be found by opening https://chromewebstore.google.com searching for and opening the page of Keeper Password Manager & Digital Vault, then copying the string at the end of the url
Firefox
Using the search function in the top right find and add Firefox to your profile.
Using the search function in the top right find and add Brave Browser to your profile.
Add Keeper ID (bfogiafebfohielmmehodmfbbebbbpei) this can be found by opening https://chromewebstore.google.com searching for and opening the page of Keeper Password Manager & Digital Vault, then copying the string at the end of the url. (Note Brave uses Chrome Webstore so will be the same as Google Chrome )
Upload to Kandji
Once you have added the desired browsers – save the file in a location you can easily find.
Sharing a Record
From the "Add People" tab, click within the email address field and search or type the email address of the Keeper user you would like to share the record with.
Click the dropdown arrow to set their permission level (can edit, share, edit & share, view only and transfer ownership) and click Add.
Sharing Permission
Sharing within an existing Keeper Enterprise tenant does not require any further steps. If you are sharing with a person outside of the tenant, you will first need to establish a "sharing relationship". The user will receive an email prompting them to login to Keeper and either accept or deny the share request. Once you establish a sharing relationship, the user will appear in the email dropdown list.
User Permissions
User Permissions are designed to control the permissions a user has over the record that is shared with them.
Permission Name
Permission Level
Can Edit
User can edit this record
Can Share
User can share this record
Can Edit & Share
User can edit and share this record
Share Admin Role
If the recipient of the shared record is part of the Share Admin role, they will inherit additional rights over the record content, ownership and permissions.
Time-Limited Access
After a share is performed, users can assign permission on a time-limited basis and automatically rotate credentials post-expiration. Learn more about Time-Limited Access rights.
Administrative Controls
The use of record and file sharing can be restricted by the Keeper Administrator in the Roles section of the Keeper Admin Console.
Commander CLI
Record sharing commands are available from the Keeper Commander CLI tool. This provides advanced users with the ability to script and automate any sharing actions.
To setup Keeper user provisioning with CloudGate, you need to have access to the Keeper Admin Console and a CloudGate Admin account.
User Provisioning SSO+SCIM
IMPORTANT: If you want your users to authenticate via SSO / SAML 2.0 with CloudGate, you must first configure and install Keeper SSO Connect with CloudGate.
View the full SSO Connect setup guides:
SSO Connect Cloud: https://docs.keeper.io/sso-connect-cloud/
Once Complete, proceed to Step 7: in the guide below.
If you just want to provision users via SCIM provisioning without SSO, proceed to the guide below.
User Provisioning (SCIM)
Configuration Steps
Step 1: Add SCIM Provisioning Method for CloudGate
Navigate to your Keeper Admin console and add the SCIM Provisioning Method to your desired "Node".
Add SCIM for CloudGate
Step 2: Select SCIM Provisioning Method
Select "SCIM (System for Cross-Domain Identity Management)" and select "Next".
Select SCIM
Step 3: Generate SCIM Token
At the next screen select "Generate" to generate your Token to connect your SCIM provisioning method.
Generate SCIM Token
Step 4: Save SCIM Provisioning Method
At the next screen, you will be presented with your URL and Token. You will need this information for the step 8 to configure the SCIM section of the Keeper SSO Application within CloudGate. Select "Save".
You will now see your SCIM Provisioning Method in a Pending State.
SCIM Pending
Step 5: Add Keeper Application to CloudGate
Navigate to your CloudGate Admin Console -> Service Provider and select the Add service provider to add Keeper Password Manager to the list of your SSO applications.
Add Keeper App to CloudGate SSO
Step 6: Configure Keeper Application
On the "ADD SERVICE PROVIDER" page, search for Keeper Security in the search bar. Select Add on the Keeper SSO Cloud Connect icon.
Configure Keeper App
Step 7: Configure SCIM within Keeper Application
Click "edit" on the Keeper SSO Cloud Connect icon you created at SERVICE PROVIDERS page and go to the provisioning settings tab.
Configure SCIM
Step 8: Activate SCIM
This is where you will supply the previously generated URL and Token within the SCIM Provisioning Method in your Keeper Admin Console at the step 4. Now you can click "Test" to check if the SCIM provisioning is OK.
Step 9: Save Keeper Application
Select "save".
Save SCIM
User provisioning with CloudGate is complete. Moving forward, new users who have been configured to use Keeper, in CloudGate and are within the provisioning scope definitions, will receive invites to utilize the Keeper Vault and will be under the control of CloudGate.
Name: Enter a descriptive name for the policy. Name your policies so you can easily identify them later. For example, a good policy name is macOS: Add preference file that configures Google Chrome on devices.
Description: Enter a description for the policy. This setting is optional, but recommended.
6. Select Next.
7. In Configuration settings, configure your settings:
Preference domain name: Enter the bundle ID as com.google.Chrome
Property list file: Select the property list file associated with your app. Be sure to choose the com.google.Chrome.plist file previously created.
The key information in the property list file is shown. If you need to change the key information, open the list file in another editor, and then re-upload the file in Intune.
Note: Be sure your file is formatted correctly. The file should only have key value pairs, and shouldn't be wrapped in <dict>, <plist>, or <xml> tags. If the PLIST file contains formatting errors, follow the PLIST (.plist) Policy Deployment instructions to remediate the issue.
8. Select Next.
9. In Scope tags (optional), assign a tag to filter the profile to specific IT groups, such as US-IL IT Team or Chicago_ITDepartment. For more information about scope tags, see Use RBAC and scope tags for distributed IT.
10. Select Next.
11. In Assignments, select the users or groups that will receive your profile. For more information on assigning profiles, see Assign user and device profiles.
12. Select Next.
13. In Review + create, review your settings. When you select Create, your changes are saved, and the profile is assigned. The policy is also shown in the profiles list.
Assign the Google Chrome profile
Select Devices > Configuration profiles. All the profiles are listed.
Select the profile you want to assign > Properties > Assignments > Edit:
Select Included groups or Excluded groups, and then choose Select groups to include. When you select your groups, you're choosing an Azure AD group. To select multiple groups, hold down the Ctrl key, and select your groups.
Select Review + Save. This step doesn't assign your profile.
Select Save. When you save, your profile is assigned. Your groups will receive your profile settings when the devices check in with the Intune service.
Include or exclude users and groups when assigning or deploying a profile in Microsoft Intune and Endpoint Manager.
Use scope tags or applicability rules
When you create or update a profile, you can also add scope tags and applicability rules to the profile.
Scope tags are a great way to filter profiles to specific groups, such as US-IL IT Team or Chicago_ITDepartment. For more information about scope tags, see Use RBAC and scope tags for distributed IT.
For security reasons, custom email invitations are only allowed for reserved domains. If you are sending invitations to users on domains that are not currently reserved to your tenant, please follow this guide.
To customize the email language, subject and logo, select Configurations then Edit next to "Email Invitations".
Edit Invitation Template
The email invitation template supports customization of the following four attributes:
Subject
Message Heading
Message Body
Download Button Text
Markdown Syntax
The body of the message supports plain text as well as basic markdown syntax. Example of markdown syntax:
For more information on the markdown language supported by Keeper, visit the following:
Custom Email Template on Admin Console:
Custom Email Invitation
The example above produces the following email invitation:
Example Email Invite Received
Note Regarding Domain Reservation
For security reasons, a custom email invitation can only be sent to a user if the domain has been reserved to the tenant. If the email domain of the recipient is not reserved, the user will receive Keeper's default email invite, which looks like the below:
Default invitation template
To ensure that your domains are reserved, please see the Domain Reservation documentation page.
Custom Invites on a Per-Node Basis
When creating a custom email invitation, the template is applied to users at the root node and all child nodes.
If you would like to have a different email invitation on a sub-node, you can use Keeper Commander's enterprise-node command to set a custom template for each node.
Additional info for creating and inviting users with Commander are documented here.
Custom Vault and One-Time Share Logo
Upload your unique company logo to the console so it will appear in the Keeper Vault header when users are logged into their Keeper Web Vault and Desktop App. It will also appear in your users' One-Time Share invites. To upload your logo, select Configurations and Edit next to "Company Logo".
Configurations > Edit Company Logo
Company Logo in Keeper One-Time Share
Custom Vault Logo on a Per-Node Basis
If you would like to have a different vault logo and one-time share logo on a sub-node, you can use Keeper Commander's enterprise-node command to set a custom logo for each node.
For MSPs, a Managed Company can be associated with a node. Using this method, a custom logo file can be added for each node.
Embedded Image from URL:

**This is bold text**
*This is Italic*
# This is Heading 1
## This is Heading 2
Link Text:
Visit [Keeper](https://keepersecurity.com)!
enterprise-node --invite-email="C:\path\to\emailTokyo.txt" Tokyo
enterprise-node --logo-file "/path/to/logo.jpg" Tokyo
Managing users and lifecycles in the Keeper Admin Console
Searching for a User
Clicking on the Search field will open a dynamic search tool that searches across Nodes, Roles, Teams and Users. The search feature uses a fuzzy searching mechanism to find the best match.
Searching
Click on the headers (Nodes, Roles, Teams, Users) to filter the results.
Filter by Type
User Detail Screen
Once a user has been added, the Administrator can edit or make changes to a user's profile. By selecting the user that you want to modify from the Users tab, you will notice what user details can be edited, such as Name, Roles, or Team.
User Status
Users can be in one several states: Invited, Active, Locked, and Locked by IdP.
Status
Description
User Actions
Additional user actions can be performed from the Edit User dialog.
Action
Description
Email Changes
The email address of an invited user can be changed using either Admin Console or Commander CLI. Once a user becomes active, their email address cannot be changed from Admin Console. For active users, email address changes can only be performed using Commander CLI. For security reasons, emails can only be changed to domains which are reserved to the tenant. Learn more about .
Commander CLI
Manage users from the command line using the tool.
Relevant commands:
For more information see our .
User and Team Provisioning
User provisioning is flexible and powerful with Keeper Enterprise
Keeper Enterprise can provision users through many different methods that are described here in detail.
Provisioning Methods Supported
Manual Provisioning through the Keeper Admin Console
Single Sign-On (SAML 2.0) Authentication and Provisioning with Keeper SSO Connect
Active Directory / LDAP Provisioning with the AD Bridge
Okta, Azure AD, Google Workspace, Ping, OneLogin Provisioning with SCIM
API Provisioning with SCIM
Email Auto-Provisioning
CLI Provisioning with Commander SDK
Watch the video below to learn more about provisioning users.
Best Practices for User Provisioning
Small Businesses and Teams
If you are deploying Keeper to a small number of users, or if you are only deploying Keeper to a team within a large Enterprise, using Keeper's "manual provisioning" or "bulk upload" may be sufficient.
See:
Organizations with On-Prem Active Directory
For organizations that are managing an on-prem AD environment, we recommend using the Keeper Active Directory Bridge application ("AD Bridge") for mapping node structure and adding Users, Teams and Roles.
See:
The AD Bridge software is used strictly for provisioning of users. To authenticate your users against AD, we recommend using AD FS with the Keeper SSO Connect service.
See:
Organizations with On-Prem Active Directory and AD FS
For organizations who are already utilizing federated services, Keeper SSO Connect provides real-time authentication and Just-In-Time (JIT) provisioning. If you would like to automatically assign users to Roles and Teams through AD security groups or other custom LDAP queries, the Keeper AD Bridge software can also be utilized.
See: with
Organizations using Entra ID / Azure AD, Okta, JumpCloud, Google Workplace or other cloud-based directories
Many Keeper Enterprise customers have either migrated to a cloud-based identity store or they are in the process of migration, either through AD->Azure syncing or other mirroring techniques.
If your organization utilizes a cloud-based directory, you have 3 choices for deployment:
SSO (SAML 2.0) Authentication
is a powerful feature of Keeper Enterprise which supports real-time authentication and provisioning of user accounts through any SAML 2.0 compatible identity provider. Azure AD, AD FS, Okta, JumpCloud, Google Workspace, Ping, OneLogin and all other identity providers are compatible with Keeper.
SSO Connect Cloud supports Just-In-Time ("JIT") provisioning to make the user onboarding process simple and straightforward.
See:
SCIM provisioning
The SCIM provisioning protocol is supported by most modern identity providers including Azure, Okta, Google Workspace and many others. Google calls it "User Provisioning". Okta and Azure call it "Automated Provisioning". Keeper's SCIM implementation can provision a user account, de-provision an account, create a team, assign a user to a team, remove a user from a team.
See: , , , and docs
SCIM provisioning and SSL (SAML 2.0) authentication
SCIM and SSO can be combined to provide real-time authentication, provisioning of accounts AND the ability to create teams, assign users into teams, de-provision users, etc. Entra ID / Azure AD, Okta, Google Workspace, JumpCloud, Ping and many other modern identity providers support a combination of these two methods.
See:
Universities and Large Organizations with legacy or fragmented directories
Universities and large organizations who have fragmented user directories or do not wish to integrate Keeper with SSO or SAML protocols can use Keeper's Email Provisioning method for a mass deployment.
Email provisioning essentially reserves a domain name (e.g. iastate.edu) and will automatically provision a user based on their domain (with email verification) into a default role. No work needs to be done by the Keeper Admin once the initial configuration is set up.
See:
Integration with Portals or Custom Apps
If you have a special integration requirement such as automatically provisioning and creating user vaults through a developer API or other custom integration needs, Keeper provides several SDK options. Visit the Commander SDK platform for Python, .Net, PowerShell, Java and other toolkits available for customers.
See:
Custom Email - Markdown Language
Overview
When formatting the body message of your custom email templates, Keeper supports plain text as well as basic markdown syntax. This document will go over the markdown syntax supported by Keeper
Heading
To create a heading, add the hash symbol (#) in front of a word or phrase. The number of hash symbols you use corresponds to the heading level.
Markdown Syntax
Font Size
Paragraphs
Sentences are plain text and multiple sentences can be grouped together to form a paragraph.
Do not indent paragraphs with spaces or tabs as it can cause formatting issues
Markdown Syntax
Rendered Output
Line Breaks
To create a line break or new line, press return or enter at the end of the line. Pressing return or enter multiple times will create multiple line breaks
Markdown Syntax
Rendered Output
Bold & Italic
To bold text, add 2 asterisks (**)
To italicize text , add 1 asterisk (*)
Markdown Syntax
Rendered Output
Links
To create a link, enclose the link text in brackets (i.e. [Keeper]) and place the URL in parentheses (i.e. (https://keepersecurity.com)). You can also format (bold or italics) the link as needed.
Markdown Syntax
Rendered Output
Embed Images from URL
To embed images from URL, add an exclamation mark (!), followed by the word Image in brackets, and the path or URL to the image asset in parentheses:
Browser Extension (KeeperFill)
KeeperFill makes it easy to login, save passwords and access your vault on web browsers.
Overview
The KeeperFill browser extension can be installed directly by the user or pushed to users by the Keeper administrator.
Direct Install from App Stores
The latest KeeperFill Browser Extension can be installed by users at the links below, or by visiting the Keeper .
Chrome, Brave, Opera and other Chromium-based Browsers:Firefox:Microsoft Edge:
Safari:
Admin Deployment
Chrome, Edge and Firefox deployment guides are linked below:
(Google)
(Microsoft)
(Mozilla)
Deployment with MDM Platforms
For environments where devices are managed through platforms such as Microsoft Intune or Jamf.
Offline / Direct Downloads
If your group policy does not support installation of extensions, your SCCM administrator may be able to use the below links to push the extensions or directly:
Microsoft Edge and Chrome:
Firefox:
Direct package install is not recommended for most environments. Using app store management portals such as Google Admin are preferred.
End-User Guides
User guides are available for every web browser at the links below:
Hiding Passwords
Methods of hiding passwords from end-users in the Keeper platform
Overview
In many enterprise environments, it’s essential to hide passwords from end-users to maintain security and enforce access policies. This is especially relevant for access to web applications, cloud services, internal tools, and infrastructure. Keeper offers multiple methods to prevent users from viewing passwords while still enabling seamless access:
The Privacy Screen feature of Keeper is a front-end method of hiding a password from viewing within the Keeper vault, browser extension and mobile apps. Privacy Screen can be applied at the level, role policy level (based on specific record domains), and at the (template) level.
With this policy in place, passwords are not visible from the user interface serving as a deterrent from casual observation. This feature is commonly used to limit viewing of passwords for the non-technically savvy users.
Team Level
In the Keeper Admin Console, the Team resource provides additional restrictions. The "Enable Privacy Screen" restriction is applied to any shared folder which the team has been added. Below is a screenshot of the "Client Services" team which has privacy screen enabled.
Role Level
At the role policy level, the Privacy Screen enforcement policy is used in conjunction with the Generated Password Complexity policy to control the viewing (unmasking) of passwords based on a specified domain.
It is important to note that password masking is only visual in nature and the password is still stored in the user's vault and accessible via API communication and browser inspection. If the admin would like to enforce that users cannot inspect the web pages, we recommend using group policies to prevent users from opening the browser development tools.
This feature can be enabled within the Generated Password Complexity settings by checking the “Apply Privacy Screen” box once a domain has been added.
Record Type Level
At the custom record type level, the Privacy Screen feature can be activated on the password field. For more information on record types, .
Vault Treatment
From the Vault shared folder, any user or team with Privacy Screen activated can be added to a shared folder:
On the recipient side, any record with a matching URL will be locked, and the user cannot unmask to view the password.
Browser Extension
On the browser extension, the password cannot be viewed:
KeeperPAM Connections
Keeper Connections allow users to instantly and securely access assets within their target infrastructure, such as servers, databases, web apps and workloads directly from their Keeper Vault. Connections can be established without exposing the underlying credentials to the user, ensuring zero-trust and zero-knowledge access.
There are several use cases which support password hiding:
RDP Sessions
SSH Sessions
Database Sessions
To learn more about KeeperPAM Connections, see the below links:
Self-Hosted Connection Manager
Keeper Connection Manager (KCM) is a self-hosted, agentless remote desktop gateway that provides instant and secure access to desktops, servers, databases and web applications from a web browser. Sessions created through Keeper Connection Manager provide a passwordless experience for users across any protocol, including:
RDP, SSH, VNC, K8s
MySQL, PostgreSQL, SQL Server
Web Applications through Remote Browser Isolation
To learn more about Keeper Connection Manager:
Remote Browser Isolation
Keeper’s Remote Browser Isolation (RBI) enables passwordless access to web-based applications by visually projecting secure browsing sessions from the Keeper Gateway directly into the user's vault. These sessions run in an up-to-date Chromium browser within a virtualized container, completely isolated from the local environment. With this approach, passwords are hidden from the end-user—credentials are securely injected via autofill, preventing exposure while still enabling seamless access. This protects users from malware, phishing, and other web-based threats, and eliminates the need for VPNs.
Remote Browser Isolation is an available connection protocol in the KeeperPAM cloud platform, and standalone Keeper Connection Manager.
To learn more about Remote Browser Isolation:
Risk Management Dashboard
Enhanced Risk Visibility With Keeper’s Risk Management Dashboard
Overview
The Keeper Risk Management Dashboard is a powerful feature of the Keeper Admin Console that provides comprehensive security posture information covering end-user deployment, utilization, cloud configuration, and event monitoring. This critical data helps administrators ensure that risks are remediated and compliance is enforced effectively.
Key Utilization Metrics
Keeper’s Risk Management Dashboard delivers a risk assessment score based on key metrics within an organization’s Keeper environment. These metrics include:
Users who have created records
Users who have logged in within 30 days
Users who have accepted Keeper invitations
Users with Two-Factor Authentication (2FA) protected vaults
Users Who Have Created Records
The Users Who Have Created Records metric indicates the number of users within your organization that are actively using Keeper and creating records.
Predefined filters allow an Administrator to view users with no records created and users who have records created.
Individual users can be clicked to view a per user detail.
A downloadable CSV file is also available for further data analysis by clicking Download Report.
Users Who Have Logged In Within 30 Days
The Users Who Have Logged In Within 30 Days metric provides an indicator that shows users who have recently used Keeper within your organization.
Predefined filters allow an Administrator to view users who have and have not been active recently.
Individual users can be clicked to view a per user detail.
A downloadable CSV file is also available for further data analysis by clicking Download Report.
Users Who Have Accepted Their Keeper Invitation
The Users Who Have Accepted Their Keeper Invitations metric allow Administrators to measure and keep track of users who have accepted their Keeper Invitation and also allows Administrators to re-invite users who have not accepted invitations. This ensures maximum coverage for your organization.
Predefined filters allow an Administrator to view invited and active users as well as re-inviting users by clicking Resend All Invites.
Individual users can be clicked to view a per user detail.
A downloadable CSV file is also available for further data analysis by clicking Download Report.
Users With 2FA Protected Vaults
The Users With 2FA Protected Vaults metric provides an indicator that shows users who have enabled 2FA to login to their individual Keeper vaults.
Predefined filters allow an Administrator to view users who have and have not enabled 2FA for their vault.
Individual users can be clicked to view a per user detail.
A downloadable CSV file is also available for further data analysis by clicking Download Report.
License Utilization
The Risk Management Dashboard will display a license count during the first two weeks of onboarding after activating your first user and allow the Administrator to purchase more licenses by clicking Add Users.
A Low license alert will display when an organization has reached 90% of used licenses and allow the Administrator to purchase more licenses by clicking Resolve.
Keeper Security Benchmarks
Keeper’s Risk Management Dashboard leverages an outlined set of to keep organizations compliant and safe. With an emphasis on enforcing least privilege and ensuring organizations embrace the highest level of security, Keeper consistently updates these benchmarks to ease security adoption and provide important information for admins.
Keeper Security Benchmarks in the Keeper Risk Management Dashboard are broken into three main categories:
Critical Items to Resolve
Completed
Ignored
If a benchmark is not applicable to your organization, an Administrator may choose to ignore it.
Keeper will periodically update recommendations for Keeper Security Benchmarks if a feature is updated or a recommendation is updated due to security advances.
When a benchmark is updated, a previously resolved item will become unresolved until configuration changes are made to adhere to the current recommendation.
The Security Benchmark tab is viewable in the default view. For information about all Keeper Security Benchmarks, click About Keeper Security Benchmarks.
Each benchmark will have a custom action to remediate the issue displayed.
In this example, clicking Add Back-up Admin will take the Admin to the Keeper Administrator role policy.
Clicking Ignore Benchmark will add the benchmark to the "Ignored" list.
High Priority Security Alerts
The Security Alerts tab will show a subset of Keeper's Advanced Reporting and Alerts Module's (ARAM) alerts. The subset is based on items that are considered high risk alerts.
Clicking View Reporting & Alerts will take the Administrator to the ARAM module in the Keeper Admin Console to view and take action on all alerts.
Each alert is clickable and will display:
Number of occurrences of the alert in the last 30 days
Sorting options for:
Name
Risk Management Dashboard Report
A PDF summary report can be generated by clicking Download Report.
Legacy Azure Sentinel
Integrating Keeper SIEM event pushes to Azure Sentinel and Log Analytics
Microsoft has deprecated this logging API. Please see the Microsoft Sentinel integration page.
Overview
Keeper supports event streaming into Azure Sentinel / Log Analytics environments. This document describes the legacy method of streaming logs, which is being deprecated in 2025. Use the or method instead.
To proceed with this method... in Azure, go to Log Analytics workspaces > Select Workspace > Classic "Agents Management". From here you can retrieve a Workspace ID and Key. Provide these two fields to Keeper to start streaming logs to your selected workspace.
Keeper will immediately start sending event data to the designated Azure Log Analytics workspace, under a custom table named Keeper_CL.
To view the logs, open the Log Analytics Workspace > Logs > select the Keeper_CL table.
Troubleshooting
If you need to troubleshoot the event log APIs, the below Python script will simulate the Keeper backend system sending event logs to your Azure environment. Replace the Workspace ID and Workspace Key before testing it.
Importing Data
Importing passwords and other private information into your Keeper Vault
Keeper provides several methods of migrating passwords and private data from other products into your vault. Each method is fully documented with screenshots and example data.
Watch the video below to learn how to import from web browsers, text files (.csv, .xls, .tsv) or another password manager.
Keeper Desktop App Import
You can easily import passwords with the Keeper Desktop App which also allows for a number of automated import methods from select password managers. Download the Keeper Desktop App .
From the Desktop App, click the account dropdown menu then select Settings > Import then click Import next to the correct source.
Importing from Web Browsers
The Keeper Web Vault and Desktop App provide automatic import of passwords from all popular web browsers including Chrome, Firefox, Edge, Safari and others. Keeper provides a standalone Importer Tool that is downloaded and installed from the Web Vault.
Detailed instructions for importing from web browsers can be found .
Importing from Flat Files
Keeper supports a wide range of flat file formats for bulk import of any vault records.
Mobile Import
Keeper supports migration from Apple Passwords or Google Password Manager directly from the mobile apps.
Importing from the Desktop Vault
Developer Tools for Migrating Data
Importing KeeperPAM Resources
Keeper Commander
Roles, RBAC and Permissions
Keeper's Least-Privilege Role permissions are both flexible and powerful.
In the Keeper architecture, Roles and Teams are separate but related concepts.
Roles define permissions, controls what features and security settings apply to users and manages administrative capabilities.
Teams are used for sharing privileged accounts and Shared Folders among users within the vault. Teams can also be used to easily assign Roles to entire groups of users to ensure the consistency of enforcement policies across a collective group of individuals (more on teams here).
Role-based Access Controls (RBAC) provide the organization the ability to define enforcements based on a user's job responsibility as well as provide delegated administrative functions.
The number of roles a business creates is a matter of preference and/or business need. At its simplest configuration the default role Keeper Administrator (under the Root Node) is applied to the initial administrator who set up the Keeper account for the organization as well as any other user who you wish to grant full admin rights. Roles can be assigned enforcement policies, and they can be assigned administrative permissions for access to the admin console.
We strongly recommend adding a secondary admin to the Keeper Administrator role in case one account is lost or no longer accessible. The creation of additional roles such as a General Employee role, is not required but highly encouraged.
Watch the video below to learn more about role-base access controls.
Adding Roles
You can add roles manually through the Admin Console, automatically mapped via SCIM, created with Keeper Commander, or assigned from Active Directory / LDAP via the .
To add roles manually, select the Roles tab. There you can navigate to the specific node you would like the role to be assigned to. Select the + button to add a role. Verify or select the appropriate Node in the organization tree (or select the Root Node). Enter the name of the role you are creating then click Add. After the role has been created, you can configure the role enforcement policies, select the users to assign the role and set administrative permissions.
Role Enforcement Policies
First, select the role you would like to configure. Click the Enforcement Policies button. Observe the enforcement policies are are structured into the following areas:
Login Settings
Two-Factor Authentication (2FA)
Platform Restriction
For more information about Enforcement Policies, click .
Team-to-Role Mapping
Team-to-role mapping allows organizations to use their existing identity provider to assign users directly into Teams that can be assigned custom Roles. With team-to-role mapping, a user who is a member of a team who is assigned to a role will assume the enforcements of the given role. That user can be a member of the role more than once, once via user-role membership and again via user-team-role memberships if any exist.
To use team-to-role mapping, administrators simply assign a role to an entire Team, as opposed to individual users, and use Role Enforcement Policies to establish different requirements and restrictions for each Team.
Currently Keeper does not allow mapping of administrative roles to teams, in order to prevent an admin from inadvertently elevating permission of a user. This feature is being considered for a future release.
SCIM Role Mapping
When setting up SCIM (System for Cross-Domain Identity Management) in the Keeper Admin Console, roles can be automatically assigned instead. By default, SCIM groups map to Keeper teams. SCIM group names that start with this optional prefix will instead map the assignments to a role.
Role Enforcement Conflicts
It is important to note, that if a user is a member of multiple roles or a team with differing role enforcements, all enforcements must be satisfied for all the roles the user is a member of. Keeper implements least-privileged policies, so when a user is a member of multiple roles, their net policy is typically most restrictive, but this can vary depending on the enforcement.
For example: Role A does not allow sharing to anyone. Role B does not allow sharing outside of the enterprise. The user will be unable to share to anyone because Role A (least privilege) does not allow it.
Enforcement Policies
The documents each of the available enforcement policies.
JSON Policy Deployment - Chrome
Deploying KeeperFill via JSON Policy
Deploying Keeper Chrome Browser Extension via JSON Policies
Step 1: Create a Keeper JSON policy configuration file
If you currently do not have JSON Policy files created in which you want to utilize to deploy the Keeper Browser extension to all PCs in your organization, please proceed to creating your Keeper JSON policy file to your desired location, Ex: /tmp, and name it keeperbe.json
OR create your keeperbe.json file via command-line
2. In your preferred JSON file editor or basic file editor, copy, paste and save the contents, below, into the keeperbe.json file or the policy file in which you currently utilize for your organization.
Step 2: Setup configuration folders
If you currently have configuration folders setup for the user PCs in your organization, proceed to Step 3: Deploying the Keeper JSON Policy File.
On each PC, in your organization, that you would like to apply this policy on, you’ll need at least one folder to apply this policy.
If it does not already exist, create the directory structure, verbatim, as follows; /etc/opt/chrome/policies/managedand set the proper permissions for that directory.
OR create your directory structure via command-line
The creation of this directory will most likely NOT be in the same directory as where Chrome is installed on the target Linux devices. Ex: My Chrome installed directory is /opt/google/chrome but my managed policy directory, in which my organization manages my Chrome install, is in the /etc/opt/chrome/policies/managed directory.
Step 3: Deploying the Keeper JSON Policy File
Use your preferred method (utility or script) to push the keeperbe.json policy file and Chrome Browser to the target Linux devices in your organization.
Push the keeperbe.json file to the /etc/opt/chrome/policies/managed directory on all target Linux devices in your network.
Confirm that the files are in the correct directories on all the target Linux devices.
Step 4: Check Your Chrome Policies
On a target client device, open Google Chrome and navigate to chrome://policy to see all policies that are applied.
You may need to select "Reload Policies" to apply this new policy to the target Linux devices.
You may need to close and reopen Google Chrome before the new policies appear.
On-Prem vs. Cloud
Which components of Keeper are on-premise versus Cloud-based?
Keeper's architecture is the most secure in the industry. Built from the ground up with record-level encryption and client-side key generation, the foundation of Keeper Enterprise is built upon a Zero Knowledge model that ensures only the user is able to decrypt and access their privileged information.
The Keeper platform is built on an access layer and encryption layer. Access and authentication controls who is able to sync the encrypted ciphertext, and client-side encryption controls who is able to physically encrypt/decrypt the data.
If you are using an SSO solution and plan to integrate Keeper into your identity provider, Keeper offers both on-premise and cloud versions of Keeper SSO Connect™. For on-prem tenants, Keeper SSO Connect generates the encryption keys and authenticates the users in real time. For cloud tenants, SSO Connect Cloud is fully managed by the Keeper infrastructure with device-level encryption to ensure Zero Knowledge.
All of Keeper's user-facing applications contain on-device local encrypted storage. All Keeper applications can be locked down to specific IP Allow lists through role-based enforcement policies. Customers can also enforce the use of 2FA and other security policies through the Keeper Admin Console. The cloud component of the Keeper architecture is hosted with Amazon AWS with multi-zone and multi-region redundancy. Isolated data centers are available in several global locations.
Related Articles on the Keeper Blog:
Active Directory Provisioning
Keeper AD Bridge supports automatic provisioning of nodes, roles, teams and users across any size Active Directory environment.
The Keeper Bridge is an enterprise-class service application that supports the ability to automatically sync Nodes, Users, Roles and Teams to your Keeper Enterprise account from an Active Directory service. To activate and install the Keeper Bridge, follow the steps below:
Create a Node (under the root node) to sync with your Active Directory.
Visit the Provisioning tab and select Add Method and then Active Directory Sync.
Download the Keeper Bridge and proceed with setup.
For detailed Keeper Bridge setup and installation instructions see our .
Keeper Bridge supports single and multi-domain, multiple forest domains and other complex environments. The Bridge also supports high-availability mode and a variety of custom configuration options based on your AD/LDAP environment. The documents the full setup process.
The Keeper Bridge does not authenticate users into their vault with their Active Directory password. For seamless user authentication, consider our add-on as described in the next section which authenticates against Active Directory via AD FS.
Automated Team provisioning requires the Keeper Administrator to authenticate on the Keeper Bridge. The Bridge will poll for users who have created their Keeper account after invitation, then the Bridge will encrypt the Team Key with the user's public key, and distribute the Team Key to the user. Once any member of the team logs into the Vault, all members of that team are approved.
Once the Active Directory Bridge is syncing, we recommend not making manual user or team changes directly on the Admin Console. Delegate all user and team provisioning to the bridge through Active Directory. Role enforcement policy changes should still be made on the Admin Console
Subscriptions
Keeper's Subscriptions tab in the Admin Console gives eligible administrators the ability to manage, purchase, and upgrade their organization's Keeper licenses directly — without leaving the console.
In-Console Checkout
In-Console Checkout is a new feature that streamlines the process of purchasing additional licenses, upgrading your plan, or adding on new products. Instead of being redirected to an external checkout page, eligible admins can complete purchases directly inside the Admin Console using a saved credit card on file.
This feature is designed to reduce friction for routine subscription changes, giving qualifying administrators a faster way to keep their organization's Keeper deployment up to date.
Nodes and Organizational Structure
Keeper's node architecture scales for organizations of all sizes
Keeper's "node" architecture provides customers with a way to organize users into distinct groupings, similar to organizational units in Active Directory. The administrator can create nodes based on location, department, division or any other structure. A node is typically associated with different provisioning methods and identity providers.
By default, the top-level node, or Root Node is set to the organization name, and all Nodes can be created underneath the Root Node.
Smaller organizations might choose to administer keeper as single level. In this scenario, all provisioned users, roles, and teams are accessed from the default Root Node.
Larger organizations benefit from organizing locations or departments into multiple nodes. Users can then be provisioned under their respective node and have roles configured to match the specific needs of the business. One of the advantages in defining multiple nodes is to help support the concept of delegated administration. A delegated administrator can be granted some or all of the Administrative permissions but only on their respective node (or sub nodes) to help reduce the administration load on the primary Keeper Administrators.
Deploying Keeper to End-Users
Methods for deploying the Keeper app to end-user devices.
Overview
This section describes the methods of deploying Keeper to end-users. Keeper can be deployed as a web browser application, browser plugin, mobile app and native desktop application.
BreachWatch (Dark Web Monitoring)
Zero-knowledge dark web breach scanning for Keeper Enterprise
Overview
BreachWatch provides organizations oversight of the vulnerabilities of user's passwords through active monitoring of dark web breach data. Users and administrators are notified if any of their passwords in a record have been used in publicly known breach that could leave your organization vulnerable to a credential stuffing attack or an account takeover.
Watch the video below to learn more about dark web monitoring with BreachWatch
Teams (Groups)
Keeper Teams allow you to share privileged accounts among pre-defined user groups
The purpose of creating teams is to give users the ability to share the records and folders within their vaults with logical groupings of individuals. The administrator simply creates the teams, sets any Team Restrictions (edit/viewing/sharing of passwords) and adds individual users to the team. Users can be added to teams either manually or using several different automated methods.
Teams can also be used to easily assign Roles to entire groups of users to ensure the consistency of enforcement policies across a collective group of individuals.
Creating a Team
Delegated Administration
Overview of role-based Administrative Permissions
Delegated Admin via Administrative Permissions
A Keeper role can be granted Administrative permissions over the node (or sub-nodes) for which a role exists. This delegated administration allows different roles to have different permissions inside of the Admin Console.
An example of a role that can be created would be a Delegated Admin role. In this role the administrator can set up one or more Administrative Permissions that allow that user in the role to login to the Keeper Admin Console and perform administrative functions. For example, the delegated admin can be given permission to create teams, add users, create or edit roles, run reports, approve devices and perform account transfers. These permissions can be limited to a single node or they can cascade or traverse down the tree structure to all the sub-nodes.
Entra ID / Azure AD Provisioning
Keeper supports SAML 2.0 Authentication and SCIM provisioning with the Azure AD / Entra ID platform.
Overview
Keeper supports the ability to provision users and teams from Microsoft Azure AD or other identity platforms using the SCIM protocol. For customers that utilize Azure AD, users can be provisioned to the platform and automatically added to Teams to receive shared folders.
Before setting this up, we recommend that you consider activating Keeper's powerful SSO Connect integration with Azure AD that provides realtime user authentication and Just-In-Time provisioning.
Account Transfer Policy
Transfer the contents of a vault to another Keeper user
Account Transfer: Employee Off-boarding
The Account Transfer policy provides business and enterprise customers with the ability to transfer a user's vault if they are terminated or abruptly leave the organization. This is an optional feature that should be configured by the Keeper Administrator during the initial deployment phase of the Keeper rollout. The reason for this is because Account Transfer relies on the sharing of encryption keys between users that have rights to perform the transfer. The exchange of keys occurs when the user logs into their vault to retain Keeper's Zero Knowledge infrastructure. Therefore, the Account Transfer setup must be configured prior to the user's account being transferred. A successful transfer requires that the users had logged in at least once prior to the transfer action.
SCCM Deployment - Chrome
This page describes how to deploy the Keeper Browser Extension with SCCM
Deploying Keeper Chrome Browser Extension via SCCM
This is a general guide in which describes how to utilize SCCM, against Google Chrome templates, to deploy the Keeper Browser extension to all desired PCs in your organization.
Group Policy Deployment - Firefox
Deploying KeeperFill via Group Policy
Deploying Keeper Firefox Browser Extension via Group Policy Management
This section describes how to utilize your Active Directory Group Policy Management, against Firefox Policy Templates, to deploy the Keeper Browser extension to all PCs in your organization. Please note this is a general guide.
Mobile Apps
Deployment of mobile apps through Intune
Overview
Keeper's mobile applications for iOS and Android are native apps that support all vault capabilities including record management, sharing management and autofill. Deploying the app to end-users is possible either through the public app store download or through mobile device management platforms.
JumpCloud Provisioning
Keeper supports SAML 2.0 Authentication and SCIM provisioning with JumpCloud
Overview
This guide covers JumpCloud Automated Provisioning with SCIM which will update and deactivate Keeper user accounts as changes are made in JumpCloud.
User has been suspended (either manually by selecting the Lock Account button or automatically via AD Bridge or SCIM). To manually lock a user account, select the Lock Account button.
Delete User
Delete the user account.
Note: this action cannot be undone and has serious consequences:
1. All of this user's owned vault records will be immediately deleted, and they will be removed from all Roles, Nodes and Teams.
2. Any unshared records created by the user are deleted.
3. Any records shared from this user to other users will continue to be shared and will become "ownerless". Contact Keeper Support if you have questions regarding claiming ownerless records.
Lock Account
To suspend an account and prevent the user from accessing their Vault, you can simply lock their account. This retains the user's owned records but blocks their access to their Keeper Vault. Any records and Shared Folders created by that user will still be accessible to other shared users and teams.
Expire Master Password
Expire a user's Master Password outside of the enforcement policy periodicity. This functionality allows the administrator to specifically target a user to rotate their Master Password if a potential compromise is suspected.
Please note, the user must first authenticate with their current Master Password, after which they will be promoted to create a new Master Password.
Resend Invite
If a user has been invited to join Keeper but has not yet completed their account setup, you can re-send their invitation to join.
Reset Security Score
Reset the stored calculations of the user's security score. Upon their next login on the Web Vault or Desktop App, the user's security scores will be re-calculated.
Invited
User has been invited to join Keeper but has not completed their account setup yet. User can be re-sent the invitation by selecting the Resend Invite button.
Active
User has created their Keeper account and joined the organization.
Locked by IdP
User has been disabled by the linked identity provider such as Active Directory or Entra ID.
Edit a user
Change the name of the user.
Disable 2FA
Disable the user's second factor authorization (2FA).
Transfer Account
If Account Transfer is active for the user's role and the currently logged-in administrator has the Administrative Permission to perform a transfer, this action will move all records and shared folders from the user's account to a destination user account. The account must first be locked before you can perform a transfer. After the transfer is completed, the user account is deleted. More information on the Transfer Account action is detailed throughout this guide.
Only displays for organizations that are not SSO enabled as 2FA is traditionally done at the SSO level. Keeper’s Risk Management Dashboard automatically detects SSO environments and tailors the risk management level to your configuration.
Number of Occurrences
Recent Occurrences
Trend percentage based on current 30 days against the previous 30 days
Option to download a csv report of the trend for further data analysis
Individual clickable user details to display information about an individual user
In-Console Checkout is available when all of the following conditions are met:
Be in the Administrator Role, either:
A Root Admin
A Non-Root Admin with the Billing Admin permission assigned to your role
Credit Card as Payment Method - Your organization must have a valid credit card saved on file as the active payment method. In-Console Checkout is not available for accounts using SEPA or Purchase Order (PO).
Active Paid Subscription AccountStatus - In-Console Checkout is not available for trial accounts and accounts with an expiring subscription.
If your account does not meet all of the above conditions, subscription management links (such as Add Users, Add Licenses, Upgrade Plan, and Add Storage) will redirect you to the standard external checkout page as usual.
Admin Permissions
Who Cannot Use In-Console Checkout
You will not have access to In-Console Checkout if any of the following apply:
You are a non-root admin without the Billing Admin permission.
Your organization's last payment method was SEPA or a Purchase Order.
Your account is currently on a trial or is in an expiring state.
In these cases, the standard Checkout page will be used for all subscription changes.
What You Can Do with In-Console Checkout
Eligible admins can perform the following actions directly from the Admin Console: add users, upgrade your plan and add available add-ons.
Add Users
Add additional user licenses to your existing plan. You can initiate this from either:
The Admin tab → Add User button (when no available seats remain)
The Subscriptions tab → Add Licenses button.
A purchase popup will appear where you can specify the number of additional users. Pricing reflects your current base plan.
Note: if you are on the Business Starter plan and your total user count exceeds 10, your plan will automatically be updated to Keeper Business and per-user pricing will be adjusted accordingly.
No Licenses Available
Add User Licenses
Purchase Confirmation
Upgrade Your Plan
Upgrade from a Business Starter or Business plan to Enterprise directly from the Subscriptions tab using the Upgrade Plan button. Adding additional users during the upgrade is not available as part of this flow.
This option is not available for accounts already on an Enterprise plan.
Add Storage
Add Available Add-Ons
Expand your Keeper deployment by adding the following products directly from the Subscriptions tab:
Add-On
Notes
Advanced Reporting & Alerts Module (ARAM)
Available for Business and Enterprise
BreachWatch
Available for Business and Enterprise
Compliance Reporting
Available for Business and Enterprise
Not available via In-Console Checkout: KCM (Keeper Connection Manager), RBI (Remote Browser Isolation), and KSM (Keeper Secrets Manager). Contact your Keeper sales representative to add these products.
Enable KeeperPAM
Purchase Process
When you initiate an in-console purchase, you will be guided through a 3 step popup:
Configure Your Purchase - Select the number of users or the add-on you want to add.
Confirmation Screen - Review the total price, prorated amount, applicable taxes, and any additional add-ons. You can click View Full Summary to open a detailed breakdown in a new tab (via the standard Checkout page).
Once you click Complete Purchase, your request is processed immediately and the Subscriptions tab will automatically refresh to reflect your updated license count or newly added products.
Successful Purchase - A confirmation popup will appear with a link to download your receipt.
Failed Purchase - An error message will be displayed with a link to the Checkout page so you can complete the transaction manually.
Viewing Your Payment Method
If In-Console Checkout is available for your account, your organization's current payment method will be visible on the Subscriptions tab. To update your payment method, click the Update link, which will direct you to the Checkout page.
Frequently Asked Questions
I don't see an in-console purchase popup — I'm being redirected to Checkout. Why?
Your account may not meet one of the eligibility requirements (see Who Can Use In-Console Checkout above). Common reasons include the payment method on file not being a credit card, or your account being in a trial or expiring state.
I'm a non-root admin. Can I use this feature?
Yes, if your administrator has granted your role the Billing Admin permission. Contact your Root Admin to request this permission if needed.
Can I add KSM, KCM, or RBI licenses through In-Console Checkout?
No. These products require involvement from your Keeper sales representative. Please contact Keeper Sales for assistance.
What happens if my purchase fails?
An error message will appear with a direct link to the Checkout page so you can complete the transaction. No charges will be applied for failed transactions.
When rolling out Keeper alongside an SSO identity provider, we require that those users are located within a node. This way, you can have any number of nodes associated with one or more SSO identity providers.
Nodes and Active Directory
When the Keeper Bridge is installed for Active Directory synchronization, AD Organizational Units are identified as Nodes. Users and security groups, within specific organizational units in Active Directory, will be placed in the corresponding Node within the Keeper Admin Console.
Watch the video below to learn about nodes and organizational structure.
Creating Nodes
To manually create Nodes and Sub Nodes, select the button and click Add Node. The Add Node window will appear. Enter the name of the Node and select the node where you want the new node to be added in the tree structure.
Adding a Node
Navigating Nodes
At any time, you can change which node you are viewing by navigating to or selecting the nodes on the Node selector. To navigate to the root-node or top level, select the business name (e.g. The Company) in the navigation tree.
Navigating Nodes
Team and User Sharing Visibility
When users are in the vault and sharing records, Teams and Users are visible in the auto-suggest field by all users regardless of what node the team or user resides in.
Sharing Autosuggest
Node Isolation
If the desire is to restrict visibility and control whether or not the usernames and teams associated with other parallel (a.k.a. "sibling") nodes will be hidden in the auto-suggestion dropdown menu when setting up sharing of folders, "node isolation" will need to be enabled. With node isolation enabled, "children" of a node can see each others' associated users/teams as well of those above it (parent nodes).
When a node is isolated, users and teams in the parent node will be visible. Node isolation only limits visibility between parallel nodes.
Note: Any user who is an a role with admin rights having Share Admin permissions will also appear in auto-suggestion drop-downs, if the role has management permissions over the node for the currently logged-in user.
Activating node isolation
Turning on node isolation can be accomplished using the Keeper Commander CLI, or by opening a support ticket with Keeper support.
To find a list of nodes and node IDs, use the enterprise-info command:
To enable node isolation for a specific node, use the enterprise-node command:
After node isolation is enabled, a visual indicator will show in the console:
Isolated Node Indicator
Node Isolation affects the ability for users to share records and folders outside of their node tree. For example, when sharing a record from the vault, the auto-suggestion list is restricted.
Node Isolation affected in Vault Sharing
Managed Service Providers
If you are a Managed Service Provider (MSP) and you are considering the use of Nodes for different customers, we recommend you instead use the Keeper MSP product which provides a specialized set of features for deploying Managed Companies. The Keeper MSP user guide can be found here: Keeper MSP Guide
Nodes & Administrative Permissions
Within a Node, the "Role" is defined that can enable administrative permissions.
If nodes are enabled either via Active Directory integration or configured manually from the Admin Console, the placement of the Role within the Node Tree is important with regards to where the administration permissions begin.
Placement of the role at the top level will allow the Admin permissions to flow down to any of the sub-nodes if the Cascade Node Permissions attribute is checked within the "Administrative Permissions" setting of the role. If the role is placed in a sub-node with the Cascade Node Permissions attribute checked then the permissions apply to that node and its sub-nodes only. If the Cascade Node Permissions attribute was not checked then the role permissions are only applied the the specific node to which the role belongs.
Cascade Node Permissions
Nodes & User Provisioning
Each node and sub-node within the Keeper deployment can provision users with different provisioning methods. For example, Finance and Sales & Marketing can use Single Sign-On, and Engineering can use Active Directory.
Stacking Provisioning Methods
A node can contain one or more authentication or provisioning methods. For example, you can provision users with Active Directory and authenticate the users with Single Sign-On (SAML 2.0) integration. Or you can authenticate with SAML 2.0 SSO and provision users with SCIM.
Adding a Provisioning Method
Navigate to the Node that you would like to provision users. Then click on the "Provisioning" tab and click "Add Method".
Provisioning Methods
Nodes and Organizational Structure
Node Structure
enterprise-info --nodes
enterprise-node --toggle-isolated <NODE_ID>
End-User Videos
A series of Keeper 101 videos are available to help train your end-users. Below is the Enterprise End-User guide:
Compatibility
Keeper works on every smartphone, tablet and computer. Keeper supports popular browsers including Chrome, Safari, Firefox, Edge, Brave and Opera. Native app installation is available from the Keeper website and every public-facing app store (iTunes, Google Play, Microsoft Store, Mac App Store, etc).
The Keeper Web Vault is available for all users across every type of web browser. To access the Keeper Web Vault login, visit the URL according to your tenant region:
Region
URL
US Data Center
US Public Sector / GovCloud
EU Data Center
AU Data Center
Desktop Application
Keeper provides customers with a fully native desktop application as an optional component. The desktop app has some unique capabilities compared to the web vault, such as native app autofill and hot keys. See the subsection Desktop Application.
Browser Extension (Keeper Fill)
Keeper's browser extension provides autofill capabilities on every web browser. See the subsection Browser Extension (Keeper Fill).
Mobile App Deployment
Keeper for mobile and tablet devices can be deployed through the public-facing app stores. MDM solutions can also push these applications to end-user devices without any special requirements. When the users register or sign into an account, Enterprise enforcement policies are automatically applied.
Keeper supports authentication, provisioning and deployment through your existing SAML 2.0 identity provider such as Entra ID, Okta, Google Workspace, JumpCloud, Ping and many others. See the SSO Connect Cloud setup guide for deployment instructions.
Azure AD Condition Access Policies
When deployed through Azure AD, Keeper fully supports Azure conditional access policies across web, mobile and desktop applications.
End-User Experience
BreachWatch will prompt the user on their client device to Resolve the breached password by either changing the password or ignoring it. If a password alert is ignored, then that record will be skipped on future scans until the password is reset. The user may also do nothing (deferring a response) and leave the risky password unchanged and thus still "at risk".
Admin Console Experience
BreachWatch provides Admins a dashboard overview and a summary table in the Admin Console detailing how users have dealt with their BreachWatch notifications.
If users have "At Risk" or "Ignored" passwords, the Keeper Administrator can reach out to the user in order to take action. If a record does not contain a password, it will not be shown in the count. The report includes both "owned" and "shared" records.
BreachWatch Report
Reporting & Alerts
If the Advanced Reporting & Alerts module is activated on the Enterprise license, then BreachWatch specific events can be sent from the devices/clients and used to report activity with a variety of filters, and/or generate an alert.
Activate BreachWatch Event Reporting
IMPORTANT: To activate event-level reporting of BreachWatch data to the Advanced Reporting & Alerts Module you must enable the event role enforcement policy under the specific role > Enforcement Policies > Vault Features screen.
By default, Keeper does not send BreachWatch event data from the user's device to connected SIEM and Advanced Reporting & Alerts reporting tools. The Keeper Admin must explicitly enable this feature. After it's enabled, the event data will begin to flow through to the Advanced Reporting engine and connected SIEM systems such as Splunk.
Note that this is not retroactive. Events will only flow through Advanced Reporting & Alerts after this feature is activated.
Enable BreachWatch Enforcement Policy
BreachWatch Reports
After BreachWatch events are flowing into the reporting module, visit the "Reporting & Alerts" screen to generate a report.
Reporting & Alerts Interface
Click on Add Custom Report then select the BreachWatch events.
BreachWatch Events
Alerts can also be created with custom event tracking.
Alerts
Webhooks can receive alerts, so that you can perform any custom logic such as Slack channel alerts, Microsoft Teams, etc.
To enable webhook alerts:
Click on the event name.
Click the Recipients tab.
Add or click on an existing Recipient.
Click the Add Webhook button.
Configure the URL, HTTP Body, and an optional token.
Click Save.
Alert Recipients and Webhooks
Events can also be streamed to 3rd party SIEM solutions.
SIEM Integration
Deployment & Reporting Enablement
The BreachWatch capability can be deployed selectively to your organization via Role Enforcements. The Pause BreachWatch on client devices toggle controls whether devices send events for reporting purposes, and whether to pause the service so it will not appear on the user's devices at all. Note that enabling events to the reporting module will send record event metadata (User Email, Record UID, IP Address and Device Type) from Keeper’s backend to any connected SIEM product.
If you do not want to deploy BreachWatch to your entire organization at once, you can control the deployment using the Pause BreachWatch on client devices toggle. Users in this node will not have BreachWatch enabled on their client devices.
Security
BreachWatch is a Zero Knowledge architecture that uses a number of layered techniques to protect our customer’s information. For detailed technical information regarding the security and encryption model of BreachWatch, please visit the BreachWatch section on the Keeper Encryption Model documentation by clicking This Link.
CLI Commands
BreachWatch can be managed and used through the Keeper Commander CLI. See the below related commands:
Navigate to the Teams tab and select the + Add Team button. Just like Roles, the teams will be added to the specific node that is selected. Enter the team name and click Add Team to save.
Teams
Editing Teams
Select the team you would like to edit from the Teams tab. From here you can make edits to the team such as change the name, disable record re-shares, disable record edits, and apply privacy screens. You can also change the Node the team belongs to as well as add Users and Roles to the team. To delete the team, simply click the Delete button.
Team-Role Mapping
Teams can be assigned to roles. This allows you to easily provision users into teams from your identity provider and automatically apply specific role enforcement policies based on team assignment.
Teams can be added to Shared Folders in the vault. This allows you to seamlessly manage the assignment of vault credentials directly from the identity provider via SCIM or the Keeper AD Bridge.
Teams can be configured with several restrictions that will override any folder-level permission settings.
Disable record re-shares
With this restriction in place, passwords shared to this team cannot be re-shared by team members. This restriction will override any permissions set at the Shared Folder level.
Disable record edits
With this restriction in place, passwords are usable and viewable but cannot be edited. This restriction will override any permissions set at the Shared Folder level.
Apply Privacy Screens
Keeper's Privacy Screen feature gives you the ability to control the viewing (unmasking) of all passwords at the team level. With this policy in place, passwords are not visible from the user interface serving as a deterrent from casual observation.
This feature is commonly used to limit viewing of passwords for the non-technically savvy users. It is important to note that password masking is only visual in nature and the password is still stored in the user's vault and accessible via API communication and browser inspection.
Privacy Screen can also be configured at the role and website domain level in Keeper's Role Policies.
Enable Privacy Screen
Watch the video below to learn more about the Privacy Screen feature.
Adding Users to Teams
Users can be added to teams several ways:
Manually through the Admin Console
Automated through the Keeper Bridge (for AD/LDAP)
Automated through SCIM provisioning (Azure, Okta, etc)
Automated through Keeper Commander CLI
Adding users to Teams through the Admin Console
Click the + Add User button to add users to a team.
Add user to team
Queuing invited users into teams with Commander
If you would like to queue invited users into Keeper Teams, you can accomplish this using Keeper Commander's command. In the example below, we are adding an invited user to a team. This shows in the "Queued User(s)" output.
Queued Teams and Users will be processed using the approval queue.
Automated Team Provisioning
Teams can be provisioned in other ways as described in the Keeper Enterprise guide, including:
Teams and team-user assignments are accomplished through the use of public/private key encryption. Teams have a public/private key. Adding a user to a team involves encrypting the Team Key with the user's Public Key. When creating teams and assigning users to teams using the Admin Console interface, all of the encryption occurs locally because the Admin has the necessary rights and access to the keys required to perform the encryption actions.
Teams and team assignments created by automated methods such as the Keeper AD Bridge and SCIM API don't have the necessary encryption keys in order to fully create the assignments. Therefore, these teams and assignments go into a "queue" system.
Queued Teams and Team-User assignments are processed upon one of the following actions:
Admin logs into the Admin Console (and optionally clicks "Full Sync")
User from the respective team logs in to the Web Vault or Desktop App
Admin runs team-approve commands from Keeper Commander
Admin sets up the service
SCIM and Commander APIs can be approved by following the instructions from the Approval Queue page.
Note regarding AD Bridge or SCIM-Managed Nodes
If users are managed through SCIM or the Active Directory Bridge in a particular node within the Enterprise, we recommend performing all team management through the automated methods and the associated identity provider. Manually creating or editing teams from the Admin Console could interfere with your identity provider and generate syncing issues.
My Vault> enterprise-team --add-user [email protected] "Social Ops"
My Vault> enterprise-team "Social Ops"
Team UID: BJa131htHCepTxuBCFQ_uA
Team Name: Social Ops
Node: root 288797895950338
Restrict Edit?: Yes
Restrict Share?: Yes
Restrict View?: Yes
Active User(s): [email protected] : [email protected] Queued User(s): [email protected]
Adding Administrative Permission
To create a privileged role with admin permissions, click on the +Add Managing Node button in the Administrative Permissions sections.
Adding Administrative Permissions to a Role
Each node a role manages has its own set of permissions and those permissions can cascade down from that node for example, if the role was created in the top root level node and there were three other nodes created under the top, root level node. The Administrative Permission can be added as the top node, the privileges added, and Cascade Node Permissions selected. This would then give those permissions to all four nodes and members of that role.
To give Administrative Permissions to a Role, select the + Add Managing Node button on the Role screen.
Select a Node and click OK.
Set permissions by clicking on the gear icon next to the node you added.
Add Managed Node
Setting Administrative Permissions
When Cascade Node Permissions is selected, the permissions will be applied to all sub-nodes of the parent node. It is important to note that Administrative Permissions cannot be added to a Role if one or more of its users still have an "invited" status.
Individual Permissions
A description of each permission is below.
Permission
Description
Manage Nodes
The ability to add, remove, or edit .
Manage Users
The ability to add, remove, or edit .
Manage Roles
The ability to add, remove, or edit .
Only administrators who are a currently a member of this role are able to select "Transfer Account". If needed, you can add yourself to the role or another administrator within the role can set this permission.
Administrative Permission vs. Role Enforcements
Both Administrative permissions and enforcements are configurable from within a role. Enforcements are rules or policies that apply to the end user's vault experience and security. Administrative Permissions grant rights to perform certain actions within the admin console (also known as delegated administration).
We recommend that only specific roles are given Administrative Permission, and the permission level should be based on the least amount of privilege required by that role.
For example, the default Keeper Administrator may have created a role called "All Users" specifically to handle the policies that are desired for all the users that have been onboarded to the Keeper platform. If you intend for one of those users to be able to perform some of the administrative permissions, create a new role called "Delegated Admin", grant the administrative permissions, and make the user a member of that role.
If you have already setup Keeper SSO Connect Cloud or you don't have the need for SSO, proceed to Step 1 in the Configuration Steps below.
Features
Keeper/Azure provisioning integration supports the following features:
Creates users in Keeper
Updates user attributes (display name in Keeper)
Deletes users (locks users in Keeper)
Creates teams in Keeper (from Azure groups)
Adds or removes users to groups (to teams in Keeper)
When provisioning users, Azure AD is mapped to a single Keeper node. Azure creates users and groups in a pending state and new users will receive an email invitation prompting them to create a Keeper account.
Requirements
To setup Keeper user provisioning with Azure AD, you need to have access to the Keeper Admin Console and an Azure account.
Configuration Steps
Watch the video below to learn more about Azure AD provisioning with SCIM.
Step 1. Navigate to your Azure Admin account and select Azure Active Directory> Enterprise Applications and then New Application. Search for Keeper and select Keeper Password Manager & Digital Vault.
Step 2. After adding the application, click on the Provisioning section and select Automatic from the listed options.
In a separate window, you will retrieve the Tenant URL and Secret Token from the Keeper Admin Console.
Automatic Provisioning
Step 3. From the Keeper Admin Console navigate to a node which should be synchronized with your Azure AD. Click Add Method.
Note: SCIM integration can only be applied to specific nodes (e.g. organizational units) within your Admin Console. Be sure to host the provisioner within a "subnode" as opposed to the "root" node.
Step 4. Choose the SCIM option and click Next then select Create Provisioning Token.
Step 5. Copy the Tenant URL and Secret Token values and paste them into the Tenant URL and Secret Token fields in the Azure AD screen from step one. Select Save to finish the Keeper provisioning setup.
Step 6. Return to the Azure AD screen and click Test Connection. If successful, save the credentials. Turn the Provisioning Status "on" and click Save.
Step 7. Go to the Users and Groups section of the Keeper Azure AD app and assign users or groups from your Azure AD to the app.
Users and groups
Step 8. Start Provisioning
Ensure that provisioning is started by clicking on the "Start" button.
Wait for approximately five minutes (in some cases, Microsoft can take up to 40 minutes for the first time run), then click the Sync button in the Admin Console. Verify that users appear under the Users tab.
SCIM-provisioned teams are not immediately created but rather put into a “Pending Queue” where they are finalized by one of several approval methods.
In Azure, you can also instantly provision a user by clicking on Provisioning > Provision on demand.
Provision on demand
Note: If a new domain needs to be used for SCIM provisioning, a support ticket must be submitted to Keeper to properly reserve the domain with your account.
SCIM + Team-to-Role Mapping
Typically, identity providers that use SCIM such as Azure, support assigning users to teams, but custom role assignment is done only on a user basis. SCIM-provisioned teams and users are applied to the default role, without the ability for a team provisioned from SCIM to be mapped into an alternative, pre-defined role.
Keeper's Team-to-role mapping allows organizations to use their existing identity provider to assign users directly into teams that can be assigned custom roles.
To use team-to-role mapping, administrators simply assign a role to an entire “Team,” as opposed to individual users and use role enforcements to establish different requirements and restrictions for each team.
Team to Role Mapping
Team Provisioning and Team Assignments
When setting up User and Team SCIM provisioning with Azure, make sure of the following:
Ensure that you have assigned the Azure groups in the SAML application
When you invite a user from Azure or assign a user into a group that has been provisioned, Azure will send the request to Keeper to either invite a user to join, or to add a user to a team, or to create a team.
If the user does not exist yet in Keeper, they will receive an invite to sign up (or they can use just-in-time provisioning)
After the user has created their Keeper account, the user will not yet be assigned into a Keeper team until one of a few things happen:
(a) Admin logs into the Admin Console > Click on "Full Sync" from the Admin screen
(b) A user from the relevant team logs into the Web Vault or Desktop App
(c) Admin runs team-approve from Keeper Commander
Sharing an encryption key (e.g. Team Key) can only be performed by a user who is logged in, and has access to the necessary private keys.
To streamline this process, the Keeper Automator service as of version 3.2 performs instant approval of Teams and team assignments. More information about the Automator service is .
SAML 2.0 Authentication with Azure AD
This document described the provisioning process with Azure AD. To enable automatic authentication with Azure AD using the SAML 2.0 protocol, follow the setup instructions in the Keeper SSO Connect Cloud Guide.
When an employee leaves the organization, an administrator with the proper Administrative Permissions can transfer a user's vault to another user. This account transfer functionality is an important and powerful way to take ownership of the content within a user's vault while retaining a secure role-based hierarchy.
When to Enable Account Transfer
By default the Account Transfer role policy is on for the All Users role, and the Transfer Account administrative permission is enabled for the Keeper Administrator role. This default configuration allows the Keeper administrator to take the contents of a user's vault and transfer it to another user. If the Transfer Account administrative permission is not enabled for the administrator, it's important to note that this permission will need to be enabled prior to the time it will need to be used. For example, if User A has a password that gains access to a business essential application or account in their vault that no one else in the organization has access to, and User A, for any number of reasons is no longer able to authenticate to their vault, the business may find they are left in a tough situation to recover access. However, if the Account Transfer permission had been enabled in the default Keeper Administrator role (and any other role that is desired to have the permission to transfer capability) and applied to the role that User A is a member of, the Keeper Administrator would have the ability to transfer the full contents of User A's vault to another user.
Why is the initial setup required?
When the decision is made to enable the Account Transfer feature on a particular role, all of the users that are a member of that role will be subjected to the possibility of having the entire contents of their vault transferred and their account deleted at will by the Keeper Administrator. After the enforcement policy is enabled, the users within the managed role will receive a pop-up notification upon logging into their vault informing them that the business has chosen to enable the capability of transferring their vault if needed. Each user will need to Accept that consent notification. Upon acceptance, Keeper performs the necessary encryption key exchange between users and roles to facilitate the data transfer in the future, if needed. Without this encryption key exchange, the user within the Admin Console would be unable to decrypt and transfer the data. The reason for this process flow is to maintain zero knowledge, and to also ensure that only specific users are able to be transferred or perform the transfer. Once the vault has been transferred to another user, the transferred user's vault is deleted.
Will the administrator have full access to a user's vault?
No. While the Account Transfer feature does give the administrator the ability to migrate the entire contents to another user, it does not give the Admin the capability to access the vault whenever they feel like it. The vault being transferred has to be locked first and after the contents are transferred the account is deleted. The end user will receive a notification when their account is locked by the Admin as well as when it's transferred and deleted.
How to Enable Account Transfer Functionality
Account Transfer functionality must be enabled and the user must login to their vault (and accept the account sharing consent) prior to performing a transfer by an Administrator. Follow the steps below to perform this action.
(1) Enable the Transfer Account setting within the Administrative Permissions of the role that will have the ability to initiate the account transfer.
Administrative Permissions
Enable Transfer Account Permission
If the Transfer Account checkbox cannot be checked, it is because the user must be logged into an account that is a member of the role, like the default Keeper Administrator, that has the Transfer Account permission enabled.
Note that a role (e.g. the Keeper Administrator role) must have this permission enabled before any other role can be granted transfer account permission.
(2) Turn on the Enable Transfer Account option under the Transfer Account section of the Enforcement Policy of the desired role.
Transfer Account Policy
(3) Select the administrative role that will have the ability to initiate a transfer (multiple roles may have the ability but only one role can be selected per enforcement).
Both new and existing users will be notified when account transfer is enabled and are required to acknowledge the organization's ability to transfer records from their vault. Users only have to agree to this consent once upon logging into their vaults.
Please note that changing the administrative role from the dropdown will trigger a new acknowledgement notification to both new and existing users regardless of previous acceptance of the notification by users.
Accepting Account Transfer
Users will see this prompt when they log into their vault:
Users have 7 days to Accept the transfer policy. After that they must accept to log in to their vault.
Performing an Account Transfer
(1) Lock the account of the user by selecting Lock Account from the user's configuration panel under User Actions (the configured admin will only have the ability to transfer records from a locked user).
(2) From within the same configuration panel, select Transfer Account. A window will open with a list of users. Select the user that will receive the transfer of records (the "recipient"), then select Transfer.
Lock and Transfer
Transfer Vault
(3) The records, folders, and subfolders in the user’s account are transferred to the recipient's vault into a single folder (with the original owner's email address) and the original owner's account is permanently deleted.
The records contained in the user's "Deleted Items" will be transferred to the recipient's "Deleted Items".
Watch the video below to learn more about Account Transfer.
Commander CLI
Account Transfer actions and automation can be performed through the Keeper Commander CLI. See the below related commands:
Create a new Configuration Item. This can be done within the Configuration Manager console, in the Assets and Compliance work space. Give it a suitable name, like Keeper Browser Extension, and click Next.
Configuration Wizard
Step 2: Platform Selection
Select the appropriate platforms in which this Configuration will apply to and click Next.
Select Your Desired Platforms / Operating Systems
Step 3: Create New Settings Configuration
Create a new settings configuration by clicking New.
New Settings Configuration
Configure the new settings, as shown below, and click OK.
Value Name: 1 This number is unique. Are you planning on adding other extensions this way, these should be added as 1, 2, 3 and so forth
New Settings Configuration
Step 4: Create New Compliance Rule
Now click on the "Compliance Rules" tab and click on New.
Compliance Rule
Configure the new compliance rules, as shown below, and click OK.
Name: Keeper Security Extension Compliance Rule
Description: Keeper Browser
Within the "the following values:" field, add the value "bfogiafebfohielmmehodmfbbebbbpei;" without the quotes.
Tick ON Remediate noncompliant rules when supported and Report noncompliance if this setting instance is not found
New Compliance Rules Configuration
Click OK to create the new compliance rule.
Click Close to finish the new configuration item wizard.
Configuration Wizard Complete
Step 5: Configuration Baseline
In order to deploy this Configuration item, you need a baseline unless you have an existing baseline you would rather use.
If you have an existing baseline you would rather use, proceed to ?.
Create a new Configuration Baseline in the Configuration Manager console, in the Asset and Compliance work space. Give it a suitable name and click Add > Configuration Item.
Create Configuration Baseline
Add your newly created Keeper Browser Extension Configuration Item, shown within the Available Configuration Items pane and click OK.
Add Keeper Browser Extension Configuration Item
Finish creating the new Configuration Baseline by clicking on OK.
Complete New Configuration Baseline
Step 6: Deployment
Finally!!!! The Configuration Baseline containing the KeeperBrowser Extension Configuration Item needs to be deployed. When deploying a baseline, remember to tick ON the Remediate noncompliant rules when supported. Also, consider how often the compliance should be evaluated. For ex: Group policies updates, by default, every 90 minutes. If this is replacing a GPO, consider to lower the policies update interval. Click OK to complete the configuration baseline.
Step 7: End user experience
Once the SCCM client has updated its policies, per device, and the Configuration Baseline has run, on a target client device, open Google Chrome and navigate to chrome://policy to see all policies that are applied. If you applied policy settings on the local computer, policies should appear immediately.
SCCM Google Chrome Extension Policies
You can also check your extension by navigating to chrome://extensions and ensuring your extensions are being forcefully installed.
Forced Chrome Keeper Browser Extension.
Step 1: Adding Firefox Policy Templates
On your domain controller, download the zip file and extract the Firefox Policy Template file to your desired location. Ex: C:\temp
Step 2: Adding Firefox .admx and .adml files to Group Policy
Navigate to the directory in which you extracted the Firefox Policy Template file and copy the firefox.admx file located within the
\policy_templates_v.(version)\windows directory to C:\Windows\PolicyDefinitions
Navigate to the directory in which you extracted the Firefox Policy Template file and copy the firefox.adml file located within the
\policy_templates_v.(version)\windows\en-US directory to C:\Windows\PolicyDefinitions\en-US
NOTE: If a different language is desired instead of en-US, please navigate to the directory for the correct language of your choosing. Ex: es-ES
Step 3: Create or Configure your Firefox Policy
Open Group Policy Manager on your domain controller and expand out your domain -> Group Policy Objects. If you currently do not have a Group Policy created in which you want to utilize for Firefox Policies, proceed to right clicking on Group Policy Objects and create a New Policy.
Creating a new Policy
2. Name the policy something relevant. Ex: "Firefox Policy”
Policy Name
3. Once created, right click the new policy and select Edit.
Editing a Group Policy
4. Expand out Firefox Policy -> Computer Configuration -> Policies -> Administrative Templates -> Firefox -> Extensions then Right click and Edit the “Extensions to Install”
Configure Forced Installed Extensions
5. Tick the Enable button, and then click the Show button.
Enabling Forced Extensions
6. Add the full hyperlink to the Add-on from Mozilla, like below:
Adding Keeper Browser Extension App ID
7. Click Apply, and then click OK
Applying the Forced Installed Extension
8. Now proceed to right clicking and Edit the “Prevent extensions from being disabled or removed”
Prevent Keeper Browser Extension Removal
9. Add the URL again from Step 6 above in the value field.
Adding Keeper Browser Extension App ID
10. Click Apply, and then click OK
Applying the Prevent Installed Extension Removal
11. Disable the Firefox Built-In Password Manager by navigating direct within Firefox Administrative Templates Policy definitions and then Right click and edit both the Offer to save logins and Offer to save logins (default) and set to Disabled, Click Apply and then OK.
Firefox AutoFill Capabilities Policies
Disable Firefox AutoFill Capabilities
12. Exit the Group Policy Management Editor, Right Click the OU of your choice, and select Link an Existing GPO.
Link Forced Installed Extension to PCs
13. Select the “Firefox Policy” and click “OK”
Firefox Policy Object
If you have more than one OU (Organizational Unit) that you would like to Link this new Group Policy to, repeat steps 12 - 13.
For any PC within that OU, the “Firefox Policy” will automatically install the Keeper Security Browser Extension, if Firefox is installed on those PCs as well as disable Firefox's, less secure, built-in password manager and AutoFill capabilities.
Step 4: Check Your Firefox Policies
On a target client device, open Firefox and navigate to about:policies to see all policies that are applied. If you applied policy settings on the local computer, policies should appear immediately.
Successful KeeperFill Firefox Forced Install
You may need to run gpupdate /force, in an elevated command prompt, to apply this new group policy to the PCs.
You may need to close and reopen Firefox before the new policies appear.
If you need the Bundle ID, it is D4D2433BGC(Case Sensitive)
Android
To deploy the Android app via Intune to your users, follow the steps below:
(1) Select app type of "Android store app"
(2) Enter the below information, feel free to customize the description.
Attribute
Value
Name
Keeper Password Manager
Description
Keeper automatically generates strong passwords, stores them in a secure digital vault accessible from any device, and autofills them across all of your sites and apps. Keeper’s powerful encryption protects your passwords and sensitive information from data breaches, ransomware, and other cyberattacks.
Appstore URL
(3) Create the application
Create Application
Notes regarding the Android app:
If you need the identifier, it is com.callpod.android_apps.keeper
You can configure SCIM without SSO or SSO+SCIM
Requirements
To setup Keeper user provisioning with JumpCloud®, you need to have access to the Keeper Admin Console and a JumpCloud® Admin account.
User Provisioning SSO+SCIM
IMPORTANT: If you want your users to authenticate via SSO / SAML 2.0 with JumpCloud, you must first configure and install Keeper SSO Connect with JumpCloud.
View the full SSO Connect setup guides:
SSO Connect Cloud: https://docs.keeper.io/sso-connect-cloud/
SSO Connect On-Prem: https://docs.keeper.io/sso-connect-guide/
Once Complete, proceed to Step 8: in the guide below.
If you just want to provision users via SCIM provisioning without SSO, proceed to the guide below.
User Provisioning (SCIM)
Configuration Steps
Step 1: Add SCIM Provisioning Method for JumpCloud®
Navigate to your Keeper Admin console and add the SCIM Provisioning Method to your desired "Node".
Add SCIM for JumpCloud
Step 2: Select SCIM Provisioning Method
Select "SCIM (System for Cross-Domain Identity Management)" and select "Next".
Select SCIM
Step 3: Generate SCIM Token
At the next screen select "Generate" to generate your Token to connect your SCIM provisioning method.
Generate SCIM Token
Step 4: Save SCIM Provisioning Method
At the next screen, you will be presented with your URL and Token. You will need this information, for future use, to configure the SCIM section of the Keeper SSO Application within JumpCloud®. Select "Save".
You will now see your SCIM Provisioning Method in a Pending State.
SCIM Pending
Step 5: Add Keeper Application to JumpCloud®
Navigate to your JumpCloud® Admin Console -> SSO and select the Plus Sign to add Keeper Password Manager to the list of your SSO applications.
Add Keeper App to JumpCloud SSO
Step 6: Configure Keeper Application
On the "Configure New SSO Application" page, search for Keeper Security in the search bar. Select Configure on the right hand side of Keeper Application.
Configure Keeper App
Step 7: Activate Keeper Application
Under "General Info", provide your Keeper application a Display Label such as "Keeper EPM" in the provided field and then select "activate".
Activate Keeper Application
You will now see your Keeper application in an active status.
Active Keeper Application
Step 8: Configure SCIM within Keeper Application
Click on the active Keeper application and within the Keeper App Configuration, scroll down to the bottom and select "Configure" under the "Identity Management Section".
Configure SCIM
Step 9: Activate SCIM
This is where you will supply the previously generated URL and Token within the SCIM Provisioning Method in your Keeper Admin Console.
To enable Team Provisioning, click on "Enable management of User Groups..."
Step 10: Save Keeper Application
Select "save".
Save SCIM
User and Team provisioning with JumpCloud is complete. Moving forward, new users who have been configured to use Keeper, in JumpCloud and are within the provisioning scope definitions, will receive invites to utilize the Keeper Vault and will be under the control of JumpCloud.
SCIM-provisioned teams are not immediately created but rather put into a “Pending Queue” where they are finalized by one of several approval methods.
Deploying Keeper Edge Browser Extension via Group Policy Management
This section describes how to utilize your Active Directory Group Policy Management, against Microsoft Edge templates, to deploy the Keeper Browser extension to all PCs in your organization. Please note this is a general guide.
Step 1: Adding Edge Policy Templates
On your domain controller, go to the Microsoft Edge Enterprise landing page to download the Microsoft Edge policy templates file (MicrosoftEdgePolicyTemplates.cab), by clicking on "Get Policy Files" and extract the contents to your desired location. Ex: C:\temp
Please select and download the correct files in accordance to your organizations environment and preferences.
2. Browse to the directory in which you saved the downloaded MicrosoftEdgePolicyTemplates.zip file. Extract the contents of the MicrosoftEdgePolicyTemplates.zip file to your desired location. Ex: C:\temp
Step 2: Adding Edge .admx and .adml files to Group Policy
Navigate to the directory in which you extracted the Microsoft Edge Templates zip file and copy the msedge.admx file located within the
\windows\admx directory to C:\Windows\PolicyDefinitions
Navigate to the directory in which you extracted the Microsoft Edge Templates zip file and copy the msedge.adml file located within the
\windows\admx\en-US directory to C:\Windows\PolicyDefinitions\en-US
NOTE: If a different language is desired instead of en-US, please navigate to the directory for the correct language of your choosing. Ex: es-ES
Step 3: Create or Configure your Edge Policy
Open Group Policy Manager on your domain controller and expand out your domain -> Group Policy Objects. If you currently do not have a Group Policy created in which you want to utilize for Edge Policies, proceed to right clicking on Group Policy Objects and create a New Policy.
2. Name the policy something relevant. Ex: “Edge Policy”
3. Once created, right click the new policy and select Edit.
4. Expand out Edge Policy -> Computer Configuration -> Policies -> Administrative Templates -> Microsoft Edge -> Extensions then Right click and Edit the “Control which extensions are installed silently”
If this Policy will apply to Users instead of Computers, the Edge Policies you will be expanding will be located under User Configuration -> Policies -> Administrative Templates -> Microsoft Edge.
5. Tick the Enable button, and then click the Show button.
6. Add the following text and click OK.
7. Click Apply, and then click OK
8. Disable Edge's Built-In Password Manager by navigating to Microsoft Edge -> Password manager and protection and then Right click and Edit the “Enable saving passwords to the password manager”
9. Tick the "Disabled" button, and then click Apply, and then click OK.
10. Following the same process as steps 8 - 9, directly within Microsoft Edge Administrative Templates Policy definitions, Disable the Edge AutoFill capabilities by editing both "Enable AutoFill for addresses" and "Enable AutoFill for credit cards" and setting them to disabled.
11. (Optional) If you would like to disable Developer Tools, to further secure against users attempting to unmask a masked password / credential, still within the Microsoft Edge Administrative Templates Policy definitions, disable Developer Tools by editing "Control where developer tools can be used" end setting it to "Enabled" and select the Options value of "Don't allow using the developer tools" and click OK.
12. Exit the Group Policy Management Editor, Right Click the OU of your choice, in which contains your Computers or Users and select Link an Existing GPO.
13. Select the “Edge Policy” and click “OK”
If you have more than one OU (Organizational Unit) that you would like to Link this new Group Policy to, repeat steps 12 - 13.
For any PC or User within that OU, the “Edge Policy” will automatically install the Keeper Security Browser Extension, if Edge is installed on those PCs, as well as disable the Edge browser, less secure, built-in password manager and AutoFill capabilities.
Step 4: Check Your Edge Policies
On a target client device, open Microsoft Edge and navigate to edge://policy to see all policies that are applied. If you applied policy settings on the local computer, policies should appear immediately.
You can also check your extension by navigating to edge://extensions and ensuring your extensions are being forcefully installed.
You may need to run gpupdate /force, in an elevated command prompt, to apply this new group policy to the PCs.
You may need to close and reopen Microsoft Edge before the new policies appear.
Group Policy Deployment - Chrome
Deploying KeeperFill via Group Policy
Deploying Keeper Chrome Browser Extension via Group Policy Management
This section describes how to utilize your Active Directory Group Policy Management, against Google Chrome templates, to deploy the Keeper Browser extension to all PCs in your organization. Please note this is a general guide.
Step 1: Adding Chrome Policy Templates
On your domain controller, navigate to the URL, provided below, and download the correct 32 or 64 bit zip bundle. Extract the Google Chrome bundle to your desired location. Ex: C:\temp
Navigate to the directory in which you extracted the Google Chrome Bundle and copy the chrome.admx file located within the
64-bit\GoogleChromeEnterpriseBundle64\Configuration\admx directory to C:\Windows\PolicyDefinitionsOR
32-bit\GoogleChromeEnterpriseBundle\Configuration\admx directory to C:\Windows\PolicyDefinitions
Navigate to the directory in which you extracted the Google Chrome Bundle and copy the chrome.adml file located within the
64-bit
NOTE: If a different language is desired instead of en-US, please navigate to the directory for the correct language of your choosing. Ex: es-ES
Step 3: Create or Configure your Chrome Policy
Open Group Policy Manager on your domain controller and expand out your domain -> Group Policy Objects. If you currently do not have a Group Policy created in which you want to utilize for Chrome Policies, proceed to right clicking on Group Policy Objects and create a New Policy.
2. Name the policy something relevant. Ex: “Chrome Policy”
3. Once created, right click the new policy and select Edit.
4. Expand out Chrome Policy -> Computer Configuration -> Policies -> Administrative Templates -> Google Chrome -> Extensions then Right click and Edit the “Configure the list of force-installed apps and extensions”
If this Policy will apply to Users instead of Computers, the Edge Policies you will be expanding will be located under User Configuration -> Policies -> Administrative Templates -> Google Chrome
5. Tick the Enable button, and then click the Show button.
6. Add the following text and click OK.
7. Click Apply, and then click OK
8. Disable Chrome's Built-In Password Manager by navigating to Google Chrome -> Password manager and then Right click and Edit the “Enable saving passwords to the password manager”
9. Tick the "Disabled" button, and then click Apply, and then click OK.
10. Following the same process as steps 8 - 9, direct within Google Chrome Administrative Templates Policy definitions, Disable Chrome's AutoFill capabilities by editing both "Enable AutoFill for addresses" and "Enable AutoFill for credit cards" and setting them to disabled.
11. (Optional) If you would like to disable Developer Tools, to further secure against users attempting to unmask a masked password / credential, still within the Google Chrome Administrative Templates Policy definitions, disable Developer Tools by editing "Control where developer tools can be used" end setting it to "Enabled" and select the Options value of "Don't allow using the developer tools" and click OK.
12. Exit the Group Policy Management Editor, Right Click the OU of your choice, in which contains your Computers or Users, and select Link an Existing GPO.
13. Select the “Chrome Policy” and click “OK”
If you have more than one OU (Organizational Unit) that you would like to Link this new Group Policy to, repeat steps 12 - 13.
For any PC within that OU, the “Chrome Policy” will automatically install the Keeper Security Browser Extension, if Chrome is installed on those PCs as well as disable Chrome's, less secure, built-in password manager and AutoFill capabilities.
Step 4: Check Your Chrome Policies
On a target client device, open Google Chrome and navigate to chrome://policy to see all policies that are applied. If you applied policy settings on the local computer, policies should appear immediately.
You can also check your extension by navigating to chrome://extensions and ensuring your extensions are being forcefully installed.
You may need to run gpupdate /force, in an elevated command prompt, to apply this new group policy to the PCs.
You may need to close and reopen Google Chrome before the new policies appear.
OneLogin Provisioning
Keeper supports SAML 2.0 Authentication and SCIM provisioning with the OneLogin platform.
Overview
Keeper Enterprise supports integration with OneLogin with automated user provisioning using the SCIM (System for Cross-Domain Identity Management) protocol. SCIM is an open standard that enables automated user provisioning between identity providers (like OneLogin) and service providers (like Keeper).
IMPORTANT: If you want your users to authenticate via SAML 2.0 with OneLogin, you must first configure and install Keeper SSO Connect. Please follow one of the guides:
- Cloud
or
- On-Prem
If you don't want to authenticate users using SAML 2.0 and you simply just want to provision users via SCIM provisioning, proceed to the SCIM Only Configuration section below.
Companies utilizing OneLogin for their identity services can easily deploy Keeper’s EPM solution to their users without the need to manually provision. When auto-provisioning for Keeper Enterprise is enabled in OneLogin, any users created, modified or deleted in OneLogin are automatically added, edited or deleted in Keeper.
In addition to provisioning and deprovisioning users, Keeper Enterprise provides zero-knowledge, SAML 2.0 compliant authentication with OneLogin for seamless and frictionless access.
Integration of Keeper Enterprise into OneLogin enables organizations of any size to secure their passwords and confidential information within an encrypted vault. By including Keeper Enterprise in their SSO implementation, organizations fill critical security and functionality gaps that are essential from a cybersecurity perspective which includes:
Protects and generates strong passwords for any non-SAML application or website
Implements zero-knowledge security architecture with full end-to-end encryption
Stores SSH keys, digital certificates and any other confidential information
User encryption keys are generated dynamically by Keeper SSO Connect, encrypted and stored locally on the installed server, providing the customer with full control over the encryption keys that are used to encrypt and decrypt their digital vaults.
SSO + SCIM Configuration - Application Connector
OneLogin has a built-in Keeper application in their catalog that supports both SSO + SCIM integration.
For OneLogin integration instructions, visit the Keeper SSO Connect Cloud guide:
This will walk through setting up the integration of SSO and getting SCIM connected.
After the API Connect status is Enabled, navigate to the Provisioning section and check the box for "Enable provisioning".
Add Users to the application.
Users can be added to the Keeper Password Manger connector in Onelogin in a couple different ways. The application can be added to the user's account or the user can be added to a Role, and the role gets added to the application via the Access section of the application in OneLogin.
After the user has been added, in order for SCIM to send the request to Keeper, the OneLogin Admin will need to approve the change by navigating to the Users section in the Keeper Password Manager application connector and clicking on the "pending" status to Approve the user. The approval link can also be reached by going to the Applications section of the Users OneLogin profile and clicking the "pending" status. Click the Approve button to allow the user to be provisioned from OneLogin to Keeper.
Observe the user status changes from "Pending" to "Provisioned".
Enable OneLogin Roles to Keeper Teams mapping
On the Parameters section, click on Groups in the Optional Parameters section. On the Edit Fields Group pop-out select 'Include in User Provisioning'.
Click save and observe the Groups status changes to Enabled.
Next, navigate to the Rules section of the application connector and select the "Add Rule" button.
Give the rule a name like "Create Team from Role.
Under the Actions section, select "Set Groups in Keeper Password Manager" from the pull down. Next, select (or search) 'role' from the pull down and add the value .* (dot star) for the matching text.
.* is regular expression to match any character 0 or more times. To refine the search to a specific role or roles alter the regular expression. Please contact OneLogin if your search results are not aligning.
SCIM Only Configuration
For SCIM-only configuration, users are directed to the following OneLogin instructions, .
On the Configuration page of your app, use the following SCIM JSON template (Keeper username must be a valid email address):
Obtain the SCIM Base URL and SCIM Bearer Token from the Admin Console
Add the following line to the Custom Headers section
After you have enabled provisioning, your configuration would look similar to the screen capture below:
SSO Connect Cloud:
SCIM + Team-to-Role Mapping
To use team-to-role mapping, administrators simply assign a role to an entire “Team,” opposed to individual users and use role enforcements to establish different requirements and restrictions for each team.
Typically, identity providers that use SCIM such as OneLogin, support assigning users to teams, but custom role assignment is done only on a user basis. SCIM-provisioned teams and users are applied to the default role, without the ability for a team provisioned from SCIM to be mapped into an alternative, pre-defined role. Team-to-role mapping allows organizations to use their existing identity provider to assign users directly into teams that can be assigned custom roles.
Unique Group Names
OneLogin appears to have a timing issue with their SCIM system which can possibly send multiple simultaneous requests to create the same Group. Keeper normally will accept the new group creation even if the Group Name is identical.
If you encounter an issue with duplicate group names, please contact Keeper and we will set a flag on your SCIM connection which enforces unique names.
Contact Keeper Support to enforce unique group names on your SCIM instance.
SCIM-provisioned teams are not immediately created but rather put into a “Pending Queue” where they are finalized by one of several approval methods.
Enforces password compliance and policy-based access controls across the entire organization – all employees on all their devices for every website, application and system
Manages shared passwords for financial, business, social media or any other critical service
The ability to add, remove, and assign base-plans and secure add-ons to managed companies. Can also launch to the managed companies administrator consoles with full administrative permissions (only appears for MSP customers).
Manage Teams
The ability to add, remove, or add members to Teams.
Manage Bridge/SSO
The ability to add, remove, or configure the Enterprise Bridge or SSO.
For SSO cloud users, the ability to approve devices
Transfer Account
The ability to transfer a user's vault (if the user's Role is configured to allow this. See Account Transfer policy.
Cascade Node Permissions
If selected, the permissions apply to this node and all sub-nodes.
Manage record Types in Vault
This permission allows the admin rights to create, edit, or delete Record Types which have pre-defined fields. Record Types appear during creation of records in the user's vault. Learn more about record types.
Share Admin
Provides elevated access rights over the organization's shared folders and shared records. Learn more about Share Admin.
Run Compliance Reports
Provides on-demand visibility of the access permissions associated with your enterprise records. Learn more about compliance reports.
The Keeper Admin Console provides administrative controls, user onboarding, reporting and auditing.
Overview
Business customers login to the Keeper Admin Console to manage their environment. In the Admin Console, you can invite users, configure provisioning methods (SSO, SCIM, AD, etc..), set role policies, manage teams, run reports and monitor security. The Admin Console scales to organizations of any size.
Admin Console Links
Please use the links below to access the Keeper Admin Console based on your tenant location:
Tenant Location
Admin Console URL
Or open > Login > Admin Console
Dashboard
When you first log in to the Admin Console, you will land on the Dashboard which will provide an overview of high level data on your user activity and overall security status.
The Dashboard provides oversight of the following:
Top Events and link to Timeline Chart
Security Audit Overall Score
BreachWatch Overall Score
Notification Center
The Notification Center is where pending actions and alerts, such as user and team approvals, can be easily viewed and marked as "read." This eliminates multiple toast messages cluttering an admin’s view of the console during their day-to-day operations. Any unread notifications are indicated by a red badge in the upper right corner of the console screen.
Admin
From the Admin screen, you can access Nodes, Users, Roles, Teams, 2FA settings, and User Provisioning.
Nodes
provide a method to organize your users, roles, teams and administrators into distinct groupings, similar to organizational units in Active Directory. The administrator can create nodes based on location, department, division or any other structure that makes sense for your organization. Nodes can have completely independent sets of users, role enforcement policies, administrators and provisioning methods.
By default, the top-level node, or Root Node is set to the organization name and all Nodes can be created underneath. Depending on your organization you may or may not need to set up nodes.
Small teams may not need multiple nodes and will be able to administer users, roles and teams from the default root node only.
Larger teams may benefit from organizing by location or department across multiple nodes.
Node Isolation
Users and Teams within different nodes can have levels of visibility and sharing capability within the Keeper Vault. If full node isolation is required between users of different node trees, please contact Keeper support to activate this special backend feature.
For more information on node isolation .
Users
All employees or users you choose to deploy Keeper to are responsible for managing their own encrypted vault. Every user's vault can be made up of private records or shared records. Users can be provisioned many different ways. Users can be required to set up a Master Password or they can be provisioned and authenticated through your SSO provider. For more information about provisioning, read the section.
Business and Personal Vaults
We recommend separating your personal, private records from your business records by creating two separate user accounts. All business end-users receive a . When enforcements are applied to the organization (such as Account Transfer privileges), only the business vault is affected.
Roles
Roles provide the organization the ability to define enforcements based on a user's job responsibility as well as provide delegated administrative functions. about roles.
Permissions for Administrators are also configurable here which toggle whether an Admin can manage nodes, users, teams, roles, SSO, AD Bridge, User Account Transfer and Run Reports.
Important: is an optional feature that should be configured by the Keeper Administrator during the initial deployment phase of the Keeper rollout. The reason for this is because Account Transfer relies on the sharing of encryption keys between users that have rights to perform the transfer. For more information, refer to .
Teams
The purpose of creating is to give users the ability to share the records and folders within their vaults with logical groupings of individuals. The administrator simply creates the team, sets any Team Restrictions (edit/viewing/sharing of passwords) and adds individual users to the team. Teams can also be used to easily assign Roles to entire groups of users to ensure the consistency of enforcement policies across a collective group of individuals.
Automated Provisioning
As you prepare to rollout Keeper to your organization, consider one of the following options when inviting users:
Risk Management
The Risk Management Dashboard provides comprehensive security posture information covering end-user deployment, utilization, cloud configuration, and event monitoring.
Additional Secure Add Ons
Access to additional Secure Add-On functionality can be accessed through the Admin Console "Subscriptions" and "Secure Add Ons" screen:
Share Admin
Elevated rights to Shared Folders and Records
Overview
Keeper's Share Admin feature is a role-based permission that gives administrators elevated access rights over your organization's shared folders and shared records.
Share Admins have full user and record privileges for any shared record that they have access to.
How it Works
From the Admin Console, assign a role with Share Admin privilege
From the Vault, add the Share Admin user to the folder or record
The Share Admin will immediately have full access rights on their Shared Folders
Restrictions
(1) The Share Admin can only take effect on Shared Folders that are created by users within the Enterprise.
(2) The Share Admin can only take effect on Shared Folders that are created by users within nodes under management by the Share Admin
(3) These restrictions are useful when you have Share Administrators that are managing just an organizational unit (or Node) and not the entire company.
(4) The Share Admin user must be added to folders they wish to manage. Anyone with "Can Manage Users" can add the Share Admin to the designated shared folder or record.
Share Admin Features
Add or remove records and users from shared folders
Change folder default permissions
Modify record permissions
Create a Share Admin
In support of least-privileged access, Share Administrator permissions are granted via Role-Based Enforcement Policies. This provides the ability to grant Share Administrator rights to a limited group of administrators and provide elevated access rights to your organizations shared records and folders.
To assign someone in your organization Share Admin permissions, first create a role or select an existing role. Under administrative permissions click on the gear icon to display the list of permissions and select “Share Admin”.
Creating a Share Admin from the CLI
In Keeper Commander, you can also run this command on the CLI:
To learn more about Keeper Commander visit:
Managing Share Admins in the Vault
Shared Folders
While in edit mode for the shared folder, select the Users tab then click within the user search bar. Your organization’s available Share Admins will appear at the top of the list. Select the share admin(s) you would like to invite to the folder and click Add.
Individual Records
Share Admins can also be added directly to an individual record through the Share Record screen.
Once a shared record or folder is shared with the Share Administrator, they will immediately be granted full permissions over the Shared Folders or Records.
Share Admin Features
From the vault, a user with Share Admin permission for a shared folder is able to view all shared folder content, change shared folder default permissions, add or remove records and users, and delete the shared folder. The Share Admin can change record permissions for those records owned by users managed by the Share Admin. Changing record permissions includes editing, sharing, or transferring ownership.
Viewing Share Admin Info
Users can view who has Share Admin permissions over a folder by clicking on the Folder Information icon.
Add & Remove Users or Records
Share Admins can add or remove users and records from Shared Folders, no matter who owns the record.
Change Record Permissions
Share Admins can change record permissions of any record within a Shared Folder or a direct share.
Change Shared Folder Default Folder Settings
Share Admins can change the Default Folder Settings of any Shared Folder.
Delete Shared Folders
Share Admins can delete Shared Folders or Shared Records.
Transfer Record Ownership
Share Admins have full record edit permissions including the right to transfer ownership of single or multiple records at once. To transfer ownership of multiple records, select the records, then right-click to reveal the context menu and select transfer ownership.
Enter the new owner’s email address or select it from the dropdown and click the transfer ownership button.
The transfer is verified if successful, if not, you will receive a notification of any records that are unable to be transferred. Share Admins can also perform a transfer of ownership of a single record directly from the record’s “Options” menu.
Working with the Commander CLI
Share Admins can use the Commander CLI for making changes to Shared Folders and Shared Records. For example:
Record Commands such as edit
Sharing Commands such as share-record, record-permissions and share-folder
Learn more about .
Compliance Reports
Share Admins will show up in the Compliance Reports interface as seen below:
Use Cases
Some use cases for Share Admin include:
Simplifies the process of editing record permissions when there are multiple users who contribute to a Shared Folder with mixed permission settings
Shared Folders that were created with unintentionally restrictive settings can be updated easily
Shared folder contains records that need to be moved to another shared folder
FAQs
How do I view the Share Admins for a shared folder in my vault?
Click the “Info” icon to reveal the shared folder detail panel. Share Admins are listed in the information dialog.
As a shared folder participant, how do I know who the “Share Admins” are for the organization so that I can invite them to participate in my shared folder?
While in edit mode for the shared folder, select the “Users” tab and “Add” users button. The organization’s available Share Admins will appear at the top of the list.
What happens to a consumer’s shared folder with owned records, if the consumer shares the folder with an enterprise user who is a Share Administrator, and the records in the shared folder have “read only” access?
The Share Admin does not manage the consumer, which means that the Share Admin cannot change record permissions and would have “read only” access to the records owned by the consumer. However, the Share Admin can manage the shared folder, users and records in the shared folder. These permissions allow the Share Admin to remove or invite users to the shared folder, change default folder permissions, or even delete the shared folder.
Given this scenario: A consumer has a shared folder with owned records and the consumer shares the folder to two users of the same enterprise with Manage Record permissions, where one of them is a Share Administrator. The non-share administrator adds a record to the folder. Can the Share Administrator manage users for this folder in this scenario since they can manage user access for records of managed record owners?
Yes. The Share Admin can manage (add/remove) any record or user from the shared folder. Additionally, if the non-share admin is associated with a node managed by the share administrator, the share administrator can change record permissions for those records owned by the administrator that does not have share admin permission.
What happens if a shared folder is shared between two businesses and there are shared folder administrators participating in the shared folder from both businesses.
The Share Admin can edit the default shared folder permissions, add/remove users and records from the shared folder, and edit record permissions for records that are owned by their managed users. If a record is removed from the shared folder, and it is the last reference to that record, it is moved to the record owner’s trash bin.
Are Share Admin permissions shown in Compliance Reports?
Yes. If a user has Share Admin access to records in a Compliance Report, this is shown in the report.
Can a Share Admin be removed from the Share Admin role and/or removed from a shared folder? If so, what happens to their permissions?
A Keeper Administrator can be temporarily assigned to a role with Share Admin permission. When they are removed from this role, their permissions to shared folders and records will revert to their previous shared folder permissions. A Share Admin can be removed from a Shared Folder by any participant that has “manage users” permission.
Will Share Admin permission be turned "on" by default for the Keeper Administrator role?
Yes. This permission is automatically turned on for the default Keeper Administrator role.
Secure File Storage & Sharing
Secure File Storage and sharing capabilities for Enterprise and public sector
Keeper offers Secure File Storage to protect your confidential files, IT documentation, photos, videos and any other type of documents.
File attachments are end-to-end encrypted. The encryption is performed locally on the user's device before being uploaded to the Keeper Cloud Security Vault. The user is in complete control of the encryption keys to access and decrypt the files for complete privacy and security. Users also have the ability to securely share files with other Keeper users via shared folders, individual record sharing and one-time share. Sharing records uses Elliptic Curve encryption, making Secure File Storage the best way to save, transfer and share the most sensitive documents.
Role-based enforcement policies can be applied by the Keeper Administrator to restrict file attachments and sharing records with files.
Visuals & Use Cases
Keeper Secure File Storage solution can be added on to any Enterprise or public sector subscription. There are several critical use cases:
Storing and sharing of confidential PDF, Excel, Word or other doc types
Protection of SSH Keys, SSL certificates and other private keys
Safe backups of ID cards such as passports and drivers licenses
Storing and sharing of confidential PDF, Excel, Word or other doc types
Simply drag-and-drop files into the Web Vault or Desktop App. Or on iOS/Android devices, you can load content from the local device. Files are then encrypted locally on the device and the ciphertext is stored in the Keeper Cloud Security Vault.
SSH, SSL and other Private Keys
The Secure File Storage feature is a secure and convenient method of storing your SSH keys, SSL keys and other cloud infrastructure access keys.
ID Cards
ID cards such as passports and drivers licenses can be easily stored and retrieved on any device with full encryption.
Financial Documents
Confidential financial documents or any other private file can be stored in the vault.
Secure Sharing of Files
Files can be securely shared either directly to other Keeper users, or within a Shared Folder.
Sharing can be disabled by Keeper Administrators from the Keeper Admin Console. Sharing features are controlled as role-based enforcement policies.
Time-Limited Access
One-Time Share
If allowed by role policies, users can also create a one-time share. One-time share links are useful for sharing a file with an outside vendor, contractor or 3rd party. In this case it's set to be revoked after 1 hour. One-time shares can be opened with a QR code or a link sent through email or a messaging platform.
On the recipient side, the one-time share is cryptographically bound to the receiving device.
For more information about one-time shares, .
Self-Destructing Shares
A record can be saved as a self-destructing one-time share. In this scenario, the record is going to be deleted from both sides after the file has been downloaded. When creating a record, select "Add Self Destruct".
Learn more about self-destructing records .
Mobile Device Access
Files can be attached and viewed from the Keeper iOS and Android applications. Files can be stored offline for fast access if an Internet connection is not available.
Event Reporting & Alerts
All file related actions such as uploading a file, downloading a file or sharing a record is tracked and monitored through Keeper's advanced reporting and alerts module. This provides event-based reporting that contains information such as: the user's IP address, location, software version, the record identifier, file identifier and other metadata.
You can run reports right here in the console, or if you are using a like Splunk, these event logs can be streamed directly into your SIEM provider's collector endpoint in real time.
Purchasing Secure File Storage
Secure File Storage is pooled among the organization's users. To add storage to your Business or Enterprise plan, from the Admin Console, click on Subscriptions then Add Storage.
At the checkout screen, you will have the opportunity to select the file storage level.
Controlling Access to File Storage and Sharing
Keeper Administrators can configure Secure File Storage capabilities at the role level. To disable sharing or file upload capabilities navigate to Roles > Enforcement Policies > Creating and Sharing.
Automation with Commander CLI
For automation and migration of files into Keeper, the is useful for IT admins or developers to either bulk add content or build automated actions into workflows.
For example, to add a file attachment to a record, the command upload-attachment is executed:
For more information about Keeper Commander record related commands, see the page below:
Benefits of Secure File Storage
Just like our password encryption technology, Keeper protects your confidential files with 256-bit AES encryption using record-level keys.
Sharing files between users takes advantage of Keeper's built-in Elliptic Curve cryptography method. The record key or folder key which protects the individual record is encrypted with the public key of the recipient(s).
Secure file storage is available across all of your devices including iOS, Android, Web Vault, and Desktop App.
Two-Factor Authentication
Keeper provides several 2FA options that can be enforced at the role level.
Overview
Two-Factor Authentication (2FA) can be enforced through Keeper's Role-based Enforcement Policies and can also be configured by the end-user directly in their vault. Keeper supports popular methods of 2FA including:
SMS/Text Message
TOTP generator apps such as Google and Microsoft Authenticator
Duo Security
RSA SecurID
Keeper DNA (using Apple Watch and Android Wear devices)
FIDO2 WebAuthn physical keys such as Yubikey
End-User Setup
Inside their vault, each user is able to individually configure their Two-Factor Authentication settings from their vault Settings screen. Upon creating a new Keeper account, the end-user is also prompted to enable 2FA.
Detailed 2FA setup steps for the various platforms can be found in the .
2FA Enforcement Policies
Two-Factor Authentication can be enforced by the Keeper Administrator, and this is controlled at the role level.
The Keeper Administrator can enforce the method of 2FA, how long the tokens stay valid and other related settings. Policies can be enforced at the role-level, so different policies can apply to different sets of users.
For more details instructions about enforcement policies, .
Configuration of Duo and RSA SecurID
Certain 2FA methods such as Duo Security and RSA SecurID require the Keeper administrator to login to the Admin Console and perform up-front configuration.
To access the Two-Factor Authentication configuration, navigate to the 2FA tab in the Keeper Admin Console for the selected Node. 2FA methods and token retention behavior can also be enforced from the Role Enforcement policy screen. Role enforcement policies can enforce the use of 2FA channels on the specific node. Therefore, different nodes can be provisioned with different 2FA methods.
DUO Security Setup
Keeper has built a tight integration into the DUO Security API which is fully integrated into all of our device platforms. Both push and SMS methods are supported. To activate DUO Security, use take the following steps:
Login to Duo.com and create an account (or login if you already have an account).
Select Applications from the left menu.
Select Protect An Application to display a list of applications, then select Keeper Security from the list.
Important Note about Username Normalization
If you receive an error when attempting to login with Duo, you may need to check your "Username normalization" setting. The Keeper email address is used when the Keeper backend communicates with Duo's API. If your Duo environment is configured with a username instead of an email address, make sure to check the "Username normalization" setting in the Duo Console configuration page and select "Simple".
DUO has a helpful knowledge base article discussing username normalization here:
DUO matches users based on their username, not their email address. If you see an "unenrolled user" in DUOs authentication logs, add their respective username from Keeper to their username aliases in DUO.
After activation, the user will be prompted with Duo Security on all devices.
Other Supported 2FA Methods
Set-up Two-Factor Authentication method of your choice directly from your vault. Click your account email address in the upper right corner, click Security > Settings then toggle Two-Factor Authentication on. You will then be prompted to select one the 2FA methods discussed below.
Text Message
Keeper supports Text Message (SMS) delivery of two-factor authentication codes. From the list of methods, toggle Text Message "on" then enter your phone number.
TOTP Method
From the list of methods, toggle Google and Microsoft Authenticator (TOTP) "on". Download the Google Authenticator, Microsoft Authenticator or any TOTP-compatible application on your mobile device and add a new entry by scanning the QR Code Keeper provides.
Smartwatch (KeeperDNA)
Keeper DNA uses the connected devices you own to create your unique profile which serves as a second factor to verify your identity and log you in. Keeper supports Apple Watch and Android Wear devices. To enable the Smartwatch (KeeperDNA) method, from your mobile device, tap Settings > Two-Factor Authentication and chose Smartwatch (KeeperDNA) as your method.
RSA SecurID Setup
Keeper's certified backend integration with RSA SecurID can be configured by Keeper's engineering team for your account. To enable RSA SecurID, additional customer integration points are necessary. Please contact your Keeper account manager to initiate this integration at .
Security Keys (FIDO2 WebAuthn)
Users can protect their Keeper vault with FIDO WebAuthn compatible hardware security keys, including YubiKey and Google Titan keys, which provide secure and easy two-factor authentication (2FA).
Security Keys are configured in the Keeper Web Vault or Keeper Desktop App. To activate 2FA using Security Keys, follow the steps below:
Click your account email address in the upper right corner of your vault, then click Settings > Security
Enable 2FA and click Edit Two Factor to activate a standard 2FA method. This will be used as a backup method when your Security Key is not supported or not available. Google Auth or TOTP should be used a backup method rather than SMS, otherwise you will receive an SMS code every time you login with the Security Key. Keeper recommends using a TOTP (Google Authenticator or equivalent) generator for two-factor authentication to eliminate the possibility of SIM takeover attacks.
Login Experience with Security Keys
Keeper's authentication system as described in the Keeper Encryption Model requires device verification and 2FA verification prior to Master Password authentication.
When using Security Keys and logging into the Browser Extension, the flow is slightly different from a user perspective but the security level is the same. Users on the Browser Extension login flow are prompted for the Master Password, but this information is not processed until the device verification and 2FA step has been performed. This workflow is due to the fact that Browser Extensions do not currently support native Security Keys.
Backup 2FA Methods
Currently, Keeper requires that users have a backup 2FA method using either TOTP, SMS, Duo, RSA or Keeper DNA. The Backup 2FA method is utilized on devices that do not support hardware security keys, or if you do not have access to your key.
For customers who do not wish to have a backup 2FA method, we recommend using the TOTP method and discarding the seed after setup. Please note that authentication with some devices will be impaired without a backup 2FA method. Also, note that if you lose all your registered Security Keys, you will need to contact your Keeper Administrator or Keeper Support teams to assist in changing 2FA methods.
Admin 2FA Control
Admins have the ability to disable 2FA for any of their users.
One-Time Share
Time-limited secure sharing of a record to anyone without having to create a Keeper account
One-Time Share
Overview
Keeper "One-Time Share" provides time-limited secure sharing of a record to anyone without having to create a Keeper account. One-Time Share is the most secure way to send confidential information to an external person or contractor without exposing information over email, text message or messaging.
One-Time Shares are secure by design, utilizing Keeper's Zero-Knowledge encryption. The record data is decrypted locally on the recipient's device using 256-bit AES and all requests to the server are signed with elliptic-curve cryptography (ECDSA).
Keeper's legacy or "General" records types are not compatible with One-Time Share. Additionally, if privacy screen is enabled for a record, One-Time share will not be available.
How to Share
To create a One-Time Share, open a Keeper record and click on the Edit Icon > One-Time Share.
Select how long the share link should be valid. The record will expire at a time of your choosing, and it can only be viewed on one device. Even if you forget to un-share the record, it will expire and access will be revoked.
Share links will expire after the selected amount of time, if the link is never used. If the link is used and bound to a device, the record access will expire after the same amount of time.
You can either copy the Link only, the Invitation to share the record with another person, or simply scan the QR code.
When the recipient opens the link, the record will render in the device browser.
As an additional layer of security, One-Time Shares are device-locked which means that only the original recipient is able to access the data. If the link is later opened up by a third party, or your email account is compromised, the link cannot be accessed, except on the original device.
Use Cases
Share access credentials with a contractor
Share an encrypted file with a co-worker
Provide secure documentation or instructions
Delivery of One-Time Shares
One-Time Share links can be sent to recipients through any trusted channel, such as:
Direct QR Code Scan
Airdrop
Email
The applications and uses for this are virtually endless. Any time you have a need to securely deliver data to a non-Keeper user, One-Time Shares are the perfect choice.
Activating One-Time Share
For existing Enterprise customers, One-Time Share is disabled on all default role policies.
To allow this feature on your existing default role policies, visit the Role > Enforcement Policies > Creating and Sharing.
For all new role policies created after the launch of the One-Time Share feature, it is enabled by default.
Bidirectional Sharing
Keeper's upgraded One-Time Share feature enables two-way sharing between Keeper users and non-users, providing a secure way of exchanging confidential information and files.
Bidirectional one-time sharing encourages seamless collaboration with the ability to collect signed documents, feedback or sensitive files and information from clients, contractors, legal times and anyone else without requiring them to create a Keeper account.
To utilize the bidirectional one-time sharing feature, begin by creating a one-time share as you normally would. Within the selected record, click Share > One-Time Share > Create a One-Time Share.
The sender can type any customized instructions for the recipient within the record "Notes" field.
To enable the bidirectional sharing capabilities for the record, check the box next to "Allow recipient to edit record fields and upload files". Use the dropdown menu to select when you would like the share to expire and click Create Link.
Once the recipient receives the secure share link, they can then Click to Open to view the contents of the shared record.
The recipient can upload file attachments and enter any other requested information or notes.
Once the recipient clicks Save, the original record will automatically update within the sender's vault with the added files/information. The sender and recipient can continue to edit the record until the share link expires or once access is revoked.
One-Time Share With Keeper Commander
Create One-Time Share links programmatically using the tool. Relevant commands:
(alias to share)
Commander offers additional controls such as fine-grained expiration times, additional output methods, and the ability to remove previously created One-Time Shares.
For more information see our .
Security and Encryption Model
The encryption model implemented for one-time sharing uses the same technology as , a zero-knowledge and zero-trust platform for protecting cloud infrastructure.
The security model and method of encryption is detailed below:
(1) In the vault, the sharer generates a one-time access token by clicking on "One-Time Share" in the record options screen. The 256-bit AES Record Key for the record being shared is encrypted with the one-time access token, and this encrypted value is stored in the Keeper Cloud.
(2) The sharer sends the One-Time Access Token to a recipient via a simple URL or QR code through their preferred channel. The URL portion that contains the access token is held within the "fragment identifier" section of the URL which is never sent over the network to Keeper's servers. Therefore, zero-knowledge is retained and Keeper has no ability to access or decrypt the information.
(3) The recipient opens the URL on their device browser, and a single-page Vault application is loaded on the device. The One-Time Access Token is handed off directly to the local vault application (not sent to the server).
(4) Upon loading the URL, the recipient's device generates a client-side public/private Elliptic Curve key pair, and the private key is stored locally on the Client Device in the browser's CryptoKey storage.
(5) Upon first use, the SDK library authenticates using the hash of the One Time Access Token and upon successful authentication, the server responds with the encrypted record ciphertext plus the Encrypted Record Key.
(6) The Client decrypts the Record Key with the One Time Access Token, and the record contents are decrypted using the Record Key. The Record Key is then stored locally on the client device in the browser's CryptoKey storage or other designated storage location.
(7) On the server, the encrypted record key for that given device is deleted so that the One Time Access Token cannot be used again. After that, the client's requests must be signed with the Client Private Key.
(8) Subsequent calls on the same device to the server are sent with an identifier which uniquely defines the device (hash of the one-time access token) and a request body that is signed with the Client Private Key. The server checks the ECDSA signature of the request for the given device identifier using the Client Public Key of the device. The Keeper Cloud processes the request for the record, and the server returns encrypted record ciphertext to the Client upon successful authentication.
(9) In addition to the record-level encryption, the Client Device creates a randomly generated AES-256 bit Transmission Key which is encrypted with the public key of the Keeper cloud API. The Client Device decrypts the response from the server with the Transmission Key and then decrypts the ciphertext response payload with the Record Key, which decrypts the contents of the record.
Additional details about Keeper's encryption model is documented .
Administrative Controls
The use of One-Time Sharing can be restricted by the Keeper Administrator in the section of the Keeper Admin Console.
API Provisioning with SCIM
Keeper supports direct SCIM API provisioning for any 3rd party identity provider
What is SCIM?
System for Cross-domain Identity Management (SCIM) is a standard for automating the exchange of user identity information between identity domains, or IT systems [].
Identity providers such as Okta, Azure AD / Entra ID, Google G Suite, JumpCloud and other popular IdP platforms support the use of SCIM for provisioning Teams and Users to Keeper Enterprise. The terminology differs between platforms. For example, Okta and Azure call it "Automated Provisioning".
Vault Offline Access
Offline access is a common use case for organizations who require vault access in poor network conditions or when SSO is unavailable.
Overview
Offline Mode allows users access to their vaults from any device when they are not able to connect online to Keeper or to their SSO Identity Provider. Offline access is available for Keeper Web, Desktop, iOS and Android Mobile Apps.
This capability works by making a copy of your encrypted vault to your local device. The vault ciphertext is stored in an encrypted format which is only accessible if the user provides their Master Password or biometric authentication. Offline access also works with multiple accounts on the same device.
Okta Provisioning
Keeper supports SAML 2.0 Authentication and SCIM provisioning with the Okta platform.
Overview
This guide covers Okta Automated Provisioning with SCIM. Before you begin the setup, we recommend that you first activate Keeper's powerful SSO Connect integration with Okta that provides realtime user authentication and Just-In-Time provisioning.
Encrypted storage of private financial information
Sharing confidential IT documentation among engineers
Files can be easily and securely shared with other Keeper users, from vault-to-vault.
Like your other Keeper records, you can set sharing permissions for records that contain your secure files (can edit, can share, can edit & share, and read only).
File sizes are supported up to 100MB for Web Vault, 5GB for Desktop App, Android and iOS.
Example of Secure File Storage - Financial Documents
Secure File Sharing
Time-limited Access on Shared Files
Access Expiration on Shared Files
One-Time Share
Create a One-Time Share Link
One-Time Share
Add Self-Destruct to Shared Files
Self-Destructing One-Time Share
Mobile File Attachments
Event Reporting on File Usage
Add Storage from the Keeper Admin Console
Creating and Sharing Enforcement Policies
Copy the provided credentials from Duo's site (including the Secret Key which must be selected to view)
Return to Keeper's Admin Console and select the 2FA tab. Select the gear icon under DUO and paste the copied credentials from DUO's site. Toggle the Enable switch "on" and click Save to finish.
From the previous Security menu, click
Setup
next to Security Keys.
Follow the on-screen prompts, provide a name for your Security Key and select Register.
If your Security Key has a button or gold disc (e.g. Yubico), press the button to register.
Other identity management products such as SailPoint also support the use of SCIM 2.0 for provisioning users automatically.
Keeper supports SCIM 2.0, a REST-based API using JSON message structure. The Keeper SCIM endpoint supports Users and Groups resources, and the following message types:
User/Team Provisioning
Retrieve user/team information
Add a user/team
Update a user/team profile
Delete a user/team
Keeper SCIM Rest endpoint is a resource available at http://keepersecurity.com/api/rest/scim/v2/<node_id>, where node_id identifies the Keeper Enterprise node used in the SCIM protocol sync.
A user can have multiple nodes synchronizing with different identity providers (Azure AD, Okta directory, etc.) from the same vendor or different vendors. One node per identity provider, parent-child relationship is not supported (e.g if SCIM is setup on a node, the sub-nodes of this node are not controlled by the integration, but they can be controlled by their own provider).
The authentication is the Header Authentication, with the token generated by Keeper when setting up the node.
Supported API Methods
Keeper SCIM endpoint supports Users and Groups resources, according to the following table:
Parses SCIM content () of the requests and adds an user to the node 123
Excluded Attributes
Per specification: https://tools.ietf.org/html/rfc7644#section-3.4.2.5
Keeper supports the “excludedAttributes” for “members” attribute. To improve performance of working with groups that contain a large number of members, you can add a parameter such as:
...on SCIM queries for multiple groups and a single group, and on PATCH query for a group.
By default, Keeper SCIM API will only return the first 1000 entries for queries that yield large result sets. To query the entire data set, use SCIM pagination parameters according to the specification. Pagination is supported on Users and Groups "GET" requests.
Pagination requires use of the startIndex and count parameters in the request.
Bulk Operations
Per RFC 7644, Section 3.7, Keeper supports bulk API operations through the URL structure below:
The SCIM bulk operation is an optional server feature that enables clients to send a potentially large collection of resource operations in a single POST request.
The body of a bulk operation contains a set of HTTP resource operations using one of the HTTP methods supported by the API, i.e., POST, PUT, PATCH, or DELETE.
Current limits can be discovered in response of /ServiceProviderConfig request:
Those 3 parameters are populated from next properties: SCIM_BULK_SUPPORTED,
SCIM_BULK_MAX_OPERATIONS and SCIM_BULK_MAX_PAYLOAD_SIZE.
We do not support circular bulk references. HTTP status code 409 (Conflict) will be returned in this case.
Security
For security reasons, SCIM provisioning is only accepted by Keeper when the enterprise tenant has the affected email domain reserved. For example, if the email address being provisions is example.com, then this domain must be reserved to the specific tenant.
For more information about domain reservation process, please see this page.
Notes Regarding Integration
The SCIM identity provider maps to a single node, and the username of the provider maps to the Keeper user name (email address), which needs to be unique globally. Therefore, if an identity provider contains a user defined by the email which is already a member of the same or different Keeper Enterprise account, any attempt to provision this user will fail. The only exception is if the user is already a member of the same node, then the provisioning will be successful, establishing the link between the identity provider and Keeper.
To avoid problems, if you already have manually created users in Keeper that match ones that you plan to use in the identity provider, move them manually under the SCIM node prior to setting up the integration in the provider.
When a user is provisioned, Keeper requires either their username or email to contain a valid email address. If not, the provisioning can be rejected (e.g. in Okta you can set username to be some arbitrary string and an email is not required). If the email is fake, it will be accepted, but the provisioned user will not be able to receive the invitation email and as such will not be able to join the enterprise.
Team and User Approval Process
New users added by the SCIM sync are created in the “invited” state and will receive an invite to join Keeper. New teams created by the SCIM sync are created in the “pending” state and require final approval from either the Keeper Administrator or another team member.
Users added to teams via SCIM are added in a "pending" state and require approval. Team and user approval occurs automatically when the Admin logs in to the Keeper Admin Console. Approvals can also be automated using the Keeper Automator service or using Keeper Commander. The reason that teams and users are approved using this method is because encryption keys must be generated and/or shared. In Keeper's Zero-Knowledge environment, this action must be performed by a Keeper Administrator, by another team member, or by the automation service. Keeper's support team can assist customers in installing the automation service.
Unique Group Names
By default, Keeper will accept group creation even if the Group Name is identical to a previously used name.
If you encounter an issue with duplicate group names, please contact Keeper and we will set a flag on your SCIM connection which enforces unique names.
If necessary, contact Keeper Support to enforce unique group names on your SCIM instance.
SCIM Push Command
Keeper has integrated SCIM into the Keeper Commander SDK. Users and groups can be pushed from any directory source directly into the Keeper SCIM endpoint.
If you click the "Test" button before saving the SCIM provisioning method in the Admin Console, the test will fail. Copy the token first, then click Save.
Keeper users are identified by their email, therefore when assigning so make sure the User Name contains a valid email address.
Team Provisioning and Team Assignments
When setting up User and Team SCIM provisioning, make sure of the following:
When you invite a user from SCIM, if the user does not exist yet in Keeper, they will receive an invite to sign up (or they can use just-in-time provisioning)
After the user has created their Keeper account, the user will not yet be assigned into a Keeper team until one of a few things happen:
(a) Admin logs into the Admin Console > Click on "Full Sync" from the Admin screen or....
(b) A user from the relevant team logs into the Web Vault or Desktop App or....
(c) Admin runs team-approve from Keeper Commander or...
(d) The Keeper Automator service approves the transaction.
The reason that teams and users can't be created instantly via SCIM, is due to the encryption model and the need to share a private key between users. Sharing an encryption key (e.g. Team Key) can only be performed by a user who is logged in, and has access to the necessary private keys.
To streamline this process, the Keeper Automator service as of version 3.2 performs instant approval of Teams and team assignments. More information about the Automator service is .
Using SCIM API Provisioning
If you are testing or programming against Keeper's SCIM API, we have created a guide with examples on working with Keeper using Postman.
For enterprise accounts, offline access is determined by a policy set by your Keeper administrator. If offline access is enabled, available options are: 30 Days, 14, Days, 7 Days, 1 Day, or OFF.
Offline Authentication Methods
Master Password
Biometrics
Platforms That Support Offline Access
Platform
Version
Desktop Apps
Keeper Desktop App (Mac, Windows, Linux)
Web Browser
(Chrome, Safari, Firefox, Edge)
Mobile Apps
iOS and Android
Work Offline With an SSO Enabled Account
If your organization's SSO is offline, click Work Offline in the lower right corner of your screen then click the Enterprise SSO Login dropdown and select Master Password to gain access to your vault offline.
From the login screen, enter your Master Password as usual to login offline.
Work Offline
SSO Master Password for Offline Login
For users who normally login with SSO and do not also have a master password setup, you must first configure one in order to login to Keeper when offline. Simply visit your vault Settings Menu and clicking Setup next to "Master Password".
Account Dropdown > Settings > Setup
This feature is managed by the Keeper Administrator from the Keeper Admin Console. The role enforcement policies are documented here.
Offline Setup
To access Offline Mode, your device will need to be “primed” with a local copy of your vault by logging in with an online connection at least once. Moving forward, you will have access to all of the records in your vault and you can create new records and edit existing records, all without requiring a network connection.
Users can confirm their Keeper Vault is available offline via a lightning bolt icon or "Available Offline" text which indicates your vault data has been loaded onto that device. If the availability indicator is not present, you will need to login to your vault at least once while online.
Offline Availability on Web and Desktop
Enable Offline Access
Web Vault & Desktop App
By default, Offline Access will be turned off. To allow Offline Access, click on your email address in the upper-right corner of your vault home screen and select Settings > Security. Next click the dropdown menu next to "Allow Offline Access". You will then be asked to re-authenticate to Keeper in order to proceed.
Settings > Security > Allow Offline Access
Once you've entered your master password, you can choose for how long you would like Offline Access to be available (30 days, 14 days, 7 days or 1 day).
Android
To allow Offline Access on your Android device, navigate to Keeper's Settings menu (Settings are located under your Avatar in the upper right corner of the app).
Next, tap Allow Offline Access and choose your preferred offline duration (30 Days, 14 Days, 7 Days, or 1 Day). Lastly re-authenticate to Keeper when prompted.
Enable Offline Access
Select Offline Duration
Re-authenticate to Keeper
iOS
To allow Offline Access on your iOS device, navigate to Keeper's Settings menu. Scroll down and select Allow Offline Access.
Next, choose your preferred offline duration (30 days, 14 days, 7 days, or 1 day). Lastly re-authenticate to Keeper when prompted.
Enable Offline Access
Select Offline Duration
Re-Authenticate to Keeper
2FA and Offline Mode
If 2FA is enabled on your account, a warning will appear informing you that 2FA will be bypassed when accessing your vault in Offline Mode. This ensures that users are aware of the potential reduction in security when accessing the vault offline.
Re-authentication for Offline Access Changes
You will be required to re-authenticate whenever you toggle the offline access on, including selecting a specific offline duration (e.g., Always Allowed or 30 Days). No re-authentication is needed when changing between the available "on" options (e.g., from 30 days to 14 days).
Work Offline
To activate Offline Mode from the vault login screen or from within your vault on Keeper Web or Desktop, click on the Work Offline button in the lower right corner of your screen. On iOS and Android, Offline Mode will automatically be initiated when logging in if you aren't connected to the internet.
Activate Offline Mode from the Vault Login Screen
The "Offline Mode" indicator will appear at that top of your vault window.
You can resume a session online at anytime (provided you have a stable network connection) by clicking Go Online in the upper right corner of your vault window.
Biometric Login
When biometrics (Touch ID, Windows Hello) have been activated on an account from the Keeper Desktop application, you can use this to authenticate offline instead of a Master Password.
To log in offline with biometrics, first enable it from your account dropdown menu, Settings > Security.
Enable Touch ID on Keeper Desktop App
Resuming Online Session
You can resume a session online at anytime (provided you have a stable network connection) by clicking Go Online in the upper right corner of your vault window.
Offline Features
Keeper's offline capabilities are central to a user's ability to retrieve important data even in the poorest of network conditions. Key vault features that are available offline include:
Creating new records
Editing records
Moving records and shortcut creation (Mobile App)
Viewing your Security Audit score
Viewing Deleted Items (Web and Desktop)
A notice will appear if you attempt to perform an action that is not available while offline.
If a device is being used temporarily (e.g. a borrowed PC), then the stored offline vault can be deleted from that device.
From the vault login screen, click the dropdown icon in the email address field, then click the "X" to the right of your email address to delete all offline data associated with that vault from the device. This action can be similarly performed on all Keeper platforms.
Offline access for users can be enabled or disabled via the Admin Console's Enforcement Policies menu with a simple toggle, by default Offline Access is enabled.
Restrict Offline Access Enforcement
Offline SSO and Master Password
To provide users who normally login with SSO the ability to access their vault in offline mode, the Keeper Administrator can enable the use of a Master Password as a role-based enforcement, this feature is disabled by default.
To enable SSO users the ability to set a Master Password for offline access, turn "on" the Allow users who login with SSO to create a Master Password toggle in the Login Settings section of Enforcement Policies menu.
SSO Master Password Enforcement (Disabled by Default)
Considerations for Offline Access
In order have a local repository to access offline the vault needs to have been authenticate and synchronized online first at least once.
Ensure that the Remember Email checkbox is selected at the login screen of the Web Vault.
The data in the vault will be as current as the last data push.
Master Password or Biometrics support offline access.
By definition, Two-Factor Authentication protects cloud-based APIs and online authentication. When users authenticate to their vault, they authenticate both locally and on the server. During offline mode, the user is authenticating locally and decrypting their vault. Therefore, during offline mode, users are not prompted for Two-Factor Authentication.
Keeper/Okta automated provisioning supports the following features:
Create users in Keeper
Update user attributes
Activate or deactivate users (locks or unlocks them in Keeper)
Creates teams in Keeper (from Okta groups)
Seamless authentication
When provisioning users, Okta directory is mapped to a single Keeper node. Okta creates users and groups in a pending state and new users will receive an email invitation prompting them to create a Keeper account.
Requirements
To setup Keeper user provisioning with Okta, you need to have access to the Keeper Admin Console and an Okta Admin account.
Configuration Steps
If you haven't added Keeper to your Okta Admin, Select the Applications tab and then select Browse App Catalog and search for "Keeper".
Add Keeper
Open the Keeper Admin Console and navigate to a node which should be synchronized with your Okta account. If you are using SAML 2.0 authentication, add the SCIM connector to the same node. Select Add Method > SCIM (System for Cross-Domain Identity Management) and click Next.
Add Method
Select SCIM
Copy the URL.
Copy the URL and Paste Into Okta
Navigate back to your Okta Admin account and paste the URL from Keeper into the Base URL of the Okta API Integration screen.
Paste the Base URL
Switch back to the Keeper Admin Console click Generate.
Click Generate
Immediately copy the generated token to your clipboard then click Save (important to Save now)
Note: If you click "Test" on the Okta side before saving the token in Keeper, the test will fail.
Paste the token into the Okta console.
Paste API Token
Select Save on Okta to finish the Keeper provisioning setup.
Provisioning Users
In the Okta Provisioning tab, click Edit under Provisioning to App. Enable "Create Users", "Update User Attributes", "Deactivate Users" capabilities, then click Save.
Provisioning Options
Assign the app to a user from Okta, and after a short period, select the Full Sync button in the Keeper Admin Console.
Please ensure that the username and email for users remains the same during user assignment.
In the Keeper Admin Console, users will show in either an "Invite" state or a "Pending transfer acceptance" state (if Vault Transfer policy is active for the default role).
Invited State
The user will receive an email invitation (unless email invites are disabled at the Role Policy level). Clicking the invite link will allow the user to login with Okta and complete the provisioning process.
Alternatively, the user can simply login to Keeper with their email address or Enterprise Domain and complete the sign-in process.
Vault Login
After the user has created their Keeper vault, the status on the Admin Console will change to "Active".
Active Status
Team Provisioning
Keeper supports Team provisioning through Okta "Push Groups".
Push Groups are added as Keeper Teams within the Admin Console
Users who are assigned to Push Groups are assigned to the Keeper Team
Keeper Teams can then be provisioned to Shared Folders
Keeper Teams can be mapped to Role Policies through Team-to-Role Mapping
Okta Push Groups to Keeper Teams
Team and User Approvals
Processing of Team and Team-User assignments must be completed locally on the Admin Console or through one of Keeper's automated tools.
After pushing Users or Teams to the Keeper Admin Console, simply login or click "Full Sync" to process and approve the transactions.
A notification will appear along the bottom of the screen when team approvals have been processed.
Okta Automated provisioning maps Push Groups to Keeper Teams. To automatically assign different teams to different Keeper Roles, you can use our "Team to Role mapping" feature.
From the Roles screen, simply add the Team to the role.
Team to Role Mapping
To use team-to-role mapping, administrators simply assign a role to an entire “Team,” as opposed to individual users and use role enforcements to establish different requirements and restrictions for each team. Note that Team-Role mapping cannot be used with Administrative roles.
Known Issues/Troubleshooting and Tips
If you click the "Test" button before saving the SCIM provisioning method in the Admin Console, the test will fail. Copy the token then click Save.
Keeper users are identified by their email, therefore when assigning the Okta user to the Keeper app, make sure the User Name contains a valid email address.
Groups assigned to the Keeper Okta application are not created as teams in Keeper by default; only group members are pushed to Keeper. To sync groups and group memberships to Keeper you need to add the groups to "Push Groups" in the Keeper Okta application.
When synchronizing group memberships from Okta, Keeper creates team memberships which are not immediately visible. For the provisioned users to become actual team members, the user must register with Keeper, accept the invitation and be receive approval for group entry by a Keeper Administrator or auto-approved by an existing Keeper team member logged into their Web Vault.
When creating a new Push Group, the Okta admin will need to manually push the groups to complete group synchronization at least one time.
Team Provisioning and Team Assignments
When setting up User and Team SCIM provisioning with Okta, make sure of the following:
Ensure that you have assigned the Okta groups as Push Groups in the SAML application
When you invite a user from Okta or assign a user into a group that has been provisioned as a Push Group, Okta will send the request to Keeper to either invite a user to join, or to add a user to a team, or to create a team.
If the user does not exist yet in Keeper, they will receive an invite to sign up (or they can use just-in-time provisioning)
After the user has created their Keeper account, the user will not yet be assigned into a Keeper team until one of a few things happen:
(a) Admin logs into the Admin Console > Click on "Full Sync" from the Admin screen
(b) A user from the relevant team logs into the Web Vault or Desktop App
(c) Admin runs team-approve from Keeper Commander
Sharing an encryption key (e.g. Team Key) can only be performed by a user who is logged in, and has access to the necessary private keys.
The Keeper Automator service as of version 3.2 performs instant approval of Teams and team assignments. More information about the Automator service is .
Okta Error Handling
If you receive the error "Unable to update Group Push mapping target App group xxx: Error while updating user group membership... Not Found"
This error can occur if the Keeper Enterprise User ID is different between the Keeper backend and the Okta admin. This can occur if you delete and re-create a user's account from the Keeper side, instead of properly creating the user from a SCIM invitation. In this case, Okta does not have knowledge of the user's new Enterpriser User ID.
To resolve this issue, you need to simply remove the application assignment to Keeper, and re-assign the user to the Keeper application.
Remove Assignment
Re-Assign Keeper
Push Group Membership
User Authentication with SAML 2.0
Please visit the Okta + Keeper SSO Connect guide for sign-on authentication.
Keeper is a cybersecurity platform for preventing password-related data breaches and cyberthreats.
Keeper Enterprise provides the highest levels of security and at the same time provides a simple user experience - with millions of users worldwide, Keeper is the proven industry leader.
Keeper is SOC 2 Certified, ISO27001 Certified, FedRAMP High Authorized and StateRAMP Authorized. Keeper's encryption has been certified by the NIST CMVP and validated to the FIPS 140 standard by accredited third party laboratories.
Keeper Enterprise Demo
Below is a 25-minute demonstration of the Keeper Enterprise platform.
For a personalized demo with a Sales Engineer:
Passwords are the single greatest cause of a data breach. 81% of data breaches are due to weak or stolen passwords. Password management solutions provide an affordable and simple way for companies to solve the root cause of most data breaches. By helping businesses generate strong passwords as well as manage and securely share them among teams, they significantly reduce the risk of a data breach.
Zero-Knowledge Security Architecture
Keeper's architecture is the most secure in the industry. Built from the ground up with record-level encryption and client-side key generation, the foundation of Keeper Enterprise is built upon a model that ensures only the user is able to decrypt and access their privileged information.
The Keeper platform is built on an access layer and encryption layer. Access and authentication controls who is able to sync the encrypted ciphertext, and client-side encryption controls who is able to physically encrypt/decrypt the data. This foundation is what gives Keeper the ability to apply the most granular level of protection to user data and enables the core features and capabilities of the product.
Users, Roles, Teams, Records and Shared Folders are all protected and managed through the use of client-side generated keys. This complex distribution of keys is completely managed by the software with a simple and easy-to-use user interface.
Multi-Platform Access
Keeper is a cross-platform solution that provides full capabilities from every major platform and device including iOS, Android, Windows, Mac and Linux. Browser plugins are compatible with Chrome, Firefox, Edge, Safari and any other chromium-based browser.
The Keeper Administrator can restrict vault access to specific platforms based on security requirements of the enterprise. End-user vault applications can be used completely independent of one another, or used together. For example, using the Web Vault or Desktop Application does not require the installation of a browser plugin.
The Keeper Vault is available on all devices and computers, with award-winning native applications:
Native Desktop Apps
Windows
Mac
Linux
Browser-Based Apps
Chrome
Edge
Safari
Native Mobile Apps
iOS
Android
Chrome, Firefox, Edge, IE and Safari Browsers
Key Differentiators
Keeper was named Best Password Manager by PC Mag in 2018, 2019, 2020 and 2021. Some of the reasons that customers select Keeper over the competition are listed below.
Keeper vs. LastPass
Keeper vs. Dashlane
Keeper vs. 1Password
Keeper Fills Security Gaps in Single Sign-On
SSO and SAML simplify login to many cloud applications, however, it does have its limitations. Keeper (with Keeper SSO Connect) complements the two major gaps with your SSO deployment:
Offering privileged access to applications that don’t support SAML protocols.
Enabling non-password use cases, such as management and sharing of digital certificates, SSH keys, API keys, secret notes, lists, files and more.
With Keeper SSO Connect, you can easily add Keeper to the apps that your IdP services. Whether you use AD FS, Entra ID/Azure, Okta, Google Workspace, Centrify, Ping, JumpCloud or any other SAML 2.0 Identity Provider, Keeper will easily integrate. Keeper SSO Connect logs the user directly into their encrypted vault while maintaining full zero knowledge. With SSO integration, there is also no master password to remember.
Keeper SSO Connect is available as a customer-hosted or cloud-hosted high availability solution that preserves zero knowledge and allows the end-user to authenticate directly into their vault.
For more information about Keeper SSO Connect, visit our web page:
Implement Zero Trust
Keeper's Zero-Trust Platform seamlessly integrates into any existing identity stack and infrastructure.
Keeper's least-privilege access model, encryption model and role-based access model support the zero trust implementation guidelines of NIST and provide organizations with a substantial leap forward in the journey towards zero trust.
For reference, see the National Institute of Standards and Technology (NIST) Special Publication (SP) 800-207 document which provides the following operative definition of zero trust and ZTA:
Global Regions
Keeper provides customers with the selection of geographic regions where data resides in-country.
United States
GovCloud US
Ireland
Role-Based Enforcement Policies
The ability to provide least privileged access to an employee is critical in the deployment of an Enterprise Password Manager. Keeper gives fine-grained control over what users are capable of accessing and managing within the platform through the use of customizable role policies. By providing a flexible role policy engine, you can lock down restrictions and access based on the risk profile of the employee. For example, you may want your IT Admins to be restricted from accessing their vault outside of the office network. Or you may want administrative assistants the ability to onboard new users, manage teams and run reports. The entire process is fully customizable through a user friendly interface.
Role Enforcements Include:
Password Complexity Rules and Biometrics
Multi-Factor Authentication, Token Expiration and Device Restriction
Offline Access Restrictions
Delegated Administration
Keeper Administrators can create organizational units (called Nodes). A role can be given Administrative permissions over the node (or sub-nodes) for which a role exists. This delegated administration allows different people in the organization to have management controls over subsets of teams of users, roles and shared folders. Users within different nodes can be provisioned and authenticated with different methods.
Eliminate the Risk of Critical Data Loss
Keeper's Zero Knowledge Account Transfer capabilities provide Enterprise customers with the peace of mind that an employee will never walk away with critical data when they leave the organization.
Increase Productivity Gains
Since 50% of help desk calls are estimated to be password related, there is a significant productivity gain by rolling out a password manager to your organization. When employees don't need to worry about remembering passwords, the cost savings are massive.
Meet Compliance Needs
Compliance is becoming even more complex with requirements mandating internal control policies and standards. Organizations in heavily regulated industries are audited for password enforcement policies and practices. Keeper's password security platform solves many of compliance and regulation enforcement requirements that organizations face.
Keeper Security is the most certified solution in the industry:
SOC 2 Certified
ISO 27001 and ISO 27017 Certified
FIPS 140-3 Validated
Keeper Security is listed as Authorized on the FedRAMP Marketplace with an authorization date of 8/23/2022.
See:
Supports ITAR Requirements
Keeper supports compliance with United States International Traffic in Arms Regulations (ITAR). Companies that are subject to ITAR export regulations must control unintended exports by restricting access to protected data to U.S. Persons, and by restricting physical location of protected data to the U.S.
Keeper’s FedRAMP Moderate environment supports ITAR requirements through the following:
Fully compliant data storage hosted on AWS GovCloud and restricted to the U.S.
Secure data encryption in transit and at rest.
Zero knowledge and zero trust security, in conjunction with granular permissions, allows organizations to ensure that only approved personnel can access sensitive data.
The Keeper FedRAMP environment has been audited by an independent third-party assessment organization (3PAO) to validate that proper controls are in place to support customer export compliance programs.
For more information about ITAR, please visit .
Time-Limited Access
Nodes and Organizational Structure
Reporting, Alerts & SIEM
Keeper's Advanced Reporting and Alerts Module (ARAM) provides advanced event logging to meet compliance requirements.
Overview
Keeper's Advanced Reporting & Alerts Module ("ARAM") is a critical component of the Keeper Security platform which provides Keeper Administrators and Compliance teams tools for monitoring overall usage and adherence to policies.
Microsoft Sentinel with Azure Marketplace
Quick setup instructions for integrating Keeper SIEM events with Microsoft Sentinel through the Azure Marketplace
Overview
This guide walks you through the step-by-step installation and configuration process for the Keeper Security SIEM integration with Microsoft Sentinel. Keeper Security is available in the Content Hub section of Microsoft Sentinel as an out-of-the-box integration in the Commercial and Government regions.
Parses SCIM content (Operations) and adds or removes the user 456 to/from teams referenced in add/remove operations as groups. Also, can process “active” property making user locked or unlocked in Keeper. The referenced teams must belong to the same node. Returns 404 if user is not found.
Locks user 456 from the node 123. Returns 404 if user is not found.
Note: Keeper locks the account instead of deletion to prevent data loss. Admin can perform permanent user deletion within the Admin Console interface or Commander API.
Parses SCIM content (Operations) and adds or removes to the team 789 users referenced in add/remove operations. The referenced users must belong to the same node. Returns 404 if team is not found.
Allow IP Listing, Sharing and Data Export Restrictions
Account Transfers (employee offboarding and break-glass scenarios)
Administrative Permissions
GDPR Compliant
GSA Certified
SAM Certified
Compliant with the EU-U.S. Data Privacy Framework (“EU-U.S. DPF”), the UK Extension to the EU-U.S. DPF and the Swiss-U.S. Data Privacy Framework (“Swiss-U.S. DPF”)
ITAR Compliant
FedRAMP Authorized
StateRAMP Authorized
Robust compliance reporting features provide a traceable, electronic audit trail of all actions performed and data entered.
Sequestered Customer Success team comprised of U.S. Persons specifically trained in safe handling of Export Controlled and ITAR-governed data.
No non-U.S. based support on public sector environments.
The Reporting & Alerts dashboard provides an overview of the top 5 events, two built-in reports and your custom reports. The "Recent Activity" report is a built-in report that provides event tracking for the last 1,000 events across 200+ event types. Customers can upgrade to the Advanced Reporting and Alerts module to generate and save custom reports and alert notifications.
The "Recent Activity" and "All Security Events" reports are provided in all Keeper Business and Enterprise subscriptions. Custom reporting and alerts is a feature of the Advanced Reporting and Alerts Module (ARAM). To take advantage of this capability, please contact your Keeper Security account manager or upgrade your subscription through the Secure Add Ons interface of the Admin Console.
Additionally, a user status report is available via the dashboard. See the Dashboard section of this guide.
Admins can also create custom reports by clicking Add Custom Report.
Preview the results by clicking Apply, and if you want to use the report in the future, click the Save button. You can export the events as a file in JSON, CSV or SysLog formats.
New events generated by Keeper vault devices can take up to 15 minutes to appear in the reporting module.
Geolocation based on IP address
Accuracy of geolocation based on IP address varies depending on the database used to identify the user's location. The precision of geolocation data depends on several factors. Most importantly is how well registries validate the data they receive. If information connected with an IP address is incorrect, it reduces its usefulness. Geolocation is incredibly challenging in the case of mobile phone usage where IP address changes are frequent and mobile carriers use centralized gateways that users reach the internet. Additionally, if users are using proxies or VPN's the location data will invariably be incorrect.
Keeper subscribes to one of the industries most reliable providers who performs quality assurance by validating data quality against known IP addresses sourced from the public on a regular basis.
Timeline Chart
The Timeline Chart provides a chart of events over a 24-hour, 7-day and 30-day period. Clicking on any event row will open a report containing all events from the time period.
Timeline Chart
Alerts
The Alert module allows you to create event-based triggers that will generate either email or SMS-based alerts.
Alerts
New alerts are created similarly to new reports, by clicking Add Alert and specifying a name and a filter criteria. You can add one or more recipients using email address, phone number (for SMS) or both. Recipients don't have to be a part of your enterprise and any email address or phone number can be provided. The first recipient is predefined to be the user who generated the event. This will be "off" by default, and you will need to toggle it "on" to enable sending the alerts (email only) to the originator.
Specifying a broad event and attribute filter could generate a lot of alerts. Adjust alert frequency and set narrow event types and filters to reduce alert noise.
To prevent the recipients from receiving too many emails or SMS, alerts can be throttled. One way to throttle is to specify Alert Frequency. For example, if you set the frequency to "Once Per Time Period" with a period of 1 hour than all events matching the alert filter will still trigger the alert "occurrence" but the message will be sent only if 1 hour has passed since the time of the previous message. Another way to throttle the alert is to pause it using the toggle switch. Paused alert will also accumulate "occurrences" without sending the actual messages. When resumed, the very next event matching the alert will trigger sending the message which will contain the number of events that happened while being on pause.
Below is an example of an email alert:
You can view the alert history in the Alerts Sent tab, with the ability to drill down to see the individual events:
External SIEM Logging
If you are utilizing a 3rd party SIEM solution, the Keeper Admin Console can be configured to automatically feed live event data into external SIEM products. Currently supported systems include:
Event data is transmitted from Keeper's servers to the destination SIEM collector. Only one method of the external sync can be active at a time.
External Logging
Click Setup to activate the external logging solution. Setup is easy on each logging platform and typically only requires a few attributes to integrate.
Event Types
Within the Admin Console, the default "Recent Activity" report contains 16 event types. Keeper's Advanced Reporting and Alert module supports over 250 event types.
The events captured by Keeper Enterprise are visible in the drop-down menus for report and alert configuration.
Event Type Filter
Enabling BreachWatch Events
By default, BreachWatch events from the end-user devices are not collected and transmitted to the Advanced Reporting & Alerts module. These events are managed by the Role policy. To activate this feature, visit the Role > Enforcement Policies > Vault Features and toggle Send BreachWatch events to Reporting & Alerts and connected external logging systems "on".
Enable BreachWatch Events
Event Descriptions
A list of all available events captured by the Keeper Advanced Reporting and Alert Module are provided in the chart below. The Event Code is utilized in the user interface and within the Keeper Commander CLI command parameters. The "Message" field is utilized for the Alerting module.
Within each event, there may be additional attributes such as Record UID, Shared Folder UID, Team UID, Username, etc. These attributes will appear within the event description and they are also provided to the 3rd party SIEM provider in the format as specified by the destination.
Raw Event Data Examples
Below are examples of 2 events in JSON format that are sent. Note that Record UID is provided with the "record_update" event since it relates to a specific record.
Below is an example of a Syslog-format event that can be exported via Keeper Commander or into the 3rd party SIEM solution:
Note that "enterprise_id" is useful for distinguishing different Keeper Enterprise tenants within the same SIEM collector.
Locating the Record UID and Other Identifiers
The event data references several types of UID values such as Record UID, Shared Folder UID and Team UID. The Record UID and Shared Folder UID can be found either through the Keeper Commander CLI or through the Web Vault user interface.
Commander CLI
The Keeper Commander CLI provides command-line and SDK integration into Keeper's reporting system for more advanced use cases. The event data can be used for generating actionable reports.
Description: Creates an informational incident when a Keeper Security Password Changed event is detected.
Severity: Informational.
MITRE ATT&CK: Select Persistence (T1556).
Status: Keep Enabled.
Click Next: Set rule logic.
Step 4. Define Rule Logic
Use the following query:
⚠️ Note: Ensure that the table KeeperSecurityEventNewLogs_CL exists (it is created automatically when Keeper logs start flowing into Sentinel). If logs are not yet ingested, the query may return an error during validation.
Under Event grouping, select Trigger an alert for each event.
Click Next: Incident settings.
Step 5. Configure Incident Settings
Enable: Create incidents from alerts triggered by this rule.
Alert grouping: Disabled (recommended for password events to capture each one individually).
Click Next: Automated response.
Step 6. Optional – Add Automated Response
You may attach a Logic App playbook if you want automated response actions (e.g., notify security team via Teams or email).
Otherwise, leave automation rules empty.
Click Next: Review + create.
Step 7. Review and Create
Confirm all details:
Rule Name
Query
Severity
Entity mapping: Username → Account, RemoteAddress → IP
Click Create to finalize.
10. Optional: Enable Analytics Rule – User MFA Changed
You can optionally enable an Analytics Rule in Microsoft Sentinel to automatically detect when a Keeper user changes their multi-factor authentication (MFA) settings. This provides visibility whenever users enable or disable two-factor authentication.
Step 1. Access Installed Content
In Microsoft Sentinel, go to Content Hub → Keeper Security SIEM Integration.
Under Installed content items, select Keeper Security – User MFA Changed.
Click on it to view the details.
Step 2. Open the Rule Template
Select Keeper Security – User MFA Changed.
On the right panel, click Create rule.
This will launch the Analytics Rule Wizard.
Step 3. Configure General Settings
Name: Keeper Security – User MFA Changed (default).
Description: Creates an informational incident when MFA settings change in Keeper Security.
Severity: Informational.
MITRE ATT&CK: Select Persistence (T1556).
Status: Keep Enabled.
Click Next: Set rule logic.
Step 4. Define Rule Logic
Use the following query:
Under Event grouping, select Trigger an alert for each event.
Click Next: Incident settings.
Step 5. Configure Incident Settings
Enable: Create incidents from alerts triggered by this rule.
Alert grouping: Disabled (each MFA change will create a separate incident).
Click Next: Automated response.
Step 6. Optional – Add Automated Response
You may attach a Logic App playbook if you want automated response actions (e.g., notify the SOC team in Teams, Slack, or email).
You can optionally enable the Keeper Security Dashboard workbook in Microsoft Sentinel to visualize Keeper event data. The dashboard provides insights into password changes, MFA events, privileged activity, and overall Keeper usage trends.
Step 1. Access Installed Content
In Microsoft Sentinel, navigate to Content Hub → Keeper Security SIEM Integration.
Under Installed content items, select Keeper Security Dashboard.
Step 2. Save the Workbook Template
From the Workbook view, select Keeper Security Dashboard.
In the right-hand panel, click Save.
The template will now be added to your personal workbooks list.
Step 3. Open the Saved Workbook
Once saved, go to Workbooks.
Select Keeper Security Dashboard from the list.
Click View saved workbook to open it.
Step 4. Visualize Keeper Events
The Keeper Security Dashboard includes prebuilt charts and insights, such as:
Password Changes (audit trail of users changing their master password).
MFA Events (tracking when MFA is turned on/off).
User Activity (logins, session usage, record access).
Azure Monitor for Microsoft Sentinel (for GovCloud)
Integration of Keeper ARAM events with Azure Monitor
For Keeper GovCloud organizations only. For all other organizations, see the Microsoft Sentinel integration page.
Overview
Azure Monitor and Microsoft Sentinel are related as Sentinel leverages Azure Monitor's infrastructure for log management and data collection. Azure Monitor provides the foundational platform, including and the , on which Sentinel is built. Sentinel then uses this data for security information and event management (SIEM) capabilities.
Keeper supports event streaming directly into Azure Monitor Log Analytics Workspace tables using the Azure . As of January 2025, this is the preferred method and API used for streaming event data into Azure logs.
Setup Instructions
Go to the to begin the setup.
Step 1. Create an App Registration
The Azure App Registration is to authenticate API requests to the Logs Ingestion API.
Navigate to > New Registration.
Fill out the form:
Name: KeeperLogging
Supported Account Types: Use the default option (Single tenant).
Leave Redirect URI blank for now.
After registering:
Expand Manage
Click on "Expose an API"
Click "Add" for the Application ID URI
Accept the default suggested URI (it should be something like api://[client-id])
Step 2. Create Client Secret
From the section of Azure, go to Manage > Certificates & Secrets > New Client Secret.
Add a description and expiration period.
Copy the generated "Value" and store it in your Keeper vault.
Save this value for the last step ("Client Secret Value").
On the "Overview" screen, also note the Tenant ID and Display Name.
Save the following entries for later:
Application (client) ID
Client Secret ID
Step 3. Create Log Analytics Workspace
A Log Analytics Workspace is the core resource where Azure Monitor collects and stores log data. If you already have one, you can skip this step.
From Azure, go to
Click Create and configure:
Subscription: Choose your Azure subscription.
Step 4. Assign Role to App Registration
You need to assign the KeeperLogging application with the role of "Log Analytics Contributor" to the Log Analytics Workspace. From the Log Analytics Workspace:
Click on the Log Analytics workspace creted in (3)
Select Access control (IAM)
Select Role assignments
Click Add
Step 5. Create a Data Collection Endpoint (DCE)
The Data Collection Endpoint is required before you can create a Data Collection Rule.
From Azure, open (DCE)
Search for "Data Collection Endpoints" and click Create.
Configure the following:
Subscription: Select your Azure subscription.
Resource Group: Use the same resource group you plan to use for the DCR.
Region: Choose a region
Note the "Logs Ingestion URL" which is used later.
Use the token and send a Curl request for a Keeper event log in the next step.
Send SIEM Events
Send a Curl request as seen below, Replace the below:
<ENDPOINT_URL> The constructed URL from above.
<TOKEN> The Bearer token from above
Note: The bearer token will expire after 1 hour.
The events will show up in Log Analytics Workspace after a few minutes.
Privacy Screen
Dark Web Monitoring
Introducing Share Admin
Account Transfer
User Provisioning with SCIM
Click Register.
Client Secret Value
Directory (tenant) ID on the App registrations page.
Resource Group: Create a new resource group or select an existing one.
Name: Give your workspace a meaningful name (e.g., KeeperLogsWorkspace).
Region: Choose a region
Click Review + Create and then Create.
>
Add role assignment
Type "Log Analytics Contributor" and select that role
Click "Next"
Click "+Select members" and select the KeeperLogging application from the list
Click "Select"
Chose "Review + assign"
Verify "Added Role assignment" success
Name: Give it a meaningful name (e.g., KeeperLogsEndpoint).
>
Add role assignment
Type "Monitoring Metrics Publisher" and select that role
Click "Next"
Click "+Select members" and select the KeeperLogging application from the list
Assign it to the "KeeperLogging" application
Type "Monitoring Metrics Publisher" and select that role
Click "+Select members" and select the "KeeperLogging" application from the list
Assign it to the "KeeperLogging" application
Endpoint URL: This is a URL that is created in the following specific format:
https://<collection_url>/dataCollectionRules/<dcr_id>/streams/<table>?api-version=2023-01-01
Depending on the data center of your Keeper tenant, the domain will change.
US: keepersecurity.com
EU: keepersecurity.eu
AU: keepersecurity.com.au
JP: keepersecurity.jp
CA: keepersecurity.ca
GOV: govcloud.keepersecurity.us
Set the Headers
Key
Value
Set the Body
Choose raw and select JSON format.
Adding a User - Users/POST
Set the HTTP Method and URL
Set the HTTP method to POST using the dropdown menu.
Enter the URL for adding a user:
Be sure to replace <node_id> with your actual node ID where you want the user added. This Node ID is provided to you on the SCIM setup page in the Keeper Admin Console, or it can be found using "enterprise-info --nodes" command.
Set the Body
Click on the "Body" tab below the URL field
Choose raw and select JSON format
Add the JSON body with the details of the user you want to add. Here's an example JSON body:
You can also add the user to a team upon creation by including the <group_id> for "value" in the groups object. This is the only required information to add the user to a group. "$ref" and "display" are optional
Send the Request
Response HTTP codes
Locking/Unlocking a user - Users/PATCH
Set the Method to PATCH and the URL to the following:
Set the body of the JSON request
Choose raw and select JSON format
Add the JSON body with the details of the user you want to add. Here's an example JSON body:
Be sure to set the "value" to true (unlocked) or false (locked)
Send the request
Retrieve information about a user/users - Users/GET
Open Postman and set the HTTP method to GET
For a information about all the users in a node, use the following URL:
For information on a specific user, specify the user ID
Send the request
We also support filter for users, below is an example for searching based on user id:
Additionally, you can use pagination by using startIndex and count:
Retrieve Groups & Group ID’s - Groups/GET
Open Postman and create a new GET request
Set the URL:
Send the request
Expected Response
The response will be a JSON object containing details of all groups under the specified node. The "id" field within each group object represents the group ID. In Keeper, a group is represented by a Keeper Team object. The ID is the Keeper Team UID.
To get the information of a single group, include the group ID at the end of the URL.
https://keepersecurity.com/api/rest/scim/v2/<node_id>/Groups/<group_id>
Creating a Team - Groups/POST
Create a New Request
Click on "New" and then select "Request" from the dropdown menu.
Alternatively, you can click on the "Request" tab if it is already open
Set the HTTP Method and URL
Set the HTTP method to POST using the dropdown menu
Enter the URL for adding a team
Set the Body
Click on the "Body" tab below the URL field.
Choose raw and select JSON format.
Add the JSON body with the details of the team you want to create. Here's an example JSON body:
Replace "Team Name" with the desired team name.
Send the Request
Click on the "Send" button in Postman to execute the request
Deleting a team - Groups/DELETE
Set the HTTP Method and URL
Set the HTTP method to DELETE using the dropdown menu.
Set the URL:
Send the request
Adding or removing a user to a team - Users/PATCH
Set the HTTP Method and URL
Set the HTTP method to PATCH using the dropdown menu.
Set the URL:
Replace <node_id> with your actual node ID and <group_id> with the ID of the team you want to update
Set the Body
Click on the "Body" tab below the URL field
Choose raw and select JSON format
Add the JSON body with the details of the user you want to add to the team. Here's an example JSON body:
Changing the "op" value to "add" will add a user to a team. Changing the value to "remove" will remove a user from the team
Send the request
Handling Roles with the Role Prefix
While Keeper's SCIM integration does not handle the roles argument of the User object, you can create and assign roles by using the role prefix.
In the settings of the SCIM Provisioning Method on the Admin Console, you can define a Role Mapping Prefix:
Any SCIM Group object created with this prefix will not generate a Team, but a Role instead. Likewise, you can assign the role to your users by running the same request as a team assignment.
Updating User Attributes - Users/PUT
Create a New Request
Click on "New" and then select "Request" from the dropdown menu.
Alternatively, you can click on the "Request" tab if it is already open.
Set the HTTP Method and URL
Set the HTTP method to PUT.
Use the URL:
Set the Body
Click on the "Body" tab below the URL field
Choose raw and select JSON format
Here is an example of the JSON body to update the user information:
Changing the "active" flag to false will lock the user account, changing it to true will unlock the account
Send the request
Click on the "Send" button in Postman to execute the request
This quick start guide will help get your small business team up and running with Keeper Business in just minutes
Video Demo: Teams and Small Business
This video will demonstrate all that Keeper has to offer your small business and provide you with step-by-step instructions to get your team up and running in no time.
Short on time? Check out our .
Admin Console Overview
When you first log in to the Admin Console, you will land on the Dashboard which will provide an overview of high level data on your user activity and overall security status.
The Dashboard provides oversight of the following:
Top Events and link to Timeline Chart
Security Audit Overall Score
BreachWatch Overall Score
The Admin tab is where majority of your set-up and user deployment will take place. Here, is where you can access Nodes, Users, Roles, Teams and Two-Factor Authentication Settings.
Key Configuration Steps
As a first step, we recommend uploading your company logo to the vault and customizing the email invitation that will invite your employees to create their Keeper Vault. These configurations are highly recommended as they have shown to help with quick user adoption of Keeper's software.
Click Configuration then click Edit next to "Company Logo" to upload your image file.
Once uploaded, your company logo will appear in the upper left side of the header when users are logged into their Keeper Web Vault and Desktop App as well as Keeper One-Time Shares.
Click Configuration then Edit next to Email Invitation, then toggle "Send Custom Email Invitations" on.
Organizational Structure
In Keeper's architecture, Roles allow you to define enforcement policies based on a user's job responsibility as well as provide delegated administrative functions. The number of roles you create is a matter of preference and/or business need.
Nodes are used to organize your users into distinct groupings, similar to organizational units in an Active Directory. You can create nodes based on location, department, division or any other structure. Smaller organizations may choose to administer Keeper as single level, meaning no additional nodes are created. In this scenario, all provisioned users are accessed from the default "Root Node".
Secondary Keeper Administrator
We recommend you create a secondary Keeper Administrator as soon as possible. At its simplest configuration, the Keeper Administrator role is applied to the initial administrator who has set up the Keeper account for the organization as well as any other user you grant full admin rights. We strongly recommend you add a second user to the Keeper Administrator role in case one account is lost or no longer accessible.
Admin > Users > Add Users enter the user's full name and email address, then click Add.
Admin > Roles > Keeper Administrator and click the add icon next to "Users".
Select the new user from the list and click OK to finish.
Account Transfer
Account Transfer will allow a Keeper Administrator to transfer records and data from one user to another, should an employee leave the company. This policy is enabled by default on new tenants and needs to be configured by the Keeper Administrator during the initial deployment phase of the Keeper rollout. The Account Transfer setup must be enabled prior to the user's account being transferred.
First you will need to enable the Transfer Account permission for the Keeper Administrator Role.
The Transfer Account permission is enabled by default on new tenants
Admin > Roles > Keeper Administrator
Select "Administrative Permissions" and click the gear icon.
Roles
Roles allow you to define enforcement policies based on a user's job responsibility as well as provide delegated administrative functions.
You will need at least one role defined for your users, but you can create as many as you would like depending on the structure of your organization. Roles can be created to support a variety of policies depending on what enforcements should be applied to a user based on their position (e.g. Administrators, Executives, Managers, Staff, and Contractors). For smaller organizations, Keeper recommends you create a default, "General Employee" role.
Admin > Roles > Add Role
Select the Node you want to add the Role to, enter the name of the role and click Add.
To learn more about Roles, click .
Nodes
Nodes are used to organize your users into distinct groupings, similar to organizational units in an Active Directory. You can create nodes based on location, department, division or any other structure.
Smaller organizations may choose to administer Keeper as single level, meaning no additional nodes are created. In this scenario, all provisioned users are accessed from the default "Root Node" (e.g. ACME Co.).
Admin > Add Node
Enter the name of the Node then click Add Node to finish.
Navigating Nodes
At any time, you can change which node you are viewing by navigating to or selecting the Nodes on the far left Node pane. To navigate to the root node or top level, select your business name (e.g. ACME Co.) in the navigation tree.
Role-Based Access Controls
Role-based Access Controls (RBAC) provide your organization the ability to define Enforcements Policies based on a user's job responsibility as well as provide delegated administrative functions.
Enforcement Policies offer a wide-range of control features that are organized into the following categories:
Login Settings
Two-Factor Authentication (2FA)
Platform Restriction
Admin > Roles select a role then click Enforcement Policies
A dialogue box will appear where you can configure the Enforcement Policies that will be applied to the selected role. Click Done when finished.
To learn more about Enforcement Policies, click .
Deploying Keeper to Your Employees
Business customers can seamlessly deploy Keeper to their users using two different methods. Admins can either manually invite individual users or bulk import users via a CSV file. Advanced deployment options are also available.
Admin > Users > Add Users
Select the Node you would like to add the user to, enter their Full Name, Email Address and optional Job Title then click Add.
This will generate an email inviting the user to setup their Keeper account. Instructions to customize the email can be found in the Key Configuration Steps section, above.
Teams
Next, we encourage you to create Teams. The purpose of creating teams is to give users the ability to share the records and folders within their vaults with logical groupings of individuals. The administrator simply creates the team, sets any Team Restrictions (edit/viewing/sharing of passwords) and adds individual users to the team. Teams can also be used to easily assign Roles to entire groups of users to ensure the consistency of enforcement policies across a collective group of individuals.
Admin > Teams > Add Team
Select the Node you want to add the team to then enter the name of the team and click Add Team
You can then set the following team-level restrictions:
Disable record re-shares
Enable Two-Factor Authentication
As a final step to further enhance your security practices, we recommend that you require the use of Two-Factor Authentication across your organization. This role enforcement can be enabled within each role's Enforcement Policy settings.
Admin > Roles select the target role and click Enforcement Policies
Toggle "Require the use of Two-Factor Authentication" on.
Set your platform-specific enforcements, enable the desired 2FA methods then click Done.
Desktop Applications
Methods for deploying Keeper to user desktops
Overview
Keeper offers users two different desktop vaults. The Keeper Web Vault in the web browser, and the native Keeper Desktop application for Windows, Mac and Linux.
Benefits of Keeper Desktop App vs. Web Vault
The Keeper Desktop App has several benefits compared to the Keeper Web Vault such as:
Ability to Autofill and auto-type passwords into native apps using feature
Ability to automatically import existing passwords without additional component installation
Automatically migrate from existing LastPass vaults
Keeper Desktop Deployment
Keeper Desktop is a cross-platform native desktop application for Windows, MacOS and Linux. Several installer files are provided at the links below. For additional details on each package, see the section below.
Installer Options
Windows AppInstaller (64 and 32-bit, supports Windows Hello)
Auto-Updates: Yes
Command-line deployment:
Microsoft Store Version (64 and 32-bit, supports Windows Hello)
Auto-Updates: Yes
Command-line deployment:
Additional Deployment Details
Microsoft Windows App Installer Distribution
Installer:
Supported Platforms: Windows 10, Windows 11
Supported Architectures: x64, ia32
The appinstaller is just a lightweight wrapper around the msixbundle that enables auto-update functionality, which is checked on app launch. Due to including the auto-update feature, the appinstaller requires Windows 10 version 1803 and newer.
Users download a small appinstaller file that automatically fetches the msixbundle from:
.
It otherwise behaves the same as the MSIX install.
The appinstaller can be deployed with PowerShell like this:
The contents of the KeeperPasswordManager.appinstaller file is below:
Microsoft Windows .MSIX Distributions
Install Link:
Supported Platforms: Windows 10, Windows 11
Supported Architectures: x64, ia32
The msixbundle file is an appx bundle containing multiple architectures, currently x86 and x86_64 are supported. The asset requires at least Windows 10 version 1703 to install, and installs to C:\Program Files\WindowsApps with a package identity which enables additional features such as Windows Hello. The installed app is owned by TrustedInstaller.
Command-line deployment:
Microsoft Windows .MSI Distributions
Install Link:
Supported Platforms: Windows 10, Windows 11
Supported Architectures: x64, ia32
The MSI installer does not auto-update. This is to satisfy enterprise administrators who require complete control over application updates.
The MSI installer is 32-bit, and it has the best compatibility with older versions of Windows.
The MSI installer does not support Windows Hello.
The MSI can be silently installed from an elevated command prompt (otherwise it will silently fail at the unanswered Windows UAC prompt that never happens because it's a silent install) in this way:
The MSI installer does not allow selecting the installation location to mitigate a security weakness whereby an administrator can install the application in a location, such as C:\ where non-privileged users have access to modify or replace the binary. Instead, the MSI installer always installs to %programfiles%.
The Keeper .MSI installer utilizes Microsoft Msiexec. Standard switches are documented here:
Windows Store
Install Link:
Supported Platforms: Windows 10, Windows 11
Supported Architectures: x64, ia32
The Windows Store build is almost identical to the normal msixbundle, but has a different app identity which is assigned by the Microsoft Store. Updates are managed by the Microsoft Store, and the app is also installed to C:\Program Files\WindowsApps and is owned by TrustedInstaller.
The desktop app is able to be installed silently from the Microsoft Store using Microsoft's package manager winget:
Intune
Businesses may push the Microsoft Store app to Intune using an Intune Connector setup to use the Microsoft Store For Business (), which is different than the consumer Microsoft Store (), which some companies block. Companies are given the option to publish two different types of apps, an "offline" (which wont update automatically via the store) and an "online" (should update via the store) version. The “online” version will update the app in Company Portal as well, so every time a user installs it from Company Portal, it’s the newest version.
Keeper Desktop for Mac
Minimum Requirements:
Mac OS 10.10+ with Intel or Apple M1 ARM-based processor, 64-bit. 512MB RAM. Keeper Desktop for Mac contains a universal installer which is optimized for both chipsets.
Auto-Updates: Yes
Download Link:
(.dmg)
Keeper Desktop for Linux
Minimum Requirements:
Fedora 28 or aboveUbuntu LTS releases 16.04 or above
Red Hat Enterprise Linux 7.0 or above
CentOS version 7.3 and above
Debian 8 and above
Hardware: 512MB RAM
Auto-Updates: No
Download Links:
Snap Store:
Keeper for Linux -
Keeper for Linux -
Checksum / Hash
For file verification, Keeper Desktop SHA1 hashes are computed based on the most recent version and can be retrieved at the below URL:
Enterprise Configuration
Keeper supports Enterprise Configuration settings to control the end-user experience.
Configuration Options
Key
Type
Description
macOS User Defaults
Keeper Desktop can be configured using standardmacOS NSUserDefaults objects using the com.keepersecurity.passwordmanager domain. If your MDM solution is able to push macOS user defaults, you can use this method for enforcing configuration settings. Note the capital letter on the key value.
Testing the Config
You can test the configuration on the local machine using the below commands:
For example:
macOS - Information Property List File
Keeper Desktop's mac app bundle has an Information Property List File, Info.plist, which contains key-value pairs that identify and configure a bundle.
Finding the App Bundle ID and App Version
The following keys in Information Property List file contains the values for the App Bundle ID and App Version:
CFBundleIdentifier: App Bundle ID
CFBundleShortVersionString: App Version
To find the values of the above keys, you need to access the Information Property List File, Info.plist, and find the corresponding values.
Location of Info.plist after mounting DMG file:
Alternatively, you can run the defaults read command:
For the Keeper Desktop App, running the following commands would give you the App Bundle ID and Version:
JSON Configuration File
All Windows, macOS and Linux end-user installations can be configured by using a UTF-8 encoded JSON file placed in the user's home folder under ".keeper/desktop.config.json". Note the identifiers are using camel case for JSON defaults with a lowercase on the first letter.
Example File
macOS End Users
Alternatively, for macOS end-users, Keeper Desktop can be configured using the standardmacOS NSUserDefaults. Visit the following for more information.
The desktop.config.json file must be UTF-8 encoded.
From your text editor, in File > Save As...
In the "Save as type" drop-down, select All Files.
Default SSO Browser Setting
In addition to the domainName, region and hideCreateAccount settings you can set with the desktop.config.json file, you can create a similar file to define whether the 'Use Default Browser For SSO' flag is enabled or disabled by default:
Note that Keeper can automatically route your users to the proper enterprise tenant, SSO provider and data center based on the email domain that they type into the Keeper login form. If you are using SSO, make sure that the "Just In Time Provisioning" option is enabled in the SSO configuration. Also, ensure that your domain is , which means that typing anything @ yourcompany.com will get routed to the proper region.
If the routing of user to the proper region and SSO is not working correctly for you, please open a support ticket.
Creating Vault Records
How to create, manage, import and export data in your Keeper vault
What's a Keeper Record?
A Keeper record can be any password, file or secret information that is stored in your encrypted vault. When a new user signs up for Keeper, they are walked through a step-by-step guide to import existing passwords from their web browser, other password manager or file upload. They will also be walked through the process of creating records manually through their desktop computer.
Users can create new vault records many different ways including:
Secure biometric login using Touch ID on compatible MacBook Pro computers
Secure biometric login using Windows Hello
Windows Hello for Business, including biometrics and smart card capabilities
Increased performance
Offline access using biometrics or master password (if permitted by Keeper Admin)
Windows 11 MSIX Installer:
Auto-Updates: No
MSIX Installer Link
Command-line deployment:
Windows 11 MSI Installer:Auto-Updates: No
Windows Hello: NoMSI Installer Link
Password Importer Standalone (Windows 11):
Auto-Updates: No
Install Link (32-bit .exe)
Install Link (64-bit .exe)
NOTE: The Password Importer may need to be allowed by your endpoint security product, since it is designed to extract passwords from your Chrome and Edge browsers.
Password Importer Standalone (macOS):
Auto-Updates: NoInstall Link
The email invitation template supports customization of the following four attributes:
Subject
Message Heading
Message
Download Button Text
The body of the message supports plain text as well as basic markdown syntax.
Once you have finalized your changes, click Save. When you are ready to add your users, they will receive your customized invite similar to the one below.
This will generate an email inviting the users to setup their Keeper account.
Check the box next to "Transfer Account" and click OK.
As a second step, Enable Account Transfer for the Keeper Administrator Role. This will allow the vaults of you and any delegated admins, under the Keeper Administrator role to be transferred.
Admin > Roles > Keeper Administrator
Click Enforcement Policies
From the Transfer Account tab, toggle "Enable Account Transfer" on then click Done.
All users will be notified and are required to acknowledge the organization's ability to transfer records from their vault. Users only have to agree to this consent one time, upon logging into their vault.
To ensure that a certain role is applied to all imported users, enable the “Set as Default Role for Node and Sub Nodes” setting. This will automatically assign new users that are added to a Node or Sub Node to a specified role.
Admin > Roles select the target role then check the box next to "Set as Default Role for Node and Sub Nodes".
Vault Features
Record Types
Sharing & Uploading
KeeperFill
Account Settings
Allow IP List
Keeper Secrets Manager
Transfer Account
Admin > Users > Add Users
Select the Node you would like to add the users to then simply drag and drop your formatted CSV file of users or click Browse Files to upload the file from your local device (the Role field is optional). To learn more about formatting your CSV file, click here.
Review the user details and click Add to complete the import.
This will generate an email inviting the users to setup their Keeper account. Instructions to customize the email can be found in the "Key Configuration Steps" section, above.
Keeper integrates with any SAML 2.0 identity provider for just-in-time provisioning:
Entra ID / Azure AD
Okta
Google Workspace
Microsoft AD FS
Amazon AWS
Auth0
Centrify
Duo SSO
F5
OneLogin
Ping Identity
PingOne
Rippling
RSA SecurID Access
SecureAuth
Shibboleth
Any other SAML 2.0 identity provider
See the section to learn more.
Disable record edits
Apply privacy screen
Click the add icon to add individual Users and Roles to the team.
Team-to-role mapping allows organizations to assign users directly to teams that can be assigned custom roles. With team-to-role mapping, a user who is a member of a team that is assigned to a role, will assume the enforcements of the given role.
It's important to note, that Keeper implements Least-Privileged policies, so when a user is a member of multiple roles or teams, their net policy is most restrictive or least privileged.
To learn more about teams and team-to-role mapping, click here.
Manual creation on the Desktop App, Web Vault, Browser Extensions or Mobile App
Import from another password manager like Chrome, Apple Passwords, KeePass, LastPass, Dashlane, 1Password and many more.
Import from a .CSV or .JSON text file
Automated LastPass transfer Vault-to-Vault
Command-line and automated SDK
Records created in any platform will instantly sync to the user's other devices. Records that are shared among users will receive updates in real time.
Import from Web Browsers
Keeper's Import Tool will seamlessly import passwords that are stored in Chrome, Firefox, Safari, iCloud, Edge and Internet Explorer web browsers on your computer.
From the Web Vault or Desktop App, click your account email address > Settings > Import. On the Web Vault, you will be then prompted to download Keeper's Import Tool. On the Desktop App, the import will start immediately.
Keeper support drag-and-drop import of files from other password managers or text files. From the Web Vault or Keeper Desktop app, select Settings > Import and then select the password manager you'd like to import your passwords from. Click View Import Instructions for step-by-step instructions to generate the proper file format from the original password manager. Once the file has been created, drag-and-drop it into the "Drop a File Here" field.
Import Options
Import from Password Manager
Automated Import from LastPass
Keeper's Desktop Application supports an automated transfer of vault records from LastPass to Keeper. To perform an import, follow these steps:
Login to Keeper Desktop using your Master Password or SSO.
Click on your account emailaddress in the upper right-hand corner.
Click Settings > Import.
Choose LastPass.
Input your LastPass Email and Password and click Next.
LastPass Automated Import from Keeper Desktop
Bulk Import from .CSV File
Keeper's CSV import method also supports advanced structure including Folders, Subfolders and Shared Folders.
File Format
• To specify subfolders, use backslash "\" between folder names
• To make a Shared Folder specify the name or path to it in the 7th field
Example 1: Create a regular folder at the root level with 2 custom fields
Example 2: Create a shared subfolder with edit and re-share permission, inside a regular folder
Example 3: Create a shared folder with edit and re-share permission on the outside and a nested folder tree underneath.
In this 3rd example, the outer shared folder is called "Family Records" and underneath is a folder tree. The record is added to the nested folder 3 levels down.
To visually see how the import will look, drag and drop the file into the Import screen and click Next. You'll see a preview of the structure:
The Keeper Commander SDK provides command-line or scripted capabilities to import records and folders into your Keeper Vault. Supported import formats are JSON, CSV, LastPass and Keepass.
JSON import files can contain records, folders, subfolders, shared folders, default folder permissions and user/team permissions.
Keepass files will transfer records, file attachments, folders and subfolders.
LastPass import will transfer records, file attachments, shared folders and permissions.
Cyberark import will transfer all Password Vault Web Access (PVWA) accounts and passwords.
Delinea import will automatically migrate Secret Server data into Keeper which includes private folders, shared folders, permissions, file attachments, TOTP codes.
Most features available in the Keeper Admin Console are available through Commander's interactive shell and SDK interface. .
Keeper provides many ways of importing structured data. See the Importing Data page for additional details.
Manual Record Creation
From any Keeper Vault application, select Create New > Record to add a record. When creating a record, you may select the Dice icon to generate a strong, unique password or passphrase. Once you have entered the details of your records, click Save to finish.
Keeper's password generator "Dice" button will auto-generate a strong and complex password. The user can customize the length and complexity level. Admin policies can also enforce the password complexity strength on a global or per-domain basis via Role policies.
Visit the target website's "Change Password" page to update the password using the KeeperFill browser extension.
KeeperFill Browser Extension
The Keeper Browser Extension for Chrome, Firefox, Safari, Edge, Opera and other Chromium-based browsers can be used to dynamically add records to your vault and Autofill passwords.
Create New records
From any website login screen, select Create New and then fill in the appropriate fields. Select the check mark to save the record and autofill the login and password.
Add or Create New Record
Prompt to Login & Fill
When visiting a website login screen, Keeper will ask you to automatically login with your saved password.
Autofill Login Credentials With Keeper
Prompt to Change Password
KeeperFill makes it easy to change your passwords. When a user visits a site's "Change Password" form, you will receive a prompt from Keeper asking if you would like help changing your password. By clicking Yes Keeper will run a wizard that walks you through a few quick steps to change your password and simultaneously update the record in your vault. These steps will include a series of prompts detailing the following actions:
Autofill your old/current password
Automatically generate and autofill a new secure password
Confirm the changes and save them to your vault
KeeperFill's Password Change Prompt
Keeper Record Fields
Based on the Record Type, the fields contained in a Keeper record will vary. Keeper has many built-in record types, and customers are also able to create their own record templates.
Keeper Login Record Type
A Keeper Login record is made up of the following fields:
Type
Title
Login (Email or Username)
Password or Passphrase
Website Address - This field is required to Autofill forms on websites. For security reasons, the website address (e.g. google.com) must match the website that you are visiting.
Custom Fields - Custom Fields streamline website information entry by auto-filling details like PINs and other private information. By mapping a website field to a Custom Field Name, Keeper enables auto-fill for that field.
Custom Field Types
Autofilled Custom Field
File Attachments - File attachments can be any type of file, photo, video or other document. An unlimited number of files can be attached to any Keeper vault record. Note that Secure File Storage is an add-on subscription.
Two-Factor Codes - Keeper can protect and generate 2FA codes for any website or service that supports the use of TOTP (Time-Based One-Time-Passwords).
Notes - Any free-form notes can be protected in this field such as access instructions or confidential documentation.
Self-Destruct - Allows you to create a that will be shared to another user and automatically deleted from both sides after viewing.
Individual Record Sharing
Keeper records can be shared on an individual basis to other Keeper users. Keeper sharing technology uses secure elliptic curve encryption to exchange the individual record keys. Therefore, in order to share or transfer a record to another user, the recipient must first have a Keeper account. Attempting to share to a user without a Keeper account will invite them to the platform.
To share a Keeper record with another user, while viewing the record, select Options > Share and then enter the email address of the recipient (or select from previously shared users). Edit and re-share permission can be applied to any shared records. Role enforcement policies can be applied from the Keeper Admin Console to control the ability for records to be shared.
Only the owner of a record is able to delete a record. A non-owner may see a Delete button but this will only remove the record from the non-owner's vault. When the owner of a record deletes it from their vault, it will delete it from everyone's vault.
Shared folders can also be created which contain records, teams, users and permissions. You can create Shared Folders from the Web Vault, Commander CLI, import files or Desktop/Mobile Apps.
Record ownership can be transferred to another Keeper user. To perform a transfer, while viewing a record, select Options > Share and enter the email address of the recipient (or select from previously shared users). Select Transfer Ownership from the sharing permission dropdown menu. Note that after transferring record ownership, the record will no longer be accessible from your vault.
Transfer Ownership
Creating Records with Commander CLI and SDKs
Keeper supports the creation of records programmatically using JSON, CSV and other formats through the Keeper Commander CLI tool.
Relevant commands:
with Commander CLI
with Commander CLI
Bulk Record Push from Admin
Through the use of Keeper Commander, records can be pushed to users in bulk.
Example usage of the "enterprise-push" command:
The "push.json" file is structured an an array of password object, for example:
Supported template parameters:
Version History
Every record created by a user is automatically backed-up through the Keeper Cloud Security Vault architecture. Every record change is also backed-up and a record version is created upon each change event. Each record is identified by a record UID and each record can have an unlimited number of version identifiers.
Version History is a critical capability to ensure that a password or record change is never lost by accident. Version History also ensures that a deleted record can be recovered.
When a record is deleted by the record owner, the record is moved into the Deleted Records trash bin. Records will remain in this location until the record owner explicitly empties the trash bin.
Users can view the Version History of any Keeper record through Keeper Web Vault or Keeper Desktop App. To view a record's history, select a record, then select Options > Record History.
Record History
Each record version is tagged with a version number and modification date. Click on the record to display the old version. Then click on "Restore" to revert back to the old version. Restoring the version will also generate a new revision.
Record Version History
Version Restore
Keeper Commander supports record history management through the command:
Data Export
The Keeper Web Vault and Keeper Desktop App include an Export capability which can be enabled by the Keeper Administrator. Exporting records from your vault can serve as a backup mechanism, however this does not retain any information about sharing relationships, folder structure or file attachments. If Export is allowed by the Keeper Administrator, we recommend that the customer stores the exported files in a secure location on an encrypted file system. The security and encryption model of Keeper purposely does not permit a Keeper Administrator to export user vaults. A user must be authorized on a Keeper record via the Team or User sharing capability in order to access and export vault information.
Keeper Commander has the additional capability of exporting data to an encrypted Keepass file which retains file attachments.
Relevant commands:
Offline Mode
Offline Mode allows users to have access to their vault from a web browser when they are not able to connect online to Keeper or to their SSO (if they have one). Note that “thick clients” such as desktop and mobile phones already have this capability, but it has been extended to users operating from web browsers.
Offline Mode is made possible by making a copy of your encrypted vault to your local device. A user's vault data is stored in an encrypted format which is only accessible by providing their Master Password or biometric. Note, multiple users can share a single device (e.g. a laptop PC) and all users are able have their vault stored safely on that PC when offline.
User Device Setup
A user’s devices (e.g. laptops that might not have offline access) will need to be “primed” with a cache of their vault by logging in with an online connection at least once. A mirror copy of their vault will be replicated to that device once completed.
User Login & Vault status
User’s will know if their vault is available when offline via a lightning bolt icon indicating it has been loaded on that device when they attempt to access their vault offline. If the icon is not present, then that device will need to be setup using the steps described above. The X next to the user's email address allows a user to delete the local copy of their vault from the device.
Click on "Work Offline" to use Keeper in offline mode. Offline mode must be explicitly approved by the Keeper Administrator in the Role enforcement settings.
Work Offline
Once logged in, a user will know if they are offline by an Offline Mode text indicator at the top of their vault screen.
Offline Mode
Not all vault features are available online and records will be "read only". For instance users can't create any new vault content such as record or folders when offline. When such a limitation occurs then a notice will be displayed.
SSO Account
If your organization's SSO is not available (e.g. is offline), then click on Work Offline to gain access to your vault offline using a Master Password.
Note: A user's Master Password has to be setup by the user via the Settings menu for this offline access to be available.
${user_email} User email address
${generate_password} Generate random password
${user_name} User full name
Record Types
How to create and manage new types of records in your Vault
Record Types Overview
A Keeper Record Type is a structured template that can contain any type of information such as logins, payment cards, bank accounts, and many more. There are several out-of-the-box record types available, and Admins can create custom types that fit the needs of your organization. Custom record types can be created for all users, or users within specific roles.
Some record types provide enhanced functionality, such as KeeperPAM resources.
Video Demo
Standard Record Types
Below are the list of available record types which are available for all customers.
Record Type
Description
Login
The set of data needed to successfully login to a website.
Payment Card
Credit card information, used in autofilling of forms. Payment cards can also be "linked" to other records, to reduce duplication of data.
Contact
Identity information about a particular person. We recommend you create one with your information, used in autofilling of forms.
KeeperPAM Record Types
KeeperPAM Resource records are special record types designed to organize and store information of your target infrastructure, machines and user accounts. These record types are reserved for KeeperPAM privileged access management tenants.
Record Type
Description
Contains information about target infrastructure being managed for privileged access management. PAM Configurations can be one of the following sub-types: Local Network, AWS, Azure or Active Directory.
Server or VM instance, such as Windows, macOS, Linux.
A database such as MySQL, PostgreSQL, SQL Server, MongoDB, MariaDB and Oracle
Custom Fields
On any record created as a new Record Type, there are several new "Custom Field" types available that can be added to any record.
Custom Field Types
Available Custom Record Fields
Text
Date
Pin Code
URL
Email
Phone Number
Security Question & Answer
Name
Payment Card
Multi-line Text
Address
Hidden Field
Native App Filler (see )
Sharing
Record Types can be shared to other users, either direct sharing or within a Shared Folder, just like any other record. This now includes Payment Cards and Contact record types.
The Payment Cards stored in the "Identity & Payments" section of the vault is separate, and cannot be shared to other users. To make a Payment Card available for sharing, please create the record within the Vault section.
Creating Payment Cards
To create Payment Cards that can be shared to other users, click on Create New > Record > then select the Payment Card type.
Record Type Sorting
Each user can set sorting of the record types which appear when creating new records. Visit Settings > Record Type Sorting > Edit Order.
Record Type Sorting
Custom Record Types
Keeper Business and Enterprise customers can define totally custom Record Types for their specific needs.
In order to create new custom Record Types, the user must be in an Administrative role with the "Manage Record Types in Vault" permission activated as seen below in the Admin Console role permission interface.
To activate this permission, visit Roles > Select Role > Hover over gear icon > Administrative Permissions.
Enable Record Type Permission
Once the permission is activated, the Admin can login to the Web Vault or Desktop App to create a record type.
From the Keeper Vault application, select Create New > Custom Record Type:
You can create the new template based on an existing template, or you can start with a blank record and add the required fields:
New "Blank Type" Record Type with the name "Crypto Wallet"
Within the new Record Type screen, you are able to define what fields will exist within this template. You are able to add, remove and re-order any field types you wish to. Add new fields by clicking the Add New Field button.
Custom Record Type Fields
Available Fields
Login
Password
URL (website address) used for Autofill
Two-Factor (TOTP) code with seed
File attachment
Security Question & Answer
Single-line Text
Multi-line Text
Hidden Field
Hostname or IP Address
Date
Payment Card
Bank Account
PIN Code (4-digit numeric)
Name
Email Address
Address
Phone Number
Native App Filler (see )
As an example, here's a custom record type that may represent a "Crypto Wallet" type:
Crypto Wallet Record Type Fields
Password Complexity and Security
One of the core benefits of Custom Record Types is the ability to specify password security settings at the Type-level. You can specify the following:
Require the password field to have a value
Require the use of the "dice" button to generate the password
Set password complexity rules
Enable "Privacy Screen" on the record
With Privacy Screen enabled, passwords are not visible from the user interface serving as a deterrent from viewing. Password masking is only visual in nature and the password is still stored in the user's vault and accessible via API communication and browser inspection.
Password Complexity and Security
Field Types Available for Custom Record Types
Field Name
Description
Title
Mandatory field, the title of the record, does not have to be unique
Login
The standard login field, this is used to autofill records.
Password
The standard password field, this is used to autofill records. Only one password field can be present for a particular record. If an account has multiple, use hidden fields or pin codes.
All fields can have a custom label associated with them and any field can be marked as a required field. Additionally, masking can be enabled on any non-password field, which will prevent the field values from being displayed by default. The visibility can be toggled via the eyeball icon.
After all needed fields have been added to the page, they can then be sorted via drag-and-drop. Click the Publish button to make it available to all users who have the record type enabled in their role policy enforcements.
Publish a new Record Type
Managing Record Types by Role
To add and remove record types for your users, login to the Keeper Admin Console > Roles > Enforcement Policies and visit the Record Types screen. From here, you can turn on or off different record types on a role basis.
By default, a role can use all Record Types
If a user is part of multiple roles, disabling a record type in any role will prevent creation of those record types for the user.
If all record types are disabled, the user will be unable to create records.
If you would like to make a global change for all users, disable the Record Type in the default role.
Enable Record Types by Enforcement Policy
Converting Types
To convert a record to a different type, right-click the record from the Keeper Web Vault or Desktop App and select "Change Type".
Change Record Type from Vault UI
Select a new Record Type
Notes about Record Type conversion:
The "General" record type is Keeper's legacy record version.
When converting between record types, fields that don't exist in other types will be saved as custom fields.
Commander CLI
Manage Record Types programmatically using the Keeper Commander CLI tool. Relevant commands:
Private folder and shared team folders in the Keeper Vault
Overview
Keeper's Private Folder, Shared Folder and Subfolder capabilities are flexible and secure. Private Folders and Shared Folders can be created within the vault (if permitted by the Admin). Users and may be provisioned automatically from SCIM-connected identity providers such as Azure, Okta and Google Workspace allowing for simple setup of shared folder permissions. Teams can also be provisioned from Active Directory through the , or using Keeper's APIs.
Private Folder
A private folder is only visible to the user who created the folder and can be made up of subfolders and records. A folder can also contain other shared folders and shared records. To create a private folder, click Create New > Folder. Choose where you would like to nest the folder using the dropdown menu. You can select the parent folder or select My Vault to add the folder at the root level.
Private Folder
Shared Folder
A shared folder can be shared with an individual Keeper user or with a Team of users (as designated in the Admin Console). Shared Folder permissions can be applied to Users, Teams and Records.
To create a Shared Folder, click Create New > Shared Folder. Choose where you would like to nest the folder using the dropdown menu. You can select the parent folder or select My Vault to add the folder at the root level. Next enter the name of the folder and set the User and Folder Permissions.
Create New > Shared Folder
New Shared Folder Creation
A Team can be setup in the Admin Console manually from AdminPanel and the Teams tab by clicking on the Add Team button and then selecting users via the + user checkbox dialogue.
Alternatively, when a user is provisioned to a Team through any of the previously described onboarding methods (Active Directory Bridge, SSO, Azure AD, SCIM, API, etc...), the user will instantly receive the shared folders for that team, and the records associated with those shared folders. When the user is removed from a team, their access is revoked from any shared folders and those folders are immediately removed from their vault.
Any user within the Keeper Vault can create a private folder or shared folder (unless restricted by their Keeper Administrator).
Add Records & Set Record Permissions
You can add records to the folder by a simple drag-and-drop or you can click Edit and add the records using the record search bar.
Add Records to a Folder via Drag-and-Drop
Record Permissions are used to govern folder members' (users) interactions with each individual record in the folder. You can access these permissions from the Records Tab by clicking Edit and then the dropdown icon next to each record name.
Record Permissions in a Shared Folder
Permission
Description
Can Edit
Users in the folder can edit this record
Can Share
Users in the folder can share this record
Can Edit & Share
Users in the folder can edit and share this record
Add Users & Set User Permissions
While in Edit mode, from the "Users" tab, click within the email address field and enter the email address of the Keeper user (including Share Admins) or Team you would like to share the folder with.
Next, set the user permissions by clicking on the dropdown arrow next to each user's email.
Shared Folder User and Team Permissions
Sharing can automatically expire after a set amount of time, or on a specified date.
Time-Limited Folder Access
Permission
Description
Can Manage Users
The user can add or remove other users in the folder
Can Manage Records
The user can add or remove records in the folder
Can Manage Users & Records
The user can add or remove other users and records in the folder
Advanced Permission Controls
In the Keeper Admin Console, role-based enforcement policies control the ability of users to use sharing capabilities. To modify sharing and creation permissions, visit the Admin Console > Roles > Enforcement Policies > Creating and Sharing for the specified role.
Creating and Sharing Policies
Permission
Can create records
Can create records in side shared folder only
Can duplicate records
Can create folders
Can create folders inside shared folders only
Subfolders
To create a Subfolder within a Shared Folder, right-click on a Shared Folder and select New Folder. You can add records to the folder by a simple drag-and-drop or you can click Edit and add the records using the record search bar.
Right-Click Menu
While viewing the records within a Shared Folder, click the Edit Icon and check the box next to “Show subfolder records" located in the Records tab to include those records in view or leave it unchecked to collapse them from view.
Show Subfolder Records
Both private and shared folders can be nested and contain an unlimited number of records or subfolders. Each subfolder inherits the same permissions structure as the parent folder.
If the parent folder is a shared folder and you move a private folder into it, the private folder will now inherit the permissions set from the shared folder, including the users that have permission to view and edit that folder and its records.
In the screen capture below, KeeperPAM Demo folder and subfolders are not shared, but the KeeperPAM Accounts in US-WEST-1 (California) are shared.
Private and Shared Folder Structure
Applications
For customers using Keeper Secrets Manager or KeeperPAM, a Shared Folder can also be assigned to a Secrets Manager Application. An Application can represent a CI/CD platform such as Github or Gitlab, or it can be used with the Keeper Gateway or Keeper Connection Manager for establishing privileged sessions. To learn more about KeeperPAM, visit the PAM documentation.
KeeperPAM Applications assigned to a Shared Folder
Default Shared Folder Settings
Default Shared Folder Settings are configured in order to easily set folder permissions for all users and records within the folder and subfolder(s). These are selected upon the initial creation of the Shared Folder but you can change them at any time by clicking the edit icon in the upper right corner of the shared folder.
Please note, newly created records inherit these permissions when adding users or records to the shared folder.
Edit Shared Folder
If you would also like to apply the permissions change to your subfolder records, you must first check the box next to "Show subfolder records" located within the "Records" tab.
"Show Subfolder Records" Configuration
Next, select the "Settings" tab and click each dropdown arrow to set your default "User" and "Record" permissions for the folder.
Shared Folder Settings
Optionally, check the box next to "Apply permissions to existing [x] records" to apply the changes to any existing folder records. You can also check the box next "Apply permissions to all subfolders ([x] records)".
If the default folder settings are not set properly, users who add records to the Shared Folder will find that the records are "View Only" by other members of the Shared Folder, even if those users have "Can Manage Records" permission. If you would like all folder members to have edit rights over all records that are added to the folder, set the Record Permissions setting to "Can Edit"
The "Can Manage Records" User Permissions setting only allows users the ability to add or remove records, it does NOT give them record permissions.
Once the default folder settings are configured, it will only affect users added after the change was made. To edit permissions for the users added prior to the default settings change, edit them individually or through a bulk change from the "Users" tab.
A bulk change can be achieved by checking the box next to "Name" and clicking the "Permissions" dropdown to make your selection.
Bulk Permissions Change to Shared Folders Users
Notes for Managing Folders and Subfolders
A Folder and a Shared Folder are objects that are created independently of records. Keeper's implementation of Subfolders (Nested Folders) is powerful and flexible, providing Enterprise customers with the most secure encryption model while providing ease-of-use functionality such as drag-and-drop.
A folder can be made up of private records, shared records or other regular subfolders.
Subfolders can be either shared or private.
You can create an unlimited number of folders and shared folders.
A shared folder can be made up of an unlimited number of subfolders, each subfolder beneath a shared folder retains the permissions of the parent.
There is no limit to the folder tree depth.
A folder is a container of records and record references (shortcuts).
A shared folder is a container of records, with flexible user and team sharing capability.
Folders and subfolders contained within Shared Folders will inherit the permission of the Shared Folder.
Shared folders within other shared folders are currently not supported, however this capability is under development and will be launched soon.
Watch the video below to learn about creating shared folders and assigning permissions.
Bulk Record Permission Changes with Commander
Keeper Commander, our command-line SDK toolkit, provides a method of bulk record permission changes. Commander has special features that can be executed on the CLI instead of using the user interface.
To download Keeper Commander binaries on Mac or PC please visit:
In this example, we will recursively change the record permissions in a Shared Folder.
(1) Identify the Shared Folder UID on the Vault user interface, or from the Commander CLI.
On Commander, you can use the "ls -l" command, similar to a Bash shell.
Finding the Shared Folder UID
On the Vault user interface, you can click on the info icon to display the Shared Folder UID.
Shared Folder UID
(2) On Commander, execute the "record-permission" command with the "--dry-run" option to simulate the command. In this example, the Shared Folder UID is "-FHdesR_GSERHUwBg4vTXw". The command is below:
As you can see, the Shared Folder UID starts with a dash so we add "--" before the identifier to escape the character.
Running this command produces the following output:
The "SKIP" section is saying that the current user on Commander cannot make those requested changes, because we are not the owner of the record. The "GRANT" section indicates the changes that will be allowed.
(3) To execute the command, we remove the "--dry-run" portion:
Now, on the Vault UI, the permission of those affected records has been changed to "Can Edit".
Permissions Updated
If you are in a situation with many record owners in the same shared folder that require update, each of those users can simply run the above Commander action to change the permissions of their respective records.
Share Admin
Keeper's Share Admin feature is a role-based permission that gives administrators elevated access rights over your organization's shared folders and shared records.
A record can exist outside of a folder, inside a folder or inside a Shared Folder. A record can also be linked into multiple folders or Shared Folders. A linked record is also referred to as a Shortcut. In either case, modifying a linked record will change it everywhere it has a shortcut.
There are two ways to move a record into a folder:
Drag-and-drop the record from the list of records and select Move when prompted
Right-click on a record and select Move To...
Watch the video below to learn about adding records to shared folders.
Creating Record Shortcuts
Use one of the following methods to to add a record to multiple folders (create a Shortcut):
Select the Folder and then select Edit. In the Add Records search box, search for the records to add and select Add. This method will always add a Shortcut to the folder.
Drag-and-Drop the record from list of records and select Create Shortcut when prompted
Right-click on a record from the list of records and select Create Shortcut...
Teams in Shared Folders
Teams are created by the Keeper Administrator, or any user who has been given administrative permissions for a specific node or organizational unit. A team is made up of users within a node or sub-node. Additionally, there is no limit to the number of teams that can be created. Teams can be provisioned using any of the following methods:
Manual creation in the Keeper Admin Console
Automatically provisioned through the Active Directory / LDAP Bridge software
Automatically provisioned through SCIM
Automatically provisioned through the Keeper Commander SDK
At the encryption layer, Teams have a public and private key pair. In order to add a user to a team, you must first be a member of the team because you need to encrypt the Team Key with the recipient's public key. When the recipient logs into their vault, the Team Key is retrieved by decrypting it with the user's private key. This encryption process is automatically handled by the provisioning methods listed above.
Team Level Restrictions
Inside the Admin Console there are several team security options. Teams that are added to a shared folder can be given limited rights:
Disable record re-shares
Disable record edits
Apply privacy screen
Team Level Restrictions
Deleting & Leaving Shared Folders
A user with access to a Shared Folder has the option to remove themselves from the Shared Folder. If the user has been granted the Can Manage Users & Records permission, the user also has the ability to delete the Shared Folder.
Leave Shared Folder vs. Delete Shared Folder
When a Shared Folder is Deleted, the records stored in the shared folder will be moved to the "Deleted Items" section of the vault, for the owner of each record.
Changing Colors of Folders
Users can change the color of a shared folder in order to make is stand out visually. This can be done on both Shared Folders and Private Folders.
Options > Change Color
Choose a Folder Color
Administrative Controls
The use of shared folders can be restricted by the Keeper Administrator in the Roles section of the Keeper Admin Console.
Commander CLI
Folder sharing commands are available from the Keeper Commander CLI tool. This provides advanced users with the ability to script and automate any sharing actions.
Credential record representing an account associated to other PAM resources
URL
The website address of a record, if included will be used for site matching and autofill.
Email
Email address field, validates the string entered matches an email format.
Two-Factor Code
Keeper can protect and generate 2FA codes for any website or service that supports the use of TOTP (Time-Based One-Time-Passwords).
File or Photo
File attachments can be any type of file, photo, video or other document. An unlimited number of files can be attached to any Keeper vault record. File storage is an add-on subscription. If file storage is disabled, please contact your Keeper administrator or the Keeper sales team.
Notes
Mandatory field. Any free-form notes can be protected in this field such as access instructions or confidential documentation.
Security Question and Answer
Typically used for account recovery, one or more security questions and answers can be stored in a record.
Text
Free form text field, single-line.
Multi-line text
Free form text field, multi-line.
Hidden field
Free form text field, hidden by default.
Pin Code
Alphanumeric code field, hidden by default.
Date
Date field, can be manually input or selected via a date picker, validates the string entered matches a date format.
Hostname or IP Address
Hostname or IP field used to store identification information to devices.
Name
Multiple value custom field. It will add First Name, Middle Name, and Last Name fields to the form.
Bank Account
Multiple value custom field. It will add Account number and Routing Number fields to the form.
Phone Number
Multiple value custom field. It will add phone number and extension fields to the form
Payment Card
Dynamically linked to a Payment card record. Data will be displayed within this record, but the source of truth and ability to edit reside in the original record.
Address
Dynamically linked to an Address record. Data will be displayed within this record, but the source of truth and ability to edit reside in the original record.
Native App Filler
Pre-defined Native Autofill capability with OCR screen recognition and auto-type of keystrokes. See the KeeperFill for Apps documentation for detailed instructions on Native App Filler.
Keeper role enforcement policies provide fine-grained control over the security and functionality of your Keeper environment.
Policy Sections:
Login Settings
Master Password Complexity
Master Password Complexity policy enforces a password complexity for users that are assigned the selected role. This policy only applies to users who login with a master password.
Settings include:
Password length
Number of digits
Number of uppercase letters
Important Note about Master Password Complexity and Default Role
When users are initially creating their vault, Keeper looks at all of the Default Roles within the Keeper Enterprise console in order to enforce master complexity rules. Keeper decides the Master Password complexity rules based on the largest value of each Default Role.
Once the account is created, Keeper will use the role assigned to the user to ensure Master Password complexity requirements are enforced on an ongoing basis.
When creating the Keeper Vault, the user will be required to adhere to the complexity requirements.
Master Password Expiration
The Master Password Expiration policy will require users to change the Master Password at the selected time interval (in days). When this policy is turned on, the Master Password will expire and the user will be forced to choose a new Master Password upon their next login. To configure the number of days that the Master Password must be changed, select this setting and make a selection between 10 to 150 days.
This feature does not affect users who login with SSO Connect Cloud.
If a user's Master Password needs to be expired immediately, this can be done from the Users tab. Select the user(s) that you wish to expire the master password for and select the Expire Master Password for all users. This will instantly expire a user's Master Password and require a password reset.
SSO Master Password
This option, which we also refer to as "Alternate Master Password", provides SSO-activated users a way to alternatively login by using their own Master Password instead. This may be useful if the SSO connection is down or the user is offline. This can also be used by SSO-enabled users to log into Keeper Commander CLI.
Customers who normally login to their Keeper Vault using Enterprise SSO Login (SAML 2.0) can also login to Keeper Web Vault, Browser Extension and Keeper Commander using a Master Password. To make use of this capability, it must be enabled by the Keeper Administrator in the role policy and then configured by the user. Offline access can also be achieved with a Master Password for SSO-enabled users when this feature is activated.
Once this policy is activated, each user can follow the below steps to activate their Alternate Master Password:
Login to the Web Vault using SSO
Visit the Settings screen and then click "Setup" or "Edit" to set the Master Password.
Once set, the user can login to Keeper Web Vault by visiting the "Enterprise SSO Login" > "Master Password" screen.
The Master Password login feature for SSO users is only available on the Web Vault, Desktop App, Browser Extension and Commander CLI.
Device Biometrics
Keeper natively supports Windows Hello, Touch ID, Face ID and Android biometrics. Customers who normally login to their Keeper Vault using a Master Password or Enterprise SSO Login can also login to their devices using a biometric. Offline access can also be achieved with a biometric for both Master Password and SSO-enabled users unless the "Restrict offline access" enforcement is applied in the Account Settings policy screen.
Keeper does not store or process biometric data of users. Keeper integrates with the existing biometrics capabilities of the operating system.
Biometric Login with a Passkey
Starting in July 2025, Keeper supports biometric login with a passkey, allowing users to authenticate using a device-bound passkey that replaces all traditional login methods - including master password, SSO, and two-factor authentication (2FA). When enabled, the passkey login acts as a complete replacement for both the first factor (e.g., master password or SSO) and the second factor (e.g., TOTP, SMS, Duo), offering a faster and more secure experience.
Biometric login with a passkey is available on Browser Extension 17.2+, and Web Vault 17.5+.
Separately, Keeper supports the use of device biometrics (e.g., Touch ID, Windows Hello) to replace just the first factor, such as the master password or SSO login, while still requiring 2FA. Both features can be configured independently by administrators through this section.
What is a Passkey and Why It Replaces First and Second Factors:
A passkey is a FIDO2 credential stored securely on the user's device, protected by a local biometric or PIN. Unlike traditional passwords, a passkey is phishing-resistant, device-bound, and cryptographically tied to the service. Because using a passkey requires both possession of the device (something you have) and biometric or PIN verification (something you are or know), it satisfies both authentication factors in a single action. This eliminates the need for separate 2FA mechanisms, while significantly improving security and user experience.
Clarification on Passkey Support – Platform Attachment Only:
Keeper’s biometric login with a passkey exclusively supports platform authenticator attachment. This means the passkey is created and stored locally on the user's device (e.g., laptop, phone, tablet) and is not portable across devices. The user must use the same device on which the passkey was registered to authenticate. We do not support cross-platform (roaming) authenticators such as security keys (e.g., YubiKey or external FIDO tokens). This design ensures that passkeys are tightly bound to a trusted device with built-in biometric protection, simplifying the login flow and improving security.
Two Factor Authentication (2FA)
Turning on the Two-Factor Authentication policy will require users to select and set up a 2FA method when setting up their Keeper profile. Existing users will be forced to enable 2FA if this enforcement is applied.
If 2FA is enforced, the user will be prompted to set up 2FA upon account creation or login
If 2FA is enforced, it cannot be disabled by the user, but they can "Edit" and re-configure their 2FA
In addition to enforcing 2FA, the Admin can also specify how often users are prompted to re-authenticate with a new code.
Note that 2FA is always enforced on the Keeper servers once it has been configured for a user, no matter how often the user is prompted for a code. When a user has authenticated with a 2FA code, a token is generated on the device which is used for subsequent communication to the backend system.
On the user's device, the Admin can decide how often the user is prompted. For example, you can specify that users on Web Vault and Desktop app are prompted every login, but users on mobile devices are prompted once every 30 days. In any case, logging into a new device will always prompt the user.
In addition to specifying the 2FA prompting frequency, the Admin can specify which 2FA methods are available to users within the role. Different roles can be enforced with different methods.
TOTP (Google Authenticator, Microsoft Authenticator or any time-based TOTP generator)
Smartwatch (Apple Watch or Android Wear)
Note: If "Biometric Login with a Passkey" is enabled, and the user creates a passkey on their device, they will not be separately prompted for 2FA on that specific device.
More information on DUO Security and RSA SecurID can be found in the section.
2FA and Device Approval
Keeper's advanced authentication system provides a built-in device verification that provides a second factor via email confirmation when attempting to login on an unrecognized device. If a user has configured 2FA, it can also be used as a method of device approval instead of email (for example, if email access is not possible).
Device Approval with a 2FA code is only possible with accounts that login with a Master Password. Users who login with SSO on a new device are required to use , or approval methods.
Platform Restriction
An Admin can restrict the use of specific platforms to access Keeper including the Web Vault, Browser Extensions, Mobile app, Desktop app, Commander SDK and KeeperChat.
Vault Features
An Admin can prevent users in a role from using standard features in the Vault. Each individual policy is described below.
Disable in-app onboarding
Turning this on will prevent the "Quick Start" module from appearing in users' vaults when they login in for the first time.
The in-app onboarding flow will adapt to the policies set by the Keeper Administrator:
If importing is not allowed, this option will be hidden
If Browser Extension is not allowed, this option will be hidden
Mask custom fields
This will force all custom field names and values to be masked. The user will need to unmask by clicking the eye icon in the record. Here's an example of what this will look like:
Mask notes
This will mask the notes section of a record. The user must click the eye icon unmask the details. Here's an example of what this will look like:
Mask passwords
Passwords are always masked, by default, across all Keeper platforms. On iOS and Android devices, users have the choice of turning password masking On or Off. If this setting is enabled, the users will always have masking enabled, and to view a password will require the user to click on the eye icon.
Pause BreachWatch on Client Devices
When enabled, BreachWatch events will not be sent from the devices to the Keeper Admin Console. The only reason to use this feature might be when using test data or in the initial setup of the Enterprise console. Pausing BreachWatch events will therefore not generate events in the Admin Console or connected reporting systems.
Send BreachWatch Events to Reporting Systems and External SIEM
By default, Keeper sends BreachWatch event data from the user's device to connected SIEM and Advanced Reporting & Alerts reporting tools. The event data flows through to the and connected SIEM systems such as Splunk.
Require Re-authentication (Master Password or biometrics)
This enforcement policy allows you to require users to re-authenticate using either their Master Password or biometric login prior to completing the following actions:
Autofilling passwords
Revealing and copying a password or masked field
Editing, sharing and deleting a record or folder.
Additionally, "Delay re-authentication after minutes of inactivity" allows you to specify how many minutes should pass after inactivity before the user is asked to re-authenticate.
Note: This feature does not apply to SSO users.
Retention of Deleted Records
By default, a deleted record will move into the Owner's trash bin ("Deleted Items"). Keeper provides two enforcement policies to control the handling of deleted items.
Day(s) before records can be cleared permanently
Day(s) before deleted records automatically purge
To prevent the possibility of a user either accidentally or maliciously permanently deleting the records in their vault, you can specify the number of days that a record must sit in the trash bin before being permanently deleted.
Admins can also configure automatic deletion of records that the user has placed into the trash bin.
Record Passwords
Keeper's password and passphrase generator can be enforced as a general policy, or for specific website domains.
Password Generator
The password generator on end-user vaults will adhere to the minimum character length, minimum number of lowercase/uppercase/numbers/symbols and allowed list of symbols as defined here. The symbols used in the password generator will be limited to the selection from the list. By default, all symbols will be used.
Passphrase Generator
The passphrase generator on end-user vaults is enabled by default, but can be disabled by the admin. Passphrases will adhere to the minimum number of words and can be configured to include capital letters and a number. The separators between words will be selected from the list of allowed symbols. By default, a set of symbols is utilized.
Domain-Specific Password, Passphrase and Symbol Policies
Domain-specific policies allow admins to enforce a password complexity privacy rule for a specific domain name, or domain pattern match.
Wildcards (*) can be used to create minimum password complexity rules for more than a single domain.
For example:
*.amazon.com
*.google.com
*.gov
example.com
One can also create a global domain rule using the wildcard character (*) by itself. Keep in mind that overlapping rules will be evaluated to produce the most restrictive outcome. If a wildcard is used by itself, the policy will be enforced for any record which contains any value for the domain name.
Keeper's Privacy Screen feature can be applied at the level, role policy level (based on specific record domains), and at the (template) level.
At the role policy level, the Privacy Screen enforcement policy is used in conjunction with the Generated Password Complexity policy to control the viewing (unmasking) of passwords based on a specified domain. With this policy in place, passwords are not visible from the user interface serving as a deterrent from casual observation. This feature is commonly used to limit viewing of passwords for the non-technically savvy users.
Inside the vault, any record with a matching URL will be locked, and the user will not be able to unmask the password field. If the user has edit rights to the record, they will only be able to update the password field using the password generator.
It is important to note that password masking is only visual in nature and the password is still stored in the user's vault and accessible via API communication and browser inspection. If the admin would like to enforce that users cannot inspect the web pages, we recommend using group policies to prevent users from opening the browser development tools.
This feature can be enabled within the Generated Password Complexity settings by checking the “Apply Privacy Screen” box once a domain has been added.
The Privacy Screen only applies to records that are shared to the user (for role-level Privacy Screen) or team (for team-level Privacy Screen). Users will still be able to view and update passwords for records they own.
Likewise, in the Browser Extension, the Privacy Screen is activated.
Watch the video below to learn more about the Privacy Screen feature.
Record Types
If record types are enabled for your account, specific record types that are not wanted can be enabled or disabled. Both default and custom record types can be enabled or disabled based on the role permissions. Custom record types show up below default types, but the desired order can be controlled within each users vault settings.
Turning off certain record types will affect what shows up in the dropdowns in user vaults:
Note that the left menu item for "Record Types" will not be visible if this capability is not enabled for your enterprise.
If all record types except one are disabled in the console, when creating a record in the vault, the popup to select a record type will not appear. The workflow will continue as if record types has not been enabled for users in that role.
Even if record types are disabled for a portion of users in an organization, this will not limit sharing and editing capabilities. For example, an Admin will be able to share a custom SSH Key record with non-admins and all data in the record will be present.
If records are shared with another organization that does not have record types enabled, the data will be there, but not visible until that organization has record types enabled.
Creating and Sharing
Creating and sharing enforcements offer admins a wide range of granular, flexible restrictions that can be applied to users when both creating and sharing records.
Creating
“Creating” enforcements handle a user’s ability to create records, folders, shared folders and more.
Creating can be customized to:
Create records, including the ability to restrict the creation of records and folders inside shared folders only and duplication of records.
Create folders, including the ability to restrict the creation of folders inside shared folders only.
Create shared folders
Sharing
“Sharing” enforcements handle a user’s ability to share and receive items including one-time share links, file attachments and more.
Sharing can be customized to:
Share and receive items
Share to others by adding records inside shared folders only, preventing a user from adding other users to records and shared folders.
Only receive shared items, preventing a user from adding other users to records and shared folders.
Admins can also individually restrict a users ability to:
Generate One-Time Share links
Create self-destructing records
Create one-time share links with editable fields and file upload capabilities
Import and Export
"Import" and Export" enforcements offers admins more targeted control over their users’ ability to import and export from their vaults.
Importing and exporting can be customized to:
Import into vault, including the ability to restrict importing shared folders from LastPass.
Export from vault
KeeperFill
The KeeperFill policies govern the behavior of the browser extension that allows Keeper users to autofill usernames, passwords, and other credentials on websites and applications.
To learn more about KeeperFill, read our guides.
KeeperFill Browser Extension
Admins can individually enable the various features and settings of the KeeperFill Browser extension.
Supported Enforcement Settings:
Enforce or Disable "Hover Locks"
Enforce or Disable "Autofill Suggestions"
Enforce or Disable "Autofill"
Disable KeeperFill on Specified Websites
Admins can disable KeeperFill on specific websites. This feature supports wildcard characters for matching domain names or URLs. One use case might be to disable KeeperFill for internal applications that have a lot of form fields.
Account Settings
Restrict offline access
Turning this on will prevent users from accessing their Keeper vault without internet access. Toggle this on to enforce the restriction so they can not login offline.
More information about Offline Access is .
Prevent users from changing their email
Turning this on prevents users from changing their email address. Note, SSO-enabled users cannot change their email.
Enable Self-Destruct
Turning this policy on will allow users in this role 5 incorrect password attempts before all locally-stored Keeper data is erased.
Prevent Keeper Family License Invites
Turning this policy on will prevent users from inviting their personal email to a Keeper Family License for personal use. More information about the free Family License for Personal Use is available .
Disable Stay Logged In
Activating this enforcement policy will disable the "Stay Logged In" feature for users in the role. This feature allows users to remain logged in to the Web Vault, Desktop App and Browser Extension in between browser or computer restarts, until the inactivity timer expires. When the enforcement policy is active, users will always be logged out when the application closes, regardless of the inactivity timer.
Default User Setting for Stay Logged In
Set the default "Stay Logged In" setting "on" or "off" for new users in this role. This setting applies only to new users, it is not retroactive.
Logout Timer
The Admin can set the inactivity logout timer for the Web, Mobile and Desktop Apps. A different duration can be set for each, in minutes. This sets the maximum and default time to automatically log out a user from Keeper when they are inactive. If a Keeper user's current timer is set greater than this value, it will be reduced to this default time setting.
Account Recovery
A 24-word auto-generated recovery phrase is a break-glass method of recovering a Keeper Vault if the user forgets their master password. Account recovery can also be used to login to an account if the SSO identity provider is unavailable.
Keeper has implemented recovery phrases using the same BIP39-word list used to protect crypto wallets. The word list in BIP39 is a set of 2,048 words used to generate an encryption key with 256 bits of entropy. Each word in the BIP39 list is carefully selected to improve visibility and make the recovery process less error-prone. More information about account recovery is found at the Keeper .
This policy allows the Admin to disable account recovery for users. This policy to disable account recovery is when customers login with Keeper SSO Connect Cloud with a SAML 2.0 identity provider.
If account recovery is disabled, we recommend that customer enable the to ensure that an Admin can assist a user who is unable to recover their vault (in the case of lost Master Password).
Keeper Invitation
Disable email invitations
If this policy is activated, users in the role will not receive email invitations when their account is provisioned. A use case for this might be if the Admin would like to send their own email invitation instead of the system invite. An additional use case for this would be if the Admin is testing the invite process.
Automatically resend email invitations
The Keeper invitation sent to new users when creating their vault can be re-sent automatically if the user does not create their account in the specified timeframe. The default setting is to only send the email invitation one time. You can increase the frequency depending on the amount of email reminders that you would like users to receive.
By default, Keeper invitations are only valid for 7 days. We recommend automatically resending invitations to ensure the highest levels of adoption.
Allow IP List
Users within the specified role can be restricted to use Keeper outside a set of IP address ranges. The IP address must be your external (public) address as seen by the Keeper infrastructure at the time of user login. To add an IP Range, click on Add Range.
Make sure you test IP Allow on a role that is not associated with your account. Adding an invalid IP range could lock you out, or all of your users. If you run into this situation, please contact Enterprise Support.
Keeper Secrets Manager
If Keeper Secrets Manager is activated on a role, the features will become available on the Web Vault, Desktop App and Commander CLI.
To learn more about Keeper Secrets Manager, see:
Keeper Password Rotation
Keeper Password Rotation allows Keeper customers to securely rotate credentials in any cloud-based or on-prem environment. If Password Rotation is activated on a role, the Password Rotation functionality will appear on the Web Vault, Desktop App and Commander CLI.
Learn more about
Privileged Access Manager
If you are a KeeperPAM customer, you'll have the ability to manage role permissions for all privileged access capabilities through the Privileged Access Manager tab, which also includes Keeper Secrets Manager permissions.
Can create applications and manage secrets
Can create, deploy and manage Keeper Gateways
Can configure rotation settings
Can rotate credentials
Transfer Account
To enable account transfer toggle on the switch and select the eligible role which can perform the account transfer from the dropdown menu.
Accounts can only be transferred after the user accepts the transfer account agreement upon Vault login. It is critical that the Transfer Account policy is configured prior to the time it will need to be used.
For detailed Account Transfer configuration information .
Managing Policies in Keeper Commander CLI
, our command-line CLI and Python-based SDK supports the ability to modify roles and enforcement policies.
For more information, visit:
Here's an example restricting the "Engineering" role to restrict the export of records.
Video Overview
Watch the video below to learn more about Enforcement Policies.
Number of lowercase letters
Number of special characters
Admin can disable a user's 2FA temporarily from the User detail screen in the Admin Console
RSA SecurID
Duo Security
Text Message (SMS)
If account recovery is disabled, this option will be hidden
If Quick Start is completely disabled, this flow will not appear
*.example.com
Create items in the identity and payments tab, including the payment and address records using the KeeperFill Browser Extension.
Upload files
Create two-factor (TOTP) codes in records
Cannot share or receive items, preventing a user from adding other users to records and shared folders and from receiving items from others. If this enforcement is enabled, then the ability to generate One-Time Share links, share records with file attachments and share to users outside of the enterprise will be disabled by default.
Delete records in shared folders
Delete shared folders or subfolders
Share records with file attachments
Can share outside of isolated nodes
Share to users outside of the enterprise
Receive items from users outside of the enterprise
Account Settings > Stay Logged In Between Sessions & Default User Setting
Account Settings > Set Maximum and Default Inactivity Logout Timer
Account Settings > Keeper Invitation & Frequency
Allow IP List Enforcements
Keeper Secrets Manager Enforcements
Privileged Access Manager
Transfer Account Enforcements
Create Shared Folders and Assign Permissions
Add Records to Shared Folders
Keeper Encryption and Security Model Details
The full details of Keeper’s encryption and security model are outlined below, with block diagrams, implementation details and additional resources.
Zero-Knowledge and Zero-Trust Architecture
Keeper is a Zero Knowledge security provider. Zero Knowledge is a system architecture that guarantees the highest levels of security and privacy. Encryption and decryption of data always occurs locally on the user's device.
Our encryption model adheres to the following structure:
Each vault record is encrypted by a unique and client-side generated 256-bit AES encryption key in GCM mode.
Each record-level key is wrapped by a 256-bit AES Shared Folder key if it is contained within a Shared Folder.
For Vault users, the Record and Folder Keys are encrypted with another AES-256 key called the Data Key.
For Secrets Manager users, the Record and Folder Keys are encrypted with a 256-bit AES Application Key.
For users who login with a Master Password, the keys to decrypt and encrypt data are derived from the user’s master password.
For users who login with SSO or Passwordless technology, Elliptic Curve cryptography is used to encrypt and decrypt data at the device level.
All encrypted payloads sent to the Keeper servers are additionally wrapped by a 256-bit AES transmission key in addition to TLS, to protect against MITM attacks. The transmission key is generated on the client device and transferred to the server using ECIES encryption via the server's public EC key.
Starting in Q1 2026, Keeper has started the rollout of Quantum-Resistant Cryptography (QRC) as an additional encryption wrapper on the transmission key.
Sharing of secrets between users uses Elliptic Curve Cryptography for secure key distribution.
Multi-Layer encryption provides access control at the user, group and admin level.
Data is encrypted locally on the user’s device before it is transmitted and stored in Keeper’s Cloud Security Vault. When data is synchronized to another device, the data remains encrypted until it is decrypted on the other device.
Keeper is the most secure, certified, tested and audited password security platform in the world. Keeper has the longest-standing SOC 2 and ISO certifications in the industry. Keeper is ISO 27001, 27017 and 27018 certified. Keeper is GDPR compliant, CCPA compliant, HIPAA compliant, FedRAMP High Authorized and StateRAMP Authorized, PCI DSS certified and certified by TrustArc for privacy.
Keeper complies with the EU-U.S. Data Privacy Framework (“EU-U.S. DPF”), the UK Extension to the EU-U.S. DPF and the Swiss-U.S. Data Privacy Framework (“Swiss-U.S. DPF”) as set forth by the U.S. Department of Commerce. Not only do we implement the most secure levels of encryption, we also adhere to very strict internal practices that are continually audited by third parties to help ensure that we continue to develop secure software and provide the world’s most secure cybersecurity platform.
Data Privacy
Keeper is GDPR compliant and we are committed to ensuring our business processes and products continue to maintain compliance for our customers in the European Union.
Our Privacy Policy can be found here:
Keeper's desktop applications, web applications and mobile applications do not contain any trackers or 3rd party libraries which perform tracking. As an example, for information on Keeper's Android app which shows that no trackers are installed.
Data Isolation
Keeper is a fully SaaS platform and currently hosts data in the following Amazon AWS data centers. Customer may host their Keeper tenant in any preferred primary region. Customer data (stored ciphertext) and access to the platform is isolated to the specific region.
Available Regions
United States (US)
United States Government Cloud (US_GOV)
Europe (EU)
FIPS 140-3 Validation
The Keeper Security Cryptographic Module is FIPS 140-3 validated under certificate #4976. This FIPS 140-3 validation is valid through July 29, 2029. This enables Keeper to meet crypto validation requirements for US Federal and DoD organizations. FIPS 140-3 also aligns with security standards defined by ISO 19790 ensuring consistency with international encryption standards.
Keeper has been issued certificate #4976 under the NIST CMVP. To click the link below:
FedRAMP High Authorized
Keeper Security Government Cloud Password Manager and Privileged Access Manager is a FedRAMP Authorized provider at the High Impact Level, hosted in AWS GovCloud (US). Keeper Security can be found on the .
The Federal Risk and Authorization Management Program (FedRAMP) is a U.S. federal government program that provides a standardized approach to security assessment, authorization and continuous monitoring for cloud products and services. FedRAMP enables government agencies to use modern cloud technologies, with an emphasis on security and protection of federal information and helps accelerate the adoption of secure, cloud solutions. For more information about FedRAMP, please visit .
ITAR Compliance
KSGC supports compliance with the United States International Traffic in Arms Regulations (ITAR). Companies that are subject to ITAR export regulations must control unintended exports by restricting access to protected data to U.S. Citizens and by restricting physical location of protected data to the U.S.
KSGC’s FedRAMP High environment supports ITAR requirements through the following:
Fully compliant data storage hosted on AWS GovCloud and restricted to the U.S.
Secure data encryption in transit and at rest.
Zero-knowledge and zero-trust security, in conjunction with granular permissions, allows organizations to ensure that only approved personnel can access sensitive data.
The Keeper FedRAMP environment has been audited by an independent third-party assessment organization (3PAO) to validate that proper controls are in place to support customer export compliance programs.
For more information about ITAR, please visit .
End-to-End Encryption (E2EE)
Keeper's platform is built with End-to-End Encryption (E2EE) across all devices and endpoints. As described in this technical architecture document:
Data stored in the platform is encrypted locally and encrypted in transit between the user's devices
Information exchanged between Keeper users is encrypted from vault-to-vault
Data at rest is encrypted with multiple layers, starting with AES-256 encryption
Record-Level Encryption
Keeper implements a multi-layered encryption system based on client-side generated keys. Record-level keys and Folder-level keys are generated on the local device which encrypt each stored Vault record (e.g. Password). For example, if you have 10,000 records in your vault, you also have 10,000 AES Record Keys protecting the data.
Keys are generated locally on the device to preserve Zero Knowledge and to support advanced features such as record and folder sharing. Record and Folder Keys are wrapped by other keys, such as the Data Key and Client Key.
All fields and all of the data in the vault is encrypted, including file attachments.
For users who login with a Master Password:
A Master Password Key is derived from the Master Password using PBKDF2 with 1,000,000 rounds and used to unwrap the AES-256 Data Key, which is then used to unwrap the AES-256 Record Keys and Folder Keys. Record Keys are then used to decrypt the stored record information in the vault.
For users who login with Keeper SSO Connect Cloud:
A locally stored Elliptic Curve (EC) key pair is generated locally to encrypt and decrypt the user's Data Key, which then unwraps the Record and Folder keys.
Additional details about the key wrapping is described in the section below.
For users who login with Keeper SSO Connect (On-Prem):
Master Password Hashes and 256-bit AES Master Password Keys are generated by the on-premise SSO Cloud application.
Enterprise Encryption Keys
Business and Enterprise customers can manage many different capabilities of the Keeper platform, such as role-based enforcement policies, provisioning, authentication and team management.
Administrative functions are protected in the Keeper platform by encryption, in addition to authorization. Authorization allows an Admin to access certain capabilities of the platform, but Encryption is used in many ways to ensure that only designated users are able to physically perform functionality or view sensitive information.
Many features within the Administrative features require decryption of keys in order to function and to preserve Zero-Knowledge and Zero-Trust. For example:
Teams have a public and private encryption key pair.
Role policies for Vault Transfer and Device Approvals utilize public and private encryption key pairs
Enterprise-level key pairs are used for sharing usage data from the individual user to the Admin
Keeper's platform as a whole can be thought of as a key management platform, where the keys are in full control of the users and the Keeper Administrators. The underlying complexity of key management is abstracted from users by the friendly front-end interface.
Cloud Authentication
Keeper has created an advanced cloud authentication and network communications model that has been built for the highest levels of privacy, security and trust. A few key features of the authentication model are:
Master Password is never transmitted over the network layer
Unlike most SaaS services, the login credentials never leave the device. PBKDF2 is utilized on the local device to derive a 256-bit AES key used for decryption. A second PBKDF2 key is generated locally and then hashed with HMAC_SHA256 to derive an authentication token. Keeper’s Cloud Security vault has zero knowledge of the user’s decryption key.
Traffic between client device and Keeper Cloud cannot be intercepted or decrypted
Keeper utilizes Key Pinning and additional layers of network-level encryption (Transmission Keys) between the device and the Keeper servers, to ensure that MITM attacks are prevented.
Authentication Methods
Keeper provides several methods of authenticating into the platform.
Master Password
SSO (On-Prem) with SAML 2.0
SSO (Cloud) with SAML 2.0
Device Verification
A user cannot attempt to login to an account without a device approval and verification step.
For customers logging in with a Master Password, device verification can be performed using several new methods including:
Email verification code
2FA code entry from a TOTP or text message
Sending a Keeper Push™ message to recognized devices
For customers who authenticate with Keeper SSO Connect Cloud, device approval performs a key transfer, in which the user's encrypted data key is delivered to the device, which is then decrypted locally using their elliptic curve private key. Device approval methods include the following:
Keeper Push (using push notifications) to existing user devices
Admin Approval via the Keeper Admin Console
Automatic approval via service
Learn more about device approvals .
2FA Verification
2FA can be added to any consumer or business account. Business customers can enforce the use of 2FA with various levels of control and security options.
Starting with version 3 of the Keeper backend API (which corresponds to version 15+ of the Keeper client applications), the 2FA step comes before the Master Password entry. Performing the device verification and 2FA step prior to the Master Password entry phase offers mitigation of several attack vectors including brute force attack, password testing and account enumeration.
Master Password
The user's vault records are encrypted locally with a 256-bit AES-GCM "Record Key" that is randomly generated on the device. The record keys are encrypted with a 256-bit AES-GCM "Data Key" that is also generated randomly on the user's device and unique to each user. For users who login with a Master Password, the Data Key is encrypted with a key derived from the user's Master Password using PBKDF2-HMAC-SHA256 with a 128-bit random salt and 1,000,000 iterations. The encrypted vault ciphertext is stored in the Keeper cloud.
For authentication, a second PBKDF2 key is generated locally on the user's device using 1,000,000 iterations and a 128-bit randomly generated salt. This key is then hashed with SHA256 to derive an authentication token. In the Keeper cloud, the authentication token is super-encrypted with a "user authentication" key. The user authentication key is randomly generated by the server and encrypted with a hardware security module (with a non-exportable key) prior to storage. The user authentication key is used to encrypt the salt, authentication token, user’s encrypted data key and other authentication related fields for alternate authentication methods like biometrics, etc.
SSO (Cloud) with SAML 2.0
Keeper's SSO Cloud capability provides authentication against a SAML 2.0 identity provider, while retaining full Zero Knowledge encryption with the user's vault. An Elliptic Curve (secp256r1) private key key pair is generated on the device. The Data Key of the user is decrypted with the device private key, and the Encrypted Data Key is provided to the user upon successful authentication from their designated identity provider.
SSO (On-Prem) with SAML 2.0
For users who authenticate to Keeper with a SAML 2.0 identity provider, Keeper SSO Connect software is hosted in the customer's environment. The SSO Connect software generates and manages the user's Master Password. The Generated Master Password is then processed with PBKDF2 to derive a key which decrypts the user's other keys such as the Data Key.
SSO Alternate Master Password
Customers who normally login to their Keeper Vault using Enterprise SSO Login (SAML 2.0) can also login to Keeper Web Vault, Browser Extension and Keeper Commander using an "Alternate Master Password". To make use of this capability, it must be enabled by the Keeper Administrator in the role policy and then configured by the user. Offline access can also be achieved with a Master Password for SSO-enabled users when this feature is activated.
This feature may be useful for users for several reasons including:
The requirement to login to the vault in offline mode
The ability to login to the vault if the SSO identity provider is unavailable
Authentication via Keeper Commander CLI (Command Line Interface)
PBKDF2 is used to derive a key from the Alternate Master Password. A hash of the key performs authentication, and the key decrypts the user's Data Key locally on the device. More information is available on SSO Master Password .
Biometrics
Keeper natively supports Windows Hello, Touch ID, Face ID and Android biometrics. Customers who normally login to their Keeper Vault using a Master Password or Enterprise SSO Login (SAML 2.0) can also login to their devices using a biometric. Biometrics must be enabled by the Keeper Administrator in the role policy. Offline access can also be achieved with a biometric for both Master Password and SSO-enabled users when this feature is activated.
When biometric login is enabled on a device, a key is randomly generated locally and stored in the secure enclave (e.g. Keychain or Keystore) of the device. The user's Data Key is encrypted with the biometric key. Upon successful biometric authentication, the key is retrieved and the user is able to decrypt their vault.
Keeper does NOT store or process biometric data of users. Keeper integrates with the existing biometrics capabilities of the operating system to authenticate the user and retrieve the encryption key protected by the device secure enclave.
Passkey Login with Biometrics
Keeper’s passkey-based authentication leverages the FIDO2 WebAuthn standard with platform-bound credentials to deliver a phishing-resistant, cryptographically secure login experience. When a passkey is created, a unique key pair is generated and stored securely on the user’s device, protected by the device’s biometric or PIN-based local authentication. During login, Keeper uses challenge-response authentication to validate the user without transmitting any secrets over the network. Because the private key never leaves the device and the authentication process requires both device possession and biometric presence, passkey login fulfills the requirements for both primary and secondary authentication factors. This approach eliminates reliance on passwords and one-time codes, significantly reducing the attack surface for credential-based threats while maintaining Keeper’s zero-knowledge encryption architecture.
Encryption of Stored Data
New User Creation
For password-based authentication, when users create their account profile, they are required to select a “Master Password”. Users are also able to configure a second factor of authentication using FIDO2 WebAuthn, TOTP, Duo Security, RSA SecurID, SMS or SmartWatch.
If the user is authenticated via Keeper SSO Connect™ Cloud, a 256-bit Elliptic Curve (EC secp256r1) private key is generated and stored locally on each device. The EC device private key is used to decrypt the AES-256 Data Key, and the Data Key decrypts the user's vault record keys and folder keys. No Master Passwords are utilized in this encryption model.
If the user is authenticated via Keeper SSO Connect™ On-Prem (integration with SAML 2.0 identity provider), the Master Password and AES-256 key is auto-generated by the SSO Connect software (hosted and operated by the Enterprise customer on-premise).
Data Storage
The “Data Key” is used to encrypt data that is synchronized to the Cloud Security Vault. For Master Password-based authentication, the “Data Key” is encrypted with the “Master Password Key” (derived from the Master Password using PBKDF2 with 1,000,000 iterations) and this ciphertext is super-encrypted and stored in the Cloud Security Vault. For SSO Cloud-based authentication, the local Device EC (secp256r1) private key is used to decrypt the Data Key. The Data Key decrypts the user's vault cipher record keys
The “Client Key” is used to encrypt data that is stored locally on the user’s device. The “Client Key” is encrypted with the “Data Key” and this ciphertext is stored in the Cloud Security Vault. For Master Password-based authentication, the “Client Key” is also encrypted with the “Master Password Key” and this ciphertext is stored locally on the device for offline use. Offline mode can be controlled by the Enterprise administrator through .
Logging In with a Master Password
When a user logs into a device (with their master password), they first decrypt their Client Key from the Master Password-derived key.
The Client Key is used to decrypt all locally stored data on the device.
The data key unwrapped locally or retrieved from the Cloud Security Vault upon successful authentication is decrypted with the user’s Master Password derived key.
Deploying KeeperPAM in Air-Gapped Environments
Overview
Keeper Privileged Access Management (KeeperPAM) provides centralized management of privileged credentials and access to protected systems.
This document describes how KeeperPAM can be deployed in environments with restricted network connectivity, including environments commonly described as air-gapped. It also outlines the infrastructure requirements necessary for KeeperPAM to operate within supported parameters.
At the current state of the product, KeeperPAM requires AWS cloud infrastructure to function.
Air-Gapped Environment Considerations
An air-gapped environment is typically defined as an environment with limited or controlled connectivity to external networks.
KeeperPAM does not support fully disconnected or offline deployments. Network connectivity between customer-deployed PAM components and Keeper-managed cloud services is required for normal operation.
Environments with restricted or tightly controlled network access may be supported, provided required connectivity is available.
Architecture Overview
KeeperPAM uses a cloud-based architecture where core services are hosted and managed by Keeper Security.
Customer environments deploy PAM components that interact with protected systems and communicate with Keeper cloud services.
At this time, AWS is the only supported cloud provider for KeeperPAM backend services.
Infrastructure Requirements
Keeper Cloud Services
KeeperPAM relies on Keeper Security cloud services hosted in AWS. These services are required for the operation of the product and are managed by Keeper Security. Customers do not deploy or manage these cloud services.
Interact with protected systems within the environment
Communicate with Keeper cloud services hosted in AWS
These components must have network connectivity to the Keeper cloud in order to function.
Network Connectivity Requirements
For KeeperPAM to operate within supported parameters, the following connectivity requirements must be met:
Network connectivity from customer-deployed PAM components to Keeper cloud services hosted in AWS
Connectivity sufficient to allow required communication between PAM components and Keeper cloud services
Fully offline or disconnected environments are not supported.
Deployment in Restricted Network Environments
KeeperPAM may be deployed in environments with restricted or controlled network access, provided that required connectivity to AWS-hosted Keeper services is available.
Deployments that prohibit all external network connectivity are not supported at this time.
Sharing
To share a Keeper Record to another user, Keeper first requests the user’s Elliptic Curve Public Key from the Cloud Security Vault.
The Record Key of each record is encrypted with the recipient’s Elliptic Curve Public Key and synchronized to the user’s Keeper vault via the Cloud Security Vault.
The recipient of the encrypted shared record decrypts the Record Key with their Elliptic Curve Private Key. For optimization, the Record Key will be re-encrypted with the user’s Data Key and the ciphertext is stored in the recipient’s Cloud Security Vault.
Random Number Generator
For all cryptographic functions in the Keeper client device, a secure random number generator is utilized. For example, on web-based applications like the Keeper Web Vault and Browser Extensions, the method of the Web Crypto API is used. On iOS, the method is used. On Android, is used.
Encryption In Transit
The Keeper Cloud Security Vault is protected by APIs which are validated through authorization by the client device. The client retrieves a session token upon login and sends it with each API call. The session token is tracked on the server. Login is performed either by a Master Password, session resumption, or SAML 2.0 SSO authentication.
When using a Master Password, the client device derives a 256-bit "Authentication Key" using PBKDF2-HMAC-SHA256 with 1,000,000 iterations and a 128-bit random salt. An "Authentication Hash" is generated by hashing the Authentication Key using SHA-256. To login, the Authentication Hash is compared against a stored Authentication Hash on the Cloud Security Vault. After login, a session token is generated on the server and sent to the client to be used by the client device for subsequent API requests. The session must be active to allow continued use of client to server communications.
KSI supports 256-bit and 128-bit TLS (1.3 and 1.2) to encrypt all data transport between the client application and KSI's cloud-based storage.
KSI deploys TLS certificates signed by Digicert using the SHA2 algorithm, the most secure signature algorithm currently offered by commercial certificate authorities. SHA2 is significantly more secure than the more widely used SHA1, which could be exploited due to mathematical weakness identified in the algorithm. SHA2 helps protect against the issuance of counterfeit certificates that could be used by an attacker to impersonate a website.
KSI also supports Certificate Transparency (CT), an initiative by Google to create a publicly auditable record of certificates signed by certificate authorities. CT helps guard against issuance of certificates by unauthorized entities. CT is currently supported in the latest versions of the Chrome web browser. More information about Certificate Transparency can be found at: . Keeper supports the following TLS cipher suites (as of October 2023, using AWS security policy ELBSecurityPolicy-TLS13-1-2-2021-06):
TLS_AES_128_GCM_SHA256
TLS_AES_256_GCM_SHA384
TLS_CHACHA20_POLY1305_SHA256
Session Resumption ("Stay Logged In")
Keeper’s “Stay Logged In” feature enforces geographic consistency on persistent sessions to reduce the risk of session hijacking and token replay attacks. When a user resumes a session, Keeper evaluates the geographic distance from the prior session location and identifies significant deviations as potential anomalies. If the location change exceeds the allowed threshold, the session is invalidated and the user is required to re-authenticate before continuing. Enterprise administrators can customize this behavior by defining policies that control the maximum permitted distance for resumed sessions, allowing organizations to balance security requirements with user mobility.
Two-Factor Authentication
To protect against unauthorized access to a customer's account, Keeper also offers Two-Factor Authentication. Two-Factor authentication is an approach to authentication requiring two or more of the three authentication factors: a knowledge factor, a possession factor, and an inherence factor. For more information on Two-Factor Authentication see .
Keeper uses something you know (your password) and something you have (the phone in your possession) to provide users extra security in the case where your Master Password or device is compromised. To do this, we generate (Time-based One-Time Passwords).
Keeper generates a 10-byte secret key using a cryptographically secure random number generator. This code is valid for about a minute, and is sent to the user by SMS, Duo Security, RSA SecurID, TOTP application, Google Authenticator or Keeper DNA-compatible wearable devices.
When using the Google Authenticator or TOTP application on your mobile device, the Keeper server internally generates a QR code containing your secret key, and it is never communicated to a third party. Each time a user deactivates, then reactivates Two-Factor Authentication, a new secret key is generated.
To activate Two-Factor Authentication, visit the Settings screen of the , Desktop App or mobile application. Keeper Business customers can optionally enforce the use of Two-Factor Authentication and supported 2FA methods via the Keeper Admin Console's role enforcement functionality.
Passkeys and FIDO2 WebAuthn Security Keys
Keeper supports Passkeys and FIDO2-compatible WebAuthn security key devices such as YubiKey and Google Titan keys as a second factor. Security keys provide a convenient and secure way to perform two-factor authentication without requiring the user to manually enter 6-digit codes.
Multiple security keys can be configured for a user's vault. For platforms that do not support security key devices, users may fall back to other configured 2FA methods.
To configure a security key and other two-factor authentication methods, visit the 'Settings' screen of the Keeper application.
BreachWatch
Keeper operates a self-contained managed service architecture on Amazon AWS called BreachWatch which is physically separate from the Keeper Backend API and stored user data.
On the BreachWatch servers, a physical Hardware Security Module (HSM) is used to process, hash and store billions of unique passwords from dark web data breaches. Each of these billions of passwords is processed on Keeper's servers using HMAC_SHA512 hashing method, hashed with a Hardware Security Module using a non-exportable key.
On the Keeper end-user client device, when BreachWatch is activated, a HMAC_SHA512 hash is generated based on each stored password and sent to the server. On the server, a second hash is created using HMAC_SHA512 via the Hardware Security Module (HSM) using a non-exportable key. These Hashes-of-Hashes are compared to determine if a password has been breached.
BreachWatch backend architecture was built to prevent correlation of a breached password to an actual password in the user's vault, no matter the size of the data breach. The hashing used in the breached password detection utilizes a physical Hardware Security Module to ensure that hashing can only be performed online - to prevent any threat of brute force attack on the BreachWatch data.
The below system diagram outlines the overall data flow, encryption and BreachWatch hash processing workflows.
In summary:
The passwords are hashed twice with HMAC_512 - once on the client device using a "pepper", and once in the Amazon AWS CloudHSM, using a hardware security module with a non-exportable key.
HMAC_512 is utilized because it takes advantage of a strong hashing function, plus a secret key (which is not exportable). Therefore, an offline attack against the hashes is not feasible.
"Message authentication code" (MAC) with the result of a cryptographic hash function. It is a way to expand the use of hash functions. Its results depend not only on the message but on a second input that can be a secret key.
SAML 2.0 Authentication with SSO Connect Cloud
Keeper SSO Connect Cloud provides Keeper Enterprise customers with a method of authenticating a user and decrypting stored data in a zero-knowledge encrypted vault, with authentication provided through a 3rd party identity provider (IdP) utilizing standard SAML 2.0 protocols in a fully cloud environment.
In this implementation, a user can authenticate through their SSO identity provider and then decrypt the ciphertext of their vault locally on their device. Each device has its own EC (Elliptic Curve) public/private key pair and encrypted data key. Each user has their own Data Key. To sign into a new device, the user must utilize existing devices to perform an approval or an administrator with the privilege can approve a new device.
The importance of this new capability is that the user can decrypt their vault using an encrypted key stored in the Keeper cloud. Zero knowledge is preserved because the Keeper cloud is unable to decrypt the user's Data Key on their device. The Data Key ("DK") of the user is decrypted with the device private key ("DPRIV"), and the Device-Encrypted Data Key ("DEDK") is provided to the user upon successful authentication from their designated identity provider (e.g. Okta, Azure, AD FS, Google Workspace, Duo, Ping, JumpCloud, etc...).
SSO Connect Cloud Data Flow
First Device Flow (New User Onboarding)
The data key, sharing key pair and device EC private/public key pair is generated
Data Key is encrypted with the device EC public key and stored in the cloud (DEDK)
The user logs in with their identity provider (IdP)
Existing Device Flow
The user logs in with their identity provider (IdP).
After IdP login, the signed SAML assertion is verified by Keeper.
Keeper delivers the device-encrypted data key (DEDK) to the user.
New or Unrecognized Device Flow
On every new device, an EC private/public key pair is generated.
The user logs in with their identity provider (IdP).
After IdP login, the signed SAML assertion is verified by Keeper.
Device Approval
A device approval is a mechanism to securely deliver the user’s data key to their new device with zero knowledge.
A user can approve their device by encrypting the data key with the new device public key.
An admin can approve the device from the Admin Console, Commander or automated approval system.
Read more about the Automator service at
Device-level Security for SSO Connect Cloud
For SSO Connect Cloud users, an Elliptic Curve private key is generated and stored locally on each device. For Chromium-based web browsers and Keeper Desktop, the Keeper Vault stores the local device EC private key ("DPRIV") as a non-exportable . On iOS and Mac devices, the key is stored in the device . On Android devices, the key is encrypted with the , utilizing . Where available, Keeper utilizes secure storage mechanisms on each operating system.
The Device Private Key is not directly utilized to encrypt or decrypt vault data. Upon successful authentication from the Identity Provider, a separate key (that is not stored) is utilized for decryption of the vault data. Therefore, offline extraction of the local Device Private Key cannot decrypt a user's vault.
End-User Device Approval
To sign into a new device, the user must utilize existing devices to perform an approval or an administrator with the privilege can approve a new device. New devices generate a new set of public/private keys, and the approving device encrypts the user's data key with the public key of the new device. The new device’s encrypted data key (EDK) is provided to the requesting user/device and then the user is able to decrypt their data key, which then decrypts the user's vault data. Within the decrypted vault data the user can decrypt their other private encryption keys such as record keys, folder keys, team keys, etc.
The importance of this capability is that the user can decrypt their vault using an encrypted key stored by the Keeper cloud, and does not require any on-prem or user-hosted application services to manage the encryption keys. Zero knowledge is preserved because the Keeper cloud is unable to decrypt the user's Data Key on their device. The Data Key of the user is decrypted with the device private key (DPRIV), and the EDK is only provided to the user upon successful authentication from their designated identity provider (e.g. Okta, Azure, AD FS).
From an administrator's perspective, the benefits are: easy setup and no required hosted software to manage encryption keys as described in Keeper's current SSO Connect encryption model.
The only workflow change in this model (compared to on-prem implementation of Keeper SSO Connect) is that the user must perform new device approval on an active device, or delegate the responsibility to a Keeper Administrator to perform device approval.
Administrator Device Approvals
An administrator with the "Can Approve Devices" role privilege is able to perform end-user device approvals using either the Keeper Admin Console or Keeper Commander CLI.
When a user is elevated to an administrative privilege in the Keeper Admin Console, the Enterprise Private Key is encrypted with the new admin's public key.
On the end-user device, each user's data key is encrypted with the Enterprise Public Key and stored in the Keeper cloud as the Enterprise Encrypted Data Key.
When a user requests admin approval, the admin is therefore able to perform an approval by (1) logging into the Admin Console or Commander CLI, (2) decrypting the Enterprise Private Key, retrieving the Enterprise Encrypted Data Key for the user, (3) decrypting the user's data key, and (4) encrypting the data key with the new device's public key.
When performing a device approval, the new Device Encrypted Data Key is securely transmitted back to the user on their new device. On the local device, the end-user then decrypts their data key using the new device private key and the device approval process is complete.
Automated Device Approvals
For enterprise rollouts, Keeper offers customers with a fully self-hosted service that performs end-user device approvals automatically and on-demand. To preserve zero knowledge, this service must be operated by the customer in their cloud or on-prem environment. Keeper offers several methods of hosting the Keeper Automator service in Azure, AWS, Google Cloud and other dedicated environments.
about the Keeper Automator service.
Device Approval Methods
In summary, Keeper SSO Connect Cloud supports several device approval methods:
(1) Keeper Push
(2) Admin Approval via the Keeper Admin Console
(3) Admin Approval via Commander automation tool
(4) Automatic Approval using (* Recommended)
Learn more about SSO Cloud Device Approvals here:
SSO Architecture
The system architecture diagram for Keeper SSO Connect is shown below:
Account Recovery
Keeper provides account recovery using a randomly generated 24-word recovery phrase. The recovery phrase can be used to regain access to your Keeper Vault in case you forget your Master Password.
Keeper implements recovery phrases using the industry-standard BIP39 word list, which is a set of 2,048 words used to generate an encryption key with 256 bits of entropy. Each word in the BIP39 list is carefully chosen to improve legibility and make the recovery process less error-prone.
The recovery phrase is generated locally on the user's device using the BIP39 word list. Keeper's backend systems do not have access to this recovery phrase, nor do any employees of Keeper. Keeper is a zero-knowledge platform and we cannot assist in the recovery process.
Recovery Phrase account recovery works by storing a second copy of the user's data key encrypted with a 256-bit AES-GCM key. This key is derived using HKDF with HMAC_SHA512 as the underlying hashing algorithm, from the 24 randomly-selected words on the BIP39 list.
To complete a vault recovery, the user is required to:
Enter an email verification code
Pass the Two-Factor Authentication step (if enabled on the account)
Enter the recovery phrase locally on the device
Memory Protection with Keeper Forcefield
Keeper Forcefield extends Keeper’s Zero-Knowledge security model by providing real-time memory protection for sensitive applications on Windows endpoints. While Keeper’s encryption ensures data is secure at rest and in transit, Forcefield prevents unauthorized access to decrypted data that resides in memory during runtime - closing a critical gap exploited by credential-stealing malware.
Traditional encryption protects stored ciphertext and network transmissions, but runtime memory remains a targeted attack surface. On Windows, processes running under the same user context can read each other’s memory, enabling malware to extract sensitive credentials, session tokens, and other secrets directly from application memory. Keeper Forcefield blocks unauthorized memory access attempts - including those from infostealer malware by enforcing strict memory access controls at the operating-system kernel level.
about Keeper Forcefield.
Secrets Manager Encryption Model
Keeper Secrets Manager is a Zero Knowledge platform for DevOps, IT Security and software development teams to manage secrets throughout the software development and deployment lifecycle.
Secrets Manager adheres to the following encryption model:
(1) Secrets are encrypted and decrypted on the device (not on the server)
(2) The device never stores plain text (human readable) data
(3) The server never receives data in plain text
(4) No Keeper employee, 3rd party or intermediary can decrypt secrets
(5) The keys to decrypt and encrypt secrets are managed by the customer on the Client Device.
(6) Each secret is encrypted by a unique and client-side generated 256-bit AES encryption key in GCM mode.
(7) Each record-level key is wrapped by a Shared Folder key if it is contained within a Shared Folder.
(8) A client-side generated 256-bit AES Application Key is used to decrypt the Shared Folder and Record Keys. The record key decrypts the individual secret.
(9) All encrypted payloads sent to the Keeper servers are additionally wrapped by a 256-bit AES transmission key in addition to TLS, to protect against MITM attacks. The transmission key is generated on the client device and transferred to the server using ECIES encryption via the server's public EC key.
(10) Sharing of secrets between users uses Elliptic Curve Cryptography for secure key distribution.
(11) Multi-Layer encryption provides access control at the user, group and admin level.
(12) Secrets that are managed within a User Vault are segmented and isolated to defined Secrets Manager devices that are granted access to the individual records and folders.
For more specific security details regarding Keeper Secrets Manager, see .
To learn more about Secrets Manager see the .
One-Time Share Encryption Model
Keeper "One-Time Share" provides time-limited secure sharing of a record (such as a password, secret, document or other confidential information) to a recipient without having to create a Keeper account. The encryption model implemented for one-time sharing uses the same technology as , a zero-knowledge and zero-trust platform for protecting cloud infrastructure.
(1) In the vault, the sharer generates a one-time access token by clicking on "One-Time Share" in the record options screen. The 256-bit AES Record Key for the record being shared is encrypted with the one-time access token, and this encrypted value is stored in the Keeper Cloud.
(2) The sharer sends the One-Time Access Token to a recipient via a simple URL or QR code through their preferred channel. The URL portion that contains the access token is held within the "fragment identifier" section of the URL which is never sent over the network to Keeper's servers. Therefore, zero-knowledge is retained and Keeper has no ability to access or decrypt the information.
(3) The recipient opens the URL on their device browser, and a single-page Vault application is loaded on the device. The One-Time Access Token is handed off directly to the local vault application (not sent to the server).
(4) Upon loading the URL, the recipient's device generates a client-side public/private Elliptic Curve key pair, and the private key is stored locally on the Client Device in the browser's CryptoKey storage.
(5) Upon first use, the SDK library authenticates using the hash of the One Time Access Token and upon successful authentication, the server responds with the encrypted record ciphertext plus the Encrypted Record Key.
(6) The Client decrypts the Record Key with the One Time Access Token, and the record contents are decrypted using the Record Key. The Record Key is then stored locally on the client device in the browser's CryptoKey storage or other designated storage location.
(7) On the server, the encrypted record key for that given device is deleted so that the One Time Access Token cannot be used again. After that, the client's requests must be signed with the Client Private Key.
(8) Subsequent calls on the same device to the server are sent with an identifier which uniquely defines the device (hash of the one-time access token) and a request body that is signed with the Client Private Key. The server checks the ECDSA signature of the request for the given device identifier using the Client Public Key of the device. The Keeper Cloud processes the request for the record, and the server returns encrypted record ciphertext to the Client upon successful authentication.
(9) In addition to the record-level encryption, the Client Device creates a randomly generated AES-256 bit Transmission Key which is encrypted with the public key of the Keeper cloud API. The Client Device decrypts the response from the server with the Transmission Key and then decrypts the ciphertext response payload with the Record Key, which decrypts the contents of the record.
Keeper Gateway Security
The Keeper Gateway is a service that is installed on-premise in order to execute rotation, discovery, connections and tunneling to line of sight devices. The Keeper Gateway communicates outbound to the Keeper Router using WebSockets and Keeper .
The Keeper Gateway authenticates first to the using the One Time Access Token provided upon installation of the Gateway service on the target machine. After the first authentication, subsequent API calls to the Router authenticate using a Client Device Identifier (which is the HMAC_SHA512 hash of the One Time Access Token).
For accessing and decrypting vault records, the Keeper Gateway uses standard which perform client-side encryption and decryption of data. The security model of Keeper Secrets Manager ensures least privilege and zero knowledge by allocating only specific folders and records that can be decrypted by the service. API requests to the Keeper Cloud are sent with a Client Device Identifier and a request body that is signed with the Client Device Private Key. The server checks the ECDSA signature of the request for the given Client Device Identifier using the Client Public Key of the device.
Like any other Secrets Manager device, access can also be restricted based on IP address in addition to the encryption and signing process.
Keeper Router Security
The Keeper Gateway is installed into the customer's environment which establishes an outbound secure connection to the Keeper Router, enabling bi-directional communication to the Keeper cloud without any network configuration. Keeper Router makes cloud access to on-prem infrastructure easy and secure by utilizing WebSockets for the inbound requests.
With Keeper, WebSockets are established between the end-user device (e.g. Web Vault) and the Keeper Router using the user's current session token. The session token is verified by the Keeper Router to authenticate the session. All encrypted payloads sent to the Keeper Router are wrapped by a 256-bit AES transmission key in addition to TLS, to protect against MITM attacks. The transmission key is generated on the end-user device and transferred to the server using ECIES encryption via the Router's public EC key.
When a user on their Web Vault or Desktop App triggers a password rotation, discovery job or remote connection, the message flow is the following:
Upon installation of the Gateway, it authenticates with the Keeper Cloud using a hashed One Time Access Token one time. The client signs the payload and registers a Client Device Public Key with the server on the first authentication. After the first authentication, subsequent requests are sent to the Keeper Router and signed with the Client Device Private Key.
The Gateway establishes an authenticated WebSocket connection using the Client Device Private Key and ECDSA signature.
The Vault sends a message to the Keeper Router with a command to execute (rotation, discovery, connection) and authenticates the command using the user's active session token.
The Keeper Router architecture is Zero Knowledge, and Keeper's infrastructure never has the ability to access or decrypt any of the customer's stored vault data.
Zero-Trust Connection and Tunnel Security
Zero-Trust KeeperPAM provides the capability to establish cloud and on-prem privileged sessions, create tunnels, establish direct infrastructure access and secure remote database access without a VPN.
A Connection is a visual remote session using the web browser. Interaction between the user and the target device is with a web browser window or within the Keeper Desktop application.
A Tunnel is a TCP/IP connection that is established between the local vault client through the Keeper Gateway to the target endpoint. The user can utilize any native application for communicating with the target endpoint, such as the command-line terminal, GUI application or database management application such as MySQL Workbench.
When the user establishes a connection or tunnel:
(1) The Vault Client application communicates to the Keeper Router infrastructure to initiate a WebRTC connection that is protected by a ECDH symmetric key that is stored inside the relevant Keeper record.
(2) The Keeper Gateway communicates with the Keeper Router through outbound-only WebSockets. This is described in detail at .
(3) The Keeper Gateway utilizes Keeper Secrets Manager APIs to retrieve the necessary secrets from the vault, including the ECDH symmetric key.
(4) For Connections, the Vault Client (using the Keeper Connection Manager guacd protocol) passes data through the WebRTC connection to the Keeper Gateway that then uses Guacd to connect to the destination found in the Keeper record.
(5) For Tunneling features (port forwarding), a local port is opened up on the local device running Keeper Desktop software. Data sent to the local port is transmitted through the WebRTC connection to the Keeper Gateway and subsequently forwarded to the target endpoint defined in the Keeper record.
(6) Session recordings of connections are protected by an AES-256 encryption key ("recording key") which is generated on the Keeper Gateway on every session. The recording key is additionally wrapped by a HKDF-derived AES-256 resource key.
Remote Browser Isolation Security
Keeper Remote Browser Isolation technology protects access to internal web applications or any other web-based asset through the Keeper Connection Manager docker container or through the Keeper Gateway.
Using the Connection Manager docker container method:
(1) The user authenticates into the Keeper Connection Manager web service, hosted by the customer in a Docker container.
(2) The user launches a remote browser isolation session to the target web application. Between the user's browser and the hosted Keeper Connection Manager web service, communication over HTTPS is protected by Let's Encrypt or the customer's specified certificate.
(3) On the Keeper Connection Manager docker container, a virtualized version of Chromium is executed within a sandbox, the resulting HTTP traffic from the container to the target website is routed through a local display driver then forwarded to the user's web browser using the Apache Guacamole ("guacd") protocol.
Using the Keeper Gateway with the Keeper Web Vault or Desktop App:
(1) The Vault Client application communicates to the Keeper Router infrastructure to initiate a WebRTC connection that is protected by a ECDH symmetric key that is stored inside the relevant Keeper record.
(2) The Keeper Gateway communicates with the Keeper Router through outbound-only WebSockets. This is described in detail at .
(3) The Keeper Gateway utilizes Keeper Secrets Manager APIs to retrieve the necessary secrets from the vault, including the ECDH symmetric key.
(4) The Vault Client (using the Keeper Connection Manager guacd protocol) passes data through the WebRTC connection to the Keeper Gateway that then uses the Apache Guacamole ("guacd") protocol to connect to the destination found in the Keeper record.
(6) Session recordings of connections are protected by an AES-256 encryption key ("recording key") which is generated on the Keeper Gateway on every session. The recording key is additionally wrapped by a HKDF-derived AES-256 resource key.
Browser Isolation Protection
Several security measures are activated by using the Remote Browser Isolation protocol:
(1) The web application endpoint being protected is wrapped by a layer of TLS encryption from the Keeper Connection Manager gateway to the user's local device, regardless of whether TLS is used between gateway and endpoint - protecting against MITM attack or packet inspection on the user's local network.
(2) The remote browsing session is visually projecting the interaction to the user's local device using a canvas and graphical rendering. No javascript code or HTML is rendered on the user's local machine.
(3) Since no website code from the target is executed locally and the local browser cannot directly access the underlying application code, the isolated web application is protected against attack vectors such as reflected cross-site scripting vulnerabilities, cross-site request forgery, and API abuse.
(4) The end user can be restricted from performing data exfiltration from the target endpoint through URL and resource request filtering. File uploads and downloads are restricted, even if the web application attempts to perform the action.
(5) The browsing session and keystrokes can be recorded for auditing and compliance purposes, providing the ability to perform forensic analysis of web-based sessions.
(6) Credentials that are auto-filled from the gateway into the target web application are never transmitted to the user's device, and are not accessible by the user on their local device, protecting against secret leakage.
(7) Through firewall policies, the user can be required to access the target web application only through the remote browser isolation session, reducing the threat from a compromised browser or local device malware.
(8) The target web application becomes protected by Single Sign-On and/or MFA authentication, even if the application does not natively support it. Keeper protects access to the vault and any remote browser isolation sessions through the advanced described in this document.
Account Transfer Policy Encryption
When Account Transfer Policy is activated for a role, a role enforcement policy public/private key pair is generated on the Admin Console locally. The end-user's data key (for users in a role to which the enforcement is applied) is encrypted with the role enforcement policy's Public Key when the user signs into the Vault. The role enforcement private key is encrypted with the Admin's Public Key. Therefore, the Admin can decrypt the role enforcement private key when a vault transfer is required.
To perform a Vault Transfer, the Keeper Admin first must lock the user's account, then the transfer can occur which immediately is followed by deleting the user's account. This ensures the operation is not performed secretly. When performing the transfer, the user's Data Key is retrieved by first unwrapping the role enforcement Private Key and then unwrapping the user's Data Key. The Data Key is then used to unwrap the record keys, team keys, and folder keys.
All encryption is performed client side within the Admin Console, and at no time does Keeper have the ability to decrypt the information being shared or transferred. Additionally, at no time is a user's client Data Key shared. Therefore, the data cached on a user’s device cannot be decrypted without the user’s master password. A user who is removed from a team, shared folder, or direct share will not receive new data from the team, shared folder, or record. Although the record, folder and team keys are compromised to the admin during the transaction, the keys are not usable for gaining access to the underlying record or folder data.
Several different administrative privileges may be assigned to portions of a hierarchical tree that allows the members of the privileged role to perform operations in our Keeper Admin Console.
about the account transfer policy.
Emergency Access (Digital Legacy)
Keeper's consumer product supports the ability to add up to 5 emergency contacts to grant vault access in the event of an emergency or death. Once a specified wait time has elapsed, the emergency contact will gain access to the user's vault. The process of sharing a vault is Zero-Knowledge, and the user's Master Password is never directly shared. 2048-bit RSA encryption is utilized to share a 256-bit AES key with the emergency contact, at the expiration of the wait time set by the originating user. Therefore, the emergency contact must have a Keeper account (and a public/private key pair) to accept the invitation.
Digital Legacy is only supported on consumer-level accounts
Mobile Apps
Keeper's mobile apps do not contain any trackers. All mobile apps go through vulnerability testing with Keeper's 3rd party testers and the Bugcrowd bug bounty program.
Exodus Privacy is an organization that monitors the applications that perform user tracking. Keeper's Android application is listed below:
Browser Extension Architecture
Browser Extension Security
The Keeper Browser extension ("KeeperFill") provides customers with autofill capabilities on all web browsers including Chrome, Firefox, Edge, Safari and other chromium-based browsers.
When users login to Keeper using a Master Password: A key is derived from the Master Password using PBKDF2. This key, called the "Master Password Key", is NOT stored anywhere. It is used to decrypt the AES-256 Client Key and the AES-256 Data Key. The Data Key is used to decrypt the data coming from the Keeper Cloud, and the Client Key is used to encrypt and decrypt the ciphertext stored locally.
After the user's ciphertext is sync'd from the Keeper Cloud to the local device, the ciphertext is decrypted locally using the Data Key and then encrypted using the Client Key into the device's local IndexedDB database. The browser IndexedDB database is only available to the Keeper browser extension.
At no time is Keeper storing the encryption key used to decrypt the local ciphertext. The information is held in memory while the user is logged in, and used for auto-fill and accessing the Keeper browser toolbar functionality. When the Service Worker is restarted, Keeper repeats the process of decrypting data from IndexedDB using the Client Key. In between Service Worker restarts, the Client Key is held in memory.
After the user logs out of Keeper, or after the inactivity logout timer expires, the vault is locked and the user must login again using their Master Password.
When users login to Keeper using Single Sign-On: After the signed SAML response is returned by the SSO identity provider, Keeper delivers the user a Device-Encrypted Data Key ("DEDK") to the user. The Data Key is decrypted with the Elliptic-Curve Device Private Key ("DPRIV"). The Data Key is then used to decrypt the ciphertext delivered by the Keeper cloud. The Data Key is never stored, and the user must authenticate with the SSO provider in order to retrieve the Device-Encrypted Data Key every login in order to decrypt their data.
Data Storage
Record Key ciphertext is synchronized from the Cloud Security Vault then decrypted locally with the user’s Data Key. Shared Folder keys are decrypted with the respective Shared Folder Key from each folder. Record content is decrypted with the respective Record Key from each record.
Record Keys and content are then encrypted with the Client Key and stored locally in IndexedDB. The Elliptic Curve private key is stored in Chromium CryptoKey storage.
Domain-to-Record mapping is stored via URLs hashed with HMAC_SHA256 using the Client Key.
3rd Party Vulnerability Testing
Keeper works with and to perform ongoing vulnerability testing of the browser extension platform, which includes source code level analysis.
Privacy & Permissions
KeeperFill requires certain permissions in the browser extension framework in order to provide basic functionality that is required by users. These permissions are only utilized to provide expected functionality, such as:
Matching stored vault credentials to the current web page
Interacting between the vault and the on-page form filling capabilities
Detecting login fields, payment card fields and other field types
The Keeper Security browser extension does not use these permissions to track or record your browsing history for any other purposes than to provide the aforementioned services. It's built on a zero-knowledge security model, which means that all encryption and decryption of your data happens locally on your device. Keeper's servers do not have access to your unencrypted data, nor do they store your browsing history.
Detailed Permissions
The below permissions are declared by the KeeperFill extension manifest. These descriptions are also provided to platform app stores (Google, Apple, Microsoft) in the permission justification requirements.
contextMenus
This permission allows the user to right-click/control-click into a "context menu" and select a credential to be used for autofill. It also grants the ability to perform other actions like creating new records, logging out and launching the Keeper Web Vault Application.
tabs
This permission allows Keeper’s extension to detect the website which is open in the current tab and provide the most relevant credentials within the contents of the right-click/control-click "context menu". It also allows the user to open new tabs from the Keeper Web Vault Application by clicking on the "launch" button to open and autofill a website of choice. Lastly, it also enables the user to access the Keeper user guide, help content and other support materials.
alarms
The Keeper extension is using alarms for the idle logout timer. When logged in, the user will have an alarm set for them equal to their logout timer time (if they have one). When the user interacts with the browser or Keeper's application, the alarm is reset for that same amount of logout time.
idle
The Keeper extension is using the idle permission for the logout timer when the computer goes to sleep and is brought back up. This permission tells the Keeper extension that the user woke their computer up, letting the extension perform a check against the idle logout timer time and the current time on the machine to determine if the user is logged in to their vault.
storage
The storage API is used to store local settings on the extension. Keeper also uses the "clear" function for the user to be able to clear their local info stored on the extension.
browsingData
This permission allows the extension to automatically update the Keeper Web Vault Application to the latest version, ensuring compatibility between extension and web vault.
webNavigation
This permission is used only for HTTP Basic Auth autofill of login/password on supported websites.
scripting
This permission is used to inject static content scripts into web pages, in order to detect fields and perform autofill functionality. The details of content script security are described below.
offscreen
This permission is used to create web workers and perform processing on multiple threads instead of a single thread.
webRequest
This permission is used only for HTTP Basic Auth autofill of login/password on supported websites.
webRequestAuthProvider
This permission is used only for HTTP Basic Auth autofill of login/password on supported websites.
webRequestBlocking
This permission is used in the MV2 version of Keeper, and only for HTTP Basic Auth autofill of login/password on supported sites. This is deprecated in MV3.
Cross-Site Scripting (XSS) Attack Protection
The Keeper Web Vault implements a strict Content Security Policy that restricts the origin of outbound requests and prevents all scripts from being executed, except those explicitly sourced from Keeper, including inline scripts and event-handling HTML attributes, reducing or eliminating most vectors for cross-site scripting attacks.
Access to the keeper domain names is restricted to HTTPS with TLS 1.3 and is enforced by HTTP Strict Transport Security. This prevents a wide array of packet sniffing, data modification, and man-in-the-middle attacks.
Within the Keeper Browser Extension, Keeper will not prompt users to login to their vault from within the page frame area. Login to the extension occurs within the Browser Extension toolbar area of the browser. Login to the vault on the web browser will always occur either on the keepersecurity.com, keepersecurity.eu, keepersecurity.com.au, keepersecurity.jp, keepersecurity.ca or govcloud.keepersecurity.us domain, or from the Keeper browser extension toolbar which exists outside of the content page.
The Keeper Browser extension on Chrome, Firefox, Edge and Safari places an iFrame into the login forms of a web page to ensure that no malicious website has access to injected content. Record content injected into iFrames is also limited to the vault records stored in the user's vault which match the domain of the target website. Keeper will not offer Autofill of login or password data unless the website domain matches the website domain field of the Keeper vault record.
The Internet Explorer Extension uses a separate native application window for logging in and accessing records. These separate windows are not subject to XSS attacks because they are not accessible from the browser. This allows the Extension in Internet Explorer to provide a login window from inside the page. The extension will not show records unless the records match the website address root domain.
3rd party browser extensions may have elevated permissions in web browsers and can access information within the page. Therefore, it is recommended that Keeper administrators prevent users from installing 3rd party browser extensions from the browser's respective app store.
Script Execution and Messaging
Background Scripts are run by the Browser Extension framework, which work with local storage and CryptoKey storage.
Web Page scripts are added to pages and perform detection of fields.
iFrame-injected documents process the Keeper user interface and user-initiated fill actions.
Context menu (right-click) scripts are built from the Chrome extension background scripts.
Autofill Security
The Keeper Browser Extension (KeeperFill) provides customers with the ability to fill and save credentials from their vault into a target website login page.
The Autofill feature protects against XSS attacks using many techniques and advanced functionality including but not limited to the following:
An iFrame is added into the login forms of a web page to ensure that no malicious website has access to injected content.
Domain matching is performed to ensure that only matching records are available for Autofill. Keeper will not offer to fill passwords unless there is a root domain match.
Customers may also enforce strict subdomain matching in role enforcement policies to restrict available logins based on exact subdomain match.
Keeper regularly performs 3rd party Autofill-specific penetration testing with Cybersecurity firms including and .
KeeperAI Autofill
KeeperAI's HTML field classification model provides privacy-preserving autofill technology by using a customized bidirectional bi-encoder architecture, distilled from Multilingual BERT, trained on over 20 million data points across 100+ languages.
All processing occurs locally on the user's device via an ONNX-optimized model embedded in the Browser Extension, ensuring zero-knowledge operation as sensitive data never leaves the machine. This local architecture guarantees no user data is stored, transmitted, or accessible to Keeper Security or third parties, offering both privacy protection and reliable performance even offline.
The model achieves over 95% accuracy in field type recognition across 51 languages, classifying 45 distinct field types, and is optimized for efficient deployment with a compact 16 MB size and low inference latency.
Quantum-Resistant Cryptography
Keeper has adopted Quantum-Resistant Cryptography (QRC), specifically Kyber Hybrid Key Encapsulation Mechanisms (KEM), to secure the vault against emerging quantum computing threats like the "store-and-crack" attack. This hybrid approach combines traditional cryptography with quantum-resistant algorithms, ensuring protection for user authentication and encrypted data transmission within TLS. The implementation leverages established Kyber libraries, allowing for a gradual, per-client rollout and independence from browser-specific support, thereby future-proofing user data against quantum adversaries.
Quantum-Resistant Security: Integrates Kyber Hybrid KEM to protect sensitive data against future quantum attacks.
Hybrid Approach: Combines traditional and quantum-resistant algorithms for layered defense and backwards compatibility.
Targeted Implementation: Secures Keeper's authentication protocol and encrypted tunnels within TLS.
The rollout of quantum-resistant cryptography across all Keeper client applications started in November 2025.
Compliance Reports
Keeper Compliance Reports adheres to Keeper's Zero-Knowledge encryption model. From an encryption standpoint, here's how it works. When the Enterprise end-user logs into their vault, the Type, Title and URL fields are encrypted with the Elliptic Curve Enterprise Public Key. This data, we call the "Audit Data", is encrypted locally on the user's device and stored in the Keeper cloud. The Audit Data is continuously updated by the end-user devices over time.
The Keeper Administrator logs into the Admin Console using either a Master Password or Single Sign On. After a successful login, the Admin decrypts what we call the AES 256 Enterprise Tree Key and then decrypts the Elliptic Curve Enterprise Private Key. If the Administrator has permissions to run Compliance Reports, they can run a report over any user within the node that they have been granted permissions.
The encrypted audit data is delivered to the Admin Console and the Admin is able to decrypt audit data locally on their device using the Elliptic Curve Enterprise Private Key. The report contents are then displayed locally on the user interface and available for export into CSV, JSON or PDF format. Only the designated Keeper administrator can retrieve and decrypt the compliance report data for the nodes that they have been granted admin rights over.
about Compliance Reports.
Issued US Patents
Patent No
Abstract
Vulnerability Reporting and Bug Bounty Program
Keeper Security is committed to the industry best practice of responsible disclosure of potential security issues. We take your security and privacy seriously are committed to protecting our customers’ privacy and personal data. KSI’s mission is to build world’s most secure and innovative security apps, and we believe that bug reports from the worldwide community of security researchers is a valuable component to ensuring the security of KSI’s products and services.
Keeping our users secure is core to our values as an organization. We value the input of good-faith researchers and believe that an ongoing relationship with the cybersecurity community helps us ensure their security and privacy, and makes the Internet a more secure place. This includes encouraging responsible security testing and disclosure of security vulnerabilities.
Guidelines
Keeper's Vulnerability Disclosure Policy sets out expectations when working with good-faith researchers, as well as what you can expect from us.
If security testing and reporting is done within the guidelines of this policy, we:
Consider it to be authorized in accordance with Computer Fraud and Abuse Act,
Consider it exempt from DMCA, and will not bring a claim against you for bypassing any security or technology controls,
Consider it legal, and will not pursue or support any legal action related to this program against you,
If at any time you are concerned or uncertain about testing in a way that is consistent with the Guidelines and Scope of this policy, please contact us at before proceeding.
To encourage good-faith security testing and disclosure of discovered vulnerabilities, we ask that you:
Avoid violating privacy, harming user experience, disrupting production or corporate systems, and/or destroying data,
Perform research only within the scope set out below, and respect systems and activities which are out-of-scope,
Contact us immediately at if you encounter any user data during testing, and
Submitting a Report
Keeper has partnered with Bugcrowd to manage our vulnerability disclosure program.
Please submit reports through .
Penetration Testing
Keeper performs 3rd party penetration and vulnerability testing with experts including , and independent security researchers against all of our products and systems. Report summaries are provided to Enterprise customers on request.
General Security FAQs
Q: Can Keeper's employees see our stored data?
A: NO. We are Zero Knowledge and cannot decrypt customer data.
Q: Where are master passwords and encryption keys stored?
A: The Master Password is not stored and the encryption keys derived from the master password are not stored. When the user types in their Master Password, a key is derived in real time using a password derivation function known as PBKDF2. This key then unwraps the ciphertext to extract the Data Key which then unwraps the folder keys, record keys and record data.
If biometrics are activated and allowed by the Admin, a AES-256 "biometric key" is generated locally on the device and then stored in the iOS Keychain. When the user successfully authenticates with the operating system using Face ID or Touch ID authentication, the key is provided to the Keeper application and used to unwrap the stored ciphertext to retrieve the Data Key.
Keeper natively supports Windows Hello, Touch ID, Face ID and Android biometrics. Customers who normally login to their Keeper Vault using a Master Password or Enterprise SSO Login (SAML 2.0) can also login to their devices using a biometric. Biometrics must be enabled by the Keeper Administrator in the role policy. Offline access can also be achieved with a biometric for both Master Password and SSO-enabled users when this feature is activated.
Q: How do you protect against brute force password attack?
A: Keeper has implemented multiple layers of protection against password stuffing and password brute force attack. We do not permit login on any device that has not been approved. Once approved, the first step is 2FA. Once 2FA passes, only then can a user attempt a password test. After 10 failed password attempts, the account will become exponentially locked with each attempt. Keeper's self-destruct mechanism can also be enabled on the local device to delete locally stored data on 5 failed attempts. Read more about our .
Q: How do you protect against 2FA attack?
A. Keeper does not permit login on any device that has not been approved. Once a device is approved (either through email verification, Keeper Push or 2FA code entry), the user will be prompted with 2FA. Keeper will lock an account after 10 failed 2FA attempts on an exponential basis for each failed attempt.
Q: How do you protect against enumeration attack?
The makes major strides in the prevention of user enumeration against the Keeper cloud infrastructure. This means that the server will not disclose the existence or non-existence of a user's account. Enumeration is denied unless the user is logging in from a trusted/known device or IP.
Since Keeper operates several isolated data centers and enumeration between data centers is denied, there are some cases when a user must perform round trips and email verifications if they attempt to login from the wrong data center. Since disclosures cannot be made through the web interface, emails are utilized to communicate login and redirection.
Q: How do you enforce policies without having access to the data?
A: When the user logs into their device, all of the Enterprise policies are downloaded from the Keeper Cloud and processed locally on the device for policies that require record-level filtering, URL filtering or password-specific rules and processing.
Q: Why does Keeper have a Recovery Phrase as account recovery?
Account recovery can be disabled by the customer in the role policy section of the Admin Console. This may be desired if you are using SSO Cloud which utilizes a 3rd party identity provider.
The way account recovery works (with the Recovery Phrase method) is by storing a second copy of the user's data key that is encrypted with a 256-bit AES key generated from the user's 24-word recovery phrase. To complete a vault recovery, the user is required to (1) enter an email verification code, (2) pass the Two-Factor Authentication step (if enabled on the account) and (3) enter the recovery phrase locally on the device to decrypt the data key, which then allows the user to reset the Master Password. In addition to enabling Account Recovery, we recommend turning on Keeper's Two-Factor Authentication feature from the 'Settings' screen.
Enterprise customers who wish to disable account recovery and rely on the "Vault Transfer" admin feature are able to set this policy. Note that if account recovery is disabled, Vault Transfer is the only way that a user can be recovered if they forget their Master Password or if they lose access to the SSO IdP.
Q: How do I off-board an employee and gain access to their vault?
Business and Enterprise customers are provided a zero-knowledge method of account recovery for their users using Keeper's Account Transfer policy. This is described in detail .
Q: How am I able to access the vault on a new device, given that Keeper is zero-knowledge?
On your first device, a 256-bit AES "Data Key" is generated unique to each user. For consumers and for user who login with a master password, the master password you selected is used to derive a key with 1,000,000 rounds of PBKDF2 that wraps and unwraps your Data Key locally.
On the Keeper cloud, we store the encrypted version of this Data Key. When you login on a new device and type in the master password, a key is derived locally, then hashed, and used for authentication with the cloud. After authentication is successful (and after you pass the device verification and 2FA step), we send the encrypted ciphertext to your device, and then you decrypt the ciphertext locally on your device using the master-password-derived key. This produces the Data Key which is then used to decrypt the vault locally.
If you change your master password, the new master-password-derived key will wrap your AES-256 Data Key. The resulting encrypted key is again stored in our cloud. The master password never leaves your device.
Users who login with SSO follow a different process as described above in the section.
Cryptographic Key Size Comparison
This section details the strength of Keeper's AES-256 encryption method (using Master Password authentication) versus the strength of ECC-256 (when using SSO authentication via Keeper SSO Connect).
How long does it take to brute force an AES 128b or 256b key?
For symmetric encryption, Keeper uses AES-256. The advanced encryption standard (AES) is assumed to be a pseudorandom permutation. By the this assumes key recovery requires brute force key enumeration.
Assume that:
1 ns/candidate key (this assumes 3 cycles/key and a 3GhZ CPU
Attacker has 1 millions CPUs operating in parallel
AES-256 key enumeration is considerably longer than AES-128, and both require more computing resources than exist presently and more than 1 billion years of compute time. Key enumeration for either algorithm are considered improbable avenues of attack given the best known attacks against AES.
ECC-256 with AES-256
ECC-256 gives only 128b of key enumeration given the best known attacks against these elliptic curves. This is half the strength of AES-128. It is true that key enumeration attacks against ECC-256 are likely easier than attacking AES-256. However, the performance difference between AES-256 vs AES-128 is negligible, but the performance difference between ECC-256 and ECC-512 is noticeable and some libraries do not support 512b versions of elliptic curves, unfortunately.
ECC-512 Usage
As is noted above key enumeration attacks against AES-128 and AES-256 are impractical. But since the performance penalty is negligible and AES-256 is supported in all development libraries, the implementation is easy and standardized. Using ECC-512 is challenging since it's not universally supported and has noticeable performance penalties.
It's worth noting that the Bitcoin blockchain uses ECC-256. This creates a de facto 300 billion dollar bounty on the strength of 256b elliptic curves.
Strength of an AES key derived by PBKDF2 applied to a Master Password
No matter the size of AES key (128b, 192b, or 256b), if the AES key is derived from a password and key derivation function, the strength of the key is very likely to be bounded by the strength of the password combined with the complexity if the key derivation function.
Keeper uses PBKDF2 () with 1 million iterations.
The derived key will have strength equal to the (entropy of the password) plus log2(iterations) up to a maximum of 256 for AES-256.
For 100,000 iterations: log2(10^5) = 16.6
For 1,000,000 iterations: log2(10^6) = 19.9
indicates that the average password used by humans is 40.5b of entropy. This implies that an AES key derived from an average strength password would be:
For 100k iterations: 40.5+16.6 = 57.1b of entropy.
For 1,000,000 iterations: 40.5+19.6 = 60.1b of entropy.
In comparison, a randomly generated ECC-256 key has 128b of entropy.
Australia (AU)
Japan (JP)
Canada (CA)
Robust compliance reporting features provide a traceable, electronic audit trail of all actions performed and data entered.
Sequestered Customer Success team is comprised of U.S. Persons specifically trained in safe handling of Export Controlled and ITAR-governed data.
No non-U.S. based support.
Data in transit is encrypted with TLS and additional layers of transmission encryption which protects against access MITM, service providers and untrusted networks.
Auditing of Password Strength and other sensitive usage data is encrypted with Enterprise Public Keys that can only be decrypted by the Admin.
New devices cannot login to an account without a device verification step
No login attempts can be made on an account without passing this step. Keeper supports several types of device verification methods that depend on the authentication scheme being used.
2FA is performed after device verification, prior to Master Password entry
If a user has 2FA configured or enforced, this step must pass prior to the Master Password entry.
Master Password entry cannot be performed until the Device Verification and 2FA step succeeds
The user is unable to proceed to the Master Password entry step without first performing a device verification and 2FA authentication. This advanced authentication flow provides protection against several attack vectors including brute force attack, password spraying, enumeration and MITM.
The EC Device Private Key is not directly utilized to encrypt or decrypt vault data. Upon successful authentication from the Identity Provider, a separate key (that is not stored) is utilized for decryption of the vault data. Offline extraction of the local Device Private Key cannot decrypt a user's vault.
The Master Password is used to derive an encryption key on the client device using a Password Based Key Derivation Function (PBKDF2) with 1,000,000 rounds.
On the client device, a 256-bit AES “Data Key” and “Client Key” are generated, as well as the User's EC Private/Public Key Pair for the purpose of sharing records between users and teams. (For legacy compatibility with older shared records, a 2048-bit RSA Private/Public Key Pair is also generated).
The vault data stored offline is AES-GCM encrypted with a 256-bit “Client Key” that is generated randomly and protected by PBKDF2-HMAC-SHA512 with a 128-bit random salt and 1,000,000 iterations. The salt and iterations are stored locally. When the user enters their Master Password, a key is derived using the salt and iterations and an attempt is made to decrypt the Client Key. The Client Key is then used to decrypt the stored record cache.
The "Device EC Public Key" is stored directly to the Cloud Security Vault.
The “Device EC Private Key” is stored locally on the device and never leaves the device. This is used for Cloud SSO authentication models.
The "User EC Public Key" is stored directly to the Cloud Security Vault.
The “User EC Private Key” is encrypted with the “Data Key” and the ciphertext is stored in the Cloud Security Vault.
For each record (e.g. Website Password or File) that is created, a 256-bit AES “Record Key” is generated on the client device. The “Record Key” is used to encrypt and decrypt the record content. The “Record Key” is encrypted with the user’s “Data Key” and the ciphertext is stored in the Cloud Security Vault. The Record Key and record data is also encrypted with the “Client Key” and the ciphertext is stored locally on the device.
Record Key ciphertext is synchronized from the Cloud Security Vault then decrypted locally with the user’s Data Key. Shared Folder keys are decrypted with the respective Shared Folder Key from each folder. Record content is decrypted with the respective Record Key from each record. Record Keys and content are then encrypted with the client key and stored locally.
For subsequent record retrievals, the recipient decrypts the Record Key with their Data Key, and then decrypts the record content with the Record Key.
Note that for legacy compatibility with Keeper's legacy "general" record type, a 2048-bit RSA Private/Public Key Pair is also utilized.
ECDHE-ECDSA-AES128-GCM-SHA256
ECDHE-RSA-AES128-GCM-SHA256
ECDHE-ECDSA-AES128-SHA256
ECDHE-RSA-AES128-SHA256
ECDHE-ECDSA-AES256-GCM-SHA384
ECDHE-RSA-AES256-GCM-SHA384
ECDHE-ECDSA-AES256-SHA384
ECDHE-RSA-AES256-SHA384
After IdP login, the signed SAML assertion is verified by Keeper The vault is created and user is onboarded
The data key is decrypted with the device EC private key.
The data key decrypts the folder keys and record keys.
Record keys decrypt the record contents.
Device is “approved” via Keeper Push, Admin Approval or Automator service (*see Device Approval below).
In the approval process, the data key is encrypted with the public key of the new device.
The device-encrypted data key (DEDK) is sent to the user.
Admin decrypts the user’s data key and re-encrypts the data key with the new device public key.
The Automator service can perform automated device approvals on the customer’s infrastructure.
The Automator service checks the SAML signature, unwraps the data key, encrypts the data key with the new device public key.
The Vault only transmits command and control messages, for example: Rotate UID XXX. No secret information is communicated between Vault and Router. The Router authenticates the command using the session token of the record's rotation configuration to validate the user's request.
The Router relays the command to the destination gateway through the existing WebSocket connection.
The Gateway retrieves secrets, admin credentials, record details and other private data by using Keeper Secrets Manager APIs. API requests to the Keeper Cloud are sent with a Client Device Identifier and a request body that is signed with the Client Device Private Key. The server checks the ECDSA signature of the request for the given Client Device Identifier using the Client Public Key of the device. The Client Device decrypts the ciphertext response from the server with the Application Private Key, which decrypts the Record Keys and Shared Folder Keys. The Shared Folder Keys decrypt the Record Keys, and the Record Keys decrypt the individual Record secrets.
The Gateway uses Keeper Secrets Manager "update" commands to update the user's vault with any password or discovery job updates.
After a rotation or discovery job is complete, the Gateway informs the Router that the job is complete. ARAM event logs are triggered by the Router.
Autofilling credentials into a website login page
Saving credentials after login
Interacting with FIDO2 WebAuthn for saving and filling passkeys
Working with HTTP Basic Auth website login schemes
Browser Action (Toolbar) filling communicates with background scripts and manages the UI toolbar menu.
Content scripts communicate with Background scripts via Chrome messaging APIs (chrome.tabs.sendMessage).
The Browser Extension and Web Vault communicate with each other via native Port messaging on chromium browsers and window.postMessage on Firefox. Messages are encrypted with Elliptic Curve transmission keys.
Background scripts communicate with Keeper's Zero-Knowledge backend API.
Keeper will not autofill passwords on any non-secure (http://) website, without explicit forced consent by the user or the Keeper Admin.
Flexible Rollout: Enables gradual, per-client deployment using established Kyber libraries.
Protection Against "Store-and-Crack": Ensures data intercepted today remains secure against future quantum decryption capabilities.
System and method for chat messaging in a
zero-knowledge vault architecture.
,
Method and apparatus for protecting account numbers and passwords.
Apparatus for selecting and displaying a file
associated with a current geographic location.
Method for facilitating quick logins from a
mobile computing device for autofilling login
credentials into websites and applications.
User-defined identity verification system.
Will work with you to understand and resolve the issue quickly, and
Will recognize your contributions publicly if you are the first to report the issue and we make a code or configuration change based on the issue.
You give us reasonable time to analyze, confirm and resolve the reported issue before publicly disclosing any vulnerability finding.
A method of detecting the existence of a
breached password in a zero-knowledge vault without disclosing any identifiable information about the password to the service provider or any outside party.