# Create Approvers, Collections, & Policies
## Creating Approvers
### Overview
**Approvers** are the people (or groups) who can approve privilege-elevation or other requests when a policy requires approval.
* **Where to Create Them:** In the Keeper Admin Console, use the area for approvers or approval settings (exact name may vary by console version).
* **What you Define:** Who is an approver (e.g., by user, group, or role) and, if applicable, which requests they can see (e.g., by collection or deployment group).
* **How they Approve:** Approvers receive requests through the Keeper workflow. They approve or deny; the agent then allows or blocks the action.
For more on how policies use approval, see [Policies](https://docs.keeper.io/en/keeperpam/endpoint-privilege-manager/policies).
When a policy in Keeper Endpoint Privileged Manager uses the **Require Approval** control, the request is routed to an approval team defined in the Keeper Admin Console.
**Approvers Can:**
* View pending requests
* Approve or deny elevated requests
* Review request details (user, machine, application, justification)
* See request history
Approval configuration is managed centrally in the **Admin Console**. Teams of approvers are assigned at the **request type level**.
#### Step-by-Step Guide
{% stepper %}
{% step %}
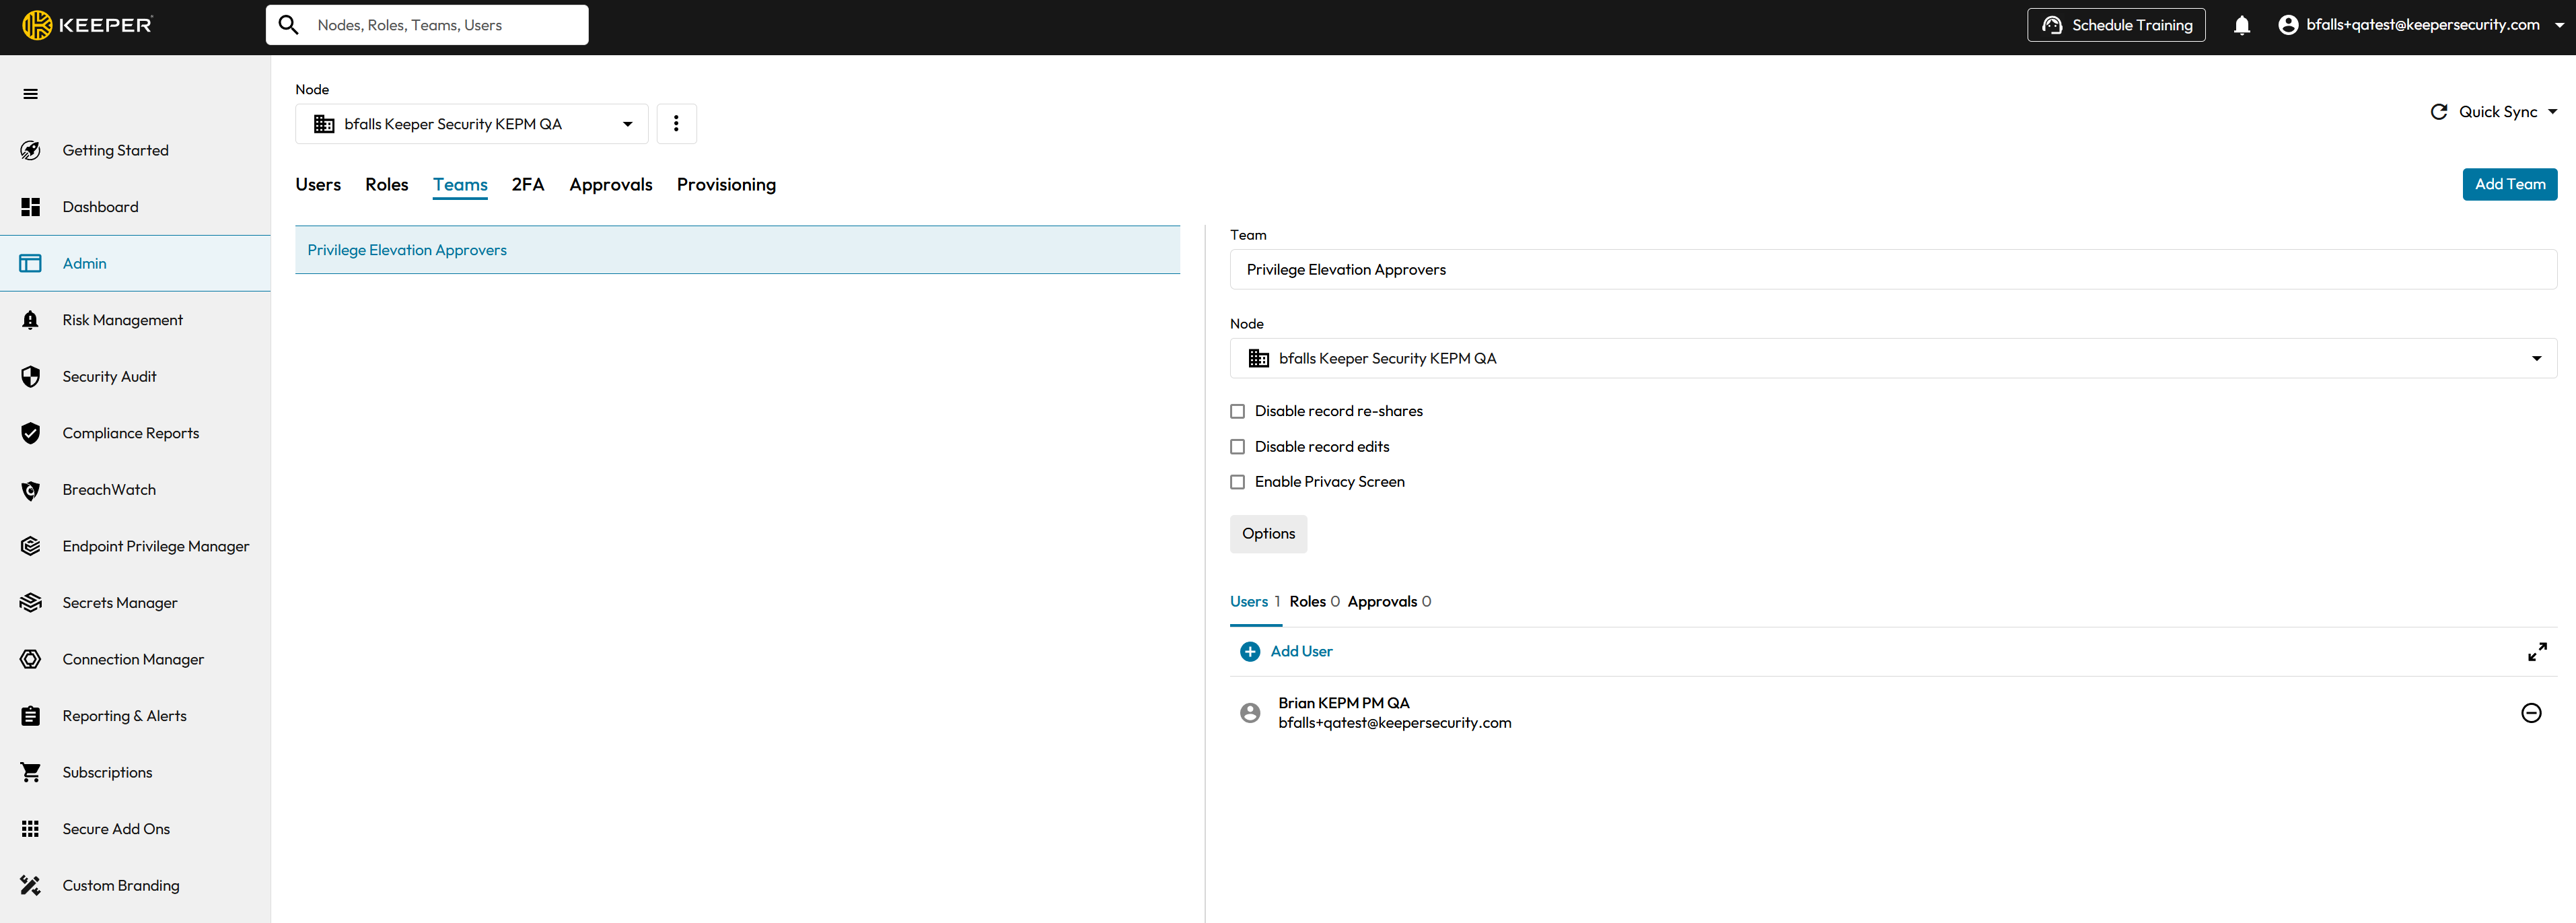
**Navigate to Admin --> Teams**
* Log in to the **Keeper Admin Console**
* Navigate to **Admin**
* Select **Teams**
{% endstep %}
{% step %}
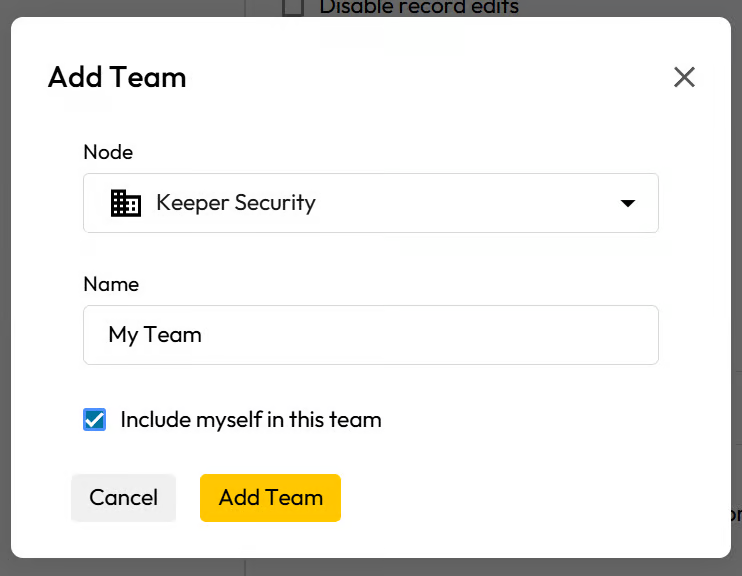
**Add a Team**
If no team exists, or if you want to create a new team for Approvals, and for Elevations.
If you leave the "Include myself in this team" checkbox checked, your user will automatically be enrolled as an approver for your new team.
{% endstep %}
{% step %}
#### Add User to Team
Once your team has been created, you may then click to add users to your new team. Clicking will spawn the "Add User to Team" modal form.
{% endstep %}
{% step %}
**Navigate to Approvals**
1. Log in to the **Keeper Admin Console**
2. Navigate to **Admin**
3. Select **Approvals**
{% endstep %}
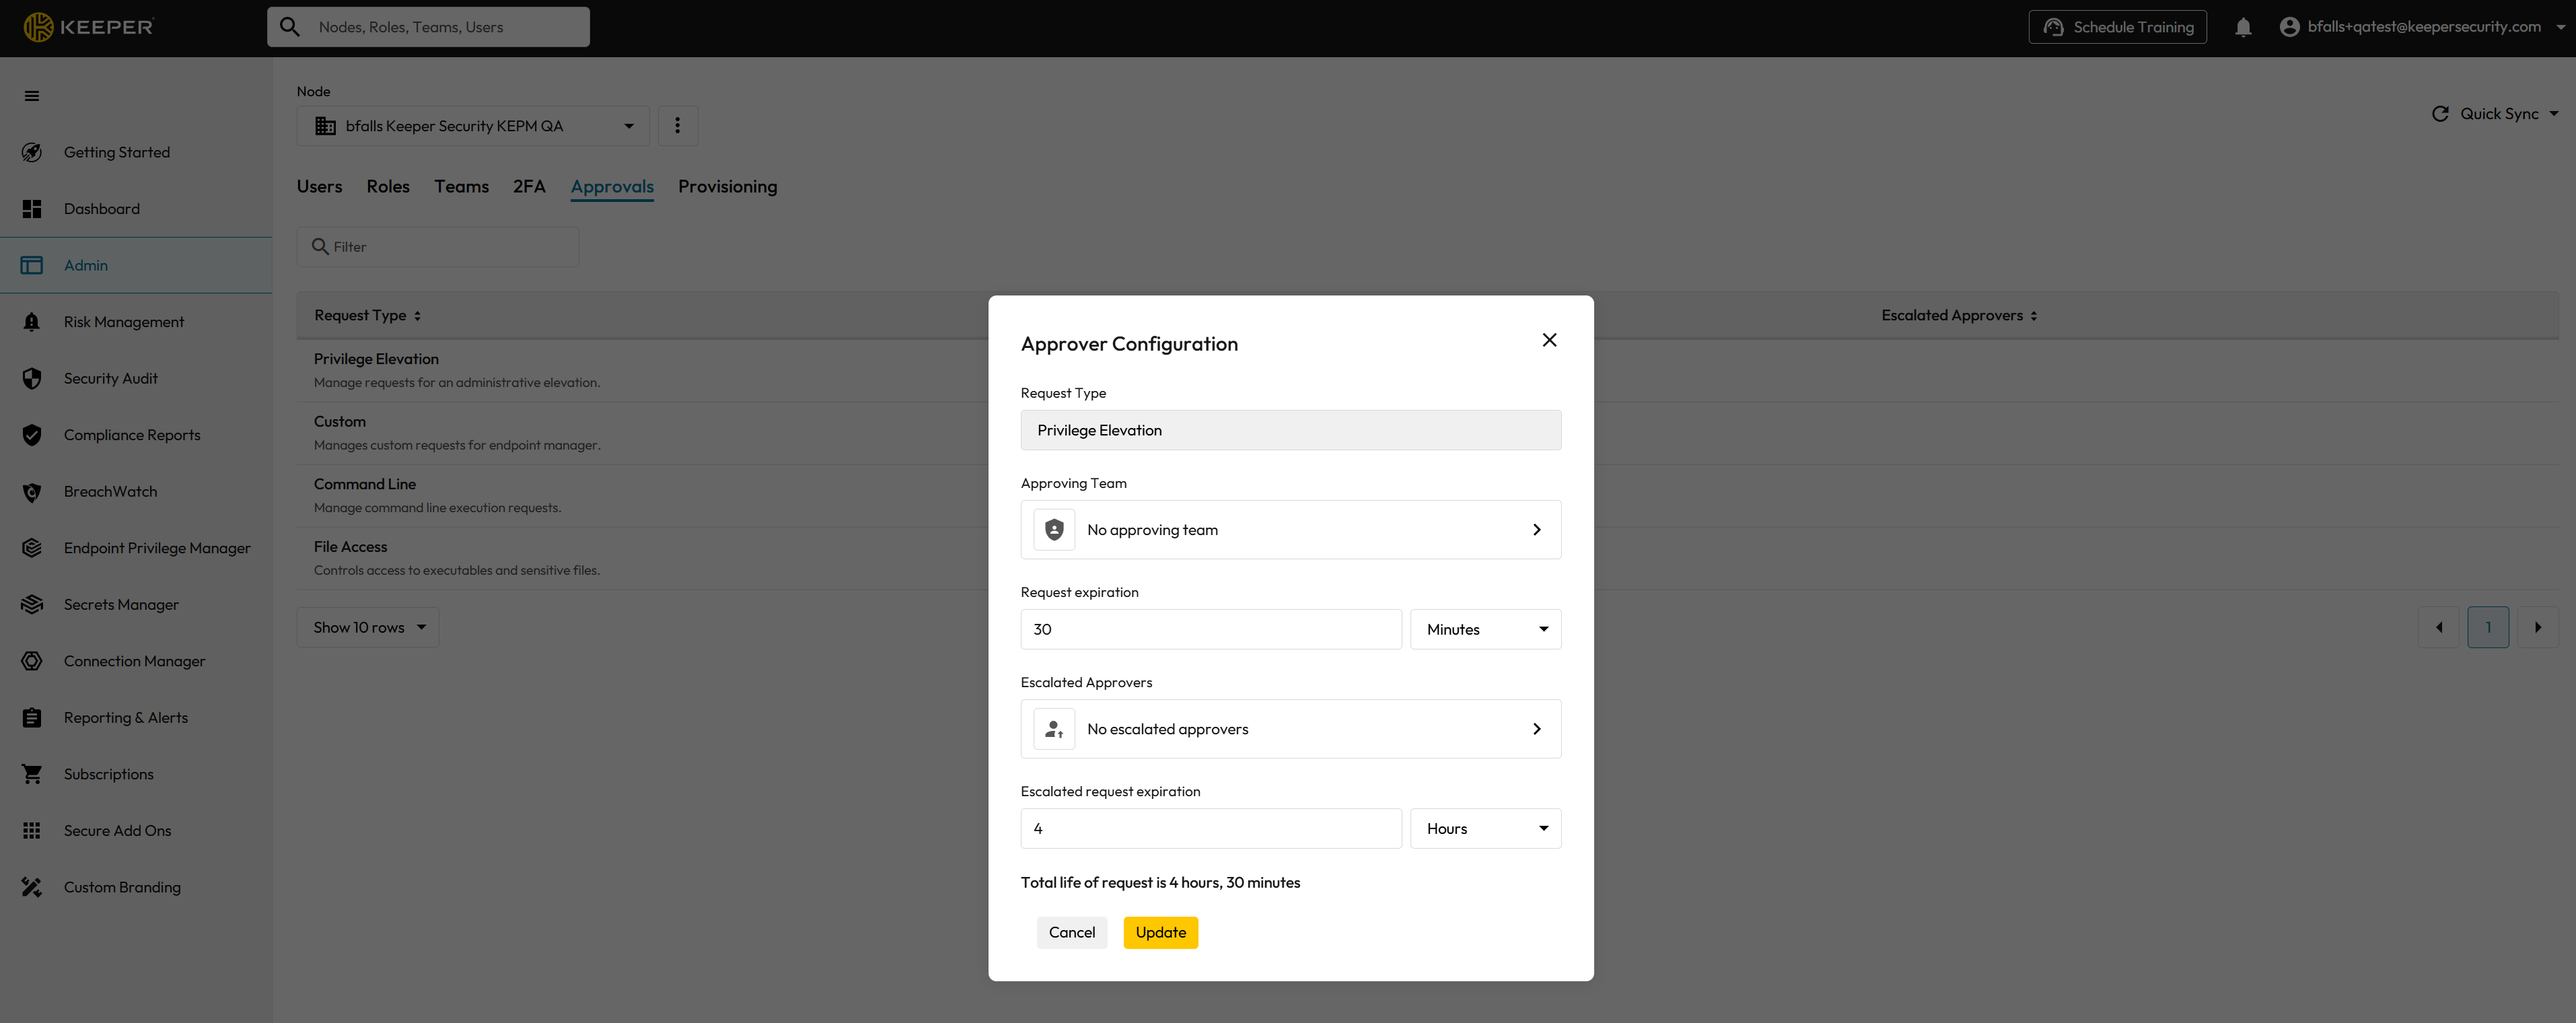
{% step %}
**Select Request Type**
Within the Approvals section:
1. Select the appropriate **Request Type**.
* For example: Privilege Elevation (or other EPM-related request types depending on your deployment).
Each request type can have its own approval configuration.
{% endstep %}
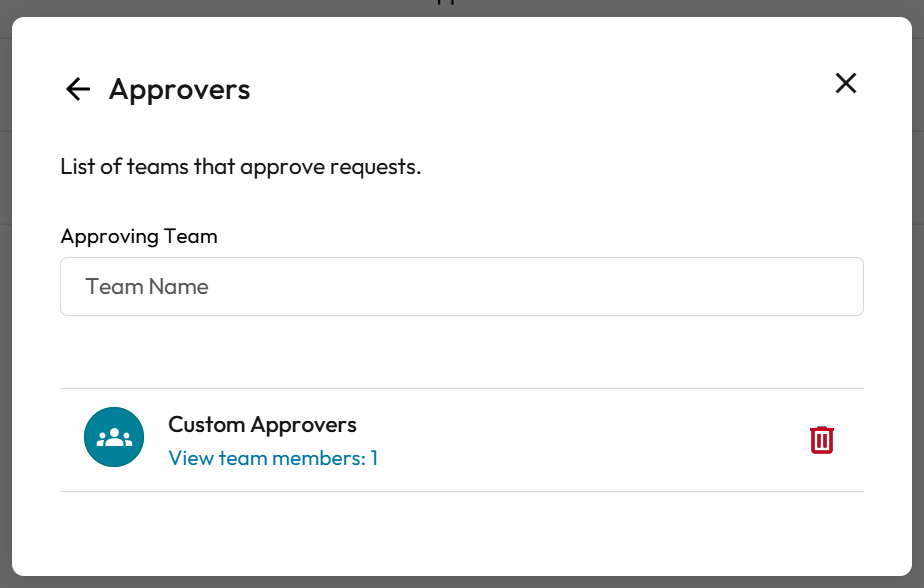
{% step %}
**Specify Approval Team**
For the selected request type:
1. Assign the appropriate **approval team**.
2. Save the configuration.
{% endstep %}
{% step %}
**Specify Escalated Approvers Team**
For the selected request type:
1. Assign the appropriate **escalated approvers**.
2. Save the configuration.
{% endstep %}
{% endstepper %}
## Creating Collections
### Overview
**Collections** group things you want to target with policies or deployment:
* **Users** (e.g., by role, department, or AD/Azure AD group).
* **Machines** (e.g., by OU, tag, or deployment group).
* **Applications** (e.g., by name or path pattern).
Collections let you write **one policy** and apply it to many users or machines instead of listing each one. You create and maintain collections in the Keeper dashboard; then you select them when building policies or deployment groups.
* **Use in policies:** In a policy’s filters, you choose which users, machines, and applications the policy applies to. Collections (or the equivalent targeting in your console) make that selection manageable.
* **Use in deployment:** Deployment groups determine which endpoints get which configuration; they often align with machine or user collections.
If your organization uses Active Directory or Azure AD, you can align collections with AD/Azure AD groups or import them as your deployment process supports.\
Reference: [**Sub-Command:** scim](https://docs.keeper.io/en/keeperpam/commander-cli/command-reference/endpoint-privilege-manager-commands)
Collections help you:
* Target specific groups of users
* Target specific machines or deployment groups
* Target specific applications
* Apply policies consistently across environments
* Organize large deployments
Instead of assigning policies to individual users or machines one at a time, you assign them to collections.
#### Custom Collections
Custom collections allow you to create logical groupings that reflect your organization structure.
Examples:
* Finance Workstations
* Engineering Users
* Domain Controllers
* Approved Administrative Tools
Collections can include:
* Users
* Machines
* Applications
They are reusable across policies and deployment groups.
#### Step-by-Step Guide
{% stepper %}
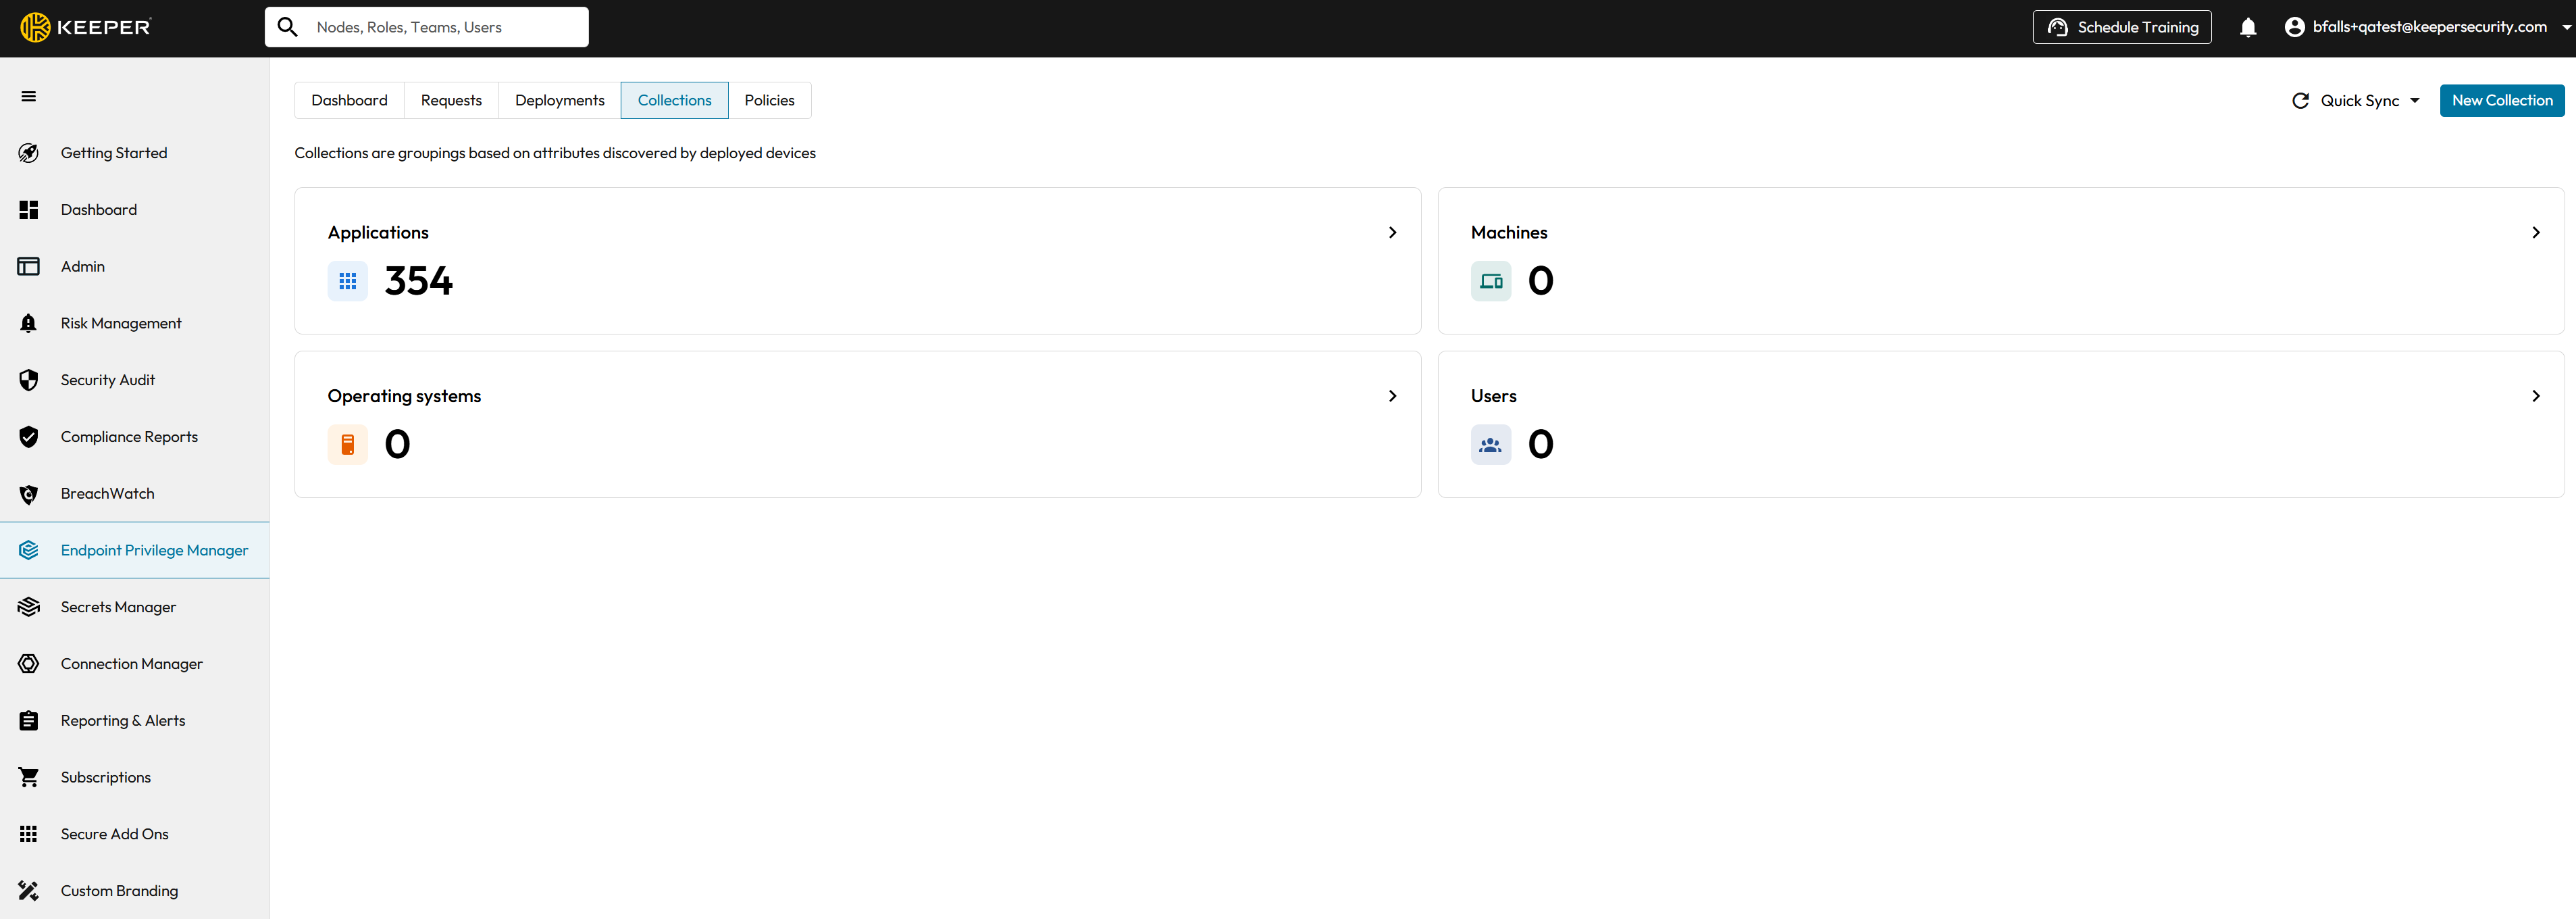
{% step %}
**Navigate to Collections**
1. Log in to the **Keeper Admin Console**
2. Navigate to **Endpoint Privilege Manager**
3. Select **Collections**
4. Click the **New Collections** Button
{% endstep %}
{% step %}
**Define Collection Details**
Select Collection **Type** (Applications, Machines, or Users) and Name your new Collection then click the **Next** buton.
{% endstep %}
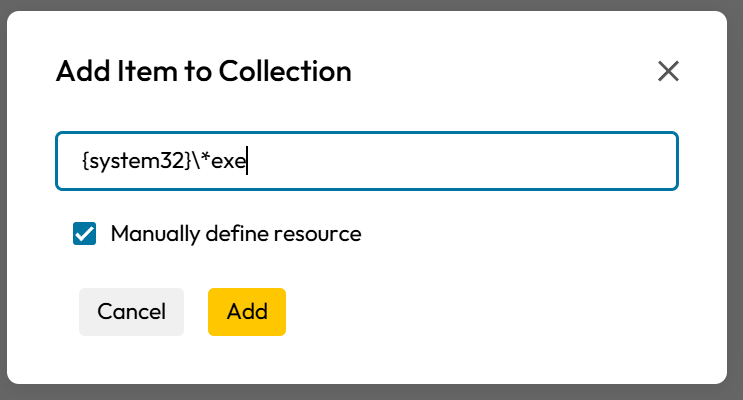
{% step %}
**Add Items to your Collection**
**Adding Items from Existing Objects**
Use the search box to display existing objects then select which objects you would like to add to your collection. Choose your objects and click the **Add** button.
**Manually Defining Objects**
Check the "Manually define resources" checkbox and the search box will be replaced with a textbox that will allow you to manually define objects for your collection. Specify your object and click the **Add** button.
{% endstep %}
{% endstepper %}
## Creating Policies
### Overview
**Policies** are the rules that enforce your security and compliance decisions: what is allowed, what requires MFA, what requires approval, and what is denied.
#### What a Policy Has
* **Name and Type:** So you can identify and categorize it (e.g., “Finance – Privilege Elevation”).
* **Type:** Privilege Elevation, File Access, Command Line, Least Privilege, Update Settings, or Update Jobs. Each type controls a different kind of action. See [Policies in Detail](https://docs.keeper.io/en/keeperpam/endpoint-privilege-manager/setup/policies).
* **Status:** Off, Enforce, Monitor, or Monitor & Notify. This controls whether the policy actually blocks or only logs. See [Policies in Detail](https://docs.keeper.io/en/keeperpam/endpoint-privilege-manager/setup/policies).
* **Controls:** What happens when the policy matches—e.g., Allow, Deny, Require MFA, Require Justification, or Require Approval. You can also use Auto-Approve or Auto-Deny in advanced options. See [Policies in Detail](https://docs.keeper.io/en/keeperpam/endpoint-privilege-manager/setup/policies).
* **Filters:** Who and what the policy applies to (users, machines, applications, and optionally time, date, or other conditions). See [Policies in Detail](https://docs.keeper.io/en/keeperpam/endpoint-privilege-manager/setup/policies) and [Reference: Variables & Wildcards](https://docs.keeper.io/en/keeperpam/endpoint-privilege-manager/examples/advanced-examples/variables-and-wildcards).
#### Where You Create Policies
Policies are created and edited in the **Keeper Admin Console**. They are then synced to agents that belong to the right deployment groups. You don’t need to edit files on each endpoint; the dashboard is the single place to manage policy.
#### Best Practices
* Start with **Monitor** or **Monitor & Notify** for new policies so you can see impact before enforcing.
* Use **collections** so one policy can cover many users or machines.
* Use **variables and wildcards** in filters to keep policies simple and scalable. See [Reference: Variables & Wildcards](https://docs.keeper.io/en/keeperpam/endpoint-privilege-manager/examples/advanced-examples/variables-and-wildcards).
#### Step-by-Step Guide
{% stepper %}
{% step %}
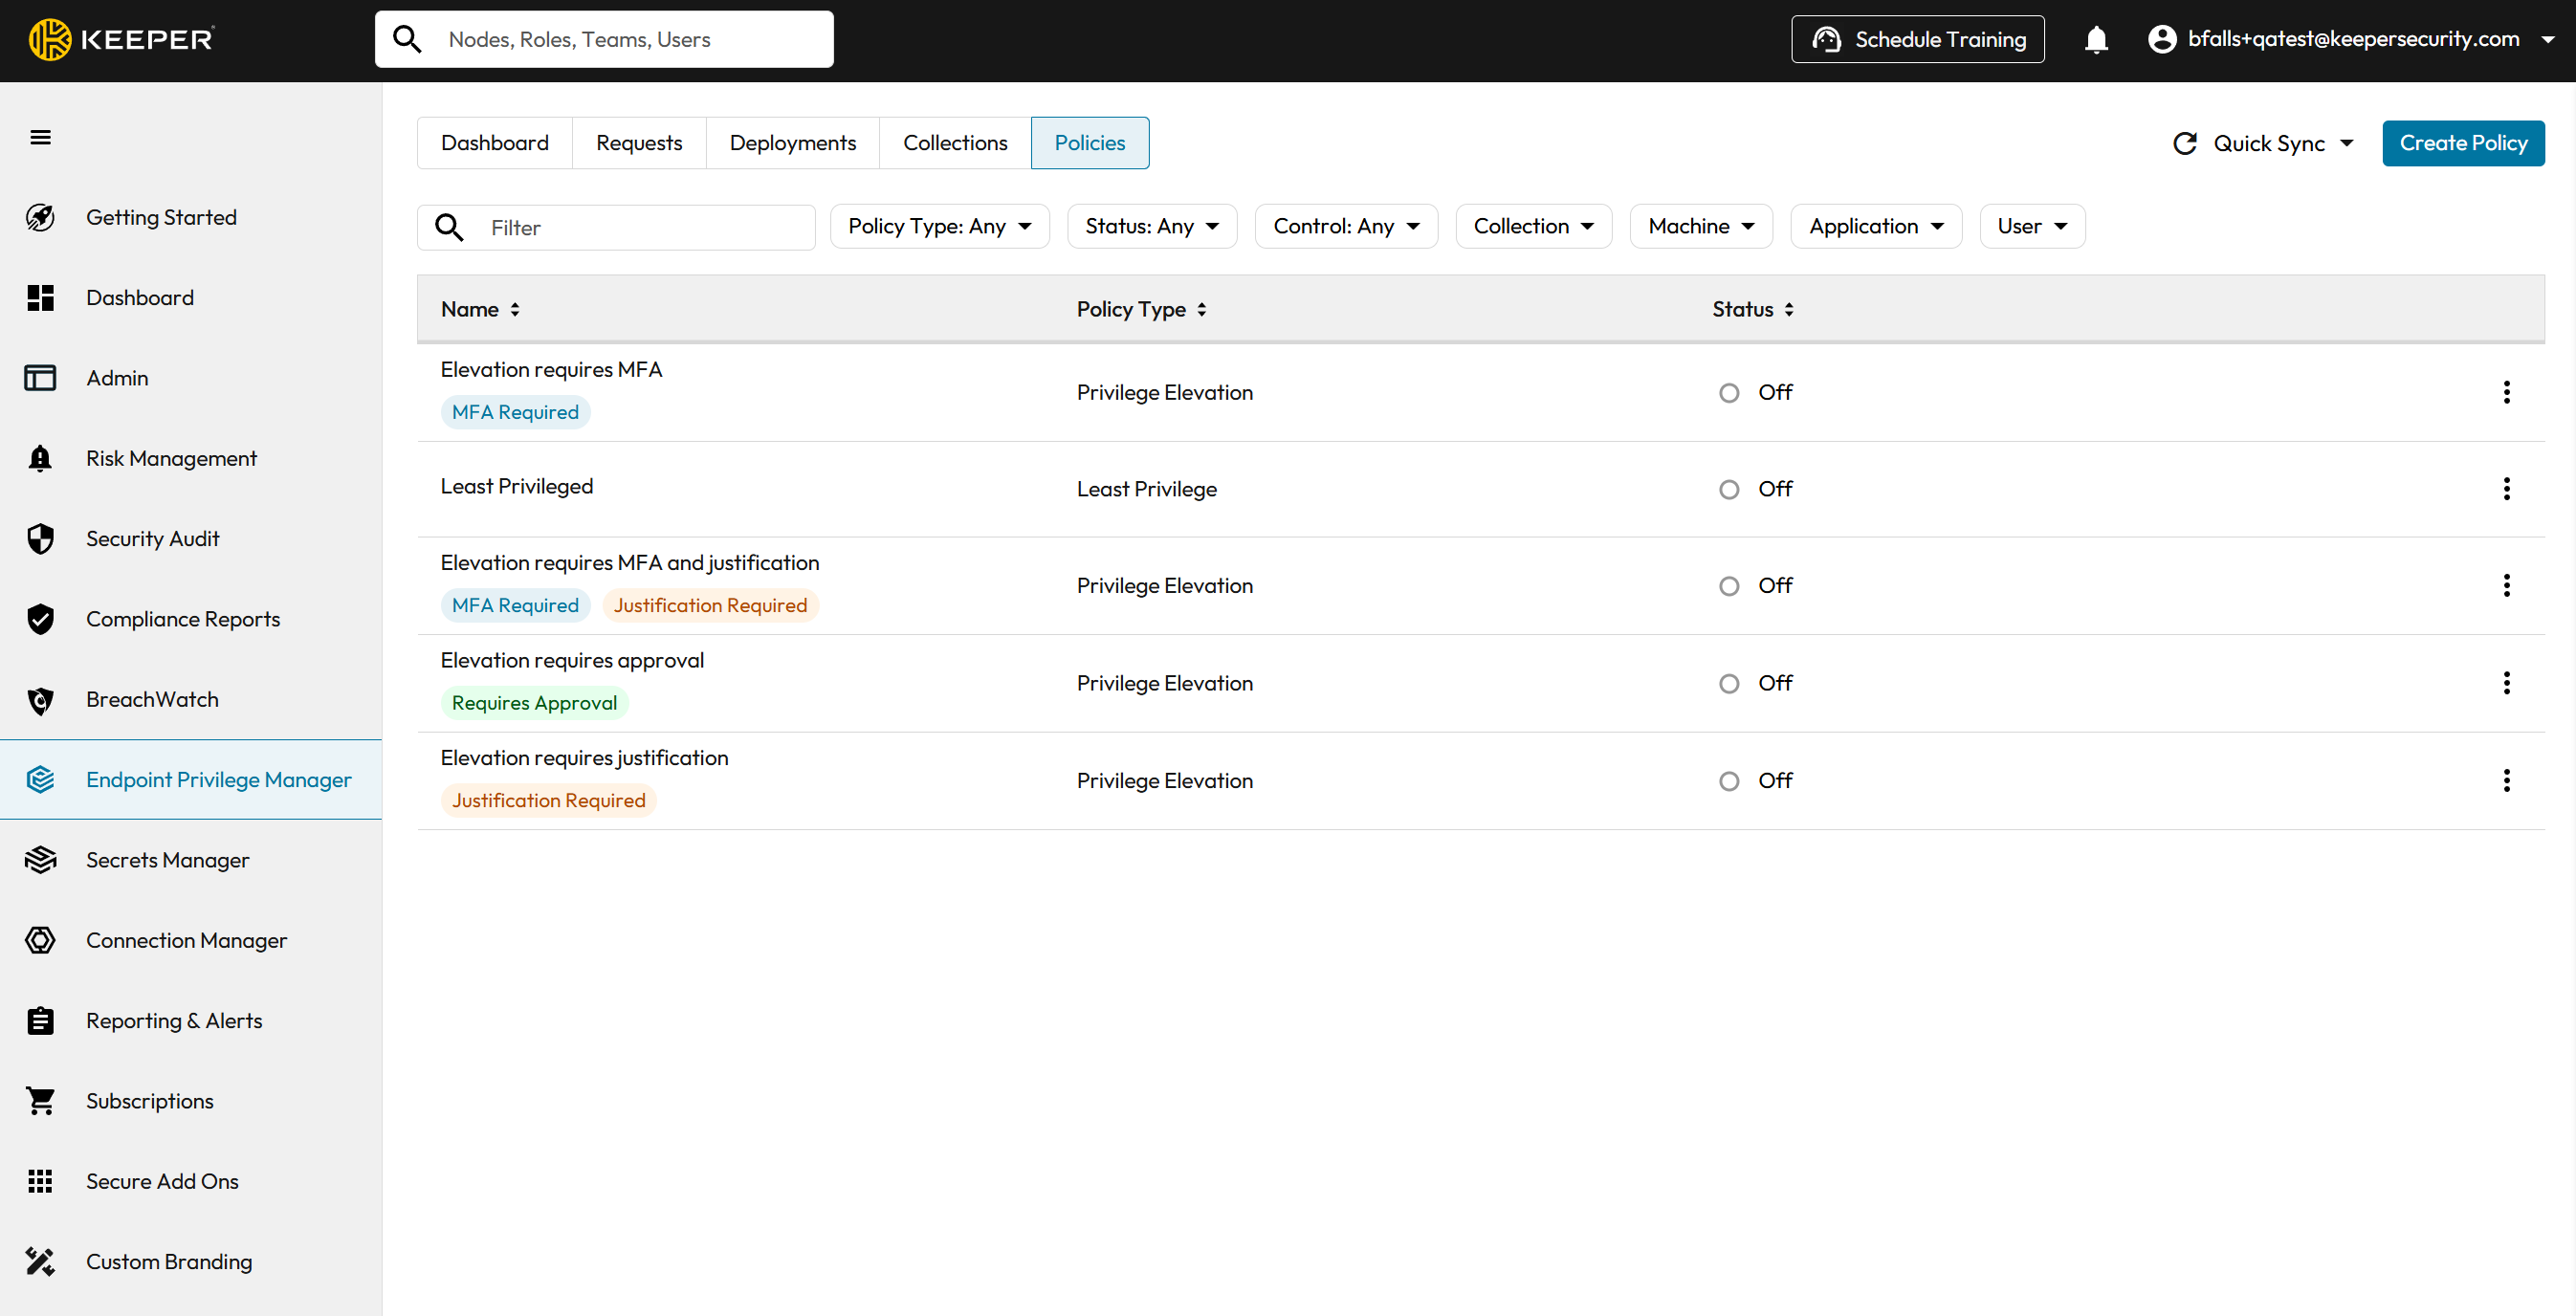
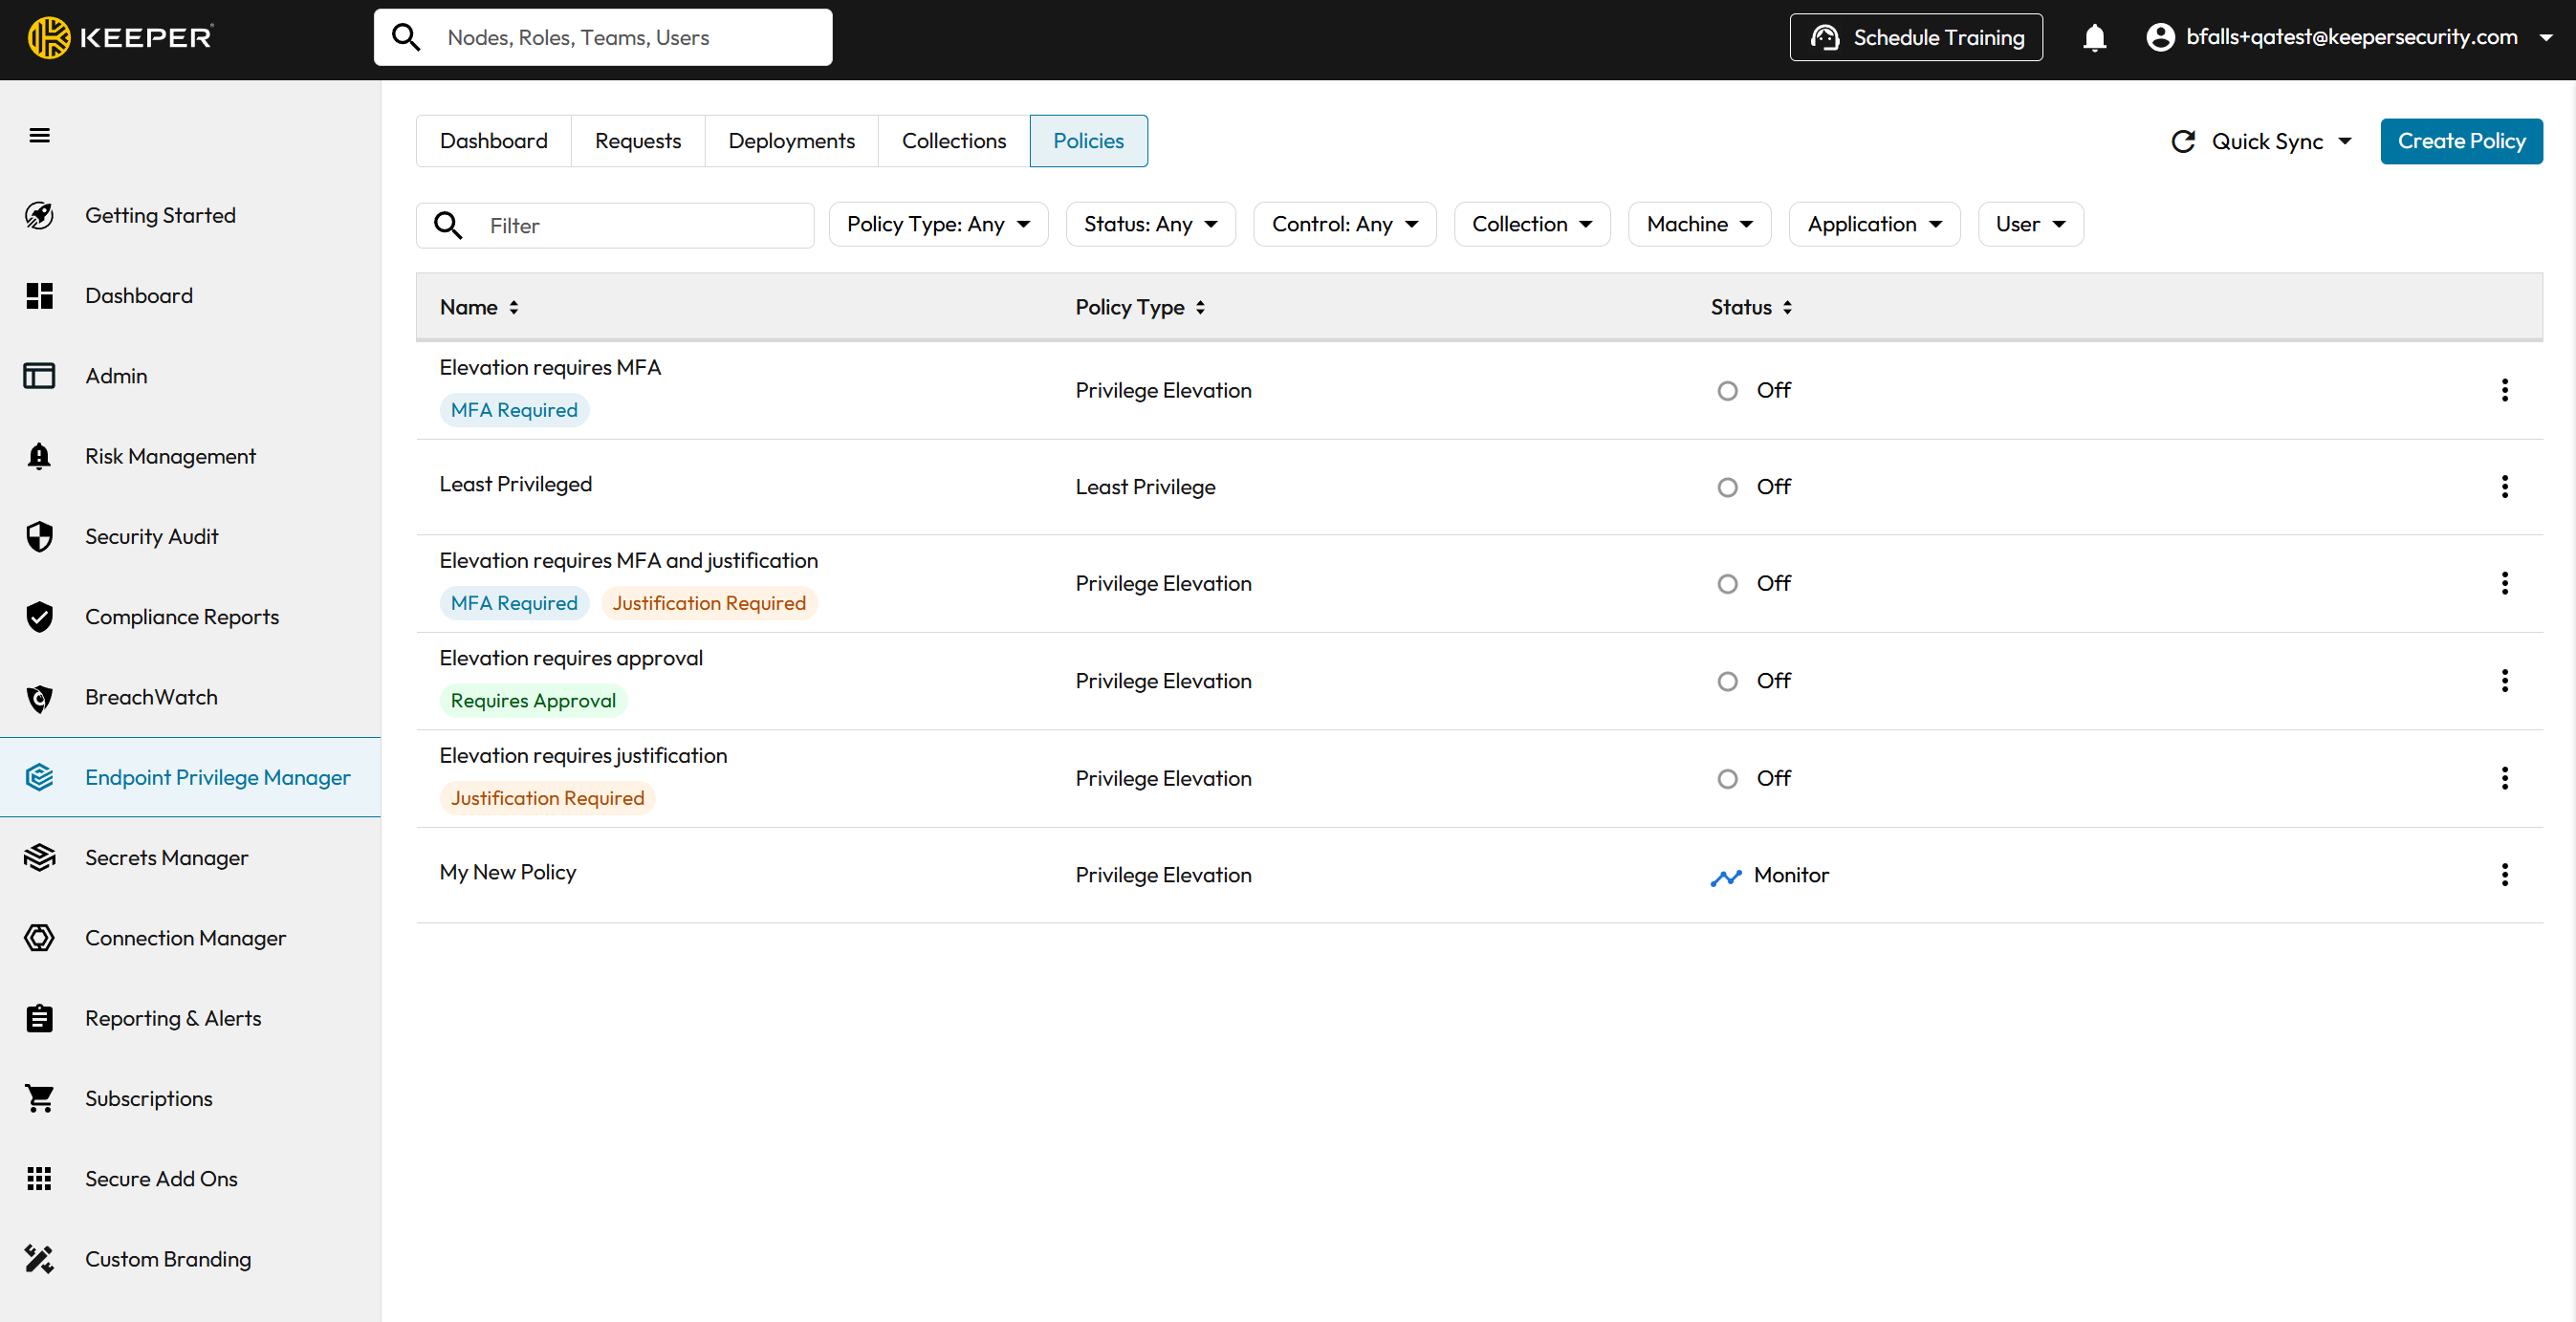
**Navigate to Policies**
* Log in to the Keeper Admin Console
* Navigate to Endpoint Privilege Manager
* Select Policies
* Click the **Create Policy** button
{% endstep %}
{% step %}
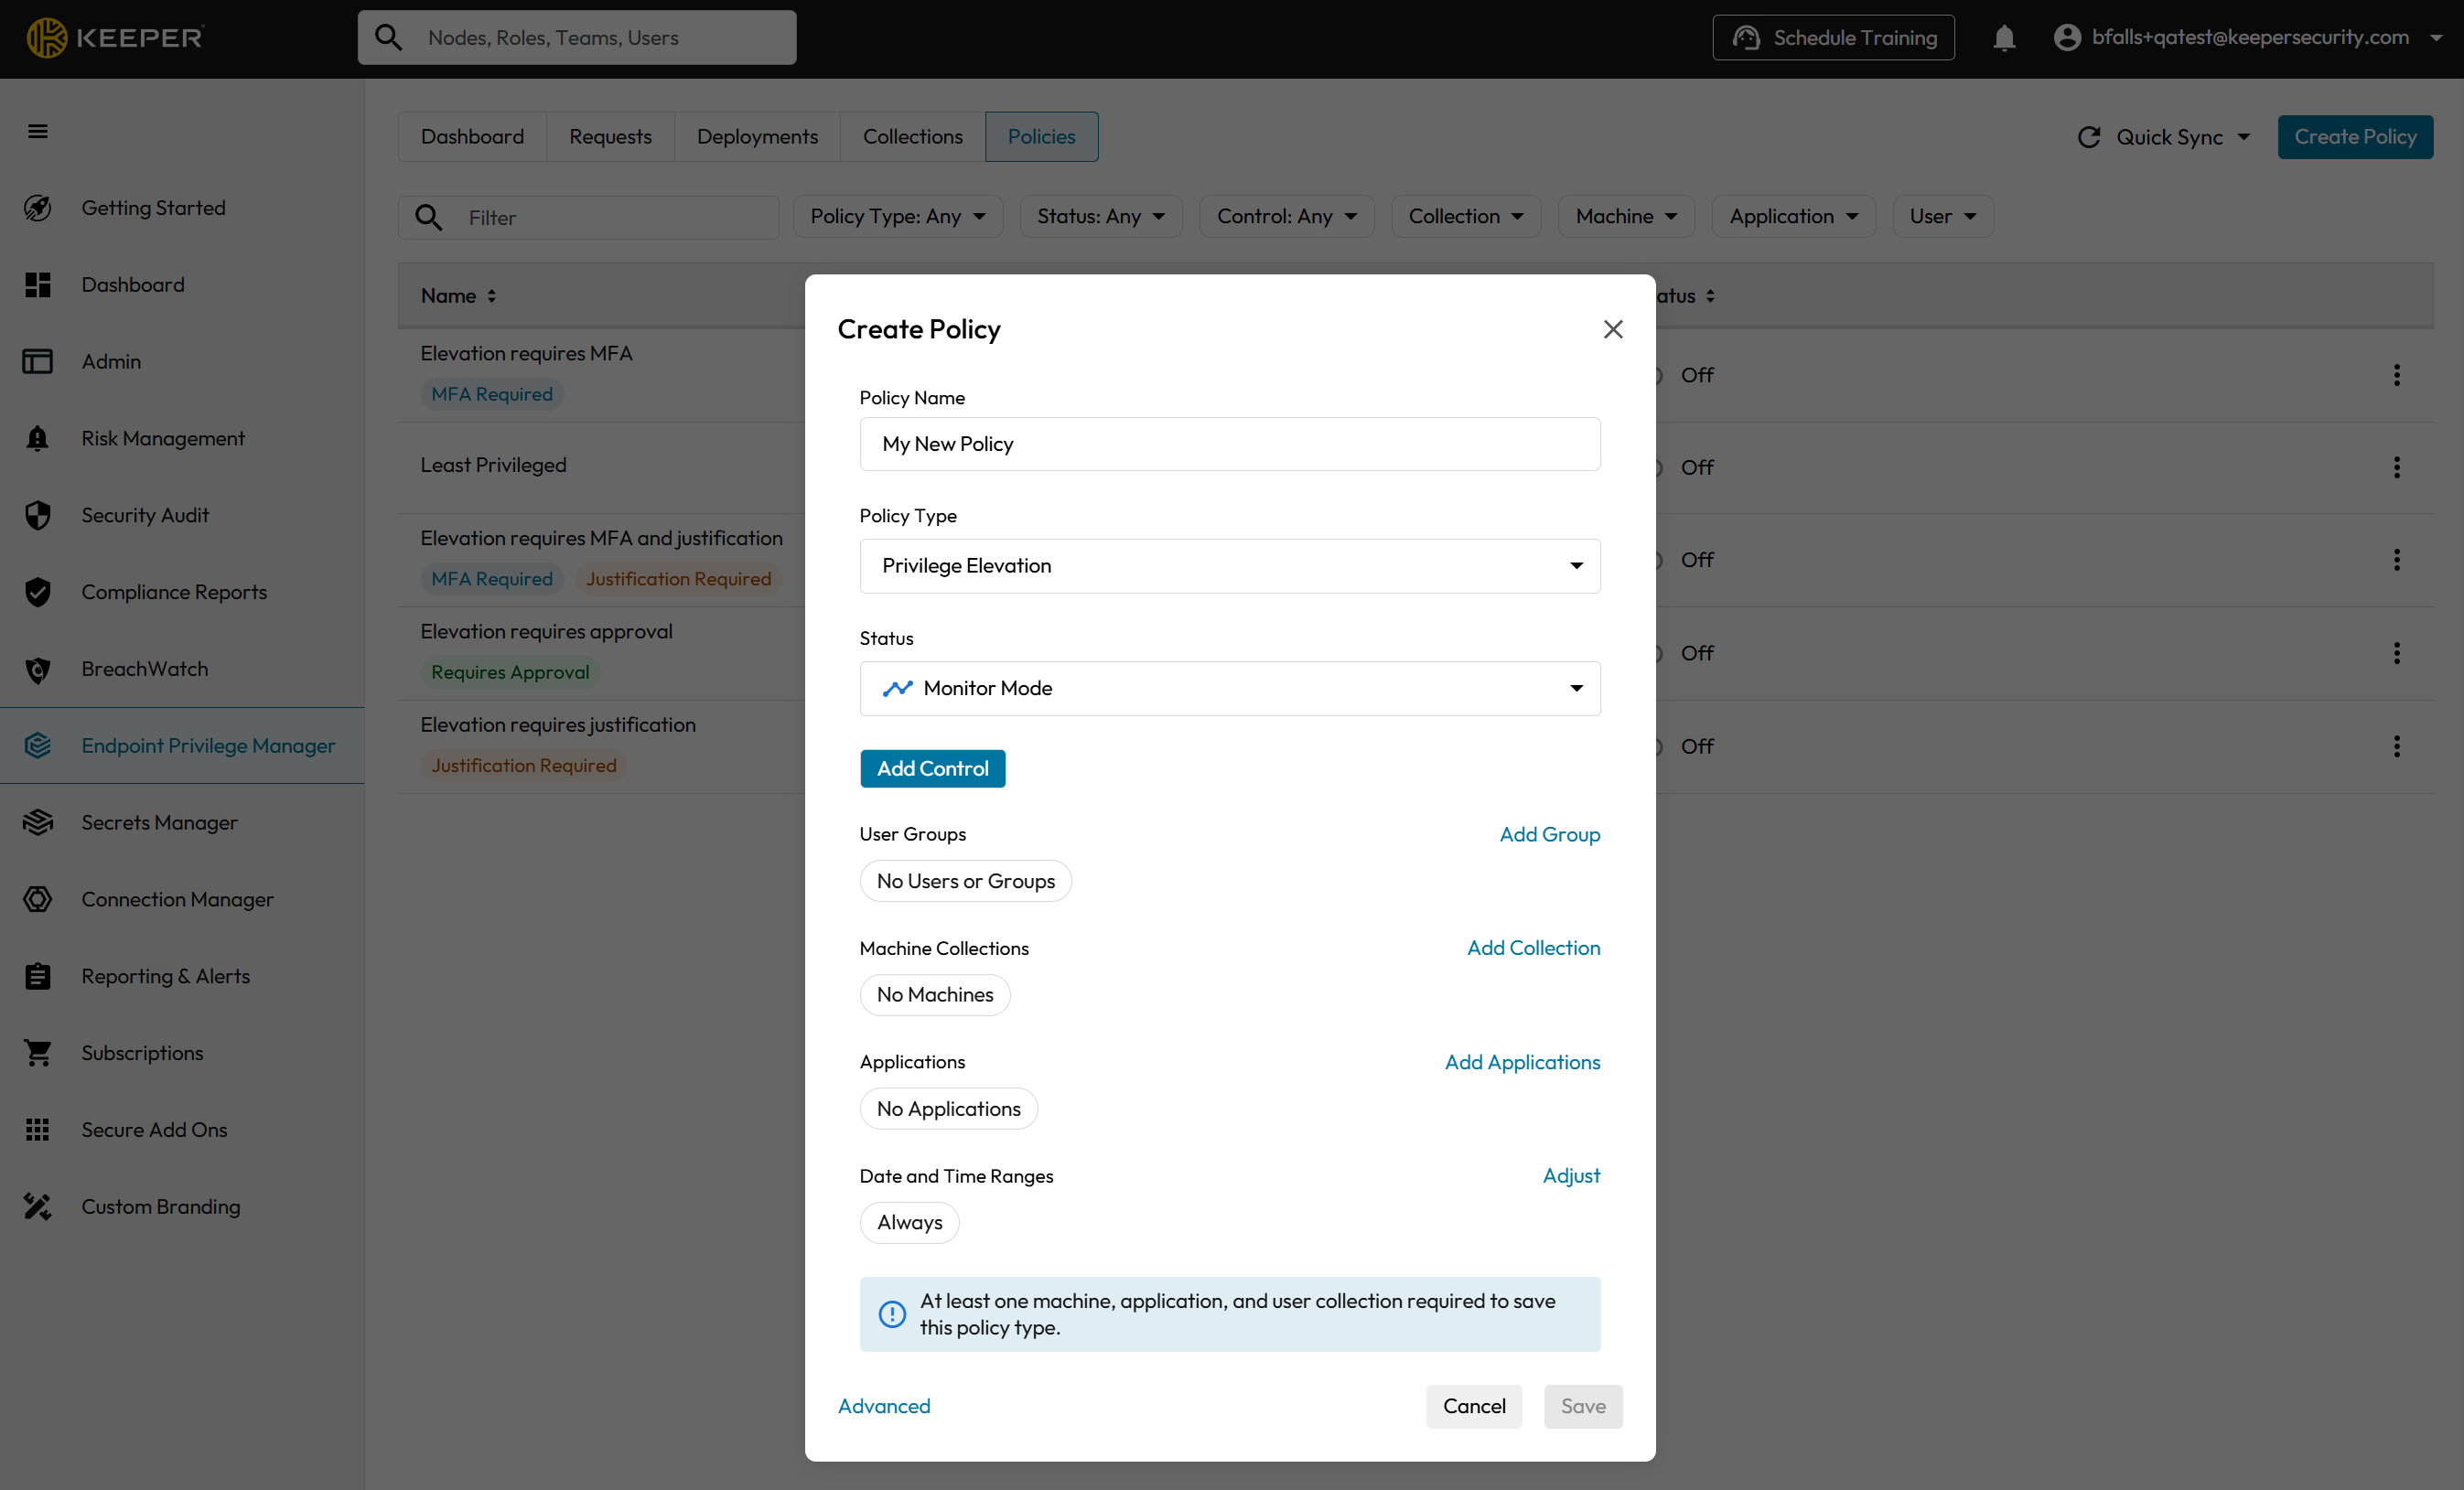
#### **Click the "Create Policy" Button**
This will pull up the Create Policy modal form.
{% endstep %}
{% step %}
**Define Policy Details**
When you create a policy, the **Policy Details** step establishes the policy’s identity, what it governs, and whether it’s currently active.
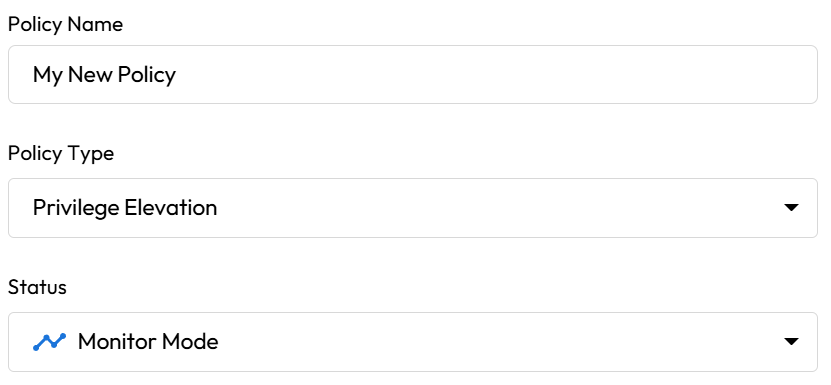
**Name your New Policy**\
Give the policy a clear, descriptive name so administrators can quickly understand its intent and scope. A good name typically reflects the audience and purpose (for example: department + action + environment).
**Choose a Policy Type**\
Select the policy type that matches what you want to control. The policy type determines which kinds of actions and controls you’ll be able to configure in later steps.
**Choose a Status**\
Set whether the policy should be active and how it should behave. Common status options include:
* **Monitor** (observe activity without enforcing)
* **Monitor & Notify** (observe and notify without enforcing)
* **Enforce** (actively apply the policy)
* **Off** (disabled)
Tip: Start in **Monitor** (or **Monitor & Notify**) to validate impact before moving to **Enforce**.
{% endstep %}
{% step %}
#### Define Policy Controls
Policy controls let you decide what a user must do **before** a privileged action is allowed. These options are commonly used to reduce risk while still letting users complete necessary work.
**Require Approval**\
Requires an authorized approver to review and approve the request before the action can proceed. This is best for higher-risk actions that should have human oversight.
**Require MFA**\
Requires the user to complete multi-factor authentication (MFA) to confirm their identity before proceeding. This helps prevent misuse if a password is compromised.
**Require Justification**\
Requires the user to provide a written reason for why they need the action. This creates accountability and improves auditability.
**Using Controls Together**\
You can apply these controls **individually or in combination**. For example, a policy can require **MFA + Justification**, or **Approval + MFA**, or **Approval + MFA + Justification** for the most sensitive actions.
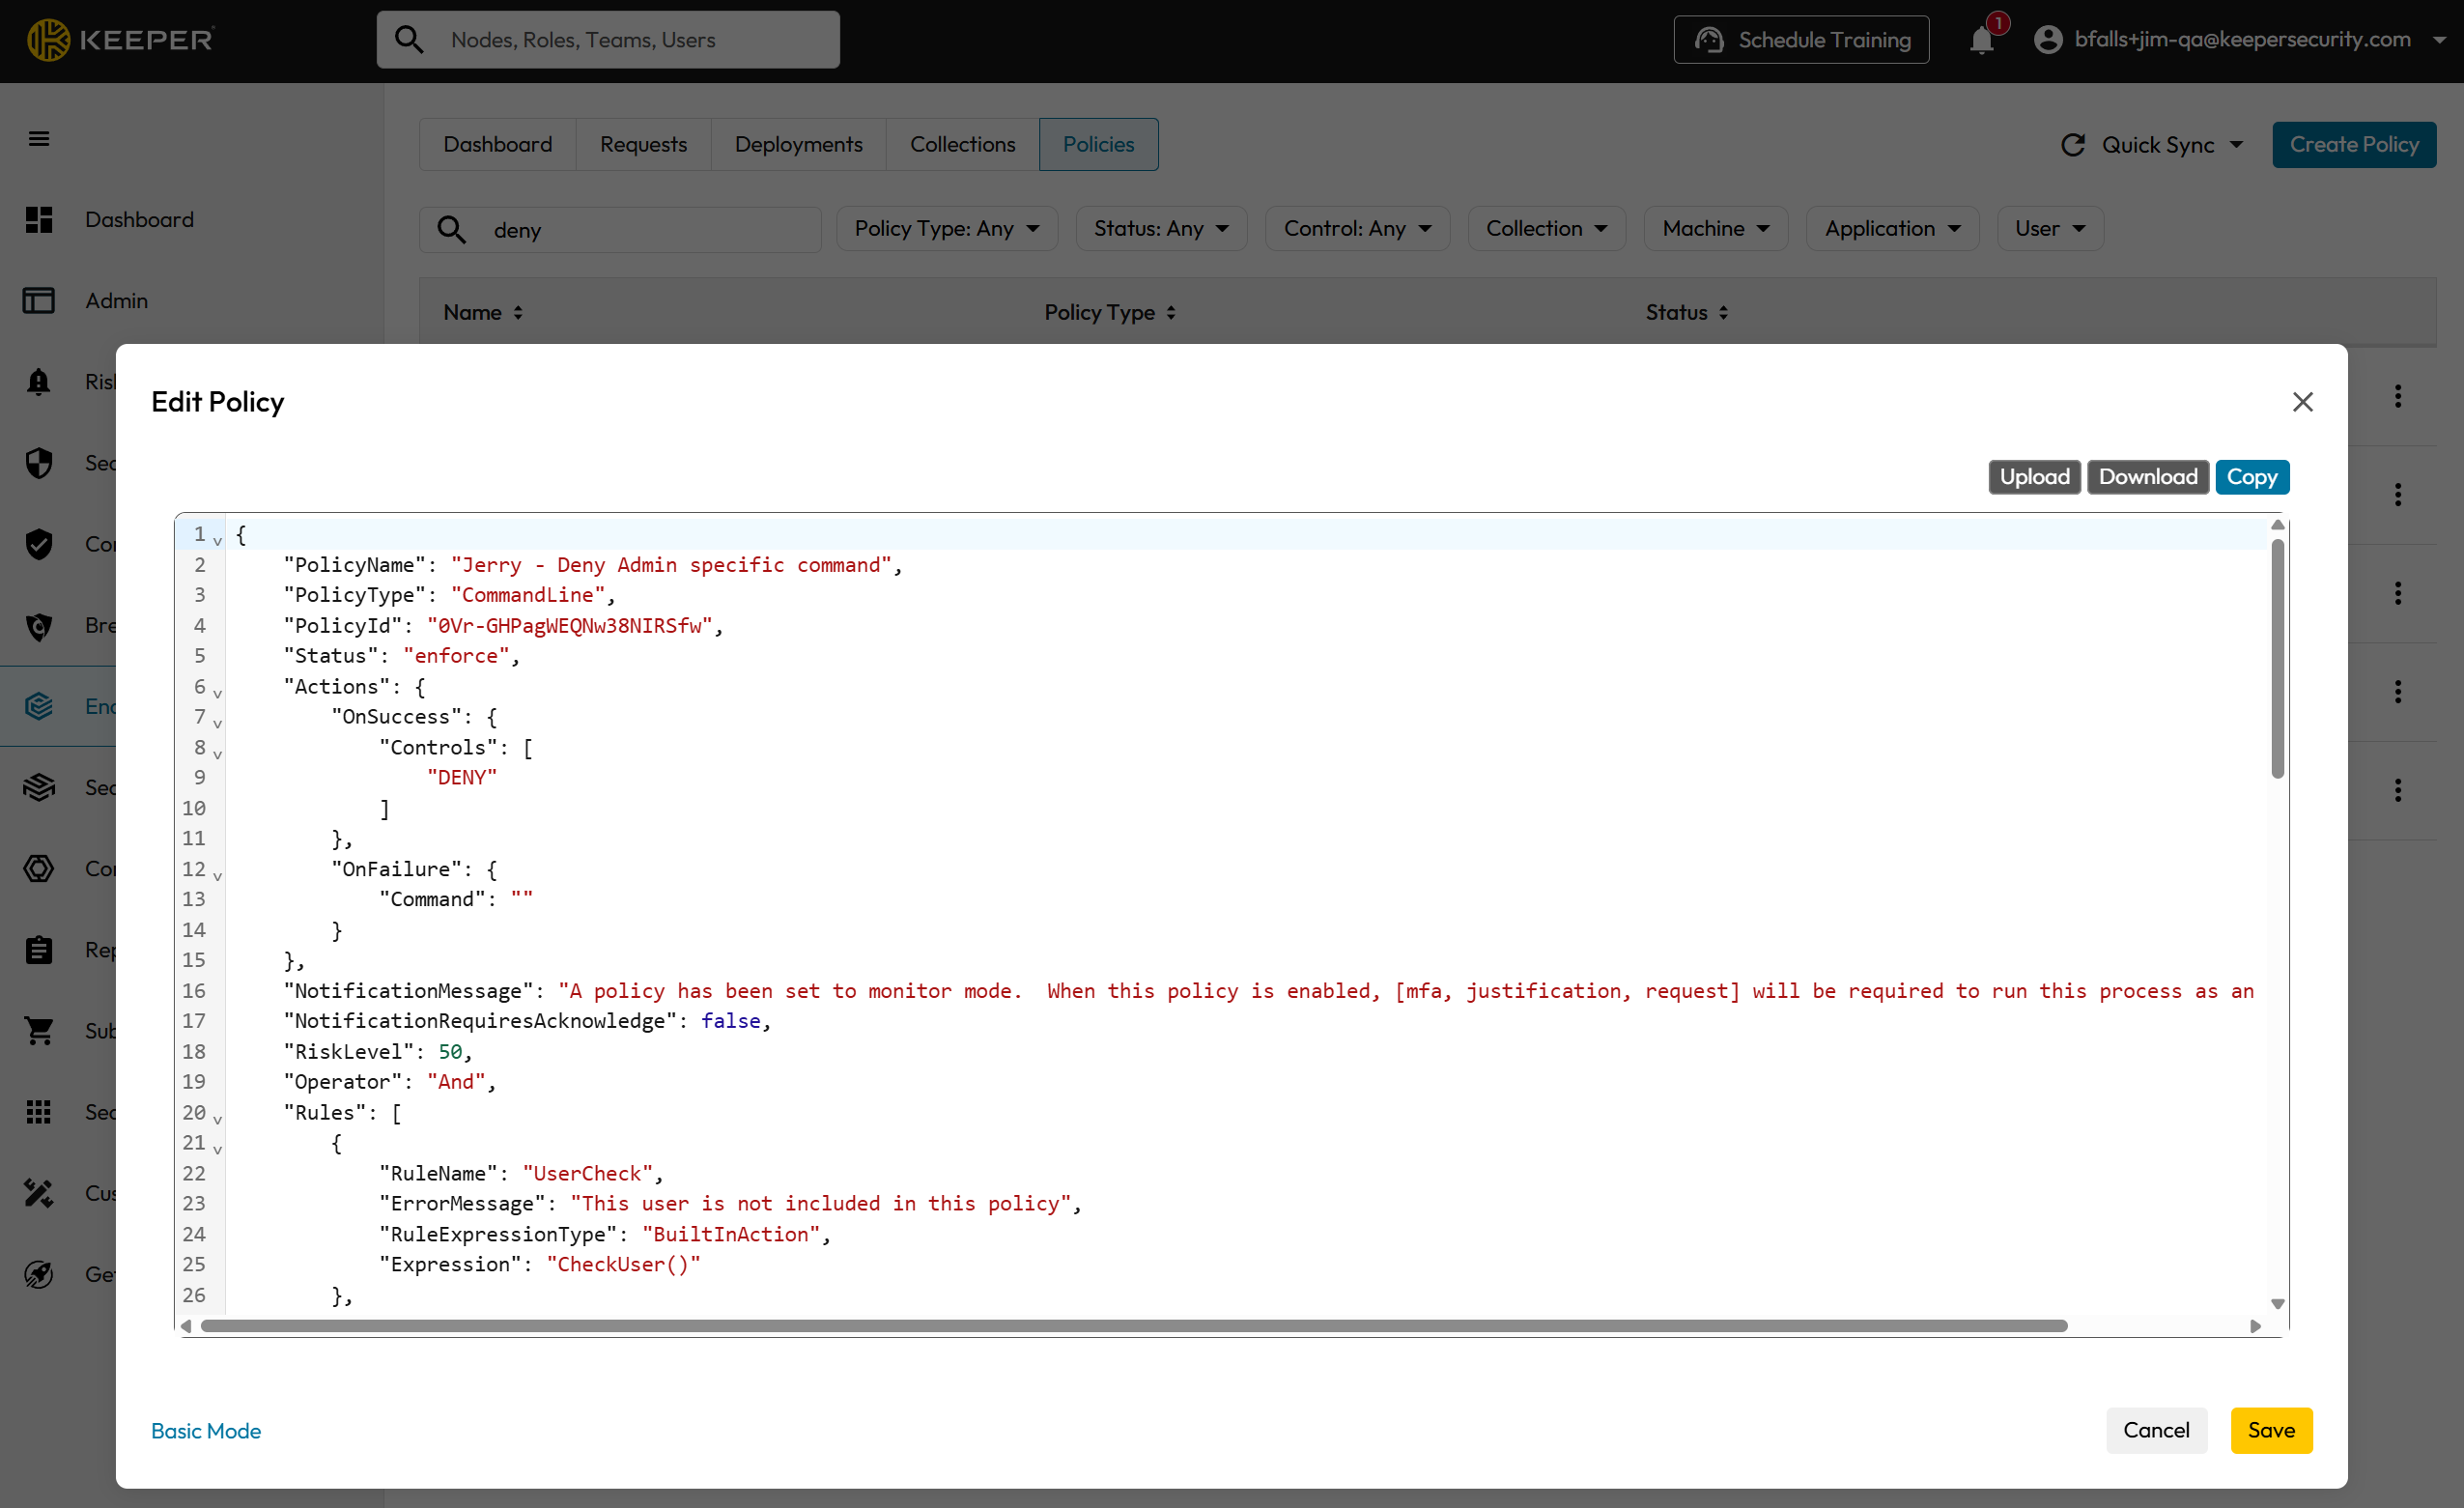
**Auto Approve or Auto Deny**\
Auto Approve and Auto Deny can only be enabled and configured in the policy form’s **Advanced Mode** section. Make sure you switch to Advanced Mode when editing a policy so these settings are properly set and enforced.
{% endstep %}
{% step %}
#### Define Targeting
**Define Targeting**
Targeting determines **exactly where a policy applies**. Instead of applying a policy to every endpoint and every user, you scope it to the **right people, devices, apps, and platforms** so enforcement is precise and predictable. You can target one category or combine multiple categories together for tighter control.
**Users**\
Target specific users or groups of users so the policy only applies when those identities attempt the action. This is useful when different teams (IT, Finance, Developers) need different privilege controls.
**Machines**\
Target specific endpoints (or groups of endpoints) so the policy only applies on selected devices. This helps you enforce stricter controls on high-risk systems (servers, shared workstations, kiosks) or pilot changes with a limited rollout.
**Applications**\
Target one or more applications so the policy only applies when those apps are launched or attempt a privileged action. This is ideal for controlling elevation for specific installers, admin tools, scripts, or business applications without impacting everything else.
**Operating Systems**\
Target by platform (Windows, macOS, Linux) so the same policy intent can be applied appropriately across environments, or restricted to only the OS where it’s relevant.
**Combining Targets**\
Targets can be layered to narrow scope. For example:
* Apply to **Developers (Users)** on **Engineering laptops (Machines)** for **Terminal tools (Applications)** on **macOS (Operating Systems)**.
* Apply to **All Users** but only on **shared Machines**, and only for a specific **Application**.
**Tip: Use Collections when Possible**\
Where available, use Collections to group users, machines, or applications and target the collection instead of managing long lists. This makes policies easier to maintain as your environment changes.
{% endstep %}
{% step %}
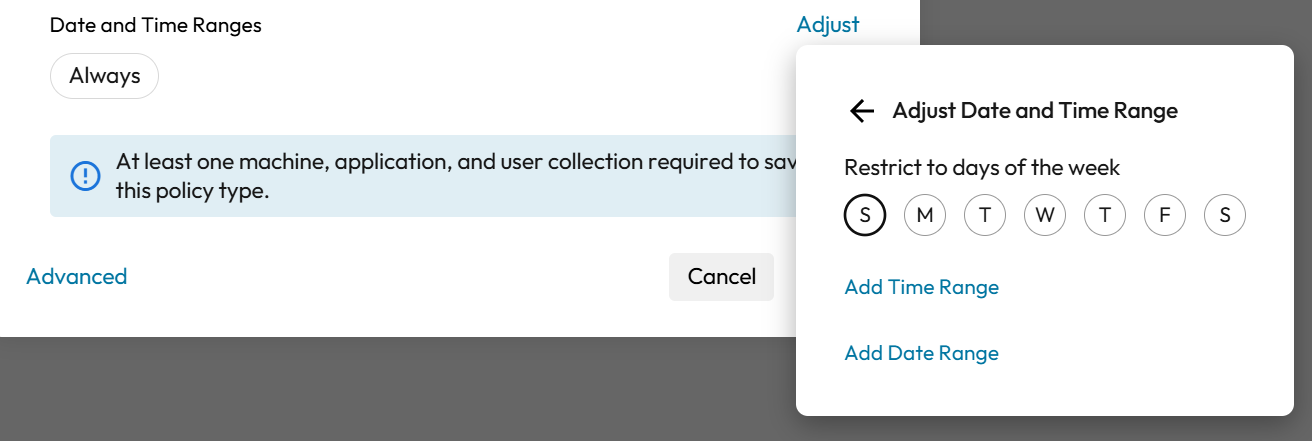
#### Define Date & Time Ranges
Date & Time Ranges let you control **when** a policy is active. This is useful for limiting privileged activity to approved windows, reducing risk outside business hours, or enabling temporary access during maintenance.
**Always (default)**\
If you leave the default **Always** setting in place, the policy applies at all times whenever the targeting conditions are met.
**Specify Date & Time Ranges**\
If you choose to define a range, you can limit the policy so it only applies during:
* **Business hours** (for example, weekdays during the day)
* **Maintenance windows** (for example, a scheduled change window)
* **Temporary time-bound periods** (for example, a short-term exception that expires)
**Why this Matters**\
Time-based limits help you:
* Reduce exposure during **nights/weekends**
* Enforce stricter controls outside normal hours (or relax controls only during maintenance)
* Support temporary access without needing to manually disable the policy later
{% endstep %}
{% step %}
#### Save your Policy
Review your policy configuration, then click the **Save** button, and your new Policy will appear in your list of Policies.
{% endstep %}
{% endstepper %}
 to add users to your new team. Clicking