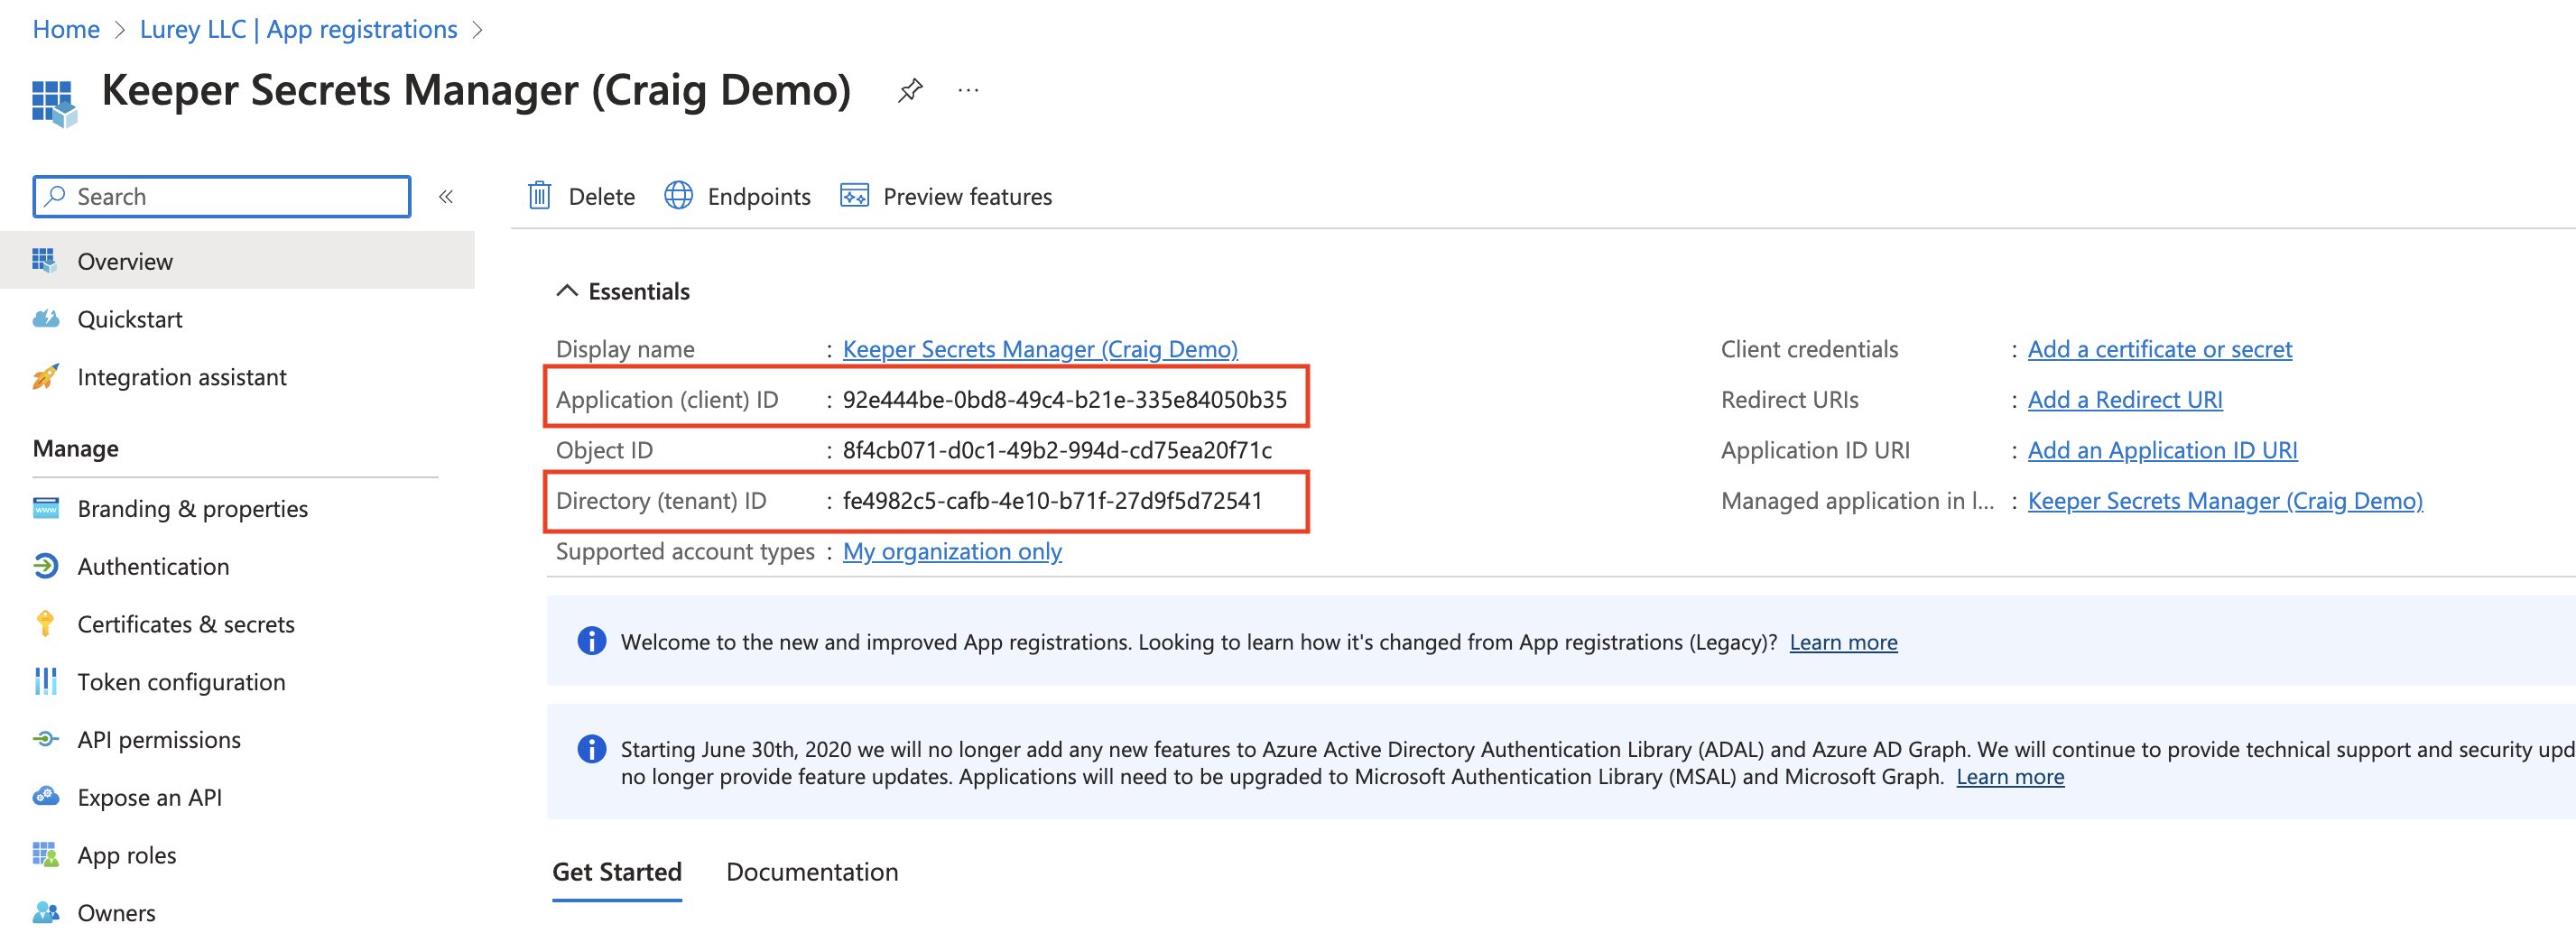
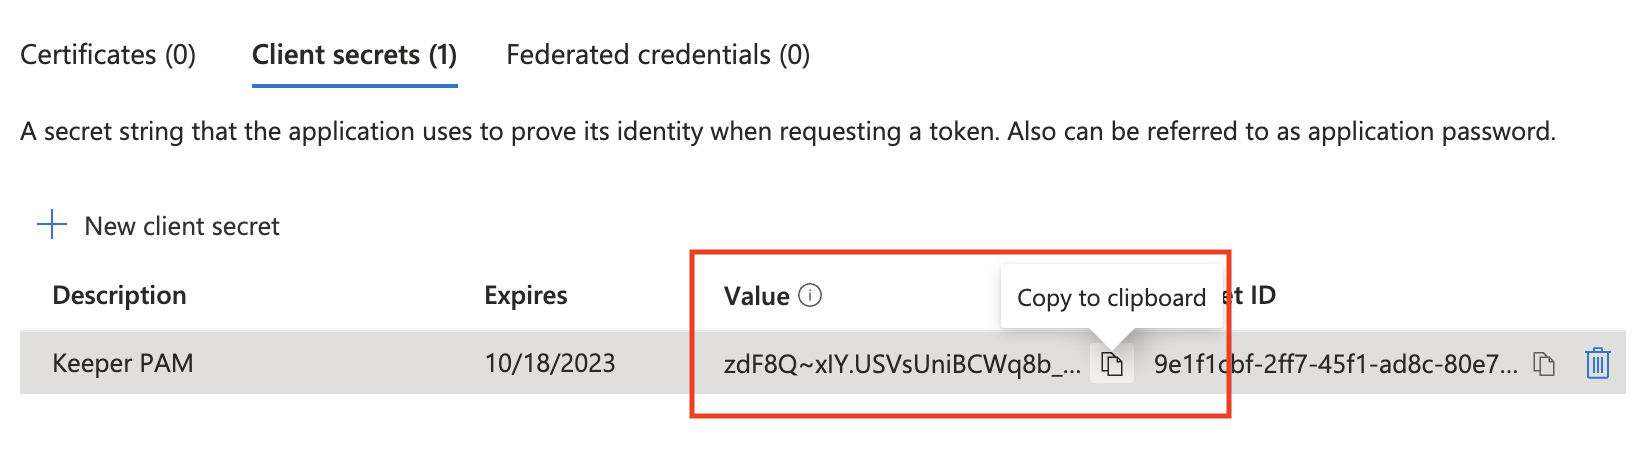
# Azure Environment Setup

<figure><img src="https://762006384-files.gitbook.io/~/files/v0/b/gitbook-x-prod.appspot.com/o/spaces%2F-MJXOXEifAmpyvNVL1to%2Fuploads%2FwYmcNZKRoL3p7QdpE5ik%2FAzure%20Environment%20Setup.jpg?alt=media&#x26;token=37c419f3-3638-4552-abb0-fdb5ded629b7" alt=""><figcaption></figcaption></figure>

## Azure Environment Overview

Resources in your Azure environment can be managed by a Keeper Gateway using Azure App policies and client IDs configured in the PAM Configuration record.

In order to set up your Azure environment, the following steps must be taken:

* Create an Azure application in the default Azure Active Directory.
* Get values for the Keeper PAM Configuration from this new application.
* Grant permissions to the application to access the Azure Active Directory.
* Create a custom role to allow the application to access/perform actions on various Azure resources.

### **Create an Azure App Registration**

Go to the **Azure portal** > **Home** and click on **Microsoft Entra ID** on the left side vertical menu. Select **App Registrations,** and then **New Registration**. Give the new application a name and select **Single tenant**. Then click the **Register** button at the bottom.

In the **Overview** of the application, the **Application (client) ID** UUID is shown. This is the **Client Id** field of the Keeper PAM Configuration record. The **Directory (tenant) ID** is also shown. This is the **Tenant Id** field of the Keeper PAM Configuration record. Save these values for later.

<figure><img src="https://762006384-files.gitbook.io/~/files/v0/b/gitbook-x-prod.appspot.com/o/spaces%2F-MJXOXEifAmpyvNVL1to%2Fuploads%2FTn00oz3MsXcV6OU6XUZE%2FScreenshot%202023-05-02%20at%201.49.35%20PM.jpg?alt=media&#x26;token=146597ab-caab-495c-9049-a4918e293dd2" alt=""><figcaption><p>Create Application</p></figcaption></figure>

Next, go to Home > General > Subscriptions and get your subscription ID. Copy the subscription ID into the Keeper PAM Configuration "Subscription ID" field. For more information on how to get your subscription ID, visit this [page](https://learn.microsoft.com/en-us/azure/azure-portal/get-subscription-tenant-id).

Next, click on the **Add a certification or secret** for **Client credentials**. On the next page, click on New client secret, give the client secret a Description, and select a desired Expires date, and click **Add**.

The page will refresh showing the secret **Value**. Copy the **Value** (not Secret ID) into the Keeper PAM Configuration "Client Secret" field. Save this value for later.

<figure><img src="https://762006384-files.gitbook.io/~/files/v0/b/gitbook-x-prod.appspot.com/o/spaces%2F-MJXOXEifAmpyvNVL1to%2Fuploads%2F1VHxRugsu0DJAHvvbpI7%2FScreenshot%202023-04-21%20at%203.57.27%20PM.png?alt=media&#x26;token=f89c8cea-d345-417d-9b30-19008d1ee8ad" alt=""><figcaption><p>Client Secret</p></figcaption></figure>

At this point, all the required the PAM Configuration fields should be filled in. You also have an Azure application that cannot do anything yet.

### Assign Roles and Administrators

In order for the Azure tenant service principal/application to rotate Azure Active Directory users or Azure Active Directory Domain Service users, the application must be a assigned to an Administrative role.

From the Azure portal go to **Home** > **Azure Active Directory** > **Roles and administrators**, and click on the Administrative role to use (such as Privileged Authentication Administrator). The correct role depends on what privileges are needed for your use case. Custom roles can be used.

* **Global Administrator** - It is not recommended to use a Global Administrator on a service principal. However, it will allow both administrator and user passwords to be rotated.
* [**Privileged Authentication Administrator**](https://learn.microsoft.com/en-us/azure/active-directory/roles/permissions-reference#privileged-authentication-administrator) - Can change the password for any user, including a Global Administrator user.
* [**Authentication Administrator**](https://learn.microsoft.com/en-us/azure/active-directory/roles/permissions-reference#authentication-administrator) - Can change the password for any user, except a Global Administrator user.

To add the application, click **Add assignments** and **Search** for the service principal/application that was created, click it, and then **Add**.

<figure><img src="https://762006384-files.gitbook.io/~/files/v0/b/gitbook-x-prod.appspot.com/o/spaces%2F-MJXOXEifAmpyvNVL1to%2Fuploads%2FW7lqqZ9KcqPA4WKUGug0%2FScreenshot%202023-05-02%20at%201.54.45%20PM.png?alt=media&#x26;token=c03eefc3-fc29-483e-8319-d1867b1ce5d1" alt=""><figcaption><p>Assign Administrator Role to Keeper Application
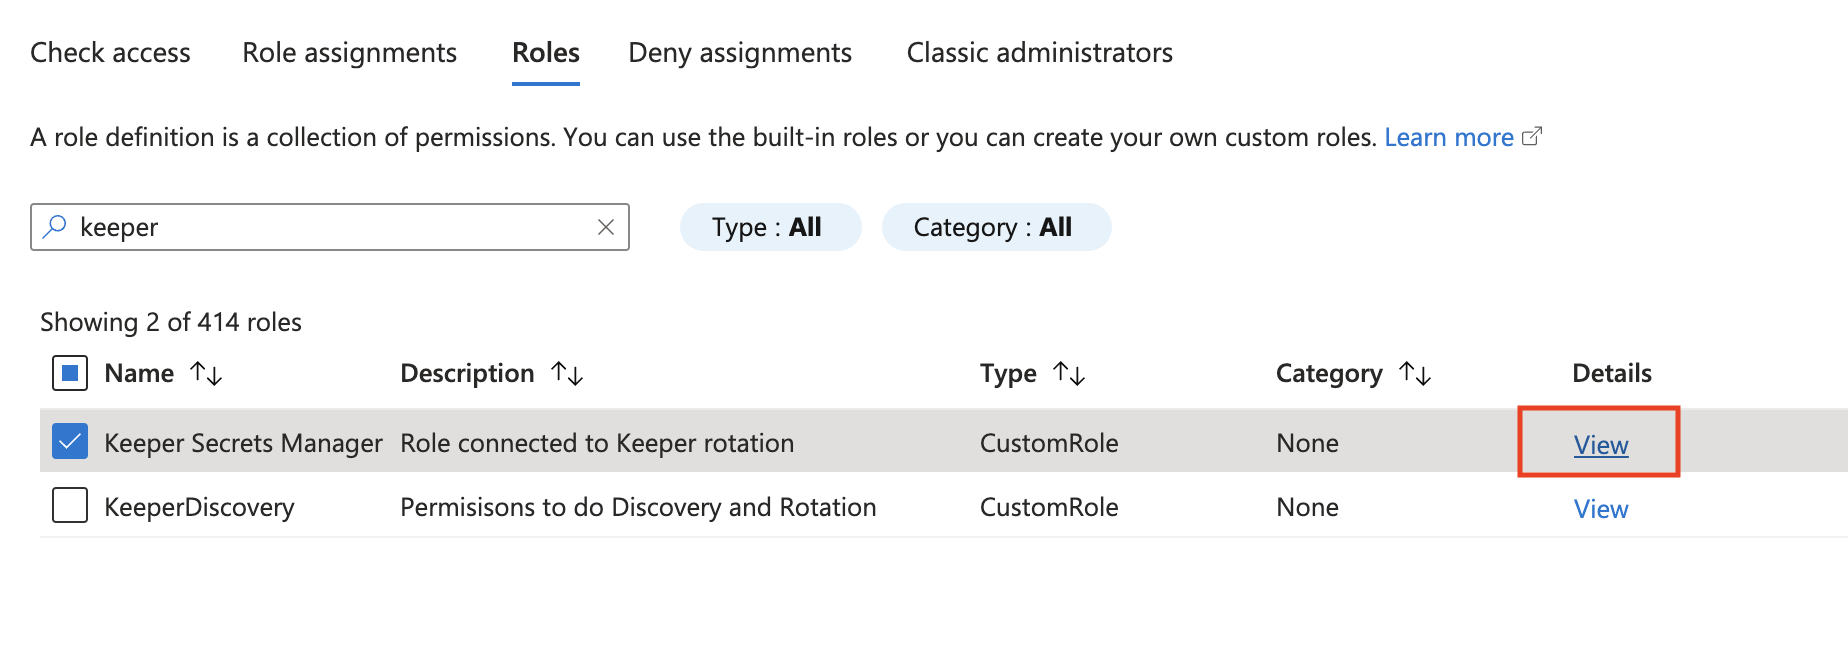
</p></figcaption></figure>

## **Assign Azure Role**

Roles need to be attached to the Azure Application (also called a Service Principle here) in order to rotate passwords of target resources. This is done in the Subscription section of the Azure portal.

Go to the **Azure portal** > **Home** > **Subscriptions** then select your subscription. Click on **Access control (IAM)**, and then **Roles**.

Click **Add** on the top menu, and then **Add custom role**. Jump to the **JSON** tab. Click on **Edit** and paste the JSON object from below, modifying it according to your setup.

{% hint style="info" %}
This is a complete list of all of the permissions that Keeper Gateway can use, if applicable. Only include those that are needed for your setup.
{% endhint %}

Change the following before you save:

* \<ROLE NAME>: Role Name, e.g. "Keeper Secrets Manager"
* \<DESCRIPTION>: Description, e.g. "Role for password rotation"
* \<SUBSCRIPTION ID>: Subscription ID of this Azure subscription

{% code lineNumbers="true" %}

```json
{
    "properties": {
        "roleName": "<ROLE NAME>",
        "description": "<DESCRIPTION>",
        "assignableScopes": [
            "/subscriptions/<SUBSCRIPTION ID>"
        ],
        "permissions": [
            {
                "actions": [
                    "Microsoft.Compute/virtualMachines/read",
                    "Microsoft.Network/networkInterfaces/read",
                    "Microsoft.Network/publicIPAddresses/read",
                    "Microsoft.Network/networkSecurityGroups/read",
                    "Microsoft.Compute/virtualMachines/instanceView/read",
                    "Microsoft.Resources/subscriptions/resourceGroups/read",
                    "Microsoft.AAD/domainServices/read",
                    "Microsoft.Network/virtualNetworks/subnets/read",
                    "Microsoft.Sql/servers/read",
                    "Microsoft.Sql/servers/databases/read",
                    "Microsoft.DBforPostgreSQL/servers/read",
                    "Microsoft.DBforMySQL/servers/read",
                    "Microsoft.DBforPostgreSQL/servers/databases/read",
                    "Microsoft.Sql/servers/write",
                    "Microsoft.DBforPostgreSQL/servers/write",
                    "Microsoft.DBforMySQL/servers/write",
                    "Microsoft.DBforMySQL/flexibleServers/read",
                    "Microsoft.DBforPostgreSQL/flexibleServers/read",
                    "Microsoft.DBforPostgreSQL/flexibleServers/write",
                    "Microsoft.DBforMySQL/flexibleServers/write",
                    "Microsoft.DBforMariaDB/servers/read",
                    "Microsoft.DBforMariaDB/servers/write"
                ],
                "notActions": [],
                "dataActions": [],
                "notDataActions": []
            }
        ]
    }
}
```

{% endcode %}

Click **Save**.

When done, click **Review + create,** and click **Create**.

Once the role is created, it needs to be assigned to the Application (Service Principle). Click **View** in the **Details** column.

<figure><img src="https://762006384-files.gitbook.io/~/files/v0/b/gitbook-x-prod.appspot.com/o/spaces%2F-MJXOXEifAmpyvNVL1to%2Fuploads%2FsBqZQC7UtyX0xiKu4k0P%2FScreenshot%202023-04-21%20at%203.11.54%20PM.png?alt=media&#x26;token=fdcb3152-1f28-43e8-a7bb-9d02ecfd04a1" alt=""><figcaption><p>Role</p></figcaption></figure>

A panel will appear on the right side of the screen. Click **Assignments**, and then **Add assignment**.

Enter in the new role's name in the search bar on the **Role** tab, then double click it to select it. Move to the **Members** tab. Click **Select members**. In the panel that opens, enter the name of the Azure application, select the current application, and click **Select**.

<figure><img src="https://762006384-files.gitbook.io/~/files/v0/b/gitbook-x-prod.appspot.com/o/spaces%2F-MJXOXEifAmpyvNVL1to%2Fuploads%2FyiFpVADjARBtRoRZE1YN%2FScreenshot%202023-05-02%20at%202.01.34%20PM.jpg?alt=media&#x26;token=23546bd6-443e-4048-8f92-c02fc1bbbe34" alt=""><figcaption><p>
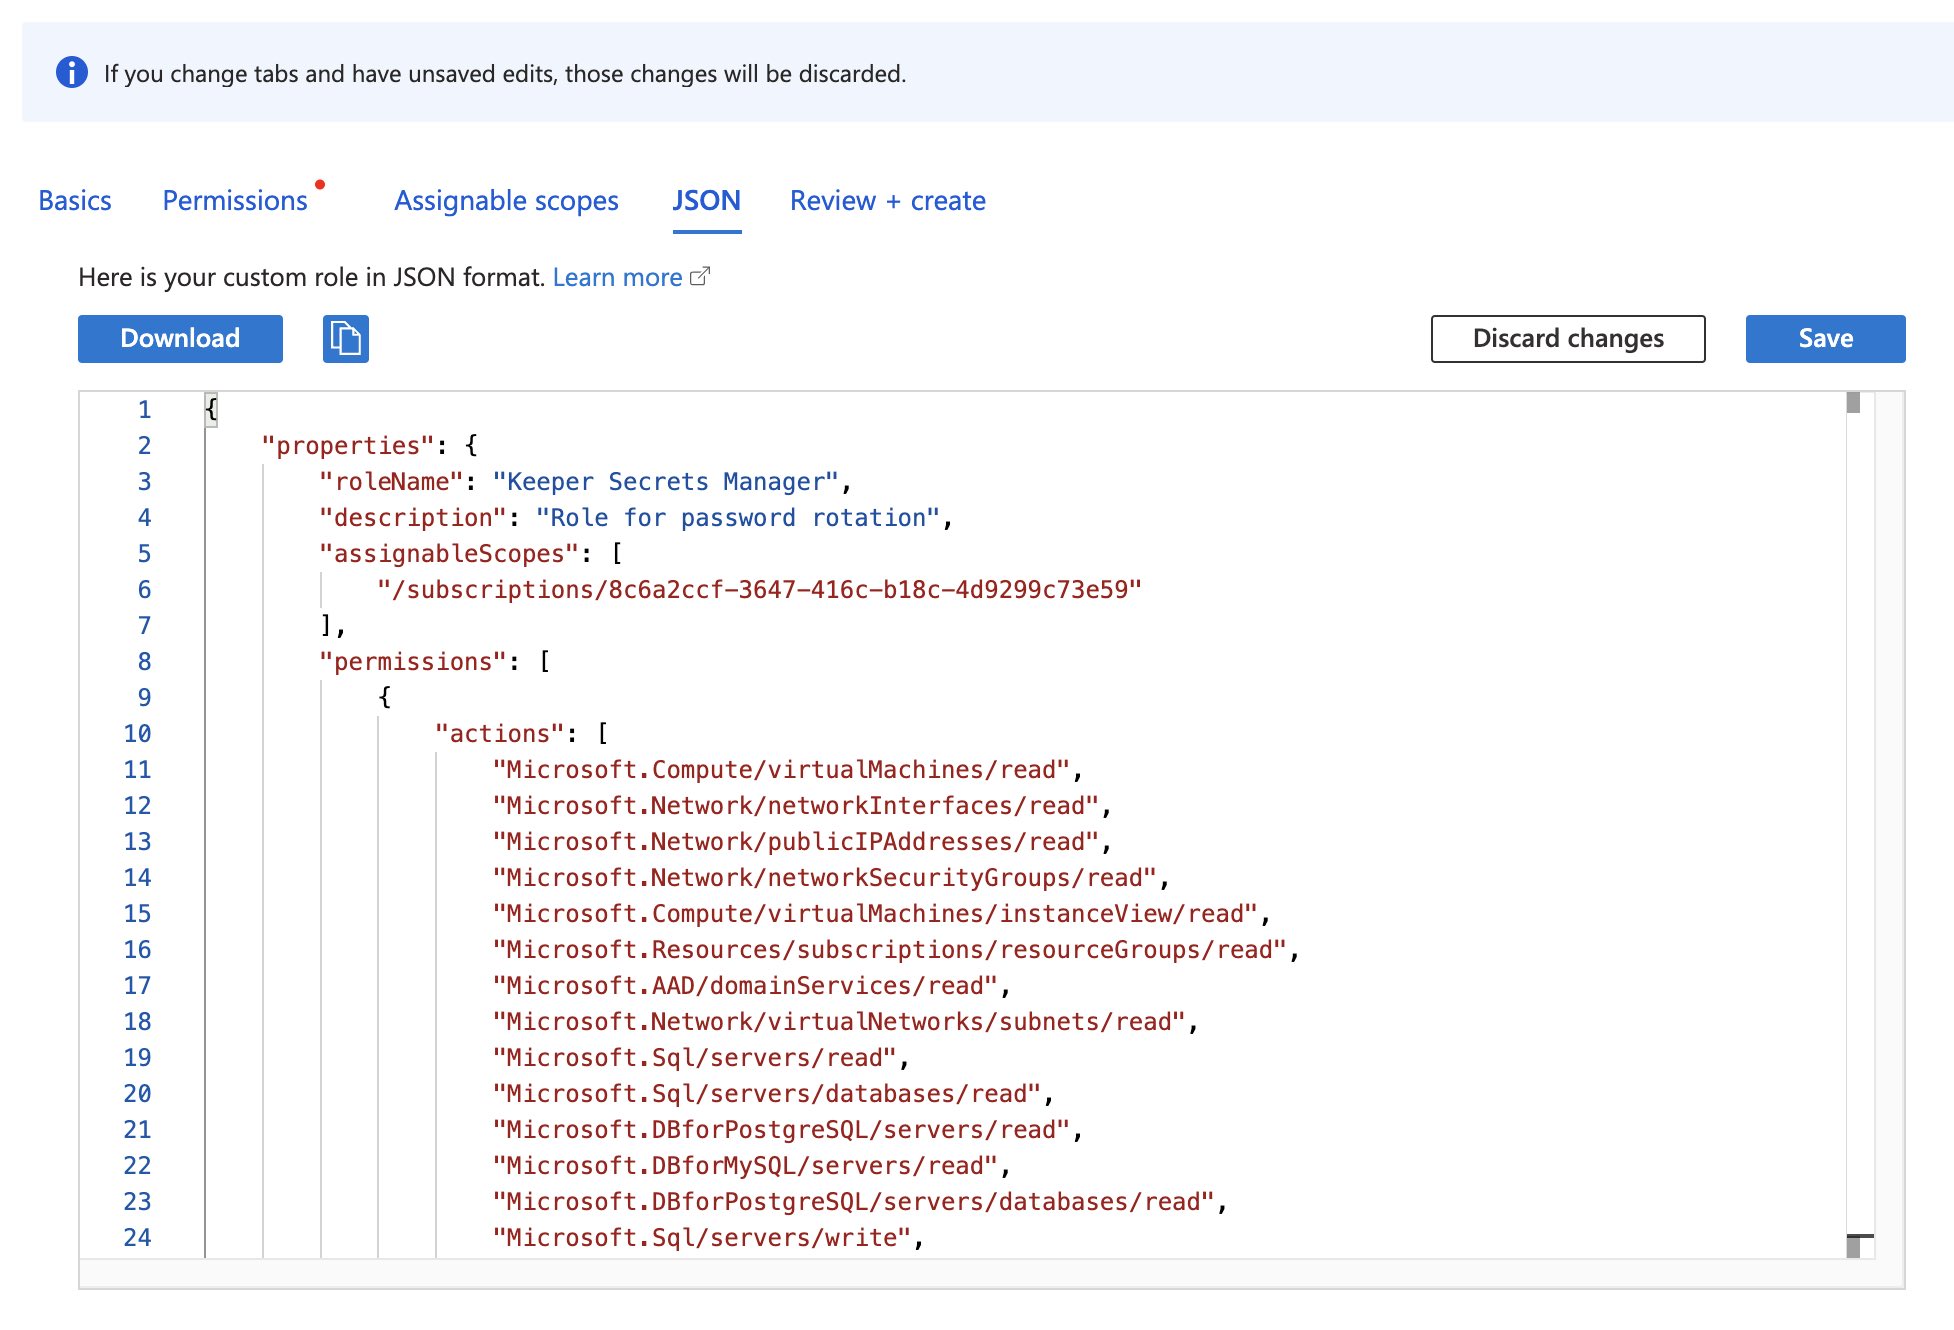
Create Azure Custom Role</p></figcaption></figure>

<figure><img src="https://762006384-files.gitbook.io/~/files/v0/b/gitbook-x-prod.appspot.com/o/spaces%2F-MJXOXEifAmpyvNVL1to%2Fuploads%2F00jLNdtIDAnsmH2r7Zuj%2FScreenshot%202023-05-02%20at%202.03.31%20PM.jpg?alt=media&#x26;token=666817a0-78a5-40ec-9f86-9280f9116514" alt=""><figcaption><p>Assign Role to Keeper Secrets Manager application member</p></figcaption></figure>

Go to the **Review + assign** tab click **Review + assign**.

At this point, you have created the necessary roles and applications within your Azure environment.

### PAM Features

The **"PAM Features Allowed"** and **"Session Recording Types Allowed"** sections in the PAM Configuration allow owners to enable or disable KeeperPAM features for resources managed through the PAM configuration:

<table><thead><tr><th width="353">Field</th><th>Description</th></tr></thead><tbody><tr><td>Rotation</td><td>If enabled, allow rotations on privileged user users managed by this PAM configuration</td></tr><tr><td>Connections</td><td>If enabled, allow connections on resources managed by this PAM configuration</td></tr><tr><td>Remote Browser Isolation (RBI)</td><td>If enabled, allow RBI sessions on resources managed by this PAM configuration</td></tr><tr><td>Tunneling</td><td>If enabled, allow tunnels on resources managed by this PAM configuration</td></tr><tr><td>Graphical Session Recording</td><td>If enabled, visual playback sessions will be recorded for all connections and RBI sessions</td></tr><tr><td>Text Session Recording (TypeScript)</td><td>If enabled, text input and output logs will be logged for all connections and RBI sessions</td></tr></tbody></table>

## Configuring PAM Features on PAM Record Types

After creating the PAM configuration, visit the following pages to:

* Configure [Rotation](https://docs.keeper.io/en/keeperpam/secrets-manager/password-rotation)
* Configure [Connections](https://docs.keeper.io/en/keeperpam/privileged-access-manager/connections)
* Configure [RBI](https://docs.keeper.io/en/keeperpam/privileged-access-manager/remote-browser-isolation)
* Configure [Tunnels](https://docs.keeper.io/en/keeperpam/privileged-access-manager/tunnels)
* Configure [Discovery](https://docs.keeper.io/en/keeperpam/privileged-access-manager/discovery)

## Override Default Azure SDK Endpoints

Certain Azure environments, such as Azure Government or other sovereign clouds, use different authentication and Microsoft Graph endpoints than Azure commercial (`azure.com`). The default Azure SDK endpoints can be configured via custom fields on the KeeperPAM configuration record, enabling password rotation to function correctly in non-commercial Azure environments. For more information on configuring these custom fields, visit the following [page](https://docs.keeper.io/en/keeperpam/privileged-access-manager/getting-started/pam-configuration/..#azure-environment).
