> For the complete documentation index, see [llms.txt](https://docs.keeper.io/llms.txt). Markdown versions of documentation pages are available by appending `.md` to page URLs; this page is available as [Markdown](https://docs.keeper.io/enterprise-guide/jp/deploying-keeper-to-end-users/keeper-fill/windows/intune-chrome.md).
# Intuneでの展開 - Chrome
Microsoft Intuneを使用してKeeperブラウザ拡張機能をGoogle Chromeに展開
### 概要
Intuneを使用してKeeper Chromeブラウザ拡張機能をユーザーに展開する手順です。
1. [**Intune管理センター**](https://intune.microsoft.com/)に移動します。
2. ポータルで **\[デバイス]** > **\[構成]** を選択します。
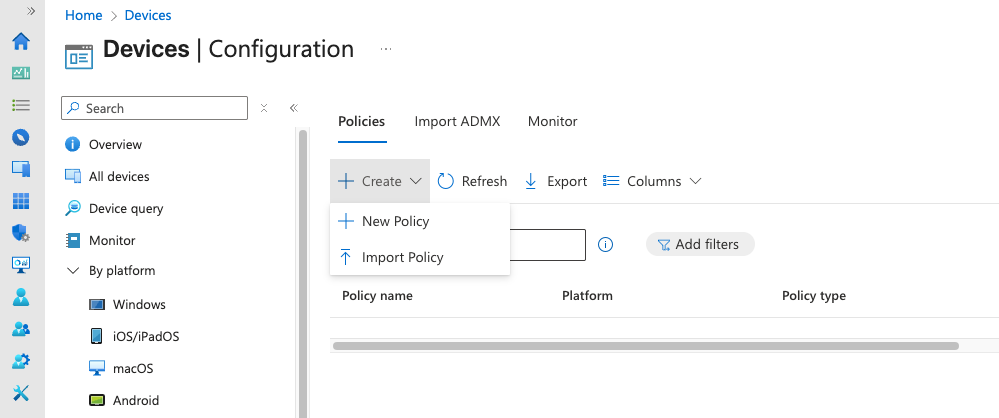
3. **\[ポリシー]** タブで、**\[作成]** > **\[新しいポリシー]** をクリックします。
4. **\[プラットフォーム]** で **\[Windows 10 以降]** を選択します。
5. **\[プロファイルの種類]** で **\[設定カタログ]** を選択し、**\[作成]** をクリックします。
6. 構成プロファイルの名前を入力し、必要に応じて説明を追加して **\[次へ]** をクリックします。
7. **\[構成設定]** タブで **\[+ 設定の追加]** を選択します。
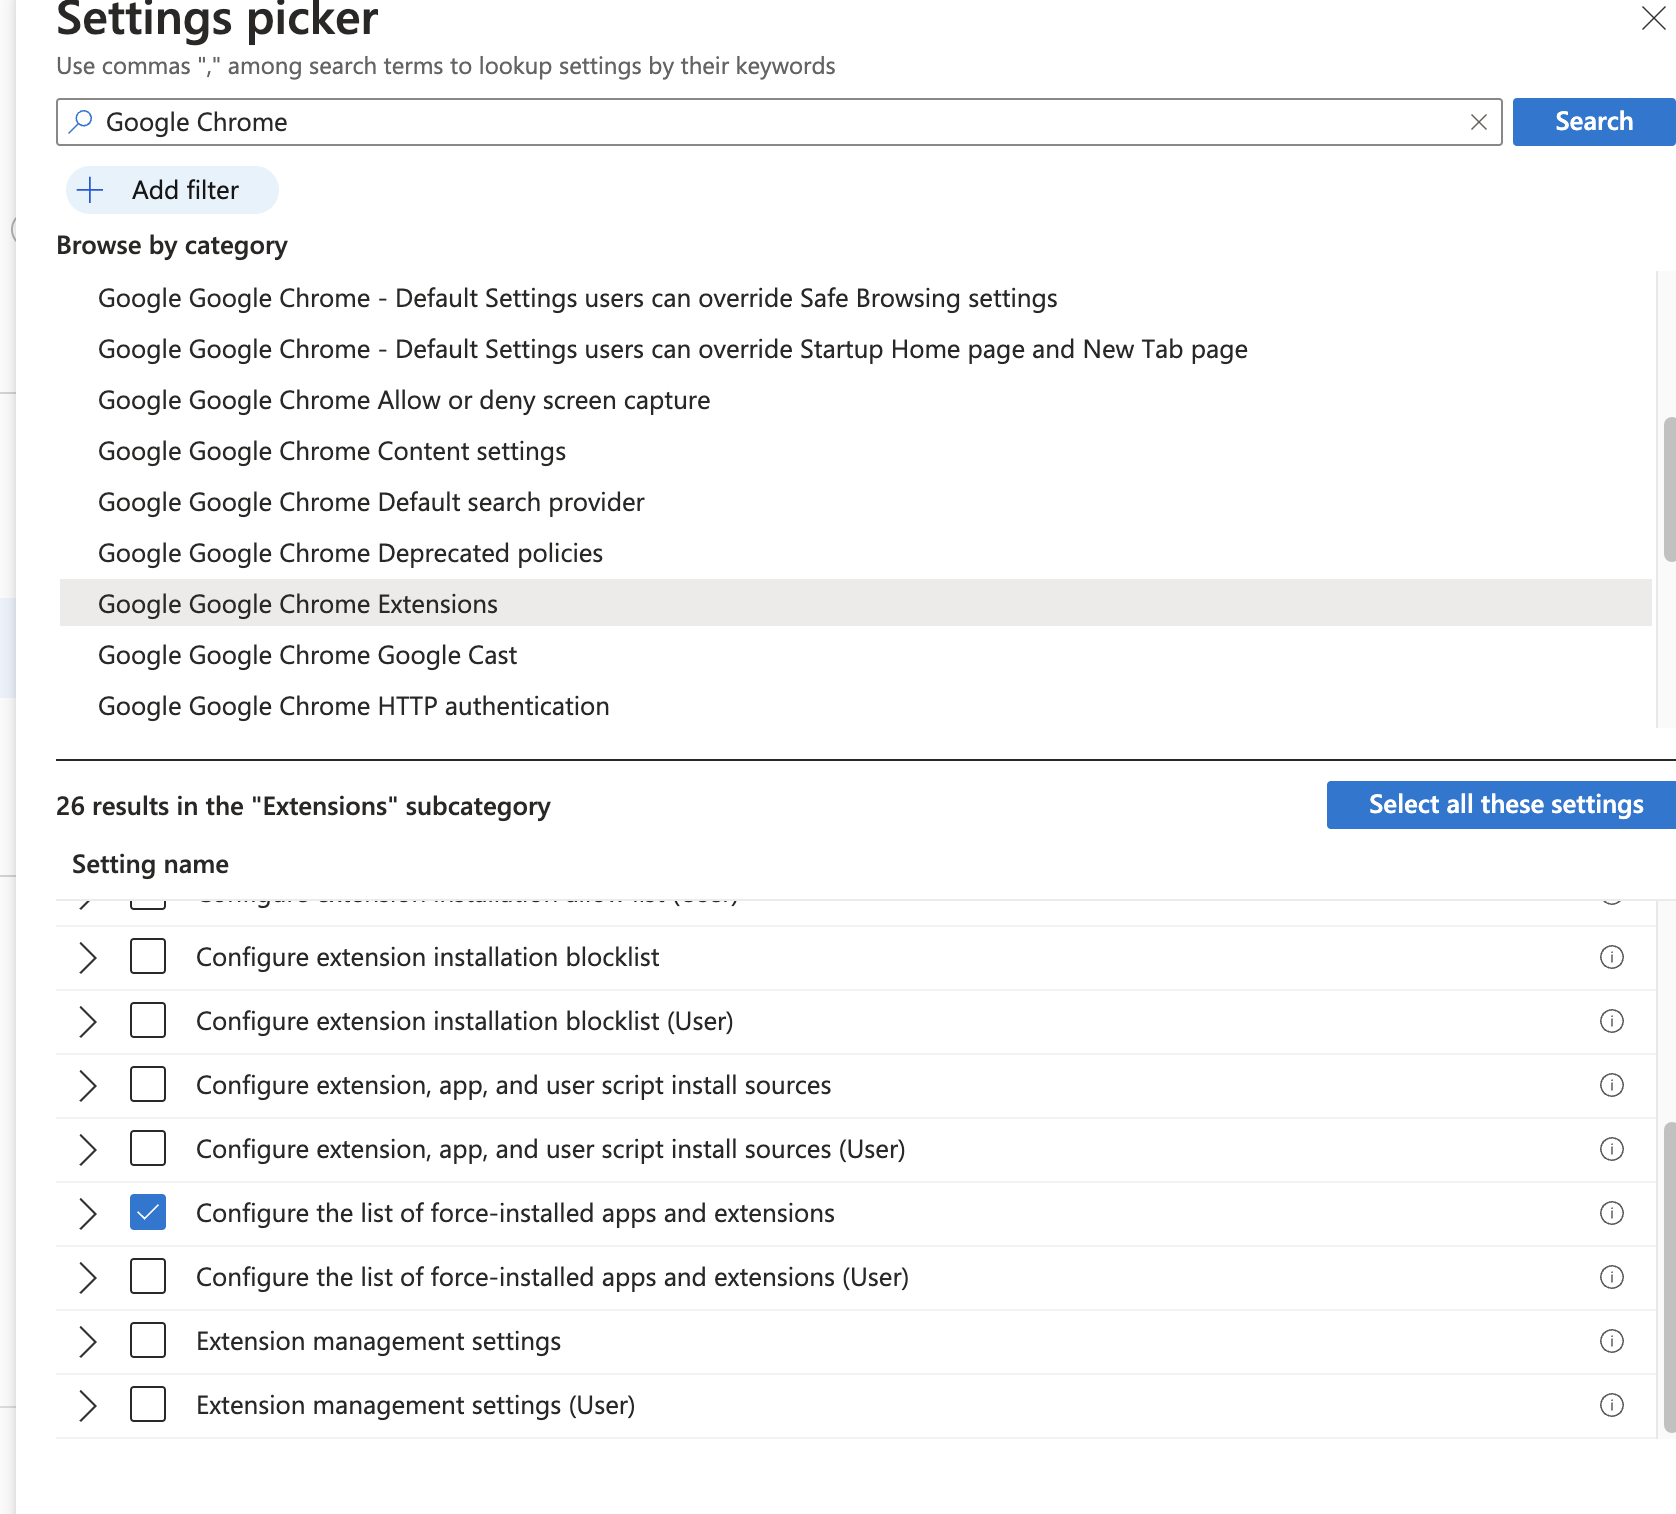
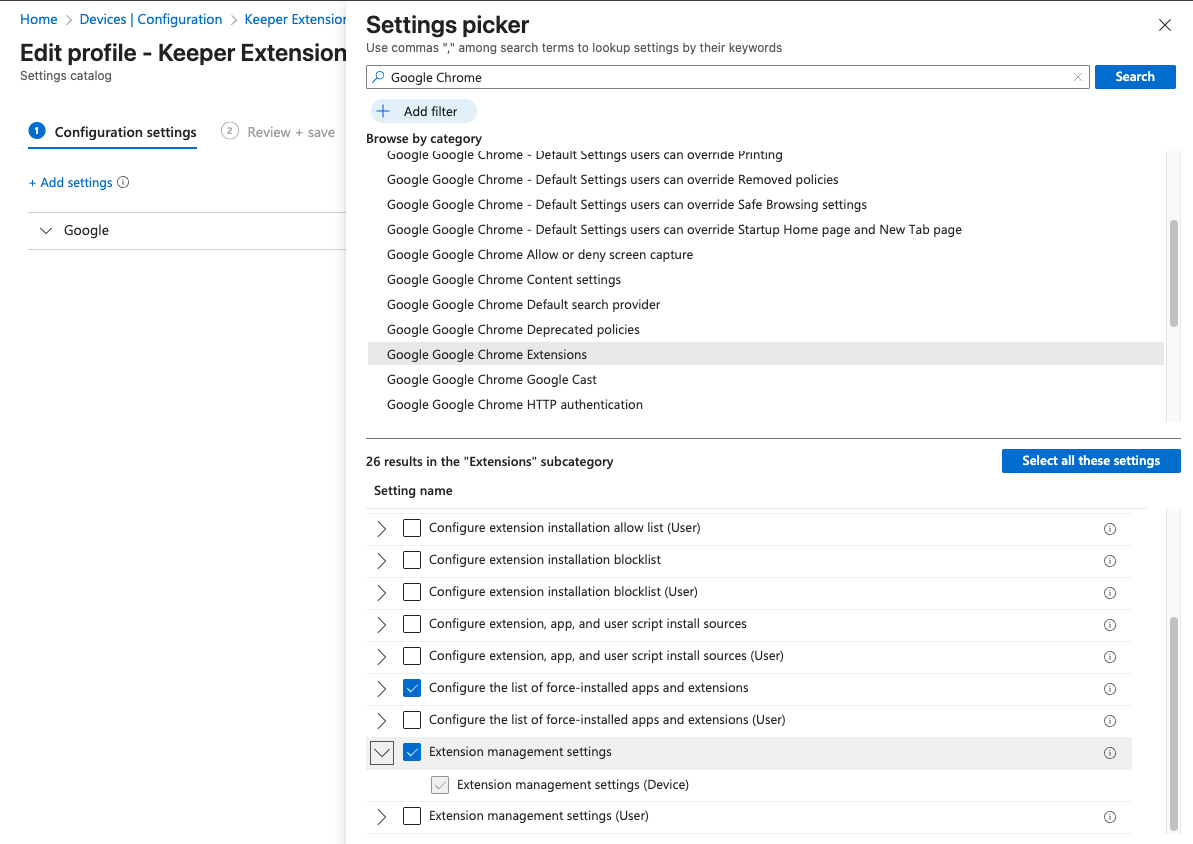
8. 「Google Chrome」と検索し、**\[Google Chrome 拡張機能]** を選択して、表示される **\[強制インストールされるアプリと拡張機能の一覧を構成する]** を選択します。続行するには **\[次へ]** をクリックします。
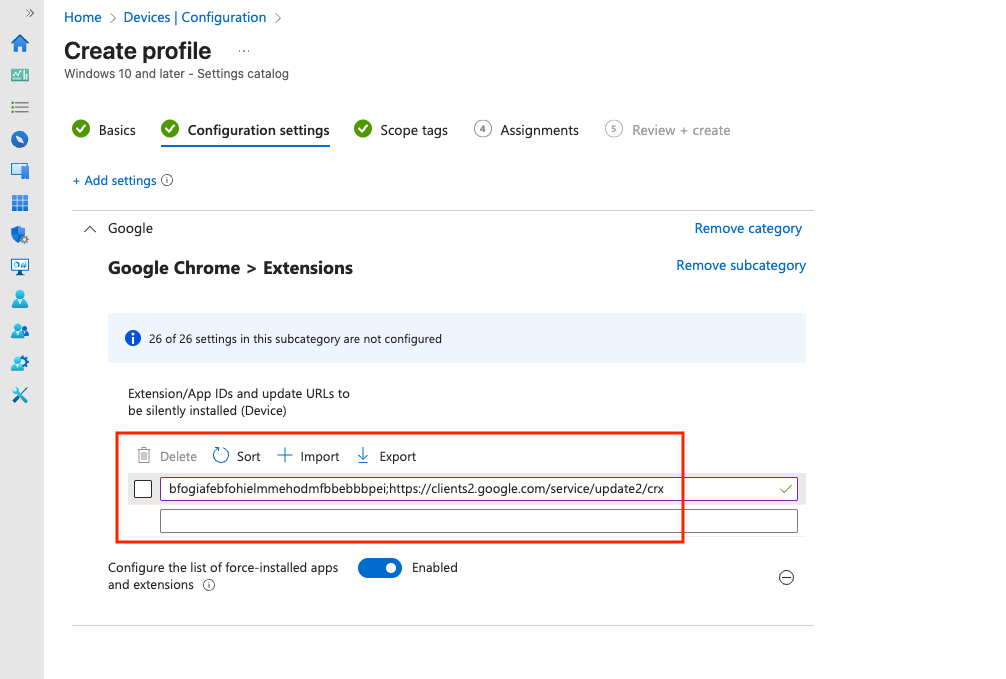
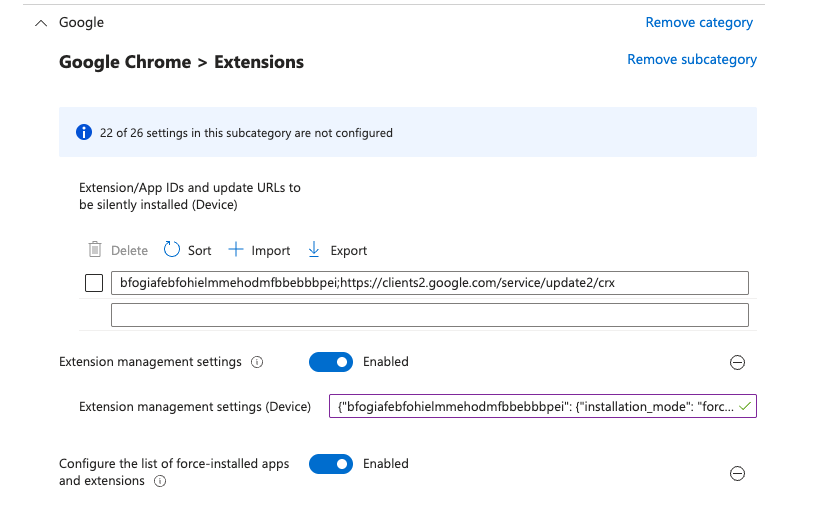
9. **\[構成設定]** タブで、**\[強制インストールされるアプリと拡張機能の一覧を構成する]** を有効にし、以下の内容を1行で貼り付けます。
```
bfogiafebfohielmmehodmfbbebbbpei;https://clients2.google.com/service/update2/crx
```
10. **\[スコープ タグ]** および **\[割り当て]** タブで適切なグループを指定し、**\[作成]** をクリックして完了します。**\[すべてのユーザー]** または特定のグループが割り当てられていることを確認します。
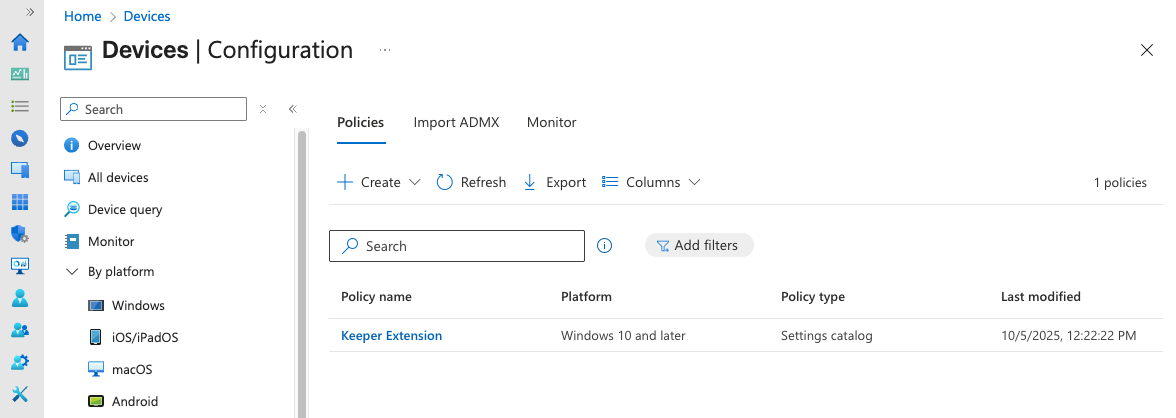
11. **\[デバイス | 構成]** に戻り、**\[最新の情報に更新]** をクリックします。
12. 新しく作成したポリシーが一覧に表示され、作成完了を確認できます。
***
ポリシーが有効になりました。ユーザーがまだIntuneに登録していない場合は、管理対象デバイスへのサインイン時に登録を求められます。登録後、Keeperブラウザ拡張機能が自動的にインストールされます。
### 拡張機能をピン留めする
ユーザーのブラウザでChrome拡張機能をピン留めする手順です。
1. **\[デバイス | 構成]** で作成したポリシーをクリックします。
2. **\[構成設定]** で **\[編集]** を選択します。
3. **\[+ 設定の追加]** をクリックし、「Google Chrome」と検索して **\[Google Chrome 拡張機能]** を選択します。
4. サブカテゴリの **\[拡張機能の管理設定]** を選択します。
5. 選択後にウィンドウを閉じ、**\[構成設定]** タブで **\[拡張機能の管理設定を構成する]** を有効にし、以下のJSONをボックスに貼り付けます。
{% code overflow="wrap" %}
```json
{"bfogiafebfohielmmehodmfbbebbbpei":{"installation_mode":"force_installed","toolbar_pin":"force_pinned","update_url":"https://clients2.google.com/service/update2/crx"}}
```
{% endcode %}
6. **\[確認して保存]** を選択し、設定を保存します。
---
# Agent Instructions
This documentation is published with GitBook. GitBook is the documentation platform designed so that both humans and AI agents can read, navigate, and reason over technical content effectively. Learn more at gitbook.com.
## Querying This Documentation
If you need additional information that is not directly available in this page, you can query the documentation by asking a question.
Perform an HTTP GET request on the following URL with the `ask` and `goal` query parameters:
```
GET https://docs.keeper.io/enterprise-guide/jp/deploying-keeper-to-end-users/keeper-fill/windows/intune-chrome.md?ask=&goal=
```
`ask` is the immediate question: it should be specific, self-contained, and written in natural language.
`goal` is what the user is ultimately trying to achieve, the reason they need the answer. Sharing it helps GitBook give you a better, more relevant answer. A goal is most helpful when it describes the outcome the user wants rather than restating the question. For example, with `ask=how do I create an API token`, a goal like `automate deployments from our CI pipeline` lets GitBook tailor the answer to that use case.
The response will contain a direct answer to the question and relevant excerpts and sources from the documentation.
Use this mechanism when the answer is not explicitly present in the current page, you need clarification or additional context, or you want to retrieve related documentation sections.