> For the complete documentation index, see [llms.txt](https://docs.keeper.io/llms.txt). Markdown versions of documentation pages are available by appending `.md` to page URLs; this page is available as [Markdown](https://docs.keeper.io/keeperpam/jp/secrets-manager/integrations/sailpoint-saas-connector.md).

# SailPoint SaaS Connector

***

<figure><img src="/files/5vg0vpEWFlaejudXIpMr" alt=""><figcaption></figcaption></figure>

## 概要 <a href="#overview" id="overview"></a>

SailPoint Identity Security Cloud (ISC) 経由で、Keeperエンタープライズのアイデンティティガバナンスを行えます。

アカウントの集約や個別アカウントの更新に加え、ノード、チーム、ロール、フォルダ、レコードのエンタイトルメントも集約できます。Keeperアカウントの作成、更新、有効化、無効化、削除も行えます。

{% hint style="info" %}
本連携はまもなく公開予定です (2026年8月予定)。
{% endhint %}

## 機能 <a href="#features" id="features"></a>

| SailPointコネクターの機能 | 説明                                                                                                                                                                                                                                                                                                                                                                |
| ----------------- | ----------------------------------------------------------------------------------------------------------------------------------------------------------------------------------------------------------------------------------------------------------------------------------------------------------------------------------------------------------------- |
| エンタイトルメント集約       | <ol><li>組織内で利用可能なロールの一覧表示</li><li>組織内で利用可能なチームの一覧表示</li><li>組織内で利用可能なノードの一覧表示</li><li>レコードとその権限の一覧表示</li><li>フォルダとその権限の一覧表示</li></ol>                                                                                                                                                                                                                             |
| アカウント集約           | <ol><li>Keeper組織のユーザーをSailPoint上に一覧表示</li><li>ユーザーを既存のKeeperボルトエンタイトルメントへマッピング</li></ol>                                                                                                                                                                                                                                                                          |
| アカウント更新           | <ol><li>SailPointからユーザーを招待し、各ユーザーにKeeperボルトをプロビジョニング</li><li>SailPointでユーザーの名前とメールアドレスを更新</li><li>SailPointのエンタイトルメント割り当てでロール、チーム、ノードを割り当て</li><li>SailPointのレコードおよびフォルダエンタイトルメントのプロビジョニングでレコードとフォルダを共有</li><li>SailPoint経由でKeeperボルトへのアクセスを有効化または無効化</li><li>アカウントを削除。<code>sailpoint-app-setup</code> で構成した対象ユーザーへKeeperボルトを移管したあと、該当するKeeperアカウントを削除</li></ol> |

## 活用事例 <a href="#example-use-case" id="example-use-case"></a>

### Keeperボルトへのユーザー招待とレコード共有 <a href="#invite-user-to-keeper-vault-and-share-record" id="invite-user-to-keeper-vault-and-share-record"></a>

{% stepper %}
{% step %}

#### SailPointでアイデンティティを選択 <a href="#select-identity-in-sailpoint" id="select-identity-in-sailpoint"></a>

SailPointでアイデンティティを選択します。アイデンティティのメールアドレスは、ユーザーのKeeperメールアドレスと一致している必要があります。

そのアイデンティティに対してKeeperアカウントのプロビジョニングをリクエストします。リクエストすると、Keeperの招待が作成されます。
{% endstep %}

{% step %}

#### Keeperアカウントのセットアップを完了 <a href="#complete-keeper-account-setup" id="complete-keeper-account-setup"></a>

ユーザーはメールで届いたKeeper招待を承認し、ボルトのセットアップを完了します。

レコードをユーザーに直接共有する前に、ユーザーのボルトがアクティブである必要があります。詳しくは、[ユーザーの作成と招待](/keeperpam/jp/commander-cli/command-reference/enterprise-management-commands/creating-and-inviting-users.md)をご参照ください。
{% endstep %}

{% step %}

#### レコードエンタイトルメントを割り当て <a href="#assign-the-record-entitlement" id="assign-the-record-entitlement"></a>

SailPointで、必要な **\[Record]** エンタイトルメントをアイデンティティに割り当てます。ユーザーのアクセス要件に合った権限レベルを選択します。

割り当てると、ユーザーのKeeperアカウントにレコード共有がプロビジョニングされます。
{% endstep %}

{% step %}

#### アクセスを確認 <a href="#verify-access" id="verify-access"></a>

SailPointでユーザーのKeeperアカウントを更新し、アイデンティティにレコードエンタイトルメントが表示されることを確認します。
{% endstep %}
{% endstepper %}

## 要件 <a href="#prerequisites" id="prerequisites"></a>

1. **Keeperエンタープライズ:** ユーザー、チーム、ロール、共有を管理できる管理者アクセスがあること
2. **Keeperコマンダーのサービスモード (API v2):** SailPointまたは承認済みのネットワーク経路から到達可能で、有効なサービスモードAPIキーがあること
3. **SailPoint ISC:** ソースの作成、相関の構成、集約の実行ができる管理者権限があること

## コマンダーサービスモードのセットアップ <a href="#commander-service-mode-setup" id="commander-service-mode-setup"></a>

ゼロ知識およびエンドツーエンド暗号化を維持するため、**コマンダーサービスモード**をお客様のインフラ上で稼働させます。SailPointコネクターからKeeperへの通信は、この経路のみを使用します。

`sailpoint-app-setup` を実行すると、DockerベースのサービスモードのデプロイとSailPoint向け設定をまとめて準備できます。

#### 開始前に <a href="#before-you-start" id="before-you-start"></a>

1. ワークステーションに[Keeperコマンダーをインストール](/keeperpam/jp/commander-cli/commander-installation-setup.md)します。
2. ISCから管理するフォルダやレコードの共有、およびエンタープライズユーザーの管理権限を持つ、専用のKeeper**サービスアカウント**の利用を推奨します。
3. そのアカウントでコマンダーにログインします。

```
keeper shell
login serviceuser@company.com
```

4. サービスモードを実行するホストでDockerが利用できることを確認します。

#### SailPointセットアップの実行 <a href="#run-sailpoint-setup" id="run-sailpoint-setup"></a>

```
My Vault> sailpoint-app-setup
```

本コマンドは2つのフェーズで実行され、**コマンダー専用**サービス (SailPoint用の別コンテナなし) を含む `docker-compose.yml` を書き出します。

**フェーズ1 (サービスモード / Docker)**

共有フォルダ、Docker構成レコード、KSMアプリケーション、クライアント構成を作成したあと、以下の入力を求めます。

| プロンプト                        | 説明                                                 |
| ---------------------------- | -------------------------------------------------- |
| **Port**                     | コマンダーサービスモードのローカルポート。デフォルト: `8900`                 |
| **Enable ngrok?**            | ngrokによる任意の公開URL。デフォルト: No                         |
| **Ngrok Auth Token**         | ngrokを有効にした場合は必須                                   |
| **Ngrok Custom Domain**      | 任意 (例: `myapp.ngrok.io`)。スキップする場合はEnter            |
| **Enable Cloudflare?**       | ngrokが無効の場合のみ表示。デフォルト: No                          |
| **Cloudflare Tunnel Token**  | Cloudflareを有効にした場合は必須                              |
| **Cloudflare Custom Domain** | Cloudflareを有効にした場合は必須 (例: `commander.company.com`) |

{% hint style="info" icon="pencil-line" %}
NgrokとCloudflareは排他です。SailPoint ISC (SaaS) では、サービスモードのURLがSailPointのコネクター実行環境から到達可能である必要があります。コマンダーがプライベートネットワーク上にある場合は、**ngrok** または **Cloudflare Tunnel** を有効にし、その公開HTTPS URLをソースの **\[Keeper Commander Service Mode API URL]** に指定します。
{% endhint %}

キューモード (API v2) は自動的に有効になります。コマンドの許可リストは、ユーザーライフサイクルと共有など、SailPoint向けに安全な操作に限定されます。`get`、`export`、`find-password` などシークレットを扱うコマンドは除外されます。

**フェーズ2 (SailPointオプション)**

| プロンプト                      | 説明                                                                                    |
| -------------------------- | ------------------------------------------------------------------------------------- |
| **Allow folder shares?**   | SailPointがフォルダ共有エンタイトルメント (`share-folder` / `nsf-share-folder`) を管理できるかどうか。デフォルト: Yes |
| **Allow record shares?**   | SailPointがレコード共有エンタイトルメント (`share-record` / `nsf-share-record`) を管理できるかどうか。デフォルト: Yes |
| **Allow role assignment?** | SailPointが `enterprise-user` / `enterprise-role` 経由でロールを割り当てられるかどうか。デフォルト: Yes        |
| **Allow team assignment?** | SailPointが `enterprise-user` 経由でチームを割り当てられるかどうか。デフォルト: Yes                            |
| **Transfer target email**  | SailPointが `transfer-user` 経由でアカウントを削除する際に、ボルトデータを受け取るアクティブユーザー (必須)                  |
| **Interval seconds**       | 招待済みユーザーを再確認し、**Active** になった後にキューされたエンタイトルメントを適用する間隔 (秒)。デフォルト: `60`。最小: `15`        |

{% hint style="info" icon="pencil-line" %}
無効にした機能を呼び出すと、サービスモード側で拒否されます (HTTP 403)。ノードは制限対象外であり、招待や移動向けに `--node` は常に利用できます。
{% endhint %}

作成されるリソース (デフォルト):

| リソース              | デフォルト名                                             |
| ----------------- | -------------------------------------------------- |
| 共有フォルダ            | `Commander Service Mode - SailPoint`               |
| KSMアプリケーション       | `Commander Service Mode - KSM App`                 |
| Docker構成レコード      | `Commander Service Mode Docker Config`             |
| SailPoint構成レコード   | `Commander Service Mode SailPoint Config`          |
| Dockerサービス / コンテナ | `commander-sailpoint` / `keeper-service-sailpoint` |

{% hint style="info" icon="pencil-line" %}
セットアップを再実行すると `docker-compose.yml` は上書きされます (手動編集は失われます)。SailPoint構成レコード上のキュー済み保留エンタイトルメントは保持されます。
{% endhint %}

#### デプロイ <a href="#deploy" id="deploy"></a>

```
My Vault> quit
rm ~/.keeper/config.json
docker compose up -d
docker ps
docker logs keeper-service-sailpoint
curl http://localhost:<port>/health
```

Docker起動前にローカルの `config.json` を削除し、同一のデバイストークンによる競合を避けます。Dockerコンテナ側の構成はKSM経由で読み込まれます。

#### ISCソース用の値 <a href="#values-for-the-isc-source" id="values-for-the-isc-source"></a>

サービスが正常になったあと、以下の値を使用します。

1. **Keeper Commander Service Mode API URL:** `/api/v2/` を含まない公開ベースURL (ngrok/Cloudflareを有効にした場合はそのトンネルURL、それ以外は到達可能なホストURL)
2. **Keeper Commander Service Mode API Key:** セットアップ時に作成されたDocker/サービス構成レコードから取得 (コンテナがサービスモードを開始したあと、ボルト内に保存)

これらの値をソース構成で使用します。

#### 遅延エンタイトルメント (招待済みユーザー) <a href="#deferred-entitlements-invited-users" id="deferred-entitlements-invited-users"></a>

ユーザーが**Active**になるまで、一部のエンタイトルメントは完全には適用できません。ユーザーがまだ**Invited**の間に要求されたロール、チーム、フォルダ、レコードの付与はキューに入り、アクティベーション後 (フェーズ2のポーリング間隔) に適用されます。

これはISCの作成時の挙動と同じです。作成時に指定した初期の**ロール** / **チーム**も、ユーザーがアクティブになった時点で適用されます。

#### 任意のCLIフラグ <a href="#optional-cli-flags" id="optional-cli-flags"></a>

```
My Vault> sailpoint-app-setup \
  --folder-name "Commander Service Mode - SailPoint" \
  --app-name "Commander Service Mode - KSM App" \
  --config-record-name "Commander Service Mode Docker Config" \
  --sailpoint-record-name "Commander Service Mode SailPoint Config" \
  --skip-device-setup
```

| フラグ                       | 説明                         |
| ------------------------- | -------------------------- |
| `--folder-name`           | 共有フォルダ名                    |
| `--app-name`              | KSMアプリケーション名               |
| `--config-record-name`    | Docker/サービス構成レコード名         |
| `--sailpoint-record-name` | SailPoint構成レコード名           |
| `--config-path`           | コマンダーの `config.json` へのパス  |
| `--timeout`               | デバイスのタイムアウト (デフォルト: `30d`) |
| `--skip-device-setup`     | すでに構成済みの場合にデバイス登録をスキップ     |

***

## ソース構成 <a href="#source-configuration" id="source-configuration"></a>

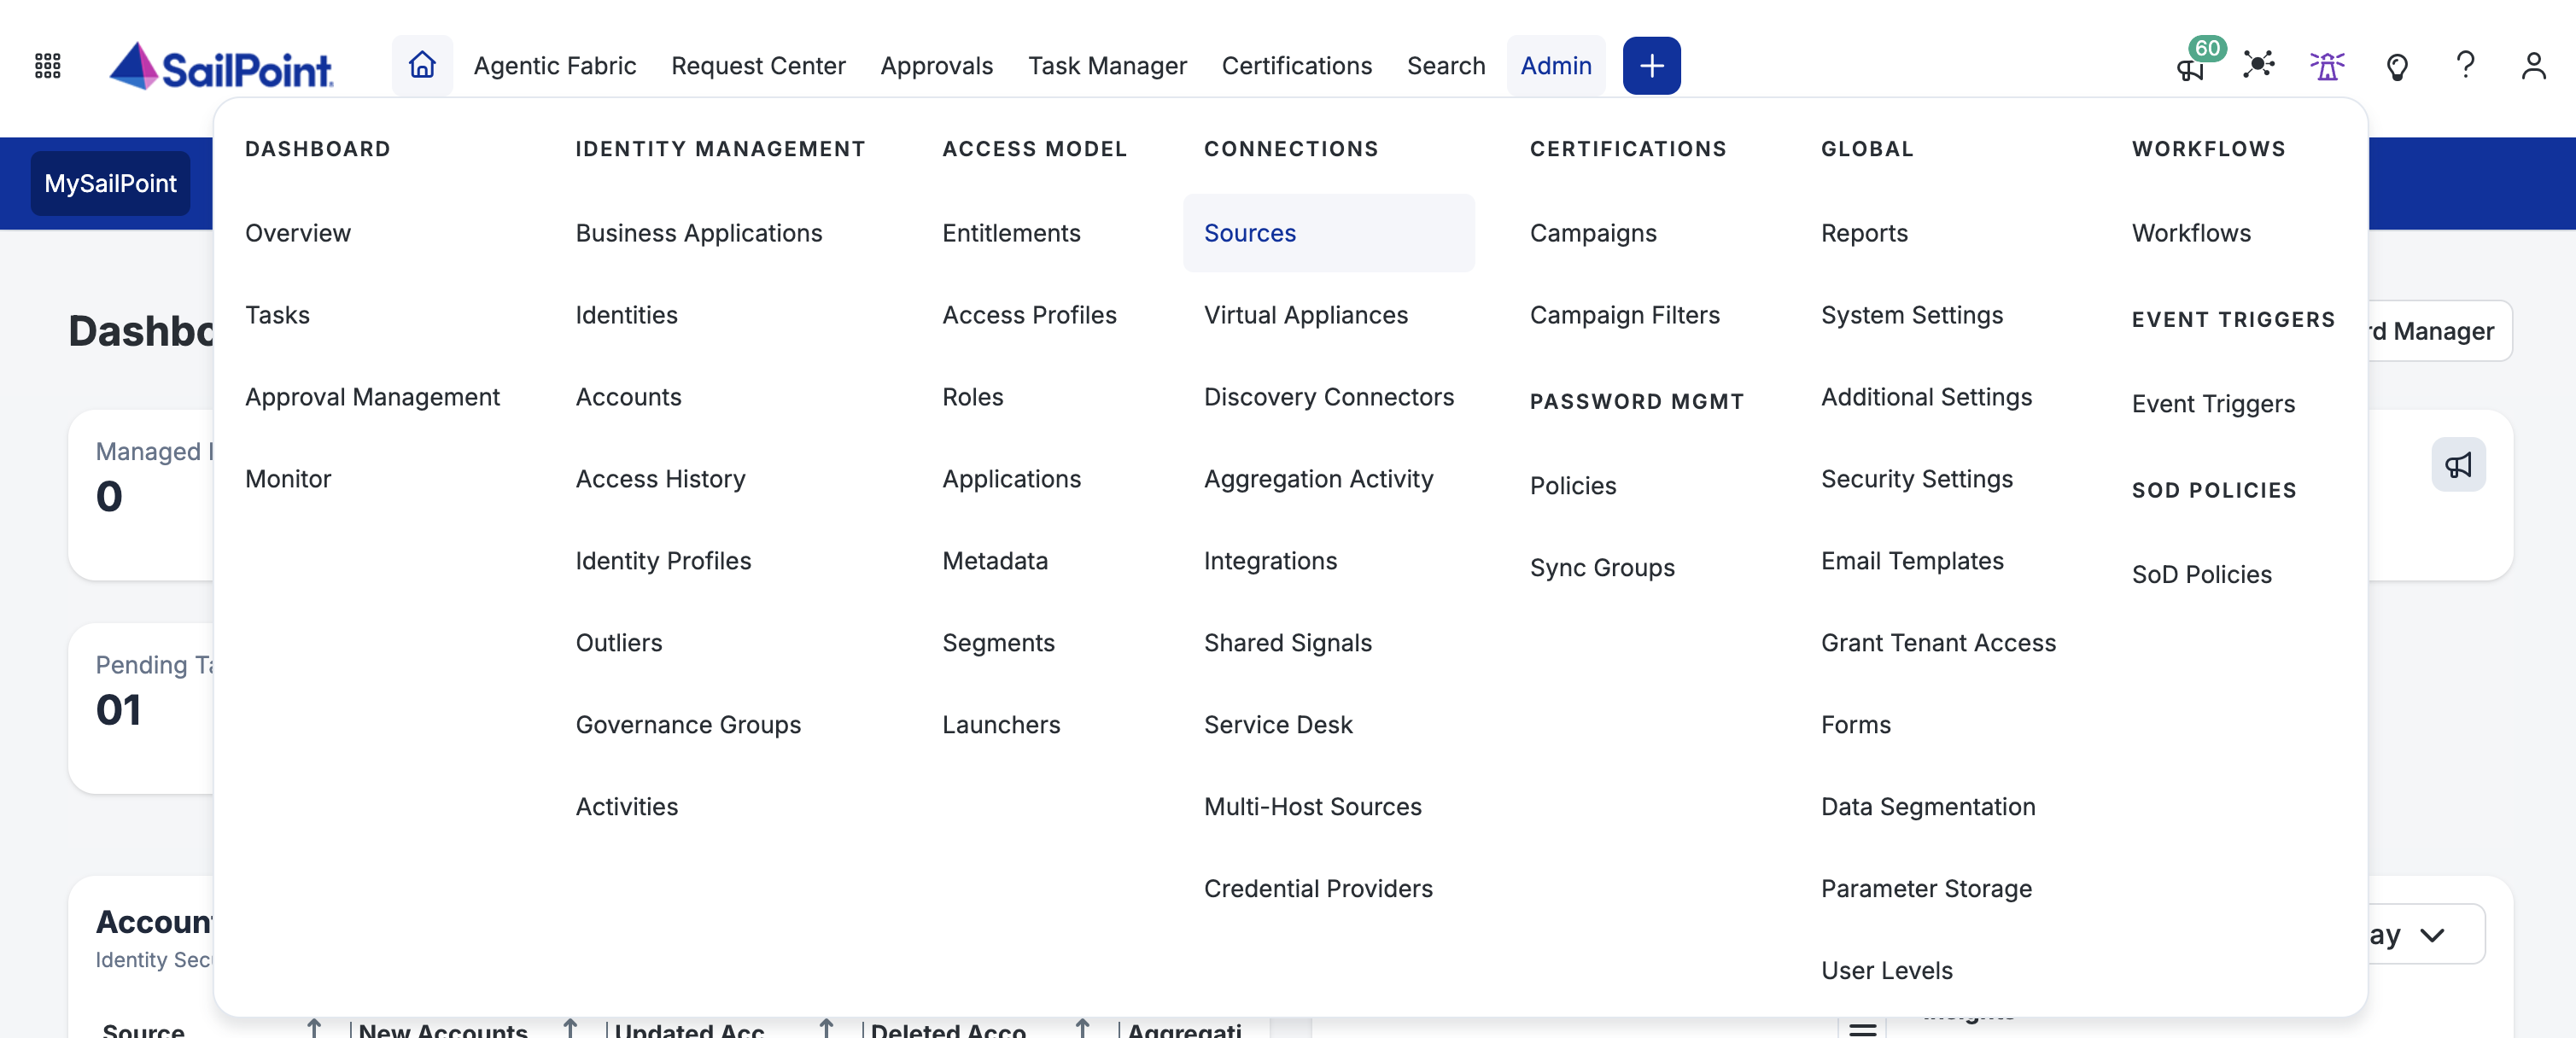
1. 管理者資格情報でSailPointにログインし、**\[Admin]** → **\[Sources]** に移動します。

<figure><img src="/files/g6wpEhb9Ic7kJA9NIRUh" alt=""><figcaption></figcaption></figure>

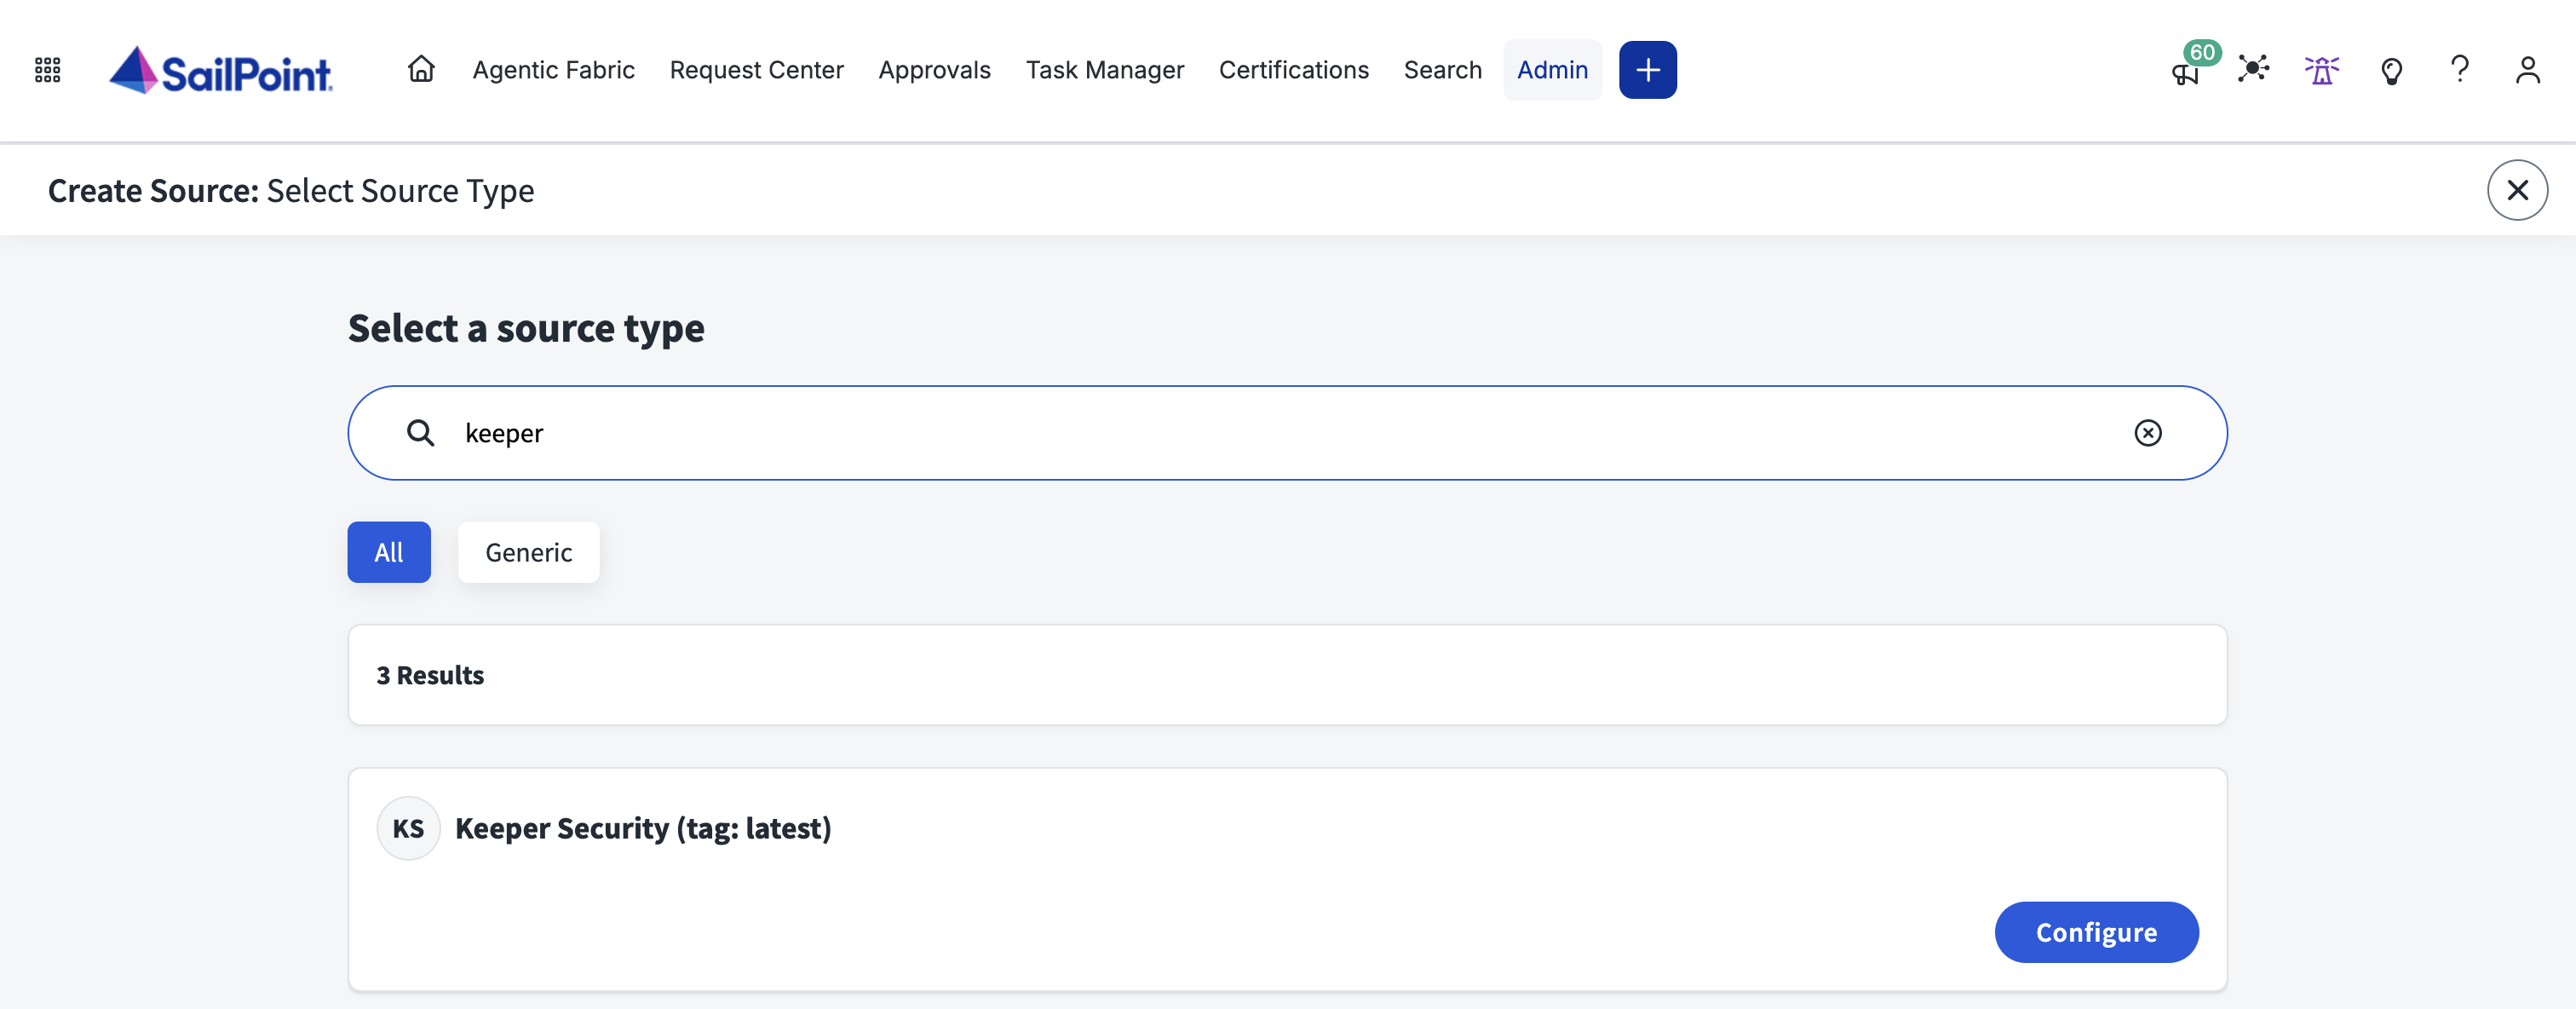
2. **\[Sources]** ページで **\[Create New]** をクリックします。**\[Keeper Security]** を検索し、**\[Configure]** を選択します。

<figure><img src="/files/Fk9zi38s8dLlXMOo8hK7" alt=""><figcaption></figcaption></figure>

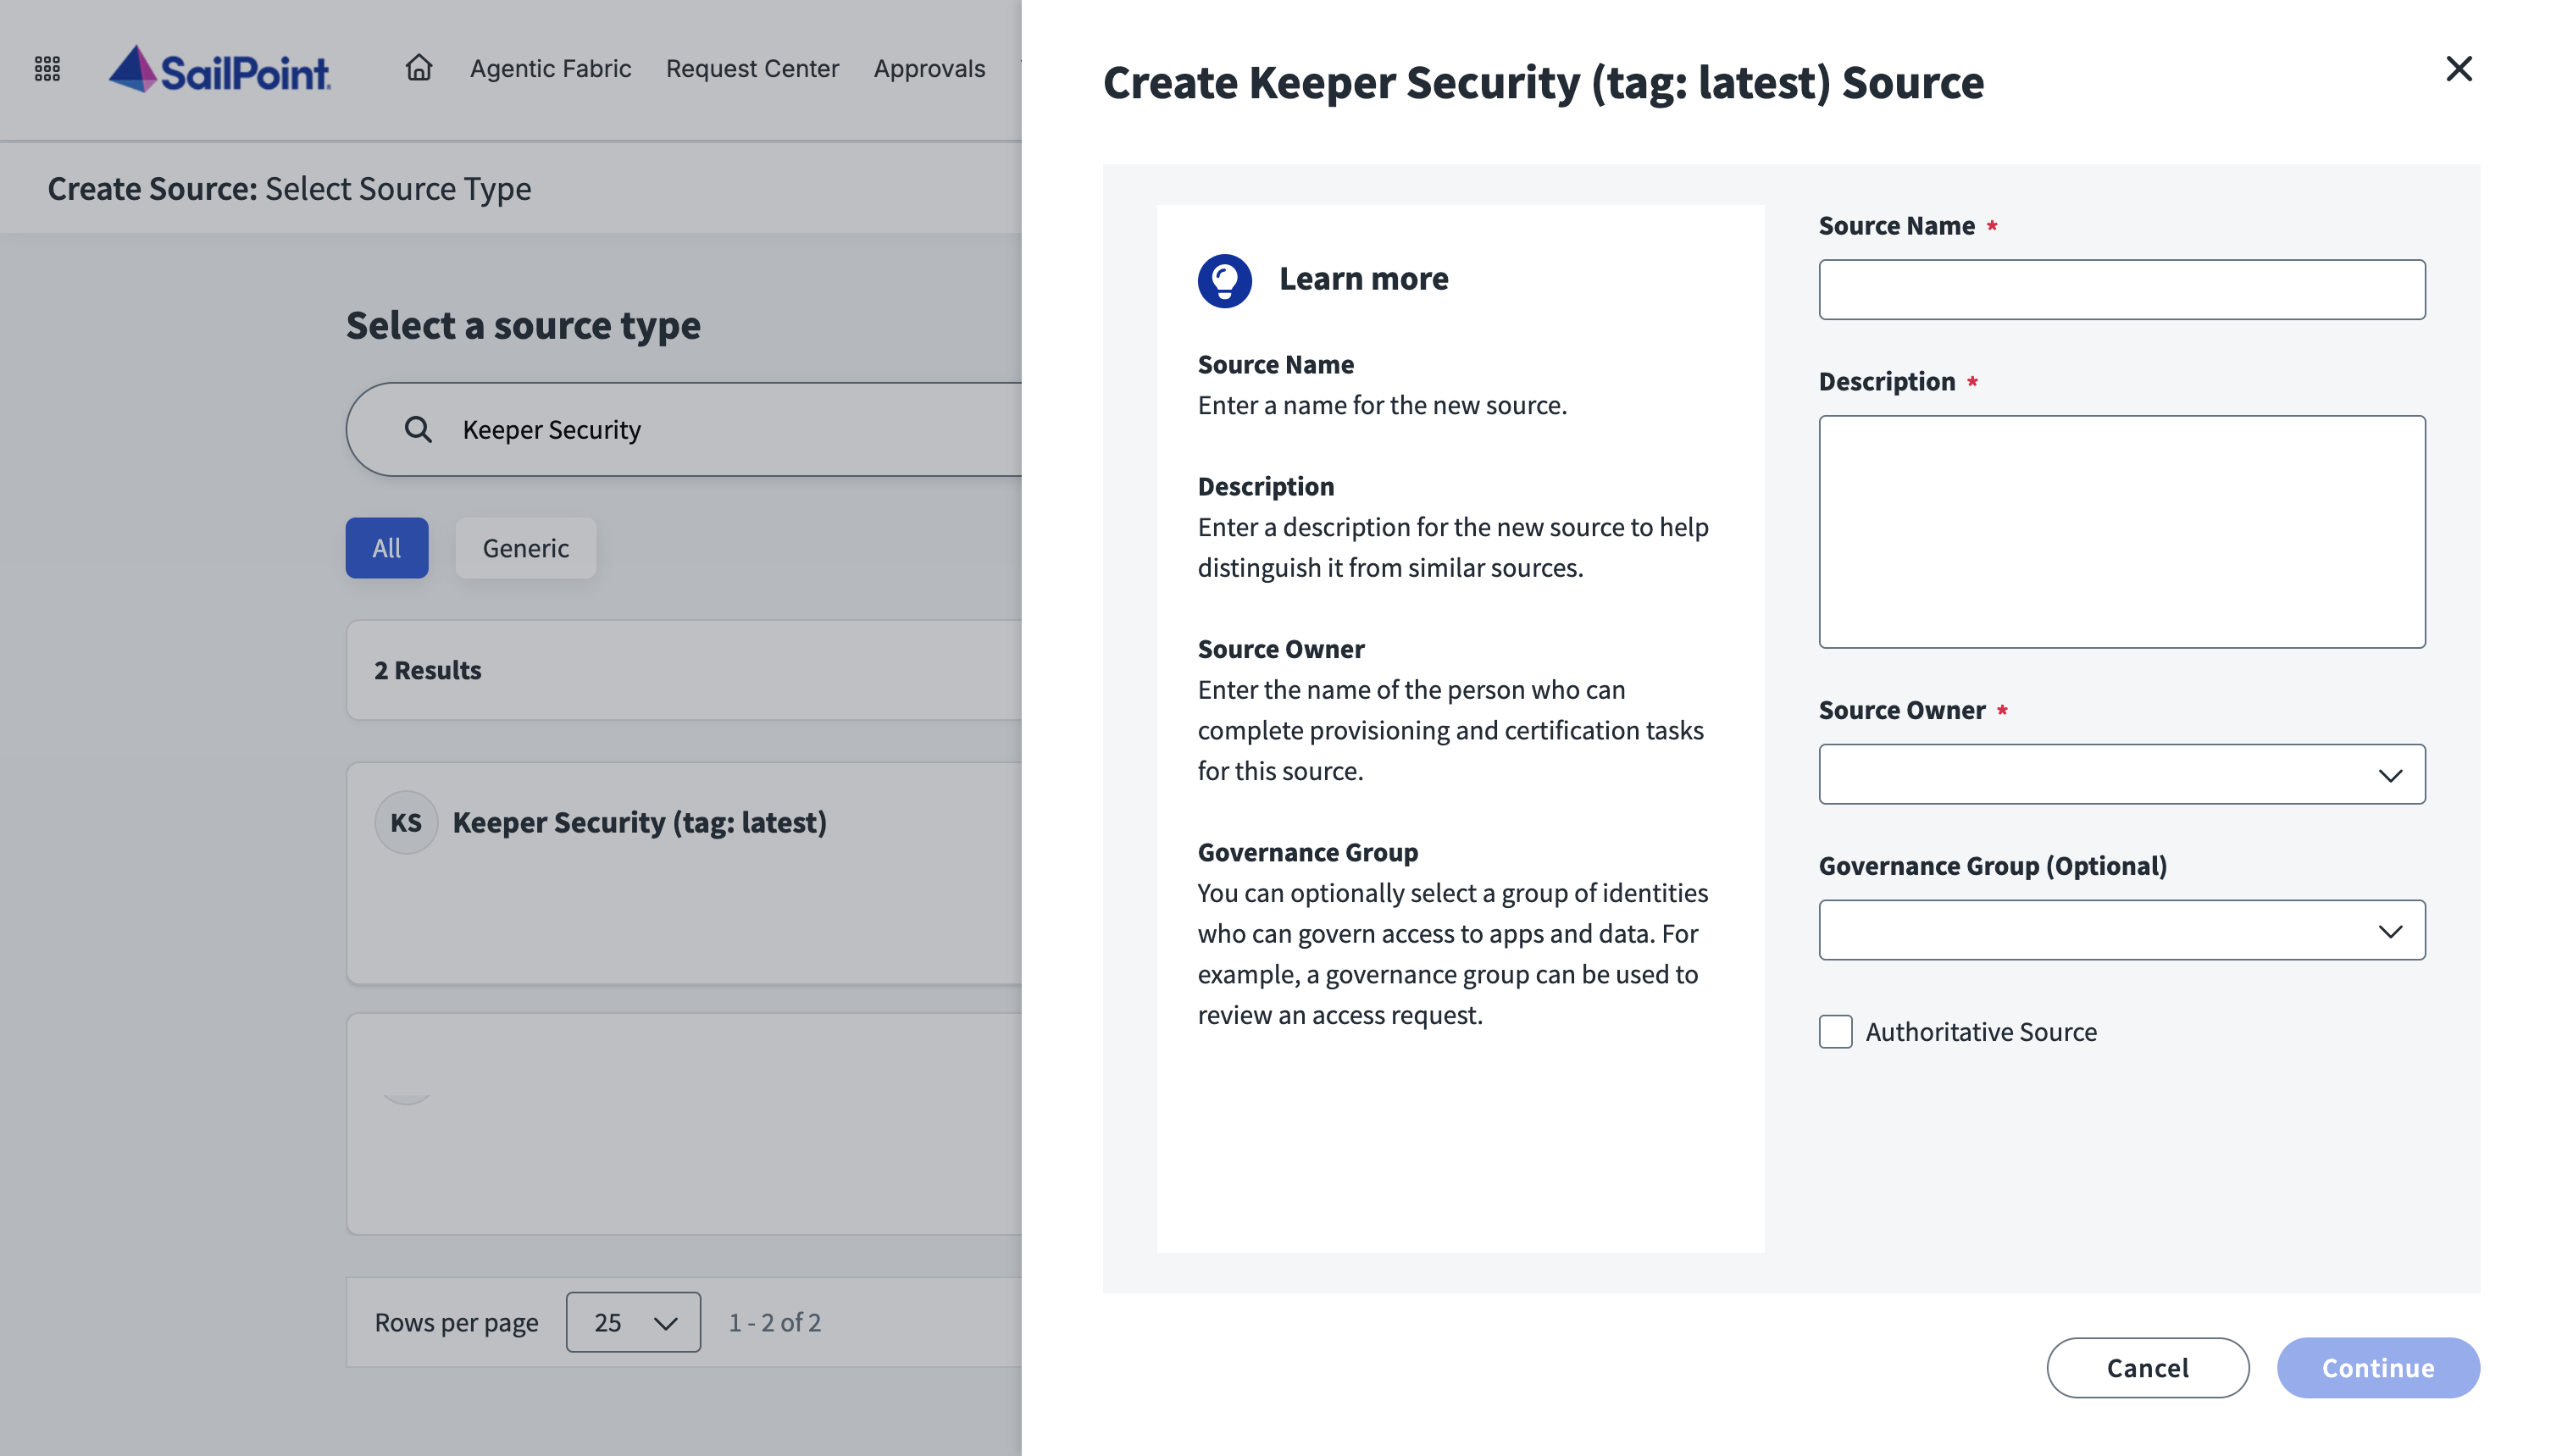
3. **\[Source Name]**、**\[Description]**、**\[Owner]** を設定してソースを構成し、**\[Continue]** をクリックします。

<figure><img src="/files/9c3s2HYUpHT6kN9QmENb" alt=""><figcaption></figcaption></figure>

4. **\[Configuration]** で、Keeperコマンダーサービスモードの認証情報を設定します。

<figure><img src="/files/5eWBTlK2w0k0D219geYY" alt=""><figcaption></figcaption></figure>

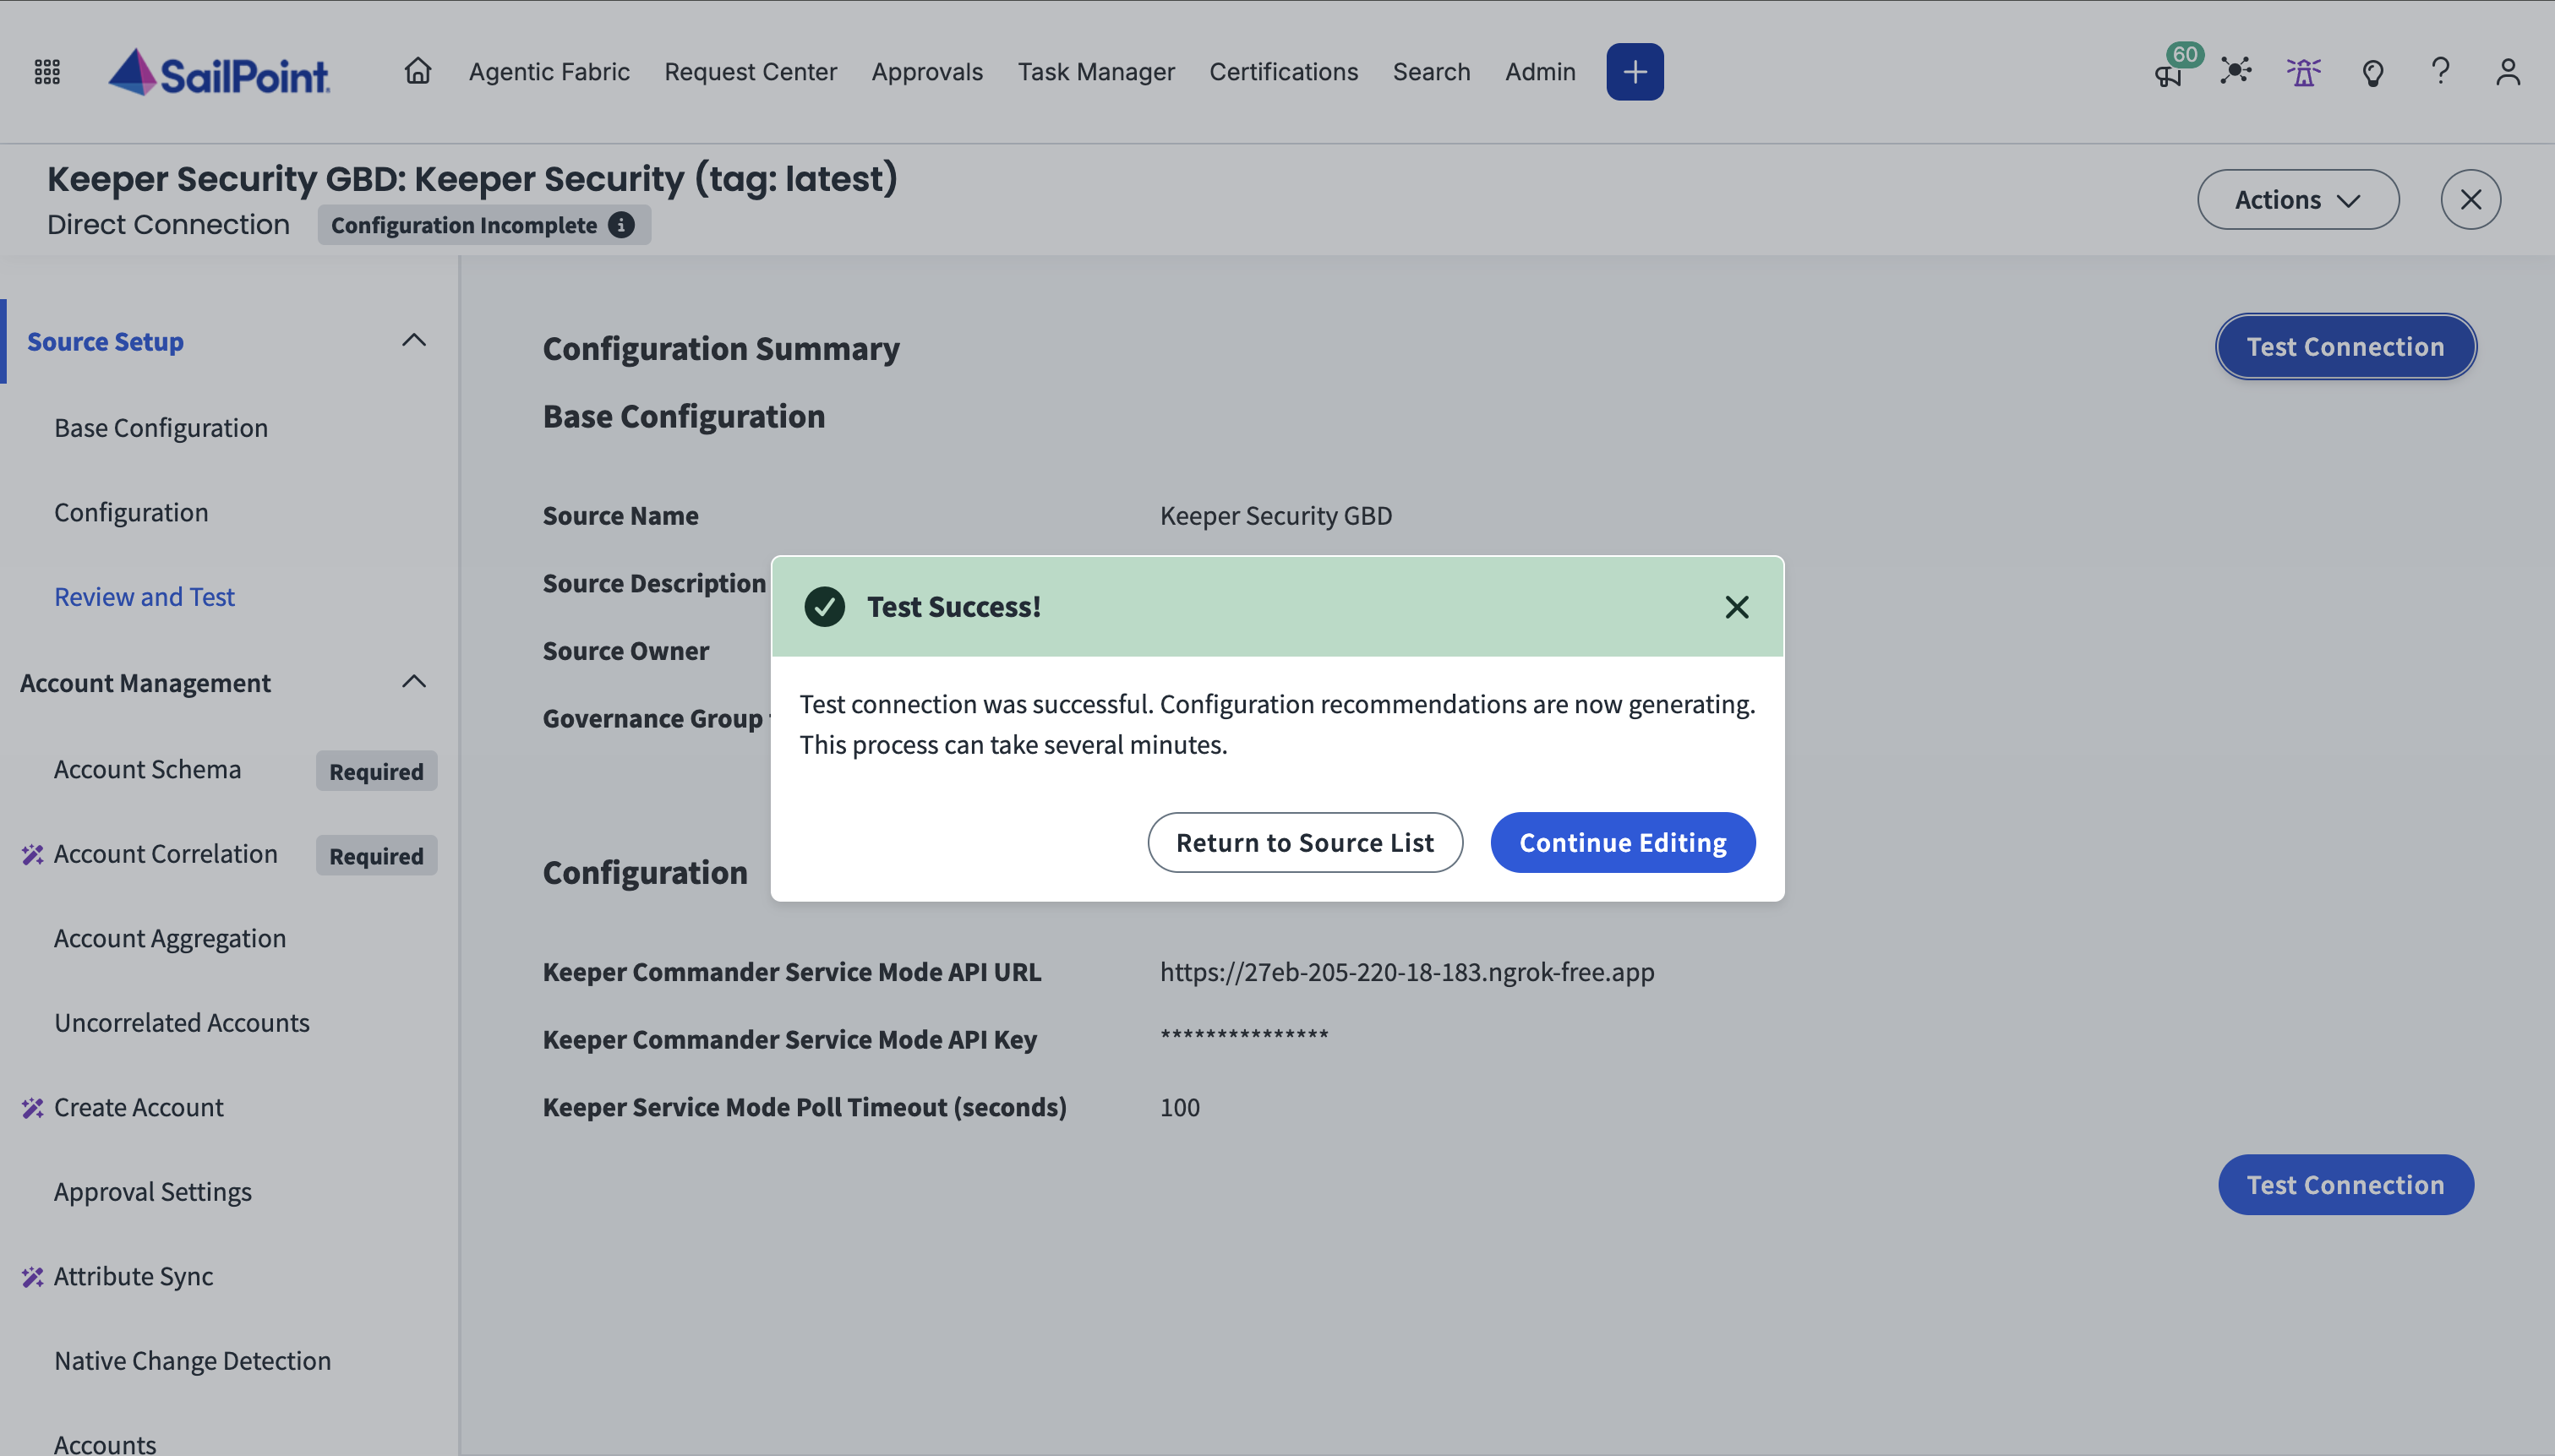
構成が完了したら、**\[Review and Test]** をクリックして、サービスモードとSailPoint間の接続を確認します。

<figure><img src="/files/YU2ozKgB6FEdRtfV0np7" alt=""><figcaption></figcaption></figure>

## エンタイトルメント集約 <a href="#entitlement-aggregation" id="entitlement-aggregation"></a>

サービスモードとSailPointの接続を確立したあと、エンタイトルメント集約を実行します。

この手順により、利用可能なノード、ロール、チーム、レコード、フォルダとその権限が一覧化されます。

Keeper Security SaaSコネクターで利用できるエンタイトルメントタイプは以下です。

## エンタイトルメントタイプ <a href="#entitlement-types" id="entitlement-types"></a>

| タイプ    | 説明                                                           |
| ------ | ------------------------------------------------------------ |
| Node   | Keeperエンタープライズ階層内の組織単位。各ユーザーは1つのノードに所属                       |
| Team   | Keeperユーザーのグループ。このエンタイトルメントを割り当てると、ユーザーがチームに追加される            |
| Role   | Keeperのロール。このエンタイトルメントを割り当てると、その権限が付与される                     |
| Folder | 共有フォルダへのアクセス (割り当てられた権限レベルを含む)。従来型および階層型共有フォルダ (NSF) に対応     |
| Record | ユーザーに直接共有されたレコード (割り当てられた権限レベルを含む)。従来型および階層型共有フォルダ (NSF) に対応 |

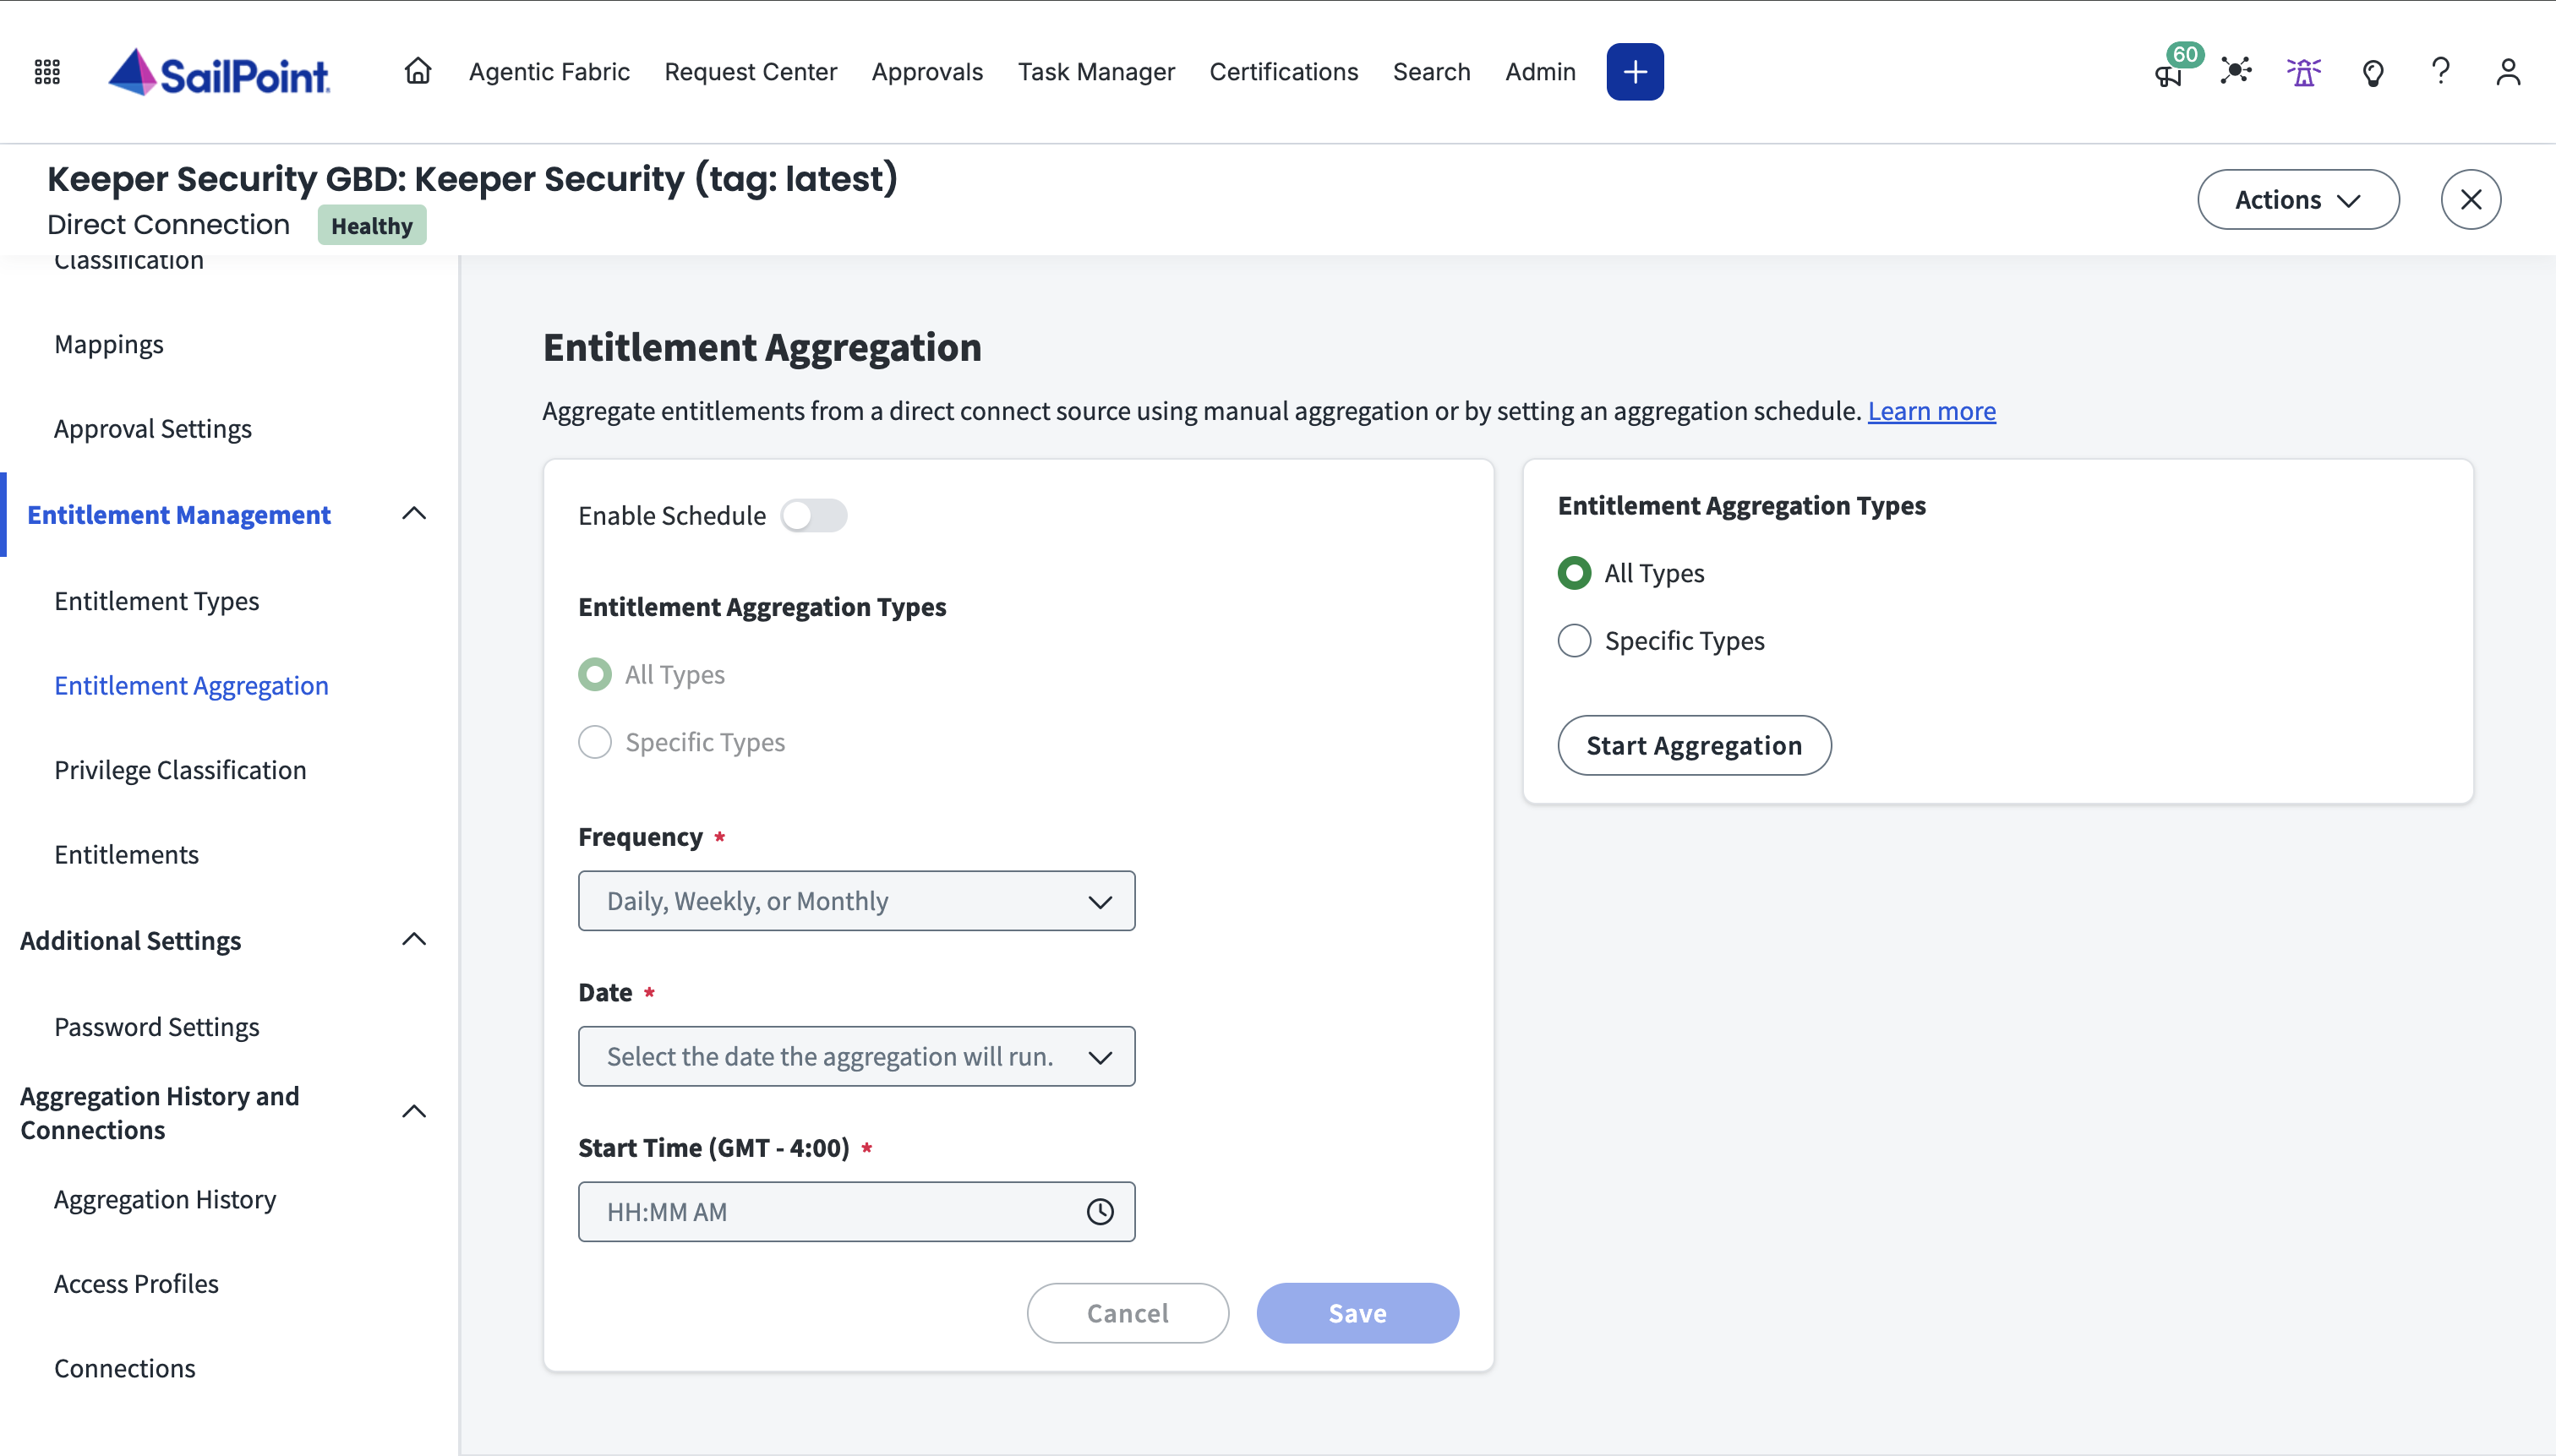
1. **\[Entitlement Management]** で **\[Entitlement Aggregation]** をクリックし、**\[Start Aggregation]** をクリックします。

<figure><img src="/files/AaHOWSRF1ViKtn0ZH7Ds" alt=""><figcaption></figcaption></figure>

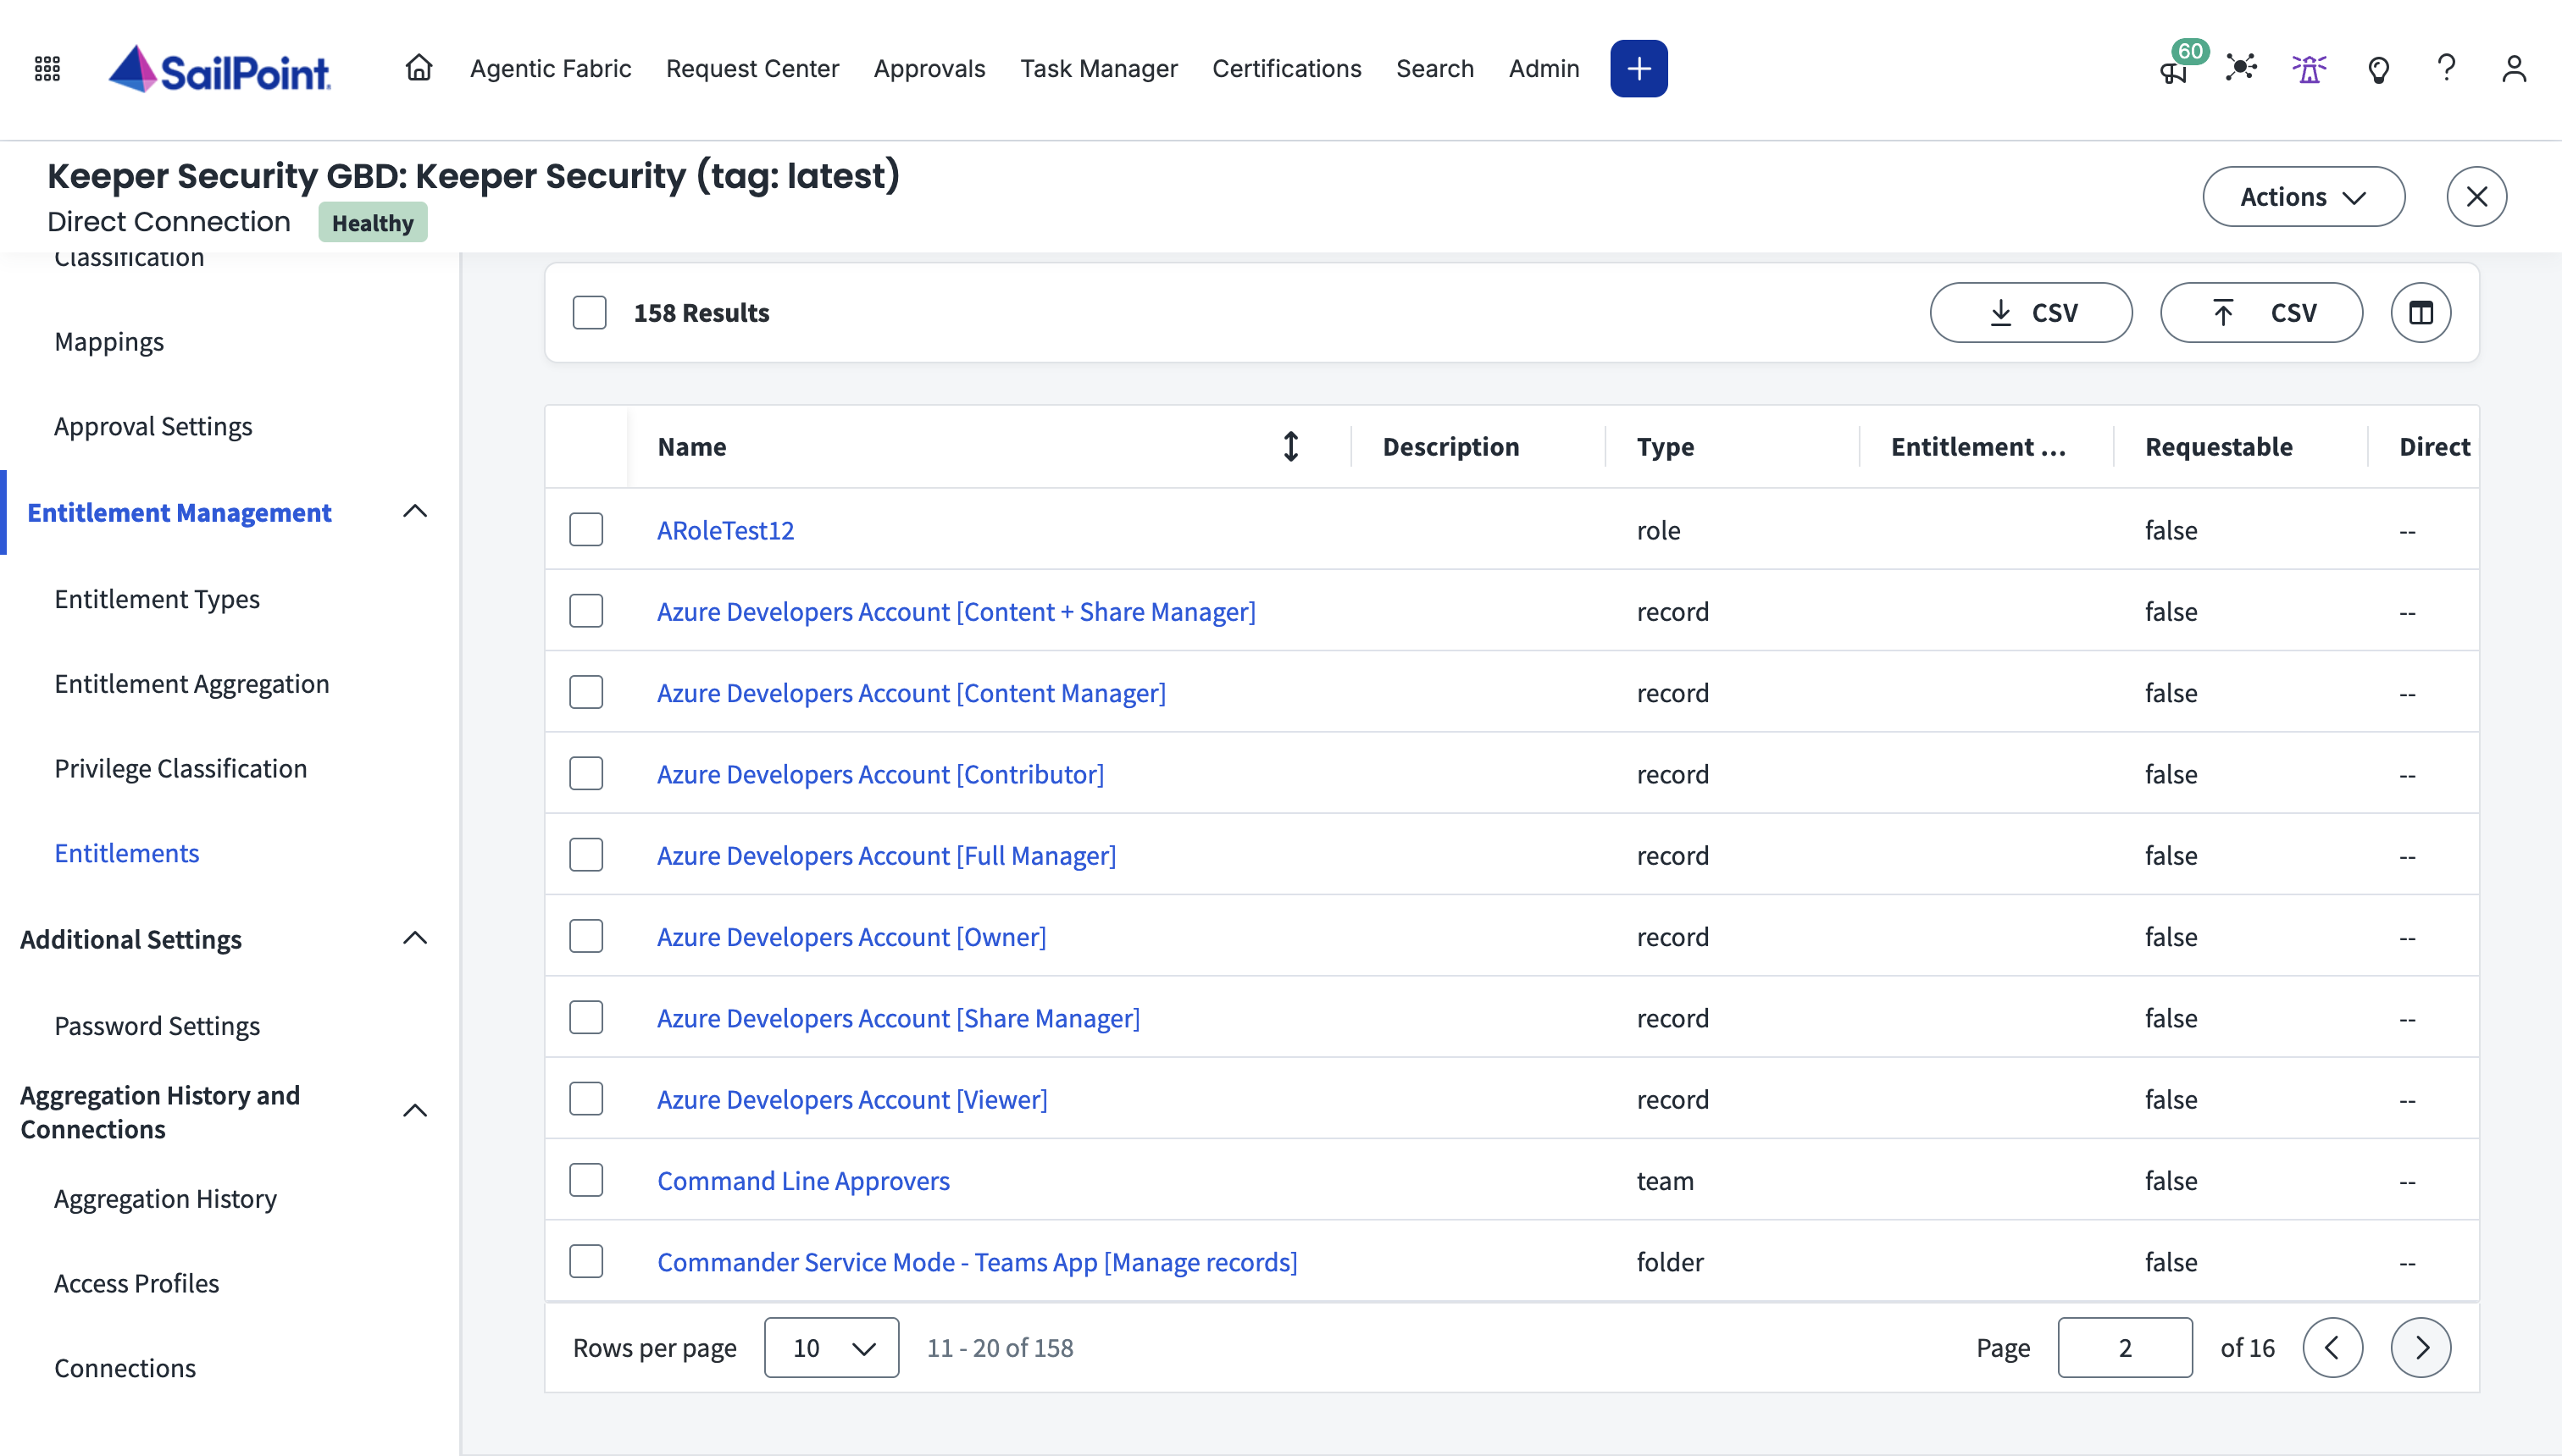
エンタイトルメント集約の完了後、**\[Entitlements]** でエンタイトルメントを確認できます。

<figure><img src="/files/GYQIGflzAmoy4K7xJgmh" alt=""><figcaption></figcaption></figure>

## アカウント集約 <a href="#account-aggregation" id="account-aggregation"></a>

エンタイトルメント集約の完了後、アカウント集約を実行します。Keeperエンタープライズからユーザーをインポートし、各ユーザーを割り当て済みのエンタイトルメントおよび既存のアクセスにマッピングします。

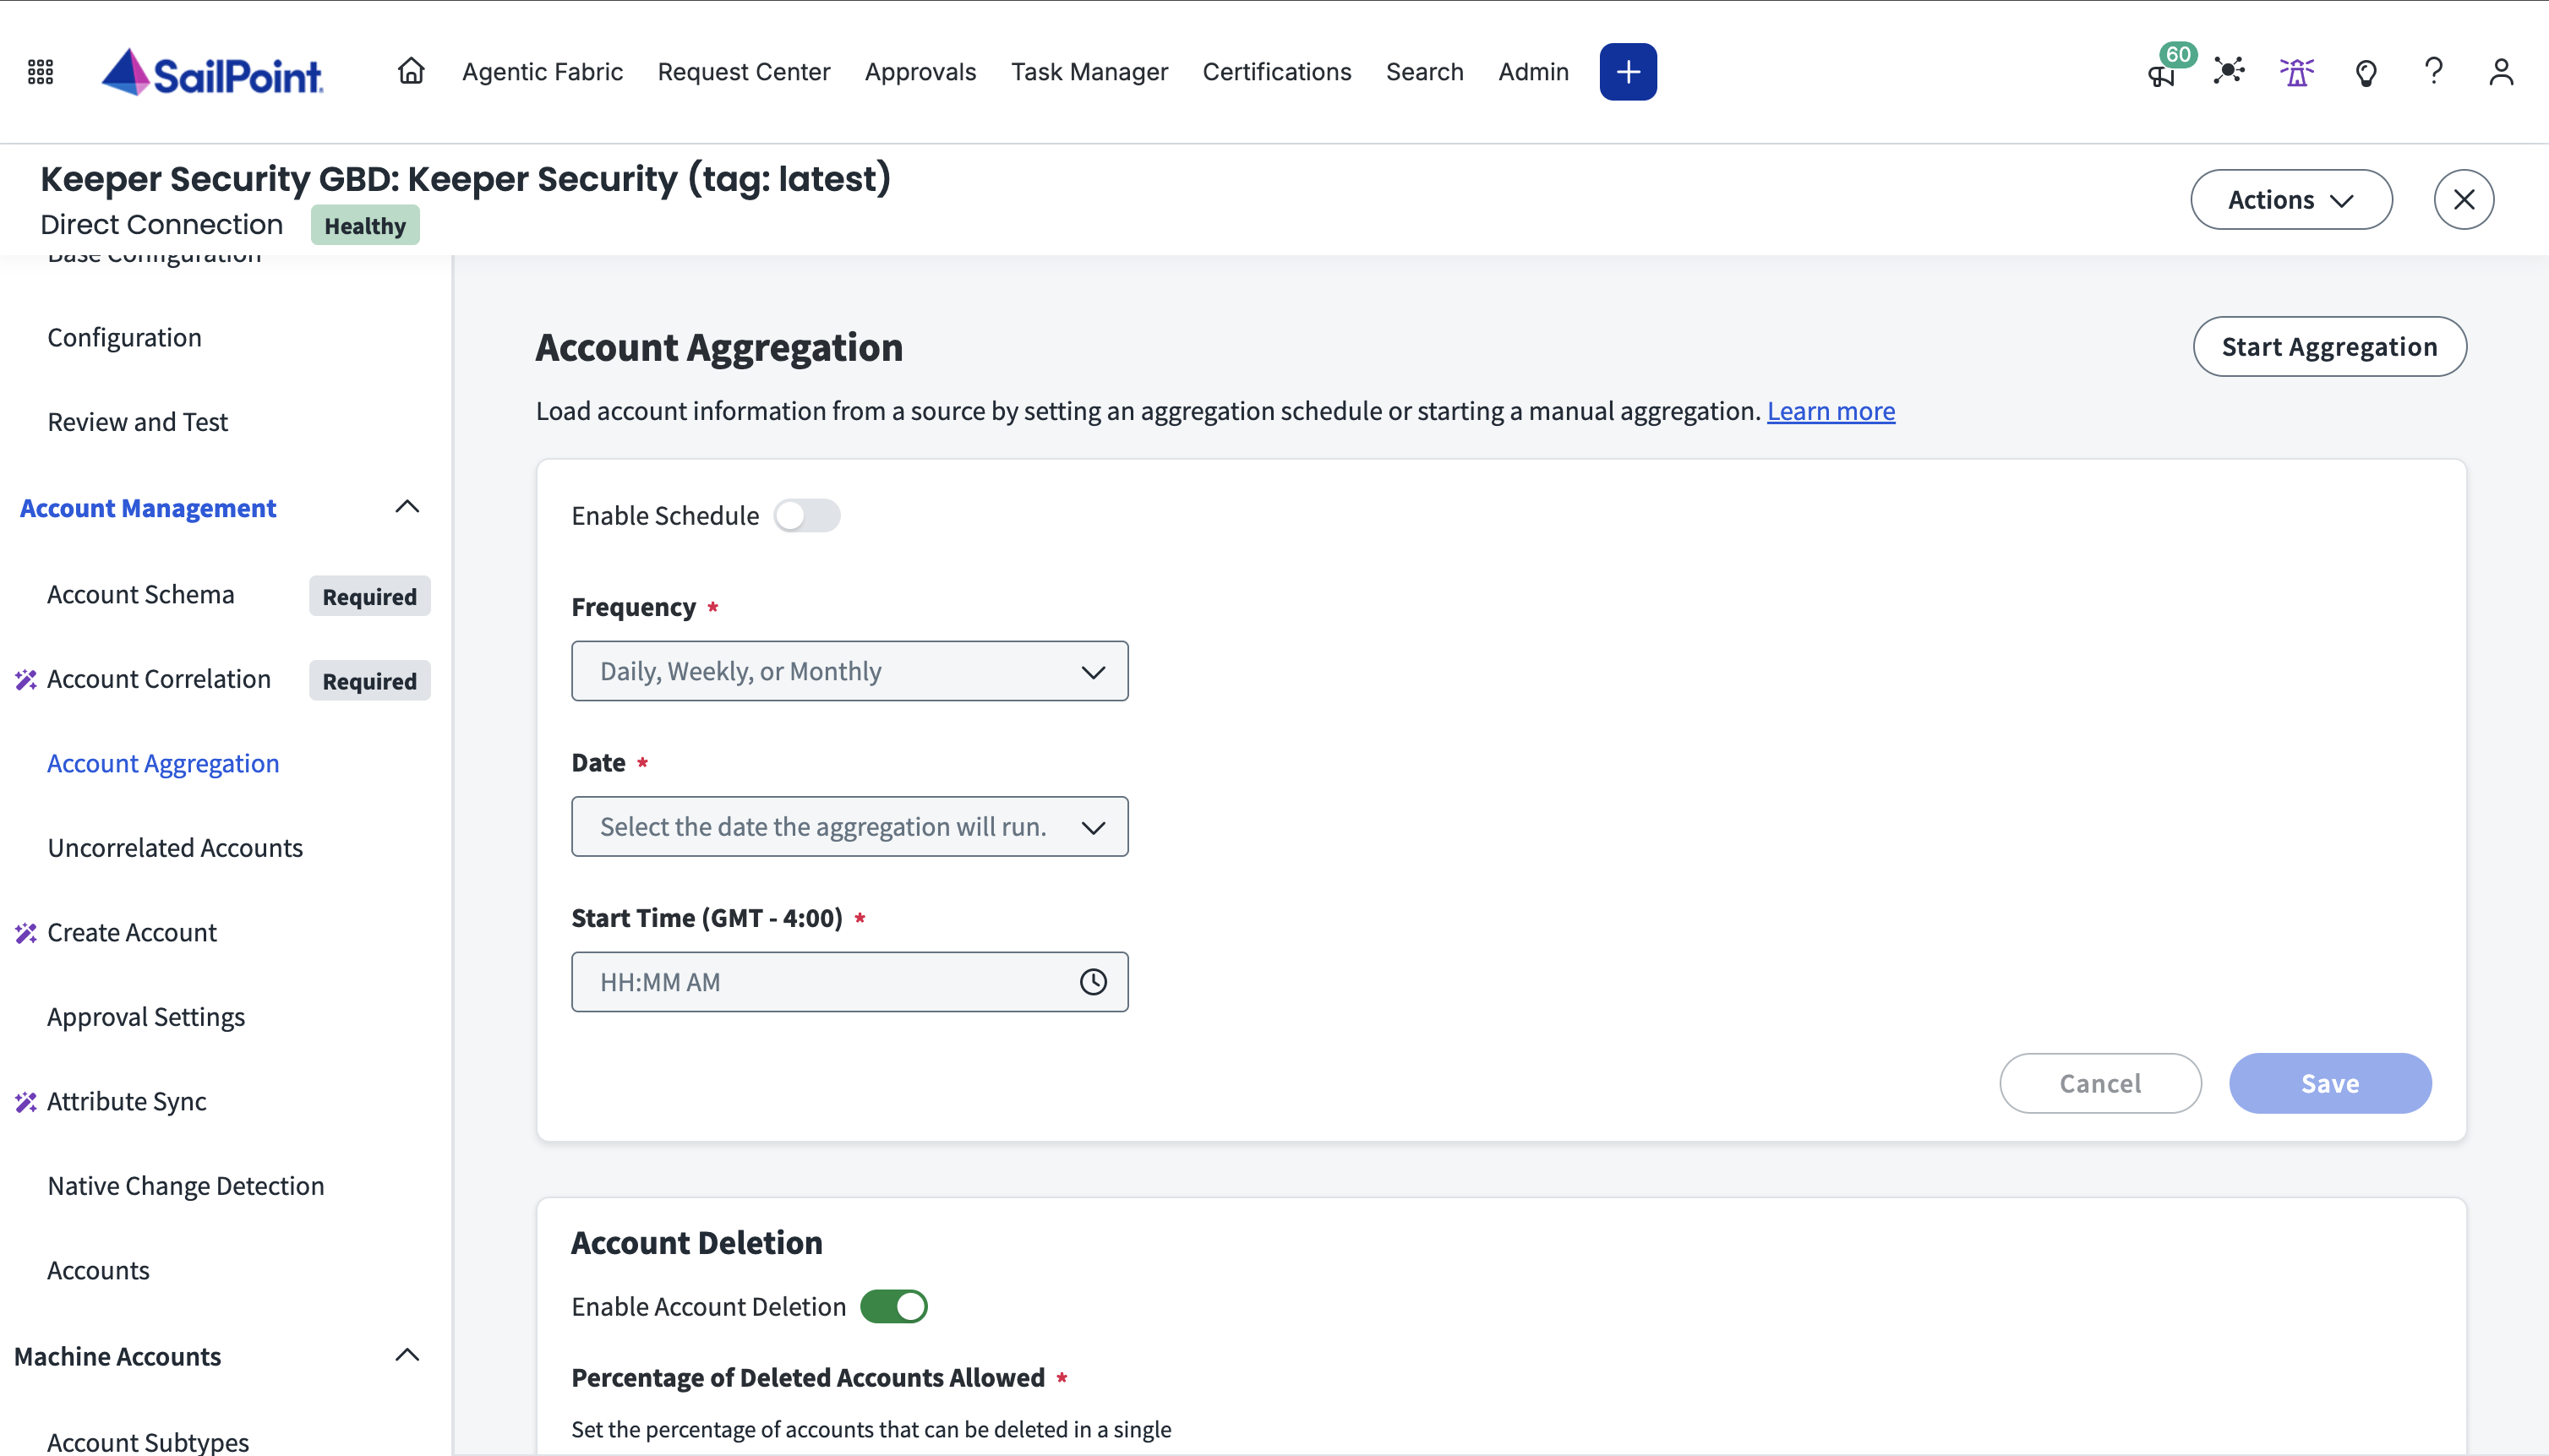
1. **\[Account Management]** で **\[Account Aggregation]** をクリックし、**\[Start Aggregation]** をクリックします。

<figure><img src="/files/bLHWcIMNpGTOd1FFshaU" alt=""><figcaption></figcaption></figure>

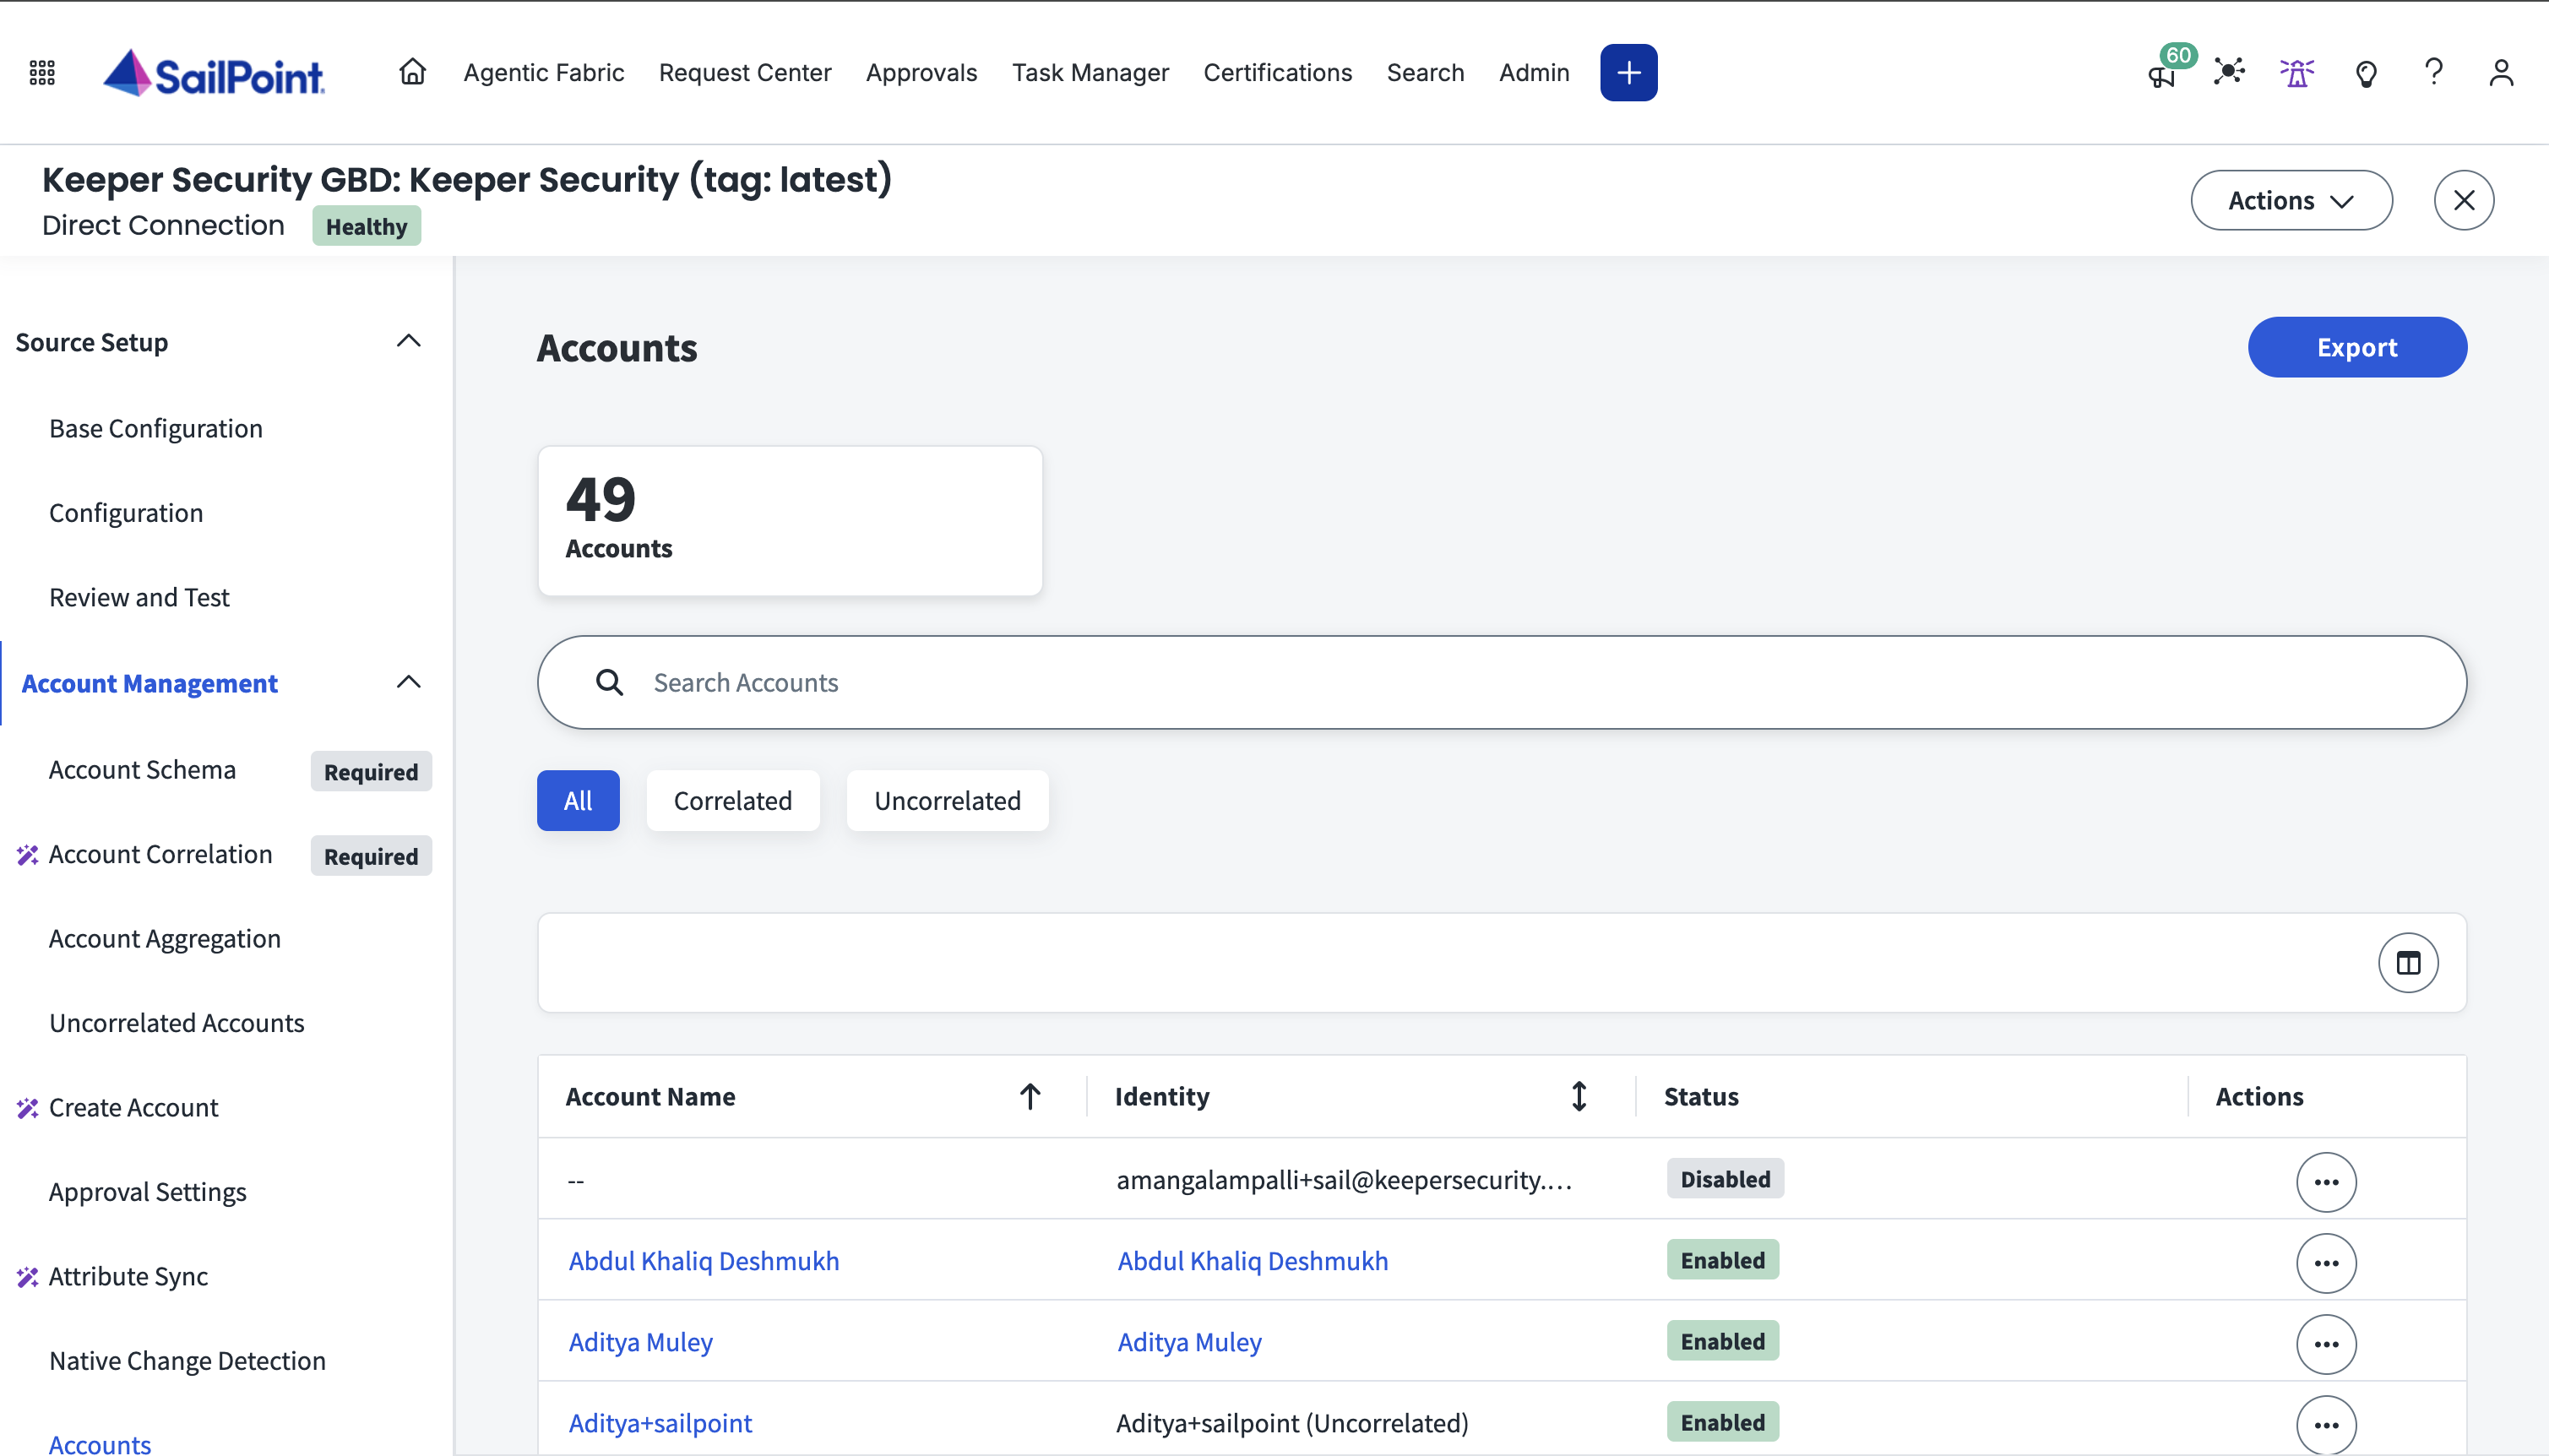
集約の完了後、**\[Accounts]** でアカウントを確認できます。

<figure><img src="/files/KcKllZUl6FgtxlYIKoAp" alt=""><figcaption></figcaption></figure>

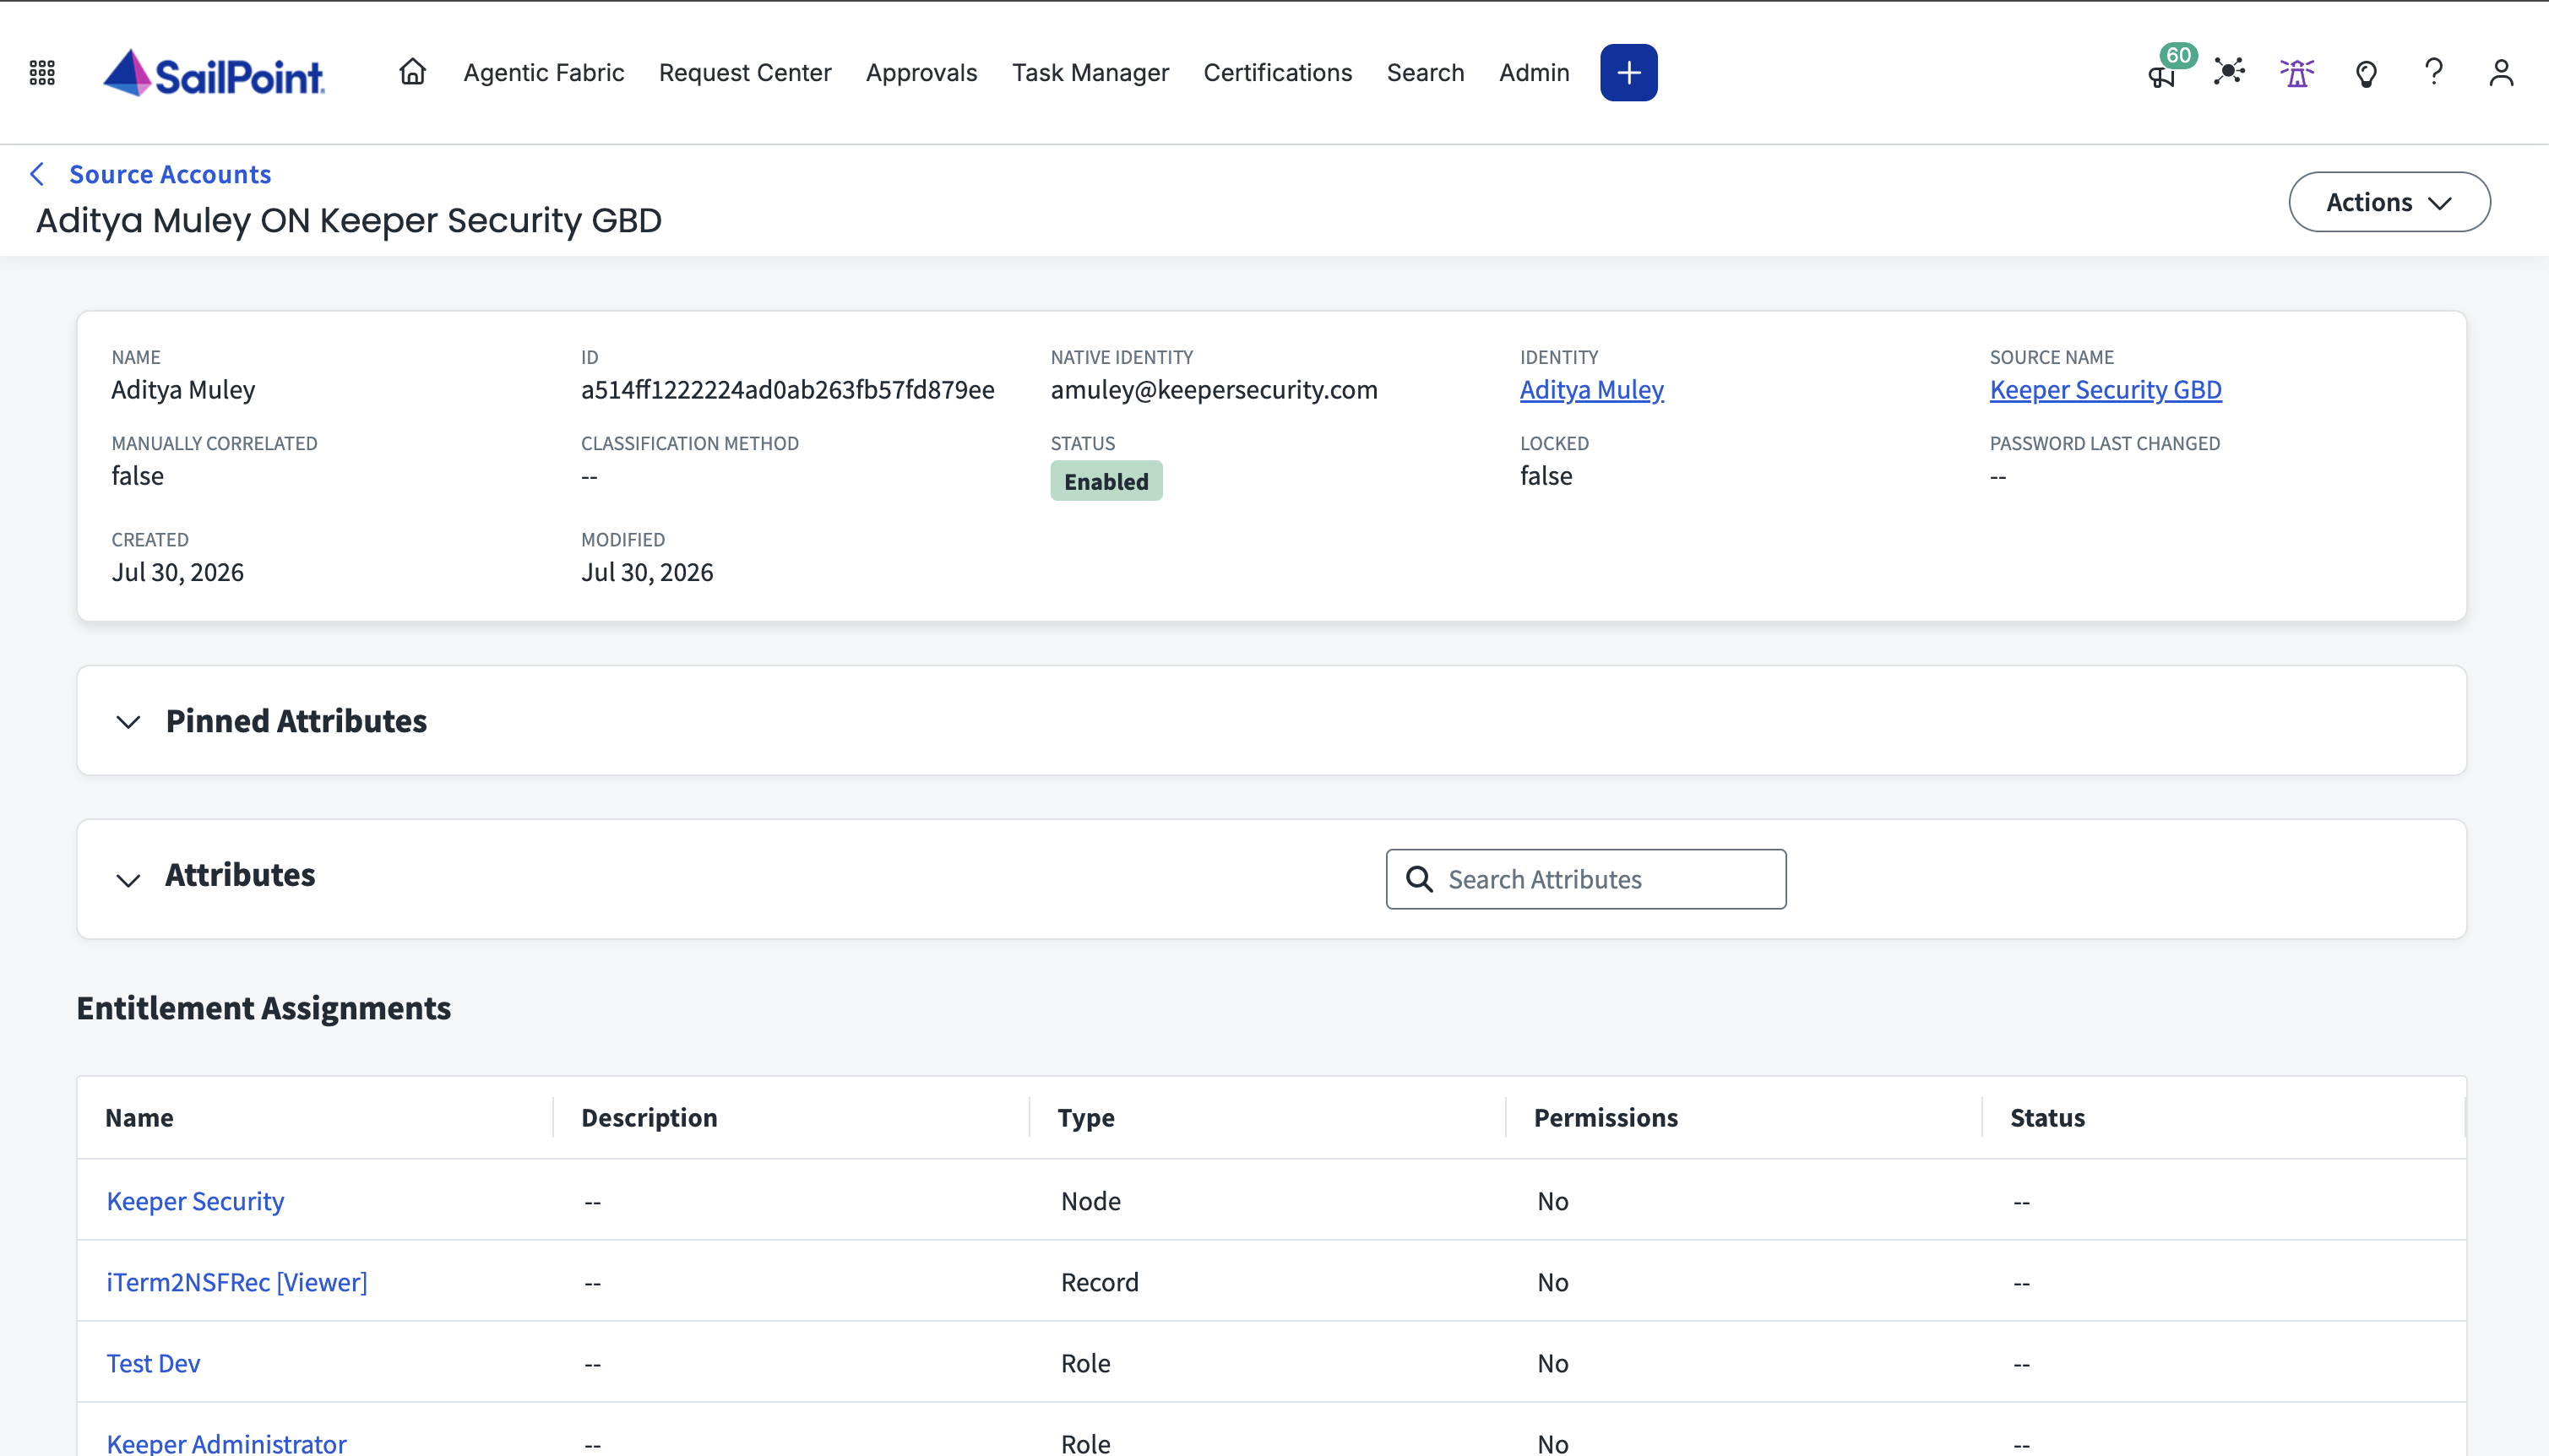
ユーザーを選択すると、割り当て済みのエンタイトルメントを確認できます。

<figure><img src="/files/6GpwkXYvxFpugLNS1t6W" alt=""><figcaption></figcaption></figure>

## エンタイトルメントの割り当て <a href="#entitlement-assignment" id="entitlement-assignment"></a>

エンタイトルメントは、以下の手順で割り当てます。

1. SailPointでアクセスプロファイルを作成します。[SailPoint公式ドキュメント](https://documentation.sailpoint.com/saas/help/access/access-profiles.html)をご参照ください。
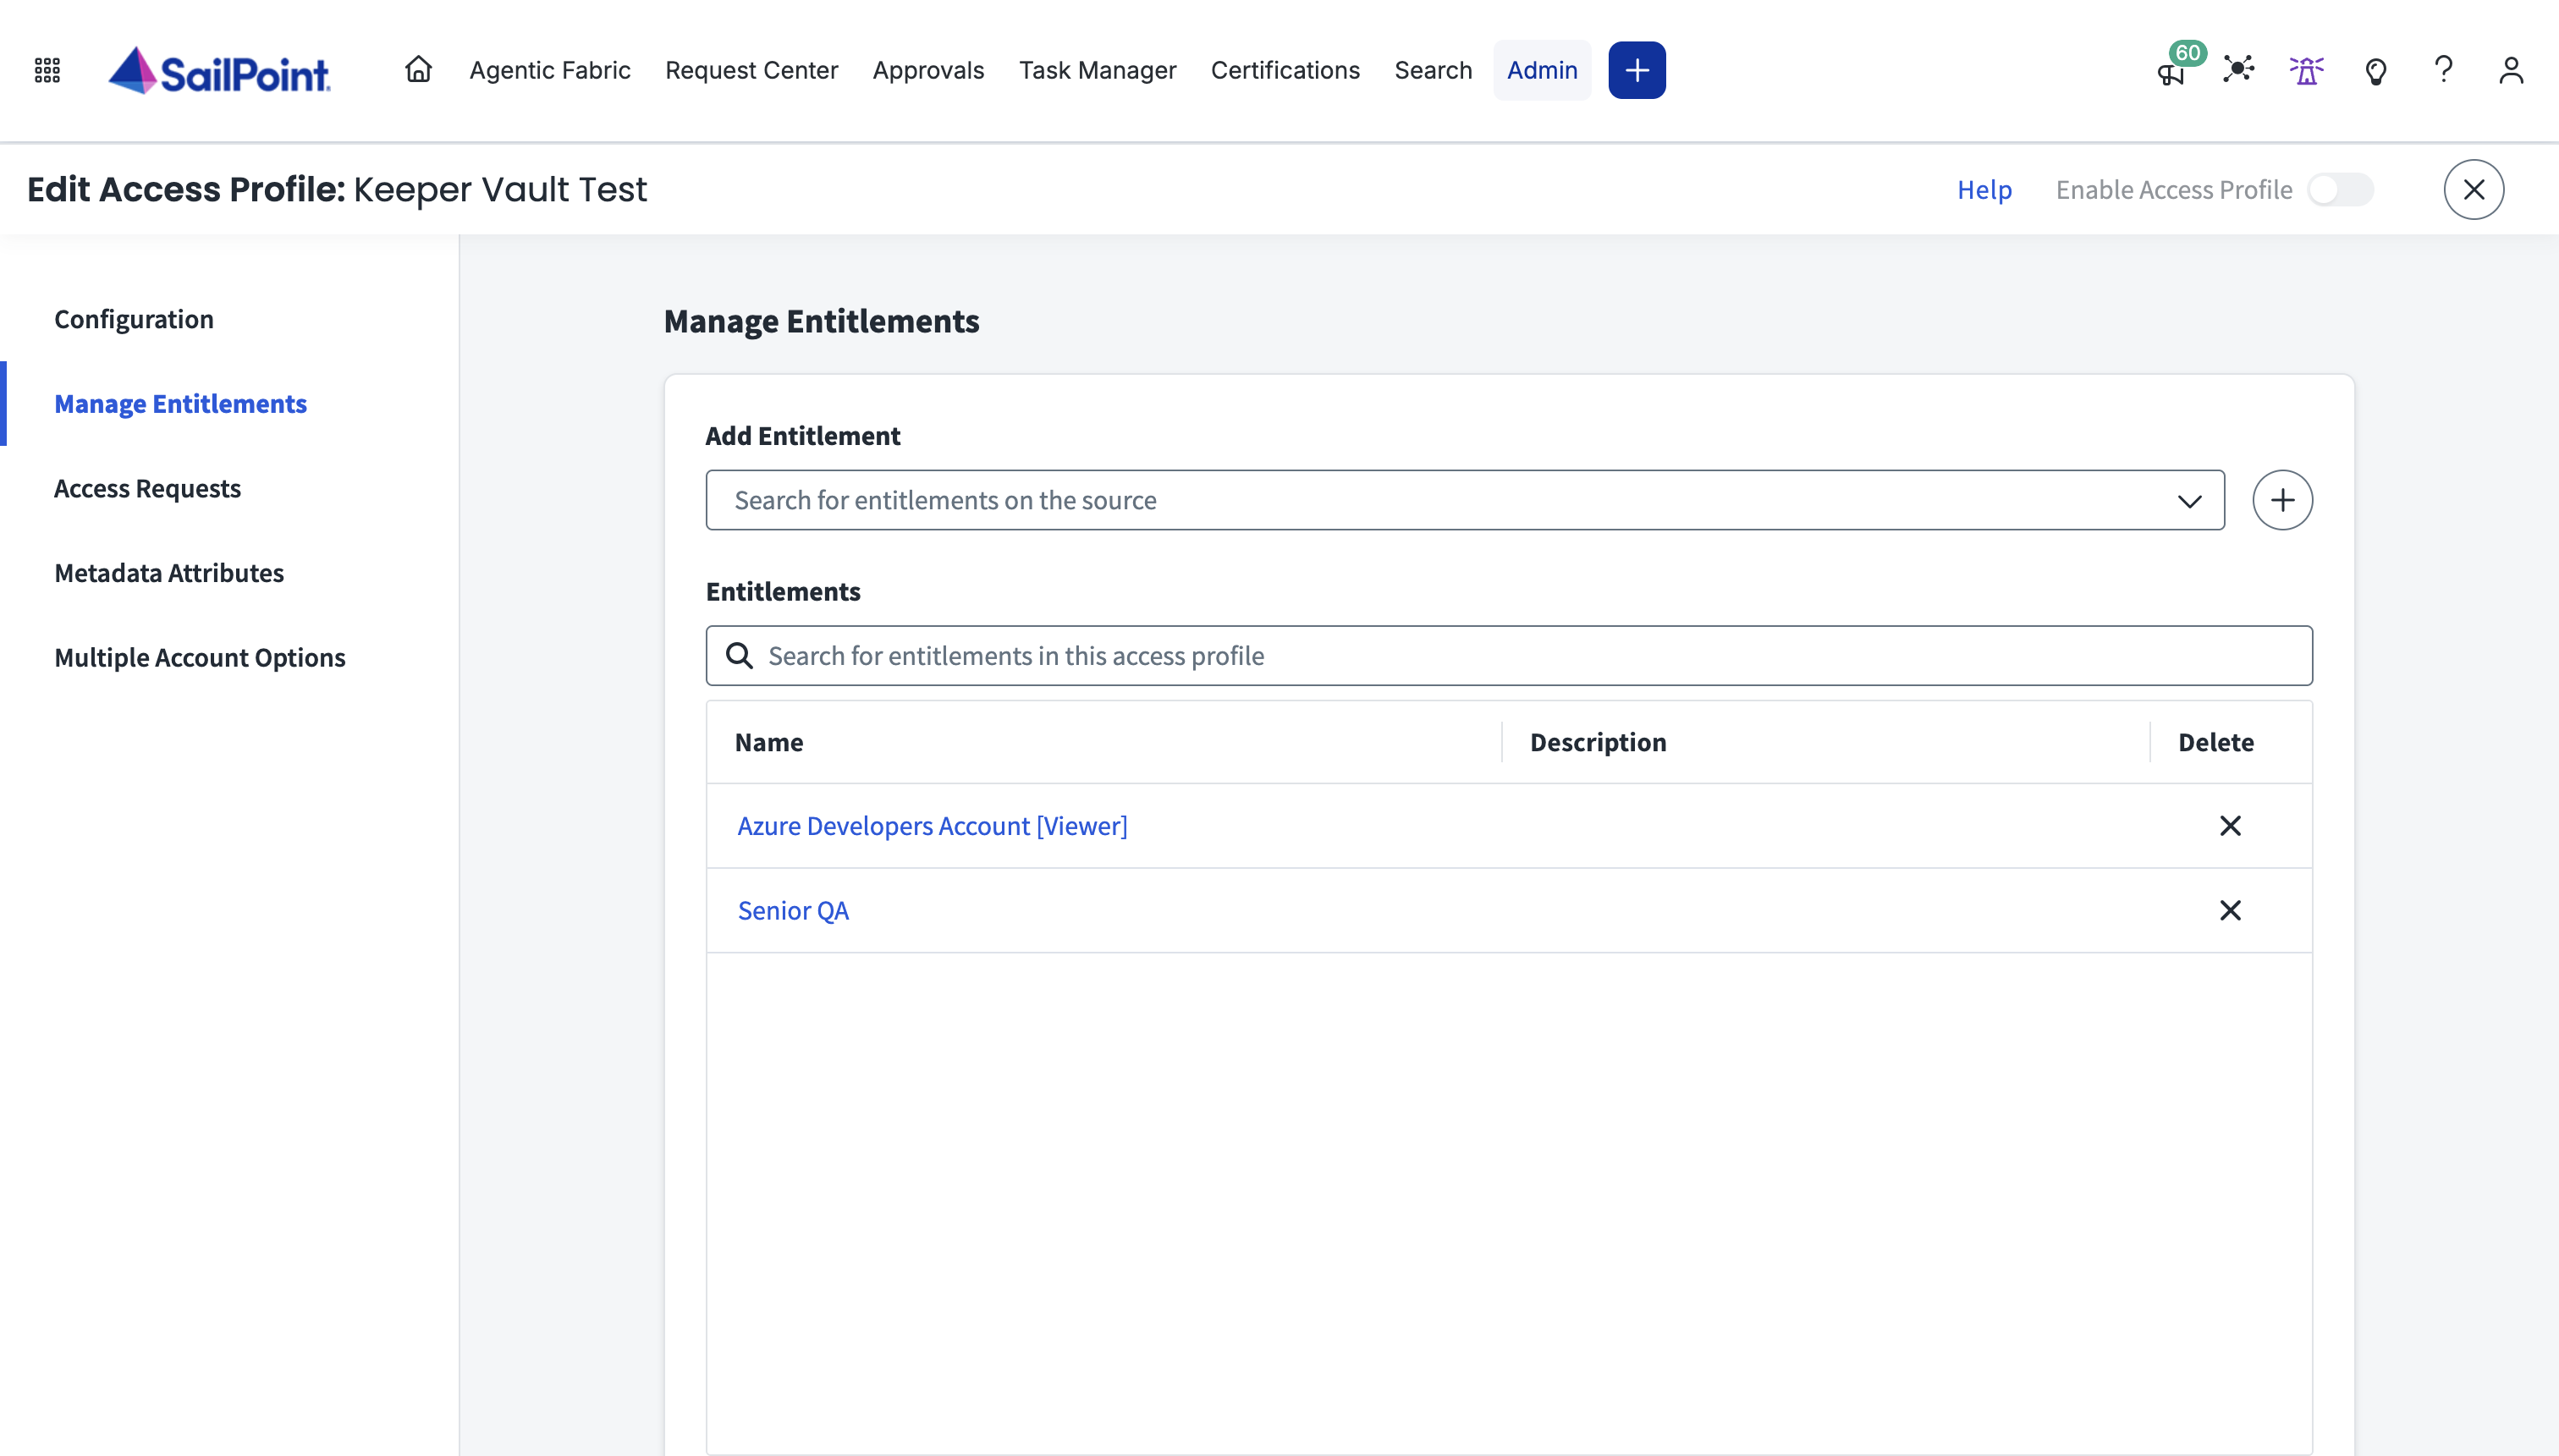
2. アクセスプロファイルの **\[Manage]** → **\[Entitlements]** で、アクセスプロファイルに割り当てるエンタイトルメントを選択します。

<figure><img src="/files/zJg812bwPbZiMTUbdvJk" alt=""><figcaption></figcaption></figure>

3. アクセスプロファイルの構成後、SailPointロールを作成します。アクセスプロファイルを追加し、そのエンタイトルメントが必要なユーザーを割り当てます。[ロール作成に関するSailPoint公式ドキュメント](https://documentation.sailpoint.com/saas/help/access/roles.html)をご参照ください。
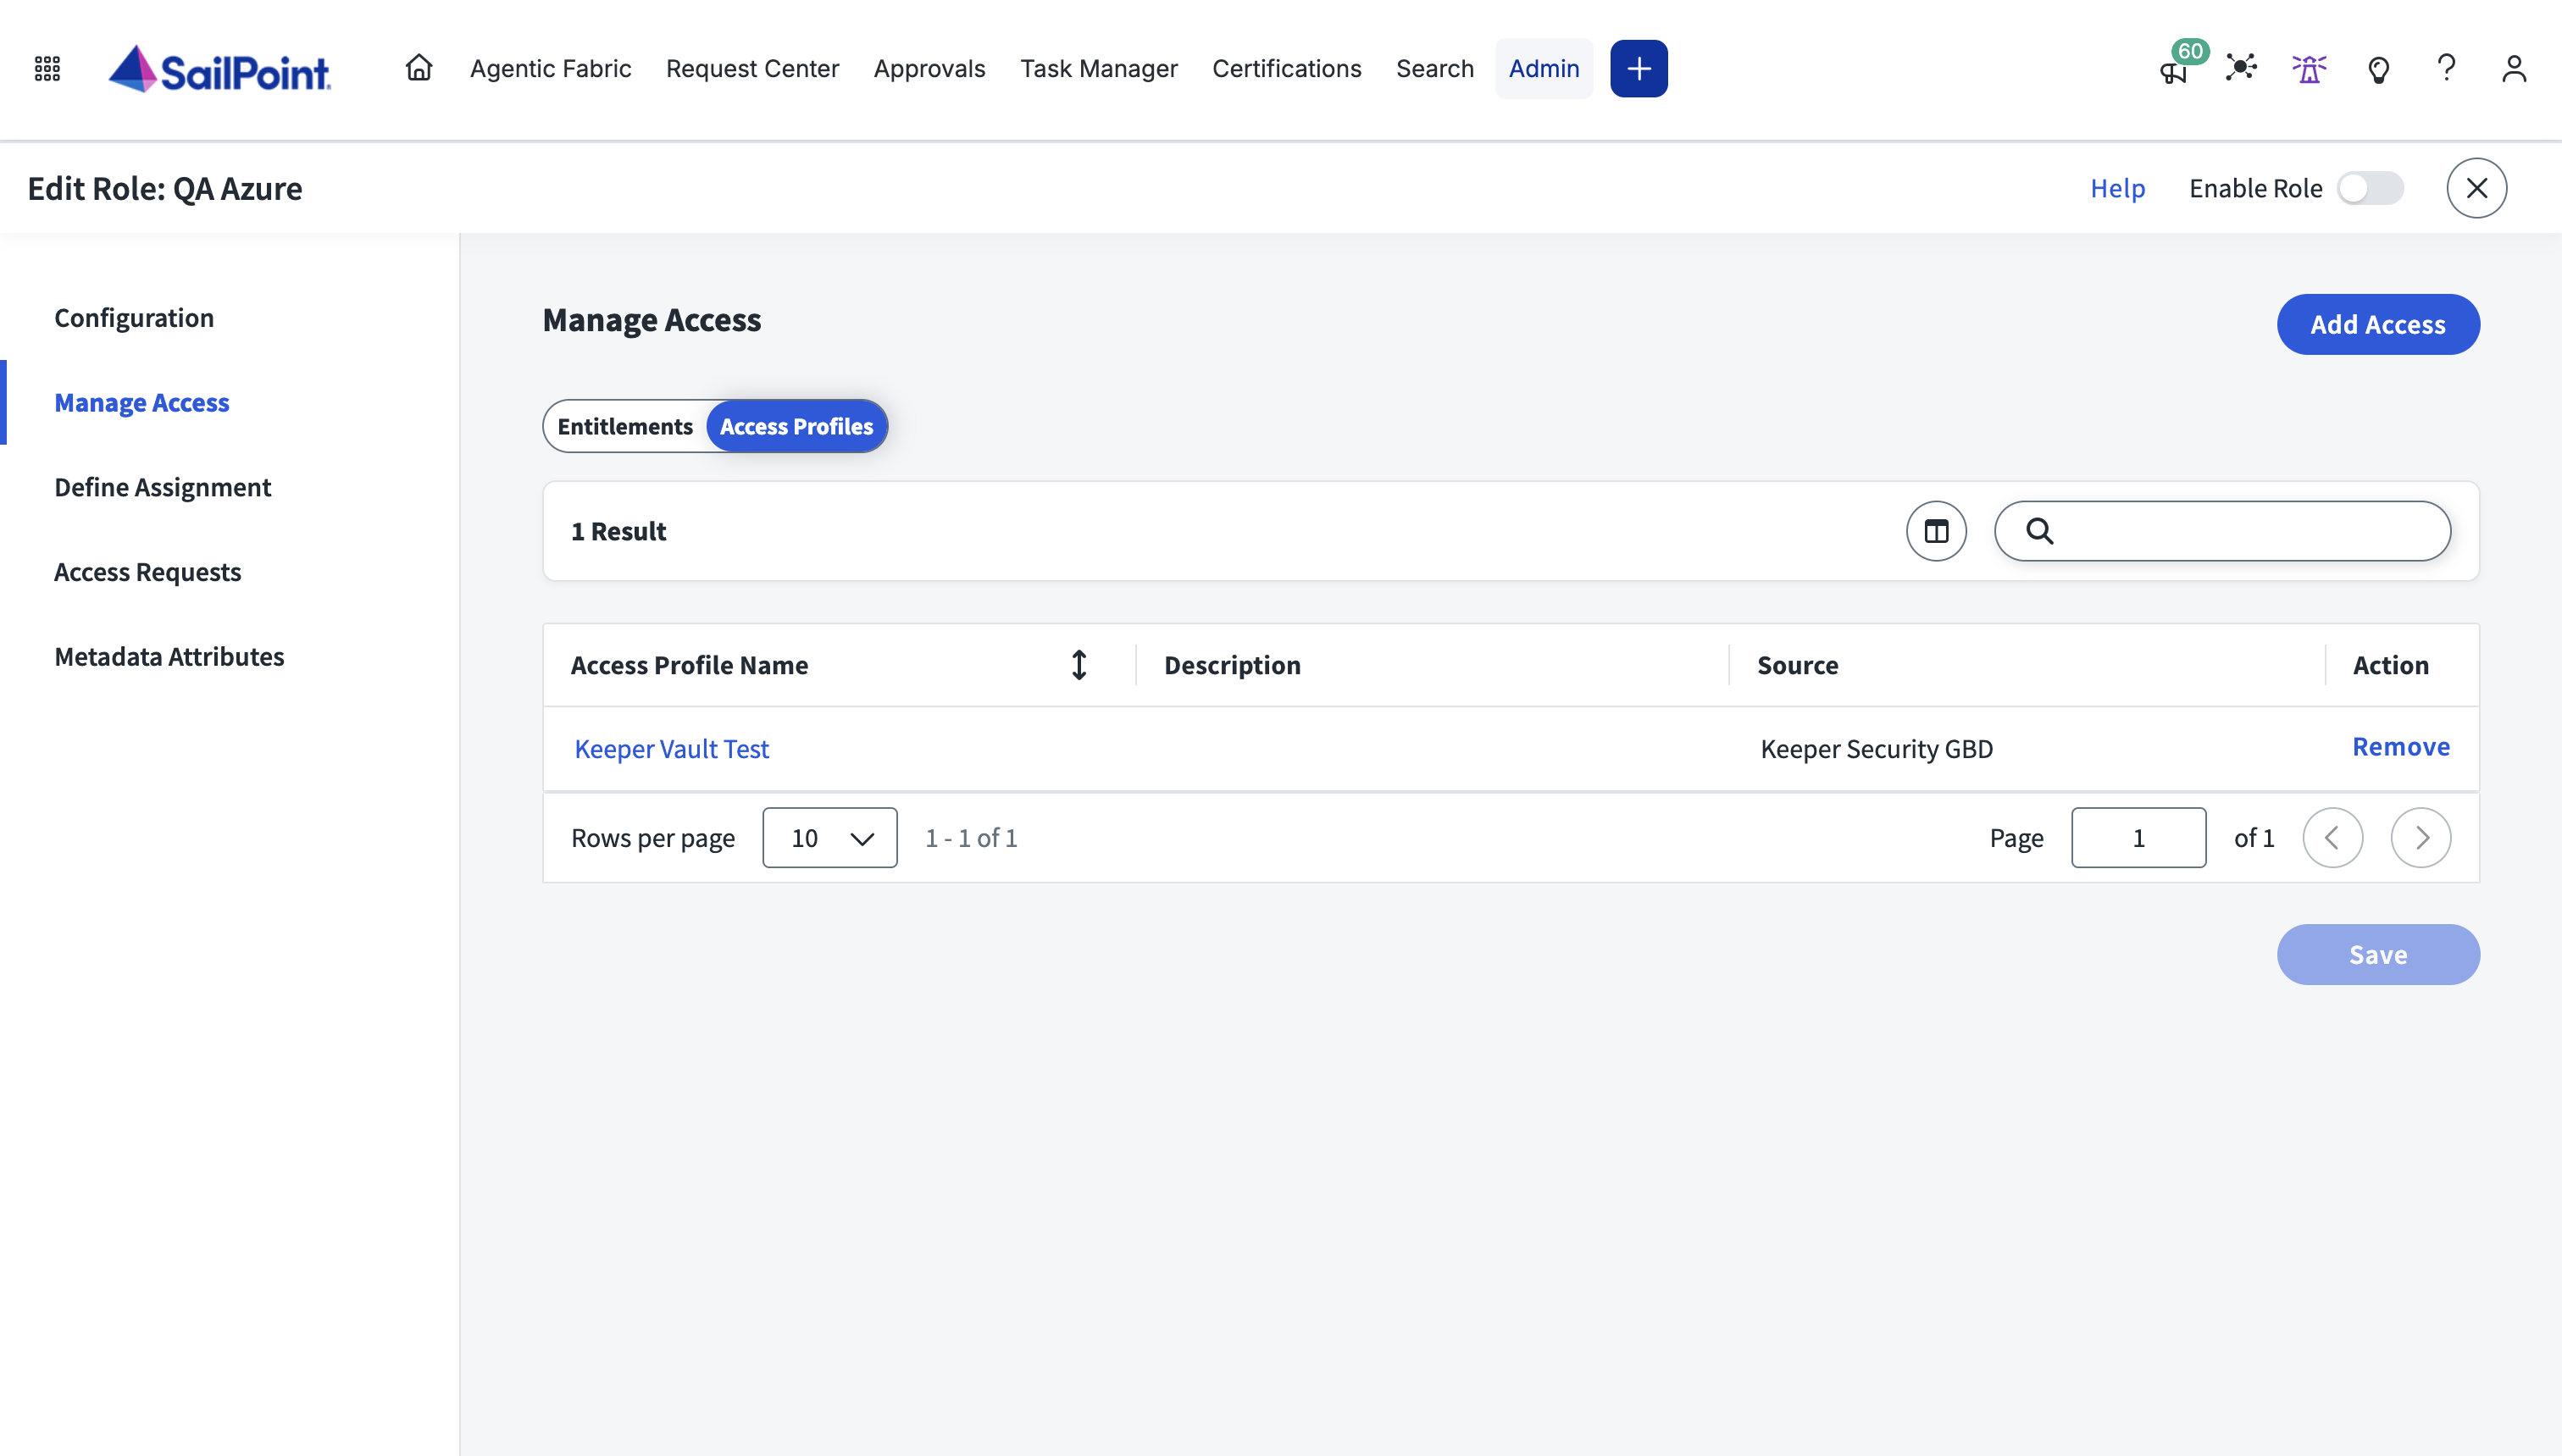
4. **\[Manage Access]** で、先ほど作成したアクセスプロファイルを追加します。

<figure><img src="/files/0ysZjLxGe5K9utv1jCHI" alt=""><figcaption></figcaption></figure>

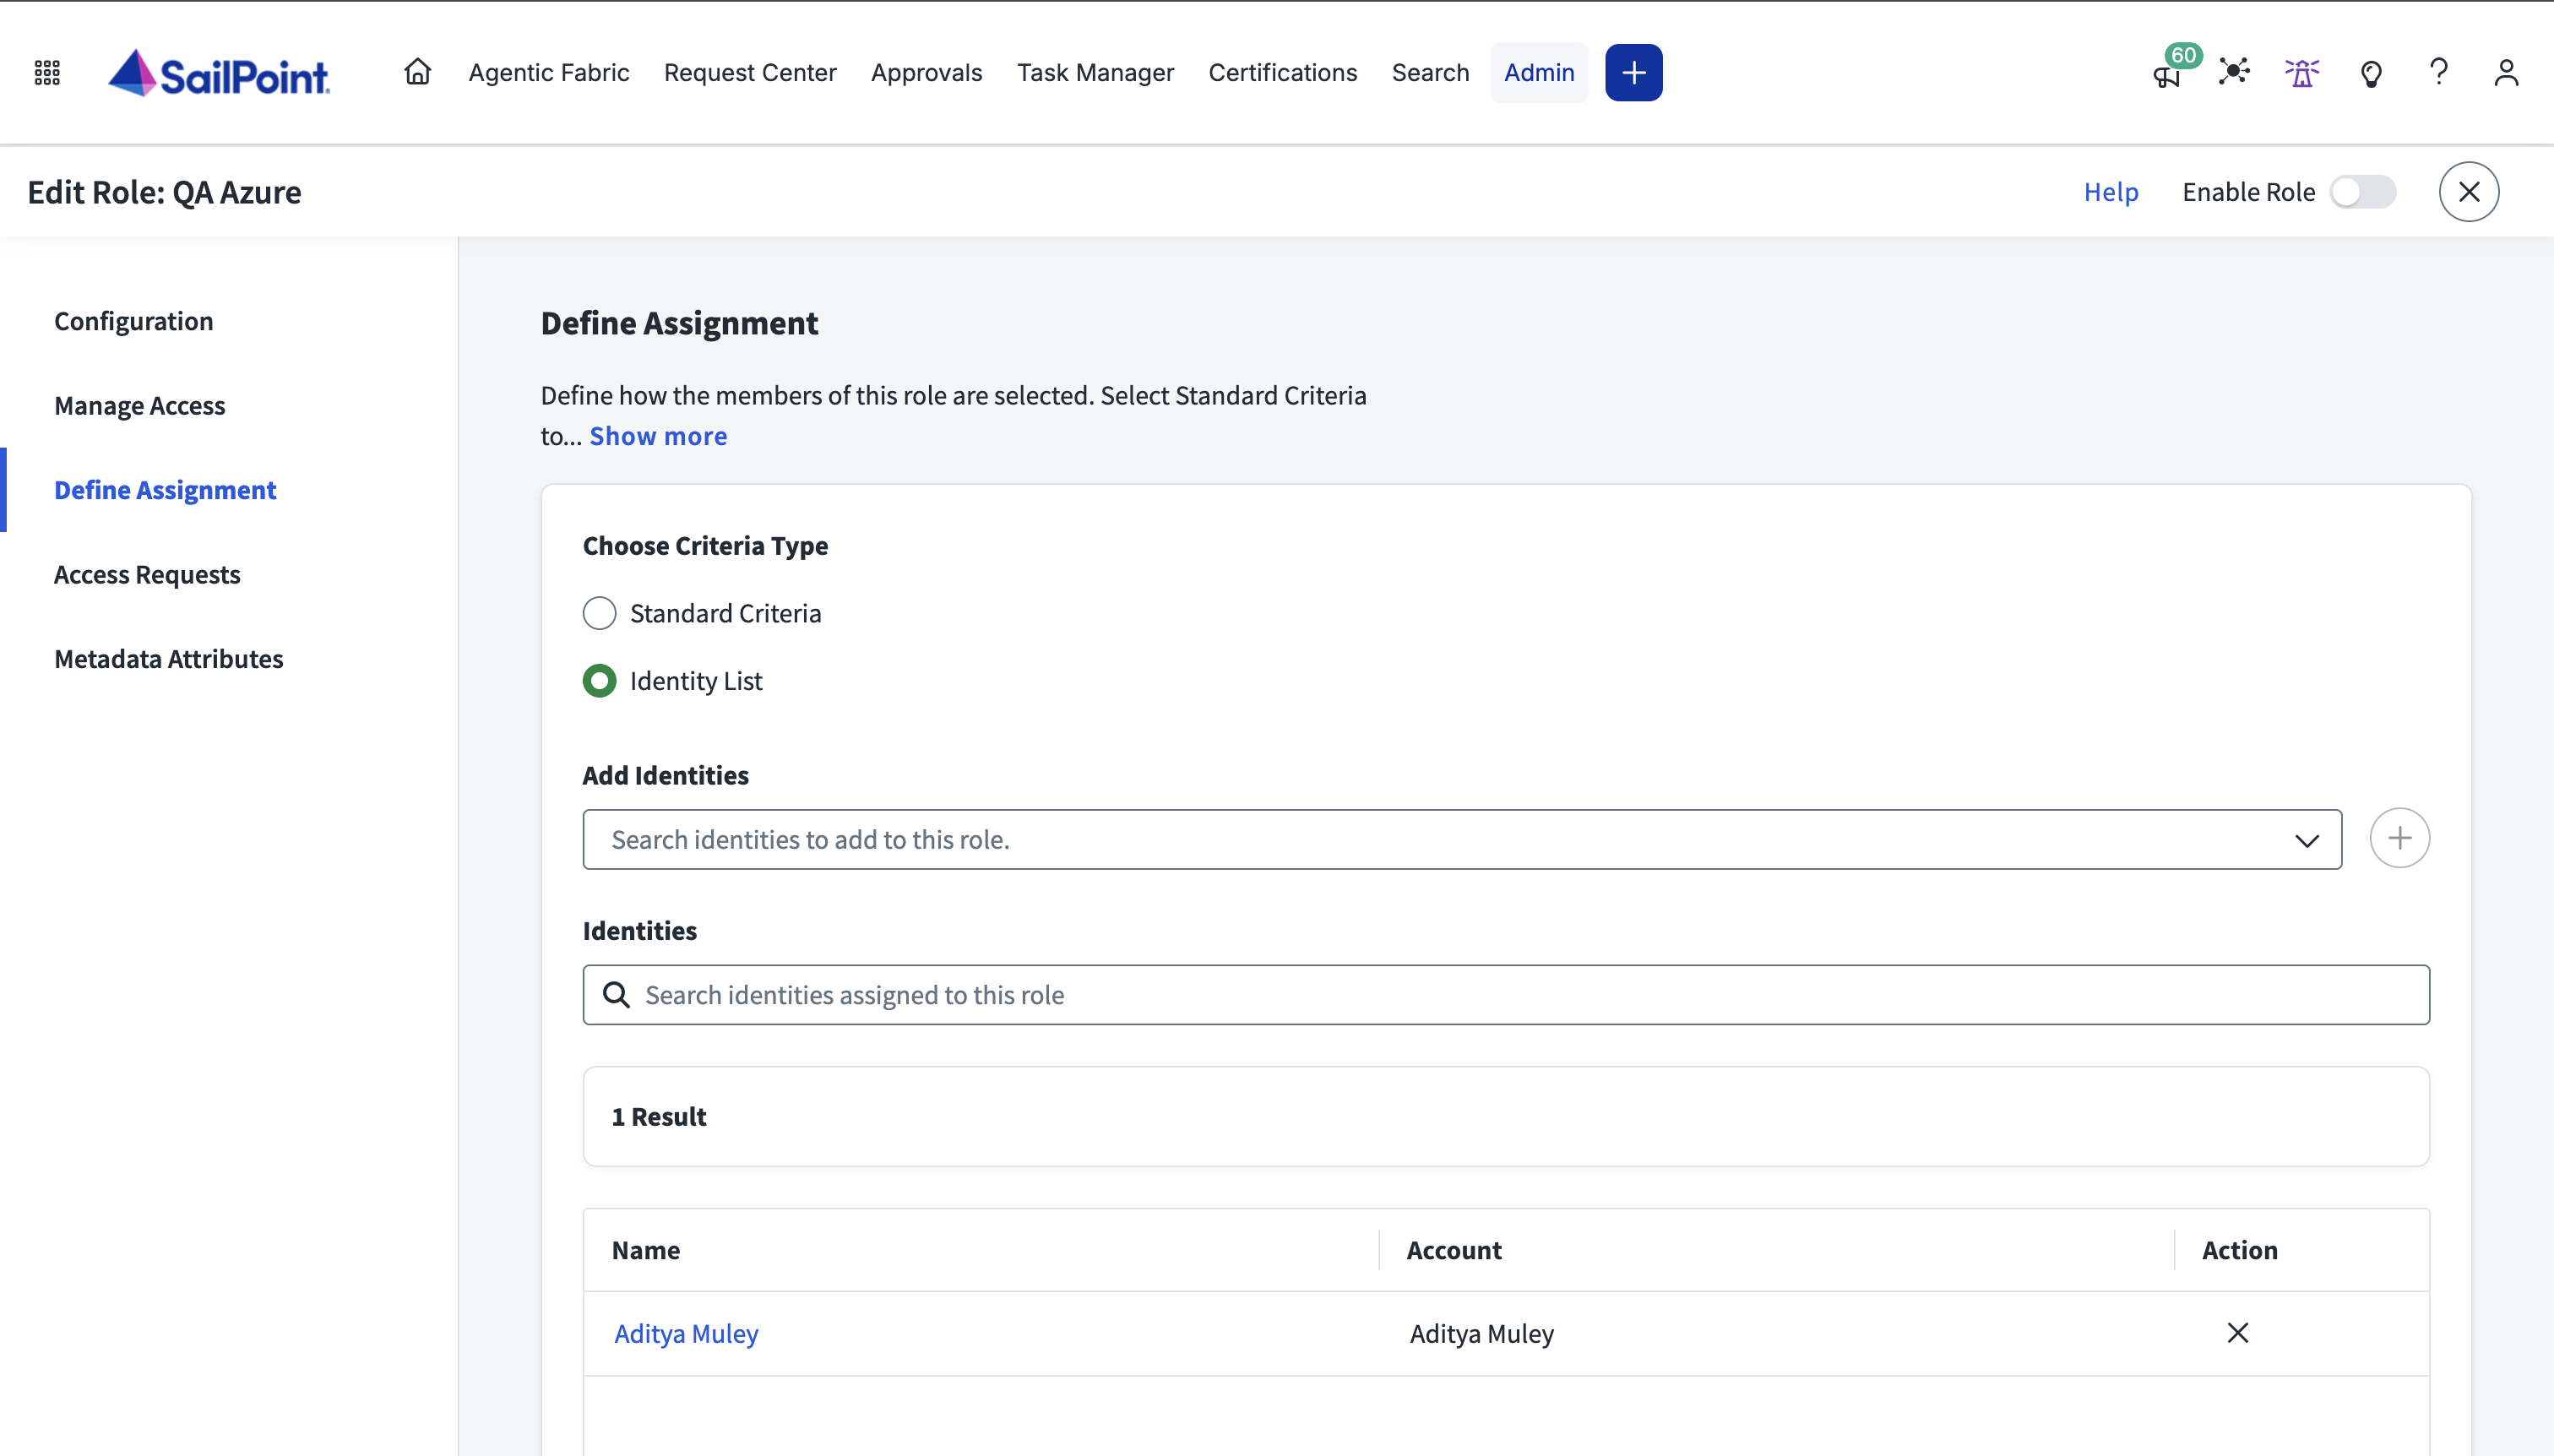
**\[Define Assignment]** をクリックし、エンタイトルメントが必要なアカウントまたはアイデンティティを追加します。

<figure><img src="/files/I4GP94D5oNlASeY1kZ2S" alt=""><figcaption></figcaption></figure>

構成が完了したら、**\[Enable Role]** をオンにして変更を適用します。エンタイトルメントがプロビジョニングされ、SailPointロールで構成したチーム、ロール、レコードがユーザーに割り当てられます。

## トラブルシューティングとログ <a href="#troubleshooting-and-logging" id="troubleshooting-and-logging"></a>

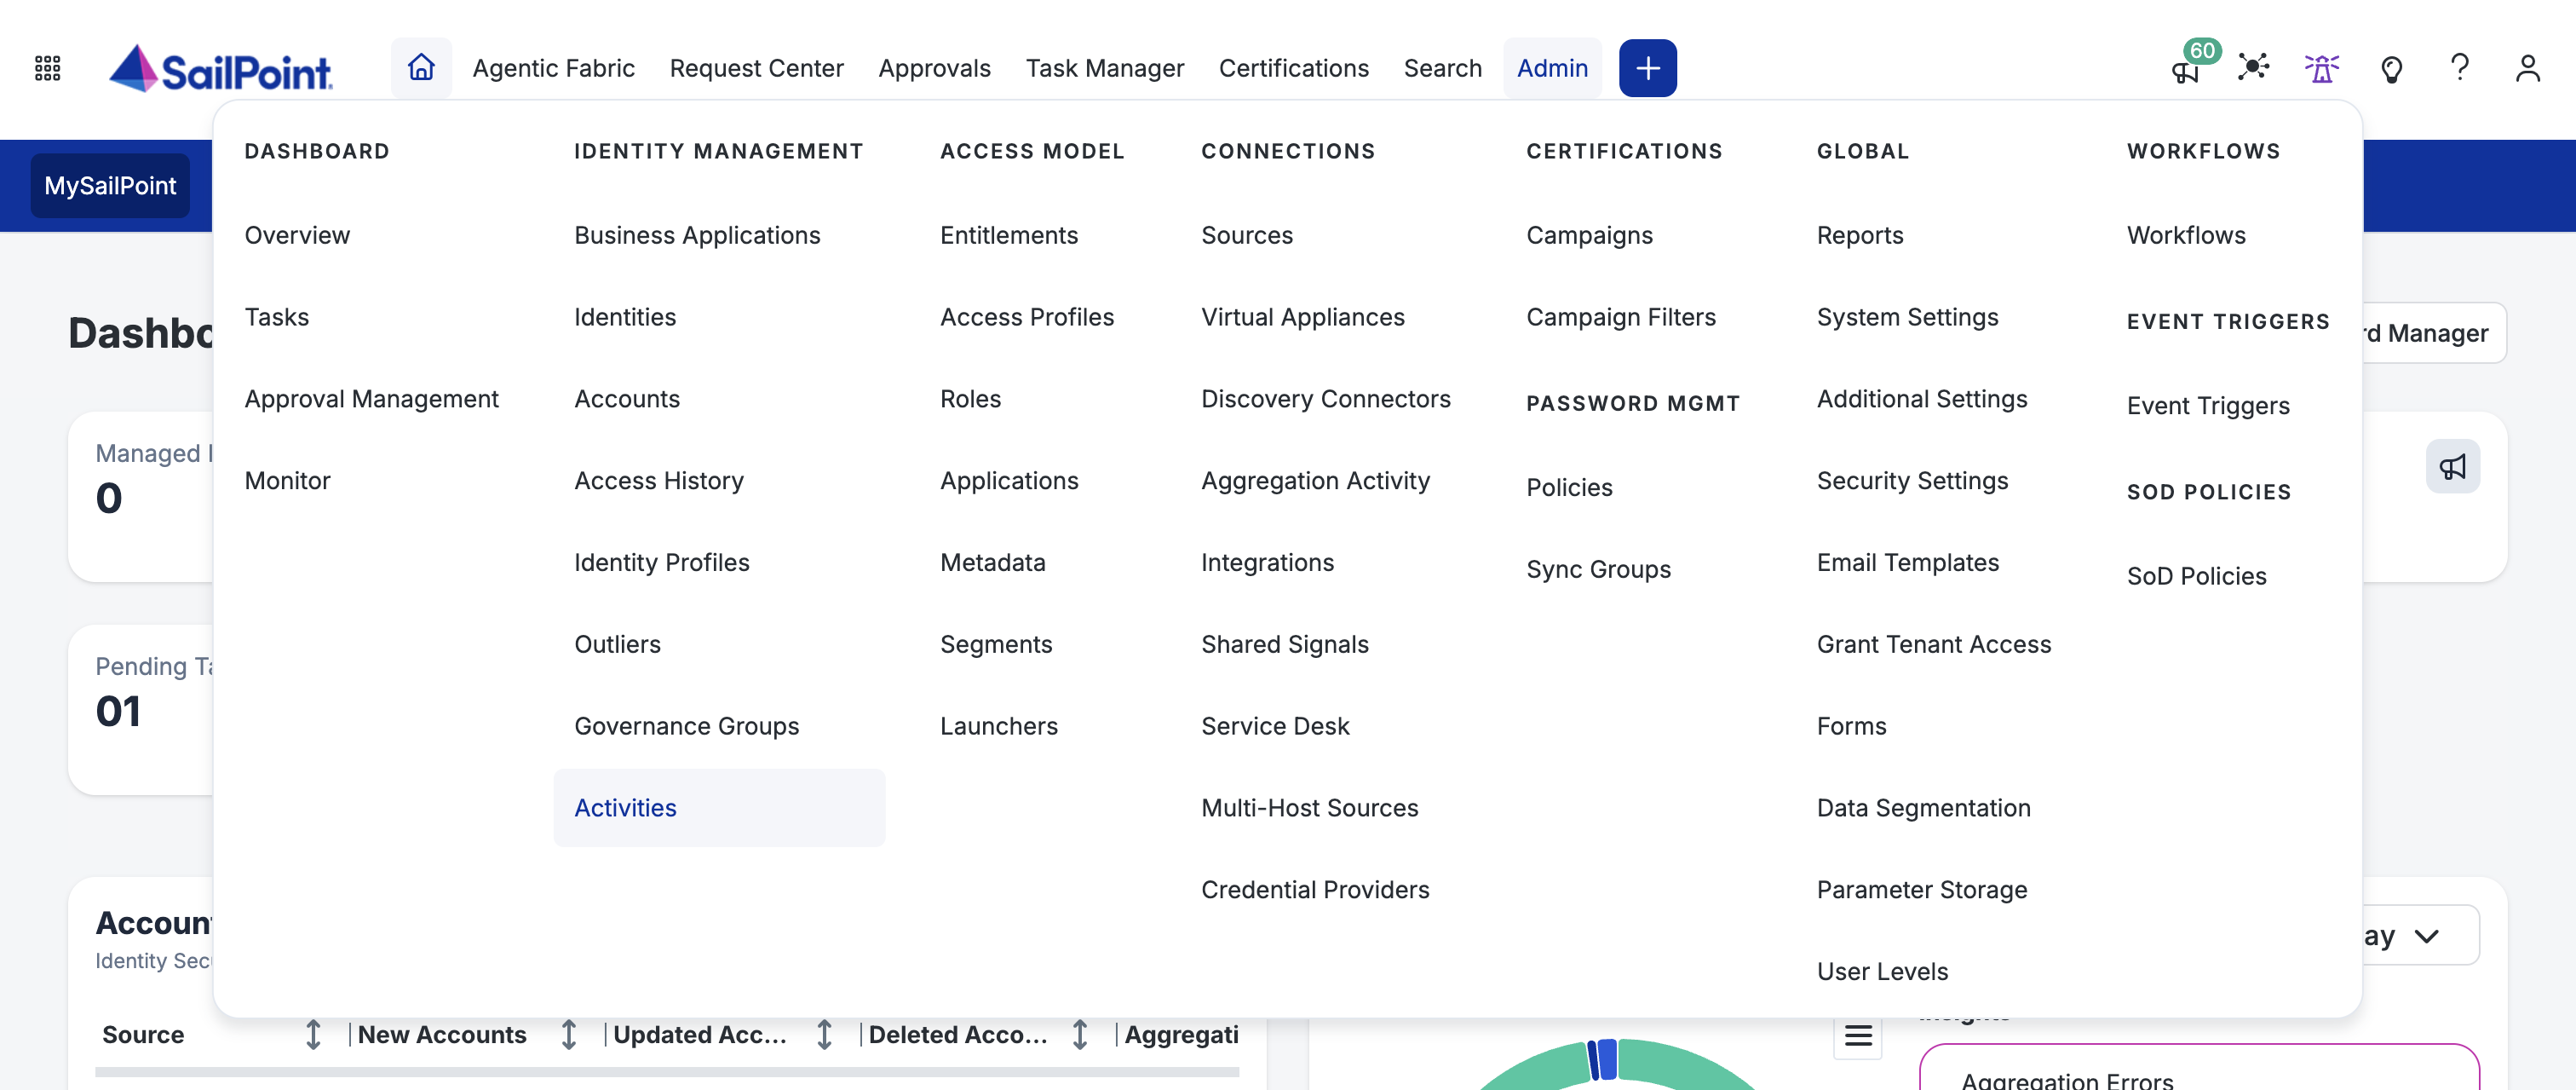
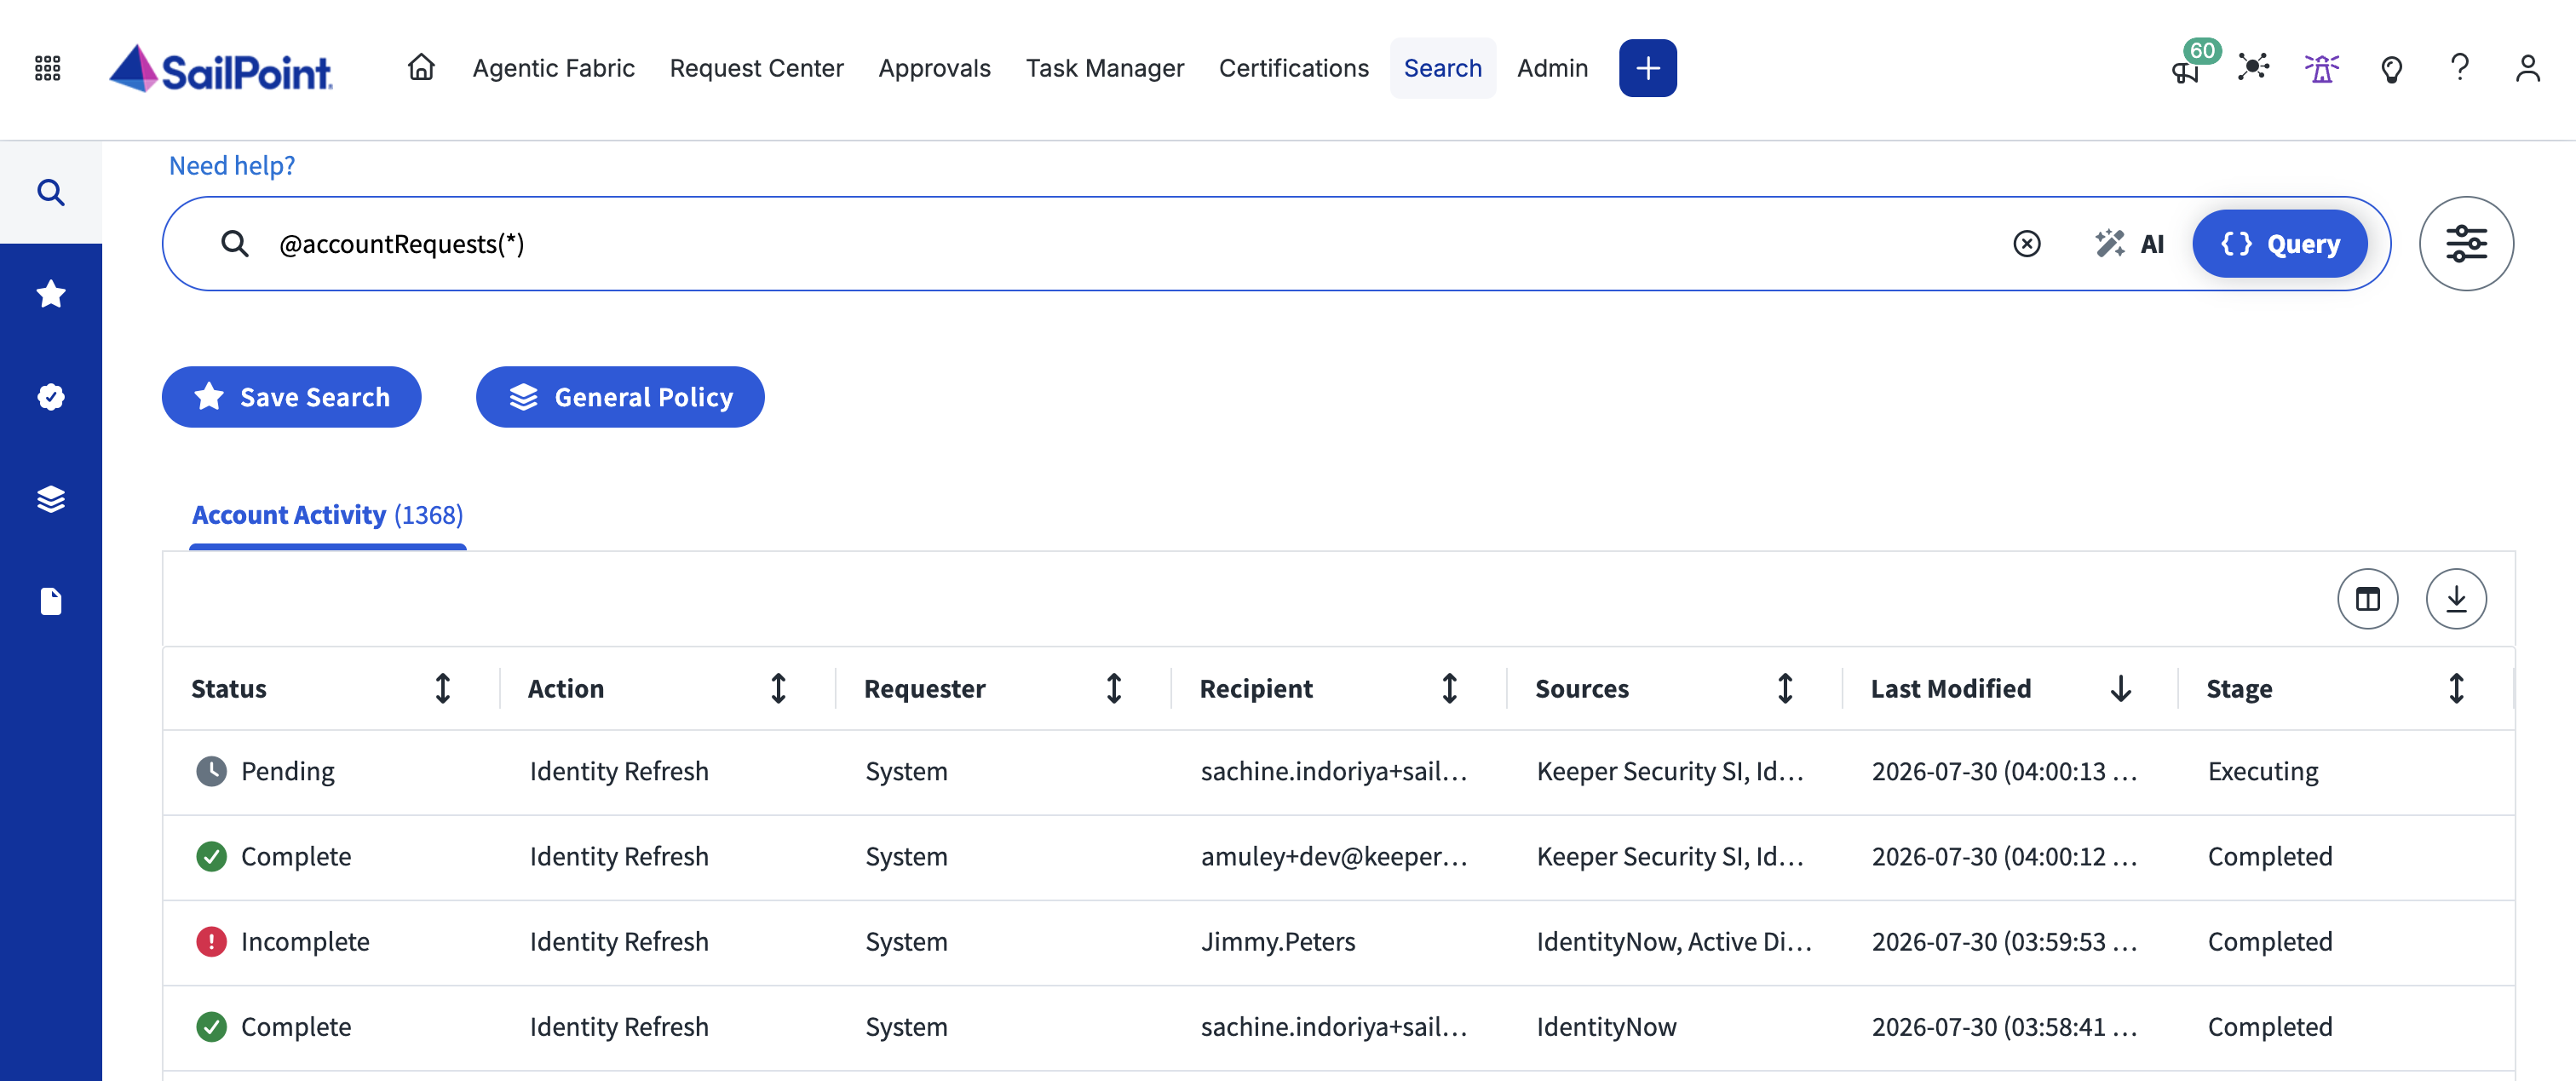
プロビジョニングのアクティビティやエラーは、**\[Admin]** → **\[Identity Management]** → **\[Activities]** で確認できます。

<figure><img src="/files/oOAKCuIYovD2FPVRGEaT" alt=""><figcaption></figcaption></figure>

<figure><img src="/files/AOO2u9xG1zoikzbie6QF" alt=""><figcaption></figcaption></figure>


---

# Agent Instructions
This documentation is published with GitBook. GitBook is the documentation platform designed so that both humans and AI agents can read, navigate, and reason over technical content effectively. Learn more at gitbook.com.

## Querying This Documentation
If you need additional information that is not directly available in this page, you can query the documentation dynamically by asking a question.

Perform an HTTP GET request on the current page URL with the `ask` query parameter, and the optional `goal` query parameter:

```
GET https://docs.keeper.io/keeperpam/jp/secrets-manager/integrations/sailpoint-saas-connector.md?ask=<question>&goal=<endgoal>
```

`ask` is the immediate question: it should be specific, self-contained, and written in natural language.
`goal` is optional and describes the broader end goal you are ultimately trying to accomplish on behalf of the user. GitBook uses it to tailor the answer towards what is most useful for that goal.

The response will contain a direct answer to the question and relevant excerpts and sources from the documentation.

Use this mechanism when the answer is not explicitly present in the current page, you need clarification or additional context, or you want to retrieve related documentation sections.