# Keeper Documentation

End-User Guides, Administrator Guides and Release Notes for All Keeper Products and Services

## <picture><source srcset="/files/A4kt5eYJJsMGEm6c6PRY" media="(prefers-color-scheme: dark)"><img src="/files/S8ku4JyiBDDwuosEXL4x" alt="" data-size="line"></picture> Password Manager

<table data-card-size="large" data-view="cards"><thead><tr><th></th><th></th><th data-hidden data-card-target data-type="content-ref"></th><th data-hidden data-card-cover data-type="files"></th></tr></thead><tbody><tr><td><strong>End-User Guides</strong></td><td>Guides for consumer and business end-users on desktop and mobile devices.</td><td><a href="/spaces/-LSGVtOTYUIkVBoYtFvK">/spaces/-LSGVtOTYUIkVBoYtFvK</a></td><td><a href="/files/OAa77geoisYlnBy3HQcQ">/files/OAa77geoisYlnBy3HQcQ</a></td></tr><tr><td><strong>Enterprise &#x26; MSP Guide</strong></td><td>Administrator guide for Keeper enterprise deployments and managed service providers</td><td><a href="/spaces/-LO5CAzpxoaEquZJBpYz">/spaces/-LO5CAzpxoaEquZJBpYz</a></td><td><a href="/files/srzXEBKDe5VaWINoU8ua">/files/srzXEBKDe5VaWINoU8ua</a></td></tr></tbody></table>

## <img src="/files/dKBGud78SGRh5bnAFgiV" alt="" data-size="line"> Privileged Access Manager

<table data-view="cards"><thead><tr><th></th><th></th><th data-hidden data-card-cover data-type="image">Cover image</th><th data-hidden data-card-target data-type="content-ref"></th></tr></thead><tbody><tr><td><strong>KeeperPAM</strong></td><td>Zero-trust modern privileged access management solution.</td><td><a href="/files/jdXjYqk5F1bfbQvqS7Pl">/files/jdXjYqk5F1bfbQvqS7Pl</a></td><td><a href="/spaces/-MJXOXEifAmpyvNVL1to">/spaces/-MJXOXEifAmpyvNVL1to</a></td></tr><tr><td><strong>Keeper Secrets Manager</strong></td><td>Zero-knowledge platform for securing infrastructure secrets.</td><td><a href="/files/yUEDfb1TPAS8MpzuXgaF">/files/yUEDfb1TPAS8MpzuXgaF</a></td><td><a href="/spaces/-MJXOXEifAmpyvNVL1to/pages/-MPuMkjsjrRQRksAfKBs">/spaces/-MJXOXEifAmpyvNVL1to/pages/-MPuMkjsjrRQRksAfKBs</a></td></tr><tr><td><strong>Keeper Commander</strong></td><td>Command-line tools and SDK interface for admins and power users.</td><td><a href="/files/c8aLnCOa1GADbw1wU4lK">/files/c8aLnCOa1GADbw1wU4lK</a></td><td><a href="/spaces/-MJXOXEifAmpyvNVL1to/pages/-MJXVk80B48JlX_-kFiy">/spaces/-MJXOXEifAmpyvNVL1to/pages/-MJXVk80B48JlX_-kFiy</a></td></tr><tr><td><strong>Endpoint Privilege Manager</strong></td><td>Eliminate standing admin rights and enable Just-in-Time (JIT) across all endpoints</td><td><a href="/files/FBGHCBt09UnqW0nmmCJk">/files/FBGHCBt09UnqW0nmmCJk</a></td><td><a href="/spaces/-MJXOXEifAmpyvNVL1to/pages/CvoSmkUyDrJmejhXBD0P">/spaces/-MJXOXEifAmpyvNVL1to/pages/CvoSmkUyDrJmejhXBD0P</a></td></tr><tr><td><strong>KeeperDB</strong></td><td>Modern multi-protocol database access with KeeperAI threat detection.</td><td><a href="/files/dh0GuezwPZAp96hxMIDs">/files/dh0GuezwPZAp96hxMIDs</a></td><td><a href="/spaces/-MJXOXEifAmpyvNVL1to/pages/LO5Rhz7iaqW6nCezIFTp">/spaces/-MJXOXEifAmpyvNVL1to/pages/LO5Rhz7iaqW6nCezIFTp</a></td></tr><tr><td><strong>Connection Manager</strong></td><td>Self-hosted agentless Connection Manager for instant and secure access.</td><td><a href="/files/auW1rWyYgPH7QTGeuxzK">/files/auW1rWyYgPH7QTGeuxzK</a></td><td><a href="/spaces/b7weUpu7VBcMnESSH8vG/pages/QyrcI8cNKXM93mCV0QHE">/spaces/b7weUpu7VBcMnESSH8vG/pages/QyrcI8cNKXM93mCV0QHE</a></td></tr></tbody></table>

## <img src="/files/9GrW4DYE7wd2uCaj8Fpm" alt="" data-size="line"> Enterprise Applications

<table data-card-size="large" data-view="cards"><thead><tr><th></th><th></th><th data-hidden data-card-cover data-type="image">Cover image</th><th data-hidden data-card-target data-type="content-ref"></th></tr></thead><tbody><tr><td><strong>AD Bridge</strong></td><td>Active Directory / LDAP provisioning for users, roles, teams.</td><td><a href="/files/ztqdRdXox2zNsFTmxzCC">/files/ztqdRdXox2zNsFTmxzCC</a></td><td><a href="/spaces/-LU7OPCLsEVoxlYAD7eo">/spaces/-LU7OPCLsEVoxlYAD7eo</a></td></tr><tr><td><strong>SSO Connect Cloud</strong></td><td>Authenticate users with any SAML 2.0 Identity Provider.</td><td><a href="/files/cDY62vC8JR3heSSkiyAC">/files/cDY62vC8JR3heSSkiyAC</a></td><td><a href="/spaces/-MB_i6vKdtG6Z2n6zWgJ">/spaces/-MB_i6vKdtG6Z2n6zWgJ</a></td></tr><tr><td><strong>SSO Connect On-Prem</strong></td><td>Legacy on-prem integration with SAML 2.0 Identity Providers.</td><td><a href="/files/5bpV5YQRVnWHdsw6kysA">/files/5bpV5YQRVnWHdsw6kysA</a></td><td><a href="/spaces/-LTyMp7XGU8wh-hRPBiB">/spaces/-LTyMp7XGU8wh-hRPBiB</a></td></tr><tr><td><strong>Keeper Forcefield</strong></td><td>Protection against infostealers and memory-based attacks on Windows.</td><td><a href="/files/fB80uDRI749mzBxexy9m">/files/fB80uDRI749mzBxexy9m</a></td><td><a href="/spaces/-LO5CAzpxoaEquZJBpYz/pages/sJTI7C38juA1X50drtEj">/spaces/-LO5CAzpxoaEquZJBpYz/pages/sJTI7C38juA1X50drtEj</a></td></tr></tbody></table>

## <img src="/files/KmWmm4f8i3smq26pKtQm" alt="" data-size="line"> Resources

<table data-view="cards"><thead><tr><th></th><th></th><th data-hidden data-card-cover data-type="files"></th><th data-hidden data-card-target data-type="content-ref"></th></tr></thead><tbody><tr><td><strong>Release Notes</strong></td><td>Full release notes and version history across Keeper platforms.</td><td><a href="/files/HrQtBgswMS170CffZhNJ">/files/HrQtBgswMS170CffZhNJ</a></td><td><a href="/spaces/-LSGErxSfzX6xZALob42">/spaces/-LSGErxSfzX6xZALob42</a></td></tr><tr><td><strong>Security &#x26; Encryption</strong></td><td>Read about Keeper's security and encryption model.</td><td><a href="/files/SNl0Bf37j5EOXnYB8SxG">/files/SNl0Bf37j5EOXnYB8SxG</a></td><td><a href="/spaces/-LO5CAzpxoaEquZJBpYz/pages/-LcHVruWHkJETCMoKbzL">/spaces/-LO5CAzpxoaEquZJBpYz/pages/-LcHVruWHkJETCMoKbzL</a></td></tr><tr><td><strong>System Status</strong></td><td>Live system status, monitoring and alerts with notification signup.</td><td><a href="/files/lwtpXGfVh5TQIw48Lgw5">/files/lwtpXGfVh5TQIw48Lgw5</a></td><td><a href="https://statuspage.keeper.io/">https://statuspage.keeper.io/</a></td></tr></tbody></table>


# Keeper End-User Guides

Guides for consumer and business end-users on desktop and mobile devices.

<figure><img src="/files/ta15R9ZEYy6Jz9L6KC03" alt=""><figcaption></figcaption></figure>

## About Our Security

Keeper is a Zero-Knowledge platform. The data stored in a Keeper vault is encrypted and decrypted locally on the user’s device. Check out this blog article which reviews how Keeper protects your information:

{% embed url="<https://www.keepersecurity.com/blog/2023/01/09/how-does-keeper-protect-your-data-security-and-transparency/>" %}

For a more in-depth technical description of our [encryption model documentation](/enterprise-guide/keeper-encryption-model).

Keeper Security employees have no ability to decrypt customer data, because the encryption keys are managed by the customer. In addition to zero knowledge architecture, Keeper supports a number of two-factor authentication methods including FIDO2 WebAuthn devices, Google Authenticator, Microsoft Authenticator and SMS. Keeper Security is SOC2 Certified, ISO 27001, 27017 and 27018 certified, FedRAMP Authorized, StateRAMP authorized.

## **User Guides**

* [**Web Vault & Desktop App**](/user-guides/web-vault)
* [**KeeperFill for Apps**](/user-guides/keeperfill-for-apps)
* [**KeeperFill for Chrome**](/user-guides/browser-extensions/keeperfill-for-chrome-and-brave)
* [**KeeperFill for Firefox**](/user-guides/browser-extensions/keeperfill-for-firefox)
* [**KeeperFill for Safari**](/user-guides/browser-extensions/keeperfill-for-safari)
* [**KeeperFill for Edge**](/user-guides/browser-extensions/keeperfill-for-edge)
* [**KeeperFill for Opera**](/user-guides/browser-extensions/keeperfill-for-opera)
* [**iOS**](/user-guides/ios)
  * [**Autofill & Passkey Setup for iOS**](/user-guides/autofill-setup-for-ios)
* [**Android**](/user-guides/android)
  * [**Autofill & Passkey Setup for Android**](/user-guides/autofill-setup-for-android)
* [**Passkeys**](/user-guides/passkeys)
* [**Enterprise End-User Setup (Master Password Login)**](/user-guides/enterprise-end-user-setup-master-password)
* [**Enterprise End-User Setup (SSO Login)**](/user-guides/enterprise-end-user-setup-sso)
* [**Command-line CLI (Commander)**](/keeperpam/commander-cli/overview)

## **Enterprise Guides**

* [**Enterprise Admin**](https://docs.keeper.io/enterprise-guide/)
* [**KeeperMSP**](/enterprise-guide/keeper-msp)
* [**SSO Connect Cloud**](/sso-connect-cloud/overview)
* [**Keeper Secrets Manager**](/keeperpam/secrets-manager/overview)
* [**Keeper Commander**](/keeperpam/commander-cli/overview)
* [**Keeper Connection Manager**](https://docs.keeper.io/keeper-connection-manager/)
* [**Active Directory Bridge**](https://docs.keeper.io/keeper-bridge/)

## **Helpful Links**

* [**Release Notes**](https://docs.keeper.io/release-notes/)
* [**System Status**](https://statuspage.keeper.io/)


# System Requirements

The system requirements for Keeper applications are listed below.

### Compatibility

Keeper works on every smartphone, tablet and computer. Keeper supports popular browsers including Chrome, Safari, Firefox, Edge, Opera, Brave and IE. Native app installation is available from the [Keeper website](https://keepersecurity.com/download) and every public-facing app store (iTunes, Google Play, Microsoft Store, etc).

| **Device**          | **OS Version Supported**                      |
| ------------------- | --------------------------------------------- |
| Windows Desktop App | 11+                                           |
| Mac OS Desktop App  | Current Version - 2                           |
| Linux Desktop App   | Fedora, Red Hat, CentOS, Debian, Ubuntu, Mint |
| iOS App             | 14+                                           |
| Android App         | 9+                                            |
| Chrome OS           | Current Version - 2                           |
| Edge                | Current Version - 2                           |
| Safari              | Current Version - 2                           |
| Firefox             | Current Version - 2                           |
| Opera               | Current Version - 2                           |
| Brave               | Current Version - 2                           |
| Internet Explorer   | Not Supported                                 |

{% hint style="info" %}
The latest Keeper downloads can be found at [https://keepersecurity.com/download](https://keepersecurity.com/download.html)
{% endhint %}

***

## Keeper Web Vault

The Keeper Web Vault is a fully featured web-based application. To access the Keeper Web Vault login, visit:

**US Data Center**\
<https://keepersecurity.com/vault>

**US Public Sector / GovCloud**\
<https://govcloud.keepersecurity.us/vault>

**EU Data Center**\
<https://keepersecurity.eu/vault>

**AU Data Center**\
<https://keepersecurity.com.au/vault>

**CA Data Center**\
<https://keepersecurity.ca/vault>

**JP Data Center**\
<https://keepersecurity.jp/vault>

***

## Keeper Desktop Application

Keeper Desktop is a cross-platform native desktop application for Windows, MacOS and Linux. Several installer files are provided at the links below.

### Download Options

* **Windows AppInstaller**\
  [Install Link](https://www.keepersecurity.com/desktop_electron/packages/KeeperPasswordManager.appinstaller)<br>
* **Microsoft Store**\
  [Microsoft Store Link](https://apps.microsoft.com/detail/keeper-password-manager/9N040SRQ0S8C?hl=en-us\&gl=US)
* **Mac OS .dmg**\
  [Install Link (.dmg)](https://www.keepersecurity.com/desktop_electron/Darwin/KeeperSetup.dmg)<br>
* **Mac App Store**\
  [Mac App Store Link](https://apps.apple.com/us/app/keeper-password-manager/id414781829?mt=12)<br>
* **Linux Fedora, Red Hat, CentOS, Debian, Ubuntu and Linux Mint**\
  [Download Page Link](https://www.keepersecurity.com/download.html)<br>
* **Snap Store for Linux**\
  <https://snapcraft.io/keepersecurity>

#### Enterprise Installation

See the [Keeper Enterprise Guide](/enterprise-guide/deploying-keeper-to-end-users/desktop-application) for more advanced deployment options.

#### Checksum / Hash

Keeper Desktop SHA1 hashes for the latest version can be retrieved here:\
<https://keepersecurity.com/desktop_electron/SHASUM256.txt>

***

## Mobile App

### iOS

Keeper for iOS can be installed directly from the App Store:

{% embed url="<https://apps.apple.com/us/app/keeper-password-manager/id287170072>" %}

### Android

Keeper for Android can be installed from the Google Play application at the link below:

{% embed url="<https://play.google.com/store/apps/details?id=com.callpod.android_apps.keeper>" %}

***

## KeeperFill Browser Extension

The latest Browser extensions can be installed by users at the links below:\
\
**Chrome, Brave, Opera:**\
<https://chrome.google.com/webstore/detail/keeper%C2%AE-password-manager/bfogiafebfohielmmehodmfbbebbbpei>\
\
**Firefox:**\
[https://addons.mozilla.org/en-US/firefox/addon/keeper-password-manager/](https://addons.mozilla.org/en-US/firefox/addon/keeper-password-manager/?utm_source=addons.mozilla.org\&utm_medium=referral\&utm_content=search)

**Edge:**\
<https://microsoftedge.microsoft.com/addons/detail/keeper%C2%AE-password-manager-/lfochlioelphaglamdcakfjemolpichk>

**Safari:**\
<https://apps.apple.com/us/app/keeper-for-safari/id6444685332>

***

## Enterprise Deployment

For Keeper Enterprise administrators, please see the link below for Enterprise deployment options:

[Deploying Keeper to End-Users](/enterprise-guide/deploying-keeper-to-end-users)


# Quick Start Guides

The following Quick Start Guides will walk you through the setup steps and main features of Keeper for Web Vault & Desktop App, iOS, and Android.

* [**Web Vault & Desktop App**](/user-guides/quick-start-guides/quick-start-guide)
* [**iOS - iPhone & iPad**](/user-guides/quick-start-guides/ios-iphone-ipad)
* [**Android - Phone & Tablet**](/user-guides/quick-start-guides/android)
* [**BreachWatch**](/user-guides/breachwatch)
* [**Secure File Storage**](/user-guides/secure-file-storage)
* [**Keeper Family Plan**](/user-guides/keeper-family-plan#overview-and-benefits)
* [**KeeperFill for Apps**](/user-guides/keeperfill-for-apps)
* [**Import Passwords from Browsers**](/user-guides/import-records-1/import-from-chrome-firefox-ie-edge-and-opera)
* [**Tips & Tricks**](/user-guides/tips-and-tricks)
* [**Troubleshooting**](/user-guides/troubleshooting)


# Web Vault & Desktop App

This Quick Start Guide will walk you through the setup steps and main features of the Keeper Web Vault & Desktop App, linking additional resources throughout for more detailed instructions.

## Set Up Steps

Here we'll cover the important setup steps and key features that will help get you up and running with Keeper in no time.

{% stepper %}
{% step %}
[<mark style="color:$primary;">**Download Keeper**</mark>](#cross-platform-downloads)

We recommend downloading Keeper's [browser extension](https://www.keepersecurity.com/download.html?t=f), [desktop](https://www.keepersecurity.com/download.html?t=d) and [mobile](https://www.keepersecurity.com/download.html?t=m) apps so you have access to your records and KeeperFill across your desktop, browsers and devices.
{% endstep %}

{% step %}
[<mark style="color:$primary;">**Import Your Passwords**</mark>](#import-your-passwords-1)

Save time and seamlessly migrate your existing logins from browsers, files and other password managers. If you don't have any existing passwords saved or if you would rather start fresh, you can skip this step.
{% endstep %}

{% step %}
[<mark style="color:$primary;">**Disable Your Browser's Password Manager**</mark>](#disable-your-browsers-password-saving-features)

We strongly recommend that you disable your browser's built-in password saving features so that it doesn't interfere with Keeper. Keeper provides a far more secure and seamless solution to save and autofill your passwords.
{% endstep %}

{% step %}
[<mark style="color:$primary;">**Enable Security & Recovery Features**</mark>](#set-up-account-recovery)

Protect your vault with two-factor authentication (2FA) and set up Account Recovery in case you ever forget your Master Password.
{% endstep %}

{% step %}
[<mark style="color:$primary;">**Create Records and Folders**</mark>](#create-your-first-record)

Now it's time to create your first record and organize your vault into folders and subfolders.
{% endstep %}

{% step %}
[<mark style="color:$primary;">**Autofill Your Passwords With KeeperFill**</mark>](#begin-autofilling-your-passwords)

The KeeperFill Browser Extension allows you to autofill your passwords into websites and apps. KeeperFill also makes it easy to change the existing passwords stored in your vault with just a few clicks.
{% endstep %}

{% step %}
[<mark style="color:$primary;">**Explore More Features**</mark>](#explore-other-features-1)

Now that you are up and running, its time to explore all the other features Keeper has to offer.
{% endstep %}
{% endstepper %}

## **Create Your Account & Log In**

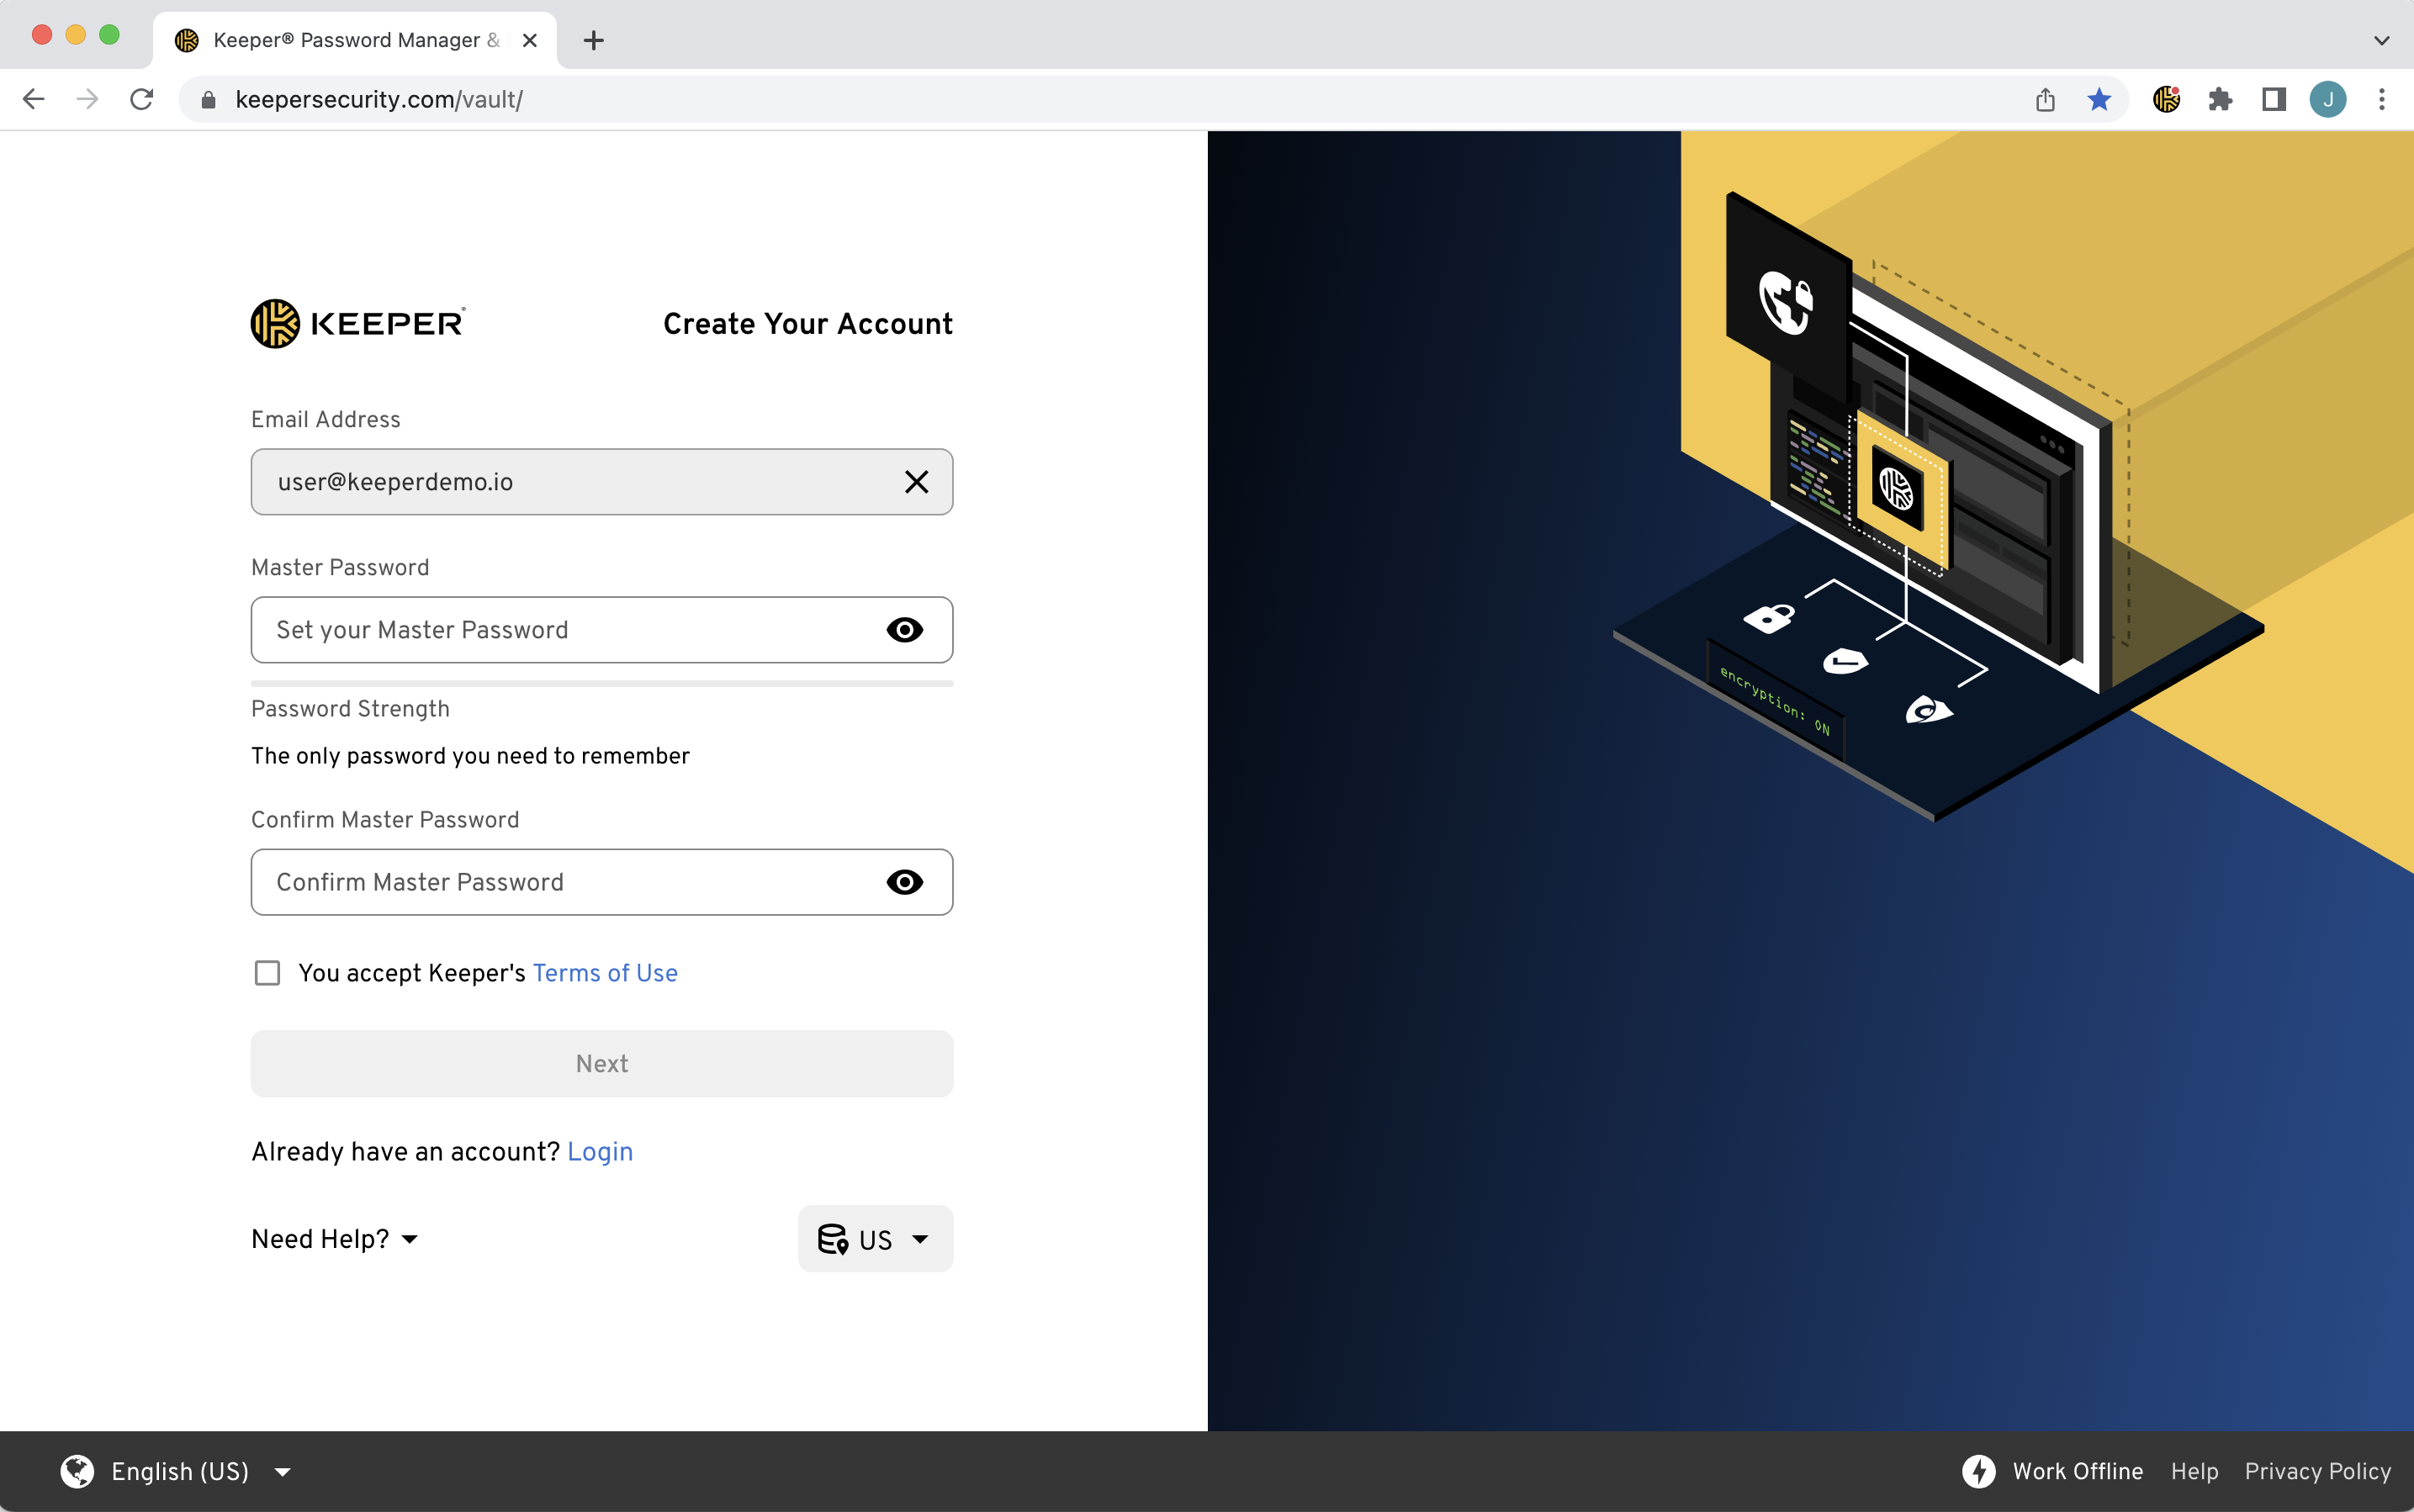
To create your Keeper account, first enter your email address then you will be asked to create and confirm a **Master Password** which will be the only password you have to remember. We recommend that you choose a strong Master Password that is only used for Keeper — don't forget your Master Password!

Next, you will be asked to verify your email address by entering the security **verification code** that was sent to your email. Once verified, you will enter your Master Password and log in.

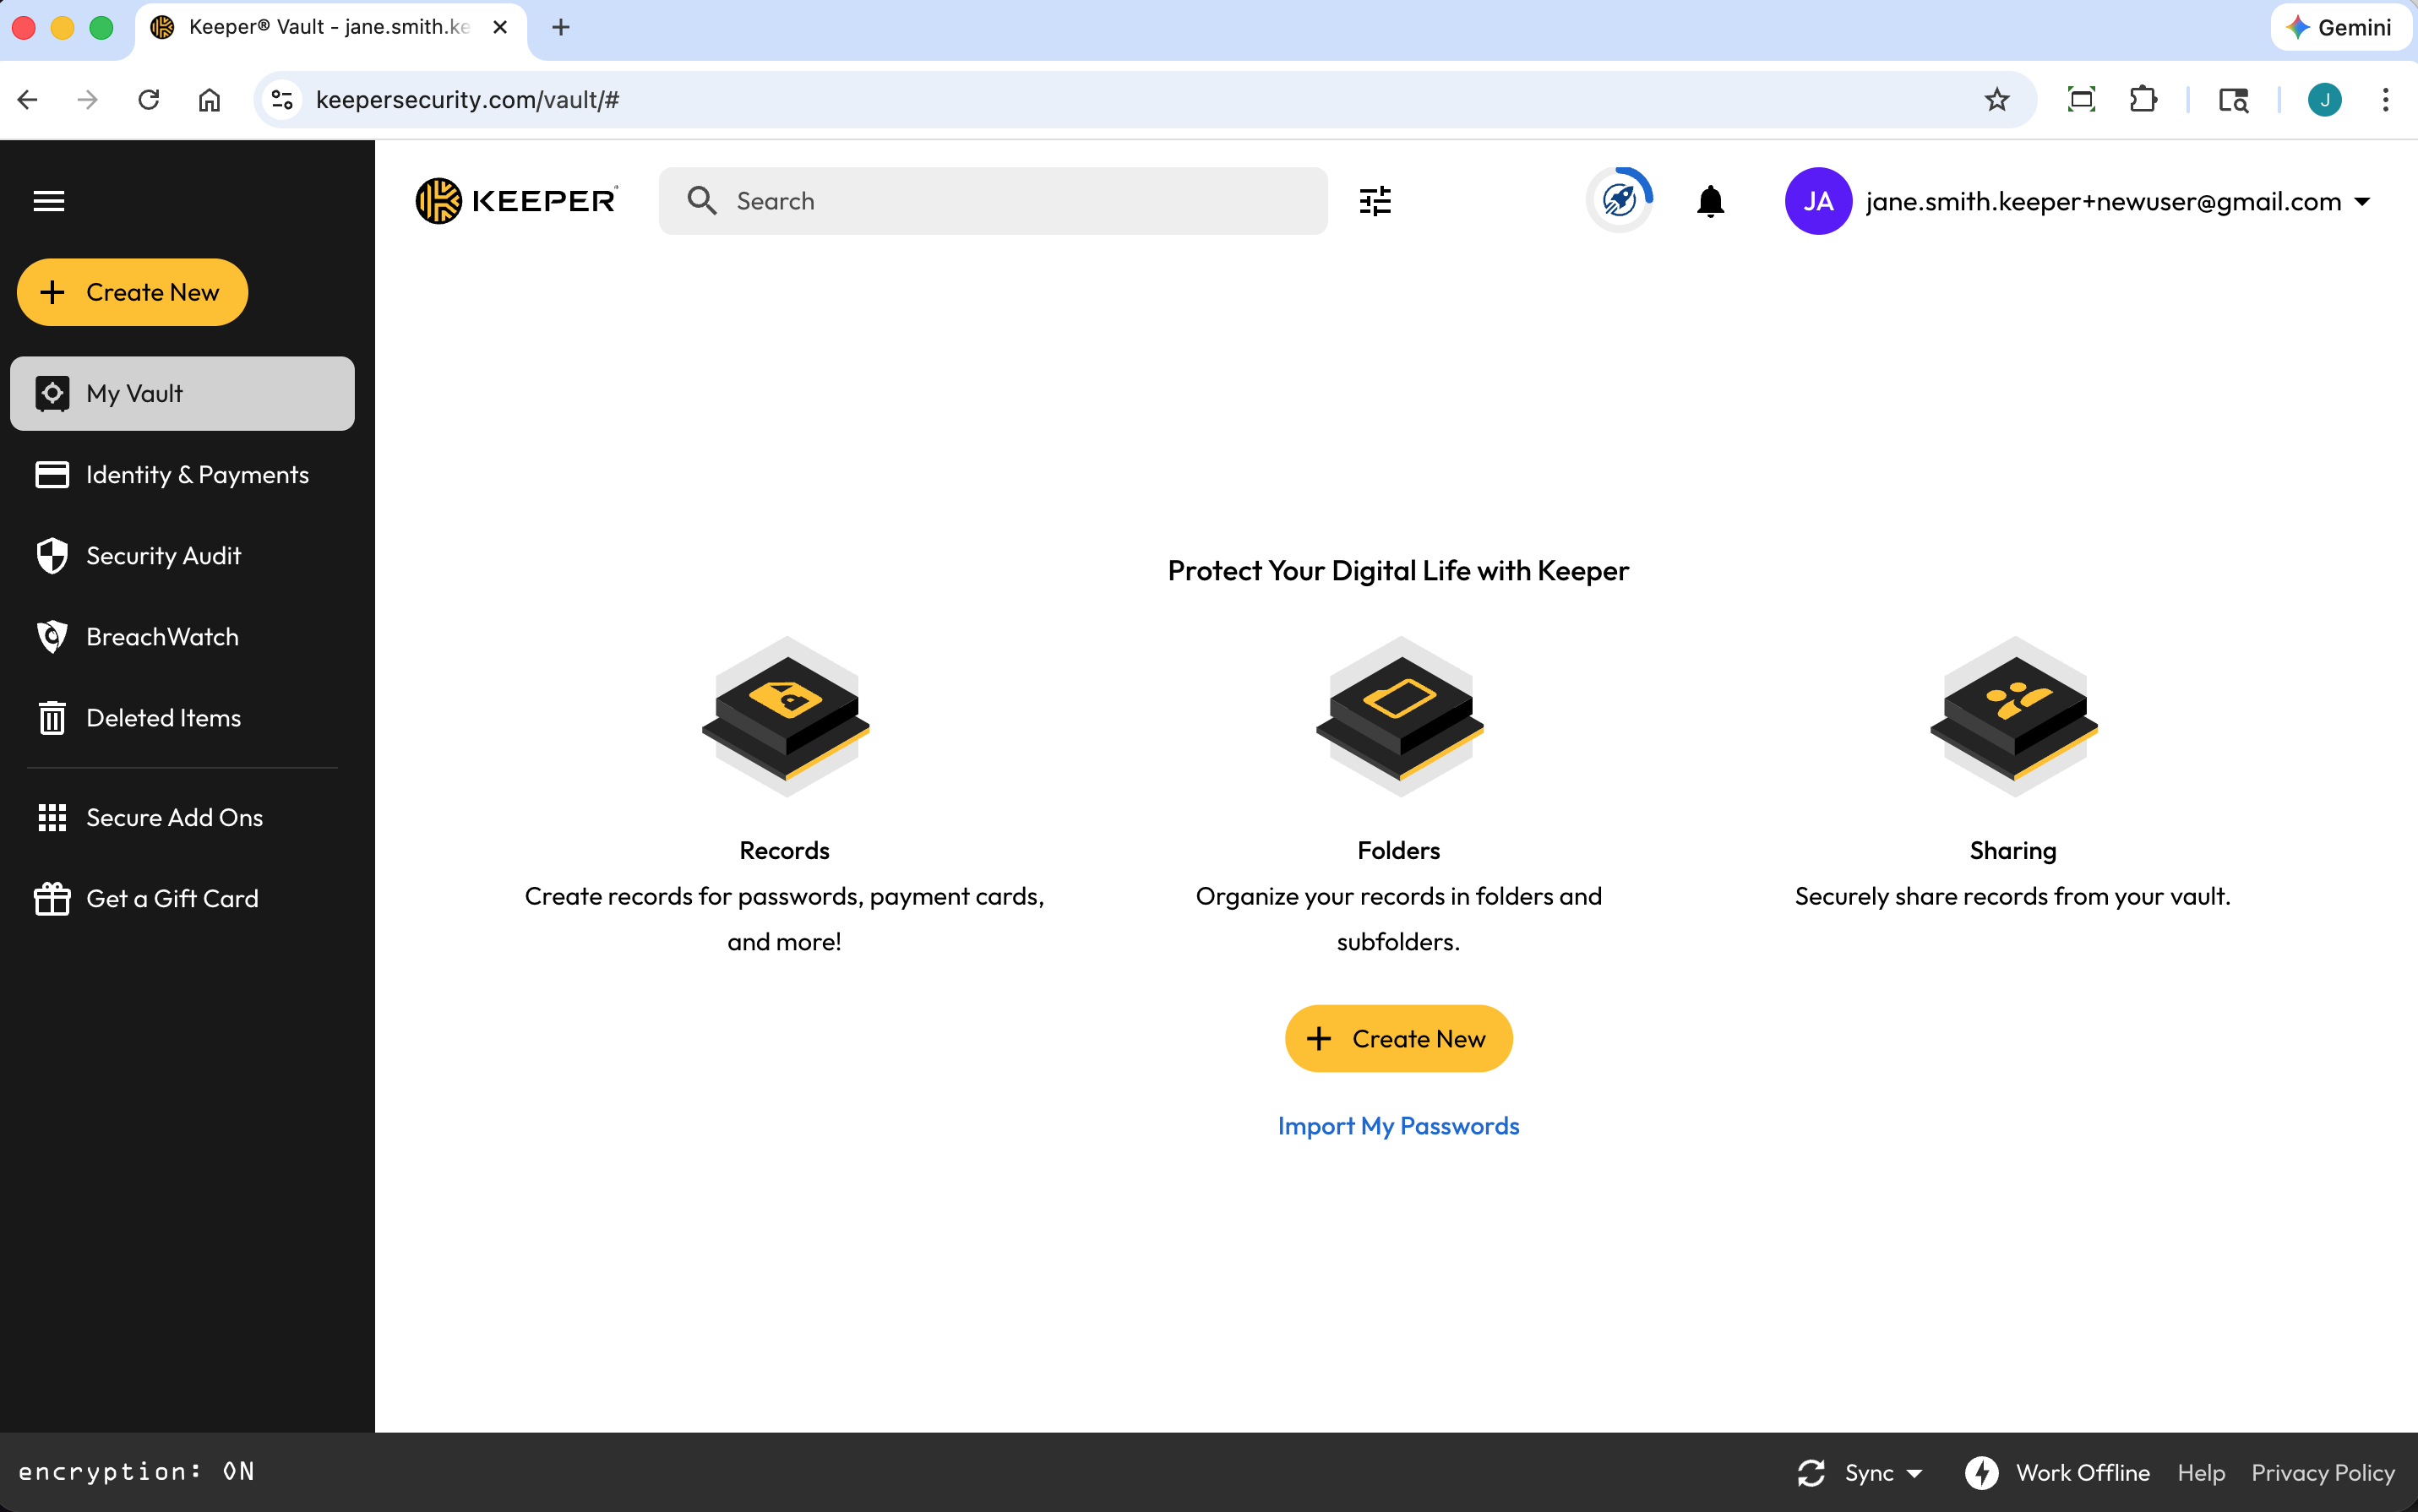
![Create Your Keeper Account](https://914511346-files.gitbook.io/~/files/v0/b/gitbook-x-prod.appspot.com/o/spaces%2F-LSGVtOTYUIkVBoYtFvK%2Fuploads%2FE4qMzGMK3jC0bs3gwuq5%2FScreenshot%202026-02-27%20at%2010.22.42%E2%80%AFAM.png?alt=media\&token=050538de-a727-491d-b163-d0f4e561c947)

<figure><img src="https://914511346-files.gitbook.io/~/files/v0/b/gitbook-x-prod.appspot.com/o/spaces%2F-LSGVtOTYUIkVBoYtFvK%2Fuploads%2FAL1al3tjhDffQJen518N%2FScreenshot%202026-02-27%20at%2010.25.56%E2%80%AFAM.png?alt=media&#x26;token=20981afd-e6cc-4e8c-860b-321e5509c68d" alt=""><figcaption></figcaption></figure>

{% embed url="<https://vimeo.com/585496888>" %}
Create Your Account
{% endembed %}

## Cross-Platform Downloads

Visit our [Download page](https://www.keepersecurity.com/download.html?t=d) to enjoy Keeper across your browsers, desktop and mobile devices.

<figure><img src="https://914511346-files.gitbook.io/~/files/v0/b/gitbook-x-prod.appspot.com/o/spaces%2F-LSGVtOTYUIkVBoYtFvK%2Fuploads%2FbvbyDt3DM5sQwLS99Uyx%2FScreenshot%202026-02-18%20at%201.27.50%E2%80%AFPM.png?alt=media&#x26;token=5c820bc9-1c03-4751-8367-916be094b1c3" alt=""><figcaption><p>keepesecurity.com/download</p></figcaption></figure>

#### Keeper Desktop & Mobile Applications (iOS, Android)

Download [Keeper's Desktop App](https://www.keepersecurity.com/download.html?t=d) which supports iCloud Keychain and automatic import from other password managers as well as TouchID on supported hardware.

Download the Keeper mobile app — simply visit the [App Store](https://apps.apple.com/us/app/keeper-password-manager-digital/id287170072) or [Google Play Store](https://play.google.com/store/apps/details?id=com.callpod.android_apps.keeper) on your mobile device and install **Keeper Password Manager.**

#### KeeperFill Browser Extension

Download [Keeper's Browser Extension](https://www.keepersecurity.com/download.html?t=f) to autofill your logins and password into websites and apps.

<figure><img src="https://914511346-files.gitbook.io/~/files/v0/b/gitbook-x-prod.appspot.com/o/spaces%2F-LSGVtOTYUIkVBoYtFvK%2Fuploads%2FFxlCu7dpoTeSwVLk7qud%2Fimage%20(7).png?alt=media&#x26;token=9431b5de-2ed2-4a0b-aa06-6c36cf7d967c" alt=""><figcaption></figcaption></figure>

Browser-specific setup instructions can be found here:

* [KeeperFill for Chrome & Brave](/user-guides/browser-extensions/keeperfill-for-chrome-and-brave)
* [KeeperFill for Firefox](/user-guides/browser-extensions/keeperfill-for-firefox)
* [KeeperFill for Safari](/user-guides/browser-extensions/keeperfill-for-safari)
* [KeeperFill for Edge](/user-guides/browser-extensions/keeperfill-for-edge)
* [KeeperFill for Opera](/user-guides/browser-extensions/keeperfill-for-opera)

{% hint style="info" %}
**Click** [**here**](/user-guides/browser-extensions) **learn more about the KeeperFill Browser Extension.**
{% endhint %}

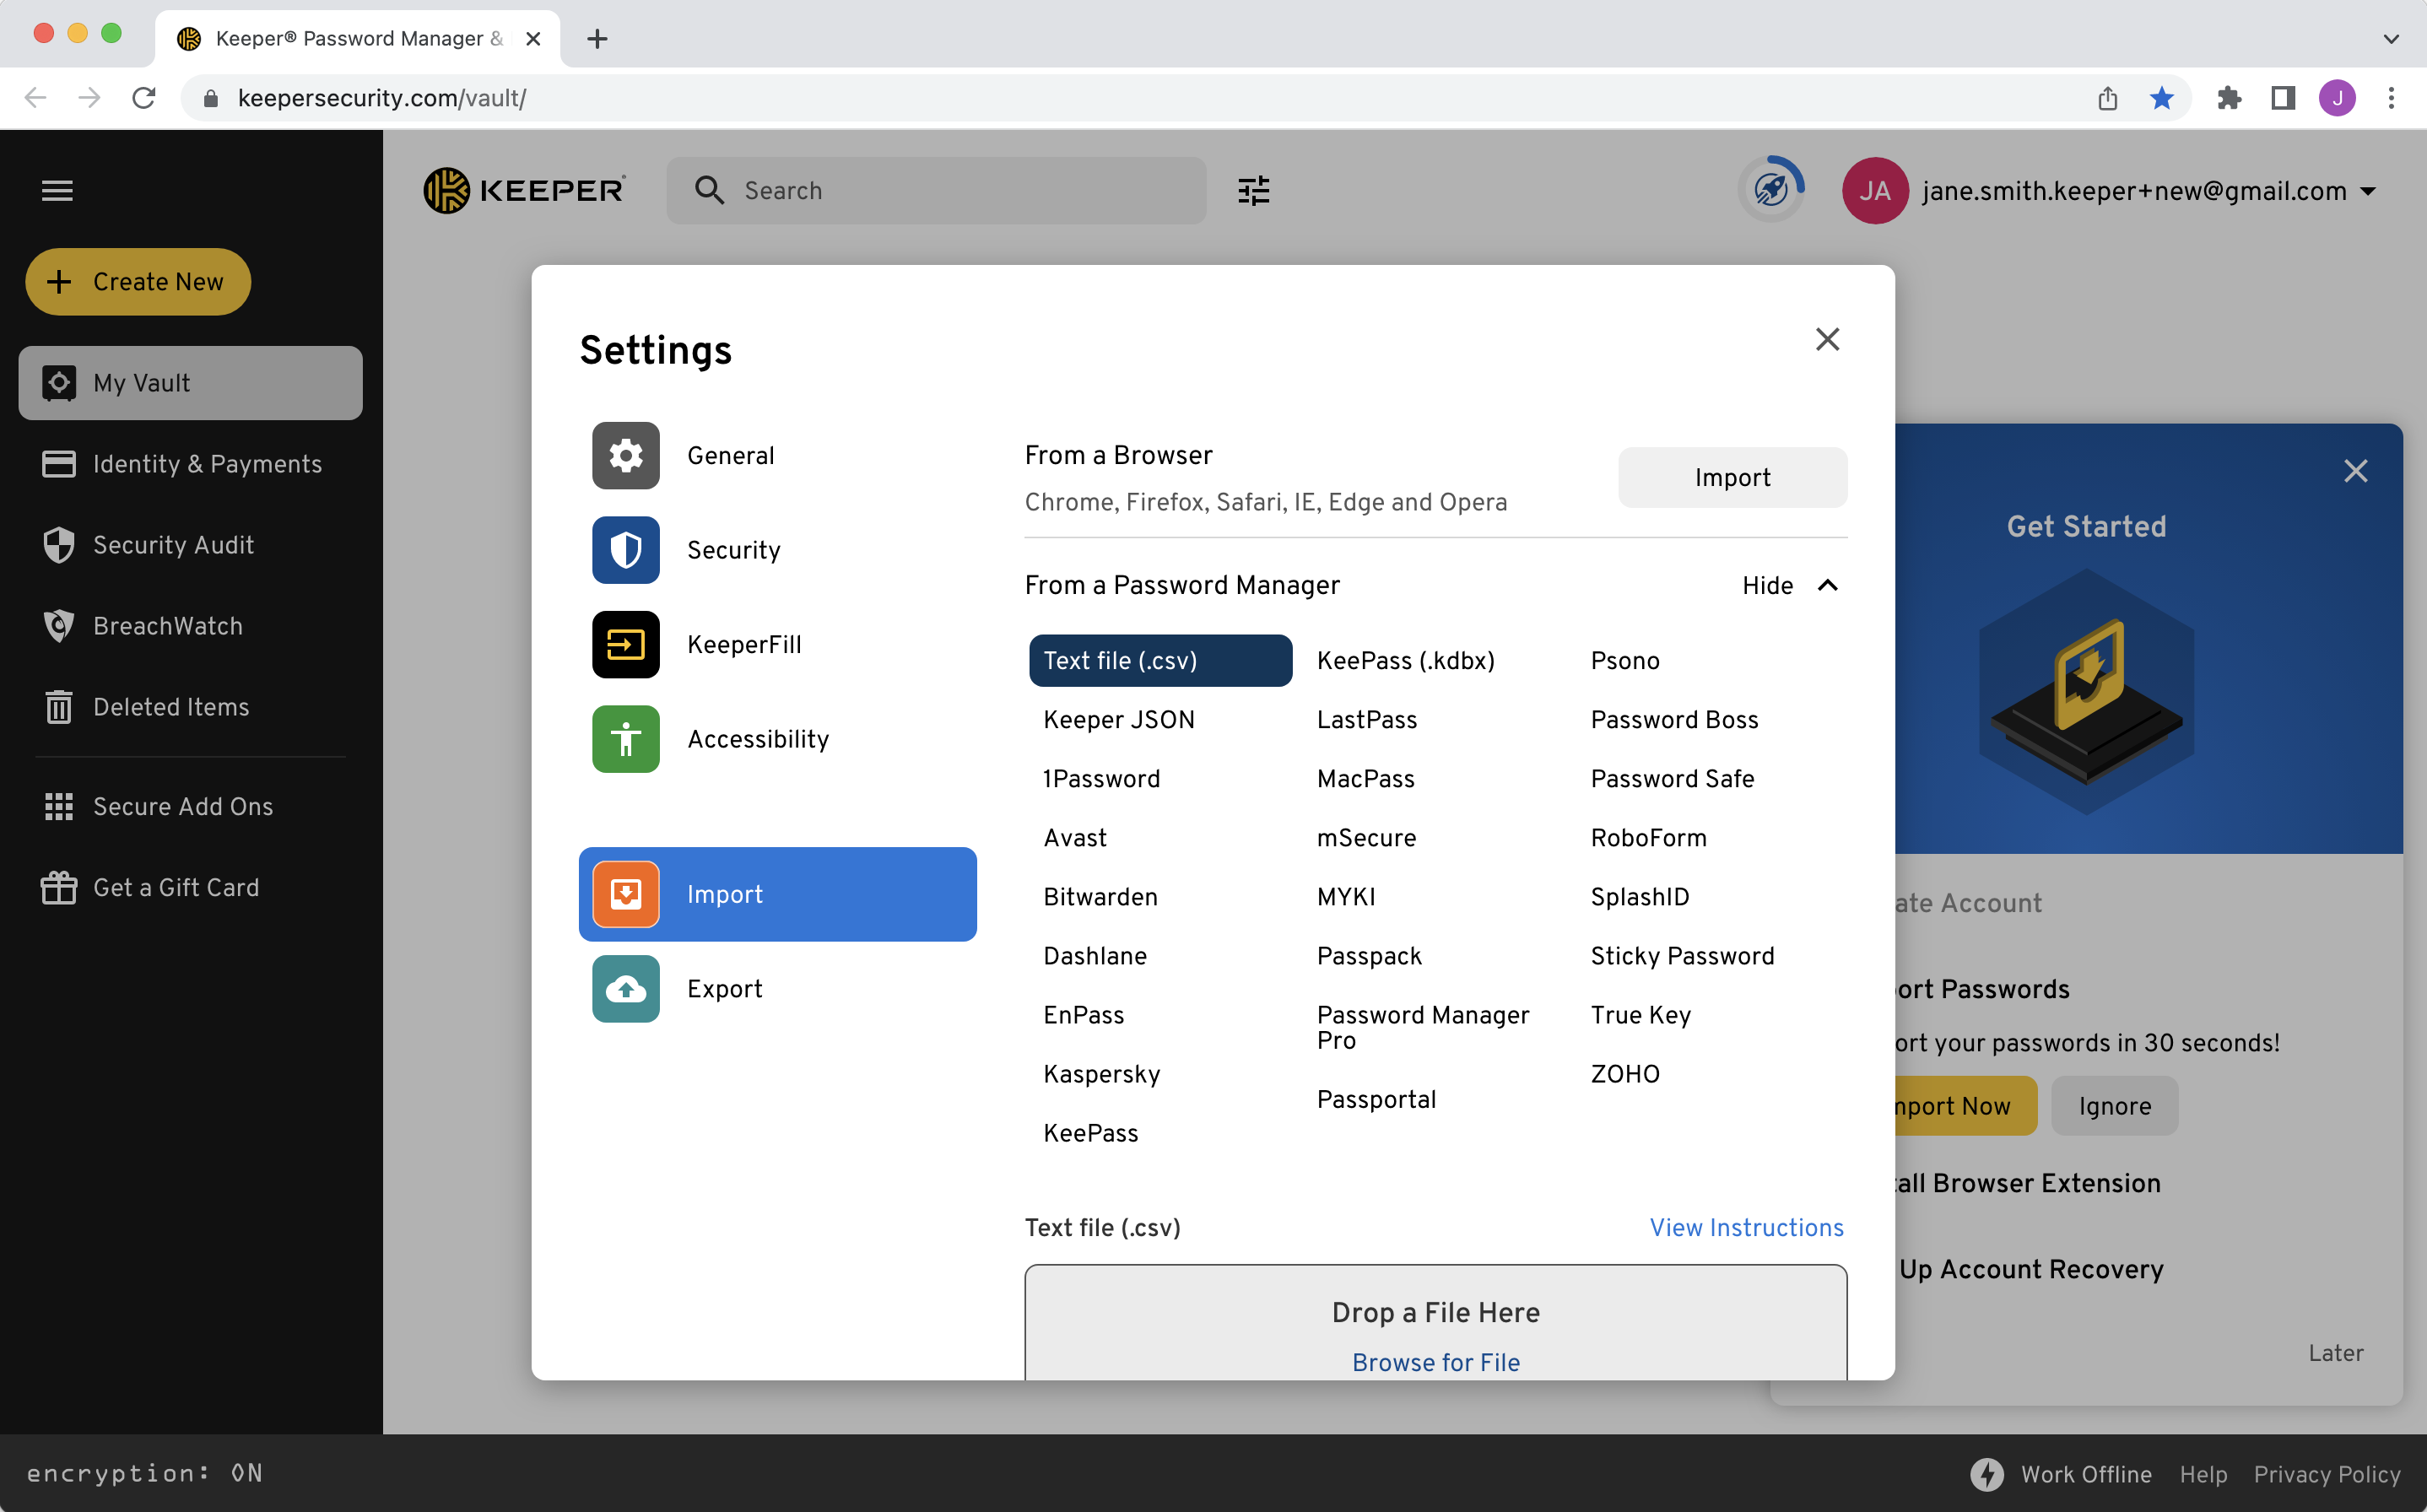
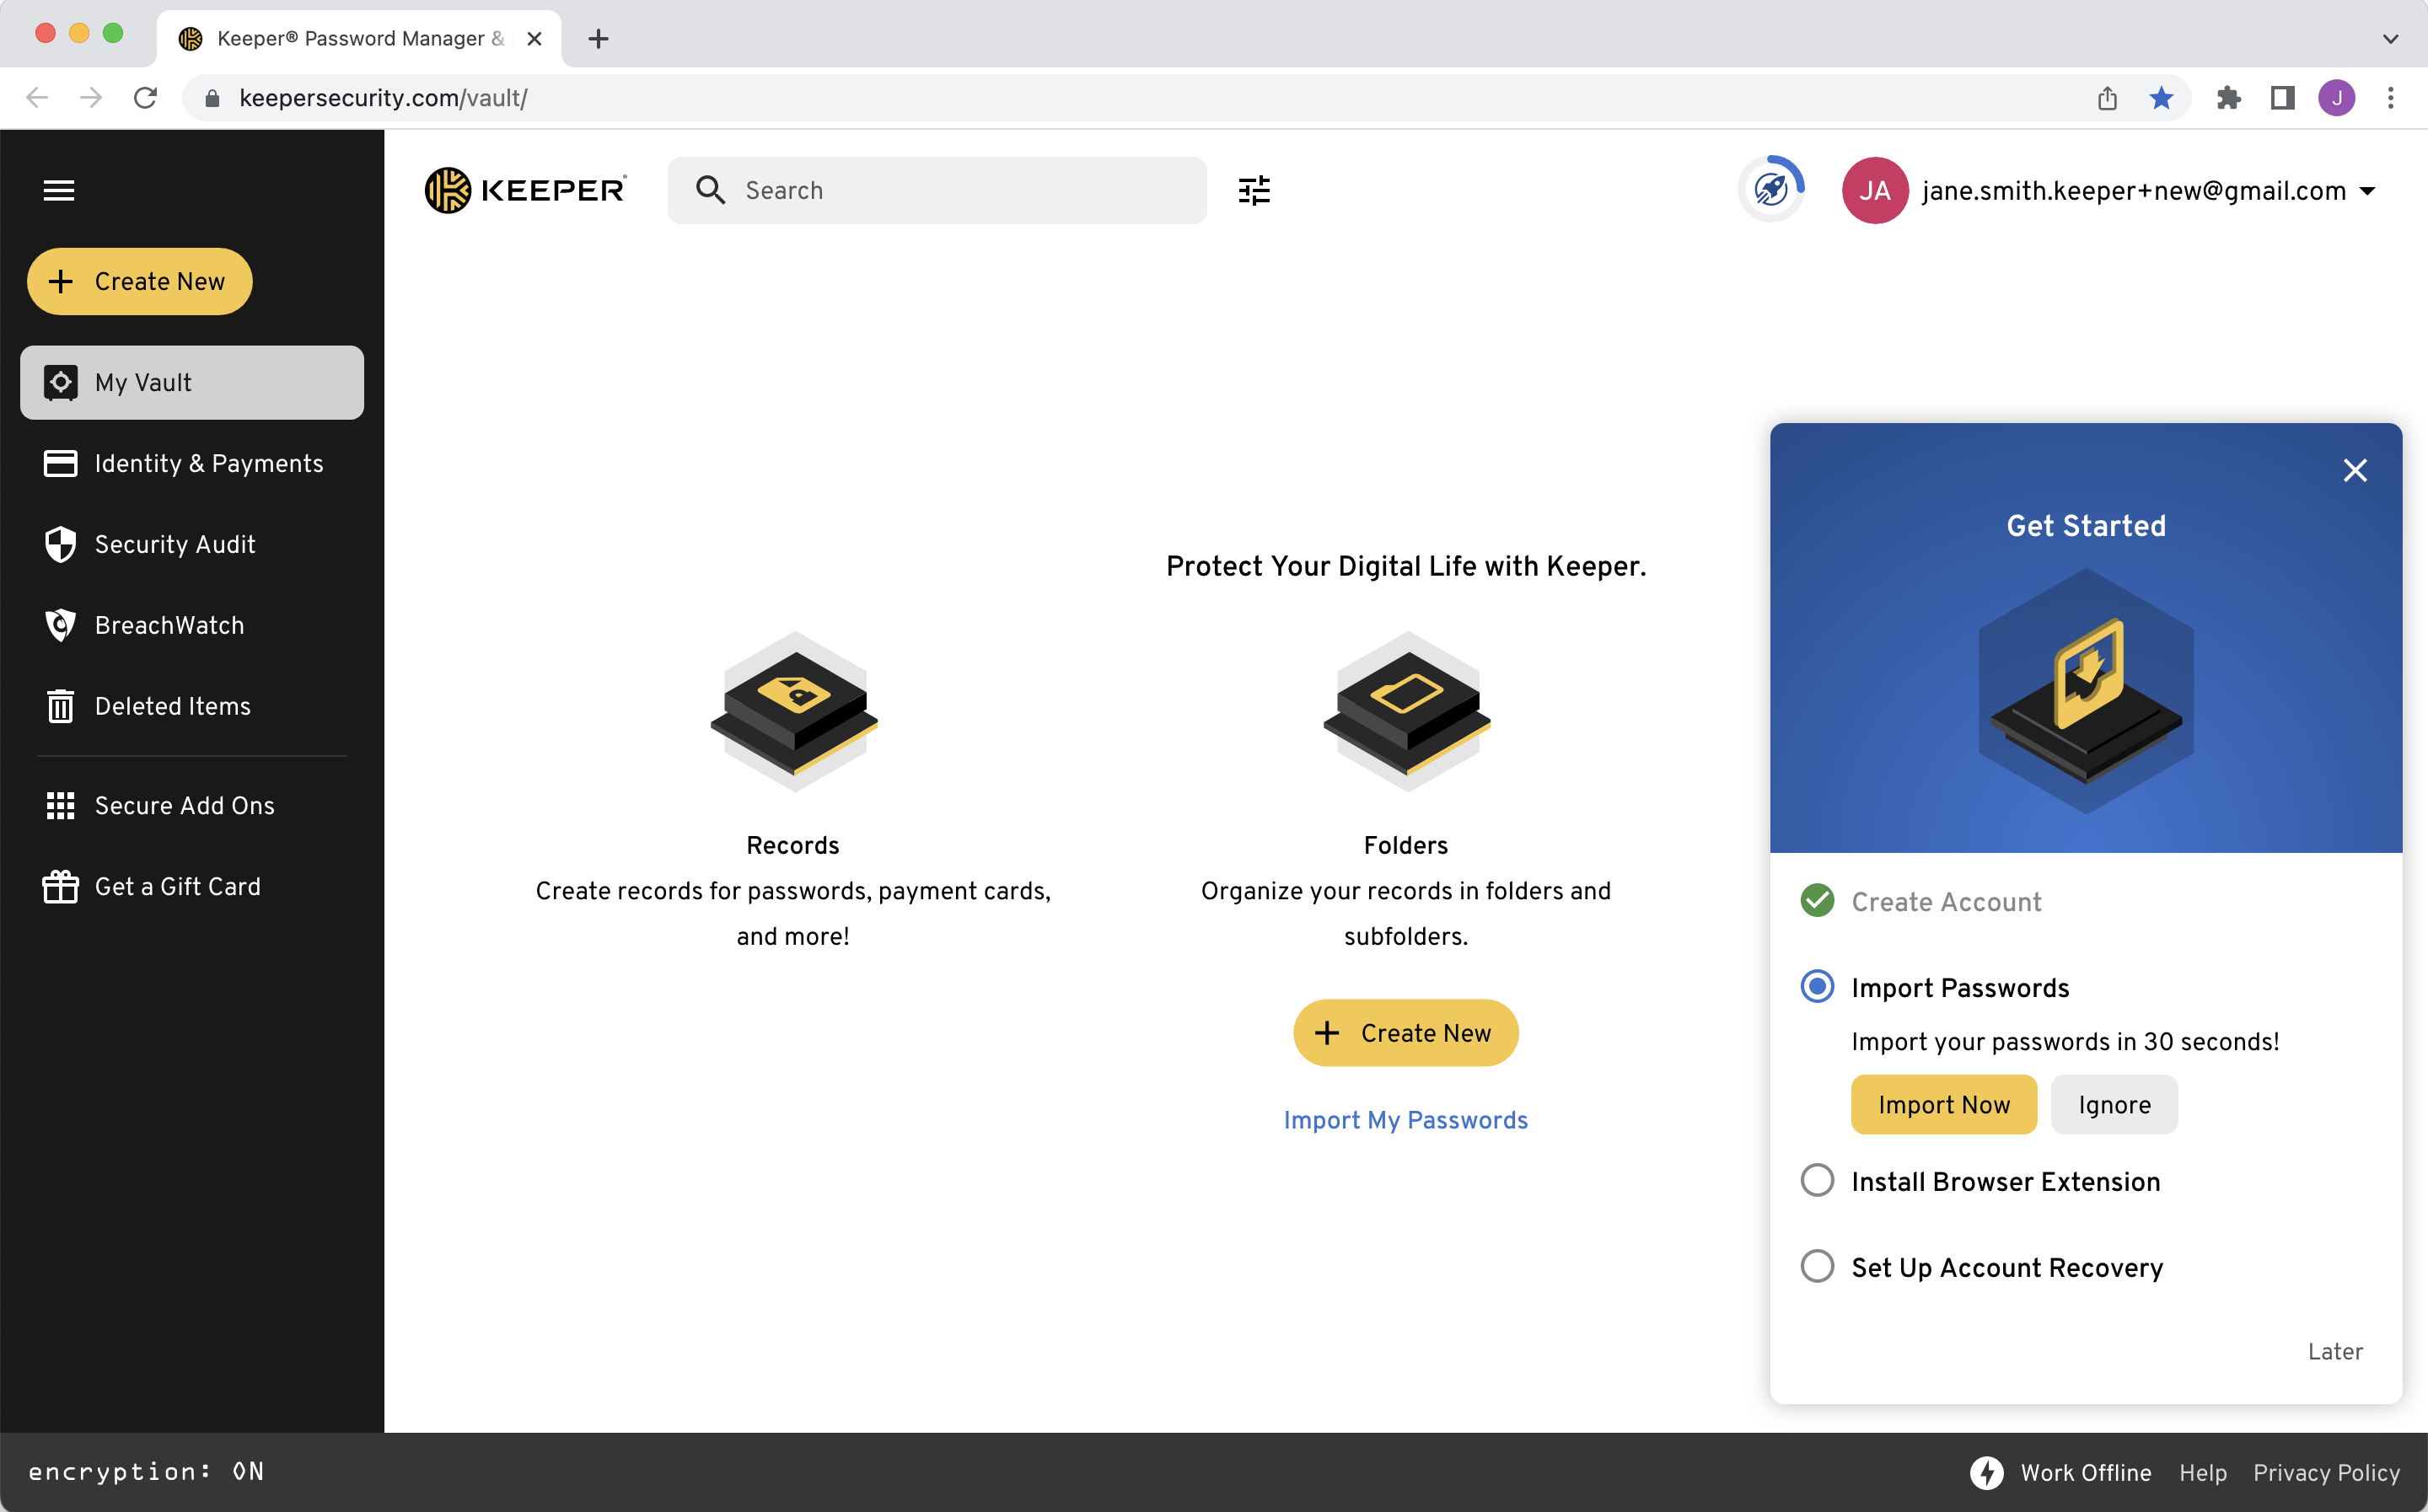
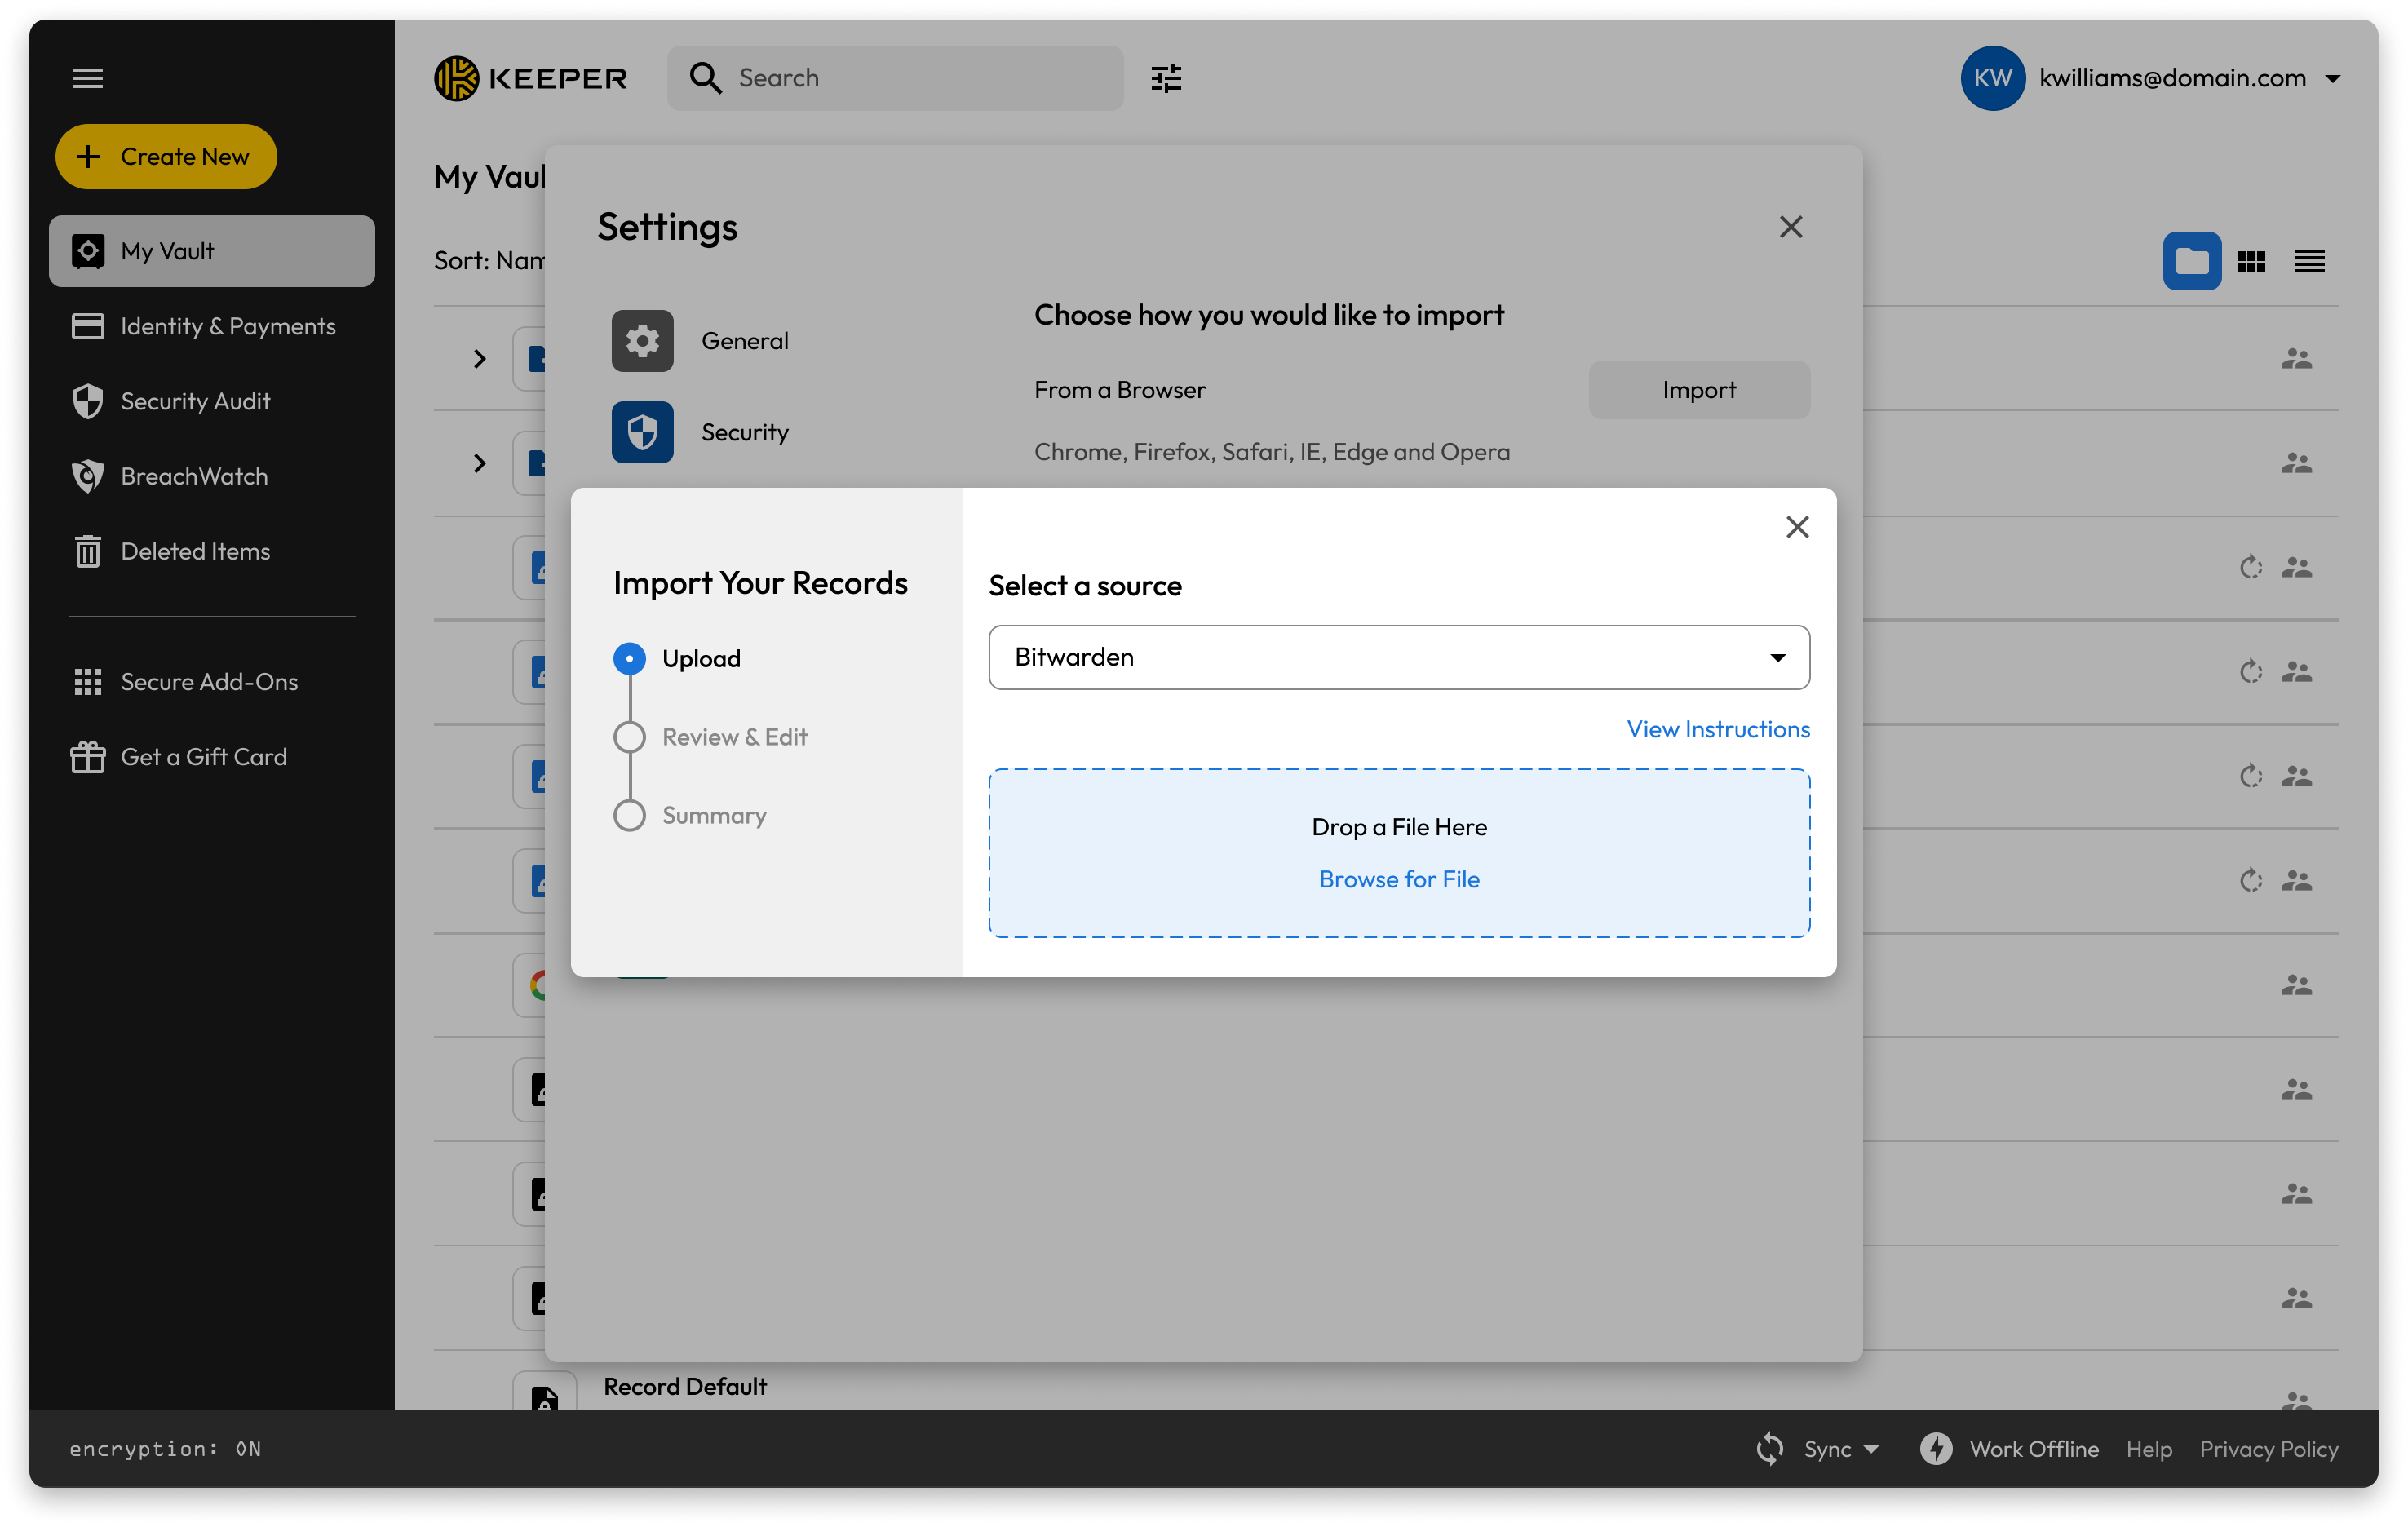
## Import Your Passwords

Keeper makes it easy import your existing logins and passwords directly from your web browsers (Safari, Chrome, Firefox), another password manager, or from a text file (.csv, .xls, .tsv). Watch the video below or continue reading to learn how.

To get started, click on the **Account Dropdown Menu** (your email) in the upper-right corner of your vault window, then click **Settings > Import**. Select the import source below for further instructions.

* [Web Browsers](/user-guides/web-vault#from-web-browsers)
* [Password Managers](/user-guides/web-vault#from-password-managers)
* [Text Files](/user-guides/web-vault#from-text-files-csv-xls-tsv)

{% hint style="info" %}
You can also skip the import process and proceed to creating new password records from scratch (see the "Create Your First Record" section in this guide).
{% endhint %}

{% embed url="<https://vimeo.com/1158911270?fe=sh&fl=pl>" %}
Import Your Passwords With Keeper
{% endembed %}

## Disable Your Browser's Password Saving Features

To make the most out of Keeper, we strongly recommend that you disable your browser's built-in password saving features. Keeper provides a much more secure and seamless solution to save and autofill your passwords across all browsers.

#### Chrome

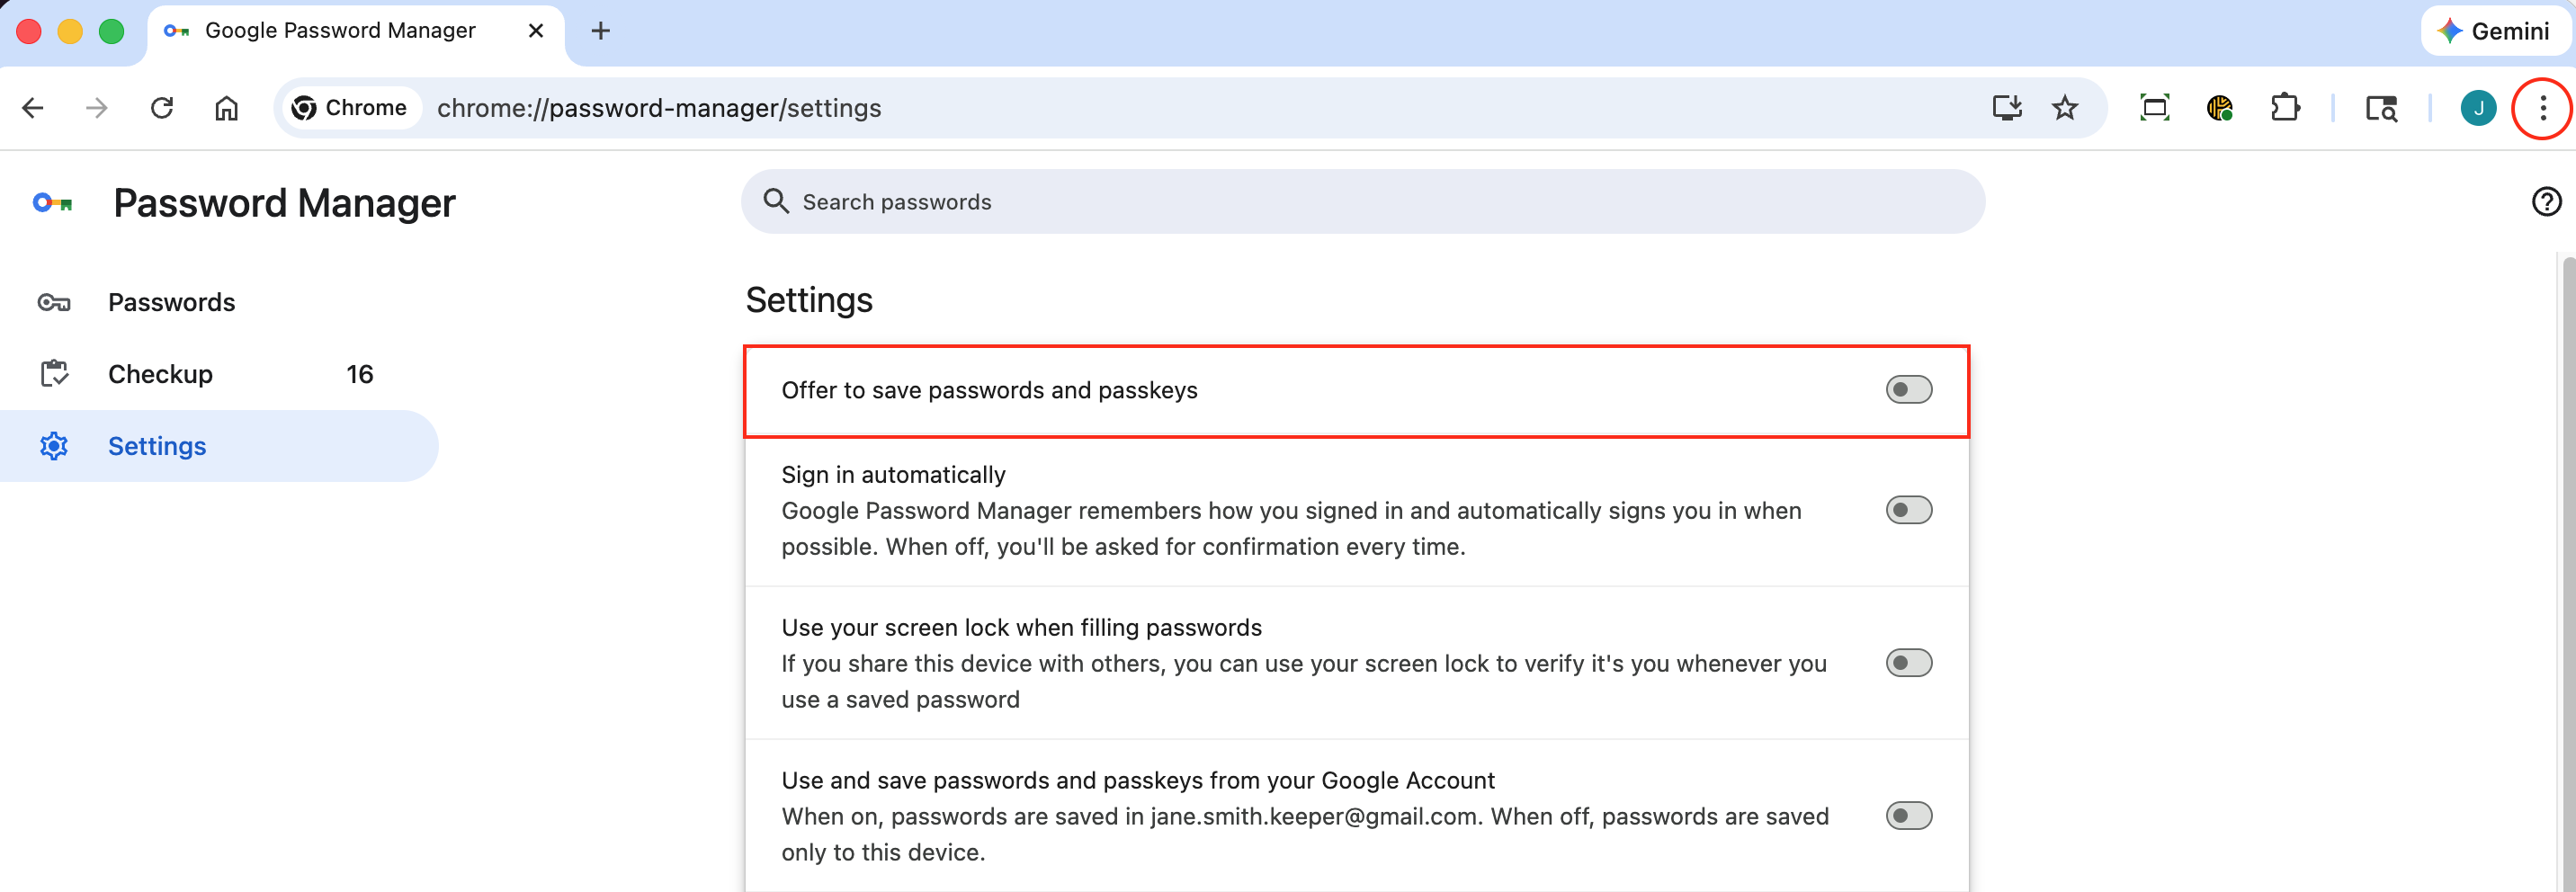
Click the Chrome **menu icon,** then click **Settings > Autofill and passwords > Google Password Manager > Settings** and ensure "Offer to save passwords and passkeys" is toggled off.

<figure><img src="https://914511346-files.gitbook.io/~/files/v0/b/gitbook-x-prod.appspot.com/o/spaces%2F-LSGVtOTYUIkVBoYtFvK%2Fuploads%2FgtsNIMru6cRvS2xSL7ib%2FScreenshot%202026-02-27%20at%2011.12.05%E2%80%AFAM.png?alt=media&#x26;token=c19a09b7-380b-43d1-95f1-7ef889293a74" alt=""><figcaption><p>Disable Password Saving on Chrome</p></figcaption></figure>

#### Firefox

Click the Firefox **menu icon**, then select **Settings > Privacy & Security** and ensure "Ask to save logins and passwords for websites" is unchecked.

![Disable Password Saving on Firefox](https://914511346-files.gitbook.io/~/files/v0/b/gitbook-legacy-files/o/assets%2F-LSGVtOTYUIkVBoYtFvK%2F-M5cJeD8n1mCXVB7q5Kx%2F-M5cNpsfxaR5TQ62jOkl%2FScreen%20Shot%202020-04-23%20at%2011.21.34%20AM.png?alt=media\&token=c29a2a31-19e2-4ce0-a4a8-6b6249d64715)

#### Safari

In the Safari dropdown menu, select **Settings**.

<figure><img src="https://914511346-files.gitbook.io/~/files/v0/b/gitbook-x-prod.appspot.com/o/spaces%2F-LSGVtOTYUIkVBoYtFvK%2Fuploads%2FhJvSoVobrkLNo03bRel9%2FScreenshot%202026-02-27%20at%2011.18.33%E2%80%AFAM.png?alt=media&#x26;token=e5195efc-4204-4fb1-91a6-38f7a379caa7" alt=""><figcaption><p>Safari > Settings</p></figcaption></figure>

Under the "Autofill" tab, uncheck all boxes for "Autofill web forms".

![Disable Password Saving on Safari](https://914511346-files.gitbook.io/~/files/v0/b/gitbook-x-prod.appspot.com/o/spaces%2F-LSGVtOTYUIkVBoYtFvK%2Fuploads%2FMDZBZLmixyIiN68fDUGm%2FScreenshot%202026-02-27%20at%2011.16.40%E2%80%AFAM.png?alt=media\&token=7ac1f030-c09e-450a-8b09-b9737c69c698)

#### Edge

Click the Firefox **menu icon**, then **Settings > Passwords** and ensure "Offer to save passwords" is toggled off.

![Disable Password Saving on Microsoft Edge](https://914511346-files.gitbook.io/~/files/v0/b/gitbook-legacy-files/o/assets%2F-LSGVtOTYUIkVBoYtFvK%2F-M5cJeD8n1mCXVB7q5Kx%2F-M5cP-F4bJlDcp-mhFX3%2FScreen%20Shot%202020-04-23%20at%2011.56.02%20AM.png?alt=media\&token=04208d74-14ba-40d0-80c0-f5e80d2e806c)

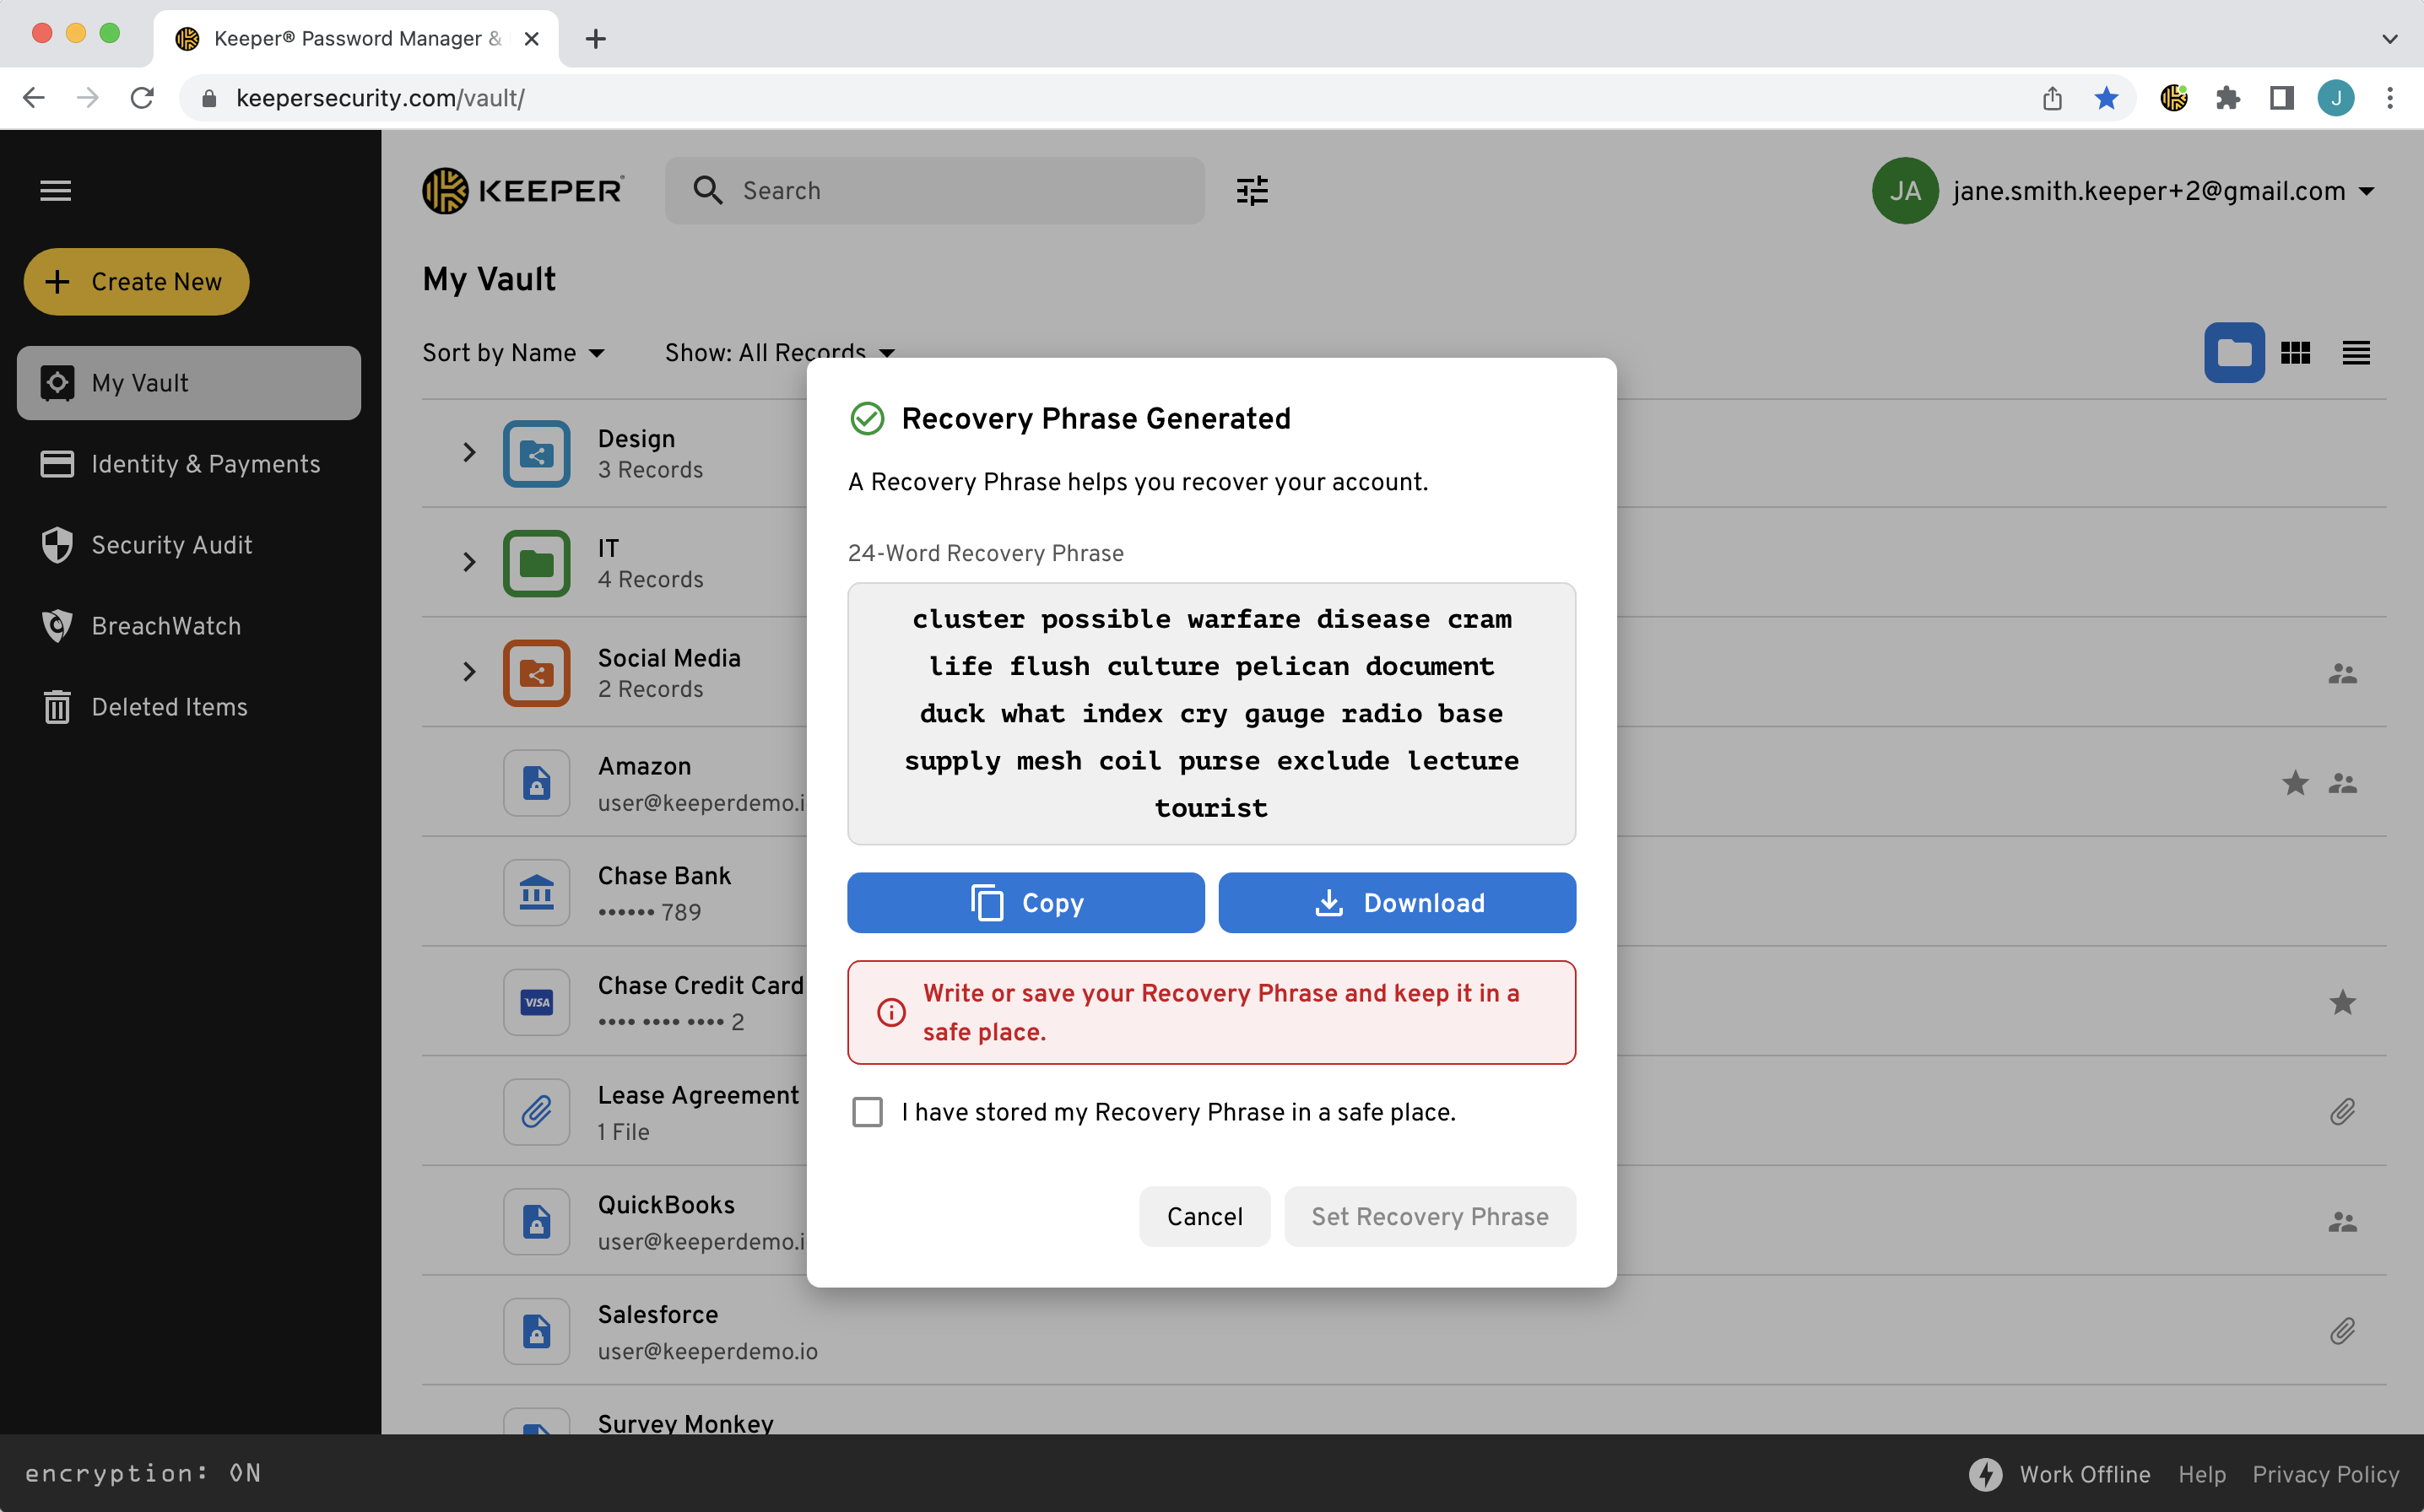
## Set Up Account Recovery

Be sure to set up your Recovery Phrase so that you can access your Keeper account if you ever forget your Master Password. Watch the video below or continue reading to learn how.

From the **Account Dropdown Menu** select **Settings > Recovery Phrase** enter your Master Password and click **Generate New Phrase**.

<figure><img src="https://914511346-files.gitbook.io/~/files/v0/b/gitbook-x-prod.appspot.com/o/spaces%2F-LSGVtOTYUIkVBoYtFvK%2Fuploads%2FL24DhLYX9RUzXJsdwbV7%2FScreenshot%202026-02-27%20at%2011.48.44%E2%80%AFAM.png?alt=media&#x26;token=91fd07d0-36bd-4321-a983-c8be92347969" alt=""><figcaption><p>Settings > Recovery Phrase</p></figcaption></figure>

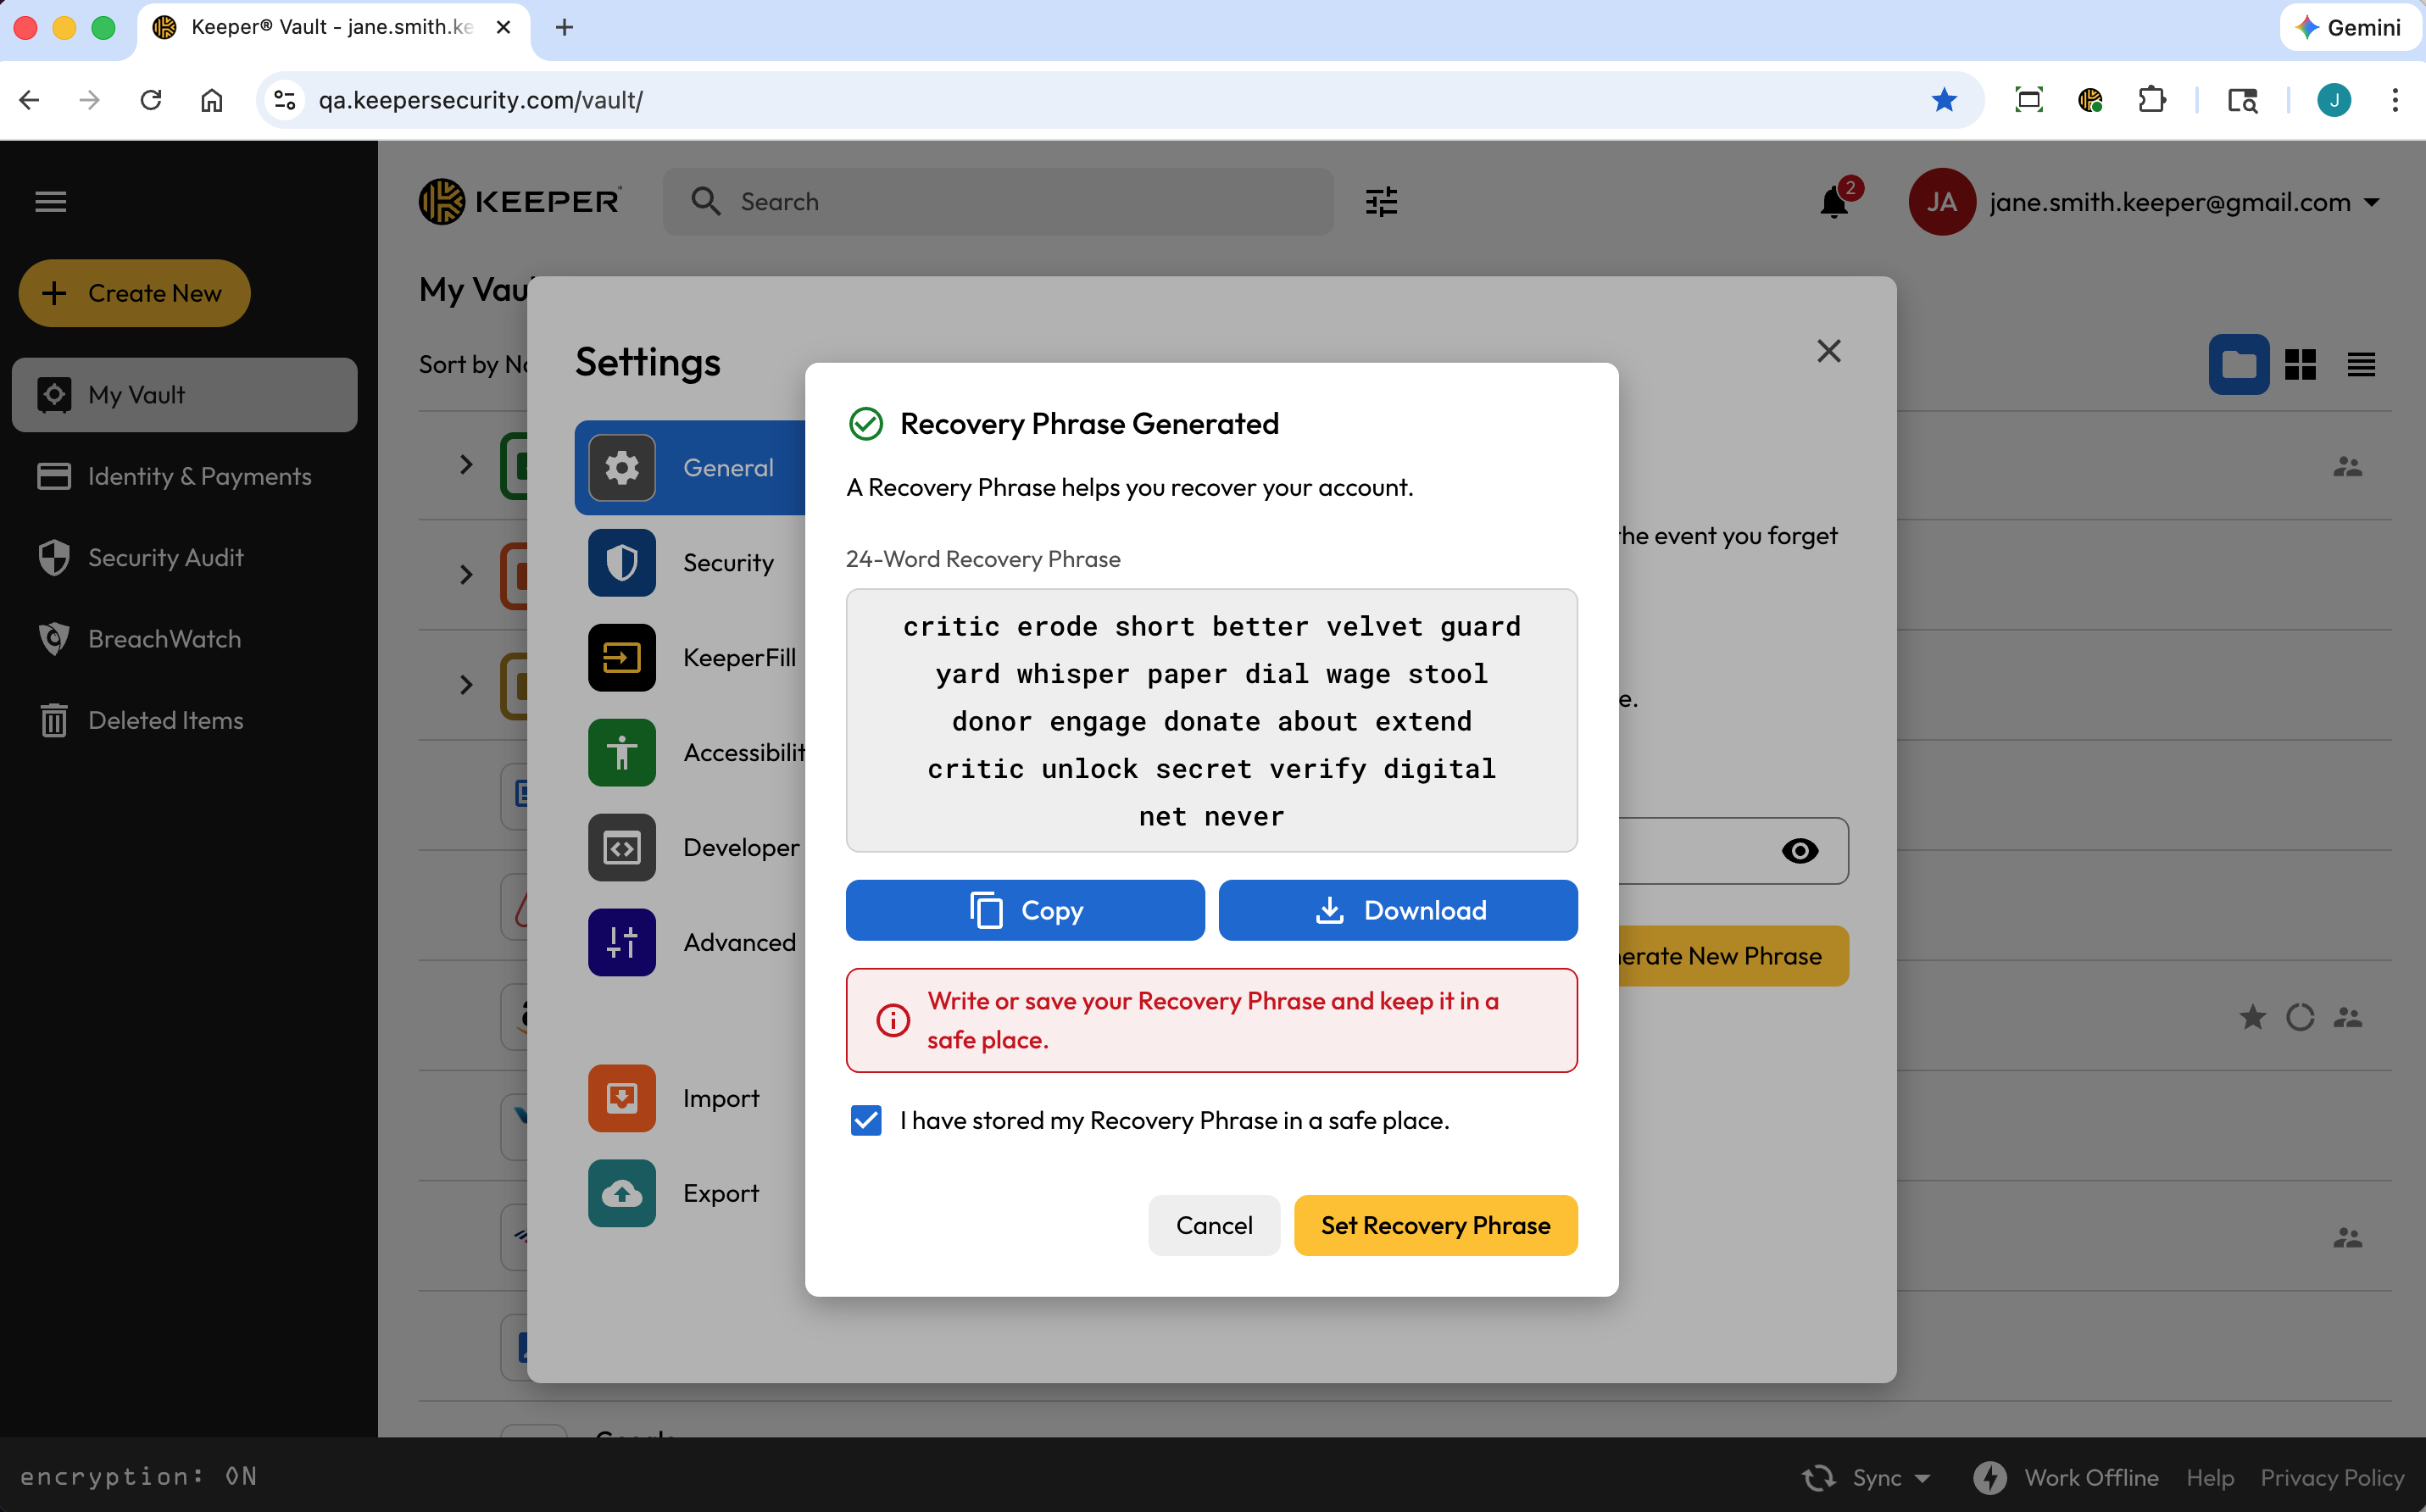
Check the box to acknowledge you have copied or downloaded your recovery phrase and click **Set Recovery Phrase** to complete the set up.

<figure><img src="https://914511346-files.gitbook.io/~/files/v0/b/gitbook-x-prod.appspot.com/o/spaces%2F-LSGVtOTYUIkVBoYtFvK%2Fuploads%2FyNgT18cyyImco6rHU03L%2FScreenshot%202026-02-27%20at%2011.56.15%E2%80%AFAM.png?alt=media&#x26;token=a5b74dd1-ad7d-4f16-9bac-8d63b6fc558d" alt=""><figcaption><p>Set Your Recovery Phrase</p></figcaption></figure>

{% embed url="<https://vimeo.com/585500674?fe=sh&fl=pl>" %}
Vault Recovery Phrase Setup
{% endembed %}

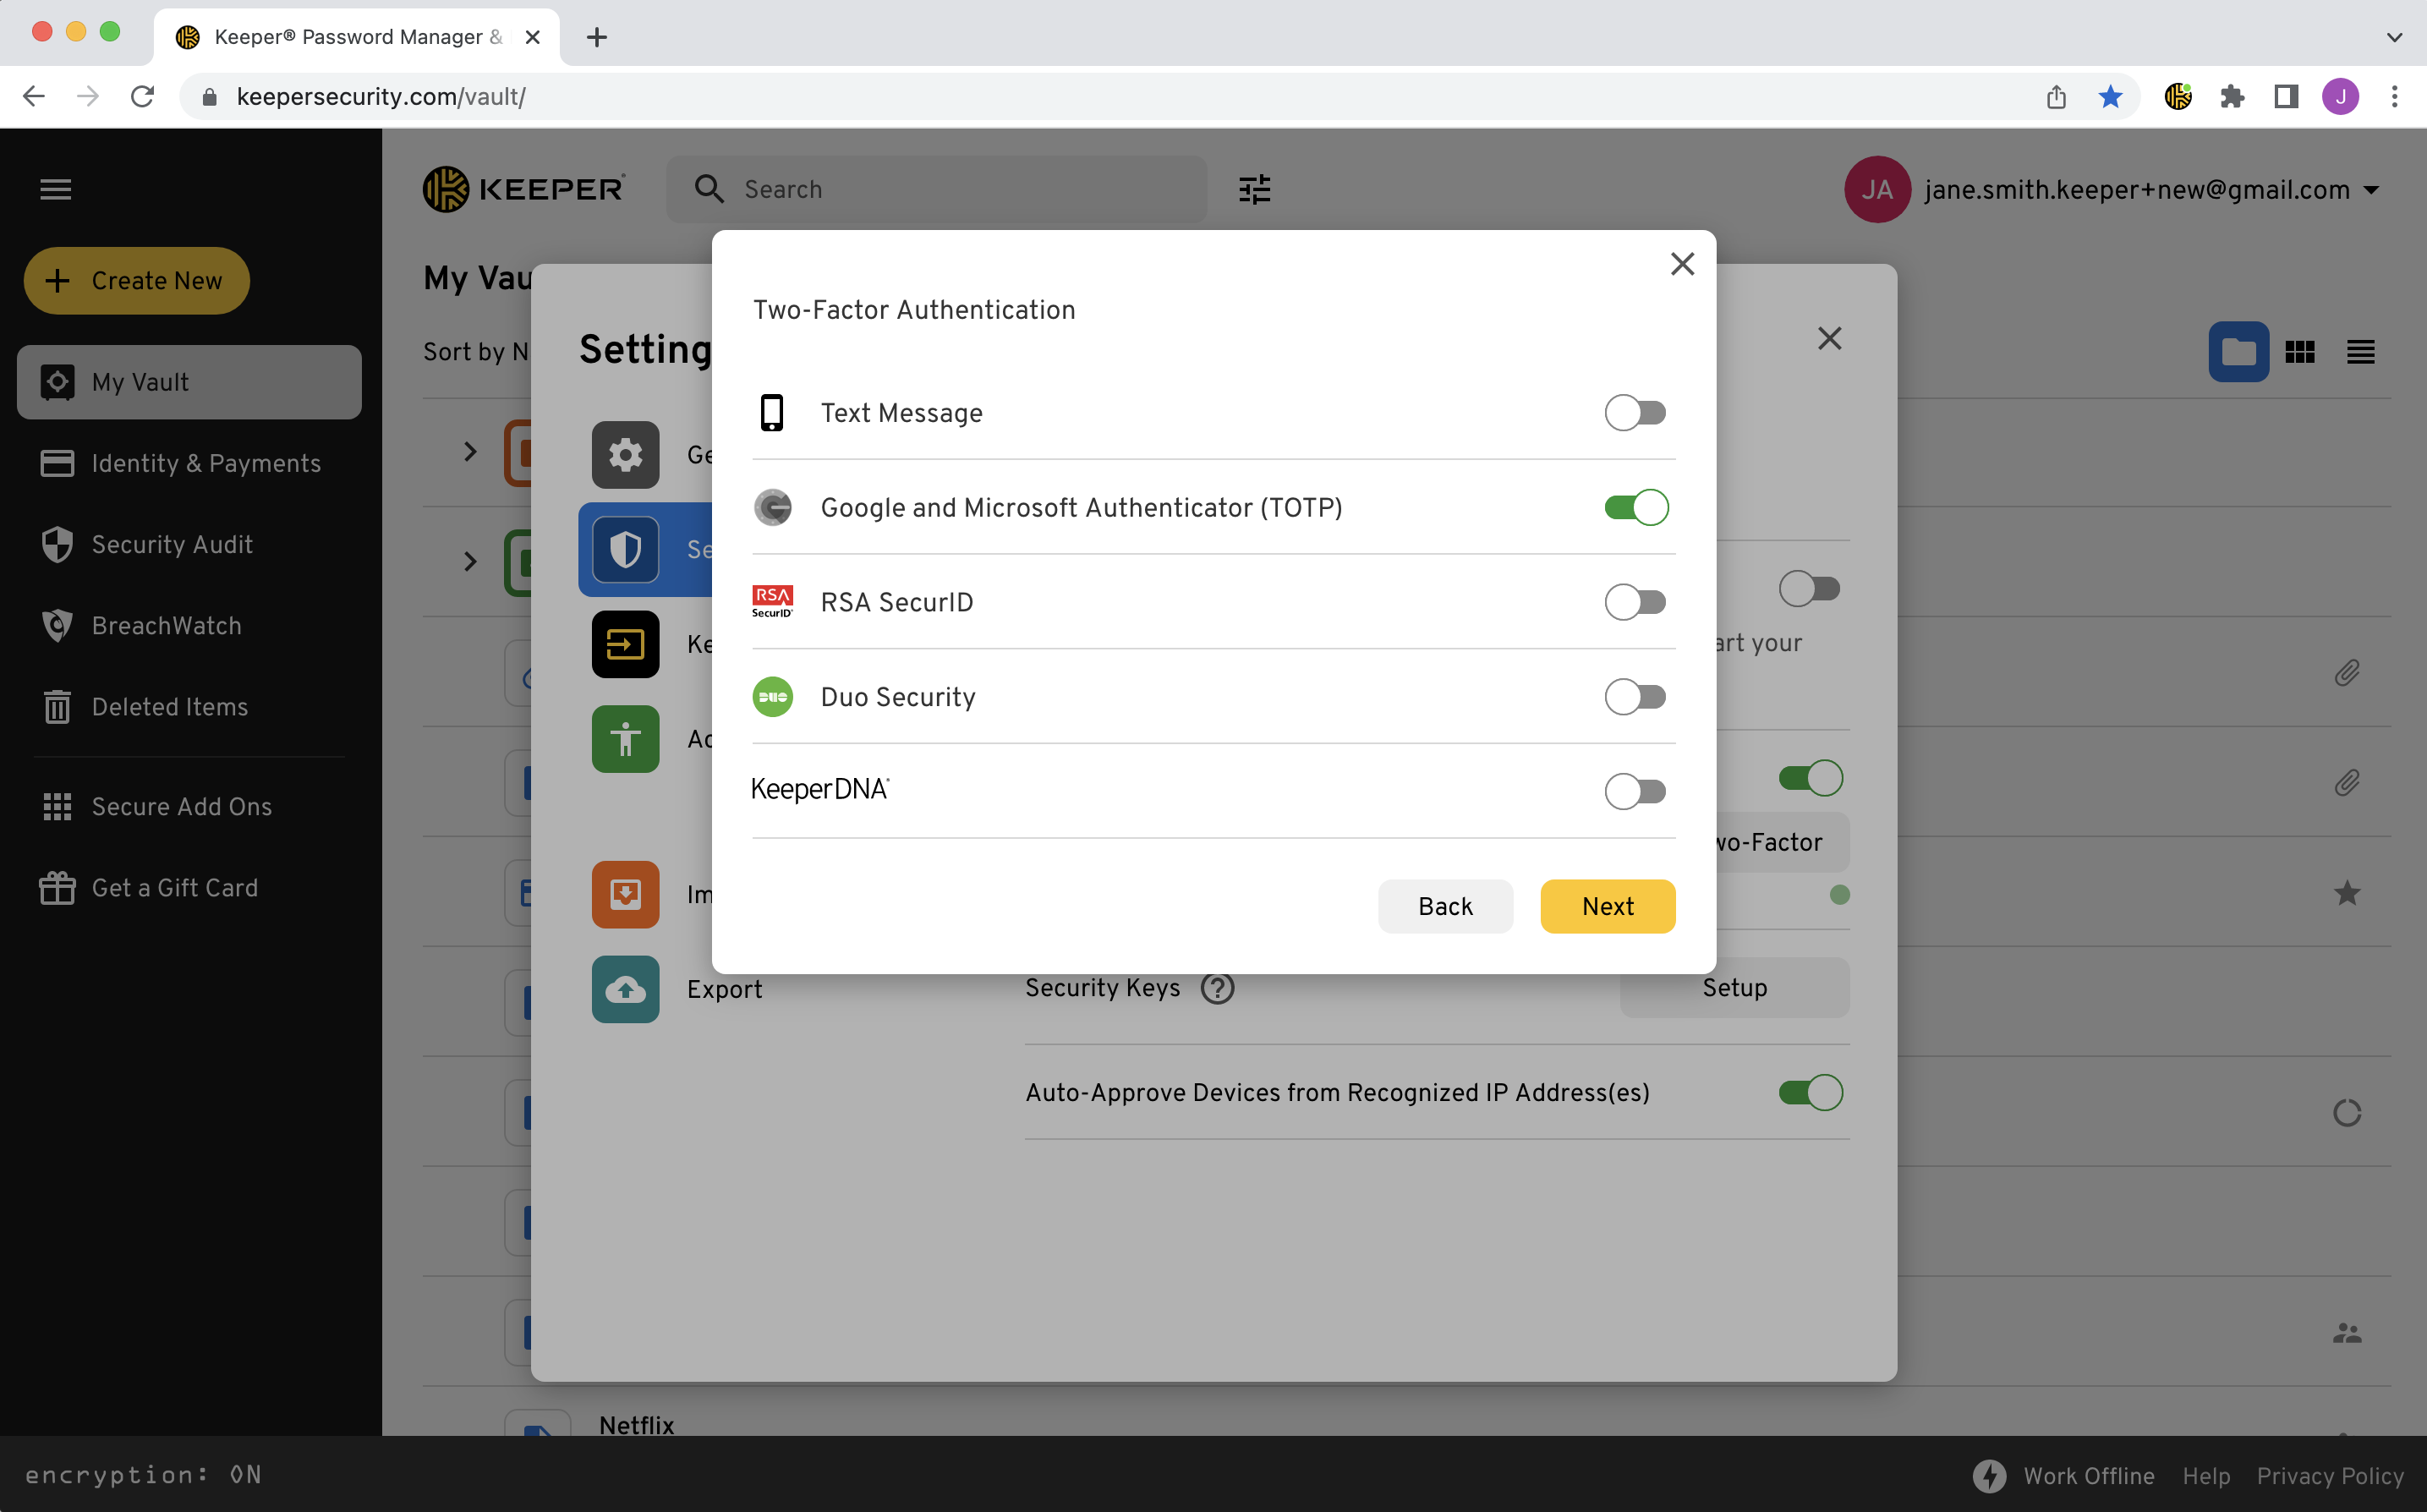
## Protect Your Vault With 2FA

Add an extra layer of security when logging into your Keeper Vault by setting up a Two-Factor Authentication (2FA) method.

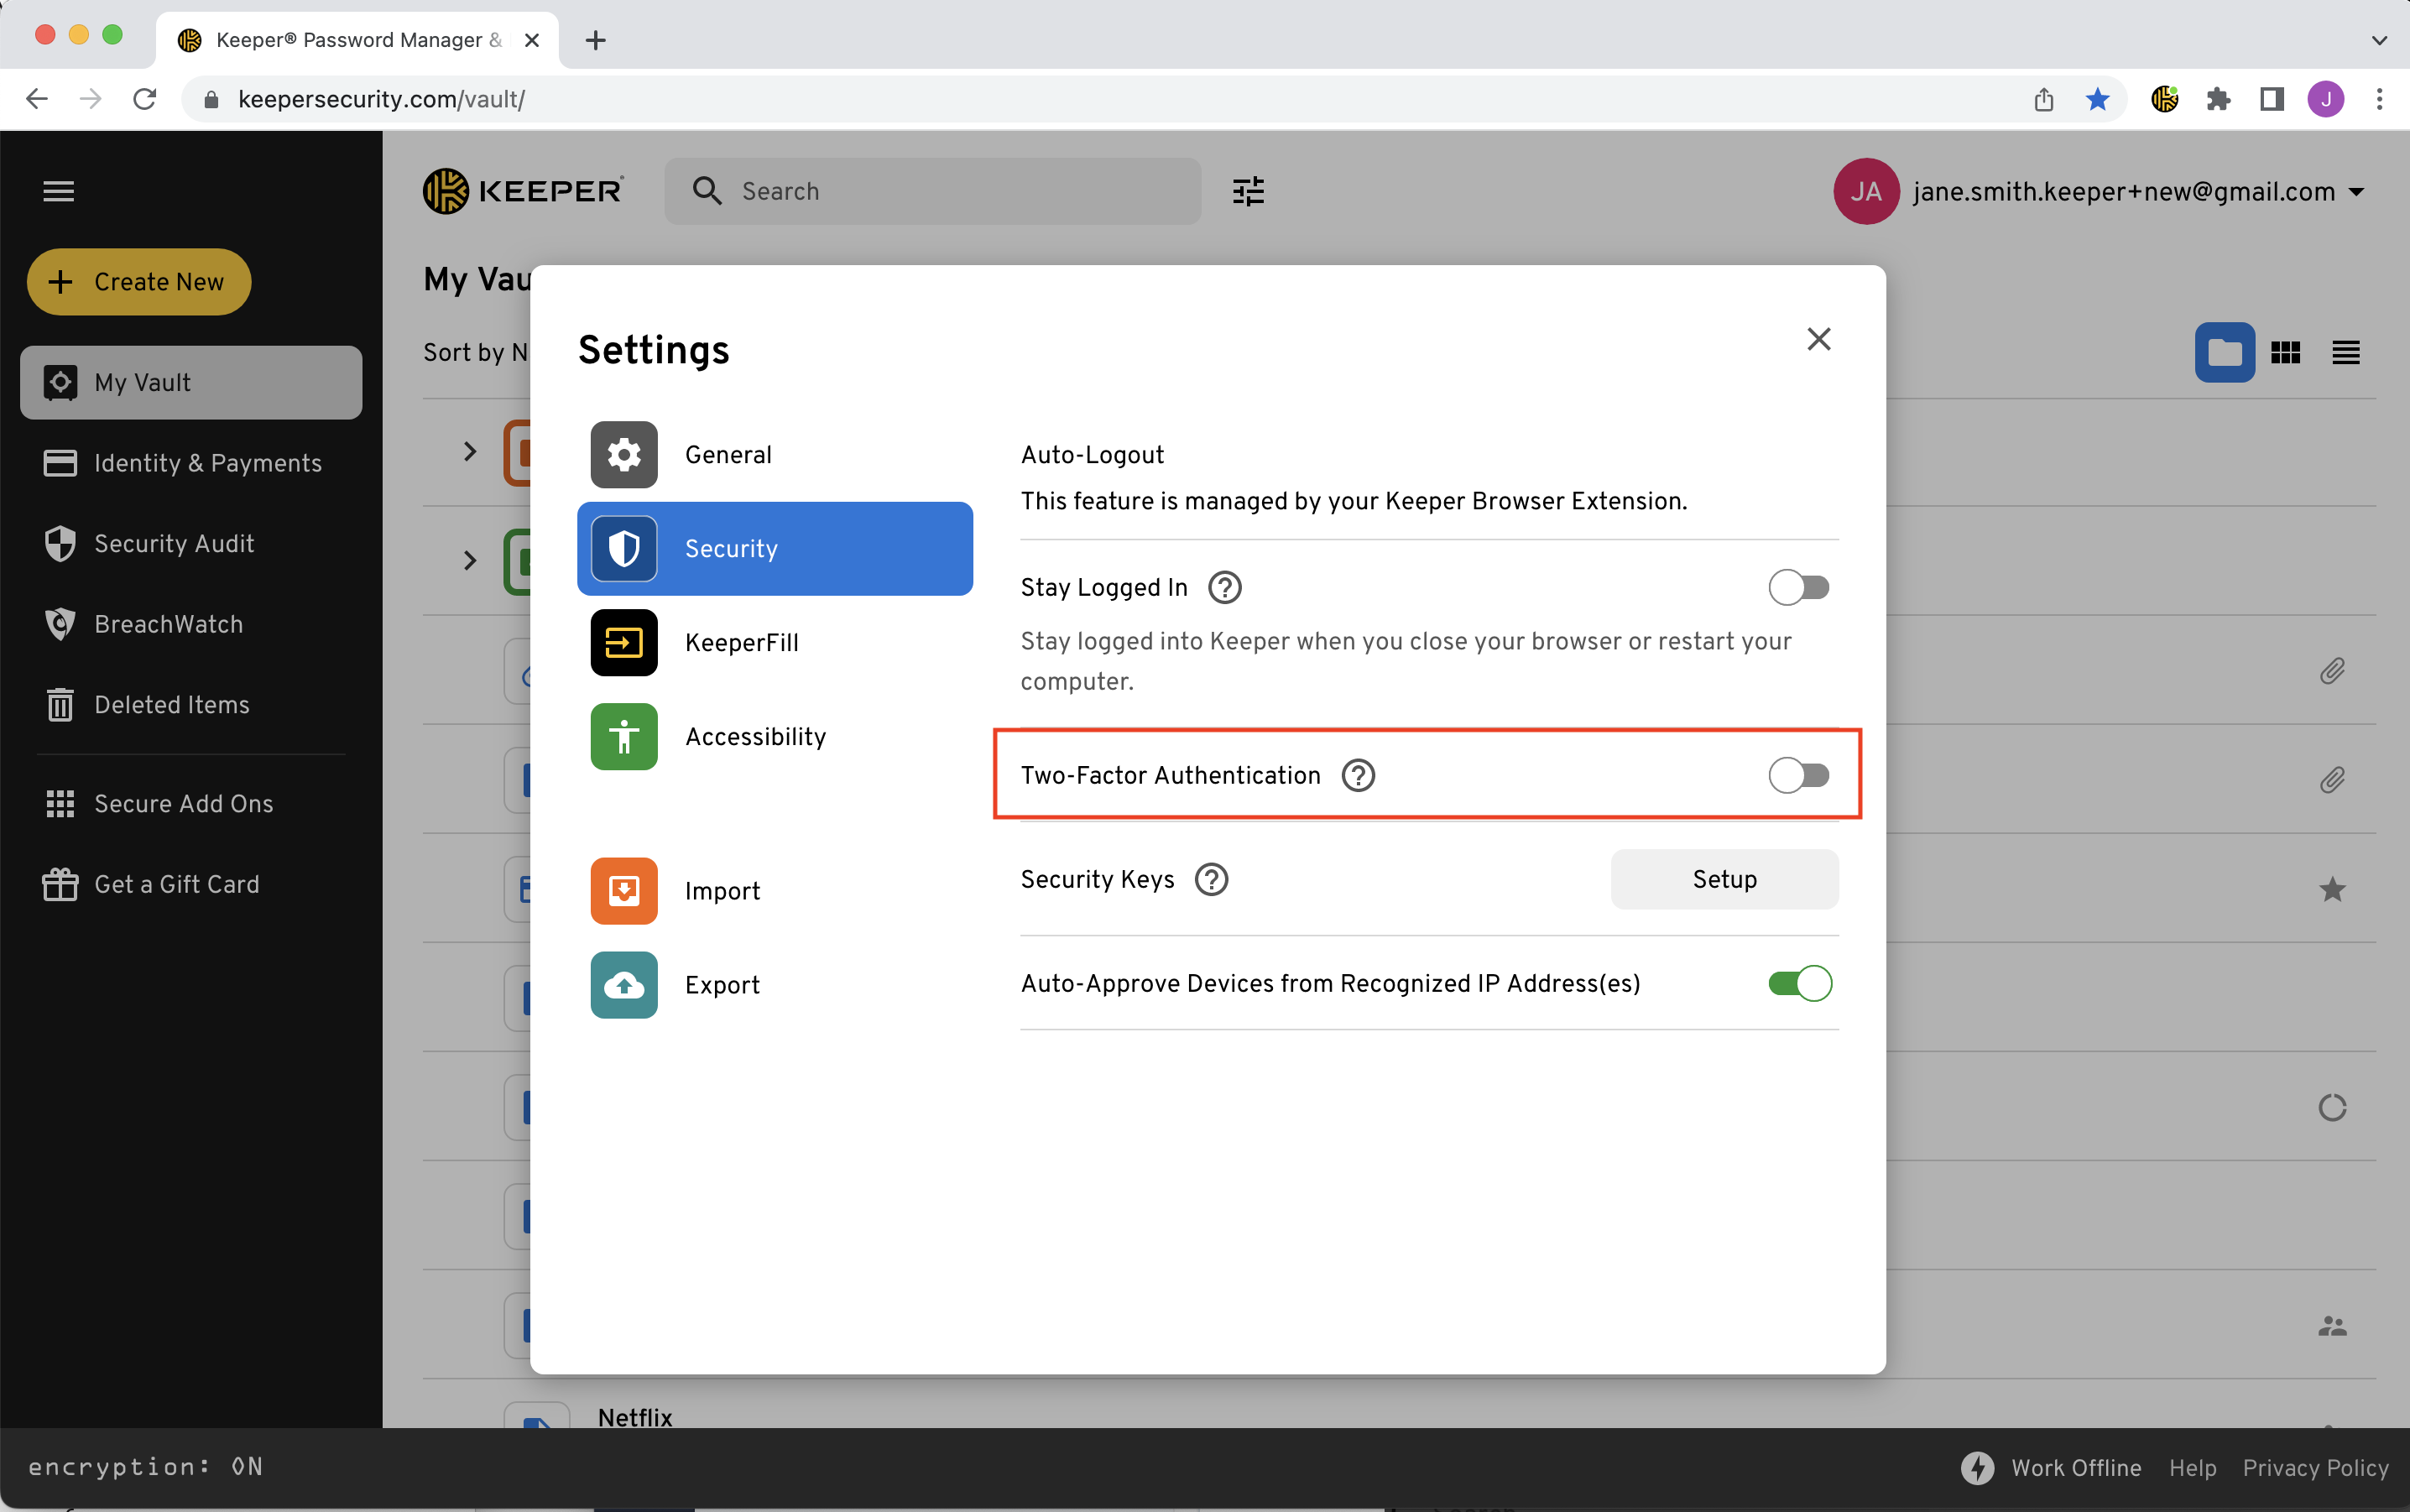
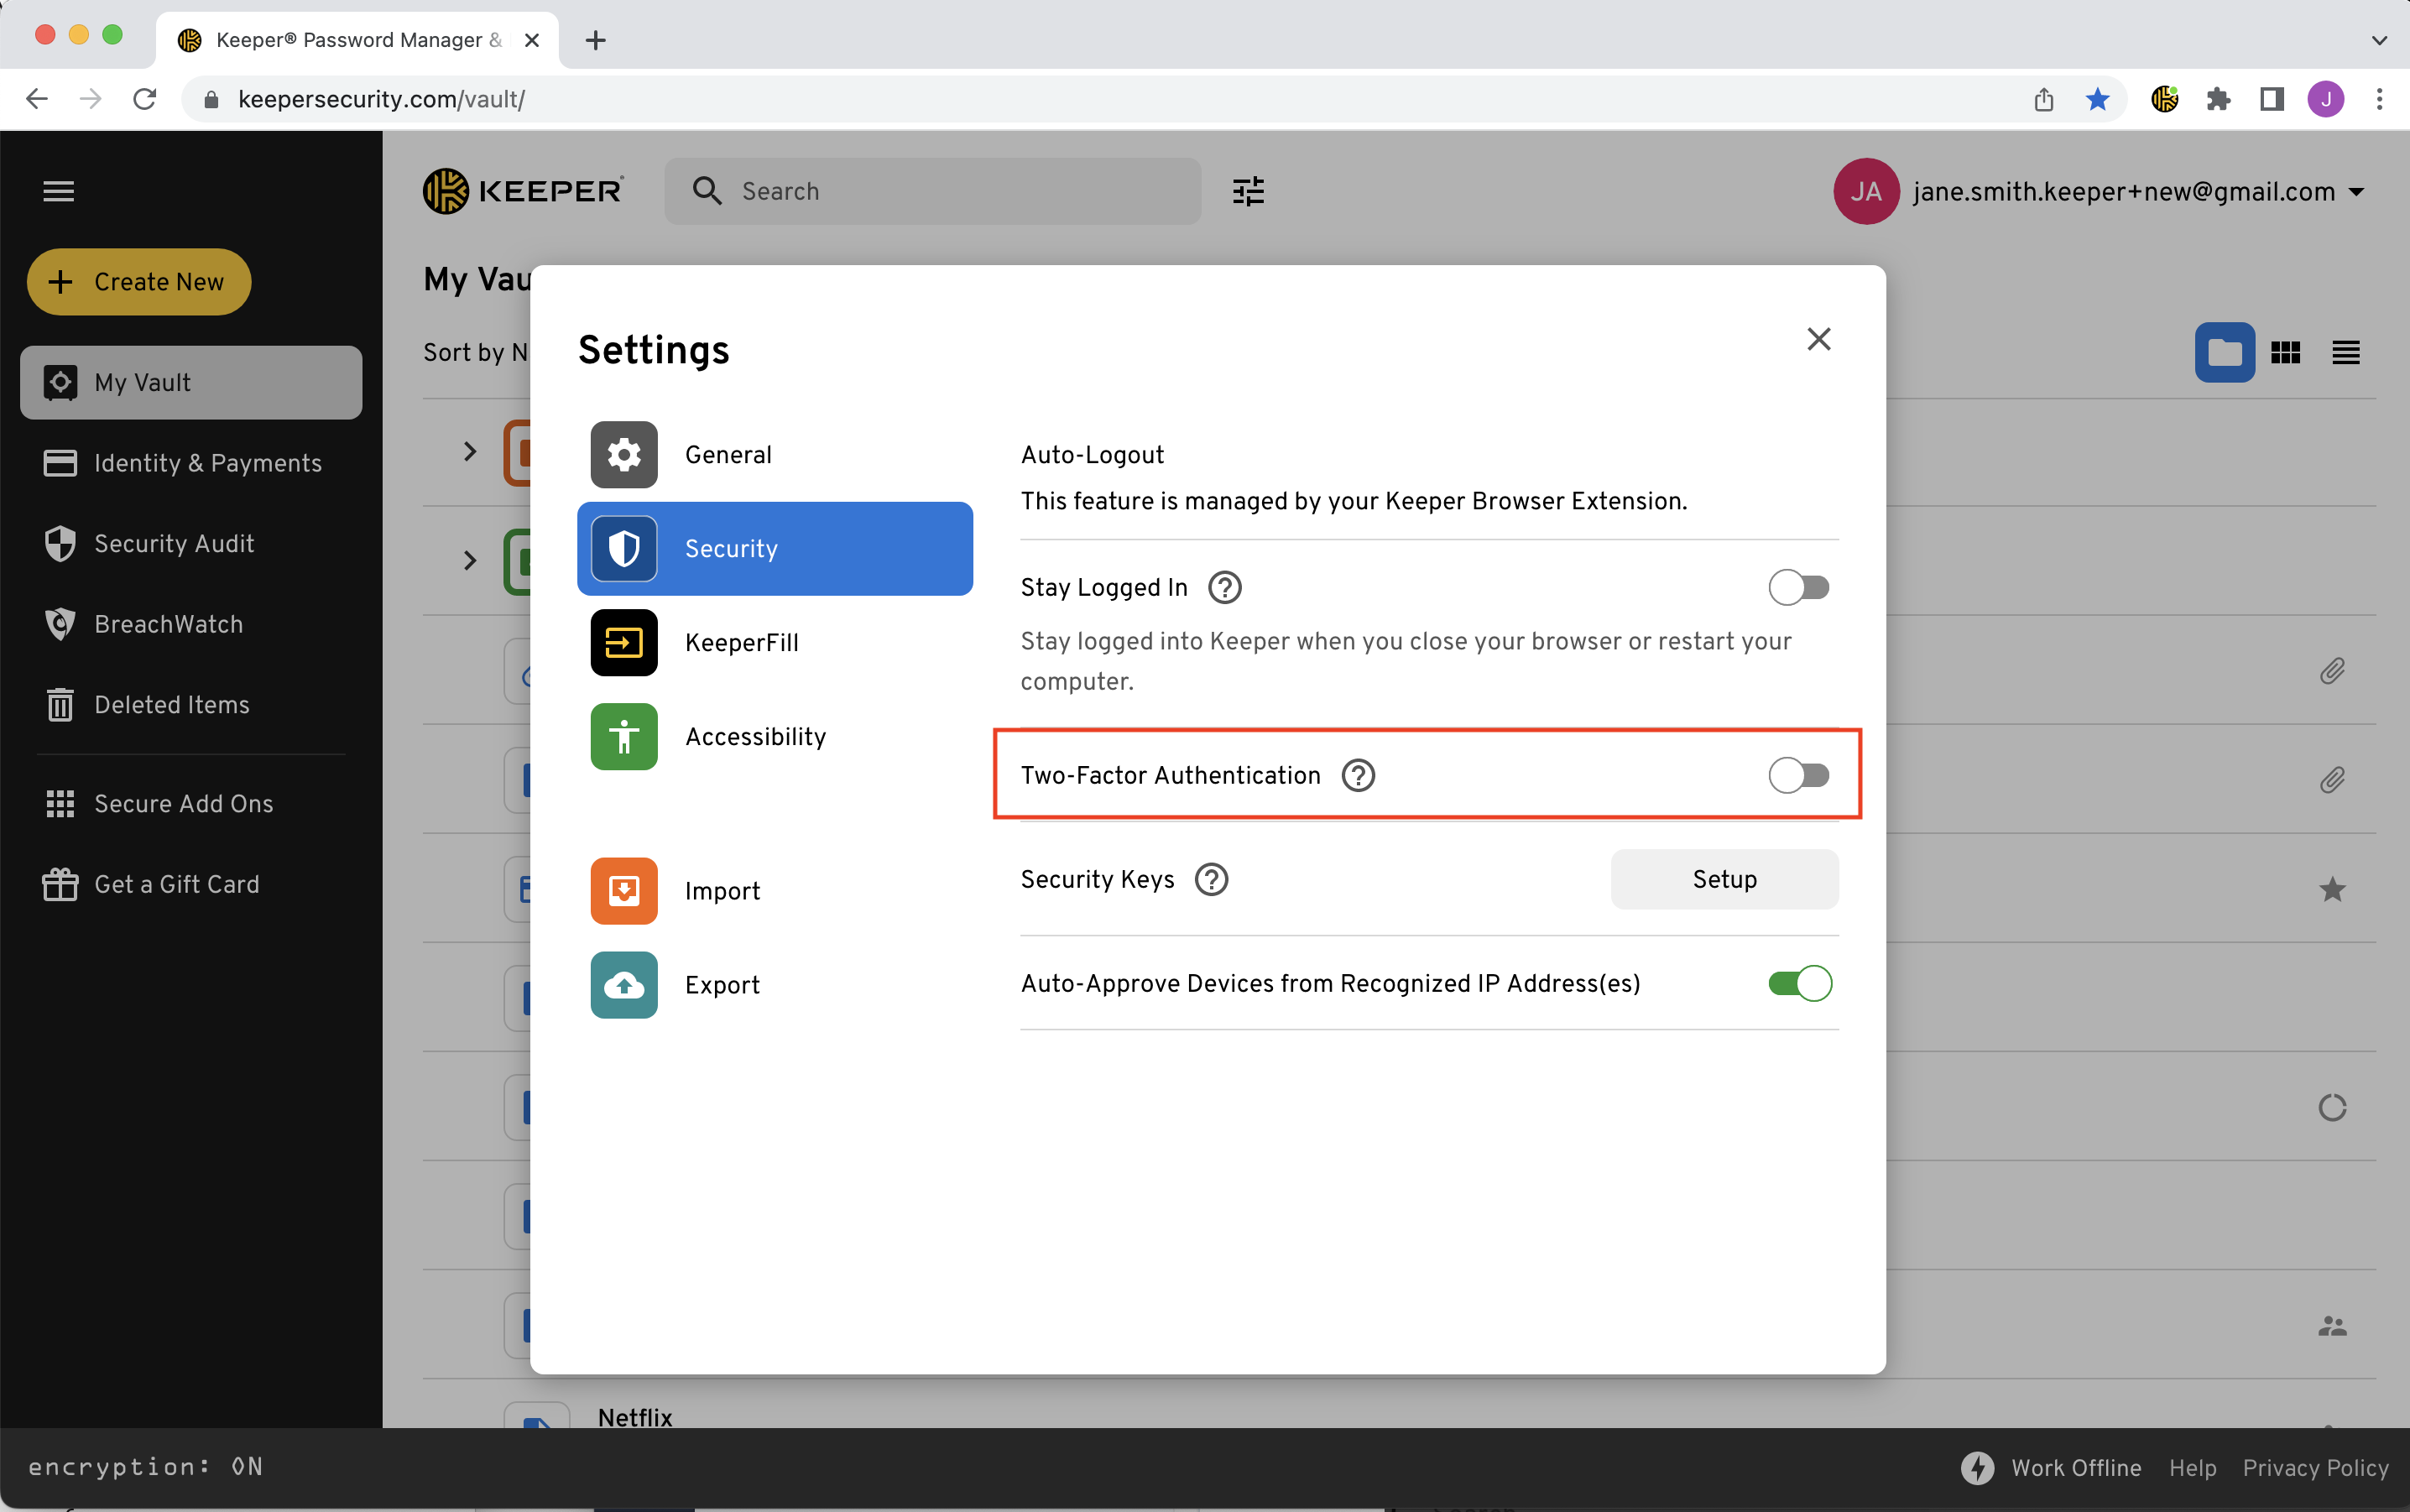
From the **Account Dropdown Menu**, select **Settings > Security** and toggle "Two-Factor Authentication" on.

![Account Dropdown > Settings](https://914511346-files.gitbook.io/~/files/v0/b/gitbook-x-prod.appspot.com/o/spaces%2F-LSGVtOTYUIkVBoYtFvK%2Fuploads%2FwiYt1YhfxBCFrzyPPo1A%2FScreen%20Shot%202023-04-13%20at%2012.43.03%20PM.png?alt=media\&token=2efd8438-a843-4e10-9be2-32c5c12c653c)

<figure><img src="https://914511346-files.gitbook.io/~/files/v0/b/gitbook-x-prod.appspot.com/o/spaces%2F-LSGVtOTYUIkVBoYtFvK%2Fuploads%2Fw68yBQtUJ3nQMdlYhPZC%2FScreen%20Shot%202023-04-13%20at%2012.43.14%20PM.png?alt=media&#x26;token=982339fa-4c10-4463-ae7c-373cea7e4931" alt=""><figcaption><p>Settings > Security > Two-Factor Authentication</p></figcaption></figure>

Select a Two-Factor method and click **Next**, then follow the on-screen prompts to complete the setup (more on that [here](/user-guides/web-vault#two-factor-authentication)).

![Select a 2FA Method](https://914511346-files.gitbook.io/~/files/v0/b/gitbook-x-prod.appspot.com/o/spaces%2F-LSGVtOTYUIkVBoYtFvK%2Fuploads%2FdhKl62E9gVZVSWyuN9z3%2FScreen%20Shot%202023-04-13%20at%2012.48.20%20PM.png?alt=media\&token=474655d8-521b-4e66-91cb-6607689e5756)

{% hint style="info" %}
Keeper lets you skip entering your 2FA verification code every time you log in. Just be sure to check "Don't ask again on this device" during set up and you'll only need to enter the code once per device.
{% endhint %}

![Select the Two-Factor Code Duration](https://914511346-files.gitbook.io/~/files/v0/b/gitbook-x-prod.appspot.com/o/spaces%2F-LSGVtOTYUIkVBoYtFvK%2Fuploads%2F4f8Kui5sN95hEqNBg9iQ%2FScreen%20Shot%202023-04-13%20at%2012.49.51%20PM.png?alt=media\&token=4e507943-095f-4ee9-a94c-f1d3878f4588)

## Create a Record

With Keeper, your passwords, logins and other personal information are saved in a private, digital vault. It is here where you can view and edit all of your website login credentials and details, as well as store important files and photos. Watch the video below or continue reading to learn how.

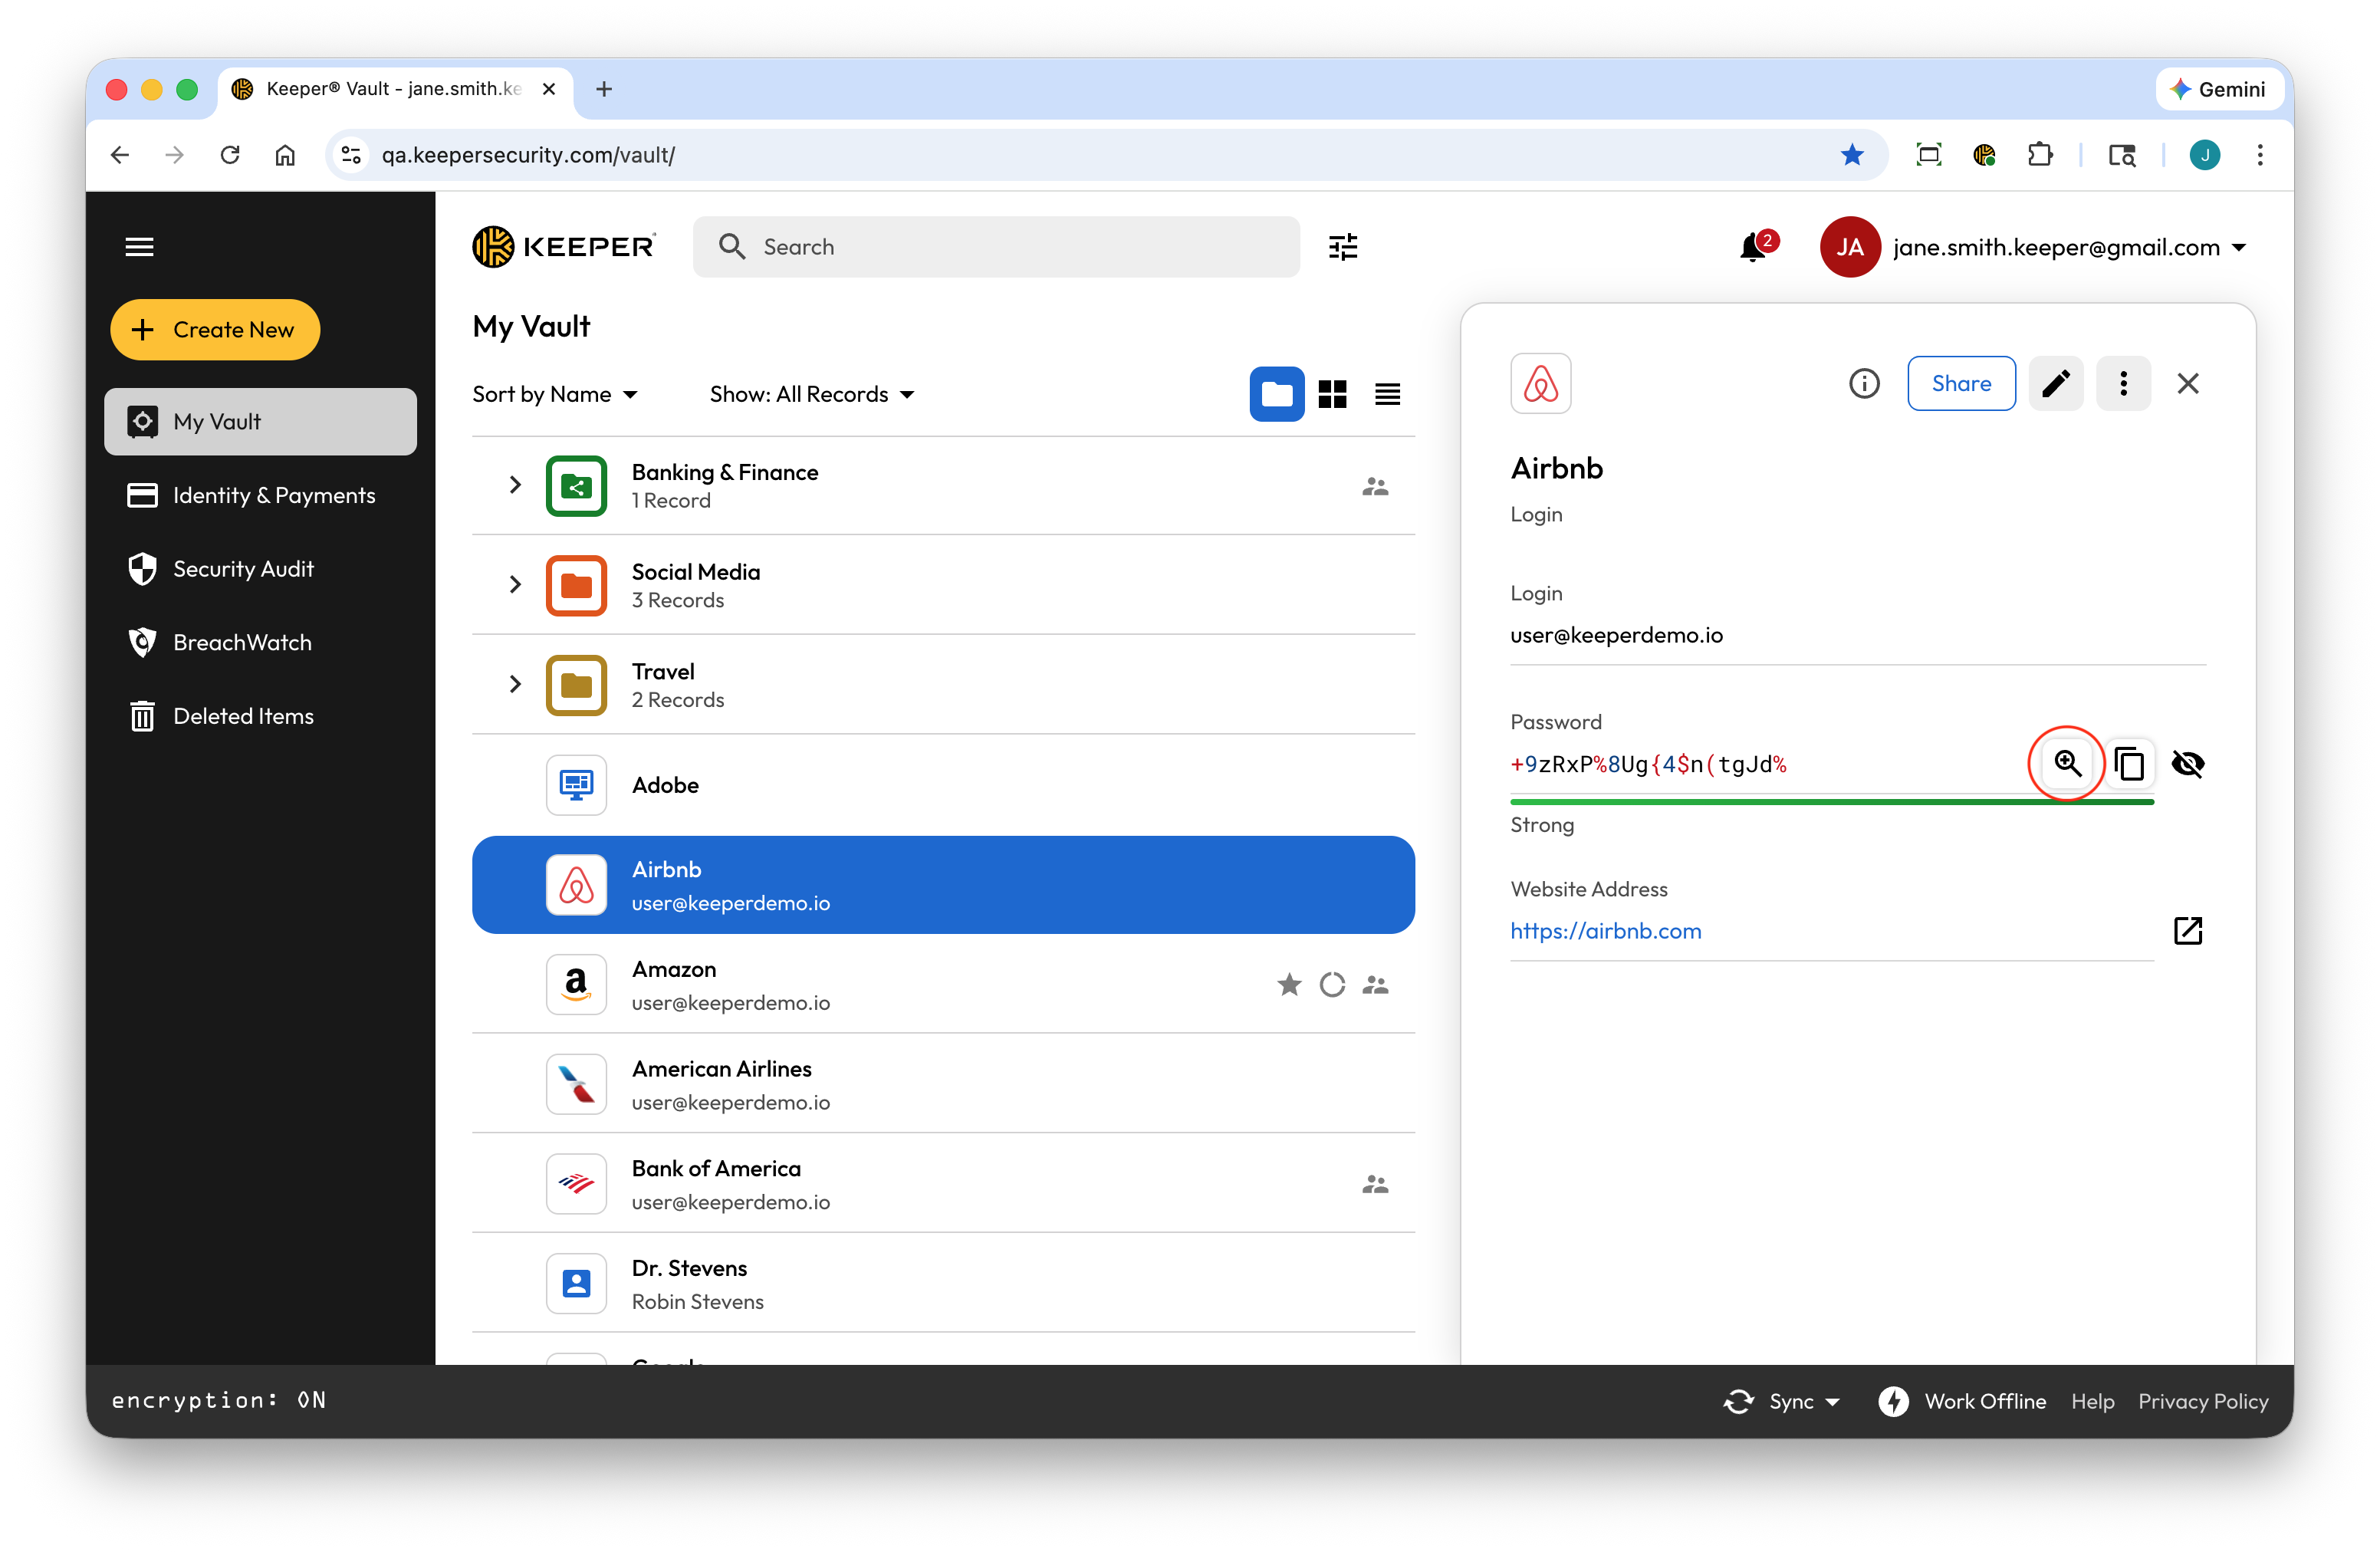
Click **Create New > Record** and select the [record type](/user-guides/record-types) from the dropdown menu. Next, enter the record details listed below (this is for the default "Login" record type, record fields will vary by the record type you selected).

* Enter a Record **Title**
* Enter the **Login** (Username or Email)
* Enter the **Password/Passkey** or click the **dice icon** to generate one (more on that [here](/user-guides/web-vault#password-generator))
* Enter the **Website Address**
* Add [Attachments](/user-guides/web-vault#secure-file-storage), a [Two-Factor Code](/user-guides/web-vault#two-factor-codes-for-totp), [Custom Fields](/user-guides/web-vault#custom-fields) and Notes

Click **Save** to finish.

{% embed url="<https://vimeo.com/585564101?fe=sh&fl=pl>" %}
Create a Record
{% endembed %}

## Create Folders & Subfolders

{% hint style="info" %}
This guide covers Keeper's "Classic" Folder System, if you would like more information about our new Nested Share System, click [here](/user-guides/sharing/nested-shared-subfolders).
{% endhint %}

Once you have created a few records you can begin organizing your records into folders and subfolders. Watch the video below or continue reading to learn how.

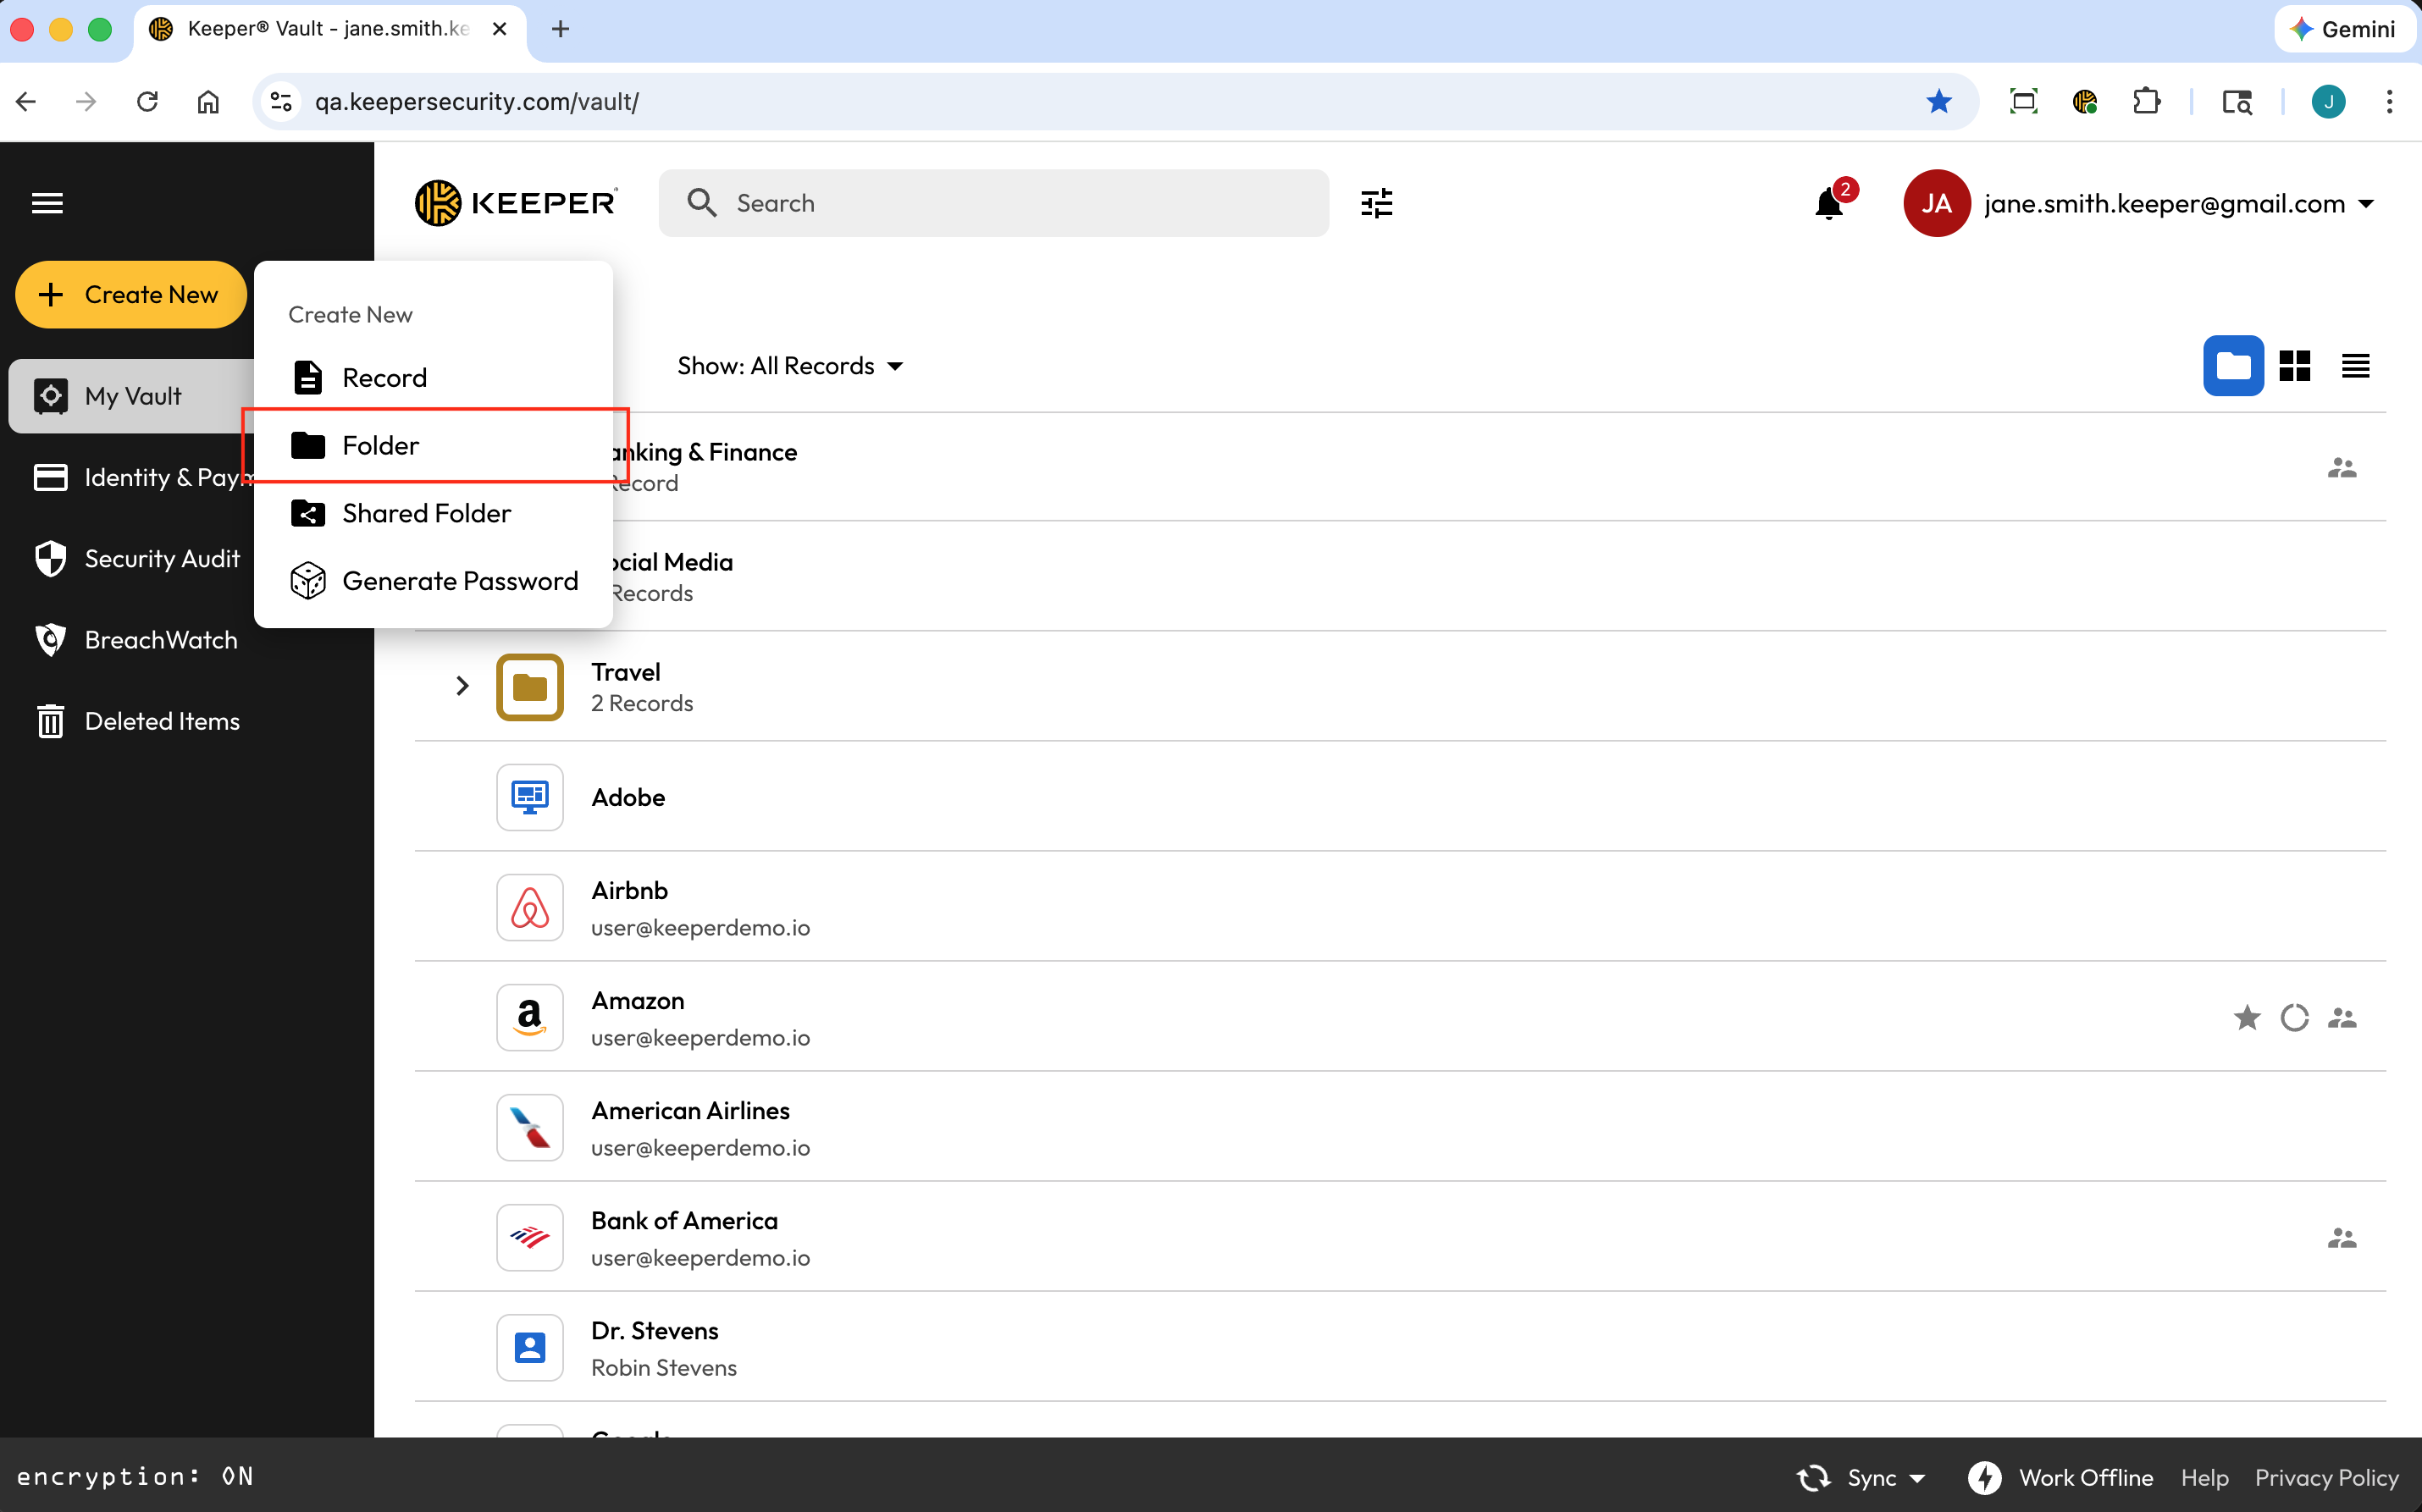
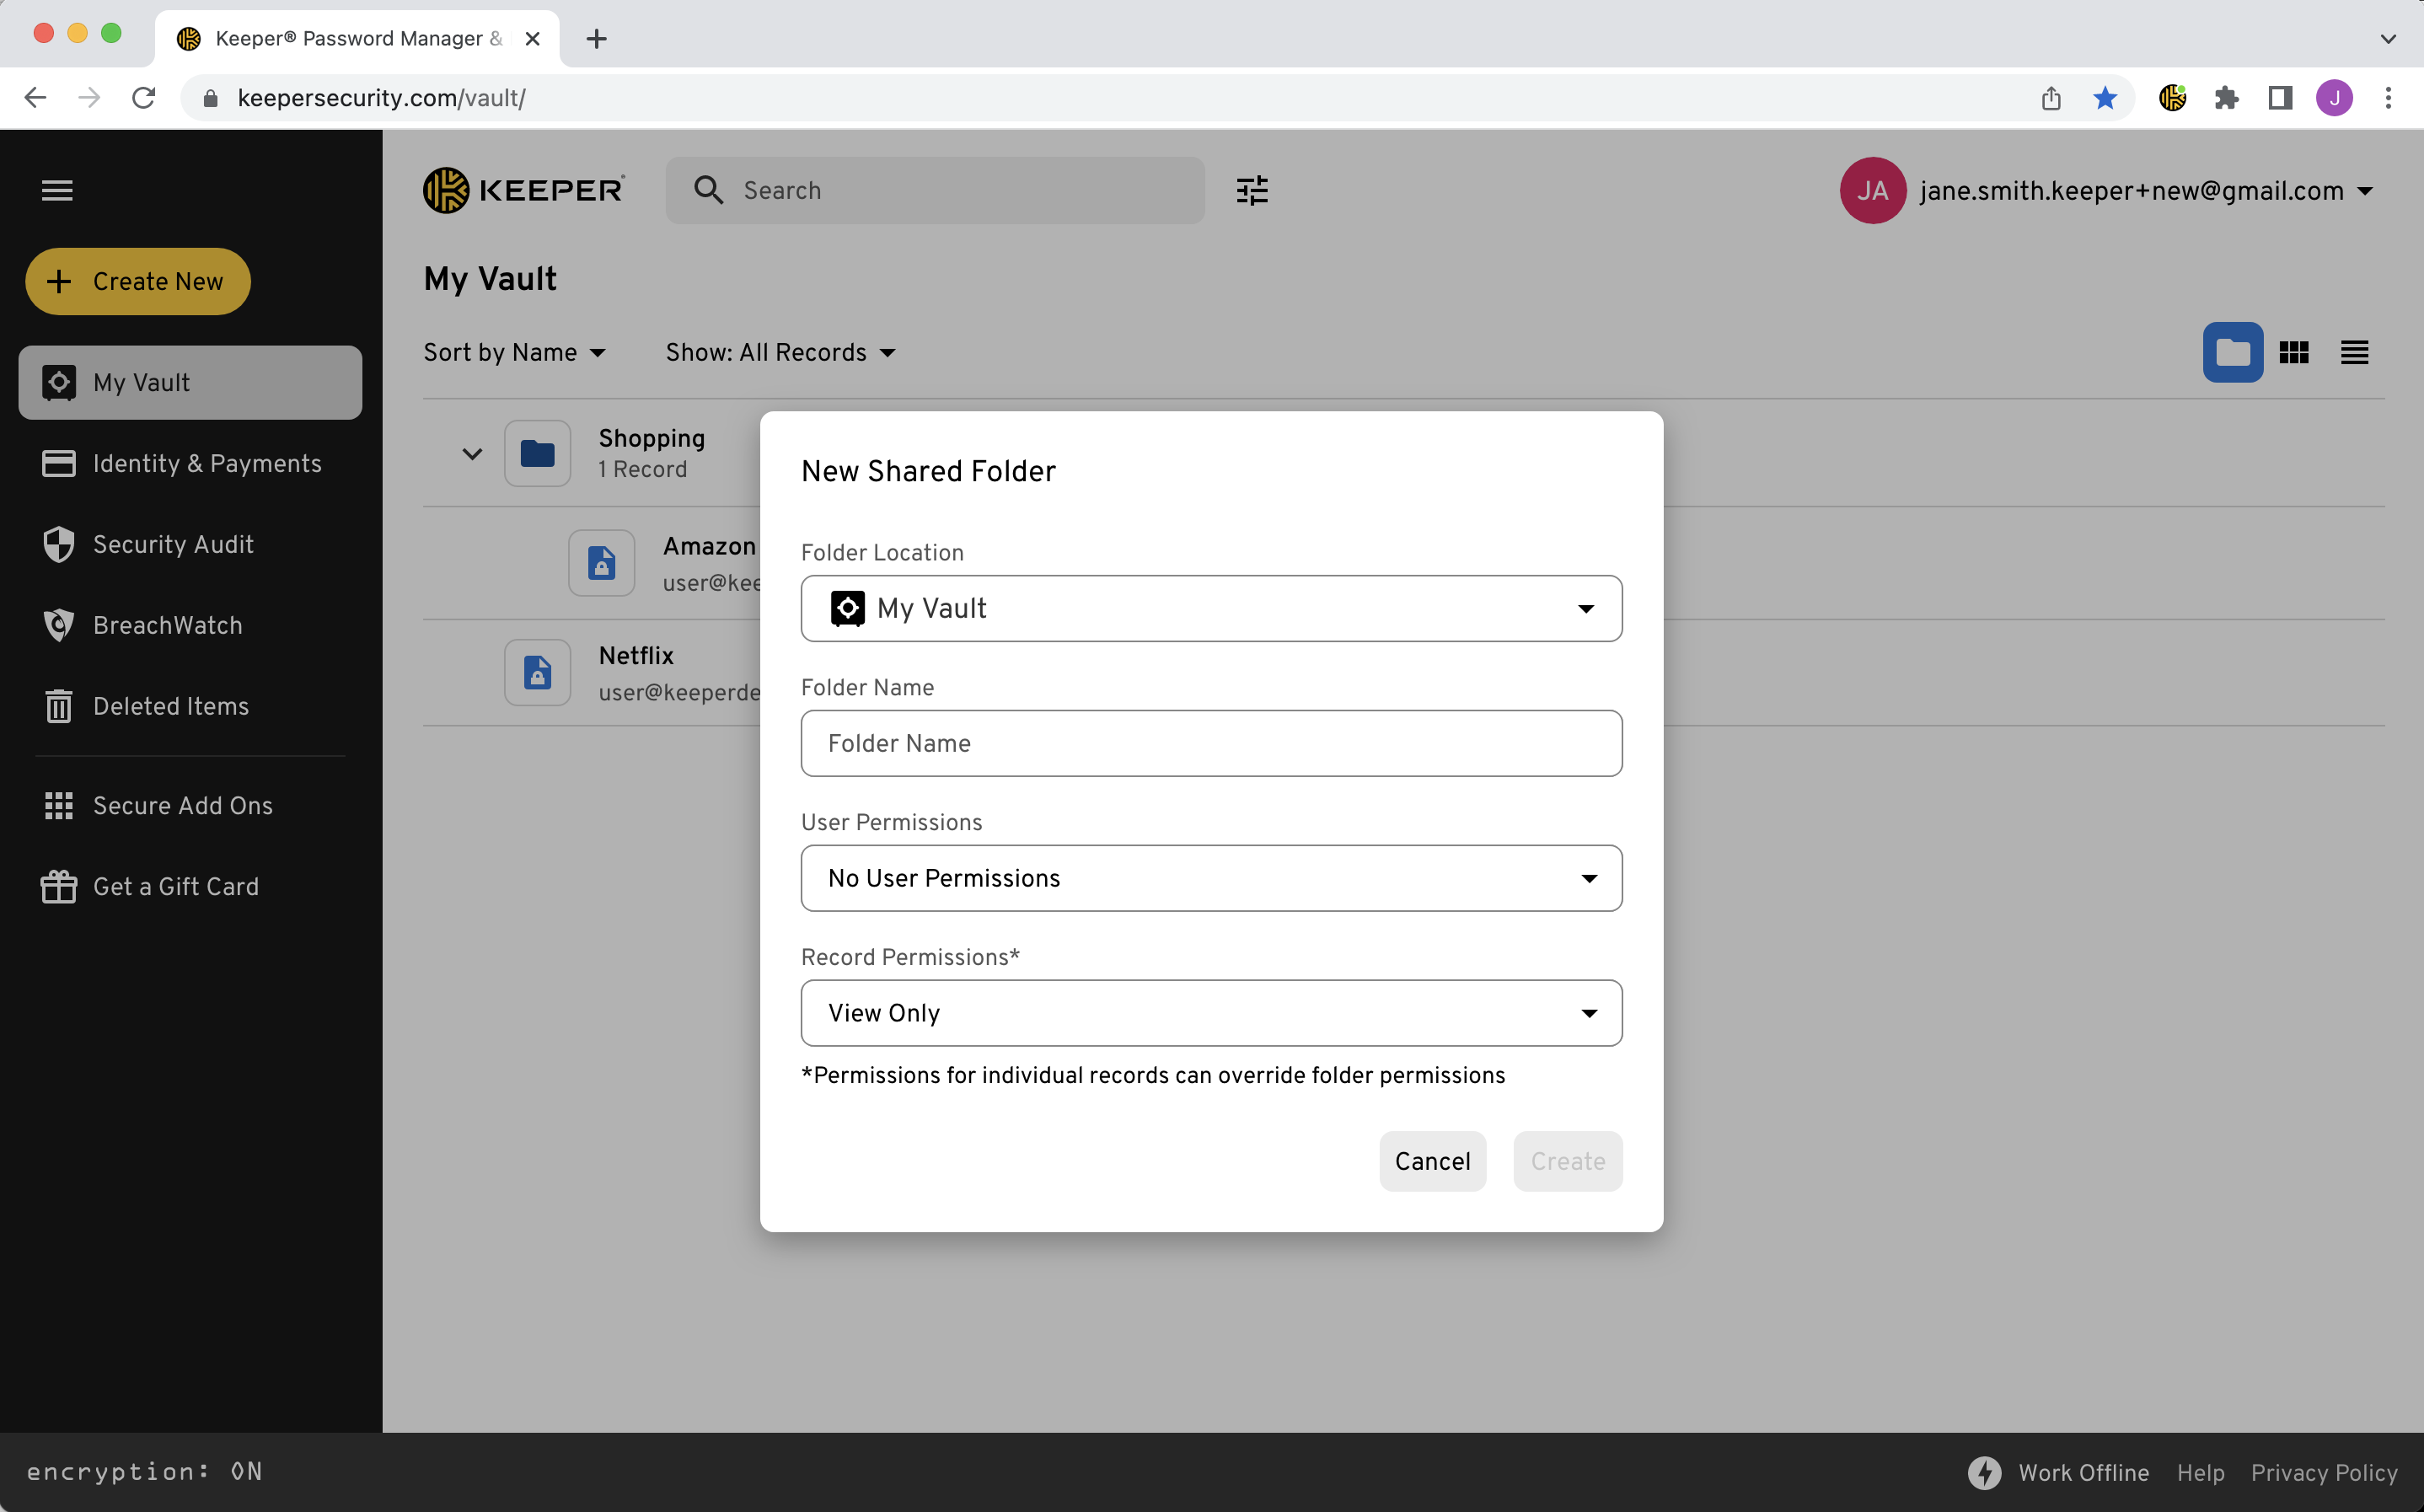
To create a folder, click **Create New > Folder**. Enter a name for the folder and click **Create**.

<figure><img src="https://914511346-files.gitbook.io/~/files/v0/b/gitbook-x-prod.appspot.com/o/spaces%2F-LSGVtOTYUIkVBoYtFvK%2Fuploads%2FQ3gy8FX4VfdbwXoE4yvt%2FScreenshot%202026-02-27%20at%2012.23.12%E2%80%AFPM.png?alt=media&#x26;token=b549eced-7dd6-4db2-8ef2-0bdd965bf721" alt=""><figcaption><p>Create a Folder</p></figcaption></figure>

To create a subfolder, right-click on an existing/parent folder and select **New Folder**.

<figure><img src="https://docs.keeper.io/en/~gitbook/image?url=https%3A%2F%2F914511346-files.gitbook.io%2F%7E%2Ffiles%2Fv0%2Fb%2Fgitbook-x-prod.appspot.com%2Fo%2Fspaces%252F-LSGVtOTYUIkVBoYtFvK%252Fuploads%252FAJFKZvbSEtzzyf87GyxT%252FScreen%2520Shot%25202023-04-12%2520at%25201.02.46%2520PM.png%3Falt%3Dmedia%26token%3Df23fd4d7-e8d9-4867-b0d5-3d0d6166b72a&#x26;width=768&#x26;dpr=3&#x26;quality=100&#x26;sign=db8e919b&#x26;sv=2" alt=""><figcaption><p>Create a Subfolder</p></figcaption></figure>

{% embed url="<https://vimeo.com/585563908?fe=sh&fl=pl>" %}
Create a Folder
{% endembed %}

## Autofill Your Passwords

The KeeperFill Browser Extension autofills your logins and password into websites and apps. Once you've [downloaded KeeperFill](https://www.keepersecurity.com/download.html?t=f) for your browser, be sure to "pin" the extension (by right-clicking on the KeeperFill icon) so it's always visible in your browser window.

The first time you log into a site after downloading KeeperFill, you will be asked if you would like Keeper to autofill your login, click **Yes**. Moving forward, Keeper will automatically fill your username and password.

![Autofill Login Credentials Prompt](https://914511346-files.gitbook.io/~/files/v0/b/gitbook-x-prod.appspot.com/o/spaces%2F-LSGVtOTYUIkVBoYtFvK%2Fuploads%2FUYlNRUbemuKLUTf7Cqp1%2Fimage%20\(9\).avif?alt=media\&token=72eb1951-5dda-4144-a825-da4db6bf0775)

{% embed url="<https://vimeo.com/585559712>" %}
Autofill With KeeperFill
{% endembed %}

#### Change Your Passwords With KeeperFill

KeeperFill also makes it easy to change your passwords. When you visits a site's "Change Password" page, you will receive a prompt from Keeper asking if you would like help changing your password. Watch the video below or continue reading to learn how.

By clicking **Yes**, Keeper will walk you through a few quick steps to change your password and simultaneously update the record in your vault. These steps will include a series of prompts detailing the following actions:

* Autofill your old/current password
* Automatically generate and autofill a new secure password
* Confirm the changes and save them to your vault

![KeeperFill Password Change Prompt](https://914511346-files.gitbook.io/~/files/v0/b/gitbook-x-prod.appspot.com/o/spaces%2F-LSGVtOTYUIkVBoYtFvK%2Fuploads%2FzlHdDNT5VWnDY2absQI8%2FScreen%20Shot%202023-10-11%20at%201.01.07%20PM.png?alt=media\&token=78da31a4-53d8-4cfa-856d-e6ce95acae8a)

{% embed url="<https://vimeo.com/736584776?fe=sh&fl=pl>" %}

## Explore More Features

* [Sharing](/user-guides/sharing)
* [Shared Folders](/user-guides/web-vault#share-a-folder)
* [Share With Non-Keeper Users (One-Time Share)](/user-guides/sharing/one-time-share)
* [Deleted Items](/user-guides/web-vault#deleted-items)
* [Secure File Storage](/user-guides/web-vault#secure-file-storage)
* [Vault Settings](/user-guides/web-vault#settings)

{% hint style="info" %}
Visit our [Keeper 101 Videos page](https://www.keepersecurity.com/getting-started.html) for access to more tutorials for Web Vault & Desktop, iOS, Android and Browser Extension.
{% endhint %}


# iOS - iPhone & iPad

This Quick Start Guide will walk you through the set up steps and main features of the Keeper iOS App, linking additional resources throughout for more detailed instructions.

## Set Up Steps

Here we've covered the important set up steps and key features that will help get you up and running with Keeper in no time.

{% stepper %}
{% step %}
**Import Your Passwords**

Save time and seamlessly migrate your existing logins from browsers, files and other password managers. Navigate to the [Keeper Web Vault](https://keepersecurity.com/vault/) or download the [Keeper Desktop App](https://www.keepersecurity.com/download.html?t=d) and log in to begin an [import](/user-guides/web-vault#importing-passwords) then return to your iOS device. If you don't have any existing passwords saved or if you would rather start fresh, you can skip this step.
{% endstep %}

{% step %}
[**Enable Security, Login and Recovery Features**](#set-up-account-recovery)

Enable two-factor authentication (2FA), Account Recovery and Face ID.
{% endstep %}

{% step %}
[**Create Records and Folders**](#create-a-record)

Now it's time to create your first record and organize your vault into folders and subfolders.
{% endstep %}

{% step %}
[**Enable KeeperFill to Autofill Your Passwords**](#enable-keeperfill)

Autofill your logins and passwords across your devices with KeeperFill which is fully integrated into the login experience of every website and app on your iOS device.
{% endstep %}

{% step %}
[**Explore More Features**](#explore-more-features)

Now that you are up and running, its time to explore all the other features Keeper has to offer.
{% endstep %}
{% endstepper %}

## Create Your Account & Log In

Signing up for Keeper's iOS mobile app is easy. Simply visit the [App Store](https://apps.apple.com/us/app/keeper-password-manager-digital/id287170072) on your device and install **Keeper Password Manager**.

Once the download is complete, enter your email address. If you are not an existing user, you will be asked to create a **Master Password** which will be the only password you need to remember. We recommend that you choose a strong Master Password that is only used for Keeper — don't forget your Master Password!

Next, you will be asked to verify your email address by entering the security **verification code** that was sent to your email. Once verified, you will enter your Master Password and log in.

<div><figure><img src="/files/g8QTNntrrIbCrOwmg1Oj" alt="" width="188"><figcaption><p>Create Master Password</p></figcaption></figure> <figure><img src="/files/Q3vC97Fsa59nBXQvx7dp" alt="" width="188"><figcaption><p>Enter Verification Code</p></figcaption></figure></div>

## Set Up Account Recovery

If you forget your Master Password, Account Recovery will help you quickly regain access.

1. Tap **Account Recovery** from the **Settings** menu.
2. Confirm your Master Password and tap **Generate New Phrase.**
3. Once your recovery phrase has been generated, be sure to store it in a safe place. For added convenience, you will be given the option to copy or download it.
4. Check the box to confirm that you've stored your Recovery Phrase.
5. Tap **Set Recovery Phrase.**

<figure><img src="/files/yYuFQb847VM8ZkTUgu8b" alt="" width="188"><figcaption><p>Set Recovery Phrase</p></figcaption></figure>

## Protect Your Vault With 2FA

Add an extra layer of security when logging into your Keeper Vault by setting up Two-Factor Authentication (2FA).

To enable 2FA for your Keeper Vault, tap **Settings > Two-Factor Authentication.** Tap the dropdown menu under "Authentication Method" and select a notification method from the list of options and tap **Next**. Follow the on-screen prompts to complete the setup (more on that [here](/user-guides/ios#two-factor-authentication)).

<div><figure><img src="/files/9I6RQkMjN5vwP2HNKe2b" alt="" width="200"><figcaption><p>Enable Two-Factor Authentication</p></figcaption></figure> <figure><img src="/files/puMq2d9GyXX1LzfxQE5n" alt="" width="200"><figcaption><p>Notification Methods</p></figcaption></figure></div>

## Enable Biometric Login (Face ID)

Biometric login, especially when paired with Keeper is a time saving, convenience feature that allows you to login to Keeper with face recognization (Face ID). Watch the video below or continue reading to learn how enable it on your device.

From the Settings menu, toggle "Biometric Login" on. Once enabled, at the Keeper login screen, face your camera to authenticate.

<div><figure><img src="/files/bCcUvdfCL5Q8dOTPULd9" alt="" width="200"><figcaption><p>Enable Biometric Login</p></figcaption></figure> <figure><img src="/files/LIPyZjULALadGkM9gi6o" alt="" width="200"><figcaption><p>Authentication Prompt</p></figcaption></figure></div>

{% embed url="<https://vimeo.com/585563910>" %}
Biometric Login
{% endembed %}

## Enable KeeperFill

KeeperFill seamlessly autofills your logins and passwords into apps and web browsers. KeeperFill is fully integrated into the login experience of every website and app (iOS 12+).

#### iOS 17 and Below

1. Open your device's **Settings** app.
2. Scroll down and select **Passwords**.
3. Tap **Password Options** and ensure "AutoFill Passwords" is toggled on.
4. Select **Keeper** below both "Allow filling from" and "Set up Verification Codes using"
5. Follow the prompt and uncheck all other password managers (including keychain).

#### iOS 18 and Above

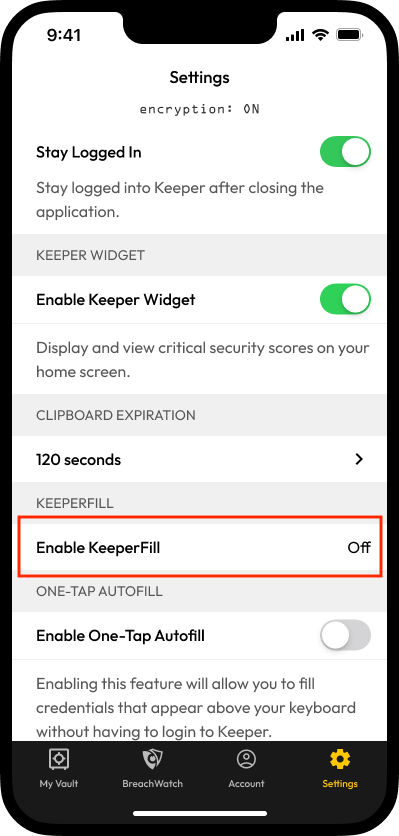
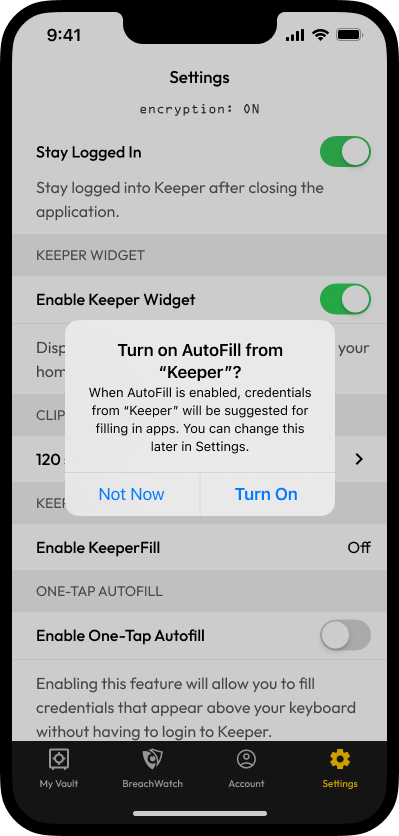
With the update of iOS 18, you can enable KeeperFill directly from the Keeper app in one quick step. From the **Settings** menu, tap **Enable KeeperFill** **> Turn On**.

<div><figure><img src="/files/t4e6s9El8cfj5Oi6usm3" alt="" width="200"><figcaption><p>Enable KeeperFill</p></figcaption></figure> <figure><img src="/files/OVkScagVp0ZheQ4Mh8gx" alt="" width="200"><figcaption><p>Confirmation Prompt</p></figcaption></figure></div>

## Autofill Your Passwords

To autofill your passwords into websites and apps using KeeperFill, watch the video below or continue reading to learn how.

Once the above setup steps are complete, you will see a **Passwords** button appear above the keyboard when logging into an app or website. By default, tapping **Passwords**, will prompt you to log in to Keeper and automatically launch KeeperFill.

KeeperFill will present a matching record from your vault. Alternatively, you can search for a record or create a new record. If there is a record match, tap **Fill** to autofill your login credentials.

<div><figure><img src="/files/p88SCbYeueOU0kPZMf62" alt="" width="200"><figcaption><p>Fill Record Match</p></figcaption></figure> <figure><img src="/files/JBJWS1pLGs2D0Et0CJfF" alt="" width="200"><figcaption><p>Email Autofilled</p></figcaption></figure></div>

{% embed url="<https://vimeo.com/585568801>" %}
KeeperFill
{% endembed %}

## Create a Record

With Keeper, your passwords, logins and other personal information are saved in a private, digital vault. It is here where you can view and edit all of your website/app login credentials and details, as well as store important files and photos. Watch the video below or continue reading to learn how to create your first record.

Tap the **create icon (+)** **>** **Create New Record** and enter a name for the record.

<div><figure><img src="/files/OdK3mR034GFK2rVTFQyi" alt="" width="200"><figcaption><p>+ Create</p></figcaption></figure> <figure><img src="/files/QO4go8whPqQf02wapktN" alt="" width="200"><figcaption><p>Create New Record</p></figcaption></figure></div>

Next, enter the record details listed below (this is for the default "Login" record type, record fields will vary based on the record type you select).

* Select the [Record Type](/user-guides/record-types)
* Enter the Email or Username
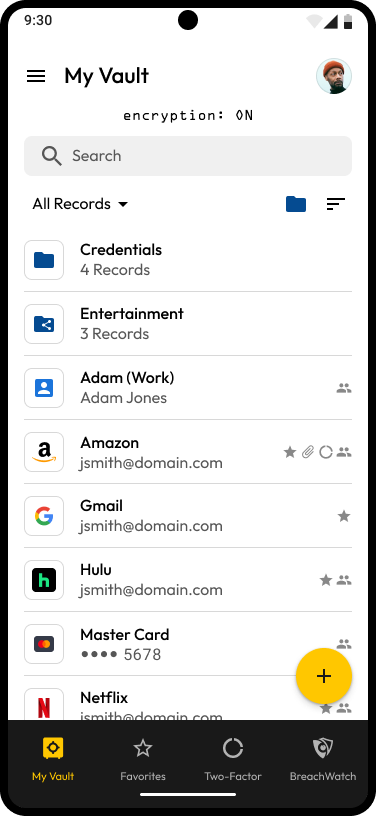
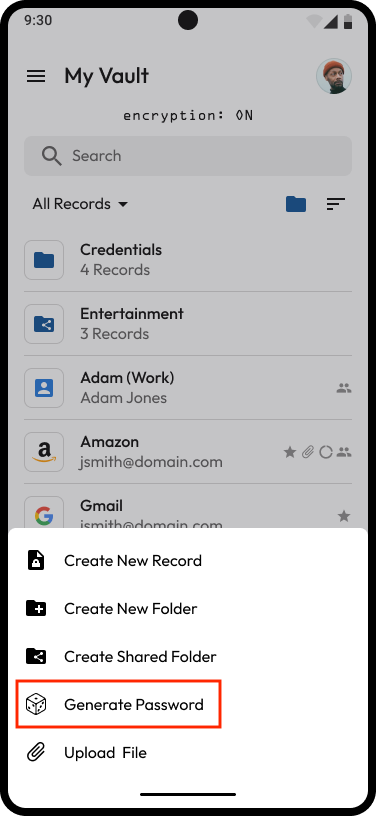
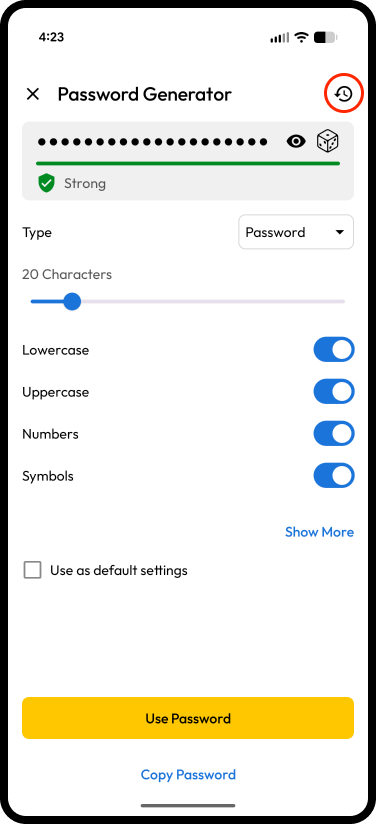
* Enter the **Password/Passkey** or click the **dice icon** to generate one (more on that [here](/user-guides/ios#password-and-passphrase-generators))
* Enter the **Website Address**
* Add a [Two-Factor Code](/user-guides/web-vault#two-factor-codes-for-totp)
* [Add Files or Photos](/user-guides/ios#secure-file-storage)
* [Scan a Document](/user-guides/ios#scan-a-document-ios-13)
* Add [Custom Fields](/user-guides/web-vault#custom-fields) and Notes

Tap **Save** to finish.

<figure><img src="/files/Nk2qkPq7Rfx9yHb2NEzy" alt="" width="188"><figcaption><p>Create a Record</p></figcaption></figure>

{% embed url="<https://vimeo.com/585569249>" %}
Create a Record
{% endembed %}

## Create a Folder

Easily organize your records into folders and subfolders.

To create a folder, tap **the create icon (+)** **>** **Create New Folder**, then enter a name for the folder.

<div><figure><img src="/files/OdK3mR034GFK2rVTFQyi" alt="" width="200"><figcaption><p>+ Create</p></figcaption></figure> <figure><img src="/files/EAaEgAvR3Vgw7644MCWi" alt="" width="200"><figcaption><p>Create New Folder</p></figcaption></figure></div>

To add records, select the folder to open it and Tap **+** and **Add Existing Record** or you can tap **Create New Record** to add a new record to the folder. To create a subfolder within the folder, tap **+** and **Create New Folder**.

## Explore More Features

* [Sharing & Shared Folders](/user-guides/ios#sharing)
* [Share With Non-Keeper Users (One-Time Share)](/user-guides/sharing/one-time-share#ios)
* [Secure File Storage](/user-guides/ios#secure-file-storage)

{% hint style="info" %}
Visit our [Keeper 101 Videos page](https://www.keepersecurity.com/getting-started.html) for access to more tutorials for Web Vault & Desktop, iOS, Android and Browser Extension.
{% endhint %}


# Android - Phone & Tablet

This Quick Start Guide will walk you through the setup steps and main features of Keeper's Android App, linking additional resources throughout for more detailed instructions.

## Set Up Steps

Here we'll cover the important set up steps and key features that will help get you up and running with Keeper in no time.

{% stepper %}
{% step %}
**Import Your Passwords**

Save time and seamlessly migrate your existing logins from browsers, files and other password managers. Navigate to the [Keeper Web Vault](https://keepersecurity.com/vault/) or download the [Keeper Desktop App](https://www.keepersecurity.com/download.html?t=d) and log in to begin an [import](/user-guides/web-vault#importing-passwords) then return to your iOS device. If you don't have any existing passwords saved or if you would rather start fresh, you can skip this step.
{% endstep %}

{% step %}
[**Enable Security, Login and Recovery Features**](#set-up-account-recovery)

Enable two-factor authentication (2FA), Account Recovery and Biometric Login.
{% endstep %}

{% step %}
[**Create Records and Folders**](#create-a-record)

Now it's time to create your first record and organize your vault into folders and subfolders.
{% endstep %}

{% step %}
[**Enable KeeperFill to Autofill Your Passwords**](#enable-keeperfill)

Autofill your logins and passwords across your devices with KeeperFill which is fully integrated into the login experience of every website and app on your Android device.
{% endstep %}

{% step %}
[**Explore More Features**](#explore-more-features-1)

Now that you are up and running, its time to explore all the other features Keeper has to offer.
{% endstep %}
{% endstepper %}

## Create Your Account & Log In

Signing up for Keeper's Android mobile app is easy. Simply visit the [Google Play](https://play.google.com/store/apps/details?id=com.callpod.android_apps.keeper) store on your device and install **Keeper Password Manager**. Watch the video below to learn how to create your account and log in on continue to learn more.

Once the download is complete, enter your email address. If you are not an existing user, you will be asked to create a **Master Password** which will be the only password you need to remember. We recommend that you choose a strong Master Password that is only used for Keeper — don't forget your Master Password!

Next, you will be asked to verify your email address by entering the security **verification code** that was sent to your email. Once verified, you will enter your Master Password and log in.

<div><figure><img src="/files/5VWGSDncpzVrld0qH9dg" alt="" width="188"><figcaption><p>Create Account</p></figcaption></figure> <figure><img src="/files/v51qNwKpOqbRgR69RdDS" alt="" width="188"><figcaption><p>Create Master Password</p></figcaption></figure></div>

{% embed url="<https://vimeo.com/585561067?share=copy>" %}
Create Your Account and Log In
{% endembed %}

## Set Up Account Recovery

If you forget your Master Password, Account Recovery will help you quickly regain access.

1. **Settings > Account Recovery**
2. Confirm your Master Password and tap **Generate New Phrase**.
3. Once your recovery phrase has been generated, be sure to store it in a safe place. For added convenience, you will be given the option to copy or download it.
4. Check the confirmation box to confirm that you've stored your Recovery Phrase.
5. Tap **Set Recovery Phrase**.

<figure><img src="/files/JyTWOaDSWiFttHBHPo8H" alt="" width="188"><figcaption><p>Set Recovery Phase</p></figcaption></figure>

## Protect Your Vault With 2FA <a href="#protect-your-vault-with-2fa" id="protect-your-vault-with-2fa"></a>

Add an extra layer of security when logging into your Keeper Vault by setting up Two-Factor Authentication (2FA).

To enable 2FA for your Keeper Vault, tap **Settings > Two-Factor Authentication.** Tap the dropdown menu under "Primary Method" and select a method from the list of options and tap **Next**. Follow the on-screen prompts to complete the setup (more on that [here](/user-guides/android#two-factor-authentication)).

<figure><img src="https://914511346-files.gitbook.io/~/files/v0/b/gitbook-x-prod.appspot.com/o/spaces%2F-LSGVtOTYUIkVBoYtFvK%2Fuploads%2FHbJPZ0HBpXMkqQMg4iv6%2Fimage%20(29).png?alt=media&#x26;token=f2cc45b3-9dd5-4646-b5c4-6c40bedbb851" alt="" width="188"><figcaption><p>Enable Two-Factor Authentication</p></figcaption></figure>

## Enable Biometric Login

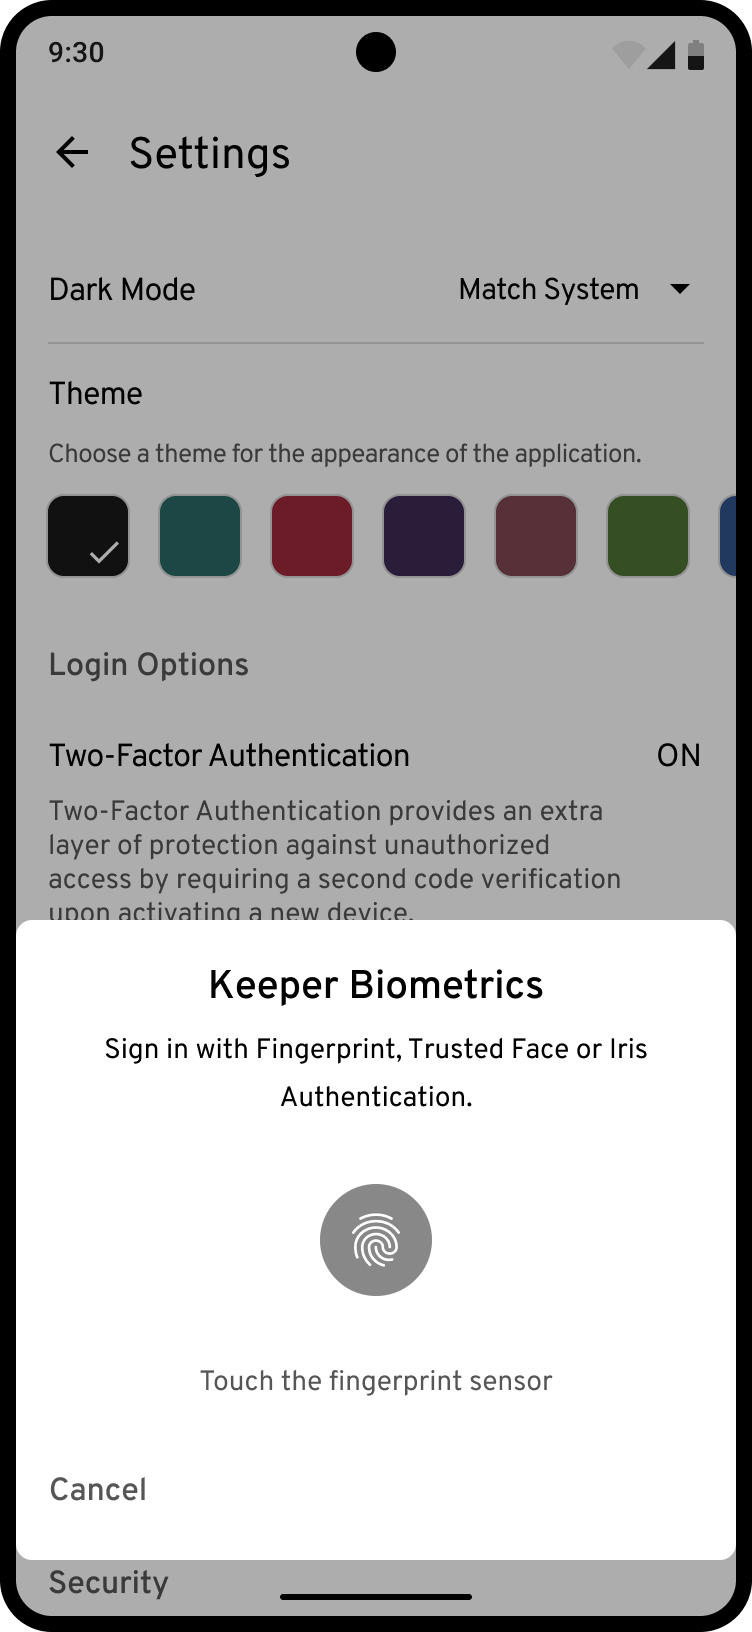
Biometric Login is a time-saving, convenience feature that allows you to sign into Keeper with just your fingerprint, face, or iris authentication. Watch the video below or continue reading to learn how enable it on your device.

From the Settings menu, toggle "Biometric Login" on.

Once enabled, at the Keeper login screen, tap **Biometric Login** and touch the fingerprint sensor when prompted (or use Face/Iris Authentication where available).

<div><figure><img src="/files/qjQxOyMIMbiLSD36cNsG" alt="" width="188"><figcaption><p>Enable Biometric Login</p></figcaption></figure> <figure><img src="/files/e0gc6JJ9LnKv9Rs1yGsE" alt="" width="188"><figcaption><p>Sign in With Biometrics</p></figcaption></figure> <figure><img src="/files/S77hEhUIQ4Bu88cYyvqw" alt="" width="188"><figcaption><p>Authentication</p></figcaption></figure></div>

{% embed url="<https://vimeo.com/585563712>" %}
Biometric Login Android Overview
{% endembed %}

## Enable KeeperFill

KeeperFill seamlessly autofills your logins and passwords into apps and web browsers. KeeperFill is available on Android 9 and newer. For the best experience, please update your Android device to the latest version.

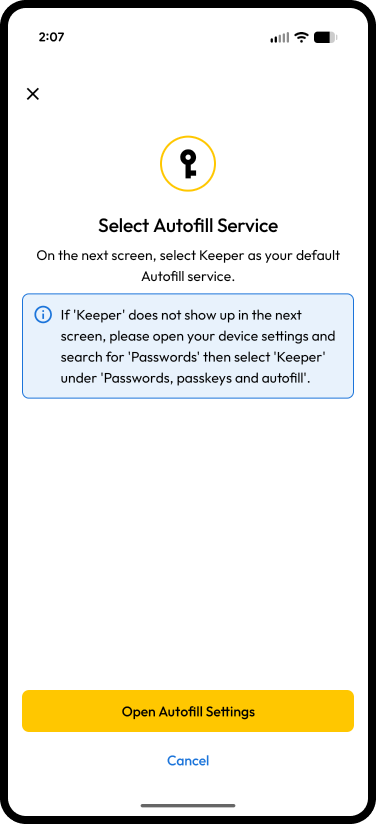
1. To enable KeeperFill, navigate to Keeper's **Settings** menu, toggle **"KeeperFill" on** and tap **Set Up > Open Autofill Settings**.

<div><figure><img src="https://914511346-files.gitbook.io/~/files/v0/b/gitbook-x-prod.appspot.com/o/spaces%2F-LSGVtOTYUIkVBoYtFvK%2Fuploads%2F2BBem92EIqi4DKiUVCEt%2Fimage%20(14).png?alt=media&#x26;token=3a402fb4-dc87-4e0f-a1c2-1fde5319ed77" alt="" width="188"><figcaption><p>Settings Menu</p></figcaption></figure> <figure><img src="https://914511346-files.gitbook.io/~/files/v0/b/gitbook-x-prod.appspot.com/o/spaces%2F-LSGVtOTYUIkVBoYtFvK%2Fuploads%2FQBeRCFc0E8LbCbvDX6Kp%2Fimage%20(15).png?alt=media&#x26;token=aa215d49-c88d-44d9-8169-fa999683757f" alt="" width="188"><figcaption><p>Enable KeeperFill</p></figcaption></figure> <figure><img src="https://914511346-files.gitbook.io/~/files/v0/b/gitbook-x-prod.appspot.com/o/spaces%2F-LSGVtOTYUIkVBoYtFvK%2Fuploads%2Fo4LQr2odefJO6J9C5gz6%2Fimage%20(33).png?alt=media&#x26;token=89c7f200-f077-41a9-a6e9-d2c18eca1c33" alt="" width="188"><figcaption><p>Set Up</p></figcaption></figure></div>

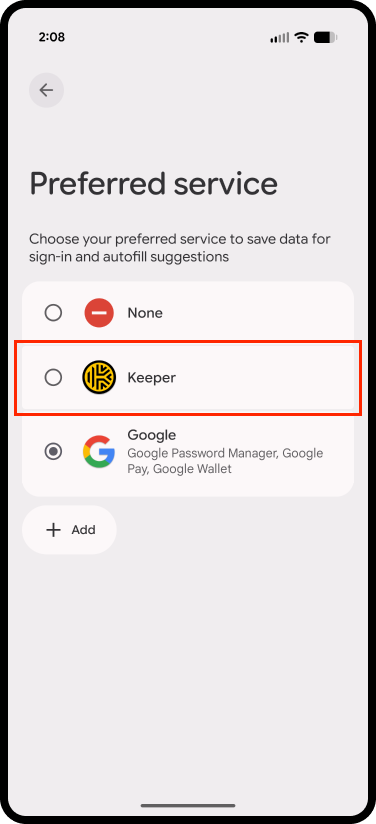
2. You’ll be redirected to your device Settings to select Keeper as your "Preferred service for passwords, passkeys & autofill".

<figure><img src="https://914511346-files.gitbook.io/~/files/v0/b/gitbook-x-prod.appspot.com/o/spaces%2F-LSGVtOTYUIkVBoYtFvK%2Fuploads%2FYdif9y5jioFUx50YZwzV%2Fimage%20(34).png?alt=media&#x26;token=936e6745-6da0-4aa3-980e-9d36286499a3" alt="" width="188"><figcaption><p>Select Keeper as Preferred Service</p></figcaption></figure>

3. You will then prompted to enable various settings on your device including:

* Selecting Keeper as the "Autofill service"
* Enabling KeeperFill in Chrome by selecting **Autofill using another service >** **Restart Chrome** (if Chrome is set as the default browser on your device).

4. Navigate back to Keeper and tap **Done**. You are now ready to start using KeeperFill.

{% hint style="info" %}
Android also supports “Additional Autofill Services” which create pop-ups via Google Credential Manager, a separate autofill option. Enabling Keeper as an additional service is not recommended as it will not trigger the fill options above your keyboard which provides the most reliable and seamless autofill experience.
{% endhint %}

## Autofill Your Passwords

To autofill your passwords into websites and apps using KeeperFill, watch the video below or continue reading to learn how.

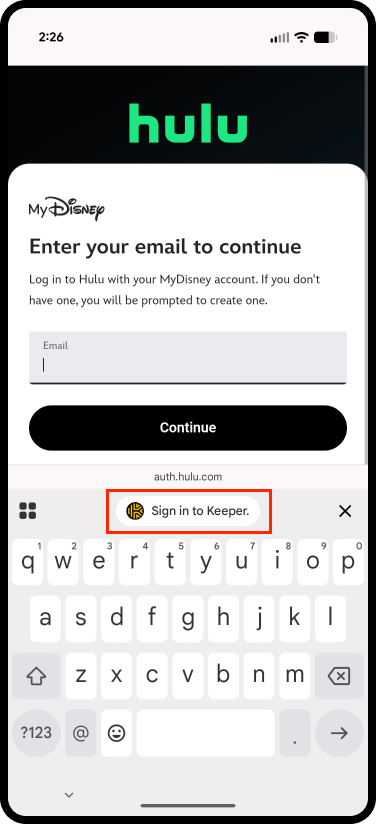
From an app or website login screen, tap **Sign in to Keeper** located above the keyboard and enter your Keeper Master Password.

<figure><img src="https://914511346-files.gitbook.io/~/files/v0/b/gitbook-x-prod.appspot.com/o/spaces%2F-LSGVtOTYUIkVBoYtFvK%2Fuploads%2FbOoi77rpFAq7Xm0S3G4D%2Fimage%20(18).png?alt=media&#x26;token=db2ba2b8-c46c-4910-850e-21d9b7a27af9" alt="" width="188"><figcaption><p>Sign In to Keeper</p></figcaption></figure>

If Keeper identifies a record match, your login will be displayed. Simply tap on your **login** next to the Keeper icon to autofill your credentials. Some apps and sites have more than one login screen and may require you to tap your login on each screen.

<div><figure><img src="https://914511346-files.gitbook.io/~/files/v0/b/gitbook-x-prod.appspot.com/o/spaces%2F-LSGVtOTYUIkVBoYtFvK%2Fuploads%2Fdjja0XWd34MT0ilQl01w%2Fimage%20(35).png?alt=media&#x26;token=bf82a2ac-7ce8-4f0b-979e-f1f82ed1c7e1" alt="" width="188"><figcaption><p>Select Record Match</p></figcaption></figure> <figure><img src="https://914511346-files.gitbook.io/~/files/v0/b/gitbook-x-prod.appspot.com/o/spaces%2F-LSGVtOTYUIkVBoYtFvK%2Fuploads%2F2S7mw0GH6JU4GPhlEDcS%2Fimage%20(19).png?alt=media&#x26;token=dff695ec-631e-49e2-8f67-b3f854fb474f" alt="" width="188"><figcaption><p>Login is Autofilled</p></figcaption></figure></div>

{% hint style="info" %}
KeeperFill presents somewhat differently depending on what Android version your device is running. Reference the screenshots below that are specific to the Android version you are currently using.
{% endhint %}

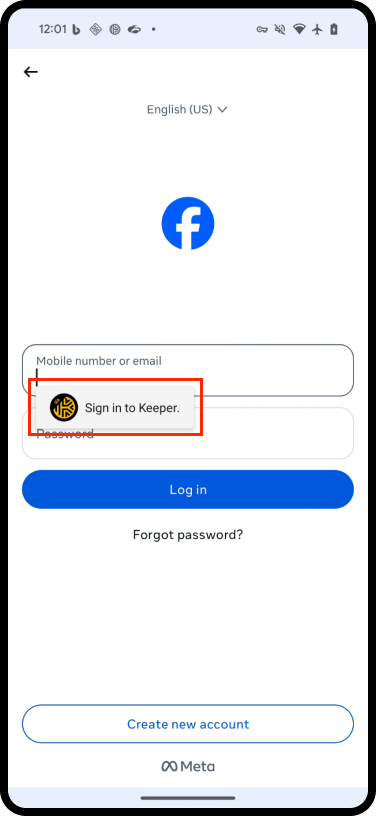
If your device's keyboard does not support autofill, KeeperFill's appearance and location will vary like in the examples below.

<div><figure><img src="https://914511346-files.gitbook.io/~/files/v0/b/gitbook-x-prod.appspot.com/o/spaces%2F-LSGVtOTYUIkVBoYtFvK%2Fuploads%2FLf5NmgBZsIAI5y1IaKfU%2Fimage%20(20).png?alt=media&#x26;token=043773e3-f621-48b2-b6d5-2565c5cd0562" alt="" width="188"><figcaption><p>Alternate KeeperFill Presentation</p></figcaption></figure> <figure><img src="https://914511346-files.gitbook.io/~/files/v0/b/gitbook-x-prod.appspot.com/o/spaces%2F-LSGVtOTYUIkVBoYtFvK%2Fuploads%2FhMVTSmIhTfBXPx6PLWbb%2Fimage%20(21).png?alt=media&#x26;token=55f8b5b8-be94-4660-b4c3-6cb06b20c64f" alt="" width="188"><figcaption><p>Alternate KeeperFill Presentation</p></figcaption></figure></div>

{% embed url="<https://vimeo.com/585568378>" %}
Autofill Logins with KeeperFill
{% endembed %}

## Create a Record

With Keeper, your passwords, logins and other personal information are saved in a private, digital vault. It is here where you can view and edit all of your website/app login credentials and details, as well as store important files and photos. Watch the video below or continue reading to learn how to create your first record.

Tap the **create icon (+)** **>** **Create New Record** and enter a name for the record.

<div><figure><img src="https://914511346-files.gitbook.io/~/files/v0/b/gitbook-x-prod.appspot.com/o/spaces%2F-LSGVtOTYUIkVBoYtFvK%2Fuploads%2FU8WG2v2nNwSO58WvEyOV%2Fimage%20(22).png?alt=media&#x26;token=a92ff2a4-f8b2-406f-a759-29dbc0d08ed7" alt="" width="188"><figcaption><p>+ Create</p></figcaption></figure> <figure><img src="https://914511346-files.gitbook.io/~/files/v0/b/gitbook-x-prod.appspot.com/o/spaces%2F-LSGVtOTYUIkVBoYtFvK%2Fuploads%2FL3mI5AC38ECIee8ZKiHa%2Fimage%20(23).png?alt=media&#x26;token=097e4d11-b57d-4e87-bc0e-607b25848570" alt="" width="188"><figcaption><p>Create New Record</p></figcaption></figure></div>

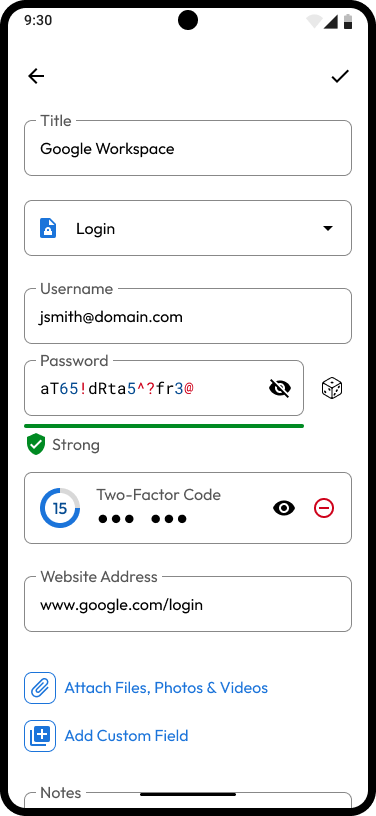
Next, enter the record details listed below (this is for the default "Login" record type, record fields will vary based on the record type you select).

* Select the [Record Type](/user-guides/record-types)
* Enter the **Username**
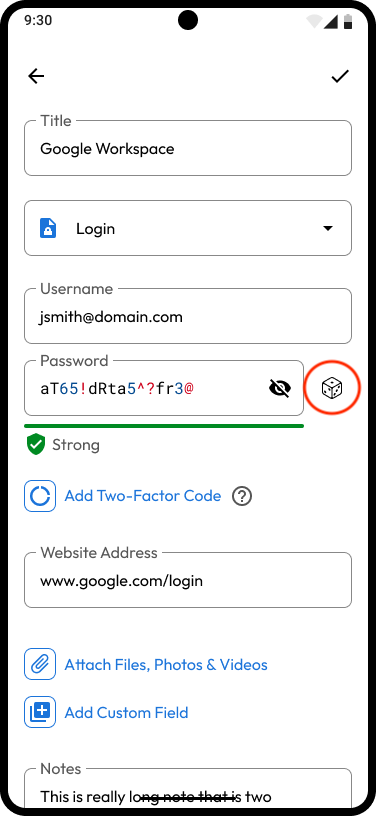
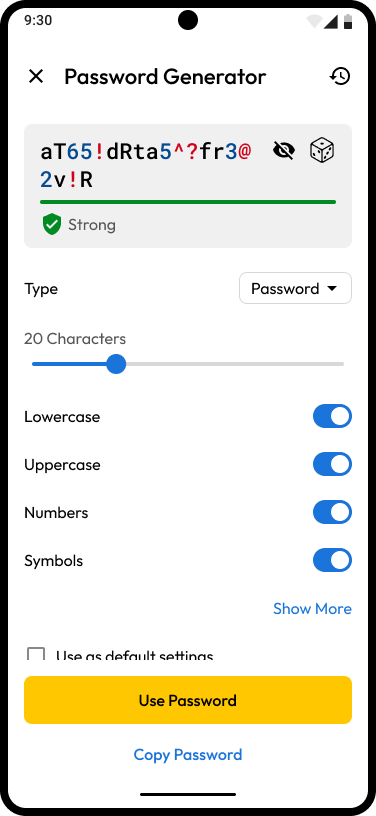
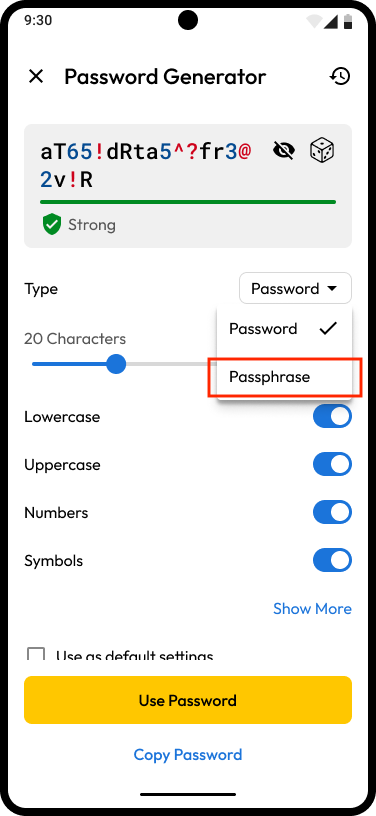
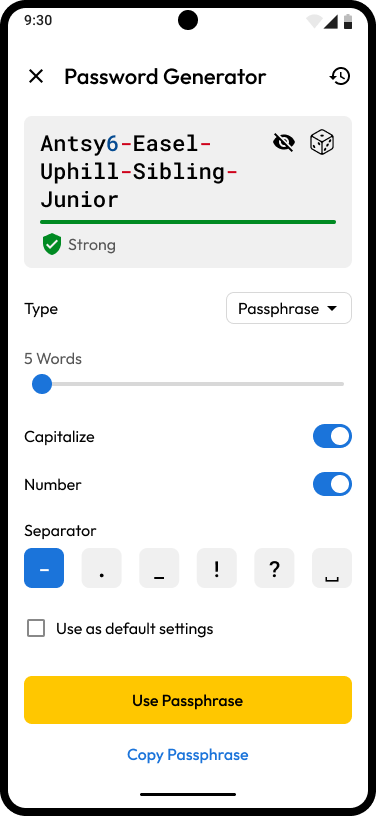
* Enter the **Password/Passkey** or click the **dice icon** to generate one (more on that [here](/user-guides/android#password-and-passphrase-generators))
* Add a [Two-Factor Code](/user-guides/web-vault#two-factor-codes-for-totp)
* Enter the **Website Address**
* [Attach Files, Photos, Videos](/user-guides/android#secure-file-storage), Add [Custom Fields](/user-guides/web-vault#custom-fields) and Notes

Tap **Save** to finish.

<div><figure><img src="https://914511346-files.gitbook.io/~/files/v0/b/gitbook-x-prod.appspot.com/o/spaces%2F-LSGVtOTYUIkVBoYtFvK%2Fuploads%2F75PCFlGSTsCGdfS8oqbl%2Fimage%20(24).png?alt=media&#x26;token=e045b731-ebad-4306-8488-d1ecfab1a14a" alt="" width="188"><figcaption><p>Create a New Record</p></figcaption></figure> <figure><img src="https://914511346-files.gitbook.io/~/files/v0/b/gitbook-x-prod.appspot.com/o/spaces%2F-LSGVtOTYUIkVBoYtFvK%2Fuploads%2Ft4gHg9juvy9Xnb4t2cmO%2Fimage%20(25).png?alt=media&#x26;token=f5c749da-678b-42c9-b6cd-0d4b3ea336b8" alt="" width="188"><figcaption><p>Saved Record</p></figcaption></figure></div>

{% embed url="<https://vimeo.com/585569056?share=copy>" %}
Create a Record
{% endembed %}

## Create a Folder

Easily organize your records into folders and subfolders. Watch the video below or continue reading to learn how.

To create a folder, tap **the create icon (+)** **>** **Create New Folder**, then enter a name for the folder.

To add records to the folder, Tap **+** and **Add Existing Record** or you can tap **Create New Record** to add a new record to the folder. To create a subfolder within the folder, tap **+** and **Create New Folder**.

<div><figure><img src="https://914511346-files.gitbook.io/~/files/v0/b/gitbook-x-prod.appspot.com/o/spaces%2F-LSGVtOTYUIkVBoYtFvK%2Fuploads%2FGLa9KkhoKI93cgc49NTH%2Fimage%20(26).png?alt=media&#x26;token=8510b16c-fb36-4737-aeed-069fdd260db9" alt="" width="188"><figcaption><p>+ Create</p></figcaption></figure> <figure><img src="https://914511346-files.gitbook.io/~/files/v0/b/gitbook-x-prod.appspot.com/o/spaces%2F-LSGVtOTYUIkVBoYtFvK%2Fuploads%2FJaiB6iOk8DPx5kDrHl9C%2Fimage%20(27).png?alt=media&#x26;token=d0cfefcc-6c84-4b96-ab23-79e4a6b9c367" alt="" width="188"><figcaption><p>Create New Folder</p></figcaption></figure> <figure><img src="https://914511346-files.gitbook.io/~/files/v0/b/gitbook-x-prod.appspot.com/o/spaces%2F-LSGVtOTYUIkVBoYtFvK%2Fuploads%2FMn5xnRh0dIHtTbJm0tgR%2Fimage%20(28).png?alt=media&#x26;token=848f3ee1-6753-48f7-bed9-51c78cccbeca" alt="" width="188"><figcaption><p>Add Records to Folder</p></figcaption></figure></div>

{% embed url="<https://vimeo.com/585566607>" %}
Create a Folder
{% endembed %}

## Explore More Features

* [Sharing](/user-guides/android#sharing)
* [Shared Folders](/user-guides/android#share-a-folder)
* [Share With Non-Keeper Users (One-Time Share)](/user-guides/sharing/one-time-share#android)
* [Secure File Storage](/user-guides/android#secure-file-storage)

{% hint style="info" %}
Visit our [Keeper 101 Videos page](https://www.keepersecurity.com/getting-started.html) for access to more tutorials for Web Vault & Desktop, iOS, Android and Browser Extension.
{% endhint %}


# Enterprise End-User

This end-user guide was created for Enterprise customers who login to Keeper using a Master Password.

![](https://914511346-files.gitbook.io/~/files/v0/b/gitbook-legacy-files/o/assets%2F-LSGVtOTYUIkVBoYtFvK%2F-MQJ5JqblNW9_Q5Cb-87%2F-MQJ5Swi99WrGJq2c2Jq%2Fenterprise-end-user-header.png?alt=media\&token=cf555e35-abc1-4053-8098-e4194dfe08da)

## **Welcome to Keeper**

{% embed url="<https://vimeo.com/640142297>" %}
Welcome to Keeper for Enterprise End Users
{% endembed %}

## Account Creation & Setup

Keeper is simple to install, easy to use and you’ll be up and running in just minutes.

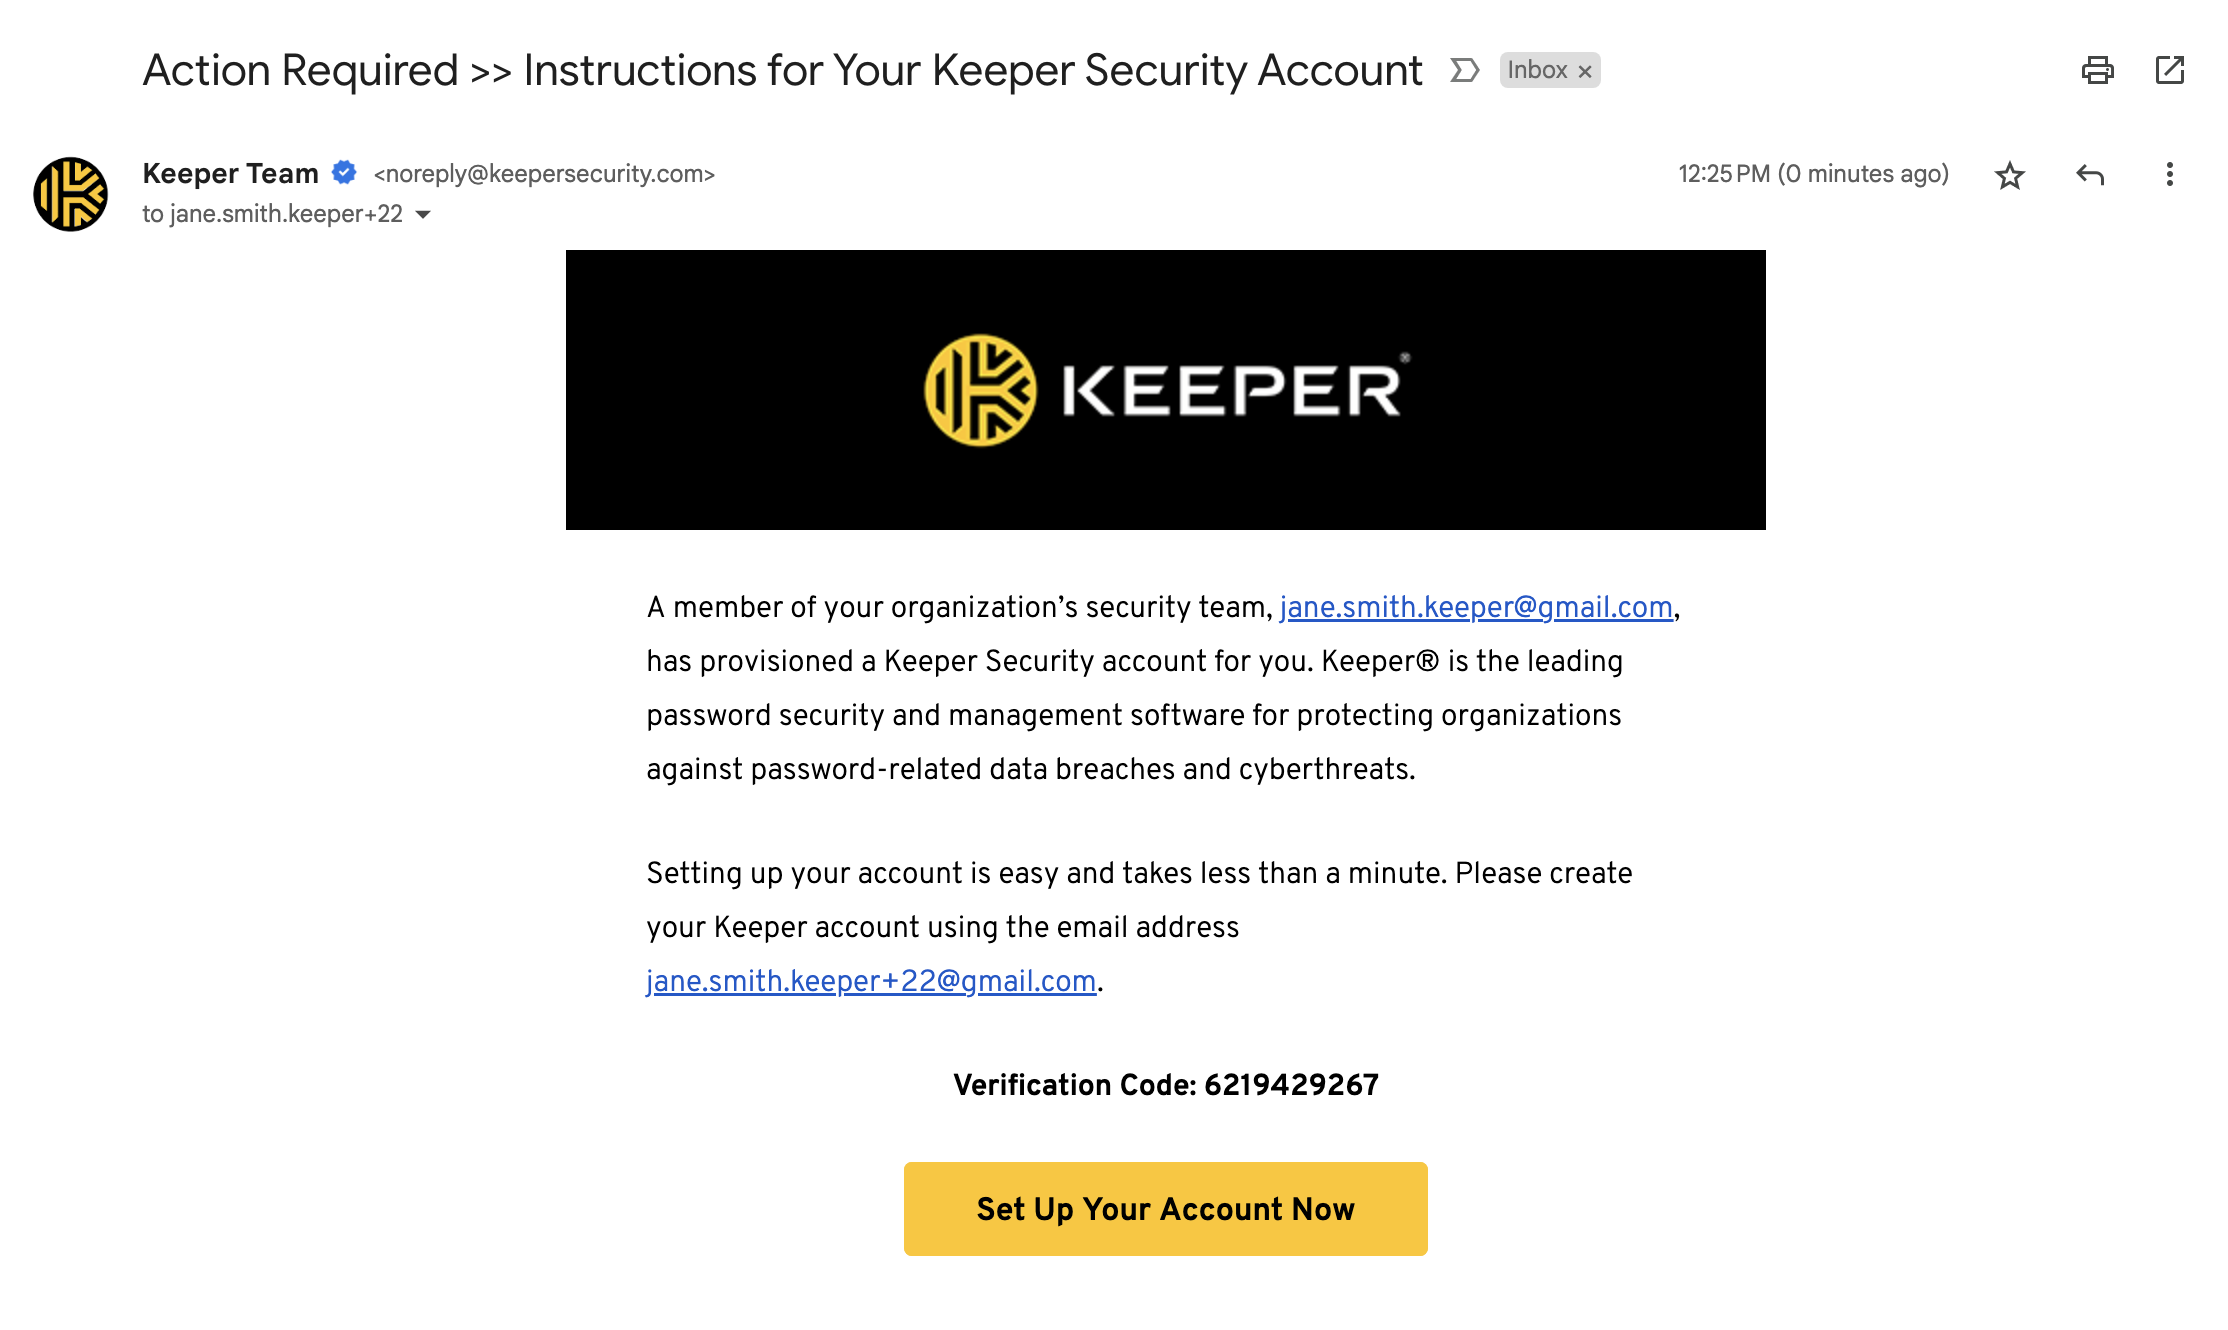
To create your Keeper account, click the **Set Up Your Account Now** button located in the email invitation sent by your Keeper Administrator.

<figure><img src="https://914511346-files.gitbook.io/~/files/v0/b/gitbook-x-prod.appspot.com/o/spaces%2F-LSGVtOTYUIkVBoYtFvK%2Fuploads%2FP8J2e1R28lUfG4K3ViRK%2FScreen%20Shot%202023-06-02%20at%2012.25.54%20PM.png?alt=media&#x26;token=e1c345e3-7081-4f55-a2a1-e70cdea68b1e" alt=""><figcaption><p>Keeper Email Invitation</p></figcaption></figure>

### Create a Master Password

Next, you will be asked to create a Master Password. It's important you choose a strong Master Password this only used for Keeper. This will be the only password you have to remember.

<figure><img src="https://914511346-files.gitbook.io/~/files/v0/b/gitbook-x-prod.appspot.com/o/spaces%2F-LSGVtOTYUIkVBoYtFvK%2Fuploads%2FL930mlUNSX4FPDthd9mI%2FScreen%20Shot%202023-06-02%20at%2011.47.31%20AM.png?alt=media&#x26;token=fdafa881-b8d0-4497-85a4-ff01dfc7819a" alt=""><figcaption><p>Create a Master Password</p></figcaption></figure>

### Enable Two-Factor Authentication (2FA)

Two-Factor Authentication (2FA) adds an extra layer of security to your vault by requiring a second passcode upon logging in. Some 2FA methods like Duo or RSA, require admin configuration. Others, like the Google or Microsoft Authenticator Apps, can be set up by individual end-users.

Click the **Account Dropdown Menu** (your email address) then click **Settings > Security** to enable 2FA for your vault.

<figure><img src="https://914511346-files.gitbook.io/~/files/v0/b/gitbook-x-prod.appspot.com/o/spaces%2F-LSGVtOTYUIkVBoYtFvK%2Fuploads%2FSZTvbD8hEM5BLbPEADHI%2FScreen%20Shot%202023-04-13%20at%2012.43.14%20PM.png?alt=media&#x26;token=38fcd3d1-3164-4ca7-b288-a130bb46ed4b" alt=""><figcaption><p>Enable Two-Factor Authentication</p></figcaption></figure>

<figure><img src="https://914511346-files.gitbook.io/~/files/v0/b/gitbook-x-prod.appspot.com/o/spaces%2F-LSGVtOTYUIkVBoYtFvK%2Fuploads%2FAKu5Z4I5Tg1VqfbRczlo%2FScreen%20Shot%202023-04-13%20at%2012.48.20%20PM.png?alt=media&#x26;token=c3cd74e9-7462-4bc5-aa74-2e1369439e67" alt=""><figcaption><p>Two-Factor Authentication Methods</p></figcaption></figure>

### Import Passwords

You can either manually enter your existing logins and passwords into your vault or Keeper can import your existing passwords directly from your [web browser](/user-guides/web-vault#from-web-browsers) (e.g. Safari, Chrome, Firefox), another [password manager](/user-guides/web-vault#from-password-managers), or from a [text file](https://docs.keeper.io/user-guides/pages/-LT-na6pfVSxeu2trL6J#from-text-file-.csv) (.csv).

To begin the import process, click the **Account Dropdown Menu** (your email address), then click **Settings > Import**.

<figure><img src="https://914511346-files.gitbook.io/~/files/v0/b/gitbook-x-prod.appspot.com/o/spaces%2F-LSGVtOTYUIkVBoYtFvK%2Fuploads%2F6NJGzt8v8uHOuTaXE5bR%2FScreen%20Shot%202023-04-12%20at%2011.49.52%20AM.png?alt=media&#x26;token=bdad2a95-dd12-470e-b43b-36a88d50b2fe" alt=""><figcaption><p>Import Your Passwords</p></figcaption></figure>

### Download Keeper Applications

Download the Keeper Desktop and Mobile Apps to access your Keeper Vault from any platform and use it for native applications across all of your devices.

{% hint style="info" %}
Visit: <https://keepersecurity.com/download> to download the Keeper App for all of your desktop and mobile devices.
{% endhint %}

Supported Platforms:

* PC, Mac and Linux desktops
* Chrome, Firefox, Safari, Edge and IE11 Web Browsers
* iOS (iPhone & iPad)
* Android (Phones & Tablets)

![Keeper Download Page](https://914511346-files.gitbook.io/~/files/v0/b/gitbook-x-prod.appspot.com/o/spaces%2F-LSGVtOTYUIkVBoYtFvK%2Fuploads%2F80ykzyy42kEkI7nZOb8M%2FScreen%20Shot%202023-06-01%20at%201.01.23%20PM.png?alt=media\&token=c12619df-0d47-4fbf-b522-ca8ec51a2442)

## Create a Record

Your passwords, databases, SSH keys, bank accounts and other sensitive data are saved in your private digital Keeper Vault (as "Records") and are encrypted on your device using 256-bit AES.

To begin, click **+ Create New > Record**.

* Choose a [Record Type](/user-guides/record-types) from the dropdown menu ("Login" is the default type)
* Enter a name for the Record and click **Next**
* Enter the Login (Username or Email)
* Enter the Password or click the **dice icon** to generate one (more on that [here](/user-guides/web-vault#password-generator))
* Enter the Website Address
* Enter Notes, add [Attachments](/user-guides/secure-file-storage), a [Two-Factor Code](/user-guides/web-vault#two-factor-codes-for-totp) and [Custom Fields](/user-guides/web-vault#custom-fields)
* Click **Save** to finish

<figure><img src="https://914511346-files.gitbook.io/~/files/v0/b/gitbook-x-prod.appspot.com/o/spaces%2F-LSGVtOTYUIkVBoYtFvK%2Fuploads%2FwCRiPzHvoWtI2s8ucqXh%2F2023-04-12_12-45-57%20(1).gif?alt=media&#x26;token=3001ad83-17b3-4bd8-8507-9cddf8630b02" alt=""><figcaption><p>Create a Record</p></figcaption></figure>

{% hint style="info" %}
For more information, please see our comprehensive [Web Vault and Desktop App Guide](/user-guides/web-vault).
{% endhint %}

## Autofill With KeeperFill

Keeper's Browser Extension called KeeperFill, autofills your logins and passwords into websites and apps. To download KeeperFill for your browser, visit [Keeper's Download page](https://www.keepersecurity.com/download.html?t=v). KeeperFill is available for every web browser.

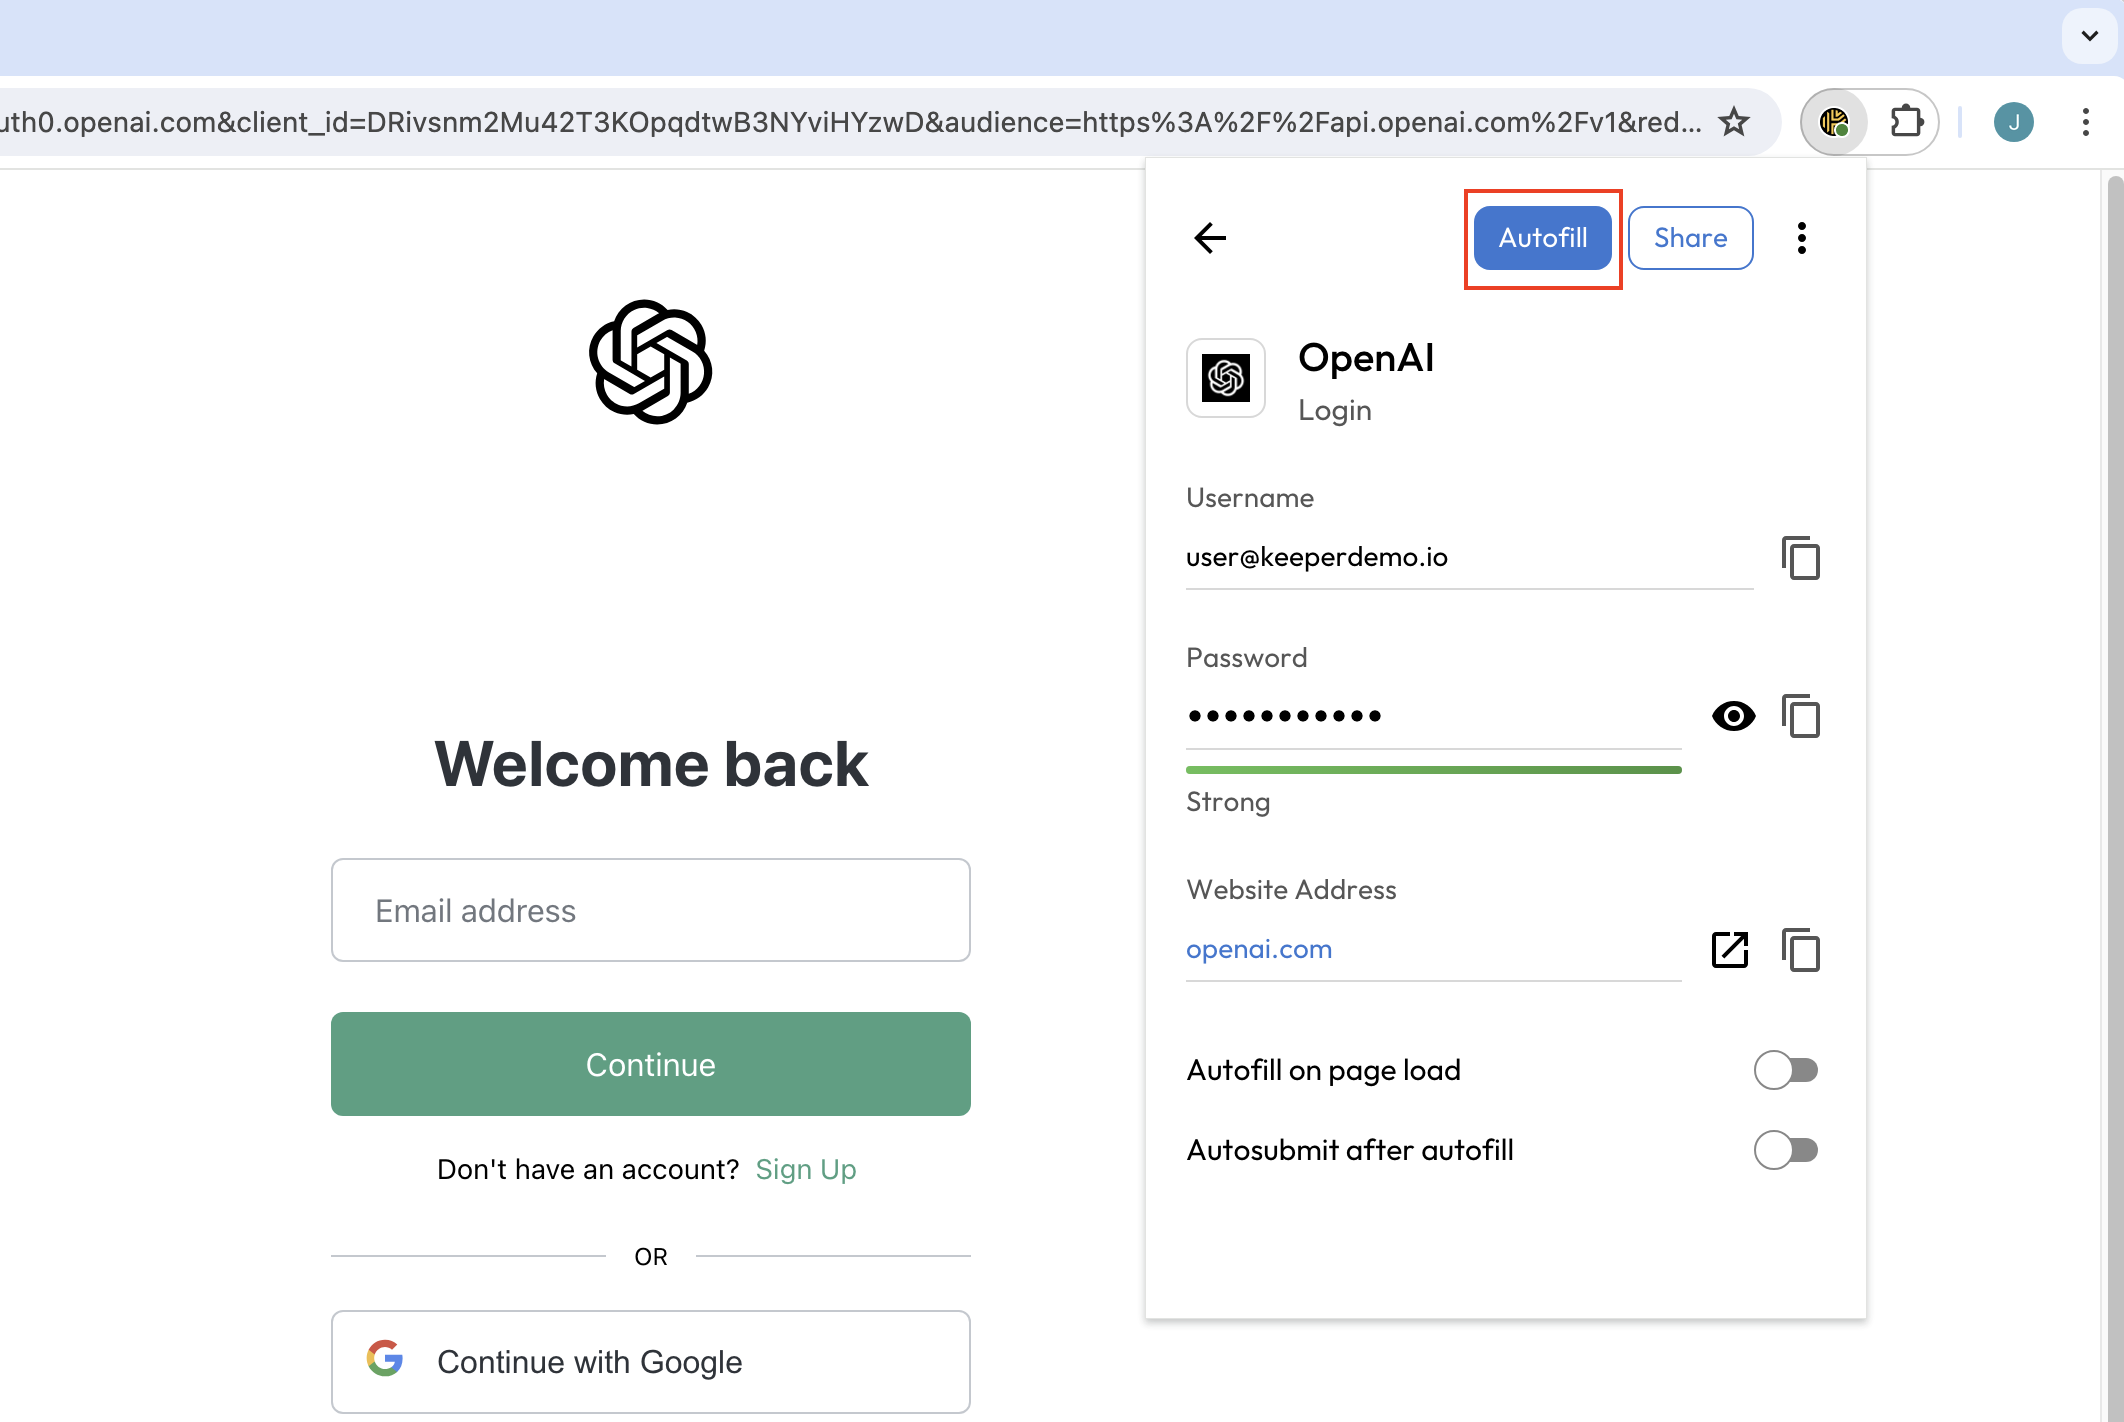
Records appear directly on the home screen as a list, with “Suggested Records” at the top to easily fill the credentials that match the website you're on. Select the record, then click **Autofill** to fill the credentials into the site's log in form.

<figure><img src="https://914511346-files.gitbook.io/~/files/v0/b/gitbook-x-prod.appspot.com/o/spaces%2F-LSGVtOTYUIkVBoYtFvK%2Fuploads%2FDho1kLd7Zp1jpiH90Uby%2FScreen%20Shot%202024-05-15%20at%2012.15.37%20PM.png?alt=media&#x26;token=6d5d14b1-7bef-4b74-bc87-64bc03206187" alt=""><figcaption><p>Autofill Suggested Record</p></figcaption></figure>

## Account Recovery

When you log into your vault for a second time, you'll be prompted to set up a 24-word recovery phrase. If you forget your Master Password, this feature will help you quickly regain access.

Once your recovery phrase has been generated, be sure to store it in a safe place. For added convenience, you will be given the option to copy or download it.

{% hint style="info" %}
If Account Recovery is not available, your Keeper Administrator may be able to transfer your vault to another Keeper account.
{% endhint %}

<figure><img src="https://914511346-files.gitbook.io/~/files/v0/b/gitbook-x-prod.appspot.com/o/spaces%2F-LSGVtOTYUIkVBoYtFvK%2Fuploads%2Fd5WfRu5pO9PbombrECJh%2FScreen%20Shot%202023-06-02%20at%2011.47.04%20AM.png?alt=media&#x26;token=7bc96a65-5316-49fa-8ca5-8ee4c64b6dee" alt=""><figcaption><p>Account Recovery Phrase Set Up</p></figcaption></figure>

## Create a Personal Vault (via Business or Enterprise Account)

Keeper Business and Enterprise users can create a free, Keeper Family Plan for up to 5 family members with unlimited devices. Once the user sets up the Family Plan, each family member receives their own vault. They can also share passwords between family members using either Shared Folders or individual record sharing.

1. Log in to your Keeper Business or Enterprise Web or Desktop Vault.
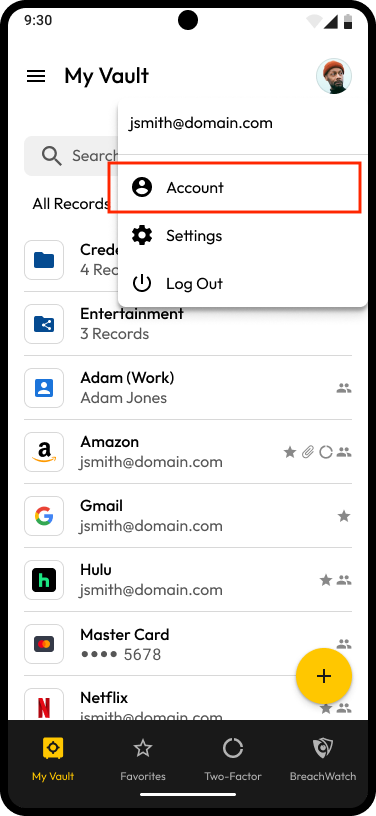
2. Click on your **email address** in the upper-right corner.
3. Select **Account** from the dropdown menu.
4. Enter your **personal email** in the "Keeper Family License for Personal Use" section.
5. Click **Send Email**.
6. This will create a separate, non-enterprise managed vault which will be associated with your personal email address.

{% hint style="warning" %}
This vault is intended for *personal use only*. All business-related credentials must be stored within your company issued vault.
{% endhint %}

![Create Personal Account](https://914511346-files.gitbook.io/~/files/v0/b/gitbook-x-prod.appspot.com/o/spaces%2F-LSGVtOTYUIkVBoYtFvK%2Fuploads%2FE5R6Pu4sVAjYPhW4v6EJ%2FScreen%20Shot%202023-06-02%20at%2012.22.27%20PM.png?alt=media\&token=4b7be7d7-d834-493f-801d-620f3d08ab7b)

## Importing Data from Other Sources

Keeper provides several methods of importing data into the vault. Each method is fully documented with screenshots and example data.

1. [Import from Chrome, Firefox, IE, Edge, Safari and Opera using the Web Vault](/user-guides/import-records-1/import-from-chrome-firefox-ie-edge-and-opera)
2. Import from Chrome, Firefox, IE, Edge, Safari and Opera using the Desktop App From the Desktop App, simply click on Settings > Import > click "Import" to begin the import process
3. [Import from .CSV file](/user-guides/import-records-1/import-a-.csv-file)
4. [Import from a structured .JSON file](/user-guides/import-records-1/import-json)
5. [Import from LastPass (Fully Automated)](/user-guides/import-records-1/import-from-lastpass)
6. [Import from 1Password](/user-guides/import-records-1/import-from-1password)
7. [Import from Dashlane](/user-guides/import-records-1/import-from-dashlane)
8. [Import from Encrypted KeePass (.kdbx) Files](/user-guides/import-records-1/import-from-keepass-kdbx)
9. [Import using the Commander CLI](https://github.com/Keeper-Security/commander#importing-records-into-keeper)
10. [Custom import coding using the Keeper Commander SDK](https://github.com/Keeper-Security/commander)


# Enterprise End-User (SSO)

This end-user guide was created for Enterprise customers who deploy Keeper through an existing Single Sign-On Identity Provider (IdP) such as Azure, ADFS or Okta.

![](/files/-MQJ5dHLI25a__WkszRb)

## **Account Creation & Setup**

Keeper is simple to install, easy to use and you’ll be up and running in just minutes. You can create your Keeper account using either one of the methods below.

**Option 1:** Click the **Set Up Your Account Now** button located in the email invitation sent by your Keeper Administrator. Since your Keeper account is deployed through Single Sign-On (SSO) you will automatically be routed to authenticate with your SSO provider to launch your Keeper Vault.

**Option 2:** Log in to your existing SSO provider dashboard as you normally do and click the **Keeper icon** to launch your Keeper Vault.

{% embed url="<https://vimeo.com/329680541>" %}
Enterprise End User SSO Login
{% endembed %}

### Enable Two-Factor Authentication (2FA)

Two-Factor Authentication (2FA) adds an extra layer of security to your vault by requiring a second passcode upon logging in. Some 2FA methods like Duo or RSA, require admin configuration. Others, like the Google or Microsoft Authenticator Apps, can be set up by individual end-users.

Click the **Account Dropdown Menu** (your email address) then click **Settings > Security** to enable 2FA for your vault.

<figure><img src="/files/LKiAWm7wRVXnZtO9RwB7" alt=""><figcaption><p>Enable Two-Factor Authentication</p></figcaption></figure>

<figure><img src="/files/CFOkq4qFVVj7bipsYMEe" alt=""><figcaption><p>Two-Factor Authentication Methods</p></figcaption></figure>

### Import Passwords

You can either manually enter your existing logins and passwords into your vault or Keeper can import your existing passwords directly from your [web browser](/user-guides/web-vault#from-web-browsers) (e.g. Safari, Chrome, Firefox), another [password manager](/user-guides/web-vault#from-password-managers), or from a [text file](https://docs.keeper.io/user-guides/pages/-LT-na6pfVSxeu2trL6J#from-text-file-.csv) (.csv).

To begin the import process, click the **Account Dropdown Menu** (your email address), then click **Settings > Import**.

<figure><img src="/files/xiKSFvisEDxP4bYhwX3h" alt=""><figcaption><p>Import Your Passwords</p></figcaption></figure>

### Web Vault Login

The next time you log in to your Keeper Vault, you can either visit the Keeper Vault Login page or your SSO provider dashboard. Both options are described below. To access the Keeper Web Vault Login page, visit:

**US Data Center:**\
<https://keepersecurity.com/vault>

**US Public Sector / GovCloud:**\
<https://govcloud.keepersecurity.us/vault>

**EU Data Center:**\
<https://keepersecurity.eu/vault>\
\
**AU Data Center:**\
<https://keepersecurity.com.au/vault>\
\
**CA Data Center:**\
<https://keepersecurity.ca/vault>

**JP Data Center:**\
<https://keepersecurity.jp/vault>

### Keeper Application Download

Download the Keeper Desktop and Mobile Apps to access your Keeper Vault from any platform and use it for native applications across all of your devices.

{% hint style="info" %}
Visit: <https://keepersecurity.com/download> to download the Keeper App for all of your desktop and mobile devices.
{% endhint %}

Supported Platforms:

* PC, Mac and Linux desktops
* Chrome, Firefox, Safari, Edge and IE11 Web Browsers
* iOS (iPhone & iPad)
* Android (Phones & Tablets)

![Keeper Download Page](/files/DWyROj3irE8ktIVWTCUC)

#### **Vault Login with Email Address**

Enter your email address at Keeper's Vault login page and click **Next.** You will then be routed to authenticate through your SSO Provider.

<figure><img src="/files/DAaXVyrGAhiLQDjVnZXv" alt=""><figcaption><p>Email Address Login</p></figcaption></figure>

#### **Vault Login with Enterprise Domain**

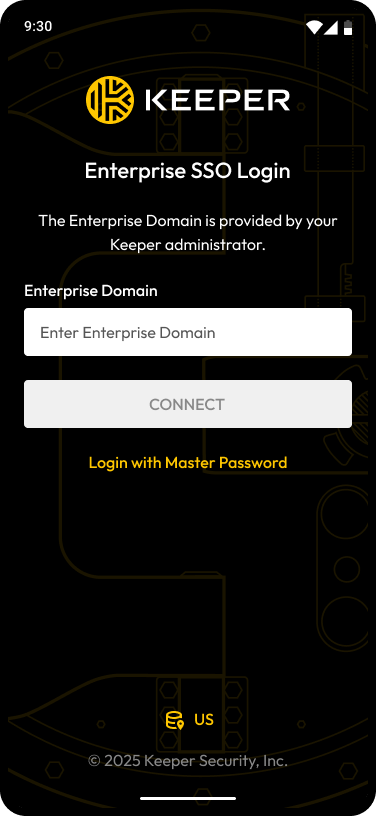
From Keeper's Vault Login page, click on the **Enterprise SSO Login** dropdown menu and select **Enterprise Domain** and enter your Enterprise Domain (provided by your Keeper Administrator). You will then be routed to authenticate through your SSO Provider.

<figure><img src="/files/60RjH0AiLOR1XKNWm47H" alt=""><figcaption><p>Enterprise SSO Login > Enterprise Domain</p></figcaption></figure>

<figure><img src="/files/I1XKgXpD9WgjPq7AVn9o" alt=""><figcaption><p>Enterprise Domain Login</p></figcaption></figure>

#### **SSO Login on the Keeper Desktop App**

Keeper provides two ways of authenticating into the Keeper Desktop application with SSO identity providers. By default, the Keeper Desktop app will open the identity provider login screen in a popup window as seen below.

<figure><img src="/files/DlLvUULW7fNiyPj1OU0s" alt=""><figcaption><p>SSO login with Keeper Desktop via popup window</p></figcaption></figure>

This popup window is part of the Keeper Desktop application and will work for most scenarios. However, if your identity provider requires the use of a FIDO2 WebAuthn device or Passkey for authentication, using the desktop web browser method may be the best option.

#### Using Default Browser for SSO

To use the web browser on the device for SSO login with the Keeper Desktop app, open the Keeper menu and select "Use Default Browser for SSO".

<figure><img src="/files/EidEkRo9RG91JTg9cy81" alt=""><figcaption><p>Use Default Browser for SSO</p></figcaption></figure>

When this option is selected, clicking "Next" will route you to the desktop web browser. After logging into your SSO provider (or if you already have an active SSO session), the web browser will redirect you back to Keeper Desktop and complete the login process.

<figure><img src="/files/StlfyEuqaRPPWmSigwzX" alt=""><figcaption><p>Finishing Login with Default Browser</p></figcaption></figure>

#### **IdP-Initiated Login**

Keeper supports IdP-initiated login from the SSO identity provider dashboard (if enabled by your Keeper administrator). Log in to your existing SSO as you normally do then from your SSO dashboard, click the **Keeper icon** to launch your Keeper Vault.

<figure><img src="/files/AGYAyffVzxWhSTTiuYbt" alt=""><figcaption><p>SSO Login</p></figcaption></figure>

<figure><img src="/files/WsCxH81ni9o6PomTDv8l" alt=""><figcaption><p>SSO Provider Dashboard</p></figcaption></figure>

{% hint style="info" %}
If you sign into Keeper on a new platform, you may encounter a "device approval" request (SSO Cloud Users Only). Please read the section below - "Device Approvals" for instructions on how to proceed.
{% endhint %}

### Device Approvals

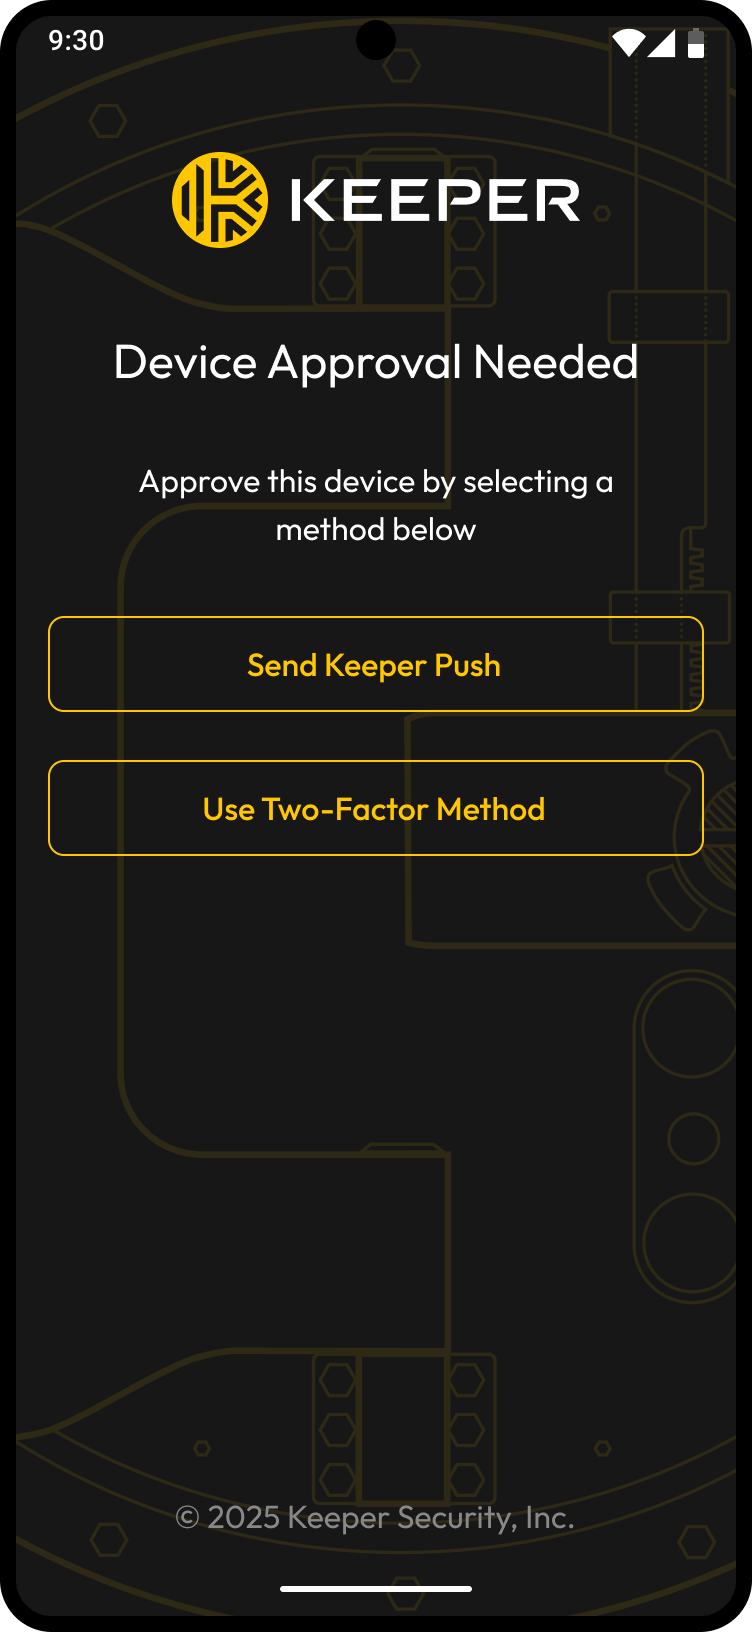
If you are attempting to log in on an unrecognized device or browser, a device approval must take place before you can proceed to your Keeper Vault. Users have two methods of approval to choose from, "Keeper Push" or "Admin Approval".

<figure><img src="/files/x1JUcQWr9k2taEZa29QX" alt=""><figcaption><p>Device Approval Request</p></figcaption></figure>

#### Keeper Push

Keeper Push is Keeper’s proprietary notification-based device approval system that sends a push notification to an existing, recognized device. This is a *self-service* process that allows users to handle the device approval on their own.

If you select **Keeper Push**, a notification (push) will be appear in your vault at an approved device or browser. Select **Yes** to approve the new device. Once the device has been approved, you will be able to proceed to your Keeper Vault.

{% hint style="warning" %}
You must be actively logged into a different, recognized/approved device to receive the notification.
{% endhint %}

<figure><img src="/files/ASCqfb4PnRqHBR7OFVRt" alt=""><figcaption><p>Keeper Push Notification</p></figcaption></figure>

#### Admin Approval

Admin Approval will send a notification to your Keeper Admin requesting device approval. If you do not have an existing, recognized device, this will be the only path gain access again.

if you select **Admin Approval**, your Keeper Admin will receive notification for approval. Once the device has been approved, you will be able to proceed to your Keeper Vault.

#### Automated Device Approvals

Keeper's platform supports automated device approvals through a product called the Keeper Automator service. If your Keeper Administrator has configured this service, device approvals will occur automatically upon successfully logging into your SSO identity provider.

[Learn more](/sso-connect-cloud/device-approvals/automator/overview) about the Keeper Automator service.

## Create a Record

Your passwords, databases, SSH keys, bank accounts and other sensitive data are saved in your private digital Keeper Vault (as "Records") and are encrypted on your device using 256-bit AES.

To begin, click **+ Create New > Record**.

* Choose a [Record Type](/user-guides/record-types) from the dropdown menu ("Login" is the default type)
* Enter a name for the Record and click **Next**
* Enter the Login (Username or Email)
* Enter the Password or click the **dice icon** to generate one (more on that [here](/user-guides/web-vault#password-generator))
* Enter the Website Address
* Enter Notes, add [Attachments](/user-guides/web-vault#secure-file-storage), a [Two-Factor Code](/user-guides/web-vault#two-factor-codes-for-totp) and [Custom Fields](/user-guides/web-vault#custom-fields)
* Click **Save** to finish

<figure><img src="/files/qlPioDD1pbD8cFwWWTZs" alt=""><figcaption><p>Create a Record</p></figcaption></figure>

{% hint style="info" %}
For more information, please see our comprehensive [Web Vault and Desktop App Guide](/user-guides/web-vault).
{% endhint %}

## Autofill With KeeperFill

Keeper's Browser Extension called KeeperFill, autofills your logins and passwords into websites and apps. To download KeeperFill for your browser, visit [Keeper's Download page](https://www.keepersecurity.com/download.html?t=v). KeeperFill is available for every web browser.

Records appear directly on the home screen as a list, with “Suggested Records” at the top to easily fill the credentials that match the website you're on. Select the record, then click **Autofill** to fill the credentials into the site's log in form.

<figure><img src="/files/M3tJ0M3jZrygg9hDb2Be" alt=""><figcaption><p>Autofill Suggested Record</p></figcaption></figure>

## Account Recovery

When you log into your vault for a second time, you'll be prompted to set up a 24-word recovery phrase. If you forget your Master Password, this feature will help you quickly regain access.

Once your recovery phrase has been generated, be sure to store it in a safe place. For added convenience, you will be given the option to copy or download it.

{% hint style="info" %}
If Account Recovery is not available, your Keeper Administrator may be able to transfer your vault to another Keeper account.
{% endhint %}

<figure><img src="/files/ppZLhmcohHag9zniabJb" alt=""><figcaption><p>Account Recovery Phrase Set Up</p></figcaption></figure>

## Create a Personal Vault (via Business or Enterprise Account)

Keeper Business and Enterprise users can create a free, Keeper Family Plan for up to 5 family members with unlimited devices. Once the user sets up the Family Plan, each family member receives their own vault. They can also share passwords between family members using either Shared Folders or individual record sharing.

1. Log in to your Keeper Business or Enterprise Web or Desktop Vault.
2. Click on your **email address** in the upper-right corner.
3. Select **Account** from the dropdown menu.
4. Enter your **personal email** in the "Keeper Family License for Personal Use" section.
5. Click **Send Email**.
6. This will create a separate, non-enterprise managed vault which will be associated with your personal email address.

{% hint style="warning" %}
This vault is intended for *personal use only*. All business-related credentials must be stored within your company issued vault.
{% endhint %}

![Create Personal Account](/files/HC3ioQUrQ2CMTlieKfL7)

## Importing Data from Other Sources

Keeper provides several methods of importing data into the vault. Each method is fully documented with screenshots and example data.

1. [Import from Chrome, Firefox, IE, Edge, Safari and Opera using the Web Vault](/user-guides/import-records-1/import-from-chrome-firefox-ie-edge-and-opera)
2. Import from Chrome, Firefox, IE, Edge, Safari and Opera using the Desktop App From the Desktop App, simply click on Settings > Import > click "Import" to begin the import process
3. [Import from .CSV file](/user-guides/import-records-1/import-a-.csv-file)
4. [Import from a structured .JSON file](/user-guides/import-records-1/import-json)
5. [Import from LastPass (Fully Automated)](/user-guides/import-records-1/import-from-lastpass)
6. [Import from 1Password](/user-guides/import-records-1/import-from-1password)
7. [Import from Dashlane](/user-guides/import-records-1/import-from-dashlane)
8. [Import from Encrypted KeePass (.kdbx) Files](/user-guides/import-records-1/import-from-keepass-kdbx)
9. [Import using the Commander CLI](https://github.com/Keeper-Security/commander#importing-records-into-keeper)
10. [Custom import coding using the Keeper Commander SDK](https://github.com/Keeper-Security/commander)


# Web Vault & Desktop App

A comprehensive guide for the Keeper Web Vault and cross-platform, Keeper Desktop Application.

## Your Keeper Vault <a href="#your-keeper-vault" id="your-keeper-vault"></a>

With Keeper, your passwords, logins and other personal information are saved in a private, digital vault. It is here where you can view and edit all of your website login credentials and details, as well as store important files and photos.

![Keeper Vault](https://914511346-files.gitbook.io/~/files/v0/b/gitbook-x-prod.appspot.com/o/spaces%2F-LSGVtOTYUIkVBoYtFvK%2Fuploads%2FOF3E9M7ev2LyZrua5pBF%2FScreen%20Shot%202023-04-14%20at%2012.39.13%20PM.png?alt=media\&token=a034366a-d265-47ba-9df8-456376693bc8)

## Master Password Login for Existing Users

Watch the video below for an overview of the vault with master password login.

{% embed url="<https://vimeo.com/824184109>" %}
End-User Vault (Master Password Log In)
{% endembed %}

If you've already signed up for Keeper on your mobile devices, you can simply login to the Web Vault or Desktop App (links below) with your email address, Master Password and Two-Factor Authentication (if enabled on your account).

Login to the Keeper Web Vault:

* <https://keepersecurity.com/vault> (United States)
* <https://keepersecurity.eu/vault> (Europe)
* <https://keepersecurity.com.au/vault> (Australia)
* <https://keepersecurity.ca/vault> (Canada)
* <https://keepersecurity.jp/vault> (Japan)
* <https://govcloud.keepersecurity.us/vault> (US GovCloud)

Download the Keeper Desktop App:

* <https://keepersecurity.com/download.html>

| Device  | OS Version Supported                          |
| ------- | --------------------------------------------- |
| Windows | 7 / 8 / 10+                                   |
| Mac OS  | Current Version - 2                           |
| Linux   | Fedora, Red Hat, CentOS, Debian, Ubuntu, Mint |

### Device Approvals

Upon logging in, you may encounter a "Device Approval" request. If you are attempting to log in on an unrecognized device or browser, a device approval must take place before you can proceed to your Keeper Vault. Users have three methods of approval to choose from: **Email**, **Keeper Push** or **Two-Factor Method**.

{% hint style="success" %}
**Keeper Push** is Keeper’s proprietary notification-based device approval system that sends a push notification to an existing, recognized device.
{% endhint %}

If you select **Keeper Push**, a notification (push) will be appear in your Keeper Vault on an approved device or browser.

![Device Approval Options](https://914511346-files.gitbook.io/~/files/v0/b/gitbook-x-prod.appspot.com/o/spaces%2F-LSGVtOTYUIkVBoYtFvK%2Fuploads%2Fqx39YgDTQDlNt0et7Sx9%2FScreen%20Shot%202023-04-14%20at%2012.51.05%20PM.png?alt=media\&token=5ed3eeb4-bc78-44a4-a01e-380e686414eb)

Select **Yes** to approve the new device.

{% hint style="warning" %}
You must be actively logged into a different, recognized/approved device to receive the notification.
{% endhint %}

![Device Approval Request](https://914511346-files.gitbook.io/~/files/v0/b/gitbook-x-prod.appspot.com/o/spaces%2F-LSGVtOTYUIkVBoYtFvK%2Fuploads%2FXxZlpySWsHNGB3XMMJHR%2FPush%20Notification.jpeg?alt=media\&token=80e87713-9a33-41cc-b1e7-7dbc7104de91)

Once your device has been approved, you will be prompted for 2FA (if enabled), then you can enter your Master Password to proceed to your vault.

## New User Account Creation

To create your Keeper account, first enter your email address then you will be asked to create and confirm a **Master Password** which will be the only password you have to remember. We recommend that you choose a strong Master Password that is only used for Keeper -- don't forget your Master Password!

To finalize your account and proceed to your vault, you will be asked to enter the security **verification code** that was sent to your email.

{% hint style="info" %}
Enterprise users who login with SSO do not require the selection of a Master Password.
{% endhint %}

<figure><img src="https://914511346-files.gitbook.io/~/files/v0/b/gitbook-x-prod.appspot.com/o/spaces%2F-LSGVtOTYUIkVBoYtFvK%2Fuploads%2Fk1Wj5OGzyXcHNTHJajPr%2Fspaces_-LSGVtOTYUIkVBoYtFvK_uploads_zFI5MVmp0Arx7SpEU686_Screen%20Shot%202023-04-12%20at%2011.webp?alt=media&#x26;token=9f302c14-daca-4657-9a69-5c9e1a68666a" alt=""><figcaption><p>Set Your Master Password</p></figcaption></figure>

Upon logging in, you will be prompted to follow our Get Started wizard, which will guide you to [import your passwords](#importing-passwords), install the [KeeperFill Browser Extension](/user-guides/browser-extensions) and set up [Account Recovery](/user-guides/troubleshooting/reset-your-master-password#forgotten-master-password-and-account-recovery).

<figure><img src="https://914511346-files.gitbook.io/~/files/v0/b/gitbook-x-prod.appspot.com/o/spaces%2F-LSGVtOTYUIkVBoYtFvK%2Fuploads%2F9zzFXmg3SFqs5A6UoO3L%2FScreen%20Shot%202023-04-12%20at%2011.33.56%20AM.png?alt=media&#x26;token=b51dd8cf-a820-4f30-918e-de640186c442" alt=""><figcaption><p>Get Started Wizard</p></figcaption></figure>

Watch the video below to learn how to create your account.

{% embed url="<https://vimeo.com/585496888>" %}
Create Your Account
{% endembed %}

## Enterprise SSO Login

Users who login with an existing identity provider have various login choices. Users can either enter their email address at the login screen or click **Enterprise SSO Login** and select their login method from the dropdown menu as determined by their Keeper administrator (Enterprise Domain Login or Master Password Login).

{% hint style="info" %}
Enterprise (SSO) users, should refer to our "[Enterprise End-User (SSO)](/user-guides/enterprise-end-user-setup-sso#create-your-keeper-account)" Guide for more information regarding account creation, login flows, device approvals and much more.
{% endhint %}

![Enterprise SSO Login](https://914511346-files.gitbook.io/~/files/v0/b/gitbook-x-prod.appspot.com/o/spaces%2F-LSGVtOTYUIkVBoYtFvK%2Fuploads%2F4m9wbx8gapY98Rk4UZF1%2FScreen%20Shot%202023-04-14%20at%201.10.42%20PM.png?alt=media\&token=272386c9-a5a8-44e2-aa22-2e0019759ce0)

## Create a Record

Your passwords, logins, credit card numbers, bank accounts and other personal information are saved in your private digital Vault (as "Records") and are encrypted on your device using 256-bit AES.

Click **+ Create New > Record**.

* Choose a [Record Type](/user-guides/record-types) from the dropdown menu ("Login" is the default type)
* Enter a name for the Record and click **Next**
* Enter the Login (Username or Email)
* Enter the Password or click the **dice icon** to generate one (more on that [here](#password-generator))
* Enter the Website Address
* Enter Notes, add [Files & Photos](#secure-file-storage), a [Two-Factor Code](#two-factor-codes-for-totp) and [Custom Fields](#custom-fields)
* Click **Save** to finish

<figure><img src="https://914511346-files.gitbook.io/~/files/v0/b/gitbook-x-prod.appspot.com/o/spaces%2F-LSGVtOTYUIkVBoYtFvK%2Fuploads%2FT1Ye1rBrU7lmFpo7dv6j%2F2023-04-12_12-45-57%20(1).gif?alt=media&#x26;token=6fd74319-b7f0-4f08-b5a5-aedbc94bfb27" alt=""><figcaption><p>Create a Record</p></figcaption></figure>

{% embed url="<https://vimeo.com/585564101>" %}
Create a Record
{% endembed %}

## Importing Passwords

Keeper makes it easy import your existing logins and passwords directly from your web browsers (e.g. Safari, Chrome, Firefox), another password manager, or from a text file (.csv, .xls, .tsv). Watch the video below or continue reading to learn how.

{% embed url="<https://vimeo.com/1158911270?fe=ci&fl=cl&share=copy>" %}
Import Your Passwords With Keeper
{% endembed %}

![Import Screen](https://914511346-files.gitbook.io/~/files/v0/b/gitbook-x-prod.appspot.com/o/spaces%2F-LSGVtOTYUIkVBoYtFvK%2Fuploads%2FG7TMOPwU0pKkhzl5lhmN%2FSettings%20\(6\).png?alt=media\&token=30782be7-8956-4f2c-8e88-9b55329174c9)

### From Web Browsers

To import passwords from your web browser, you must first install the Keeper Import Tool. To begin the installation, from the Account Dropdown Menu, click **Settings > Import > Import** (next to "From a Browser") **> Install**.

{% hint style="info" %}
If you have started the import process from a mobile app and came to the Web Vault, you will be prompted to import your existing passwords, click **Next > Install.**
{% endhint %}

![Install the Keeper Import Tool](https://914511346-files.gitbook.io/~/files/v0/b/gitbook-x-prod.appspot.com/o/spaces%2F-LSGVtOTYUIkVBoYtFvK%2Fuploads%2FcBFgooe5bypx0LBxm1iC%2FSettings%20\(7\).png?alt=media\&token=994a0967-bcc3-4b44-a7ad-15aca8dc2a12)

Keeper will then walk you through a few steps to download the Keeper Import Tool:

1. Copy the code Keeper provides (you will need this later when prompted in the Keeper Importer).
2. For **PC**: click **Run** when prompted.
3. For **Mac**: double click the "KeeperImport.zip" file located in your downloads and double click on the "Keeper Import App" to start the import process. You will encounter a few Keychain permission windows that will require you to enter your computer password to allow Keeper to access your web browsers.
4. Keeper will then ask for the code you received from step one; paste the code and click **Import**. Keeper will then import your credentials across all of your web browsers at once.
5. Skip to our [Field Mapping instructions](#field-mapping) below to finalize your import details.

![Copy Import Code](https://914511346-files.gitbook.io/~/files/v0/b/gitbook-x-prod.appspot.com/o/spaces%2F-LSGVtOTYUIkVBoYtFvK%2Fuploads%2F6oA8nwkXY1m9ZRFCZxtc%2FDownload%20Modal.png?alt=media\&token=183c6e5e-ae27-4c58-8352-156fd36c94d3)

### From Password Managers

Keeper can quickly import your logins and passwords from other password managers. From the Account Dropdown Menu, click **Settings > Import > Import** (next to "Use Another Source").

From the dropdown menu, select the password manager you want to import from, then click **View Instructions** which will involve logging into the password manager and exporting your existing password records. If an automated import using the Keeper Desktop App is available for your selected password manager, additional instructions will be provided.

![Select Password Manager Source](https://914511346-files.gitbook.io/~/files/v0/b/gitbook-x-prod.appspot.com/o/spaces%2F-LSGVtOTYUIkVBoYtFvK%2Fuploads%2FDnmekbZcH6C67NcnG79Q%2FText%20file%20\(3\).png?alt=media\&token=b454d9e8-be56-41d7-98bd-fdb2b58291ba)

Once you have created the export file per the instructions, drag-and-drop the file onto Keeper's "Drop a File Here" window or browse for the file on your computer and click **Next**. Skip to our [Field Mapping instructions](#field-mapping) below to finalize your import details.

{% hint style="warning" %}
Confirm the export file has the correct extension at the end of the file name (e.g. export.csv).
{% endhint %}

<figure><img src="https://914511346-files.gitbook.io/~/files/v0/b/gitbook-x-prod.appspot.com/o/spaces%2F-LSGVtOTYUIkVBoYtFvK%2Fuploads%2FCUVIfzBPObje0FGJjlaI%2FUpload%20a%20file%20and%20confirm.png?alt=media&#x26;token=5e0df032-865e-4834-bd63-de929c50f8fe" alt=""><figcaption><p>Drop or Browse for Exported File</p></figcaption></figure>

### From Text Files (.csv, .xls, .tsv)

Keeper can import your logins and passwords from a text file (.csv). To begin, from the Account Dropdown Menu, click **Settings > Import > Import** (next to "Use Another Source").

From the dropdown menu, select **Text File (.csv, .xls, .tsv)**, then click **View Instructions**. Keeper's CSV import method supports advanced structure including folders, subfolders, shared folders, TOTP codes and any number of custom fields.

Once you have created the export file per the instructions, drag-and-drop the file onto Keeper's "Drop a File Here" window or browse for the file on your computer.

<figure><img src="https://914511346-files.gitbook.io/~/files/v0/b/gitbook-x-prod.appspot.com/o/spaces%2F-LSGVtOTYUIkVBoYtFvK%2Fuploads%2F6daXwzAxC8nbj075LW0g%2FText%20File%20(4).png?alt=media&#x26;token=ea392533-e610-4d1c-9ab3-bdd8db1db84f" alt=""><figcaption><p>Import from Text File</p></figcaption></figure>

Check the box if your file includes column headers, otherwise, the first row will be treated as data and click **Next.** Skip to our [Field Mapping instructions](#field-mapping) below to finalize your import details.

<figure><img src="https://914511346-files.gitbook.io/~/files/v0/b/gitbook-x-prod.appspot.com/o/spaces%2F-LSGVtOTYUIkVBoYtFvK%2Fuploads%2FeSi4I97w2c0BQ53fvoCJ%2FUpload%20a%20file%20confirmation%20(2).png?alt=media&#x26;token=9e950a00-fd66-48f4-ab50-b07bbbb25fb1" alt=""><figcaption><p>File Uploaded</p></figcaption></figure>

**File Format Examples**

```
Folder,Title,Login,Password,Website Address,Notes,Shared Folder,Custom Fields
```

• To specify subfolders, use backslash "\\" between folder names

• To make a Shared Folder specify the name or path to it in the 7th field

**Example 1: Create a regular folder at the root level with 2 custom fields**

```
My Business Stuff,Twitter,marketing@company.com,123456,https://twitter.com,These are some notes,,API Key,5555,Date Created,2018-04-02
```

**Example 2: Create a shared subfolder inside another folder with edit and re-share permission**

```
Personal,Twitter,craig@gmail.com,123456,https://twitter.com,,Social Media#edit#reshare
```

Keeper also supports advanced JSON structured file formats. We recommend using JSON files for import and export of structured data instead of CSV files. This is described in the [JSON Import page.](/user-guides/import-records-1/import-json)

{% hint style="info" %}
See the full instructions and file format of our CSV import [here](/user-guides/import-records-1/import-a-.csv-file).
{% endhint %}

### Field Mapping

Once you have imported your credentials using one of the methods above, you can customize how you would like the information to appear in your vault in the field mapping screen. Here you'll see standard field names across the top that “map” to the data below for each Keeper record.

To adjust these mappings:

1. Click any field to open a dropdown menu
2. Select the appropriate field name from the list. Repeat this process across each column as needed
3. Click **Next** to finalize your selections.

{% hint style="info" %}
Change the title of each column to accurately represent the information below (e.g. If you see a column of URLs and the column title says "Notes", change that column title to "URL").
{% endhint %}

<figure><img src="https://914511346-files.gitbook.io/~/files/v0/b/gitbook-x-prod.appspot.com/o/spaces%2F-LSGVtOTYUIkVBoYtFvK%2Fuploads%2Fy4bbjR8UIWXoyVuZrtnw%2FReview%20upload%20(1).png?alt=media&#x26;token=e266680b-0bd2-46f1-8730-19da78913ad5" alt=""><figcaption><p>Review &#x26; Edit the Imported Information</p></figcaption></figure>

Next, a summary screen will display a preview of your vault, showing the folder structure of your imported records. Here you can adjust the folder structure and click into individual records to preview their details before finalizing the import.

Click **Confirm Import** to complete the import process.

<figure><img src="https://914511346-files.gitbook.io/~/files/v0/b/gitbook-x-prod.appspot.com/o/spaces%2F-LSGVtOTYUIkVBoYtFvK%2Fuploads%2Fr2rR0ortV1ZS3esx0Yu4%2FReview%20upload%20(3).png?alt=media&#x26;token=5659ce5c-83c3-4bdb-8b1f-a67705050a55" alt=""><figcaption><p>Summary of Import</p></figcaption></figure>

Once the import is complete, we highly recommend that you delete any unencrypted password files from your computer and disable any old password managers.

<figure><img src="https://914511346-files.gitbook.io/~/files/v0/b/gitbook-x-prod.appspot.com/o/spaces%2F-LSGVtOTYUIkVBoYtFvK%2Fuploads%2FCBrQcou8GweuB12oofTi%2FUpload%20a%20file%20confirmation%20(1).png?alt=media&#x26;token=9f1ea266-1d65-4fef-bcb6-42445c12f4d2" alt=""><figcaption><p>Successful Import</p></figcaption></figure>

{% hint style="success" %}
Specific import instructions based on your import source can also be found in the [Import](/user-guides/import-records-1/import-overview) section of our user guides.
{% endhint %}

## Download Keeper Applications <a href="#download-keeper-applications" id="download-keeper-applications"></a>

Download the Keeper Desktop and Mobile Apps to access your Keeper Vault from any platform and use it for native applications across all of your devices.

{% hint style="info" %}
Visit: <https://keepersecurity.com/download> to download the Keeper App for all of your desktop and mobile devices.
{% endhint %}

![Keeper Download Page](https://914511346-files.gitbook.io/~/files/v0/b/gitbook-x-prod.appspot.com/o/spaces%2F-LSGVtOTYUIkVBoYtFvK%2Fuploads%2Fi78tt0O2iyNzr5uf51wa%2FScreenshot%202025-11-07%20at%2012.25.40%E2%80%AFPM.png?alt=media\&token=e90e1852-e867-4fbf-b707-fcd8bfed03e7)

## Organization

With Keeper you can organize your records into folders and subfolders. To create a folder, click on **+ Create New > Folder**. Enter the name of the folder and click **Create**.

![Create a Folder](https://914511346-files.gitbook.io/~/files/v0/b/gitbook-x-prod.appspot.com/o/spaces%2F-LSGVtOTYUIkVBoYtFvK%2Fuploads%2FbdTS4OPYezupSUIDPlQe%2FScreen%20Shot%202023-04-12%20at%2012.54.31%20PM.png?alt=media\&token=0502f0a2-40cf-4557-93b7-7c66876fcd6c)

To create a subfolder, right-click on an existing/parent folder and select **New Folder**.

![Create a Subfolder](https://914511346-files.gitbook.io/~/files/v0/b/gitbook-x-prod.appspot.com/o/spaces%2F-LSGVtOTYUIkVBoYtFvK%2Fuploads%2FAJFKZvbSEtzzyf87GyxT%2FScreen%20Shot%202023-04-12%20at%201.02.46%20PM.png?alt=media\&token=f23fd4d7-e8d9-4867-b0d5-3d0d6166b72a)

{% embed url="<https://vimeo.com/585563908>" %}
Create a Folder
{% endembed %}

### Move, Shortcut & More

Drag and drop the record(s) you would like to store in a folder or subfolder and click **Move** or **Create shortcut**. To move multiple records, hold "shift" and click the items to drag-and-drop.

{% hint style="info" %}
Record shortcuts = like alias files, can exist in two or more places and when edited, change together.
{% endhint %}

![Move Records with Drag-and-Drop](https://914511346-files.gitbook.io/~/files/v0/b/gitbook-x-prod.appspot.com/o/spaces%2F-LSGVtOTYUIkVBoYtFvK%2Fuploads%2FisSpKWSijXEMzq7WJiiI%2FScreen%20Shot%202023-04-12%20at%2012.58.28%20PM.png?alt=media\&token=819d4da5-b41d-4dc3-bdbd-c1b092fc8bd8)

#### Right-Click Context Menu

You can perform a number of actions by right-clicking on a record or folder to generate a contextual options menu.

<figure><img src="https://914511346-files.gitbook.io/~/files/v0/b/gitbook-x-prod.appspot.com/o/spaces%2F-LSGVtOTYUIkVBoYtFvK%2Fuploads%2FWAvuLRA7ws1d8O3Ic0NL%2FScreen%20Shot%202023-04-17%20at%2011.37.25%20AM.png?alt=media&#x26;token=c5f8d6cc-d8b9-4dc5-a3eb-64066f8669e3" alt=""><figcaption><p>Right-Click Context Menu</p></figcaption></figure>

### Delete a Record or Folder

Right-click on a record or folder and select **Delete**. Click **OK** to confirm.

If you are deleting a folder, all records in the folder will also be deleted.

<figure><img src="https://914511346-files.gitbook.io/~/files/v0/b/gitbook-x-prod.appspot.com/o/spaces%2F-LSGVtOTYUIkVBoYtFvK%2Fuploads%2Fibi2x1evVwI8rCwo4gj9%2FScreen%20Shot%202023-04-17%20at%2011.29.11%20AM.png?alt=media&#x26;token=ac1cdf90-9649-44a7-96ad-ac070a942aa7" alt=""><figcaption><p>Delete a Record</p></figcaption></figure>

### Delete Multiple Records or Folders at Once

To delete multiple records and folders simultaneously, hold down the Ctrl/Cmd key on your keyboard while selecting the records/folders for deletion. Next, right-click on the selection and select **Delete** and **OK** to confirm. "Shift-click" for selecting a list of items is also supported.

If a folder is included in your selection, all records in the selected folder will be deleted.

<figure><img src="https://914511346-files.gitbook.io/~/files/v0/b/gitbook-x-prod.appspot.com/o/spaces%2F-LSGVtOTYUIkVBoYtFvK%2Fuploads%2FoN7SIGChvoUNr3xNuq4O%2Fimage.png?alt=media&#x26;token=a3acb64e-eda8-4711-8b4d-f95d027506be" alt=""><figcaption></figcaption></figure>

{% hint style="info" %}
Deleted records can be found in the "Deleted Items" section of your vault (for paid consumer accounts). More information on Deleted Items can be [found in this section](#deleted-items).
{% endhint %}

{% embed url="<https://vimeo.com/585566196>" %}
Delete a Record
{% endembed %}

### Favorites

Record Favorites are used to easily identify your most frequently used records. Right-click on a record and select **Add to Favorites**.

![Add a Record to Your Favorites](https://914511346-files.gitbook.io/~/files/v0/b/gitbook-x-prod.appspot.com/o/spaces%2F-LSGVtOTYUIkVBoYtFvK%2Fuploads%2F4ngwfVLFPsPJMibfDSMh%2FScreen%20Shot%202023-04-17%20at%2011.29.02%20AM.png?alt=media\&token=a31448fd-2795-4927-8d4a-8873873fa8db)

## Sharing

Securely share records and folders with other Keeper users such as family, friends and colleagues.

{% hint style="info" %}
If you attempt to share a record or folder with someone who is not an existing Keeper user, they first receive an email inviting them to sign-up for Keeper.
{% endhint %}

### Share a Record

While viewing a record, click **Share**.

![](https://914511346-files.gitbook.io/~/files/v0/b/gitbook-x-prod.appspot.com/o/spaces%2F-LSGVtOTYUIkVBoYtFvK%2Fuploads%2FWZF2kM3P1bLbXS9DvTBF%2FScreen%20Shot%202023-04-13%20at%2010.47.42%20AM.png?alt=media\&token=b2217599-533e-449a-b027-128cec3f2f8a)

Enter the email(s) of the user(s) you would like to share with, then choose their permission type from the dropdown menu.

![](https://914511346-files.gitbook.io/~/files/v0/b/gitbook-x-prod.appspot.com/o/spaces%2F-LSGVtOTYUIkVBoYtFvK%2Fuploads%2FXkVp9IxYsSVpZfTs65fX%2FScreen%20Shot%202023-04-13%20at%2011.22.09%20AM.png?alt=media\&token=5e14b24a-85bc-41f1-ad8b-fa572283da29)

#### User Permissions

<table><thead><tr><th width="374">Permission Name</th><th>Permission Level</th></tr></thead><tbody><tr><td>Can Edit</td><td>User can edit this record</td></tr><tr><td>Can Share</td><td>User can share this record</td></tr><tr><td>Can Edit &#x26; Share</td><td>User can edit and share this record</td></tr><tr><td>View Only</td><td>User can only view the record</td></tr><tr><td>Transfer Ownership</td><td>User will obtain ownership the record and control the sharing permissions</td></tr></tbody></table>

{% embed url="<https://vimeo.com/585566660>" %}
Share a Record
{% endembed %}

{% hint style="info" %}
Keeper "One-Time Share" provides time-limited secure sharing of a record to anyone without having to create a Keeper account. To learn more about One-Time Share, click [here](/user-guides/sharing/one-time-share).
{% endhint %}

### Share a Folder

{% hint style="info" %}
This guide covers Keeper's "Classic" Folder System, if you would like more information about our new Nested Share System, click [here](/user-guides/sharing/nested-shared-subfolders).
{% endhint %}

Shared folders allow you to share multiple records at once and new records can be added to the folder as needed.

To create a Shared Folder, click **Create New > Shared Folder**.

![Create New > Shared Folder](https://914511346-files.gitbook.io/~/files/v0/b/gitbook-x-prod.appspot.com/o/spaces%2F-LSGVtOTYUIkVBoYtFvK%2Fuploads%2FgUCNXgANj8Biaqt5jCcu%2FScreen%20Shot%202023-04-13%20at%2011.30.12%20AM.png?alt=media\&token=a573a129-10e1-407f-8845-79e1541076da)

Choose where you would like to nest the folder using the dropdown menu and enter a name for the folder. Set the User and Record Permissions and click **Create**.

<figure><img src="https://914511346-files.gitbook.io/~/files/v0/b/gitbook-x-prod.appspot.com/o/spaces%2F-LSGVtOTYUIkVBoYtFvK%2Fuploads%2F0mD1aucttFMTrLdAzz6Q%2FScreen%20Shot%202023-04-13%20at%2011.32.02%20AM.png?alt=media&#x26;token=0d2cba7e-369a-4180-bf9b-f72c8dd2788e" alt=""><figcaption><p>New Shared Folder Creation</p></figcaption></figure>

{% hint style="info" %}
Learn more about Keeper's sharing features [here](/user-guides/sharing).
{% endhint %}

{% embed url="<https://vimeo.com/585564434>" %}
Create a Shared Folder
{% endembed %}

## Identity & Payments

Identity & Payments is the place for you to store your personal contact/address information and credit card numbers safely.

From **Identity & Payments** enter a username and click **+ Phone Number** and **+ Address.**

Enter the corresponding personal information and click **Save** to finish.

![Add Personal Info](https://914511346-files.gitbook.io/~/files/v0/b/gitbook-x-prod.appspot.com/o/spaces%2F-LSGVtOTYUIkVBoYtFvK%2Fuploads%2FXTyy0B52MM0L4FGTEbIY%2FScreen%20Shot%202023-04-13%20at%2011.41.25%20AM.png?alt=media\&token=43262f28-f90f-447c-bdfb-c8c21886c056)

To store a payment card, click the **Payment Cards** tab, enter the card information and click **Save** to finish.

![Add Payment Cards](https://914511346-files.gitbook.io/~/files/v0/b/gitbook-x-prod.appspot.com/o/spaces%2F-LSGVtOTYUIkVBoYtFvK%2Fuploads%2F6RSZrpDpd0Y74AyDNj0m%2FScreen%20Shot%202023-04-13%20at%2011.41.52%20AM.png?alt=media\&token=dc876382-5c50-4112-badc-1dededbc77e0)

{% hint style="info" %}
You can also create a "Payment Card" Record by using the record type dropdown menu during record creation.
{% endhint %}

### Create a Payment Card Record

Click **Create New > Record** and select "Payment Card" from the dropdown menu, enter a title and click **Next**. Enter your payment card info and click **Save**.

![Create Payment Card Record Type](https://914511346-files.gitbook.io/~/files/v0/b/gitbook-x-prod.appspot.com/o/spaces%2F-LSGVtOTYUIkVBoYtFvK%2Fuploads%2FxRdgfP94fbf5autagbrw%2FScreen%20Shot%202023-04-19%20at%2010.10.34%20AM.png?alt=media\&token=6ebf5f01-7908-4fbc-98f5-78e8745ece0c)

## Key Features

### Password Generator

Long, random passwords that are created for each login help protect your information and reduce your exposure to data breaches. Keeper generates and securely stores strong, random passwords for all of your sites and apps by clicking on the **dice icon**. The default password length for generated passwords is 20 characters. The length slider can be used to generate longer or shorter passwords for specific sites.

![Password/Passphrase Generator](https://914511346-files.gitbook.io/~/files/v0/b/gitbook-x-prod.appspot.com/o/spaces%2F-LSGVtOTYUIkVBoYtFvK%2Fuploads%2FiAaz5XnFOpiUvoQATvx9%2FScreen%20Shot%202024-04-22%20at%2012.25.01%20PM.png?alt=media\&token=f2e444f0-48d9-4463-bc00-c09dd0d7c4e8)

<figure><img src="https://914511346-files.gitbook.io/~/files/v0/b/gitbook-x-prod.appspot.com/o/spaces%2F-LSGVtOTYUIkVBoYtFvK%2Fuploads%2FrFb7WaMHyi8OzRHfZRlz%2FScreen%20Shot%202024-03-27%20at%2010.28.14%20AM.png?alt=media&#x26;token=ad900ebd-e484-4770-8264-c68d3eee6f94" alt=""><figcaption><p>Password Customization</p></figcaption></figure>

{% hint style="warning" %}
This will NOT automatically change the website's existing login password. You must still visit the corresponding website's "Change Password" form to update the old password to match the new, stronger password. Click [here](#changing-passwords-with-keeperfill) to learn how to easily change your password with KeeperFill.
{% endhint %}

#### Character Sets Used for Password Generation

| Lowercase Letters          | Uppercase Letters      | Digits     | Symbols               |
| -------------------------- | ---------------------- | ---------- | --------------------- |
| abcdefghijklmnopqrstuvwxyz | ABCDEFGHIJKLMNOPQRSTUV | 0123456789 | !@#$%()+;<>=?\[]{}^., |

### Passphrase Generator

Similar to Keeper's password generator, a click of the **dice** will generate a highly secure, random, yet easy-to-remember passphrase for any of your accounts stored in Keeper. By combining multiple words, passphrases are a more secure alternative to passwords.

<figure><img src="https://914511346-files.gitbook.io/~/files/v0/b/gitbook-x-prod.appspot.com/o/spaces%2F-LSGVtOTYUIkVBoYtFvK%2Fuploads%2FVQWCQ72kpwDtuHkZw9WG%2FScreen%20Shot%202024-03-27%20at%2010.18.08%20AM.png?alt=media&#x26;token=eec76323-b1ff-4e48-866b-67245f7b3da2" alt=""><figcaption><p>Password/Passphrase Generator</p></figcaption></figure>

Click on the dropdown and select **Passphrase**.

<figure><img src="https://914511346-files.gitbook.io/~/files/v0/b/gitbook-x-prod.appspot.com/o/spaces%2F-LSGVtOTYUIkVBoYtFvK%2Fuploads%2F6EC3wijTVqRDgXRuehKX%2FScreen%20Shot%202024-03-12%20at%2010.42.53%20AM.png?alt=media&#x26;token=2163e0c4-99a8-4540-9a23-8fc6281030df" alt=""><figcaption><p>Select Passphrase</p></figcaption></figure>

A strong passphrase includes a mix of uppercase and lowercase letters, numbers and symbols. You can use numbers, symbols or spaces to separate each word of the passphrase.

<figure><img src="https://914511346-files.gitbook.io/~/files/v0/b/gitbook-x-prod.appspot.com/o/spaces%2F-LSGVtOTYUIkVBoYtFvK%2Fuploads%2Fwj3bEmt94WPp1wdWcdtM%2FScreen%20Shot%202024-03-12%20at%2010.43.06%20AM.png?alt=media&#x26;token=758f6810-0d2c-4972-aea7-c67aa0d6732f" alt=""><figcaption><p>Customize Passphrase</p></figcaption></figure>

{% hint style="warning" %}
This will NOT automatically change the website's existing login password. You must still visit the corresponding website's "Change Password" form to update the old password to match the new, stronger passphrase.
{% endhint %}

### Password Zoom

Password Zoom allows you to view password character positions in the Password Zoom tray. To reveal the Password Zoom icon, first you must click the **View Password Button (eye icon)**. Next, hover your cursor to the left of the copy icon and click on the **Password Zoom** icon.

<figure><img src="https://914511346-files.gitbook.io/~/files/v0/b/gitbook-x-prod.appspot.com/o/spaces%2F-LSGVtOTYUIkVBoYtFvK%2Fuploads%2Fq3SJUNHyJuyqPdji3YA1%2FScreenshot%202026-02-23%20at%2010.56.44%E2%80%AFAM.png?alt=media&#x26;token=c9debf4f-9edc-4573-8378-4e427f46e329" alt=""><figcaption><p>Password Zoom Icon</p></figcaption></figure>

<figure><img src="https://914511346-files.gitbook.io/~/files/v0/b/gitbook-x-prod.appspot.com/o/spaces%2F-LSGVtOTYUIkVBoYtFvK%2Fuploads%2Fcmvy1rZ5pZ1snLgpBrWC%2FScreenshot%202026-02-23%20at%2010.56.58%E2%80%AFAM.png?alt=media&#x26;token=5d935f24-5bbf-46eb-91e7-35453a4f2ff6" alt=""><figcaption><p>Password Zoom Tray - Character Positions</p></figcaption></figure>

### Custom Fields

Custom Fields allow you to store additional data within a record, such as the answer to a site's security question or a passport number. Any record created with one of Keeper's [Record Types](/user-guides/record-types), can be further enhanced with various custom field options.

Custom field labels can be edited and if you are creating multiple custom fields, you can drag and drop them in your preferred order.

{% hint style="info" %}
To learn more about Record Types, click [here](/user-guides/record-types).
{% endhint %}

While creating or editing a record, click **Custom Field**.

![Add Custom Field](https://914511346-files.gitbook.io/~/files/v0/b/gitbook-x-prod.appspot.com/o/spaces%2F-LSGVtOTYUIkVBoYtFvK%2Fuploads%2FcV5zsW3JR1vGMSE9puAk%2FScreen%20Shot%202023-04-13%20at%2012.05.59%20PM.png?alt=media\&token=2030aea4-551d-49f5-adbb-03eff5665f3b)

Select the custom field you would like to add to the record.

![Select Custom Field Type](https://914511346-files.gitbook.io/~/files/v0/b/gitbook-x-prod.appspot.com/o/spaces%2F-LSGVtOTYUIkVBoYtFvK%2Fuploads%2FACvGfwXkZcahVhsuwlZq%2FScreen%20Shot%202023-04-13%20at%2012.06.11%20PM.png?alt=media\&token=6197c943-5f10-4d12-9b98-96d327f9b85b)

Available Custom Fields:

* Text
* URL (website address) used for Autofill
* Security Question & Answer
* Multi-line Text
* Date
* Email
* Name
* Address (new or linked)
* Pin Code (4-digit numeric)
* Phone Number
* Payment Card (new or linked)
* Hidden Field

Enter the field values and click **Save** to finish.

<figure><img src="https://914511346-files.gitbook.io/~/files/v0/b/gitbook-x-prod.appspot.com/o/spaces%2F-LSGVtOTYUIkVBoYtFvK%2Fuploads%2FUA3vZoH3wUc6WomTTWKn%2FScreen%20Shot%202023-04-13%20at%2012.11.08%20PM.png?alt=media&#x26;token=10b2eeb0-922c-4c23-9087-a2ba0b967910" alt=""><figcaption><p>Security Question &#x26; Answer Custom Field</p></figcaption></figure>

{% hint style="success" %}
Keeper autofills the custom fields of login forms as long as both the Website Address and Custom Field Name of the Keeper record match those of the login form.
{% endhint %}

#### "General" Record Types (Keeper's Legacy Record Version)

Within a "general" record type, custom fields can be created in pairs: a "Custom Field Name" and a "Custom Field Value".

![Custom Field in Legacy Record Type](https://914511346-files.gitbook.io/~/files/v0/b/gitbook-legacy-files/o/assets%2F-LSGVtOTYUIkVBoYtFvK%2F-MGL-6CX1cBADODXsjz7%2F-MGL0ixWNY67-aTRNSPU%2FScreen%20Shot%202020-04-13%20at%201.49.17%20PM.png?alt=media\&token=644f83c4-2cc9-400e-9efd-d86b94cba839)

### Advanced Filters & Quick Search

Use advanced search filters to quickly narrow down your results and find exactly what you need.

<figure><img src="https://914511346-files.gitbook.io/~/files/v0/b/gitbook-x-prod.appspot.com/o/spaces%2F-LSGVtOTYUIkVBoYtFvK%2Fuploads%2F2BQWILNKhn49nYvj0q33%2FScreen%20Shot%202023-05-01%20at%2012.12.10%20PM.png?alt=media&#x26;token=7838e39d-0d94-4dc1-9a8d-974ee74002ed" alt=""><figcaption><p>Advanced Search Filters</p></figcaption></figure>

Quick search shows recently viewed items and improves sort results. Click within the "Search" field to narrow down your results based on search terms or to reveal recently viewed items.

<figure><img src="https://914511346-files.gitbook.io/~/files/v0/b/gitbook-x-prod.appspot.com/o/spaces%2F-LSGVtOTYUIkVBoYtFvK%2Fuploads%2FWnGgeHW2jd5CVYTrzrXC%2FScreen%20Shot%202023-05-01%20at%2012.12.27%20PM.png?alt=media&#x26;token=cc2ab7b7-21ab-45f3-bd5b-d142e43a7f03" alt=""><figcaption><p>Quick Search and Recently Viewed</p></figcaption></figure>

### Launch

Launch allows you to quickly navigate to your favorite websites. Simply click a record's **Website Address**, **Launch button**, or **launch icon** to launch the target site and login with Keeper in a new window.

![Launch](https://914511346-files.gitbook.io/~/files/v0/b/gitbook-x-prod.appspot.com/o/spaces%2F-LSGVtOTYUIkVBoYtFvK%2Fuploads%2FPFjipZoKdWNQlwiz57Ym%2FScreen%20Shot%202023-04-19%20at%2010.24.14%20AM.png?alt=media\&token=4f5f99da-a8ec-46f1-b1be-9700fd7d7286)

### Notification Center

Keeper's Notification Center creates a secure, in-app hub for viewing and managing notifications. Types of notifications you can expect to receive include:

* **Security Alerts** - Notifies users in real-time about suspicious login attempts or changes to their account settings.
* **Access Requests** - Notifies users when someone requests access to shared files or records, enabling quick approval or denial.
* **Device Management** - Alerts users to new device logins or provides reminders to review active device sessions.
* **Record Reminders** - Notifies users about time-sensitive actions related to stored records, like expiring passwords or access keys.
* **Master Password Updates** - Reminds users to update their master password or provide notifications about password reset requests.
* **Subscription Reminders** - Informs users about upcoming subscription renewals or expired payment methods.
* **Product Updates** - Seamlessly delivers product updates without interrupting the user experience.

Click the **bell icon** to open your Notifications Center.

<figure><img src="https://914511346-files.gitbook.io/~/files/v0/b/gitbook-x-prod.appspot.com/o/spaces%2F-LSGVtOTYUIkVBoYtFvK%2Fuploads%2FbpzF2zwjC1vBbvEzEO2D%2FClick%20Bell%20Icon%402x.jpg?alt=media&#x26;token=6bf9ffcf-4e9e-46be-a739-75ac2baf5141" alt=""><figcaption><p>Open Notifications Center</p></figcaption></figure>

Quickly review and respond to actionable events such as device approvals and sharing requests with one click.

<figure><img src="https://914511346-files.gitbook.io/~/files/v0/b/gitbook-x-prod.appspot.com/o/spaces%2F-LSGVtOTYUIkVBoYtFvK%2Fuploads%2F3bxiIUxSf08UZlBu4Q5g%2FClick%20Dropdown%402x.jpg?alt=media&#x26;token=dd92abe3-a2bf-4f0a-ae3f-61d9f7550e71" alt=""><figcaption><p>Approve/Deny Requests</p></figcaption></figure>

Options like the "Unread Only" toggle and "Mark all as read" allow you to simplify and filter your view.

<figure><img src="https://914511346-files.gitbook.io/~/files/v0/b/gitbook-x-prod.appspot.com/o/spaces%2F-LSGVtOTYUIkVBoYtFvK%2Fuploads%2Fp2eSrJ8ReMgSDmFh3rtz%2FSelect%20Mark%20all%20as%20read.png?alt=media&#x26;token=dc6e67b9-e74b-4d35-8a98-7af46dc38cc9" alt=""><figcaption><p>Filter Notifications, Unread Only, &#x26; Mark All as Read</p></figcaption></figure>

{% hint style="success" %}
**To learn more about the Notification Center, click** [**here**](/user-guides/notification-center)**.**
{% endhint %}

### Security Audit

The Security Audit screen gives the passwords stored in your vault an overall security score based on password strength. You can clearly view information about each record's password strength and reuse from this screen.

You can easily view a record that contains a high-risk password by clicking on it from the provided list. To resolve the risk, you will be directed to change the password at the record's website and then update the corresponding record in your vault.

![Security Audit](https://914511346-files.gitbook.io/~/files/v0/b/gitbook-x-prod.appspot.com/o/spaces%2F-LSGVtOTYUIkVBoYtFvK%2Fuploads%2FeIqNEjVzlIqVHQrACKST%2FScreen%20Shot%202023-04-19%20at%2010.33.56%20AM.png?alt=media\&token=07dd537d-a095-4a62-9c56-4d4bf5b469a2)

{% hint style="info" %}
Learn more about Security Audit [here](/user-guides/security-audit).
{% endhint %}

### Record History

Keeper provides you with the ability to view and restore previous versions of a record by clicking on the record's **information icon** and **View Record History**.

![Record Information](https://914511346-files.gitbook.io/~/files/v0/b/gitbook-x-prod.appspot.com/o/spaces%2F-LSGVtOTYUIkVBoYtFvK%2Fuploads%2FVK0MuZ2nOAr5oK0MUehs%2FScreen%20Shot%202023-04-19%20at%2010.37.48%20AM.png?alt=media\&token=618a6fa2-6767-442c-a492-cadaacbe7be8)

Select the version of the record you want to review/and or restore based on the last modified date and time. Click **Restore** to revert the record back to the selected version.

![](https://914511346-files.gitbook.io/~/files/v0/b/gitbook-x-prod.appspot.com/o/spaces%2F-LSGVtOTYUIkVBoYtFvK%2Fuploads%2FA2HO4CdbaiK3v5LqULCS%2FScreen%20Shot%202023-04-19%20at%2010.42.54%20AM.png?alt=media\&token=80dada95-1718-4173-836d-3edff33ef30a)

{% hint style="info" %}
Deleted records can be reviewed and restored by visiting the **Deleted Items** section of your vault (this is available for paying customers only).
{% endhint %}

### Emergency Access

Give trusted family and friends access to your Keeper Vault in the event of an emergency or loss of life. You can designate up to five emergency contacts and decide how much time should pass before their access is granted.

{% hint style="info" %}
The Emergency Access feature is only available for consumer accounts.
{% endhint %}

From the Account Dropdown Menu, click **Account > Emergency Access**

Click **Trusted Users** and enter the email addresses of up to five contacts (Keeper users). Optionally, select a "Delay Access" duration from the dropdown menu for each user, then click **Send**.

The amount of time between your request to provide emergency access and access granted can be set up to three months per contact. If a delay is configured, the countdown begins the moment the trusted user attempts to login to your vault.

![Account > Emergency Access >Trusted Users](https://914511346-files.gitbook.io/~/files/v0/b/gitbook-x-prod.appspot.com/o/spaces%2F-LSGVtOTYUIkVBoYtFvK%2Fuploads%2FxgGAA21uembBdI2AOvSq%2FScreen%20Shot%202023-04-19%20at%2010.51.24%20AM.png?alt=media\&token=28926061-74e0-4e49-b3b6-11d6ed5227cb)

<figure><img src="https://914511346-files.gitbook.io/~/files/v0/b/gitbook-x-prod.appspot.com/o/spaces%2F-LSGVtOTYUIkVBoYtFvK%2Fuploads%2FPU8b08OsiwtBKl7OmZ0X%2FScreen%20Shot%202023-04-19%20at%2010.51.40%20AM.png?alt=media&#x26;token=26d929e8-94f6-4476-82b0-231e2711d776" alt=""><figcaption><p>Add Trusted Users</p></figcaption></figure>

In order for the recipient to accept the request, you must first establish a "sharing" relationship if one hasn't already been established through Keeper's record/folder sharing features.

If prompted, click **Send Invite**.

If the recipient is not an existing Keeper user, they will receive an email inviting them to sign up for a Keeper account. Once they sign up and login to their account, they can accept the sharing relationship request.

Once the recipient accepts your sharing request, you will need to invite them to be your emergency contact once more from the “Emergency Access” section of your vault. This step is not necessary if a sharing relationship has previously been established.

{% hint style="info" %}
To learn more about Emergency Access, click [here](/user-guides/emergency-access).
{% endhint %}

## Deleted Items

You can view and restore previously deleted records from the "Deleted Items" section of your vault by clicking **Restore**.

<figure><img src="https://914511346-files.gitbook.io/~/files/v0/b/gitbook-x-prod.appspot.com/o/spaces%2F-LSGVtOTYUIkVBoYtFvK%2Fuploads%2FX0wMaGXqiaQiSWywSlfs%2FScreen%20Shot%202023-04-14%20at%2011.35.12%20AM.png?alt=media&#x26;token=81d38db7-be19-4b4f-81fa-77fc831740a3" alt=""><figcaption><p>Recently Deleted Records</p></figcaption></figure>

### Delete Forever

Records in the Deleted Items can be purged permanently by selecting the "Delete Forever" option.

<figure><img src="https://914511346-files.gitbook.io/~/files/v0/b/gitbook-x-prod.appspot.com/o/spaces%2F-LSGVtOTYUIkVBoYtFvK%2Fuploads%2FsqEYNQaPU406QDW1nfmx%2FScreenshot%202025-03-23%20at%2011.07.29%E2%80%AFAM.png?alt=media&#x26;token=7437748e-13d5-4efe-99fe-0c1dc3fd59f4" alt=""><figcaption><p>Delete Forever</p></figcaption></figure>

### Data Retention Policy

Business customers have the option of applying data retention policies in the enforcement policy section of the Keeper Admin Console. If a retention policy is set, you may be denied the ability to permanently delete items from the vault. If this occurs, you will receive a message similar to below:

<figure><img src="https://914511346-files.gitbook.io/~/files/v0/b/gitbook-x-prod.appspot.com/o/spaces%2F-LSGVtOTYUIkVBoYtFvK%2Fuploads%2Fn92RVANGOyt6GQVQFut9%2FScreenshot%202025-03-23%20at%2011.03.51%E2%80%AFAM.png?alt=media&#x26;token=9b08285f-c1aa-4e20-bb09-2be75147058f" alt=""><figcaption><p>Enforcement of Data Retention Policies</p></figcaption></figure>

### Lost Access

The “Lost Access” tab contains records that you own, but are no longer accessible (e.g. You delete a record that you own that has also been shared with another user). This feature allows users to individually add these records back to their vault.

Click **Add to My Vault** to add a record back to your vault.

<figure><img src="https://914511346-files.gitbook.io/~/files/v0/b/gitbook-x-prod.appspot.com/o/spaces%2F-LSGVtOTYUIkVBoYtFvK%2Fuploads%2FEUktAH6aRvRXkMVNmPjI%2FScreen%20Shot%202023-04-14%20at%2011.35.29%20AM.png?alt=media&#x26;token=27775976-dc19-44e4-adcc-47c0294076c4" alt=""><figcaption><p>Lost Access</p></figcaption></figure>

### Shared Item Recovery

Recently deleted shared records from within shared folders can be recovered from the tab called "**Shared Folder Contents**". This tab contains records that were deleted by a user of the shared folder with "Can manage records" permission. Records which appear in this tab are able to be restored from any user who currently has access to the shared folder. This feature was created to make the restore process accessible from any shared folder participant when a record has been removed by any team member.

{% hint style="info" %}
For security reasons, if a change was made to the record after it was removed from the shared folder, it cannot be restored and the original owner must re-share it.
{% endhint %}

<figure><img src="https://914511346-files.gitbook.io/~/files/v0/b/gitbook-x-prod.appspot.com/o/spaces%2F-LSGVtOTYUIkVBoYtFvK%2Fuploads%2F2gefFd2IhFtVEA9nK2ic%2FScreenshot%202024-05-01%20at%2010.17.23%E2%80%AFAM.png?alt=media&#x26;token=530998b6-664c-43b8-921c-3b7678d15eb8" alt=""><figcaption><p>Shared Item Recovery</p></figcaption></figure>

## **Two-Factor Codes for TOTP**

For extra security on supported sites and apps, click **Add Two-Factor Code** to store Two-Factor Authentication (2FA) codes for standard TOTP (Time-Based One Time Passwords) in your Keeper records.

<figure><img src="https://914511346-files.gitbook.io/~/files/v0/b/gitbook-x-prod.appspot.com/o/spaces%2F-LSGVtOTYUIkVBoYtFvK%2Fuploads%2F2ozvFvCtKGC7UwWsrBIA%2FScreen%20Shot%202023-04-28%20at%2011.47.27%20AM.png?alt=media&#x26;token=b327ca6b-6b5e-4adb-81f6-6788702dc022" alt=""><figcaption><p>Add Two-Factor Code to a Record</p></figcaption></figure>

<figure><img src="https://914511346-files.gitbook.io/~/files/v0/b/gitbook-x-prod.appspot.com/o/spaces%2F-LSGVtOTYUIkVBoYtFvK%2Fuploads%2F9DTTxMw4sWemd8753eII%2FScreen%20Shot%202023-04-28%20at%2011.49.00%20AM.png?alt=media&#x26;token=38aa1367-3f10-4d95-927d-115bb3480520" alt=""><figcaption><p>Store 2FA Code in a Record</p></figcaption></figure>

Storing two-factor codes in your vault has several advantages:

* Keeper two-factor codes are more secure than using SMS text messages.
* Two-factor codes stored in Keeper are protected with strong Zero-Knowledge encryption.
* Codes can be auto-filled quickly while logging in to a site, saving time and reducing friction.
* Keeper records are securely backed up so if you lose a device you don’t have to reset all the codes.
* Since Keeper records are shareable, two-factor codes are always available to everyone who has access to the record.

{% embed url="<https://vimeo.com/356075220>" %}
Two-Factor Codes Integration
{% endembed %}

## KeeperFill

The KeeperFill Browser Extension allows you to autofill your passwords and save new login credentials to your vault. KeeperFill is available for every web browser.

Download KeeperFill for your browser by visiting our [Downloads Page](https://www.keepersecurity.com/download.html?t=v).

![Autofill Your Logins With KeeperFill](https://914511346-files.gitbook.io/~/files/v0/b/gitbook-x-prod.appspot.com/o/spaces%2F-LSGVtOTYUIkVBoYtFvK%2Fuploads%2FDho1kLd7Zp1jpiH90Uby%2FScreen%20Shot%202024-05-15%20at%2012.15.37%20PM.png?alt=media\&token=6d5d14b1-7bef-4b74-bc87-64bc03206187)

{% embed url="<https://vimeo.com/585559712>" %}
Autofill With KeeperFill
{% endembed %}

{% hint style="info" %}
To learn more about the KeeperFill Browser Extension, click [here](/user-guides/browser-extensions).
{% endhint %}

### Changing Passwords with KeeperFill

KeeperFill makes it easy to change your passwords. When visiting a site's "Change Password" form, you will receive a prompt from Keeper asking if you would like help changing your password. By clicking **Yes**, Keeper will walk you through a few quick steps to change your password and simultaneously update the record in your vault. These steps will include a series of prompts detailing the following actions:

* Autofill your old/current password
* Automatically generate and autofill a new secure password
* Confirm the changes and save them to your vault

![KeeperFill's Prompt to Change a Password](https://914511346-files.gitbook.io/~/files/v0/b/gitbook-x-prod.appspot.com/o/spaces%2F-LSGVtOTYUIkVBoYtFvK%2Fuploads%2FTtXTvurUel6iuwwNdqDy%2Fspaces_-LSGVtOTYUIkVBoYtFvK_uploads_V13A93Uhg0hZgf7LKaPf_Screen%20Shot%202023-10-11%20at%201.webp?alt=media\&token=af40f57f-c5e5-4b09-a831-3c8a84a45a04)

{% embed url="<https://vimeo.com/736584776>" %}
Changing Your Passwords
{% endembed %}

## Secure Add-Ons

### Secure File Storage

Keeper offers Secure File Storage to protect your confidential files, photos and videos. Securely upload and store files such as passport photos, medical cards, drivers licenses, tax and loan documents, videos and any other private file to your Keeper vault.

{% hint style="info" %}
Files can either be added to an existing record or you can create a new record to store the file independently of other login information.
{% endhint %}

Click **Files or Photos** to upload a file, or simply drag-and-drop the file directly into your Vault.

![Files or Photos](https://914511346-files.gitbook.io/~/files/v0/b/gitbook-x-prod.appspot.com/o/spaces%2F-LSGVtOTYUIkVBoYtFvK%2Fuploads%2FVgoip4VwavpTRBUD3zQ6%2FScreen%20Shot%202023-04-13%20at%2011.58.43%20AM.png?alt=media\&token=fb727b07-4a0e-411a-a5c0-e45e78d34159)

![Drag-and-Drop a File Directly Into Your Vault](https://914511346-files.gitbook.io/~/files/v0/b/gitbook-x-prod.appspot.com/o/spaces%2F-LSGVtOTYUIkVBoYtFvK%2Fuploads%2F9GmrRFJkttX0PnfY39G0%2FScreen%20Shot%202023-04-13%20at%2011.59.31%20AM.png?alt=media\&token=39b0de38-9941-4763-8f4e-cd268bac2a6c)

{% hint style="info" %}
To learn more about Secure File Storage, click [here](/user-guides/secure-file-storage).
{% endhint %}

### BreachWatch

BreachWatch is a powerful secure add-on feature that monitors the internet and dark web for breached accounts matching records stored within your Keeper Vault. BreachWatch alerts you so that you can take immediate action to protect yourself against hackers. Once activated, BreachWatch continuously monitors for compromised credentials and notifies you if any of your records are at risk.

To start your BreachWatch scan, from the left navigation menu, click **BreachWatch > Let's Begin**.

![BreachWatch](https://914511346-files.gitbook.io/~/files/v0/b/gitbook-x-prod.appspot.com/o/spaces%2F-LSGVtOTYUIkVBoYtFvK%2Fuploads%2F6WxHziyEcESe6Gi1QGC5%2FScreen%20Shot%202023-04-28%20at%2012.17.59%20PM.png?alt=media\&token=86ef6c18-7853-4211-a00e-bc0270476088)

BreachWatch will then scan your records and report any risks associated with them. Clicking each record listed will allow you view the steps needed to resolve each risk.

Resolving the risk requires you to change the password at the affected website. Once you have done that, be sure to update the corresponding record in your Keeper Vault with the same password.

![](https://914511346-files.gitbook.io/~/files/v0/b/gitbook-x-prod.appspot.com/o/spaces%2F-LSGVtOTYUIkVBoYtFvK%2Fuploads%2FtL80ZSesRxHemq6eCx5k%2FScreen%20Shot%202023-04-28%20at%2012.29.31%20PM.png?alt=media\&token=6a26ee44-200b-41c6-a974-7d8e64560ae7)

If you click **Ignore**, then that record will be skipped on future scans until the password is reset. You may also do nothing (deferring a response) and leave the risky password unchanged and thus still at risk.

{% hint style="info" %}
To learn more about BreachWatch, click [here](/user-guides/breachwatch).
{% endhint %}

## Settings

Users can configure specific features like language, theme and two-factor authentication from the Settings Menu. You can access the Settings Menu by clicking on the **Account Dropdown Menu** (your email) in the upper-right corner of your screen.

![Account Settings Menu](/files/n2FUK5RSwJusxM7mXixV)

### General

* Choose a Theme: Select from a number of available themes. The theme will affect coloring of buttons, backgrounds, icons and other components.
* Dark Mode: Gives users a more comfortable viewing experience in low-light environments.
* Clipboard Expiration (Desktop App Only): This will clear any data copied to the clipboard via a copy button after a period of time. Note: If your operating system maintains a clipboard history, this information may still be available after it has been cleared.
* Choose another language: English US & UK, Spanish, Japanese, Romanian, Chinese Simplified & Traditional, French, Korean, Russian, Arabic, Greek, Dutch, Slovak, Brazilian Portuguese, Hebrew, Polish, German, Italian, and Portuguese
* Record Type Sorting: Adjust the order that record types show in the "Create new" dropdown.
* Master Password: Allows you to reset your master password. You must re-enter your current master password in order to change it.
* Account Recovery: Allows you to set your recovery phrase which can be used to access your vault in the event you forget your master password.
* Email Address: Allows you to change the email address associated with your account. You must re-enter your current master password in order to change it.
* Delete All Unshared Owned Records: This will delete all records from your vault that you own. Records that have been shared, will still be shared. Deleted records will be moved to the trash can. To permanently delete them, you must also empty your trash.

### Security

* Auto-Logout: Logout of Keeper after a number of minutes of inactivity. On the web vault, this is controlled in the browser extension settings. On desktop you have the ability to also wipe application memory and restart the desktop app on logout.
* Stay Logged In: If Auto-Logout is enabled, this setting will maintain the inactivity timer and preserve your login if the system is rebooted or your browser is restarted. If "Stay Logged In" is disabled, you will be logged out if the application closes.
* [Two-Factor Authentication](#two-factor-authentication-setup): Enable a second factor of authentication such as SMS, RSA token, DUO security token, Authenticator or KeeperDNA. This will be used in addition to device verification and a master password.
* [Security Keys](#security-keys): Setup a security key such as a Yubikey as a second factor for authentication.
* Auto-Approve Devices from Recognized IP Address(es): Device approval is needed for any client to login for the first time. The device token is saved per device. If you would like to automatically skip device approval when you are on an IP that matches another already approved device, this will skip the check.
* [Windows Hello Login (PC Only)](#windows-hello-login): Login to the keeper vault using biometrics. This replaces the first factor (your master password), and second factors will still be required.
* Touch ID (MacOS only): Login to the keeper vault using biometrics. This replaces the first factor (your master password), and second factors will still be required.

### KeeperFill

* [KeeperFill for Apps](#keeperfill-for-apps): KFFA allows interaction with desktop and thick clients to input passwords and other fields into apps via shortcut keys. This requires the desktop app to be installed.
* [KeeperFill Browser Extension](#keeperfill): The browser extension provides most keeper capabilities directly from the browser.

### Accessibility

* Optionally extend display of temporary confirmation messages.
* Zoom keyboard shortcut: Cmd +/-

{% hint style="info" %}
In order to properly utilize the vault's **+Create New** button and various dropdown menus, users must first disable the JAWS "Virtual Cursor" setting if applicable (or ALT + arrow up/down for NVDA).

In JAWS navigate to **Utilities > Settings Center** and search for "use virtual PC cursor", then uncheck "Use Virtual PC Cursor".
{% endhint %}

### Advanced

* Search Settings: Control the visibility of Keeper’s search results dropdown overlay and advanced search filters.
* Automatic Syncing Delay (Business Customers Only): Set your vault sync delay frequency to improve syncing performance across large user groups.
* Show Numbering In Record List View: Choose whether you want records in "list view" to be numbered.

<figure><img src="https://914511346-files.gitbook.io/~/files/v0/b/gitbook-x-prod.appspot.com/o/spaces%2F-LSGVtOTYUIkVBoYtFvK%2Fuploads%2FpWeY7CWup6jCDcYUICgm%2FScreen%20Shot%202023-11-17%20at%2011.04.52%20AM.png?alt=media&#x26;token=afd41d8e-9044-4f74-8ba7-333de22d8d81" alt=""><figcaption><p>Advanced Account Settings > Search</p></figcaption></figure>

### Import & Export

* Import: Import passwords from browsers or other password managers. Web imports are typically file based. Keeper Desktop has more availability for automated imports from other solutions.
* Export: Export your vault to CSV, JSON or PDF. This includes the ability to include records that have been shared with you that you are not the owner of.
* Shared Records Report: Generate a report in CSV, JSON or PDF format. This provides a list of records that you own, and who those records are shared with.

### Keeper Forcefield

Keeper Forcefield is an advanced endpoint security feature for Microsoft Windows that protects sensitive applications and processes from unauthorized access. It is specifically designed to defend against threats such as infostealers and password-stealing malware installed from phishing or other attacks. Forcefield will only show on the Windows version of the Keeper Desktop application.

<figure><img src="https://914511346-files.gitbook.io/~/files/v0/b/gitbook-x-prod.appspot.com/o/spaces%2F-LSGVtOTYUIkVBoYtFvK%2Fuploads%2FPpm3Cc3goGMZrU9TrB7e%2Fforcefield_status_on.png?alt=media&#x26;token=9977558a-86c9-47eb-93b8-60feaf0a39e7" alt=""><figcaption><p>Keeper ForceField</p></figcaption></figure>

See the [Keeper Forcefield](/user-guides/keeper-forcefield) page for more information.

## Two-Factor Authentication

Two-Factor Authentication (2FA) provides an extra layer of security when logging into your Keeper Vault or another site or application by requiring a secondary passcode upon logging in.

{% hint style="warning" %}
Enabling Two-Factor Authentication is advised for highly valuable or sensitive accounts (e.g. banking, medical and social media accounts).
{% endhint %}

Keeper provides two ways to take advantage of 2FA:

* To log into your Keeper Vault.
* To login into any site or application from your Keeper Vault by embedding a Two-Factor code into your records.

### 2FA for Your Keeper Vault

To enable 2FA for your Keeper vault, from the Account Dropdown Menu, click **Settings > Security**, toggle **"**&#x54;wo-Factor Authentication" on and select your 2FA method.

<figure><img src="https://914511346-files.gitbook.io/~/files/v0/b/gitbook-x-prod.appspot.com/o/spaces%2F-LSGVtOTYUIkVBoYtFvK%2Fuploads%2FmHYiuYTEmjmo1G0gDrFr%2FScreenshot%202024-01-18%20at%205.37.19%E2%80%AFPM.jpg?alt=media&#x26;token=f96d2654-85e0-423b-80b7-001c5fa83468" alt=""><figcaption><p>Two-Factor Authentication</p></figcaption></figure>

Keeper support several methods of Two-Factor Authentication:

* Text Message (SMS)
* Authenticator App (such as Google Authenticator, Microsoft Authenticator, etc)
* RSA SecurID (for Enterprise customers)
* Duo Security (for Enterprise customers)
* Keeper DNA (using Apple Watch or Android Wear devices)
* FIDO2 Security Keys (or device passkeys)

<figure><img src="https://914511346-files.gitbook.io/~/files/v0/b/gitbook-x-prod.appspot.com/o/spaces%2F-LSGVtOTYUIkVBoYtFvK%2Fuploads%2FPKCQT4ihPEyZgjcU4GIM%2FScreenshot%202024-01-18%20at%205.39.01%E2%80%AFPM.jpg?alt=media&#x26;token=f43f8e4d-c63b-4f40-9e21-9be771ff775f" alt=""><figcaption></figcaption></figure>

#### **Text Message Setup**

(1) The Text Message toggle is on by default. Select a **Region** from the dropdown (US+1 by default), enter your **10 digit phone number including your area code** and click **Next**.

(2) To verify that you trust this number and device, **enter the Keeper web code** that was sent to the phone number you provided. Select your 2FA code duration from the dropdown menu and click **Next**. Codes will only last for a minute; if you need another code sent, click **Send a new code**.

{% hint style="info" %}
You will be prompted for 2FA every time you login to your Vault unless you select an alternative code duration. Business customers may be required to enter the code every login as determined by their Keeper Administrator.
{% endhint %}

![Enter Verification Code](https://914511346-files.gitbook.io/~/files/v0/b/gitbook-x-prod.appspot.com/o/spaces%2F-LSGVtOTYUIkVBoYtFvK%2Fuploads%2FUrZIVSGGoHYagka82CTZ%2FScreen%20Shot%202023-05-01%20at%2011.23.05%20AM.png?alt=media\&token=8d175c5d-f1e1-4e22-8fb5-03ccaae181a4)

(3) Backup codes will be shown next. If you are unable to receive Two-Factor codes via the phone number you entered, you can enter one of the codes listed instead. Click **I have written these codes down** to finish.

If you are NOT receiving SMS messages from Keeper, please use the TOTP method.

#### Authenticator App (TOTP) Setup:

(1) Toggle "**Authenticator App**" on and click **Next**.

(2) Using the device that runs the the TOTP application, **scan the QR code** provided or manually enter the secret key. The app will then acknowledge the QR code and produce a verification code.

<figure><img src="https://914511346-files.gitbook.io/~/files/v0/b/gitbook-x-prod.appspot.com/o/spaces%2F-LSGVtOTYUIkVBoYtFvK%2Fuploads%2F6K4qWXfWvKal0FLbrJZ1%2Fqr-code.png?alt=media&#x26;token=b09a94e9-d9dc-4218-8a15-2e1c24821fd6" alt=""><figcaption><p>Two-Factor Authentication Sign Up</p></figcaption></figure>

(3) **Enter that verification code** and click **Next**.

{% hint style="info" %}
You will be prompted for 2FA every time you login to your Vault unless you select an alternative code duration. Business customers may be required to enter the code every login as determined by their Keeper Administrator.
{% endhint %}

(4) Backup codes will be shown next. If you are ever unable to receive Two-Factor codes, you can enter one of the codes listed instead. Click **I have written these codes down** to finish.

{% hint style="info" %}
In order for Azure MFA (using the Microsoft Authenticator app.) to be utilized as a TOTP, the Azure administrator needs to allow the verification method "Verification code from mobile app or hardware token" when setting up MFA in Azure.
{% endhint %}

#### KeeperDNA Setup:

Keeper DNA is a Two-Factor Authentication method that uses your smart watch as your second factor.

To use this feature, toggle the switch next to Keeper DNA, then follow these links to set up KeeperDNA on your preferred platform:

* [Keeper DNA for iOS and Apple Watch](/user-guides/ios#apple-watch)
* [Keeper DNA for Android and Wear Devices](/user-guides/android#keeper-dna-2fa)

#### Security Key Setup:

Keeper supports any FIDO2-compatible WebAuthn security key, including hardware-based security key devices such as YubiKey and device passkeys on your web browser or operating system. A user can register up to five security keys. Any one of those keys will unlock the account.

1. Go to **Settings > Security** and enable **Two-Factor Authentication** then select **"**&#x53;et Up"
2. Make sure the security key is NOT already inserted into your USB port and click **Next**.
3. Insert the security key into the USB port, name the key and click **Register**.

If you have a PIN associated with your security key, you will be required to enter the PIN when registering your key. If you would like to remove the requirement for PIN entry, this can be done after registration.

<figure><img src="https://914511346-files.gitbook.io/~/files/v0/b/gitbook-x-prod.appspot.com/o/spaces%2F-LSGVtOTYUIkVBoYtFvK%2Fuploads%2F7ib1oUi9rYNtslK0p4BO%2FScreenshot%202024-01-18%20at%205.39.08%E2%80%AFPM.jpg?alt=media&#x26;token=114ecf69-c05c-45f3-b4b4-b28a034fa00b" alt=""><figcaption><p>Security Key Setup</p></figcaption></figure>

<figure><img src="https://914511346-files.gitbook.io/~/files/v0/b/gitbook-x-prod.appspot.com/o/spaces%2F-LSGVtOTYUIkVBoYtFvK%2Fuploads%2FFBktFhvUxNdBMoaBNcX0%2FScreenshot%202024-01-18%20at%205.39.49%E2%80%AFPM.jpg?alt=media&#x26;token=468a8e70-ce19-498f-b223-8915f2f0271e" alt=""><figcaption><p>Registration of Security Key</p></figcaption></figure>

#### Security Key with Fallback Method

If you don't always have your security key on hand, or if you are using mobile devices which don't support hardware security keys, you may add additional methods of 2FA such as a TOTP code. When logging into a device, you will then have the option of using either method.

#### Security Key as the Only Factor

For the highest level of protection, you can elect to use Security Keys as the only 2FA method. There are some important things to know about this configuration:

* Support for enforcing a FIDO2 Security Key can vary based on the device operating system and device firmware capabilities.
* Keeper on iOS currently requires using NFC-enabled keys.
* The PIN requirement is supported based on the capabilities of the device. As of this writing, mobile OS support for PIN enforcements is limited. We do not recommend enforcing the PIN if users are accessing Keeper on their mobile device.
* Keeper supports up to 10 security keys on a single account. Any key can be used during the login process.

#### Managing the Security Key PIN Requirement

To manage the entry of PIN every login with a security key, go to Settings > Security > Security Keys > Edit > Edit > and see the "Require PIN if set on security key" setting.

<figure><img src="https://914511346-files.gitbook.io/~/files/v0/b/gitbook-x-prod.appspot.com/o/spaces%2F-LSGVtOTYUIkVBoYtFvK%2Fuploads%2Fp1ugo4fyLFCSpUM0oeuR%2FScreenshot%202024-01-18%20at%206.51.04%E2%80%AFPM.jpg?alt=media&#x26;token=3aa13310-d394-4726-9b21-0ab494e08b03" alt=""><figcaption><p>Require PIN if set on security key</p></figcaption></figure>

### 2FA for **Websites & Apps**

Keeper can protect, manage and store TOTP codes for authenticating into any 3rd party website.

(1) At the target website, visit the two-factor authentication screen which is usually located within security settings. It is sometimes referred to as "login verification" or "two-step verification". Screengrab the QR pattern or copy the secret code to your clipboard.

(2) Within a record, click **Add Two-Factor Code**.

![Add Two-Factor Code](https://914511346-files.gitbook.io/~/files/v0/b/gitbook-x-prod.appspot.com/o/spaces%2F-LSGVtOTYUIkVBoYtFvK%2Fuploads%2FUmSEDYM1SHMTo6qwGbXH%2FScreen%20Shot%202023-04-13%20at%2012.25.47%20PM.png?alt=media\&token=79f1ce06-603b-4aac-9e67-74b505619d42)

(3) Upload the screengrab of the two-factor QR pattern (with security key) associated with the site or application. If there isn't a QR pattern, use the manual entry method. Enter the code given under “Secret Key”, often a 32-digit code and fill out the rest of the fields.

If you're using Keeper Desktop, you can also use the handy "Scan" feature to automatically capture the code.

<figure><img src="https://914511346-files.gitbook.io/~/files/v0/b/gitbook-x-prod.appspot.com/o/spaces%2F-LSGVtOTYUIkVBoYtFvK%2Fuploads%2FRmPUt73lhJfBmu78jklV%2FScreen%20Shot%202023-04-13%20at%2012.29.03%20PM.png?alt=media&#x26;token=015a6ff1-dd29-48cb-a4b3-bcb404eda268" alt=""><figcaption><p>Upload QR Code or Manual Entry Setup</p></figcaption></figure>

{% hint style="info" %}
**Allowing Chrome to Scan Your Screen**

When using the Scan feature for the first time, your browser or operating system may prompt you to grant screen recording or screen capture permissions. Follow the steps below based on your setup:

* **On macOS:** A system dialog will appear asking whether to allow Chrome to record your screen. Click **Allow**. If you dismissed this prompt, go to **System Settings → Privacy & Security → Screen Recording**, find **Google Chrome** in the list, and toggle it on. You may need to restart Chrome for the change to take effect.
* ![](/files/fvnXgtu0d1NnxunZ89K9)
* **On Windows:** Chrome will display a screen-sharing picker dialog. Select the window or screen containing the QR code and click **Share** or **Allow**. No additional system permissions are typically required on Windows.
* **On ChromeOS:** Chrome will request access to capture the screen. Click **Allow** when prompted.
* **In Chrome Browser Settings:** If you previously denied the permission, navigate to **chrome://settings/content** → **Additional permissions**, locate the screen capture or camera setting for the Keeper extension, and set it to **Allow**.

Once permissions are granted, click **Scan** within the Keeper record, position the capture area over the QR code displayed on your screen, and Keeper will automatically read and store the code.

> **Note:** If you continue to experience issues with scanning, ensure your Chrome browser and the Keeper extension are both updated to the latest version, then retry after restarting Chrome.
> {% endhint %}

(4) After adding the security key to the record, a two-factor code will be generated inside the Keeper record.

(5) The two-factor code will be regenerated frequently and can then be copied and filled into the site or app when prompted after logging in with a username and password.

![Store 2FA Code in a Record](https://914511346-files.gitbook.io/~/files/v0/b/gitbook-x-prod.appspot.com/o/spaces%2F-LSGVtOTYUIkVBoYtFvK%2Fuploads%2Fm1q9m4nb1QQ6NoYX9Zo0%2FScreen%20Shot%202023-04-13%20at%2012.29.38%20PM.png?alt=media\&token=77cca885-87b9-48bd-b21e-4939720ff29c)

## KeeperFill for Apps

KeeperFill for Apps is a convenient tool used to further enhance your experience with the fully-featured Keeper Desktop App. Used in conjunction with your desktop applications, KeeperFill for Apps provides a simple login solution and quick access to your vault records.

Using a hotkey, KeeperFill for Apps also provides autofill features for native desktop applications. Please note, this feature is only available when using the Keeper Desktop application.

![KeeperFill for Apps](https://914511346-files.gitbook.io/~/files/v0/b/gitbook-legacy-files/o/assets%2F-LSGVtOTYUIkVBoYtFvK%2F-M7cMeNcW3ftDbJtTyEH%2F-M7cOHaQntsE2zLc_9RX%2FScreen%20Shot%202020-04-20%20at%2010.32.44%20AM.png?alt=media\&token=5e530339-aeb7-41e0-8c1c-8c089391b70d)

{% hint style="info" %}
To learn more about KeeperFill for Apps, click [here](/user-guides/keeperfill-for-apps).
{% endhint %}

## Biometric Login with Passkeys

Keeper supports biometric login with passkeys, allowing users to sign in with a device-bound passkey instead of traditional login methods such as a Master Password, SSO, or 2FA. This provides a faster, phishing-resistant sign-in experience using the authentication method already configured on the user’s device. Enabling biometric login can:

* Reduce reliance on traditional credentials
* Provide a faster and simpler sign-in experience
* Improve protection against phishing and credential-based attacks
* Allows you to use trusted device authentication methods that you are already familiar with

### Before You Begin

Before enabling biometric login, make sure your device’s local authentication method is already set up, such as [**Touch ID**](#touch-id-magic-keyboard-fingerprint-login)**,** [**Windows Hello**](#windows-hello-login), facial recognition, or a device PIN.

Biometric login with passkeys is currently available on Chrome, Edge, and other Chromium-based browsers.

### Set Up Biometric Login

New users can enable biometric login by selecting **Set Up Now** from the getting started prompt.

<figure><img src="/files/SQgDdVSVDnKkWiTIp06E" alt=""><figcaption></figcaption></figure>

Keeper will then display the device’s local authentication prompt. After successful authentication, biometric login is enabled for the Web Vault and a confirmation message is shown.

<figure><img src="/files/Ei3Mz86S26gpepXYHppv" alt=""><figcaption></figcaption></figure>

<figure><img src="/files/Ew0ShOd3nKGXw69XHpMB" alt=""><figcaption></figcaption></figure>

Existing users may also see a prompt to enable biometric login. Selecting **Don’t Show This Again** permanently dismisses that prompt.

{% hint style="info" %}
For business and enterprise users, biometric login may be restricted by your Keeper Administrator.
{% endhint %}

### Manage Biometric Login

You can turn biometric login on or off at any time and manage your passkeys from **Account Settings > Security > Biometric Login**.

<figure><img src="/files/my6bpTUwMekxolo46kUj" alt=""><figcaption><p>Settings > Security > Biometric Login</p></figcaption></figure>

Before disabling biometric login, confirm you can still access your vault using your Master Password or SSO login so you don’t risk losing access to your account.

### Offline Behavior

If your vault is in offline mode, Biometric Login will be temporarily unavailable and you must authenticate with your Master Password until you return online.

## Platform-Specific Features

### Touch ID Magic Keyboard (Fingerprint Login)

On supported Mac devices equipped with the Apple M1 chip, users with [Touch ID Magic Keyboards](https://support.apple.com/guide/mac-help/touch-id-mchl16fbf90a/mac) can use their fingerprint to log in to the Keeper Desktop App.

#### Touch ID Configuration

To configure your Touch ID Magic keyboard fingerprint login capabilities, you must first be running the latest version of macOS (Big Sur 11.5.2 or newer). Once updated, navigate to your computer's **System Preferences > Touch ID > Add Fingerprint**. Follow the prompts to register your fingerprint to the device.

![Mac System Preferences](https://914511346-files.gitbook.io/~/files/v0/b/gitbook-legacy-files/o/assets%2F-LSGVtOTYUIkVBoYtFvK%2F-Mi8pn29QGvzcO36d9pk%2F-Mi8qFhOPgDxGP0ZwhdQ%2FScreen%20Shot%202021-08-26%20at%2012.07.21%20PM.png?alt=media\&token=ea899e59-4f5b-4a6a-a119-91b671d7a3de)

![System Preferences > Touch ID](https://914511346-files.gitbook.io/~/files/v0/b/gitbook-legacy-files/o/assets%2F-LSGVtOTYUIkVBoYtFvK%2F-Mi8pn29QGvzcO36d9pk%2F-Mi8qThn3n3nC4HrTg_s%2FScreen%20Shot%202021-08-26%20at%2012.07.35%20PM.png?alt=media\&token=946244c7-b616-4de4-b4f0-6064135ce0e1)

![Fingerprint Successfully Registered](https://914511346-files.gitbook.io/~/files/v0/b/gitbook-legacy-files/o/assets%2F-LSGVtOTYUIkVBoYtFvK%2F-Mi8pn29QGvzcO36d9pk%2F-Mi8rjfGI636WrxQ3rQ7%2FScreen%20Shot%202021-08-26%20at%2012.15.55%20PM.png?alt=media\&token=80956160-211a-4ad7-880c-086c4c28bb47)

**Enable Touch ID in Your Keeper Vault**

Once you have registered your fingerprint, log in to the Keeper Desktop App and click on the account dropdown menu in the upper-right corner of your screen, then click **Settings > Security** and toggle "Touch ID" on.

![Enable Touch ID](https://914511346-files.gitbook.io/~/files/v0/b/gitbook-x-prod.appspot.com/o/spaces%2F-LSGVtOTYUIkVBoYtFvK%2Fuploads%2Fs0aBEiTtp9LRFZeEtAdq%2FScreen%20Shot%202023-06-08%20at%2012.41.29%20PM%20\(1\).png?alt=media\&token=739bff24-3e36-4c11-ad64-df0171496db1)

The next time you login to the Keeper Desktop App, the "Touch ID" button will appear at the login screen. Click **Touch ID** and when prompted, apply your registered fingerprint to the Touch ID sensor on your keyboard to log in.

![Touch ID Login](https://914511346-files.gitbook.io/~/files/v0/b/gitbook-x-prod.appspot.com/o/spaces%2F-LSGVtOTYUIkVBoYtFvK%2Fuploads%2Falpw5GMLdpw5Al4w3Wtm%2Flogin-mac-toucid.jpg?alt=media\&token=2023c895-fb63-4b08-8d17-184cfd2c8ab7)

![Touch ID Prompt](https://914511346-files.gitbook.io/~/files/v0/b/gitbook-x-prod.appspot.com/o/spaces%2F-LSGVtOTYUIkVBoYtFvK%2Fuploads%2FCa3E7VBDVbZqDJi0Iv2g%2Flogin-mac-touchid-prompt.jpg?alt=media\&token=dae952a3-7b1c-4495-a4e1-19f26da9ac1e)

### Windows Hello Login

Keeper is compatible with Windows Hello, a biometrics-based technology that allows users to authenticate and log into their Windows device using biometric facial recognition, fingerprint reader, or pin (available on Windows 11).

To enable Windows Hello Login for Keeper, from the Account Dropdown Menu, click **Settings > Security** and toggle "Windows Hello Login" on.

![Enable Windows Hello Login](https://914511346-files.gitbook.io/~/files/v0/b/gitbook-x-prod.appspot.com/o/spaces%2F-LSGVtOTYUIkVBoYtFvK%2Fuploads%2FesFT8DksvYIAAWnicpx0%2FSettings%20for%20windows.jpg?alt=media\&token=5326bd37-8555-4168-afeb-1efc3a91be0c)

Next time you log in to Keeper, click the **Windows Hello** login button.

<figure><img src="https://914511346-files.gitbook.io/~/files/v0/b/gitbook-x-prod.appspot.com/o/spaces%2F-LSGVtOTYUIkVBoYtFvK%2Fuploads%2FnEYGSIa1gh17BWquKrUA%2Flogin-windows-hello.jpg?alt=media&#x26;token=ea7578dd-ad2a-4d61-aa72-01487c05a983" alt=""><figcaption><p>Windows Hello Login</p></figcaption></figure>

Windows Hello will then attempt to authenticate your identity. Once authenticated, you will be automatically logged into Keeper.

![Windows Hello Prompt](https://914511346-files.gitbook.io/~/files/v0/b/gitbook-x-prod.appspot.com/o/spaces%2F-LSGVtOTYUIkVBoYtFvK%2Fuploads%2FpN0QwR5Wbp8Q7m6ksvwB%2Flogin-windows-hello-prompt.jpg?alt=media\&token=cef4b41e-89c3-4c93-90cd-69ab98c2c864)

{% hint style="info" %}
To learn more about logging into Keeper with Windows Hello, click [here](/user-guides/tips-and-tricks/login-to-keeper-with-windows-hello).
{% endhint %}

### Keychain Access (Mac OS)

When accessing your Keychain, a popup will be triggered asking you to enter your Mac password. This is because Keeper Desktop App saves local storage protected by a key saved in Keychain Access which is used to encrypt local app data. Enter your Mac password and click **Always Allow**.

![Keychain Access Password Popup](https://914511346-files.gitbook.io/~/files/v0/b/gitbook-x-prod.appspot.com/o/spaces%2F-LSGVtOTYUIkVBoYtFvK%2Fuploads%2FfZ7k4clSpJitXpiTmnSC%2FScreen%20Shot%202022-08-16%20at%2012.36.57%20PM.png?alt=media\&token=1b1dc0ad-21e8-4ab6-a9de-8e591ce59418)

## Password Export (Backup)

To backup your records or generate a Shared Records Report, from the Account Dropdown Menu click **Settings > Export**. There are 4 formats for export: CSV, JSON, PDF and encrypted KeePass (.KDBX). To begin backup, select your preferred file format and click **Export**.

<figure><img src="https://914511346-files.gitbook.io/~/files/v0/b/gitbook-x-prod.appspot.com/o/spaces%2F-LSGVtOTYUIkVBoYtFvK%2Fuploads%2FXmTYdFaDtgNmtoL9hzvr%2FScreenshot%202025-01-19%20at%2012.45.48%E2%80%AFPM.png?alt=media&#x26;token=27afd5fa-4a12-4ec2-8b4c-b70255a0883d" alt=""><figcaption><p>Export Options</p></figcaption></figure>

{% hint style="warning" %}
The encrypted KeePass format (.kdbx) is the only format which includes attachments saved in records. For advanced backup capabilities see [Keeper Commander](/keeperpam/commander-cli/overview).
{% endhint %}

## Uninstall

The instructions below are for uninstalling Keeper Desktop App (Keeper Password Manager) for Mac and Windows OS.

{% hint style="danger" %}
Uninstalling the Keeper Password Manager will delete the data from Keeper on the local device. Data stored in Keeper's Cloud Security Vault is NOT erased.
{% endhint %}

#### Mac

1. Drag the Keeper Password Manager app to the **Trash**.
2. Empty the Trash.

{% hint style="danger" %}
Uninstalling Keeper Password Manager will also remove KeeperFill Browser Extension from Safari. Data stored in Keeper's Cloud Security Vault will NOT be erased.
{% endhint %}

#### Windows

![Uninstall Keeper Password Manager](https://914511346-files.gitbook.io/~/files/v0/b/gitbook-legacy-files/o/assets%2F-LSGVtOTYUIkVBoYtFvK%2F-M-zqL1hcX2B3ok3T7ce%2F-M-zqVMFyyksir2rHNYP%2FWindows%20Desktop%20Web%20Vault.jpg?alt=media\&token=f31a5418-e593-4ae1-9c84-22f87801112a)

1. Navigate to the **Windows Start Menu > Settings > Apps & Features**.
2. Within Apps & features, click the **Keeper Password Manager** application.
3. Click **Uninstall**.
4. You will be warned that the app and its related info will be uninstalled, click **Uninstall** to confirm.
5. User Account Control will ask you to confirm making changes to your device, confirm the changes by clicking **Yes**.

{% hint style="info" %}
Additional user tutorial videos are available at: <https://keepersecurity.com/support>
{% endhint %}


# Browser Extensions

User guides for the KeeperFill Browser Extension for Chrome, Firefox, Safari, Microsoft Edge, Opera and other Chromium-based browsers.

<figure><img src="/files/k4ra0sRv1hyf68hKuvyj" alt=""><figcaption></figcaption></figure>

## Overview

KeeperFill is Keeper’s powerful, autofilling browser extension. Once you install the Keeper Browser Extension, you can conveniently autofill your logins, passwords, passkeys and save new records that you create to your Keeper Vault. The KeeperFill browser extension is available for every web browser including Chrome, Firefox, Safari, Edge, Opera and other Chromium-based browsers.

## Installation & Setup

Below you will find browser-specific installation and setup instructions. Instructions will vary across different browsers and operating systems.

* [Chrome](/user-guides/browser-extensions/keeperfill-for-chrome-and-brave)
* [Firefox](/user-guides/browser-extensions/keeperfill-for-firefox)
* [Safari](/user-guides/browser-extensions/keeperfill-for-safari)
* [Edge](/user-guides/browser-extensions/keeperfill-for-edge)
* [Opera](/user-guides/browser-extensions/keeperfill-for-opera)
* [Other Chromium-based browsers](/user-guides/browser-extensions/keeperfill-for-chrome-and-brave) such as Brave

## Disable Your Browser's Password Manager

Since your browser's native password manager can interfere with Keeper, we strongly recommend disabling it once you've downloaded the Keeper Browser Extension. This eliminates potential conflicts and ensures you receive the best possible KeeperFill experience without the hassle of manual configuration.

* **Administrative Controls:** In a future release, administrative controls will be implemented in the Keeper Admin Console, allowing organizations to determine whether KeeperFill automatically disables a browser’s built-in password manager.
* **Existing Passwords:** Existing passwords saved in your browser's password manager will not be removed if this feature is enabled.
* **Autofill for Payments, Addresses & Personal Information:** Payments, addresses and personal information saved in your browser's password manager will be unaffected by this feature.

**Existing Users**

If you are an existing user, this new feature update *may* trigger the browser extension to register an error — if it does, just click "Turn on" or "Accept permissions" (depending on your browser) to re-enable Keeper. Accepting permissions allows Keeper the option to disable your browser's built-in password manager.

<div><figure><img src="/files/hDvkWt5B1OyxiBiKo3KE" alt=""><figcaption></figcaption></figure> <figure><img src="/files/sJEDBK35vPKg98VDKeNO" alt=""><figcaption></figcaption></figure></div>

**Set Up**

Upon logging into Keeper for the first time (or following an update) a prompt will suggest that you choose your default password manager and import the passwords from your browser. Click **Continue** to complete this quick setup or **Skip For Now.**

<figure><img src="/files/2TwTa3uaTfKFg1iE4X0v" alt="" width="180"><figcaption><p>Prompt to Begin Setup</p></figcaption></figure>

Check the box for "Keeper Security" or toggle "Disable Built-in Password Manager" on (this prompt will vary depending on if your specific browser type is detected or not). Next, click **Continue** to complete the process.

<div><figure><img src="/files/txfykVXJJFf2qWyHAONm" alt="" width="180"><figcaption><p>Keeper Selected as Default<br>Password Manager</p></figcaption></figure> <figure><img src="/files/h7hosg52L746GKqOBLtc" alt="" width="180"><figcaption><p>Disable Built-In Password Manager</p></figcaption></figure></div>

{% hint style="info" %}

### Click "Skip For Now" at the bottom of the extension window if you'd like to skip this process at any point in the set up wizard. You can also manage this feature at any time from Keeper's Settings menu.

{% endhint %}

## Logging In

Most users can log into the KeeperFill browser extension with their email address and master password. If you are part of an Enterprise rollout, you may be directed to log in with your Enterprise SSO login credentials.

When you log in or out of your Keeper Web Vault you will be simultaneously logged in or out of KeeperFill and vice-versa.

<figure><img src="/files/9H4rOUg6mUkvvEZL6ojp" alt=""><figcaption><p>KeeperFill Master Password Login</p></figcaption></figure>

For customers who log in with SSO, typically entering the email address will route to the corresponding identity provider login screen. If your Keeper administrator requires a specific Enterprise Domain entry, click on **Enterprise SSO Login**.

<figure><img src="/files/pWTR1cIOc5jF5G7SHOqL" alt=""><figcaption><p>KeeperFill Login for Enterprise SSO</p></figcaption></figure>

{% hint style="info" %}
If Keeper does not automatically route you to the proper data center location or identity provider, please contact your Keeper administrator.

For GovCloud customers, ensure that the "US (GOV)" region is selected.
{% endhint %}

## Stay Logged In

By default, users are logged out of Keeper if their browser window closes, or if their computer restarts. Keeper's "Stay Logged In" feature allows you to remain logged into Keeper for a configurable duration.

<figure><img src="/files/dh3KBgUclk2BdQ6ZkSuH" alt="" width="563"><figcaption><p>KeeperFill Settings > Security</p></figcaption></figure>

To enable Stay Logged In, click the **options icon** > **Settings > Security**, then enable "Stay Logged In".

<figure><img src="/files/hzSPosJoyTmRIcyrfNxc" alt="" width="563"><figcaption><p>Stay Logged In Enabled</p></figcaption></figure>

Keeper recommends that you also set the "Inactivity Logout Timer" which automatically logs you out of Keeper after a period of inactivity. You can set this timer to the duration you prefer (minutes, hours, or days) and your session will resume even once you close your browser.

<figure><img src="/files/BHceUJTgB26jqIOiTYE2" alt="" width="563"><figcaption><p>Inactivity Logout Timer</p></figcaption></figure>

## Record Overview

Records now conveniently appear directly on the home screen as a list, with “Suggested Record(s)” at the top to easily fill the credentials that match the website you're on.

<figure><img src="/files/SFwAYtwqnrtGHBsjqdTF" alt=""><figcaption><p>Suggested and Recently Used Records</p></figcaption></figure>

Select a record to view all its details as well as conveniently take common actions like launching, sharing, editing, and accessing the record's options menu.

<div><figure><img src="/files/l5YIHKTeVtQrgWwNIKYg" alt="" width="563"><figcaption><p>Record Details and Action Buttons</p></figcaption></figure> <figure><img src="/files/uwqLe6L98C21xqwIrZGg" alt="" width="563"><figcaption><p>Options Menu</p></figcaption></figure></div>

## Suggested Records, Sort & Filter

Vault records appear directly on the browser extension home screen, making it quick and easy to find exactly what you are looking for.

<figure><img src="/files/hHTsEnEGvxciJwFGPyaS" alt="" width="218"><figcaption></figcaption></figure>

Easily fill credentials with suggested records that match the website you're on. Favorite records will appear on top when more than one suggested record is shown.

<figure><img src="/files/yc7InRlV8N3Un8Fsf5jC" alt="" width="375"><figcaption><p>Suggested Records List</p></figcaption></figure>

Sort records by most recently used, name, or date modified. Filter by favorites, record type, and more.

<div align="center"><figure><img src="/files/2TZlN7icLwPLF41ZRTnR" alt="" width="563"><figcaption><p>Recent Records</p></figcaption></figure> <figure><img src="/files/7iOwJpCWut7sgdC0kVLg" alt="" width="563"><figcaption><p>Sort &#x26; Filter</p></figcaption></figure></div>

## Autofill Your Passwords

The KeeperFill Browser Extension allows you to autofill your passwords and save new login credentials you create to your vault.

If it's the first time you are logging into a site with KeeperFill, you will be asked if you would like Keeper to autofill your login.

Keep in mind, you must already have created a Keeper record for this site containing the website address for Keeper to recognize, match and fill your login. Upon clicking **Yes**, your credentials will be autofilled into the login form and you will be logged in.

<figure><img src="/files/wQKPJ0XtN2jGHUIQNQZo" alt=""><figcaption><p>Autofill Login Credentials With Keeper</p></figcaption></figure>

Records appear directly on the home screen as a list, with “Suggested Records” at the top to easily fill the credentials that match the website you're on. Select the record, then click **Autofill** to fill the credentials into the site's log in form.

<figure><img src="/files/IBq6TMhhjvHlAGF9YFGo" alt=""><figcaption><p>Suggested Records</p></figcaption></figure>

<figure><img src="/files/zKFF7uW2kiz14fuQ02fr" alt=""><figcaption><p>Autofill Your Login Credentials With KeeperFill</p></figcaption></figure>

{% embed url="<https://vimeo.com/585559712>" %}
AutoFill With KeeperFill
{% endembed %}

## KeeperAI Autofill

Keeper offers AI-powered autofill that intelligently recognizes and fills login forms across websites using local AI processing with zero-knowledge encryption.

Unlike traditional autofill solutions that struggle with modern single-page applications, complex authentication flows, and multilingual websites, KeeperAI Autofill uses locally-processed machine learning to understand form context, recognize usage patterns and predict multi-step authentication sequences to intelligently suggest the most appropriate login credentials.

The system is designed with privacy as a core principle. All AI model inference runs locally within the browser extension runtime, ensuring that form data, credentials and browsing patterns never leave the user's device.

{% hint style="info" %}
To report any issues with KeeperAI Autofill please email [feedback+aIautofill@keepersecurity.com](mailto:feedback+AIautofill@keepersecurity.com).
{% endhint %}

#### Activate KeeperAI

To activate KeeperAI Autofill, navigate to your extension **Settings**, select **KeeperAI Autofill** then toggle the feature on.

<div><figure><img src="/files/K76WMNfbNp6dwFOFcimq" alt="" width="375"><figcaption><p>Settings > KeeperAI Autofill</p></figcaption></figure> <figure><img src="/files/gEuG0XcZ7eLGPwwMQjk7" alt="" width="375"><figcaption><p>KeeperAI Autofill Enabled</p></figcaption></figure></div>

{% hint style="info" %}
For Business and Enterprise users, the use of KeeperAI Autofill may be restricted by your Keeper Administrator.
{% endhint %}

## Searching Your Vault

The KeeperFill toolbar provides easy access to all of your vault records You can quickly search for a website login or anything else stored in your vault. The search feature is case insensitive and will match any record within your vault as you type.

<figure><img src="/files/aqkHgf9cAe1Fs6WvE9qR" alt="" width="375"><figcaption><p>Search Your Vault</p></figcaption></figure>

## Understanding Record Matching

When logging into a website, KeeperFill will provide a list of matching records. The matching is performed by looking at the "Website Address" field of the record as well as the custom fields.

The list of matching records is determined by looking at the URLs stored within your Keeper record. Once the list is generated, a series of logical steps determines the sort order of the selection list and which specific record is selected as the default choice.

**(1)** If the page you're visiting has a subdomain (e.g. xyz.google.com), then Keeper first looks at the subdomain for the closest match in your vault records. The best matches are sorted by the last time they were used.

**(2)** After checking subdomain, Keeper looks at the "path" information (e.g. xzy.google.com/some/path) and compares it to the path stored within your Keeper record. The best matches are again sorted by the last time they were used.

**(3)** If the page contains an email address on the screen (such as a pre-filled email field) then Keeper will pre-select the record from the subdomain and path criteria which contains the email field.

## Create a New Record

With KeeperFill, there are multiple paths to create a new record and save it to your vault.

### Toolbar Window

You can quickly create a record from the KeeperFill toolbar at any time by clicking the **yellow plus button**. If you have no suggested records for the website you are on, Keeper will display an **Add Record** button instead. Click this button to "quick add" a record by auto-generating its "Title" and "URL" based on the website you are visiting.

<figure><img src="/files/uU8JhEhsGXezMHQKSUxL" alt="" width="563"><figcaption><p>Add or Create Record</p></figcaption></figure>

You can also choose which folders any given record is stored in. Record location can be selected on existing records as well as new records you are in the process of creating. Simply click the "Location" dropdown menu to select the folder or subfolder you would like the record to reside in.

<figure><img src="/files/ZOSnZNPDFylnaTbOWpNp" alt="" width="563"><figcaption><p>Create a New Record</p></figcaption></figure>

{% hint style="info" %}
**Check the box for "Trim URL" if you would like Keeper to automatically simplify the URL and improve matching across different pages of the website.**
{% endhint %}

### Fill Prompt

Alternatively, you can create a new record from a website's "account creation" or "sign in" page by selecting the Keeper icon in the form field. On "account creation" pages, click the **Create a Record** or **Add to Keeper** button that appears to be routed to a secure Extension Tab, where you can create a new vault record. On "sign in" pages, the same **Create a Record** and **Add to Keeper** buttons will appear if you have no matching records for that website.

<figure><img src="/files/vYshzpdFPsElQFodjobQ" alt=""><figcaption><p>Add New Account to Keeper</p></figcaption></figure>

If you do have matching record(s) and you'd like to create a new record, use the options menu in the prompt that appears to begin creating a new record in the secure Extension Tab.

<figure><img src="/files/niKX7S2Yfu3H2QxNrU29" alt=""><figcaption><p>Options Menu > Create New</p></figcaption></figure>

When you begin creating a record in Keeper's Extension Tab, the record "URL" and "Title" will be auto-generated. If you entered any data into the site's username or password fields before opening the Extension Tab, those values will be automatically populated into the new record form as well.

Upon reviewing and saving the record details, the Extension Tab will close and you will be automatically routed back to the website you came from. For additional convenience, Keeper will auto-fill the username and password fields on this website, if they are not already populated.

<figure><img src="/files/pnXP8W9JYKMzC9xLNnlf" alt=""><figcaption><p>Create a New Record in Keeper's Extension Tab</p></figcaption></figure>

### Save Prompt

Keeper will offer to save a password to the vault, if you login manually on a site by typing or pasting in the login and password. The "Save Password Prompt" feature is enabled by default, and can be disabled in the browser extension settings menu. For Enterprise customers, this feature can also be enforced on or off.

<figure><img src="/files/62Xaslpz0OOXuR1nwazE" alt=""><figcaption><p>Save Password Prompt</p></figcaption></figure>

Note: For enterprise environments, the "Save Password Prompt" will only appear if the password entered by the user meets the complexity requirements enforced by the Keeper Administrator. See [role policies](/enterprise-guide/roles/enforcement-policies#record-passwords) for more information on password complexity enforcements.

### Custom Fields

Add Custom Fields directly to your records from the browser extension without needing to switch to the web vault.

Click **Add Custom Field** within a record to create a Text, URL or Hidden Field for storing sensitive information such as security questions, PINs, or private notes alongside your login. The Hidden Field is masked by default to keep your data private.

<div><figure><img src="/files/8R5KAeiSei6DQDm2vzd2" alt="" width="186"><figcaption><p>Add Custom Field</p></figcaption></figure> <figure><img src="/files/U8XGTsWMSuYbcvj1X27t" alt="" width="186"><figcaption><p>Add Text, URL or Hidden Field</p></figcaption></figure></div>

Add as many custom fields as you'd like, reorder them with drag-and-drop and edit or remove the field by clicking on the options icon to the right of the new field.

<figure><img src="/files/U4jeR6XOb5d283Q6s7fj" alt="" width="186"><figcaption><p>Hidden Field Options Menu</p></figcaption></figure>

### Add Additional Website Address

Add additional website addresses to a record by clicking the **Add Custom Field** button and selecting **URL**. This functionality allows you to efficiently store and organize all related website domains for a record directly from the browser extension.

<div><figure><img src="/files/yHUjHptQMBesNi5dwI5k" alt="" width="186"><figcaption><p>Add Custom Field</p></figcaption></figure> <figure><img src="/files/FinpW4OTSXnFKuvXBWKH" alt="" width="186"><figcaption><p>Add Additional URL</p></figcaption></figure></div>

Add as many website addresses as you'd like and easily reorder them with drag-and-drop.

Click the **option icon** to the right of a website address to:

* Set it as the primary address (this will swap the selected address with the record's primary address)
* Edit the field label
* Remove the website address

## Passkeys

A passkey is a cryptographic key that allows you to log into your accounts and apps without having to enter a password or second factor.

Storing passkeys in your Keeper Vault allows them to be used across different browsers and operating systems. They can also be shared with other users like any other record in your vault.

Passkeys can be used as a replacement for any FIDO2 security key for either first factor or second factor login to supported websites.

{% hint style="info" %}
Passkeys as a primary login factor only work on websites and applications that have been specifically built to support them. [The list of supported sites](https://www.keepersecurity.com/passkeys-directory/) is growing every day.
{% endhint %}

### Create a Passkey

To create and save a passkey for a site, typically you'll need to visit the "Security" or "Account Settings" page of the website.

Upon clicking "Create Passkey" at the desired site, Keeper will intercept the request. Click **Create Passkey** to create and save the passkey to your vault.

<figure><img src="/files/uynyikZo1XnwPO7TOiSu" alt=""><figcaption><p>Create a Passkey With Keeper</p></figcaption></figure>

### Log In With a Passkey

The next time you visit a website that supports passkey login, locate the "Sign in with a Passkey" or similar action button on the site, then click **Use Passkey** in the KeeperFill window to log in.

<figure><img src="/files/m60sg2eG5yjqST14sf3K" alt=""><figcaption><p>Log In With Passkey</p></figcaption></figure>

{% hint style="info" %}
To learn more about Keeper and Passkeys, including Passkeys for mobile, [click here](/user-guides/passkeys).
{% endhint %}

## Password & Passphrase Generators

Long, random passwords that are created for each account help protect your information and reduce your exposure to data breaches. Alternatively, by combining multiple words, *passphrases* are an even more secure alternative to traditional passwords.

Keeper's password generator can create and securely store strong, random passwords or passphrases for all of your sites and apps.

### **Generate a Password**

To begin, click the **dice icon** within a new or existing record. You can customize your password by character length (8-99 characters) and choose to include lowercase and uppercase letters, numbers and symbols.

Check the box at the bottom of the toolbar if you'd like to make your selections the default setting for all passwords moving forward. Select **Use Password** to update the record or **Copy Password** to copy it to your clipboard.

<div><figure><img src="/files/vTPaAxXVXOB7ZzFSvpCC" alt="" width="563"><figcaption><p>Edit/Create Password</p></figcaption></figure> <figure><img src="/files/3bbolM7wx9kSi2NSNVM2" alt="" width="563"><figcaption><p>Password Generator</p></figcaption></figure></div>

### **Generate a Passphrase**

Click the **dice icon** within a new or existing record and from the dropdown menu next to "Type", select **Passphrase**.

You can customize your passphrase by setting the length, including capitals and numbers in the passphrase and choosing from various symbols to separate the words.

Passphrases can be up to 20 words long, with a minimum length of 5 words and each word including at least 3 characters.

Check the box at the bottom of the toolbar if you'd like to make your selections the default setting for all passphrases moving forward. Select **Use Passphrase** to update the record or **Copy Passphrase** to copy it to your clipboard.

<div><figure><img src="/files/RndqeuarmZhOYIyw74N1" alt="" width="563"><figcaption><p>Select Passphrase</p></figcaption></figure> <figure><img src="/files/rpXIJHFOspzx4TDy8xBX" alt="" width="563"><figcaption><p>Passphrase Generator</p></figcaption></figure></div>

{% hint style="info" %}
This will NOT automatically change the website's existing login password. You must still visit the corresponding website's "Change Password" form to update the old password to match the new, stronger password. Click [here ](/user-guides/tips-and-tricks/password-changing-with-keeperfill)to learn how to easily change your password with KeeperFill.
{% endhint %}

Alternatively, you can generate a standalone password or passphrase by clicking the **Options Menu >** **Password Generator**.

<figure><img src="/files/sgszZMIPiABIjaMulU5c" alt=""><figcaption><p>Options Menu > Password/Passphrase Generator</p></figcaption></figure>

### Generator History

To view your password/passphrase history, click the **clock icon** within the generator screen. Hover your cursor over a password to either view it or copy it to your clipboard.

<div><figure><img src="/files/movamCV8e4wR5HmQf8zz" alt="" width="563"><figcaption><p>View Generator History</p></figcaption></figure> <figure><img src="/files/SxHtj6zLdvAVBCfWvq3B" alt="" width="563"><figcaption><p>Show or Copy Password</p></figcaption></figure></div>

Your password generator history can be cleared at any time by clicking **Clear History**.

<figure><img src="/files/jiDD11JCsbEsIYVhKww4" alt="" width="375"><figcaption><p>Generator History</p></figcaption></figure>

### **Password Enforcement Policies**

For Enterprise customers, the password generator on end-user vaults will adhere to the minimum character length, minimum number of lowercase/uppercase/numbers/symbols and allowed list of symbols as defined by your Keeper Administrator.

The passphrase generator on end-user vaults is enabled by default, but can be disabled by your admin. Passphrases will adhere to the minimum number of words and can be configured to include capital letters and numbers. The separators between words will be selected from the list of allowed symbols.

For more information on record password enforcement policies, please see our [Enterprise Guide](/enterprise-guide/roles/enforcement-policies).

## Change a Password

KeeperFill makes it easy to change your passwords. When a user visits a site's "Change Password" page, you will receive a prompt from Keeper asking if you would like help changing your password. By clicking **Yes**, Keeper will run a wizard that walks you through a few quick steps to change your password and simultaneously update the record in your vault. These steps will include a series of prompts detailing the following actions:

* Autofill your old/current password
* Automatically generate and autofill a new secure password
* Confirm the changes and save them to your vault

<figure><img src="/files/anP8Rta327fKHwbPVXjj" alt=""><figcaption><p>KeeperFill's Password Change Prompt</p></figcaption></figure>

{% embed url="<https://vimeo.com/736584776>" %}
Changing Your Passwords
{% endembed %}

## Autofill Custom Fields

Keeper can automatically fill custom fields into login forms. From the Keeper Web Vault, create a custom field in your record, ensuring the label matches that of the field you want to fill. (e.g. "Last 4 digits of SS&#x4E;**"**).

<figure><img src="/files/cmltUI0bFX8FuZ5X8Fmh" alt=""><figcaption><p>Create Custom Field</p></figcaption></figure>

<figure><img src="/files/PgHfEr8ZFIQwUJmpi9mF" alt=""><figcaption><p>Autofilled Custom Field</p></figcaption></figure>

You can also fill the the custom field value via the fill window.

<figure><img src="/files/2C8mW0ymqhjnl4fp2lY4" alt="" width="375"><figcaption><p>Fill Custom Field</p></figcaption></figure>

## Keyboard Shortcuts

If you prefer to use keyboard shortcuts instead of mouse clicks to autofill your passwords, follow the steps below:

1. Navigate to the site you would like to log in to.
2. To open the KeeperFill extension, enter **shift+command+K** (Mac) or **Alt+K** (Windows).
3. In the field provided, enter your search terms.
4. Use the **up and down arrows** on your keyboard to find and select the record you are searching for.
5. Use the **enter/return** key to open the record details and **shift+enter/return** keys to launch and fill a record.

{% hint style="info" %}
You can modify the shortcut command to your preference in your browser's extension settings.
{% endhint %}

<figure><img src="/files/KanlDnFuhi550q5pSC0e" alt=""><figcaption><p>chrome://extensions/shortcuts</p></figcaption></figure>

## Two-Factor Codes for TOTP

### Autofilling 2FA Codes

Upon autofilling your username and password via KeeperFill, when prompted, a stored two-factor code will also be autofilled into the field provided.

Alternatively, you can click the **copy icon** next to the code and paste it into the field provided.

<figure><img src="/files/z7N0dk15DjPdeGnoL3oI" alt=""><figcaption><p>Fill Two-Factor Code</p></figcaption></figure>

{% embed url="<https://vimeo.com/356075220>" %}
Two-Factor Codes Integration
{% endembed %}

Storing two-factor codes in your Keeper Vault has several advantages:

* Keeper two-factor codes are more secure than using SMS text messages.
* Two-factor codes stored in Keeper are protected with strong zero-knowledge encryption.
* They can be auto-filled quickly while logging in to a site, saving time and reducing friction.
* Keeper records are securely backed up so if you lose a device you don’t have to reset all the codes.
* Keeper records are shareable. If you have multiple people that need to log in with the same credentials, they won’t need to track down the person who has the only device containing the code.

### TOTP Scanner

When configuring multi-factor authentication for any account, you can capture TOTP codes directly through the Browser Extension without switching between apps.

Simply hover to the right of a record name click the **options icon** and select **Scan 2FA Code**. Keeper will automatically detect and save the 2FA code to your Keeper record, making it instantly available for future logins.

<div><figure><img src="/files/aEv0W8m5e5XrDtDJVdvB" alt="" width="361"><figcaption><p>Options > Scan 2FA Code</p></figcaption></figure> <figure><img src="/files/Kcr4MnJW82wmpWjiX5Iv" alt=""><figcaption><p>2FA Code Added to Record</p></figcaption></figure></div>

TOTP codes can also be quickly added from the record "Create" and "Edit" screens. If a secret key is provided instead of a QR code, you can manually enter it to generate your two-factor code.

<figure><img src="/files/34QX8bgCnaHFZvWiISx4" alt="" width="563"><figcaption><p>Scan 2FA Code or Enter Secret Key</p></figcaption></figure>

## Payment Cards & Addresses

From the fill window you can view and fill the payment cards and addresses that are stored in your vault.

<figure><img src="/files/ZlSSEXlKGDnyV0xS2mUG" alt=""><figcaption><p>Payment Cards &#x26; Addresses Stored in Keeper</p></figcaption></figure>

## Right-Click Context Menu

KeeperFill is fully integrated with your browser's right-click context menu and offers an alternative filling method. Simply right-click on a login field to produce a context menu. Select Keeper to fill logins, two-factor codes, payment cards, addresses and create and edit records.

<figure><img src="/files/JBL9G2UKOzKwwadBV4kp" alt=""><figcaption><p>Fill Login via Right-Click Context Menu</p></figcaption></figure>

<figure><img src="/files/NaqgbHh98LZQtTHX2tNn" alt=""><figcaption><p>Fill Payment Card via Right-Click Context Menu</p></figcaption></figure>

{% hint style="info" %}
For security reasons, only records with a matching domain name for the site you visit will display in the menu of autofill options.
{% endhint %}

### Add 2FA Codes to Records

You can also quickly capture 2FA codes from the right-click context menu. When a website displays a QR code during two-factor authentication (2FA) setup, simply right-click on the QR code to open the context menu and select **Keeper > Scan 2FA Code** to save it directly to the matching record in your vault.

<figure><img src="/files/YHXnF6N34hgwqbgaUjCa" alt=""><figcaption><p>Right-Click Context Menu to Scan 2FA Code</p></figcaption></figure>

<figure><img src="/files/txdjg0dqjK8ajSK0V0e8" alt=""><figcaption><p>Add Scanned 2FA Code to Record</p></figcaption></figure>

## Hide Keeper

Sometimes you don't want the Keeper Browser Extension to autofill or show suggestions on a particular website — for example, when you're filling out a long form manually or browsing a site where autofill gets in the way. Hide Keeper allows you to effectively have a pause-for-a-visit / site-pause to temporarily silence the Keeper Browser Extension on any domain with a single click.

**What it Does**

* Hides all Keeper Browser Extension autofill popups, autofill suggestions and Keeper lock icons on the target site
* Keeps the extension toolbar icon active so you can still open your vault or resume at any time
* Works on sites already saved in your vault *and* sites you haven't saved yet

Click on the **Keeper lock icon** and from the overflow menu (three vertical dots), select **Hide Keeper on This Site**.

<figure><img src="/files/E8lG6dqhpD5uFnriF5se" alt=""><figcaption><p>Hide Keeper from Autofill Prompt</p></figcaption></figure>

Alternatively, right-click on any autofill field and select **Hide Keeper on this Site** from the Keeper context menu.

<figure><img src="/files/mhAs8Lfism2ITMvNA79c" alt="" width="375"><figcaption><p>Right-Click Context Menu</p></figcaption></figure>

{% hint style="info" %}
Hiding Keeper on a site applies to the entire domain (e.g., all pages on [example.com](http://example.com/)), not just the current URL. Your hide/restore preferences are remembered locally in your browser until you change them.
{% endhint %}

**How to Restore Keeper**

When you're ready to resume Keeper's functionality on a site, click the **Restore** button at the top of the extension toolbar. Alternatively, within the extension **Settings** menu, select **Hidden Sites >** **Restore** next to the site's domain name. Keeper's autofill and suggestions functionally will immediately return to normal.<br>

<div><figure><img src="/files/o0OtiBNaq67ytrlOptQZ" alt=""><figcaption><p>Restore Keeper on Current Site</p></figcaption></figure> <figure><img src="/files/SWqPjl8kvJY1lVCWzHm2" alt=""><figcaption><p>Settings > Hidden Sites</p></figcaption></figure> <figure><img src="/files/WteeeAmwyrz8ebJMr6E8" alt=""><figcaption><p>Manage All Hidden Sites</p></figcaption></figure></div>

## Account Switching

Have more than one Keeper account? Keeper supports the use of multiple vaults on the same device and makes it easy to seamlessly switch between your personal and business accounts for example, without having to log out of your current session.

To switch accounts, click on your **user icon** and select the account you'd like to switch to or tap **Add Account** to register another account on that browser.

<div><figure><img src="/files/HIcghjtLMejgjc3G8LRs" alt="" width="361"><figcaption><p>Account User Icon</p></figcaption></figure> <figure><img src="/files/00uWtgDNFMWHVzAzPurK" alt="" width="361"><figcaption><p>Account Switch/Add</p></figcaption></figure></div>

{% hint style="info" %}
Quick account switching only works for active sessions that are already logged in.
{% endhint %}

Easily remove unwanted accounts from the browser by hovering to the right of an account email then clicking on the **remove icon**.

<figure><img src="/files/90AE4bBPyRSzqk5xA0Lp" alt="" width="361"><figcaption><p>Remove Account from Browser</p></figcaption></figure>

## Tools & Settings

All your KeeperFill tools and settings are consolidated in an easy to use Options Menu found in the upper right corner of the KeeperFill toolbar.

<figure><img src="/files/L0MeRlWIEzcuGzX91ZE3" alt="" width="563"><figcaption><p>Options Menu > Settings Menu</p></figcaption></figure>

The Settings Menu covers everything from security settings, appearance, autofill and autosubmit functionality, the various KeeperFill prompts, and much more.

<div><figure><img src="/files/VHkFpnmdZHdtMnCVfCyO" alt=""><figcaption><p>Settings Menu</p></figcaption></figure> <figure><img src="/files/YDaFQcn7WNhz9T9LMiWr" alt=""><figcaption><p>Settings Menu Continued</p></figcaption></figure></div>

### Landscape Mode

Users can customize their viewing experience with the ability to expand the extension window via “Landscape Mode”. The dual-pane window allows you to view your record details and records list at the same time – providing seamless access to what you need most.

You can easily switch between “Landscape” and “Portrait” mode with a single click of a button on your extension toolbar.

<figure><img src="/files/agxJBbrkFFcXZYdh4MHi" alt="" width="563"><figcaption><p>Switch to Landscape Mode</p></figcaption></figure>

<figure><img src="/files/7nE6HRYNII6ZShAOhnhc" alt=""><figcaption><p>Landscape Mode</p></figcaption></figure>

### Reporting Autofill Issues with the Snapshot Tool

From time to time, users inform us that autofill is not functioning as expected on certain websites. The Snapshot Tool greatly simplifies the process of reporting and fixing autofill issues by seamlessly providing Keeper's Engineering Team with key website information.

To report an Autofill Issue, there are 2 locations to access this feature: From the on-page form fill and the browser extension toolbar.

#### On-Page Form Fill

From the on-page form filling screen, click on the overflow menu > Report an Autofill Issue

<figure><img src="/files/xuTLW00XYeLr16uh36Up" alt=""><figcaption></figcaption></figure>

#### Activation

This works on:

* Login pages (Username, Password)
* TOTP code pages
* Payment and identity pages

#### Reporting Issues

If you are having trouble with a website's login page, simply select **Report an Autofill Issue** from the extension Options menu or from the fill tool.

<figure><img src="/files/xdS1VenAMHWqUiu7G06M" alt="" width="375"><figcaption><p>Report Issue from the Extension Toolbar</p></figcaption></figure>

#### Browser Extension Toolbar

From the browser extension toolbar window, click on the **overflow menu** > **Report an Autofill Issue**.

<figure><img src="/files/7JqvCMrLV4nd3xamw7mC" alt=""><figcaption></figcaption></figure>

<figure><img src="/files/crQXKDfz6Sr9unsLslIK" alt="" width="563"><figcaption><p>Report Issue from the Fill Tool</p></figcaption></figure>

Click **Take Snapshot** to take a screen capture of your current browser window. Click **Next: Preview** to review exactly what data will be sent to Keeper, ensuring there is no confidential information included before you proceed.

<div><figure><img src="/files/HVz7qPNWffB1IZxXuSz5" alt="" width="308"><figcaption><p>Take Snapshot</p></figcaption></figure> <figure><img src="/files/9vJvpioxAPccXeM4UW5k" alt="" width="308"><figcaption><p>Next: Preview</p></figcaption></figure></div>

Next, select from the provided list of autofill issues or describe your own.

Keeper will NOT send credentials or confidential information. We only send the screenshot and HTML page structure exactly as displayed in the preview window.

<figure><img src="/files/IALsk2z6AZ3cRs5PbSwP" alt=""><figcaption></figcaption></figure>

Click **Report Issue** to send the information to the Keeper Team.

<figure><img src="/files/8UYC4yLWSWETk2VO1XV6" alt=""><figcaption></figcaption></figure>

{% hint style="info" %}
If you need to re-submit an issue for a website, return to the extension toolbar or fill tool and click **Report an Autofill Issue > Retake**.
{% endhint %}

#### Autofill Fixes

The Keeper Team will promptly receive the necessary information to diagnose and resolve the filling issue. Once a solution is implemented, an update will be released to all customers. You will receive an email notification confirming the update. In many cases, site-specific fixes can be turned around within the same day.

### Biometric Login with Passkeys

Keeper supports biometric login with a passkey, allowing users to authenticate using a device-bound passkey that replaces all traditional login methods – including master password, SSO, and 2FA.

{% hint style="info" %}
**Biometric login with Passkeys is available on Chrome, Edge and other Chromium-based browsers**. Mozilla Firefox support will be available with Firefox release 147 or 148 pending [this Mozilla ticket](https://bugzilla.mozilla.org/show_bug.cgi?id=1956484). Safari is also pending native passkey support from Apple.
{% endhint %}

To activate biometric login, navigate to the extension "Settings" menu and Select **Biometric Login**. When you toggle biometric login “on”, Keeper will prompt you to create a Passkey and the platform will request a biometric or PIN authentication, depending upon the capabilities of your device.

<figure><img src="/files/nQdeYWl2SNK3SDpSDi4p" alt="" width="563"><figcaption><p>Create a Passkey Using Your Device's Biometric Scanner</p></figcaption></figure>

{% hint style="info" %}
For Business and Enterprise users, the use of Biometric Login may be restricted by your Keeper Administrator.
{% endhint %}

Once created, the passkey login acts as a complete replacement for both your first factor – master password or SSO and the second factor such as TOTP, SMS, or DUO (if configured).

<figure><img src="/files/PUcmJrUpK3BzSXX2dRvW" alt="" width="563"><figcaption><p>Biometric Login Enabled</p></figcaption></figure>

You can now unlock the Keeper Browser Extension using your device’s built-in biometric authentication. Click **Biometric Login** at Keeper's login screen and use your fingerprint or facial recognition to access your vault instantly.

<figure><img src="/files/plPh26kUXPE6nMfTArhh" alt=""><figcaption><p>Biometric Login Initiated on Google Chrome for Mac</p></figcaption></figure>

Multiple Passkeys can be stored in your Keeper account to account for the various platforms you may use. In this example, a passkey is available in iCloud Keychain, Windows Hello and Google Chrome. On each platform where you use Keeper, click **Manage Passkeys** to create a new one.

<figure><img src="/files/OrZXs70netGMA4XfvUNQ" alt=""><figcaption><p>Multiple Passkeys Configured</p></figcaption></figure>

### Advanced Settings

Keeper offers two advanced settings for individual records tailored to certain autofill use cases.

#### **Overwrite Field Content**

This setting allows users to control whether a record’s Custom Fields can autofill into fields on a webpage that are already populated. Previously, Custom Field content wouldn't autofill into an already-populated field.

#### **Autofill on Subsequent Pages**

This setting will prevent Keeper from attempting to autofill any given record on multiple pages in a row. Disabling this setting can help prevent accidental “false positive” autofill scenarios, where Keeper autofills on a page you don’t want it to.

To access the Advanced Settings menu, select the record overflow menu/options icon.

<figure><img src="/files/oNAGhgMHXgcs7DmHK8uI" alt=""><figcaption><p>Advanced Settings Menu</p></figcaption></figure>

<figure><img src="/files/Vv4yaKbY8A7SfxqjA3sh" alt=""><figcaption><p>Advanced Settings</p></figcaption></figure>

### Field Icons

Users have the option to entirely disable form field icons – these are the Keeper icons that appear within website login fields. This will allow you to disable the icons without disabling KeeperFill’s autofill and auto submit functionality.

<figure><img src="/files/UVUpuauy6UCCroMFzf1H" alt="" width="375"><figcaption><p>Field Icons Setting</p></figcaption></figure>

### Clipboard Expiration

If "Clipboard Expiration" is enabled, Keeper will automatically clear your computer’s clipboard after a short delay whenever you copy information from your browser extension. Durations range from 30 to 120 seconds. This security feature mitigates the risk of confidential data remaining on your clipboard for extended periods, thereby reducing potential exposure to other applications.

<figure><img src="/files/aObVzdxYzAwHSFyrLR8X" alt="" width="563"><figcaption><p>Clipboard Expiration Setting</p></figcaption></figure>

### Autofill on Page Load

If "Autofill on page load" is enabled, Keeper will automatically fill a matching record into the login fields of the website. Users can enable this feature on an individual record basis.

<figure><img src="/files/37eFhnZ0tB4StzGzuohn" alt="" width="563"><figcaption><p>Autofill On Page Load Enabled for Record</p></figcaption></figure>

### Autosubmit After Autofill

If "Autosubmit After Autofill" is enabled, Keeper will automatically submit the form and log in to the website after autofilling your username and password. Users can enable this feature on an individual record basis, or universally enable it for all of your records within KeeperFill's Settings Menu.

<figure><img src="/files/4FzGPTEvf2lRUKHp0hTp" alt="" width="563"><figcaption><p>Autosubmit After Autofill Enabled for Record</p></figcaption></figure>

### Verify Mode

When Verify Mode is enabled, pasting a password into a login form triggers an instant check against the records in your vault. If the site doesn't match a record, you'll receive a real-time warning before anything is submitted, showing which site triggered the alert, with the option to proceed or cancel. This security setting protects against phishing and accidental exposure.

<figure><img src="/files/XFRIU7Uy1YSwUYxoqIsg" alt="" width="563"><figcaption><p>Verify Mode Warning</p></figcaption></figure>

To enable Verify Mode, navigate to **Settings > Security**.

<div><figure><img src="/files/C565C62nRVnY5gR8ctXg" alt="" width="181"><figcaption><p>Settings > Security</p></figcaption></figure> <figure><img src="/files/affVoTsYal5owrTyAsf3" alt="" width="188"><figcaption><p>Verify Mode Configuration</p></figcaption></figure></div>

You can then customize how aggressively the extension monitors your activity:

* **Off:** Passwords fill or paste without any confirmation.
* **Medium:** You'll only be warned if you copy a password from your vault and paste it into a *different* site than the one it's saved for.
* **High:** You'll be warned any time you paste a password on a site that isn't saved in your vault at all, regardless of where the password came from.
* **Maximum:** You'll always be asked to confirm before pasting a password, even on websites you've already saved and trust.

Choose a higher level of protection if you want more peace of mind, or a lower one if you prefer fewer interruptions during your normal browsing.

### Accessibility

With the accessibility setting, users have the ability to control tabbing behavior and focus on the Keeper icon within form fields.

Select the **Options Menu > Settings > Accessibility** to disable this setting, preventing focus on the Keeper icons when tabbing through form fields with keyboard controls.

<figure><img src="/files/bAipjWF0SLPXcl2EF6Xq" alt="" width="375"><figcaption><p>Accessibility Focus Setting</p></figcaption></figure>

### **Match on Subdomain**

The "Match on Subdomain" setting enables KeeperFill to differentiate a record's subdomain (if present) from its domain. In doing so, Keeper will only display records matches based on strict subdomain matching to the website you are currently visiting.

Example: If a user has a record with a website address containing a **subdomain** and **domain** such as "subdomain1.company.com" and another record with the website address containing only the **domain** "company.com" and attempts to log in to "subdomain1.company.com, the only record match that will appear is "subdomain1.company.com".

To enable this feature, select the **Options Menu >** **Settings > Match on Subdomain**.

<figure><img src="/files/shtSl7TGIJneP5RoR0eL" alt="" width="375"><figcaption><p>Match on Subdomain Setting</p></figcaption></figure>


# Install for Chrome

Installation instructions for KeeperFill for Chrome, Brave and other Chromium-based browsers.

### Chrome Web Store Install

Visit the link below to install **Keeper Password Manager & Digital Vault** from the Chrome Web Store.

{% embed url="<https://chromewebstore.google.com/detail/keeper%C2%AE-password-manager/bfogiafebfohielmmehodmfbbebbbpei>" %}
Chrome Web Store
{% endembed %}

In order for Keeper to be visible in your toolbar at all times, click on the **puzzle icon** and then the **pin icon** next to Keeper Password Manager.

<figure><img src="/files/wcUMB0e6N3YB94YsosUz" alt=""><figcaption><p>Pin Keeper Password Manager</p></figcaption></figure>

Keeper needs to be enabled on all sites by default. To confirm, navigate to the extensions options screen. Site access should be enabled "On all sites".

<figure><img src="/files/iTPOH89pUv8pvPz0y5l6" alt=""><figcaption><p>Keeper Enabled for All Sites</p></figcaption></figure>

### Disable Chrome Built-In Password Manager

We recommend that you disable Chrome's built-in password saving features.

* Navigate to: <chrome://password-manager/settings> and ensure all autofill features are disabled.

<figure><img src="/files/lfcTFGXpGiOIM94Nd21d" alt=""><figcaption><p>Browser Autofill Features Disabled</p></figcaption></figure>


# Install for Firefox

Installation instructions for KeeperFill for Firefox.

### Firefox

Visit the link below to download **Keeper Password Manager & Digital Vault** from Firefox Browser Add-ons.

{% embed url="<https://addons.mozilla.org/en-US/firefox/addon/keeper-password-manager/?utm_content=search&utm_medium=referral&utm_source=addons.mozilla.org>" %}

Once installed, the Keeper icon shows when you click the puzzle on the top right of the Firefox browser window.

<figure><img src="/files/5cZYhaMvBaW7x3oxAdpF" alt="KeeperFill Browser Extension Enabled"><figcaption><p>KeeperFill Browser Extension Enabled</p></figcaption></figure>

Next we recommend you disable your browser's built-in password saving features:

1. In the upper right corner of your browser click on the **Menu Icon** (3 horizontal lines) and select **Settings > Privacy & Security**.
2. Under "Logins and Passwords", uncheck the box next to "Ask to save logins and passwords for websites".

To ensure you are using the latest version of KeeperFill and allow Keeper to run in private windows, enable both of these settings (pictured below) from the Keeper extension menu. Right-click on the Keeper extension icon in the upper-right corner of your browser window and select "Manager Extension".

<figure><img src="/files/VWmsJ1XKvM7fSTV5Ml7N" alt=""><figcaption><p>Allow Auto Updates &#x26; Run In Private Windows</p></figcaption></figure>

{% hint style="info" %}
Private mode on Firefox only currently works if you login from the Web Vault. Logging in directly from the browser extension will not login to Keeper.
{% endhint %}


# Install for Safari

Installation and usage instructions for the KeeperFill extension on Safari.

### Safari

**(1)** Visit the link below to download **Keeper for Safari** from the Mac App Store.

{% embed url="<https://apps.apple.com/us/app/keeper-for-safari/id6444685332?mt=12>" %}

**(2)** Open your Safari browser and navigate to **Safari > Preferences > Extensions.**

**(3)** If you have an existing KeeperFill extension, uninstall it.

**(4)** Activate the newly downloaded Keeper Password Manager extension by clicking the **checkbox**.

<figure><img src="/files/VfZrdyUDvEQOfDMwCUnW" alt=""><figcaption><p>Activate Keeper Password Manager for Safari</p></figcaption></figure>

**(5)** At some point you will be asked for permissions. Make sure to select "**Always Allow on Every Website**" so that Keeper can work across websites that you visit.

<figure><img src="/files/dPS79Y2cVUdYaX1zE6nD" alt=""><figcaption></figcaption></figure>

**(6)** Now the KeeperFill extension should be displayed in your browser toolbar. However, you may need to restart Safari in order for the Keeper icon to appear.

**(7)** We recommend that you disable Safari's built-in autofill features. Open **Safari > Preferences > AutoFill** and disable "user names and passwords".

<figure><img src="/files/CSx7e8AAzFyUlKrY7aGt" alt=""><figcaption><p>Disable Safari Autofill Feature</p></figcaption></figure>

{% hint style="info" %}
It is important to allow Keeper to operate on all websites. This permission allows Keeper to autofill passwords and save passwords on the sites you login to. Keeper is a zero-knowledge product and does not monitor, store or track any site you visit, or your browsing history. See our [Privacy Policy](https://www.keepersecurity.com/privacypolicy.html) with any questions or concerns.
{% endhint %}

<figure><img src="/files/rSM516gTt3pGbfSPM1pb" alt=""><figcaption><p>"Allow Keeper" Permissions</p></figcaption></figure>

{% embed url="<https://vimeo.com/269252081>" %}
How to Use KeeperFill for Safari
{% endembed %}

#### Troubleshooting

Crash after install: If a user installs Keeper for Safari on both M1 Mac and Intel Mac at the same time via the "Share Across Devices" feature of Safari, it may require taking the following action:

1. Open your Safari browser and go to **Safari > Preferences > Extensions**.
2. Disable and enable the Keeper for Safari extensions.
3. Try to launch Keeper again.


# Install for Edge

Installation instructions for KeeperFill for Edge.

### Microsoft Edge

Visit the link below to download **Keeper Password Manager & Digital Vault** from Microsoft Edge Addons.

{% embed url="<https://microsoftedge.microsoft.com/addons/detail/keeper%C2%AE-password-manager-/lfochlioelphaglamdcakfjemolpichk>" %}
Edge Addon Link
{% endembed %}

In order for Keeper to be visible in your toolbar at all times, click on the extensions **puzzle icon** then click on the **eye icon** next to Keeper Password Manager to "Show in Toolbar".

<figure><img src="/files/fSp4dfKEDj3CCl23HETM" alt=""><figcaption><p>Show Keeper in Toolbar</p></figcaption></figure>

### Disable Built-In Password Manager

Next, we recommend that you disable Edge's built-in autofill features.

1. Click on the **Edge menu icon** and select **Settings** and under "Microsoft Wallet".
2. Click **Passwords > Settings**.
3. Disable "**Offer to save passwords**" and "**Autofill passwords and passkeys**".

<figure><img src="/files/n83HPr8ErLpV70DkdFWi" alt=""><figcaption><p>Edge Microsoft Wallet Password Settings</p></figcaption></figure>


# Install for Opera

Installation instructions for KeeperFill for Opera.

### Opera

Visit the link below to download **Keeper Password Manager & Digital Vault** from the Chrome Web Store.

{% embed url="<https://chromewebstore.google.com/detail/keeper%C2%AE-password-manager/bfogiafebfohielmmehodmfbbebbbpei>" %}

In order for Keeper to be visible in your toolbar at all times, click on the extensions **box icon** and then the **pin icon** next to Keeper Password Manager.

<figure><img src="/files/TUqrq0dwA3ngGn5Qukoa" alt=""><figcaption><p>Pin Keeper Password Manager</p></figcaption></figure>


# Enterprise Deployment

Deploying the Browser Extension through group policy

For business customers, see Keeper's Enterprise end-user deployment guide:

[Deploying Keeper to End-Users](/enterprise-guide/deploying-keeper-to-end-users)


# KeeperFill for Apps

This guide provides an overview of the main features of KeeperFill for Apps, a convenient tool used to enhance your experience using the Keeper Desktop App on Mac and Windows OS.

## Overview

KeeperFill for Apps is a useful tool built into the Keeper Desktop application for Mac and PC that lives in the system tray/menu bar of your computer and gives you quick and easy access to your vault using a simple hotkey.

## Features

* Fast access to your vault
* Hotkey filling into native applications and browsers
* Custom keystroke filling with multiple steps, like a "macro"
* Works with RDP sessions and other remote desktop products
* Automatic record selection based on application title
* Advanced record matching using OCR (optical character recognition)
* Works with "green screen" terminal emulators such as the Rumba AS400 and others

You can search for records and access any information in your vault with a few clicks, using hotkeys to fill the login, password and other keystroke sequences into applications.<br>

{% embed url="<https://vimeo.com/428529885>" %}
KeeperFill for Apps Overview
{% endembed %}

Upon downloading the latest version of [Keeper Desktop App](https://www.keepersecurity.com/download.html?t=v), you will have full use of KeeperFill for Apps, available on both MacOS and Windows devices. Logging into the Keeper Desktop App will simultaneously log you into KeeperFill for Apps (and vice versa). The Keeper Desktop App can be closed but will remain running and can be accessed through your computer's menu bar (MacOS) or system tray (Windows) via the familiar Keeper icon.

![MacOS](/files/-M590h4_cWO314iLrw1a)

![Windows](/files/-M59274ybs2rUUjgMPJ6)

{% hint style="success" %}
You can launch KeeperFill for Apps at any time by either clicking on the Keeper icon in your menu bar/system tray or by using the hotkey: **Ctrl/Cmd + Shift + K**.
{% endhint %}

## Launch Record in KeeperFill for Apps

While viewing a record in Keeper Desktop App, click the **launch icon**.

![](/files/Anm4PFnBVpjqiJvVMv4N)

The Keeper Desktop App window will close, but remain running and the record will open in KeeperFill for Apps.

![](/files/-M5NcaEaEilipz-lO3rQ)

## Logging into Apps

You can either log into your device's apps by launching the record in KeeperFill for Apps from the Keeper Desktop App (see previous section) or you can login directly from KeeperFill for Apps.

Click on the Keeper icon in your device's menu bar/system tray to open KeeperFill for Apps (login with your master password if prompted).

![](/files/-M5NdO-ZcydZ6LOjXI3z)

Either search for the record in the provided search bar or locate it in **All Records** or **Favorites** then click on the record to open it.

![](/files/-M5NdANvEvaEDxIvqxII)

Open the application you would like to login to, clicking once in the username field. In KeeperFill for Apps, hover over the login and click **Fill Value** to fill your username into the application.

{% hint style="info" %}
Fill Username Hotkey: **Ctrl/Cmd + Shift + U**
{% endhint %}

![](/files/-M5Necb83ftDFBc_G9fh)

Next, click once in the password field of the open application. In KeeperFill for Apps, hover over the Password and click **Fill Password**.

{% hint style="info" %}
Fill Password Hotkey: **Ctrl/Cmd + Shift + P**
{% endhint %}

![](/files/-M5NemgNwDVwYWoaWoWF)

If a record contains a two-factor code, you can use a hotkey to fill the value.

{% hint style="info" %}
Fill Two-Factor Code Hotkey: **Ctrl/Cmd + Shift + T**
{% endhint %}

KeeperFill for Apps will fill the last focused area (e.g. login field, password field, etc.) so be sure to click on each individual field of the application as you fill your credentials.

## Launch Record Website

Quickly launch a record's website in your device's default web browser by hovering over a record and clicking **Launch.**

![](/files/-M5Ng7hK8C_L6jCJBWqe)

You can also launch a record website while viewing it in detail view and clicking the **launch icon**.

![](/files/-M5NgY4IoVhwX7pY9M9a)

## Hotkeys

Hotkeys are alternative keyboard shortcuts that further streamline your experience using Keeper, reducing the number of mouse clicks it takes to complete an action.

View and customize KeeperFill for Apps hotkey actions by clicking **Settings** > **KeeperFill Hotkeys**.

![](/files/-M5NhHNBms-AGDTsPVQC)

Click the **pencil icon** to customize the following actions:

* Launch KeeperFill
* Fill Username
* Fill Password
* Fill Two-Factor Code
* Open Desktop App
* Logout

![](/files/-M5Ni1Cgsi1rZEs_RwdU)

{% hint style="warning" %}
To ensure that KeeperFill for Apps does not interfere with your device's existing hotkey actions (e.g. screenshot feature), restore KeeperFill for Apps to its default settings by clicking **Settings > Restore Default Settings**.
{% endhint %}

![](/files/-M5OY6I4qy98sdkr6xxH)

## Return to Keeper Desktop

Quickly return to the Keeper Desktop App from the main menu by clicking **Desktop App**.

![](/files/-M5NiW8GiLohMpAPd3LK)

You can also return to the Desktop App while viewing a record by clicking the **return icon**.

![](/files/-M5Niu-e9Ldlp8raDu0w)

{% hint style="info" %}
Open Desktop App Hotkey: **Ctrl/Cmd + Shift + D**
{% endhint %}

## Enabling Keeper on Mac

In order for KeeperFill for Apps "fill" feature to function normally, Keeper Password Manager must be enabled in your computer's privacy settings.

From your computer's System Preferences, click **Security & Privacy**.

![](/files/-M5Nywoe3TTX0_jF2VjW)

Click **Accessibility > Privacy** then check the box next to Keeper Password Manager.

![Accessibility Settings on MacOS](/files/-M5Nz-7MrVisUdNQVgE8)

{% hint style="info" %}
Please note, the "Screen Recording" permission is also required for performing Native App Autofill keystroke filling with OCR (Optical character recognition) in version 16.4+ of Keeper Desktop.
{% endhint %}

## Use KeeperFill for Apps Over Remote Sessions

KeeperFill for Apps is a great solution for filling passwords and other content over a remote session, such as when using Microsoft Remote Desktop. Below is an example of using KeeperFill for Apps over RDP with a remote website login on Amazon AWS.

![Using KeeperFill for Apps over RDP](/files/-M9s80pFRHsVDD4l3cW4)

KeeperFill for Apps is compatible with most remote session tools. You may need to adjust the keyboard mode to "Unicode" in order to ensure that the characters are relayed properly.

![Microsoft Remote Desktop Keyboard Mode Setting](/files/-M9s8h7prU9RJuy2349u)

## Native App Filler

Keeper can automatically fill fields in any native application using a set of custom keystrokes.

With the release of Keeper's "Record Types" feature, a new field type is introduced which is called "Native App Filler".

{% embed url="<https://vimeo.com/703884522>" %}
Native App Filler
{% endembed %}

* The Native App Filler function includes a Title match and a Record match field.
* The Title match looks at the application title or program name.
* The Record match looks at the contents of the screen using OCR scanning and will select a matching record only when the Title matches. This is useful for legacy terminal connection tools such as TN3270 client emulators.
* The "Auto-Type Keystrokes" field allows you to initiate a specific keystroke sequence utilizing portions of the record and any other keyboard actions.

![Native App Filler Custom Field](/files/JehnjhtYCNxjAX51co3S)

In the simple example below, the "Zoom" app name is matched and the username + \<Tab> + password is typed when the user hits the hotkey "ctrl+shift+M".

![Example of Native App Filler](/files/PW2FlwvOdA2ozCHaJSXw)

When you launch an application that matches the Application Title or Program Name field, the KeeperFill for Apps system tray icon will change from the Keeper logo to a lock icon. At that point, hitting the assigned hotkey will initiate the Auto-Type keystroke filling sequence.

![Auto-Type Keystroke](/files/iXFQTm6ryJpkpnCyuLye)

By default, the Native App Filler hotkey is set to **Ctrl/Cmd + Shift + M**. To change the hotkey, simply to go **Settings > KeeperFill Hotkeys**.

![Change Auto-Type Keystroke Hotkey](/files/eznVpOvxyjAWxca0srnY)

The Auto-Type Keystrokes can contain many different keystroke elements. The supported keystrokes are as follows:

| Keystroke   | Description                     |
| ----------- | ------------------------------- |
| {USERNAME}  | Record username field           |
| {PASSWORD}  | Record password field           |
| {TOTP}      | Record Two-Factor Code field    |
| {URL}       | Record Website URL field        |
| {FIELD:XXX} | XXX=Value for Custom Field Name |
| {ENTER}     | Enter key                       |
| {TAB}       | Tab key                         |
| {DELAY:X}   | Delay by X number of seconds    |
| {UP}        | Up arrow key                    |
| {DOWN}      | Down arrow key                  |
| {LEFT}      | Left arrow key                  |
| {RIGHT}     | Right arrow key                 |
| {TEXT:XXX}  | XXX=Arbitrary text to fill      |
| {SPACE}     | Space character                 |

#### Native App Filler for Multiple Apps with Identical Credentials

An additional feature of Native App Filler is the ability to use the same Keeper record to fill credentials for multiple applications. For example, for Microsoft Office, you likely have a set of Microsoft Credentials that you use to log in to multiple applications in the Office suite. Simply list your applications separated with commas in the **Application Title or Program Name** field of the Native App Filler section of the record.

In this example, we can automatically fill credentials for Teams and Excel by listing "Microsoft Teams,Excel" in the **Application Title or Program Name** field.

<figure><img src="/files/4LsycMyeHvMHl8jsVKcq" alt=""><figcaption><p>Use a Single Record to Fill Credentials for Multiple Native Apps</p></figcaption></figure>

## Troubleshooting

Helpful tips and tricks for troubleshooting KeeperFill for Apps issues.

#### Hotkey Filling Failure On Mac OS

If hotkey filling is not working, most likely you need to re-activate your Mac OS accessibility settings. Please follow the instructions below:

1. Open the Terminal app, found in *Applications > Utilities*.
2. Copy the following and press Return: `sudo tccutil reset Accessibility`
3. When prompted, enter your administrator password to approve the command.
4. Immediately restart your Mac from * > Restart*.
5. The next time you open Keeper and attempt to Autofill, you'll get prompted to allow Keeper to have the permissions.
6. Open the * > System Preferences > Security & Privacy > Accessibility.*
7. Ensure that Keeper is listed and selected on the Accessibility screen within the list of applications. If not, click the "+" button and add the Keeper application.
8. Now select the "Screen recording" section the left and ensure that Keeper is listed. If not, click the "+" button and add the Keeper application.

![Accessibility Settings](/files/u97ztzzhbz4Oh0wSo5AK)

![Screen Recording Settings](/files/3uMj0VxuFroosbPrpcAC)


# iOS - iPhone & iPad

A comprehensive guide for Keeper for Apple iOS (iPhone, iPad) devices.

## **Your Keeper Vault**

With Keeper, your passwords, logins and other personal information are saved in a private, digital vault. It is here where you can view and edit all of your website login credentials and details, as well as store important files and photos.

![Keeper for iOS](https://914511346-files.gitbook.io/~/files/v0/b/gitbook-x-prod.appspot.com/o/spaces%2F-LSGVtOTYUIkVBoYtFvK%2Fuploads%2FmSOqmNJbpn6ZyYjYiirR%2Fios2.png?alt=media\&token=1cf23196-52c3-427d-b588-08eec2b63a00)

## Account Creation & Login

Signing up for Keeper's iOS mobile app is easy. Simply visit the [App Store](https://apps.apple.com/us/app/keeper-password-manager-digital/id287170072) on your device and install **Keeper Password Manager**. Watch the video below to learn more about account creation and login.

{% embed url="<https://vimeo.com/585561341>" %}
Account Creation and Login
{% endembed %}

#### New Users

To create your Keeper account, first enter your email address then you will be asked to create and confirm a **Master Password** which will be the only password you have to remember. We recommend that you choose a strong Master Password that is only used for Keeper -- don't forget your Master Password!

To finalize your account and proceed to your vault, you will be asked to enter the security **verification code** that was sent to your email.

{% hint style="info" %}
Enterprise users who log in with SSO do not require selection of a Master Password.
{% endhint %}

![](https://914511346-files.gitbook.io/~/files/v0/b/gitbook-x-prod.appspot.com/o/spaces%2F-LSGVtOTYUIkVBoYtFvK%2Fuploads%2FFLXE12x9PokGvvibUIHu%2Frename-this-image%20\(1\).png?alt=media\&token=d4a6d53e-2f7b-468f-9365-5ce4e0028561)

#### Existing Users

If you are an existing user, tap **Login** and enter your email address. If you are attempting to log in on an unrecognized device, a device approval must take place before you can proceed to your Keeper Vault. Users have three methods of approval to choose from:

* Email Verification
* Keeper Push
* Two-Factor Method

Keeper Push is Keeper’s proprietary notification-based device approval system that sends a push notification to an existing, recognized device.

If you select **Send Keeper Push**, a notification (push) will appear in your Keeper vault at an approved device or browser.

![Device Approval Prompt](https://914511346-files.gitbook.io/~/files/v0/b/gitbook-x-prod.appspot.com/o/spaces%2F-LSGVtOTYUIkVBoYtFvK%2Fuploads%2FufoRWAsf1HxWfHjHJF6f%2Frename-this-image%20\(7\).png?alt=media\&token=aebabe76-f153-481b-a95f-5487e7df6ae2)

On the device, login and tap **Yes** to approve the new device. You must be actively logged into a an approved device to receive the notification.

Once your device has been approved, you will be prompted for 2FA (if enabled), then enter your Master Password to proceed to your vault.

![Device Approval Request in Web Vault](https://914511346-files.gitbook.io/~/files/v0/b/gitbook-x-prod.appspot.com/o/spaces%2F-LSGVtOTYUIkVBoYtFvK%2Fuploads%2FMMEkJE9hFuyyy0yodjO7%2FPush%20Notification.jpeg?alt=media\&token=b68c763d-4040-48e0-b5e7-e1688e383e26)

## Enterprise SSO Login

If you are an Enterprise customer using SSO Login, you can enter your email address and tap **Next** to login through SSO. Alternatively, you can tap **Use Enterprise SSO Login** and enter the enterprise domain provided by your Keeper administrator and tap **Connect**.

![Enterprise SSO Login](https://914511346-files.gitbook.io/~/files/v0/b/gitbook-x-prod.appspot.com/o/spaces%2F-LSGVtOTYUIkVBoYtFvK%2Fuploads%2F9XXgUzN4LcmXRAGKZPKa%2Frename-this-image%20\(1\)%20copy.png?alt=media\&token=b4dc5438-e150-45c5-b533-3393133ee533)

Next, you will be directed to the Safari browser for web-based SSO Enterprise authentication. After you have successfully entered your SSO credentials and two-factor authentication code (if enabled), you will be returned to Keeper to complete the login. You may be required to approve your device using Keeper Push or administrator approval after the SSO login process has been completed.

{% hint style="info" %}
For more information about Enterprise SSO login, click [here](/user-guides/enterprise-end-user-setup-sso#create-your-keeper-account).
{% endhint %}

![Login via Enterprise SSO](https://914511346-files.gitbook.io/~/files/v0/b/gitbook-x-prod.appspot.com/o/spaces%2F-LSGVtOTYUIkVBoYtFvK%2Fuploads%2FeROMYs5AUE2RcP7ZtSbW%2Frename-this-image%20\(24\).png?alt=media\&token=d56a48e5-c072-430d-a1c0-ef5bf9de45e9)

## Importing Passwords

#### iOS Version 26+

If you are running iOS version 26 or higher, you can import your passwords, passkeys and two- factor codes from Apple Passwords directly into Keeper.

To begin, open the Apple Passwords app on your mobile device and tap the **Options icon** **>** **Export Data to Another App**.

<div><figure><img src="https://914511346-files.gitbook.io/~/files/v0/b/gitbook-x-prod.appspot.com/o/spaces%2F-LSGVtOTYUIkVBoYtFvK%2Fuploads%2FoWz6g1y7KBSkgbkQNHD7%2FApple%20Passwords%20-%20Tap%20Menu.png?alt=media&#x26;token=7df0bd32-11e0-45b7-b74d-d2afa2f09257" alt="" width="200"><figcaption><p>Apple Passwords Options</p></figcaption></figure> <figure><img src="https://914511346-files.gitbook.io/~/files/v0/b/gitbook-x-prod.appspot.com/o/spaces%2F-LSGVtOTYUIkVBoYtFvK%2Fuploads%2FK9EST1WTp2ja688FBf4b%2FTap%20Export.png?alt=media&#x26;token=651243af-5409-4a24-8821-e492479eeff7" alt="" width="200"><figcaption><p>Export Data</p></figcaption></figure></div>

Select the logins you would like to export to Keeper and tap **Continue**. Select Keeper from the compatible apps listed and tap **Continue > Continue in "Keeper"**.

<div><figure><img src="https://914511346-files.gitbook.io/~/files/v0/b/gitbook-x-prod.appspot.com/o/spaces%2F-LSGVtOTYUIkVBoYtFvK%2Fuploads%2FpCIpnbtNlRAZ5yO1VwYS%2FTap%20continue.png?alt=media&#x26;token=65e27d29-88e2-4454-b973-fd25b2112594" alt="" width="200"><figcaption><p>Select Passwords to Export</p></figcaption></figure> <figure><img src="https://914511346-files.gitbook.io/~/files/v0/b/gitbook-x-prod.appspot.com/o/spaces%2F-LSGVtOTYUIkVBoYtFvK%2Fuploads%2F2gZGs5XC9GojQd7blgGc%2FTap%20Continue%20(1).png?alt=media&#x26;token=c5240b38-cb44-4056-98e6-52c5a81e91ce" alt="" width="200"><figcaption><p>Choose Keeper as Destination</p></figcaption></figure></div>

Once you've authenticated to Keeper, tap **Import**. When the import is complete, you will be able to find all of your logins in the Keeper folder named "Apple Passwords".

<div><figure><img src="https://914511346-files.gitbook.io/~/files/v0/b/gitbook-x-prod.appspot.com/o/spaces%2F-LSGVtOTYUIkVBoYtFvK%2Fuploads%2FtnrrfVDSLoB3P4vtIFU5%2Fimport%20dialog.png?alt=media&#x26;token=673def81-a9dc-4551-b364-027cf0c6804a" alt="" width="200"><figcaption><p>Import Into Keeper</p></figcaption></figure> <figure><img src="https://914511346-files.gitbook.io/~/files/v0/b/gitbook-x-prod.appspot.com/o/spaces%2F-LSGVtOTYUIkVBoYtFvK%2Fuploads%2FdumL5NVE5HOAOUUK47mH%2Fimport%20complete%20dialog.png?alt=media&#x26;token=2ea7fe50-5c10-437f-b3cb-610d40644398" alt="" width="200"><figcaption><p>Import Complete</p></figcaption></figure></div>

#### iOS 18.7 and Below

{% hint style="warning" %}
Importing passwords is not available on the iOS app for versions 18.7 and below. Please use the Keeper Web Vault or Desktop App on a desktop computer to import your passwords.
{% endhint %}

When you first log in to your vault, Keeper will prompt you to import passwords from your computer and/or web browsers. If you're not near a desktop computer, you can perform the import at a later time using the Keeper Web Vault.

1. Tap **I'm at my computer**.
2. Keeper will ask you to navigate to [keepersecurity.com/setup](https://keepersecurity.com/setup) on your desktop computer to begin the process of importing your passwords.

For detailed instructions on importing passwords from web browsers and other password managers to your Keeper Web Vault, click [here](/user-guides/web-vault#importing-passwords).

## Creating New Records

Your passwords, logins, credit card numbers, bank accounts and other personal information are saved in your private digital vault (as "Records") and are encrypted on your device using 256-bit AES.

Tap **+** and **Create New Record**.

![Create New Record](https://914511346-files.gitbook.io/~/files/v0/b/gitbook-x-prod.appspot.com/o/spaces%2F-LSGVtOTYUIkVBoYtFvK%2Fuploads%2FELuHtOa1Tky7Nwz9ScG9%2Frename-this-image%20\(1\).png?alt=media\&token=4579b2c5-43b6-441b-ae21-b905f27bef99)

![Vault Record](https://914511346-files.gitbook.io/~/files/v0/b/gitbook-x-prod.appspot.com/o/spaces%2F-LSGVtOTYUIkVBoYtFvK%2Fuploads%2Fxk7N7soLahjRtsygggZj%2Frename-this-image%20\(3\).png?alt=media\&token=e157c458-0031-4191-b6bb-afb0cbe451e6)

* Choose a [Record Type](/user-guides/record-types) from the dropdown menu ("Login" is the default type)
* Enter a Title for the record
* Enter the Email or Username
* Enter the Password or tap the **dice icon** to generate one (more on that [here](/user-guides/web-vault#password-generator))
* Enter the Website Address (if one wasn't already entered for you)
* Enter Notes, add [Files & Photos](/user-guides/web-vault#secure-file-storage), a [Two-Factor Code](/user-guides/web-vault#two-factor-codes-for-totp) and [Custom Fields](/user-guides/web-vault#custom-fields)
* Tap **Save** to finish

Depending on the Record Type you selected, the default record fields will vary.

{% embed url="<https://vimeo.com/585569249>" %}
Records
{% endembed %}

## Organization

With Keeper you can organize your records into folders and subfolders. To create a folder, tap **+** and **Create New Folder**, then enter a name for the folder. To add records to the folder, Tap **+** and **Add Existing Record** or you can tap **Create New Record** to add a new record to the folder.

<figure><img src="https://914511346-files.gitbook.io/~/files/v0/b/gitbook-x-prod.appspot.com/o/spaces%2F-LSGVtOTYUIkVBoYtFvK%2Fuploads%2F8pnaTh3KAQhzadPM0Nss%2Frename-this-image%20(1).png?alt=media&#x26;token=581afa7d-d034-47d6-aa04-647d374ed0da" alt=""><figcaption><p>Create New Folder and Add Records</p></figcaption></figure>

<figure><img src="https://914511346-files.gitbook.io/~/files/v0/b/gitbook-x-prod.appspot.com/o/spaces%2F-LSGVtOTYUIkVBoYtFvK%2Fuploads%2FQksh6nuYp43M5ehl7wFi%2Frename-this-image%20(3).png?alt=media&#x26;token=305b3233-1b79-4f75-a420-eb62a8d576e3" alt=""><figcaption><p>Add Existing Record(s) to a Folder</p></figcaption></figure>

To create subfolder, within the new folder, tap **+** and **Create New Folder**.

{% hint style="info" %}
Once created, a regular folder cannot be converted to a shared folder. To learn how to create a shared folder, click [here](#share-a-folder).
{% endhint %}

### Moving & Shortcuts

Keeper makes it easy to move records around within your vault. Individual or multiple records and folders can be moved and shortcuts can be created. Shortcuts, like alias files, can exist in two or more places and when edited, change together.

To begin, tap the **pencil icon** and select the folder(s) and/or record(s) and then select an option listed below.

* Create a Shortcut
* Move to a New Folder
* Move to an Existing Folder
* Change the record(s) "type"
* Delete

![Moving Records and More](https://914511346-files.gitbook.io/~/files/v0/b/gitbook-x-prod.appspot.com/o/spaces%2F-LSGVtOTYUIkVBoYtFvK%2Fuploads%2FAB1gyUz5a7RA9Nxu7nLr%2Frename-this-image%20\(1\).png?alt=media\&token=8b185a7a-a71c-435c-9442-aa51f08cbf4f)

### Favorites

Adding a record to your vault Favorites is an easy way to locate your most frequently visited sites. To add a record to your Favorites, tap **More > Add to Favorites**.

![Add to Favorites](https://914511346-files.gitbook.io/~/files/v0/b/gitbook-x-prod.appspot.com/o/spaces%2F-LSGVtOTYUIkVBoYtFvK%2Fuploads%2FqPLjcYhBN82MLjfjCMxY%2Frename-this-image%20\(1\).png?alt=media\&token=9b7a87a6-c4a1-4c1d-8774-5f17d38633f0)

#### Apple Watch Favorites

Available for download in the [App Store](https://www.apple.com/app-store/), Keeper's smartwatch app for Apple (also known as KeeperDNA) provides users with quick access to their favorite records.

To add a record to your Watch Favorites, navigate to a record and tap **More > Add to Watch Favorites**.

<figure><img src="https://914511346-files.gitbook.io/~/files/v0/b/gitbook-x-prod.appspot.com/o/spaces%2F-LSGVtOTYUIkVBoYtFvK%2Fuploads%2FriE4z7NtqgbukoGBP5vq%2Frecord_options_light.png?alt=media&#x26;token=6f81d0b8-6a3f-4d5e-a645-05093a076f08" alt="" width="200"><figcaption><p>More > Add to Watch Favorites</p></figcaption></figure>

On your smartwatch, you can access all of your Watch Favorites from the home screen. Selecting an individual record will allow you to view its details.

<div><figure><img src="https://914511346-files.gitbook.io/~/files/v0/b/gitbook-x-prod.appspot.com/o/spaces%2F-LSGVtOTYUIkVBoYtFvK%2Fuploads%2F10dnBWSjFquLhgZdwzoW%2FHome%20Screen%20(1).png?alt=media&#x26;token=059f68a5-fd57-42a4-ae48-ad58b23c1f5c" alt="" width="126"><figcaption><p>Keeper App Home Screen</p></figcaption></figure> <figure><img src="https://914511346-files.gitbook.io/~/files/v0/b/gitbook-x-prod.appspot.com/o/spaces%2F-LSGVtOTYUIkVBoYtFvK%2Fuploads%2FYqSD4gycpPCMoVLupEH0%2FWatch%20Fav%20-%20List.png?alt=media&#x26;token=b6981a86-8990-471b-b02d-74687a397327" alt="" width="126"><figcaption><p>Watch Favorites</p></figcaption></figure> <figure><img src="https://914511346-files.gitbook.io/~/files/v0/b/gitbook-x-prod.appspot.com/o/spaces%2F-LSGVtOTYUIkVBoYtFvK%2Fuploads%2F8q1g6bBs8sKBR74qeQTa%2FRecord%20Detail%20(2).png?alt=media&#x26;token=6637d55b-7051-4a0e-a39c-5d57696b0062" alt="" width="126"><figcaption><p>Record Detail</p></figcaption></figure></div>

## Sharing

Securely create, share and manage records and folders with other Keeper users such as friends, family, friends and colleagues.

{% embed url="<https://vimeo.com/585567346>" %}
Sharing
{% endembed %}

### Share a Record

Open the record you would like to share and tap **Share > Share with User**. Enter the user's email address, then use the toggle switches to select permissions (Can Edit, Can Share, Make Owner) then tap **Save**.

If this is the first time you are sharing with this person, you will first need to establish a "sharing relationship". The user will receive an email prompting them to login to Keeper and either accept or deny the share request. Once you establish a sharing relationship, the user will appear in the email dropdown list.

![Share a Record](https://914511346-files.gitbook.io/~/files/v0/b/gitbook-x-prod.appspot.com/o/spaces%2F-LSGVtOTYUIkVBoYtFvK%2Fuploads%2FZ1PYD3njVkPpTn1GUznA%2Frename-this-image%20\(1\)%20copy.png?alt=media\&token=a4c2009c-9ab7-4a5d-88c5-5d0d925f81a1)

### One-Time Share <a href="#one-time-share" id="one-time-share"></a>

(4) Once the share link has been created, select how you would like to share the link. (SMS, Email, Copy or the recipient can scan the provided QR code to view the record.) When the recipient of the share link opens the record, it will open in their web browser and will be bound to their device. The record access will automatically expire after the set amount of time.

<figure><img src="/files/WhJjWpPVV9kSywqkDsUo" alt=""><figcaption><p>Create a One-Time Share Link</p></figcaption></figure>

Keeper's One-Time Share feature provides time-limited secure sharing of a record with anyone even if they don't have a Keeper account. One-Time Share is the most secure way to send confidential information to a friend, family member or co-worker without exposing information over email, text message or messaging. Access is time-limited, viewable on one device only and read only.

Open a record then tap **Share > One-Time Share > Create a Share Link**.

<figure><img src="/files/IChcKT6WrT9wInFDS90B" alt="" width="188"><figcaption><p>Create Share Link</p></figcaption></figure>

From the dropdown menu, select when you would like the share link to expire and check the box if you want to allow bidirectional sharing capabilities (allowing the recipient to edit record fields and upload files), then click **Create Link**.

<figure><img src="/files/NUY3pKOMS4mRs5epJAw1" alt="" width="188"><figcaption><p>Expiration &#x26; Bidirectional Sharing<br>Options</p></figcaption></figure>

Once the share link has been created, tap **Share** or **Copy Link** (to paste into a message); additionally, the recipient can scan the provided QR code to view the record.

<figure><img src="/files/gXLkSi8OF9q5nXdzZUxP" alt="" width="188"><figcaption><p>Share or Copy Link</p></figcaption></figure>

{% hint style="info" %}
Click [here](#one-time-share) for more information on Keeper's One-Time Share feature.
{% endhint %}

### Share a Folder

{% hint style="info" %}
This guide covers Keeper's "Classic" Folder System, if you would like more information about our new Nested Share System, click [here](/user-guides/sharing/nested-shared-subfolders).
{% endhint %}

Shared folders allow you to share multiple records at once and new records can be added to the folder as needed.

#### Create a Shared Folder & Share with Others:

1. Tap **+** and **Create Shared Folder**.
2. Enter a name for the folder and tap **Save**.
3. The new folder will now appear in your records list. To share the folder with other users, select the folder, then tap the **three dots** to the right of the folder name to open a menu of options.
4. Select **Manage Users & Records** and enter the **email addresses of the user(s)** you would like to share the folder with.

<figure><img src="https://914511346-files.gitbook.io/~/files/v0/b/gitbook-x-prod.appspot.com/o/spaces%2F-LSGVtOTYUIkVBoYtFvK%2Fuploads%2F4nmsaW3dNkvvadhj0cnd%2Frename-this-image%20(1)%20copy%202.png?alt=media&#x26;token=93c24b5d-0c88-4da6-9ff8-e7645985e49e" alt=""><figcaption><p>Share Folder with Other Users</p></figcaption></figure>

#### Assign Permissions & Add Records:

1. You can assign permissions for each user by tapping on their email address under the "Users" tab.
2. To add records to the folder, switch to the "Records" tab.
3. Select the record(s) you would like to add to the shared folder. Once a record has been added, select it from the list to assign permissions (Can Edit, Can Share). Tap **Save** to finish.

![Shared Folder Users and Records List](https://914511346-files.gitbook.io/~/files/v0/b/gitbook-x-prod.appspot.com/o/spaces%2F-LSGVtOTYUIkVBoYtFvK%2Fuploads%2FHEkgk9HLasFEWEggKZMq%2Frename-this-image%20\(1\).png?alt=media\&token=53da743f-9563-4fb1-ba27-98366b87bcd5)

## Identity & Payments

Identity & Payments is the place for you to store your personal contact/address information and credit card numbers safely.

Payment cards can also be stored in your vault as records using the "Payment Card" record type which allows them to be shared with other users. See our [Record Types](/user-guides/record-types) Guide for more information.

![Identity & Payments](https://914511346-files.gitbook.io/~/files/v0/b/gitbook-x-prod.appspot.com/o/spaces%2F-LSGVtOTYUIkVBoYtFvK%2Fuploads%2FCrwKPMjvEYAer0dPOsgf%2Frename-this-image%20\(74\).png?alt=media\&token=79303389-045f-439d-98f2-008f13b2116b)

## Key Features

### Password & Passphrase Generators

Long, random passwords that are created for each account help protect your information and reduce your exposure to data breaches. Alternatively, by combining multiple words, *passphrases* are an even more secure alternative to traditional passwords.

Keeper's password generator can create and securely store strong, random passwords or passphrases for all of your sites and apps.

**Generate a Password**

To begin, tap the **dice icon** within a new or existing record. You can customize your password by character length (8-99 characters) and choose to include lowercase and uppercase letters, numbers and symbols.

Check the box at the bottom of your screen if you'd like to make your selections the default setting for all passwords moving forward. Tap **Use Password** to update the record or **Copy Password** to copy it to your device's clipboard.

![Password Generator](https://914511346-files.gitbook.io/~/files/v0/b/gitbook-x-prod.appspot.com/o/spaces%2F-LSGVtOTYUIkVBoYtFvK%2Fuploads%2FizQdpETlTKwYMrKFxzc5%2FiOS_double%20\(4\).png?alt=media\&token=af3dec8e-e7d0-40d7-a2f4-bca6cb0381c6)

#### Generate a Passphrase

Tap the **dice** **icon** within a new or existing record and from the dropdown menu next to "Type" and select **Passphrase**.

You can customize your passphrase by setting the length, including capital letters and numbers in the passphrase and choosing from various symbols to separate the words.

Passphrases can be up to 20 words long, with a minimum length of 5 words and each word including at least 3 characters.

Check the box at the bottom of your screen if you'd like to make your selections the default setting for all passphrases moving forward. Tap **Use Passphrase** to update the record or **Copy Passphrase** to copy it to your device's clipboard.

<figure><img src="https://914511346-files.gitbook.io/~/files/v0/b/gitbook-x-prod.appspot.com/o/spaces%2F-LSGVtOTYUIkVBoYtFvK%2Fuploads%2Fze6Oui48RdOtVQYDLllI%2FiOS_double%20(5).png?alt=media&#x26;token=a45c1f31-f24d-4795-80de-0232d53f0d59" alt=""><figcaption><p>Passphrase Generator</p></figcaption></figure>

{% hint style="warning" %}
This will NOT automatically change the website's existing login password. You must still visit the corresponding website's "Change Password" form to update the old password to match the new, stronger password. Click [here ](/user-guides/tips-and-tricks/password-changing-with-keeperfill)to learn how to easily change your password with KeeperFill.
{% endhint %}

To generate a password or passphrase from your vault home screen, tap the yellow **create button** and select **Generate Password**. Select either password or passphrase next to "Type". You can either use the password/passphrase to create a new record or copy it to your device’s clipboard to use elsewhere.

<figure><img src="https://914511346-files.gitbook.io/~/files/v0/b/gitbook-x-prod.appspot.com/o/spaces%2F-LSGVtOTYUIkVBoYtFvK%2Fuploads%2Fja0f5ccTtdSJKv8Zmyze%2FiOS_double%20(6).png?alt=media&#x26;token=8a6342f9-7985-4dc3-bbb7-8a2eb3a450c9" alt=""><figcaption><p>Create Button > Generate Password</p></figcaption></figure>

#### Generator History

To view your password/passphrase history, tap **Generate Password** from either your vault home screen or create one within a record and tap the **clock icon**. You can delete your generator history at any time by tapping **Clear**.

<figure><img src="https://914511346-files.gitbook.io/~/files/v0/b/gitbook-x-prod.appspot.com/o/spaces%2F-LSGVtOTYUIkVBoYtFvK%2Fuploads%2F5kFcM8XUI9678rb10PLV%2FiOS_double%20(9).png?alt=media&#x26;token=69d714c2-0e2a-4e97-8174-fce67e84b797" alt=""><figcaption><p>Generator History</p></figcaption></figure>

#### Password Zoom

To produce a zoomed-in view of a record's password or passphrase, tap the **eye icon** then long press on the **password field**. An enlarged view of your password/passphrase will appear and any numbers and symbols can be easily identified by blue and red color-coding.

![Password Zoom](https://914511346-files.gitbook.io/~/files/v0/b/gitbook-x-prod.appspot.com/o/spaces%2F-LSGVtOTYUIkVBoYtFvK%2Fuploads%2FqGHU0QvGk4LrhSKG0CBH%2Frename-this-image%20\(3\).png?alt=media\&token=801494c5-87df-4ced-8b75-1cb50f3e51ab)

**Password Enforcement Policies (Business/Enterprise Users)**

The password generator on end-user vaults will adhere to the minimum character length, minimum number of lowercase/uppercase/numbers/symbols and allowed list of symbols as defined by your Keeper Administrator.

The passphrase generator on end-user vaults is enabled by default, but can be disabled by your admin. Passphrases will adhere to the minimum number of words and can be configured to include capital letters and numbers. The separators between words will be selected from the list of allowed symbols.

For more information on record password enforcement policies, please see our [Enterprise Guide](/enterprise-guide/roles/enforcement-policies#password-generator).

### Wi-Fi Record Type with QR Code

Keeper's "WiFi Login" record type simplifies creating and sharing Wi-Fi passwords. This record type even includes the ability to generate a shareable QR code that can be scanned by others to automatically join the Wi-Fi network.

To create a Wi-Fi login record, select **WiFi Login** from the "Record Type" dropdown and enter the record details.

<figure><img src="https://914511346-files.gitbook.io/~/files/v0/b/gitbook-x-prod.appspot.com/o/spaces%2F-LSGVtOTYUIkVBoYtFvK%2Fuploads%2FrCw2RR9TJd0r8tkIpnpM%2Fwifi%20record%20view.png?alt=media&#x26;token=9a07375f-5fce-4003-87ee-bdcf1206f485" alt="" width="200"><figcaption><p>Select WiFi Login Record Type</p></figcaption></figure>

To generate a Wi-Fi network QR code, ensure the "Network Name (SSID)" and "Password" fields are entered.

<figure><img src="https://914511346-files.gitbook.io/~/files/v0/b/gitbook-x-prod.appspot.com/o/spaces%2F-LSGVtOTYUIkVBoYtFvK%2Fuploads%2FpttYgNn7PV8ekAaV2WfU%2FQR%20Code.png?alt=media&#x26;token=d2e565c0-e834-43a9-96c8-e4bd975601e5" alt="" width="200"><figcaption><p>QR Code for Automatic Network Access</p></figcaption></figure>

{% hint style="info" %}
Currently, Wi-Fi record type creation is only available on iOS. This functionality on the Web Vault, Android and Desktop App is coming soon.
{% endhint %}

### Send a File to Keeper

When you open a file from your email for example, you seamlessly launch into the Keeper App to create a new record or add the file to an existing record.

Upon opening the file, tap the **share icon**. From the share dialogue, select **Keeper** in the list of apps.

<figure><img src="https://914511346-files.gitbook.io/~/files/v0/b/gitbook-x-prod.appspot.com/o/spaces%2F-LSGVtOTYUIkVBoYtFvK%2Fuploads%2FIeQonAcTnBO9PCvd1Glf%2Frename-this-image%20(4).png?alt=media&#x26;token=f26d82ca-f19d-456f-9482-0d11b4177a8d" alt=""><figcaption><p>File Share Dialogue</p></figcaption></figure>

Once Keeper opens, select either **Add to New Record** or **Add to Existing Record**. If you are creating a new record, the record type will automatically default to a "File Attachment" (Tap the dropdown icon to change the record type). Enter the record details and tap **Save**.

<figure><img src="https://914511346-files.gitbook.io/~/files/v0/b/gitbook-x-prod.appspot.com/o/spaces%2F-LSGVtOTYUIkVBoYtFvK%2Fuploads%2FKKOkxhc4BHsVaSMyiaI4%2Frename-this-image%20(1).png?alt=media&#x26;token=cc0e0423-2870-4708-ac3d-905027107ccf" alt=""><figcaption><p>Options to Send File to Keeper</p></figcaption></figure>

### Scan a Document (iOS 13+)

Keeper's Scan a Document feature uses optical recognitiion (OCR) to scan a picture, document, card or credentials written on paper then transcribes them in plain text with your record's "Notes" field. This makes it easier to use the text, remember notes and save time.

While viewing a record in edit mode, tap **Scan a Document** to open the camera function of your device. Once the document has been scanned, tap **Save**. You will have the option to either add the scanned document to the record as a file attachment or save it in plain text to the "Notes" field.

![Scan a Document](https://914511346-files.gitbook.io/~/files/v0/b/gitbook-x-prod.appspot.com/o/spaces%2F-LSGVtOTYUIkVBoYtFvK%2Fuploads%2FxpAjY5CClLm59xmoTuVo%2Frename-this-image%20\(3\).png?alt=media\&token=a59ab0c3-02b9-4a12-92ac-433e0aaaf767)

### Security Audit

Security Audit, located in the the left navigation menu, provides a snapshot of your vault's overall security health. A security score and actionable dashboard allow you to quickly improve your score and minimize security vulnerabilities by updating weak passwords, enabling Two-Factor Authentication and rotating reused passwords.

<figure><img src="https://914511346-files.gitbook.io/~/files/v0/b/gitbook-x-prod.appspot.com/o/spaces%2F-LSGVtOTYUIkVBoYtFvK%2Fuploads%2FgE32IwTXnCLpBFc1Abzi%2FMost%20Items%20Incomplete.png?alt=media&#x26;token=4da44c2a-01c1-4282-b3aa-c8e3c9f99339" alt="" width="200"><figcaption><p>Overall Security Score</p></figcaption></figure>

Clear password strength icons and improved sorting and filtering, help you prioritize and manage your most critical security items.

<div><figure><img src="https://914511346-files.gitbook.io/~/files/v0/b/gitbook-x-prod.appspot.com/o/spaces%2F-LSGVtOTYUIkVBoYtFvK%2Fuploads%2FloXAA2KmYegDalqQ8IG4%2FiOS%20-%20All%20Records.png?alt=media&#x26;token=fa844c73-f767-46ad-ab22-ddf7f0d16fc4" alt="" width="200"><figcaption><p>Individual Record Password Strength</p></figcaption></figure> <figure><img src="https://914511346-files.gitbook.io/~/files/v0/b/gitbook-x-prod.appspot.com/o/spaces%2F-LSGVtOTYUIkVBoYtFvK%2Fuploads%2FTAPpUllf4NEQGEP6paSW%2FiOS%20-%20Reused%20Password%20-%20Record%20Detail.png?alt=media&#x26;token=a0c52ebd-5396-476f-9857-1f87afe1c200" alt="" width="200"><figcaption><p>Reused Password Alert</p></figcaption></figure></div>

### Record History

Users also have the ability to conveniently restore previous versions of a record. While viewing a record, tap **More > Record History**.

To restore a record back to a previous state, tap on the version you would like to restore. Review the record information by tapping the "Record Information" dropdown then tap **Restore**.

![Record History](https://914511346-files.gitbook.io/~/files/v0/b/gitbook-x-prod.appspot.com/o/spaces%2F-LSGVtOTYUIkVBoYtFvK%2Fuploads%2FBPnHt2SvlGktyiRTkGgg%2Frename-this-image%20\(1\).png?alt=media\&token=e1e38a64-ceff-4d96-ac76-e1ae83b2b0a1)

A few notes on Record History:

* Restoring a record does not place it back into the original folder structure.
* Record History is only available as part of the paid consumer and business plans.
* Deleted records can be reviewed and restored by visiting "Deleted Items" in the left navigation menu.

### Notification Center

The Notification Center creates a secure, in-app hub for viewing and managing notifications. This streamlined system ensures you never miss a time-sensitive update. Types of notifications you can expect to receive include:

* **Security Alerts** - Notifies users in real-time about suspicious login attempts or changes to their account settings.
* **Access Requests** - Notifies users when someone requests access to shared files or records, enabling quick approval or denial.
* **Device Management** - Alerts users to new device logins or provides reminders to review active device sessions.
* **Record Reminders** - Notifies users about time-sensitive actions related to stored records, like expiring passwords or access keys.
* **Master Password Updates** - Reminds users to update their master password or provide notifications about password reset requests.
* **Subscription Reminders** - Informs users about upcoming subscription renewals or expired payment methods.
* **Product Updates** - Seamlessly delivers product updates without interrupting the user experience.

Tap the **bell icon** to open your Notifications Center. Quickly review and respond to actionable events such as device approvals and sharing requests with one click and further simplify your view with the "Unread" and "Requests" filters.

<div><figure><img src="https://914511346-files.gitbook.io/~/files/v0/b/gitbook-x-prod.appspot.com/o/spaces%2F-LSGVtOTYUIkVBoYtFvK%2Fuploads%2Fjr6dJdyKTOFXtZzh6ogP%2Fmy_vault_light.png?alt=media&#x26;token=49a8b357-ee13-4b0b-82b5-ba7e64535432" alt="" width="200"><figcaption><p>Open Notifications Center</p></figcaption></figure> <figure><img src="https://914511346-files.gitbook.io/~/files/v0/b/gitbook-x-prod.appspot.com/o/spaces%2F-LSGVtOTYUIkVBoYtFvK%2Fuploads%2F4TN2Yo9jbGqgtp5PEytM%2FNotifications%20(chips)%20-%20Unread.png?alt=media&#x26;token=76f95fdb-bdad-405e-bb4c-b16073b2bf9b" alt="" width="200"><figcaption><p>Filter Unread Notifications</p></figcaption></figure></div>

{% hint style="success" %}
**To learn more about the Notification Center, click** [**here**](#notification-center)**.**
{% endhint %}

### Custom Fields

Custom Fields allow you to store additional data within a record, such as the answer to a site's security question or a passport number. Any record created with one of Keeper's Record Types can be further enhanced with various custom field options.

Custom field labels can be edited and, if you are creating multiple custom fields, they can be reordered by holding and dragging them into your preferred order.

{% hint style="info" %}
To learn more about Record Types, click [here](/user-guides/record-types).
{% endhint %}

While creating or editing a record, tap **Add Custom Field**.

<figure><img src="/files/Muvzflyl6ygP1DQWggqX" alt="" width="188"><figcaption></figcaption></figure>

Select the custom field type you would like to add to the record.

<figure><img src="/files/PFdeRkIhNcTDiejPacY4" alt="" width="188"><figcaption></figcaption></figure>

Available Custom Fields:

* Text
* Email
* Name
* Pin Code
* Address (new or linked)
* Password
* Payment Card (new or linked)
* Phone Number
* Hidden Field
* Date
* URL (website address) used for Autofill
* Security Question & Answer
* Multi-line Text

Enter the field values and tap **Save** to finish.

## KeeperFill

Keeper is fully integrated into the login experience of every website and app. Once enabled, KeeperFill will help you sign into apps and website with just a few taps.

### iOS 17 and Below

#### Autofill Setup

Before you can utilize KeeperFill's autofill features, you must first complete a few setup steps.

1. Open your device's **Settings** app.
2. Scroll down and select **Passwords**.
3. Tap **Password Options** and ensure "AutoFill Passwords" is toggled on.
4. Select **Keeper** below both "Allow filling from" and "Set up Verification Codes using"
5. Follow the prompt and uncheck all other password managers (including keychain).

{% hint style="info" %}
To learn how to set up 2FA for websites and apps, click [here](#2fa-for-websites-and-apps).
{% endhint %}

<figure><img src="https://914511346-files.gitbook.io/~/files/v0/b/gitbook-x-prod.appspot.com/o/spaces%2F-LSGVtOTYUIkVBoYtFvK%2Fuploads%2F2s66ONql2eWXwp4aM21N%2Frename-this-image%20(1).png?alt=media&#x26;token=76cc7466-6055-46e7-b22d-422b7e24e2e2" alt=""><figcaption><p>Select Keeper in Password AutoFill Options</p></figcaption></figure>

#### Autofill & Two-Factor Codes

Once the above setup steps complete, you will see a **Passwords** button appear above the keyboard when logging into an app or website. By default, tapping **Passwords**, will prompt you to log in to Keeper and automatically launch KeeperFill. Please note, for security purposes, you must authenticate to Keeper each time you autofill a record on your mobile device.

{% hint style="info" %}
If you subscribe to iCloud+, you may need to tap the **key icon** to the right of "Hide My Email" to open KeeperFill.
{% endhint %}

KeeperFill will present a matching record from your vault. Alternatively, you can search for a record or create a new record. If there is a record match, tap **Fill** to autofill your login credentials.

![Passwords > Fill](https://914511346-files.gitbook.io/~/files/v0/b/gitbook-x-prod.appspot.com/o/spaces%2F-LSGVtOTYUIkVBoYtFvK%2Fuploads%2FyDRdlMPseEU7Znp3ScRm%2Frename-this-image%20\(8\).png?alt=media\&token=2c5fea12-e293-4171-b62a-74b0c42237bb)

As of iOS version 16.2, Keeper is also able to store your two-factor authentication (2FA) codes automatically by serving as your time-based one-time password (TOTP) generator.

Two-factor codes will be automatically copied to your clipboard when possible. To copy it manually, tap the **copy icon** next to the code and when prompted paste the code into the field provided.

### iOS 18 and Above

#### Autofill Setup

With the update of iOS 18, you can enable KeeperFill directly from the Keeper app in one quick step. From the **Settings** menu, tap **Enable KeeperFill** **> Turn On**.

<div><figure><img src="https://914511346-files.gitbook.io/~/files/v0/b/gitbook-x-prod.appspot.com/o/spaces%2F-LSGVtOTYUIkVBoYtFvK%2Fuploads%2F90uVQQPApwyBC4YbUzyq%2FiOS%20Settings%20-%20Autofill%20Off.png?alt=media&#x26;token=33c61c61-075d-47d6-b5c4-a2c043cd37f1" alt="" width="200"><figcaption><p>Settings Menu</p></figcaption></figure> <figure><img src="https://914511346-files.gitbook.io/~/files/v0/b/gitbook-x-prod.appspot.com/o/spaces%2F-LSGVtOTYUIkVBoYtFvK%2Fuploads%2FQxOPbFIv6VvF8Bd4fqyw%2FAutofill%20Throttle%20Messaging%20-%20settings.png?alt=media&#x26;token=6eabd39d-fbe8-463d-bf81-212daa22e594" alt="" width="200"><figcaption><p>Enable KeeperFill</p></figcaption></figure></div>

#### Autofill & Two-Factor Codes

**Primary method:** When you tap into a username or password field in any app or website, Keeper will automatically appear above the keyboard. Tap the Keeper suggestion and your credentials will be filled. Because this method uses the app's identity and/or website URL, Keeper can accurately match the best record from your vault.

After filling your credentials, if a two-factor code is required, Keeper will automatically fill it within the same workflow.

{% hint style="info" %}
Please note, this feature is dependent on the iOS autofill framework and structure of the target website or application. If there are no suggestions above the keyboard, use the secondary method.
{% endhint %}

**Secondary method:** You can also long-tap any field to bring up the context menu, then select **Autofill > Passwords** to open Keeper.

<figure><img src="https://914511346-files.gitbook.io/~/files/v0/b/gitbook-x-prod.appspot.com/o/spaces%2F-LSGVtOTYUIkVBoYtFvK%2Fuploads%2FClqTuiq4JbkgcNrCljWP%2FiOS_double%20(1).png?alt=media&#x26;token=8c45eb27-b136-4a6b-a0e7-8a1c76f6d7ab" alt=""><figcaption><p>Autofill > Passwords</p></figcaption></figure>

When Keeper opens, it will display your **favorited records** by default. Tap the search bar to see your **10 most recently viewed records**, or start typing to search your full vault. Once you find the right record, tap the field you'd like to fill. Your selection will also be copied to your clipboard.

<figure><img src="https://914511346-files.gitbook.io/~/files/v0/b/gitbook-x-prod.appspot.com/o/spaces%2F-LSGVtOTYUIkVBoYtFvK%2Fuploads%2FXxgDgiD0nxLGj85FGoTD%2FiOS_double%20(2).png?alt=media&#x26;token=e8ad14bf-338c-48e4-a5a5-aaadda3bb213" alt=""><figcaption><p>Tap to Fill</p></figcaption></figure>

{% hint style="info" %}
When filling via the context menu, Keeper does not have access to the app or website's identity, so automatic record matching is unavailable. However, this method is useful for filling information from your vault into any field.
{% endhint %}

After logging in with your username and/or password, if a two-factor code is required, Keeper will automatically fill the code within the same workflow, reducing friction during the login process.

Alternatively, when Keeper detects a TOTP field at a login page, select **Keeper** from the verification code menu that appears and authenticate to Keeper.

<figure><img src="https://914511346-files.gitbook.io/~/files/v0/b/gitbook-x-prod.appspot.com/o/spaces%2F-LSGVtOTYUIkVBoYtFvK%2Fuploads%2FSbUMfVTahAE1FizOPjXU%2FiOS_single.png?alt=media&#x26;token=06ab2d2c-cc56-4dda-bcc2-96bf90cbab1b" alt=""><figcaption><p>Select Keeper</p></figcaption></figure>

Next, select a code to fill from the list of matching records to autofill it.

<figure><img src="https://914511346-files.gitbook.io/~/files/v0/b/gitbook-x-prod.appspot.com/o/spaces%2F-LSGVtOTYUIkVBoYtFvK%2Fuploads%2FOpob5JN6APKO6Q0b5Ztw%2FiOS_double%20(3).png?alt=media&#x26;token=676399b7-f67e-4274-a8e9-5ae5dfc84927" alt=""><figcaption><p>Select a Code to Autofill</p></figcaption></figure>

## Passkeys on iOS

Passkeys on iOS devices, a highly anticipated feature for enhanced security and convenience, is now available on Apple devices running **iOS 17+**. This update marks a significant enhancement in our mobile applications capabilities, offering users an even more secure and streamlined experience. To learn more about Passkeys with Keeper, click [HERE](/user-guides/passkeys).

{% hint style="info" %}
Passkeys work on websites and applications that have been specifically built to support them. Keeper maintains a passkey directory, which can be found [HERE](https://www.keepersecurity.com/passkeys-directory/).
{% endhint %}

<figure><img src="https://914511346-files.gitbook.io/~/files/v0/b/gitbook-x-prod.appspot.com/o/spaces%2F-LSGVtOTYUIkVBoYtFvK%2Fuploads%2FFlgrAoJHPqU6quOsFGVY%2FiOS%20Passkey%20CreateUse.png?alt=media&#x26;token=073c81a1-40aa-4983-9600-9e1b0bd3f0c2" alt=""><figcaption><p>Create &#x26; Sign in with passkey</p></figcaption></figure>

* Creating a passkey for a website or app is a simple process on your iOS device.
* Tapping **Create Passkey** on a site or app will trigger Keeper to intercept the request. Keeper then prompts you to create a passkey for your associated login and saves it to your vault.
* Returning to sites or apps where you have a stored passkey you will either be prompted to sign in with passkey or will be able to select **Sign in with Passkey**. Keeper does the rest!

{% hint style="warning" %}
Passkey functionality is not enabled by default on iOS devices. To enable Passkeys with Keeper follow the steps below.
{% endhint %}

### Activating Passkeys on iOS

<figure><img src="https://914511346-files.gitbook.io/~/files/v0/b/gitbook-x-prod.appspot.com/o/spaces%2F-LSGVtOTYUIkVBoYtFvK%2Fuploads%2FE4U4IZJNelkITHweY8Sf%2FiOS%20Passkey%20Setup.png?alt=media&#x26;token=6449ab9f-7813-4269-bae3-fbc5ce89a7e8" alt=""><figcaption></figcaption></figure>

1. Launch the **Settings** app on your iOS device and select **General.**
2. Next, choose **AutoFill & Passwords**.
3. Toggle ON **AutoFill Passwords and Passkeys.**
4. Then tap **Keeper** so a blue tick appears. If you have used Autofill before, **iCloud Passwords & Keychain** may have a blue tick as well. For optimal accuracy when using Keeper for Passkeys, make sure to tap **iCloud Passwords & Keychain** to remove it as an option.

## Secure Add-Ons

### Secure File Storage

Secure File Storage protects your confidential files, photos, and videos. Securely upload and store files such as legal, tax and loan documents, videos and any other private file to your Keeper Vault.

You can either add an attachment to an existing record or create a new record. The example below utilizes the "File Attachment" record type. Tap **Attach Files, Photos & Videos** to upload an attachment. You will then be prompted to either **Take a Photo** or **Choose Existing File**.

<div align="center"><img src="https://914511346-files.gitbook.io/~/files/v0/b/gitbook-x-prod.appspot.com/o/spaces%2F-LSGVtOTYUIkVBoYtFvK%2Fuploads%2FksBTkZssIcDrAtLhCA7e%2FNew%20Record%20-%20Attachment.png?alt=media&#x26;token=12402d9a-aa62-4a5c-96b7-12eaa075071d" alt="Attach Files, Photos &#x26; Videos to a Record" width="200"> <figure><img src="https://914511346-files.gitbook.io/~/files/v0/b/gitbook-x-prod.appspot.com/o/spaces%2F-LSGVtOTYUIkVBoYtFvK%2Fuploads%2FuNOl2WPutIiITU7cW9OH%2FAttachment%20Added.png?alt=media&#x26;token=e4297878-456d-469d-996c-f778abe63b4b" alt="" width="200"><figcaption><p>Uploaded File Attachment</p></figcaption></figure></div>

#### Opening Record Attachments

Tap on the file name within a record to **View**, **Save**, or **Delete Local Copy**. Save files to your device, open them in other apps, or share them via Messages, WhatsApp, Airdrop, and more.

<div><figure><img src="https://914511346-files.gitbook.io/~/files/v0/b/gitbook-x-prod.appspot.com/o/spaces%2F-LSGVtOTYUIkVBoYtFvK%2Fuploads%2FUzFHtWxR20kU3yqilejR%2Fios1.png?alt=media&#x26;token=a52a132a-14c5-4ac7-b524-d2646a573e4b" alt="" width="200"><figcaption><p>File Attachment Options</p></figcaption></figure> <figure><img src="https://914511346-files.gitbook.io/~/files/v0/b/gitbook-x-prod.appspot.com/o/spaces%2F-LSGVtOTYUIkVBoYtFvK%2Fuploads%2FidlP7GFf7SsJrlIAONn6%2Fios2.png?alt=media&#x26;token=1fd0ce75-e4b2-45f1-bece-05f0c98ba367" alt="" width="200"><figcaption><p>Share File</p></figcaption></figure></div>

{% hint style="info" %}
To learn more about Secure File Storage, click [here](/user-guides/secure-file-storage).
{% endhint %}

### BreachWatch

BreachWatch is a powerful, secure add-on feature that monitors the internet and dark web for breached accounts matching records stored within your Keeper Vault. BreachWatch alerts you so that you can take immediate action to protect yourself against hackers. Once activated, BreachWatch continuously monitors for compromised credentials and notifies you if any of your records are at risk.

To start your BreachWatch scan, tap **BreachWatch** in the lower menu of your screen tap then **Let's Begin > Scan**.

BreachWatch will then scan your records and report any risks associated with them. Resolving the risk requires you to change the password at the affected website. Once you have done that, be sure to update the corresponding record in your Keeper vault with the same password.

If you tap **Ignore**, then that record will be skipped on future scans until the password is reset. You may also do nothing (deferring a response) and leave the risky password unchanged and thus still at risk.

![BreachWatch Scan Results](https://914511346-files.gitbook.io/~/files/v0/b/gitbook-x-prod.appspot.com/o/spaces%2F-LSGVtOTYUIkVBoYtFvK%2Fuploads%2FYZsQ9o5oITysmLtLGZ45%2Frename-this-image%20\(4\).png?alt=media\&token=af375813-81dc-4309-ad3e-c31cd9c368b3)

To learn more about BreachWatch, click [here](/user-guides/breachwatch).

## Settings

The Settings screen allows you to customize the personalization and security features of the application.

{% hint style="info" %}
Please note that some security settings may be enforced by your Keeper Administrator if you are part of a Keeper Business account.
{% endhint %}

<figure><img src="https://914511346-files.gitbook.io/~/files/v0/b/gitbook-x-prod.appspot.com/o/spaces%2F-LSGVtOTYUIkVBoYtFvK%2Fuploads%2FoehBtQrJUKtdgcF6MpIO%2Fios1.png?alt=media&#x26;token=93299de6-d1a9-4c0c-af9a-9f7ccf177c11" alt="" width="188"><figcaption><p>Settings Menu</p></figcaption></figure>

* Appearance (Dark Mode, Theme)
* Login Options (Two-Factor Authentication, Biometric Login, Stay Logged In)
* Keyboard Widget
* Clipboard Expiration
* KeeperFill
* Auto-Logout
* Default Browser
* Security (Enable Self-Destruct, Hide Passwords)
* Sort Record Types (Edit Order,
* Change Email
* Account Recovery
* Reset Master Password
* Fast Login Mode
* Image Quality

### Account Recovery

If you forget your Master Password, this feature will help you quickly regain access.

**Set up Account Recovery:**

1. Tap **Account Recovery** from the **Settings** menu.
2. Confirm your Master Password and tap **Generate New Phrase.**
3. Once your recovery phrase has been generated, be sure to store it in a safe place. For added convenience, you will be given the option to copy or download it.
4. Check the confirmation box to confirm that you've stored your Recovery Phrase.
5. Tap **Set Recovery Phrase.**

### Reset Master Password

To change your Master Password:

1. Tap **Reset Master Password**.
2. Enter your current master password.

{% hint style="info" %}
If you have Touch ID or Face ID enabled, you won't be required to enter your current master password.
{% endhint %}

3. Create and confirm a new master password.

{% hint style="danger" %}
If you are unable to login with your current master password, and you've set a recovery phrase, go to [Forgotten Master Password & Account Recovery](/user-guides/troubleshooting/reset-your-master-password#forgotten-master-password-and-account-recovery) to recover your account.
{% endhint %}

<figure><img src="https://914511346-files.gitbook.io/~/files/v0/b/gitbook-x-prod.appspot.com/o/spaces%2F-LSGVtOTYUIkVBoYtFvK%2Fuploads%2F6luIWfiPs43xNcx6uxeo%2Fimage.png?alt=media&#x26;token=2a8e02a4-712f-4595-b510-d7228f07a5f6" alt=""><figcaption><p>Reset Master Password</p></figcaption></figure>

## Two-Factor Authentication

Two-Factor authentication (2FA) provides an extra layer of security when logging into your Keeper Vault or another site or application by requiring a secondary passcode upon logging in.

{% hint style="success" %}
Enabling two-factor authentication is especially advised for highly valuable or sensitive accounts (e.g. banking, medical and social media accounts).
{% endhint %}

Keeper offers two ways to take advantage of 2FA:

* To log into your Keeper Vault.
* To log into any site or application from your Keeper Vault by embedding a TOTP (time-based one-time password) into your records.

### 2FA for Keeper Vault

To enable 2FA for your Keeper Vault, tap **Settings > Two-Factor Authentication** then select your method from the list of options.

![Enable Two-Factor Authentication](https://914511346-files.gitbook.io/~/files/v0/b/gitbook-x-prod.appspot.com/o/spaces%2F-LSGVtOTYUIkVBoYtFvK%2Fuploads%2FKdLKuD6aTqkX6ocgnJyR%2Frename-this-image%20\(6\).png?alt=media\&token=85ec687d-3aae-47e0-a254-34b311ad9346)

#### **Text Message Setup:**

(1) Select a Region (US+1 by default), enter your 10 digit phone number including your area code and tap **Save**.

(2) Select how long you want the two-factor method to be valid for.

{% hint style="info" %}
You will be prompted for 2FA every time you login to your vault unless you select an alternative duration. Business customers may be required to enter the code every login as determined by their Keeper Administrator.
{% endhint %}

(3) Enter the **code** that was sent to the phone number you provided. Codes will only last for a minute; if you need another code sent, tap **Send a new code.**

![Enter Code](https://914511346-files.gitbook.io/~/files/v0/b/gitbook-x-prod.appspot.com/o/spaces%2F-LSGVtOTYUIkVBoYtFvK%2Fuploads%2FP8UQwFmtwlxA4r5Cr3gi%2Frename-this-image%20\(21\).png?alt=media\&token=cfeca83e-0016-44c9-9a7e-1c9ebda3226f)

(4) Backup codes will be shown next. If you are unable to receive two-factor codes via the phone number you entered, you can enter one of the backup codes listed instead. Save these codes somewhere safe, and then tap **OK** to finish.

{% hint style="warning" %}
If you are not receiving SMS messages from Keeper, please use the TOTP method.
{% endhint %}

#### Authenticator App (TOTP) Setup:

(1) Once you select "Authenticator App" tap **Save**.

(2) Select how long you want the code to be valid and tap **Back**.

{% hint style="info" %}
You will be prompted for 2FA every time you login to your vault unless you select an alternative code duration. Business customers may be required to enter the code every login as determined by their Keeper Administrator.
{% endhint %}

(3) You will be asked to scan the QR Code or enter your secret key in your authenticator or TOTP app. Copy the code displayed in Keeper. Open Google or Microsoft Authenticator (or whichever app you use for 2FA) and add a TOTP record, pasting in the copied Secret Key.

(4) Return to Keeper and copy or enter the **TOTP code** provided.

(5) Backup codes will be shown next. If you are ever unable to receive Two-Factor codes, you can enter one of the codes listed instead. Tap **OK** to finish.

{% embed url="<https://vimeo.com/647810971>" %}
Enable 2FA on iOS
{% endembed %}

{% hint style="info" %}
In order for Azure MFA (using the Microsoft Authenticator app) to be utilized as a TOTP, the Azure Administrator needs to allow the verification method "Verification code from mobile app or hardware token" when setting up MFA in Azure.
{% endhint %}

#### **2FA Frequency:**

You can manage how often you are prompted to sign in on your device with your selected two-factor method at any time. Once you have set up two-factor authentication for your vault (following the steps above), the 2FA Frequency setting will be available within the "Settings" menu. Tap **2FA Frequency** and select from: every login, every 12 hours, every 24 hours, every 30 days, or don't ask again on this device.

<figure><img src="https://914511346-files.gitbook.io/~/files/v0/b/gitbook-x-prod.appspot.com/o/spaces%2F-LSGVtOTYUIkVBoYtFvK%2Fuploads%2FNEGn3VgVlfRvABcJAAEg%2FiOS%202FA%20Setting.png?alt=media&#x26;token=2fa2659b-06a1-4b03-bf80-f365c7aa4390" alt=""><figcaption><p>Choose 2FA Frequency</p></figcaption></figure>

#### **Keeper for Apple Watch**

Available for download in the [App Store](https://www.apple.com/app-store/), Keeper's smartwatch app for Apple (also known as KeeperDNA) provides users with quick access to their favorite records as well as a convenient two-factor method for logging in to your Keeper Vault.

In Keeper, navigate to **Settings > Two-Factor Authentication** and under "Authentication Method" select **Keeper for Apple Watch** then follow the prompts to verify your identity.

<div><figure><img src="https://914511346-files.gitbook.io/~/files/v0/b/gitbook-x-prod.appspot.com/o/spaces%2F-LSGVtOTYUIkVBoYtFvK%2Fuploads%2FMQXmw9pUB839ZJFdb4En%2F2fa_light.png?alt=media&#x26;token=3c91a60d-4b6d-4930-9ac5-d792392ee574" alt="" width="200"><figcaption></figcaption></figure> <figure><img src="https://914511346-files.gitbook.io/~/files/v0/b/gitbook-x-prod.appspot.com/o/spaces%2F-LSGVtOTYUIkVBoYtFvK%2Fuploads%2Fm2qyljRRpYjBATrJlq4g%2F2fa_method_light%20(1).png?alt=media&#x26;token=8bcbf8b1-4389-4b45-ac54-5dd53cfeb987" alt="" width="200"><figcaption></figcaption></figure></div>

{% hint style="info" %}
If you don't get a notification, you may not have notifications enabled for Keeper. To turn on notifications, on your phone navigate to **Settings** > **Notifications** > **Keeper** and toggle "Allow Notifications" on.
{% endhint %}

Next time you login to Keeper, you will receive a push verification request on your smartwatch to approve or deny the login attempt.

<div><figure><img src="https://914511346-files.gitbook.io/~/files/v0/b/gitbook-x-prod.appspot.com/o/spaces%2F-LSGVtOTYUIkVBoYtFvK%2Fuploads%2Ft767HXuVV0V4zMIog0CN%2FVerification%20Request%20(1).png?alt=media&#x26;token=b3c97252-baec-49e9-b936-c0ce91dfcc9e" alt="" width="126"><figcaption><p>Login Verification Request</p></figcaption></figure> <figure><img src="https://914511346-files.gitbook.io/~/files/v0/b/gitbook-x-prod.appspot.com/o/spaces%2F-LSGVtOTYUIkVBoYtFvK%2Fuploads%2F6hNNVtsGIXHTT9LKWxYb%2FApproved.png?alt=media&#x26;token=86ca6500-1180-4e44-a632-deea61a9c1ef" alt="" width="126"><figcaption><p>Request Verified</p></figcaption></figure></div>

Alternatively, you can enter the time-based verification code from the Keeper Apple Watch app home screen. This is especially useful in cases where the Keeper Push notification times out.

<figure><img src="https://914511346-files.gitbook.io/~/files/v0/b/gitbook-x-prod.appspot.com/o/spaces%2F-LSGVtOTYUIkVBoYtFvK%2Fuploads%2F3R3NPYJbCfubgMQvOkm6%2FVerification%20Code%20(1).png?alt=media&#x26;token=2217bf97-86e9-4eb5-8d74-db879645a324" alt="" width="126"><figcaption><p>Verification Code</p></figcaption></figure>

### **2FA for Websites & Apps**

Keeper can fill 2FA codes on any website or application that supports time-based one-time passwords (TOTP). Keeper supports the following methods to add two-factor codes to records.

* Automatically Import a Setup Code
* Enter Secret Key
* Scan QR Code (requires a second device)
* Upload QR Code

Continue reading to review these four setup methods in more detail.

**Automatically Import a Setup Code**

{% hint style="warning" %}
Be sure to first set Keeper as your default password manager in your device's Settings. Learn how [here](#keeperfill).
{% endhint %}

1. For apps that allow an automatic import of the setup code into Keeper, follow the app or website setup steps prompting you to link a compatible authentication app to the account.
2. Keeper will automatically open and log in as normal.
3. Select whether to add the two-factor code to a new or existing record (if you choose existing record, select if from your records list or locate it using the search bar).

<figure><img src="https://914511346-files.gitbook.io/~/files/v0/b/gitbook-x-prod.appspot.com/o/spaces%2F-LSGVtOTYUIkVBoYtFvK%2Fuploads%2FvsypnKu7gUMHO6hxQW6r%2FAdd-code.png?alt=media&#x26;token=af40bc42-75af-40d6-b286-11dd62404048" alt="" width="200"><figcaption><p>Add Two-Factor Code to Record</p></figcaption></figure>

3. You will see the code has been added to the record. Tap **Save** and return to the record to copy the code to your clipboard.

<figure><img src="https://914511346-files.gitbook.io/~/files/v0/b/gitbook-x-prod.appspot.com/o/spaces%2F-LSGVtOTYUIkVBoYtFvK%2Fuploads%2FjRjP5aahops2oOwf37zP%2FAutofill.png?alt=media&#x26;token=1634c7ff-ef9e-43c4-bcef-233172fafa02" alt="" width="200"><figcaption><p>Copy 2FA Code</p></figcaption></figure>

4. Return to the app/site to paste the code to complete the setup.

#### Enter a Secret Key

1. For apps that provide a secret setup key to paste into Keeper, begin by copying the key to your device’s clipboard.
2. Switch to the Keeper app and log in. Open the corresponding record and tap **Edit >** **Add Two-Factor Code**.
3. Select **Enter Secret Key** and paste the key into the field provided and tap **OK**.

<div><figure><img src="https://914511346-files.gitbook.io/~/files/v0/b/gitbook-x-prod.appspot.com/o/spaces%2F-LSGVtOTYUIkVBoYtFvK%2Fuploads%2Fu10as0ruupeBmjkhUTGv%2FTwo-Factor%20Menu.png?alt=media&#x26;token=0263bb48-3ae5-4108-9628-3050eb59be9e" alt="" width="188"><figcaption><p>Enter Secret Key</p></figcaption></figure> <figure><img src="https://914511346-files.gitbook.io/~/files/v0/b/gitbook-x-prod.appspot.com/o/spaces%2F-LSGVtOTYUIkVBoYtFvK%2Fuploads%2FCA2nsWB7SuYaTpIeFzJn%2FSetup%20Key%20Input%20Dialog%20-%20Filled%20(1).png?alt=media&#x26;token=2a44f043-b03e-46a6-a9e3-f6b883237cb1" alt="" width="188"><figcaption><p>Paste Secret Key</p></figcaption></figure></div>

4. You will see the code has been added to the record. Tap **Save** and then tap the code to copy it to your clipboard.

<figure><img src="https://914511346-files.gitbook.io/~/files/v0/b/gitbook-x-prod.appspot.com/o/spaces%2F-LSGVtOTYUIkVBoYtFvK%2Fuploads%2FR0J0yEewFqj5ey0EIhN9%2FRecord%20Edit%20-%20Two-Factor%20Code%20Added.png?alt=media&#x26;token=82322970-5c19-4752-a766-78a70bcef863" alt="" width="188"><figcaption><p>2FA Code Added to Record</p></figcaption></figure>

5. Return to the app/site to paste the code to complete the setup.

#### Scan QR Code

1. Open the Keeper record on your mobile device and tap **Edit >** **Add Two-Factor Code > Scan QR Code** (this will open your device's camera).

<figure><img src="https://914511346-files.gitbook.io/~/files/v0/b/gitbook-x-prod.appspot.com/o/spaces%2F-LSGVtOTYUIkVBoYtFvK%2Fuploads%2Fu10as0ruupeBmjkhUTGv%2FTwo-Factor%20Menu.png?alt=media&#x26;token=0263bb48-3ae5-4108-9628-3050eb59be9e" alt="" width="188"><figcaption><p>Scan QR Code</p></figcaption></figure>

2. On a secondary device (e.g. tablet, computer), navigate to the corresponding record's 2FA set up screen to retrieve the site's QR code.
3. Scan the QR code with your mobile device.

<figure><img src="https://914511346-files.gitbook.io/~/files/v0/b/gitbook-x-prod.appspot.com/o/spaces%2F-LSGVtOTYUIkVBoYtFvK%2Fuploads%2FVjexL91KmdEr56dWyQai%2FScan%20UI.png?alt=media&#x26;token=e7dfd2c8-bcca-4eb9-9ef6-68a3adaa1555" alt="" width="200"><figcaption><p>Scan QR Code</p></figcaption></figure>

4. You will see the code has been added to the record. Tap **Save** and then tap the code to copy it to your clipboard.

<figure><img src="https://914511346-files.gitbook.io/~/files/v0/b/gitbook-x-prod.appspot.com/o/spaces%2F-LSGVtOTYUIkVBoYtFvK%2Fuploads%2FGv5UbmUGR2LierVhO1cW%2FRecord%20Edit%20-%20Two-Factor%20Code%20Added.png?alt=media&#x26;token=e8be572e-3f9a-43f4-9281-a1f0115a9682" alt="" width="188"><figcaption><p>2FA Code Added to Record</p></figcaption></figure>

5. Return to the app/site to paste the code to complete the setup.

#### Upload QR Code

1. For apps that provide a QR code to upload to Keeper, begin by saving the provided QR code image to your device's camera roll.
2. Open the corresponding Keeper record on your mobile device and tap **Edit >** **Add Two-Factor Code > Upload QR Code** and allow access to your photo(s).

<figure><img src="https://914511346-files.gitbook.io/~/files/v0/b/gitbook-x-prod.appspot.com/o/spaces%2F-LSGVtOTYUIkVBoYtFvK%2Fuploads%2Fu10as0ruupeBmjkhUTGv%2FTwo-Factor%20Menu.png?alt=media&#x26;token=0263bb48-3ae5-4108-9628-3050eb59be9e" alt="" width="188"><figcaption><p>Upload QR Code</p></figcaption></figure>

3. Select the QR code image from your camera roll.

<figure><img src="https://914511346-files.gitbook.io/~/files/v0/b/gitbook-x-prod.appspot.com/o/spaces%2F-LSGVtOTYUIkVBoYtFvK%2Fuploads%2FIOlHj22uaI03LUPUbSmM%2FSelect%20File.png?alt=media&#x26;token=464fe10c-37a9-481d-af4e-48bed85b38a1" alt="" width="200"><figcaption><p>Select Image of QR Code</p></figcaption></figure>

4. You will see the code has been added to the record.

<figure><img src="https://914511346-files.gitbook.io/~/files/v0/b/gitbook-x-prod.appspot.com/o/spaces%2F-LSGVtOTYUIkVBoYtFvK%2Fuploads%2FGv5UbmUGR2LierVhO1cW%2FRecord%20Edit%20-%20Two-Factor%20Code%20Added.png?alt=media&#x26;token=e8be572e-3f9a-43f4-9281-a1f0115a9682" alt="" width="188"><figcaption><p>2FA Code Added to Record</p></figcaption></figure>

5. Tap **Save** and then tap the code to copy it to your clipboard.
6. **Return to the app/site to paste the code to complete the setup.**

{% hint style="info" %}
For more information about storing two-factor codes in Keeper, [click here](/user-guides/tips-and-tricks/protecting-totp-codes).
{% endhint %}

## Siri Shortcuts

Keeper is integrated with Siri Shortcuts and supports the following voice command variations:

Begin each phrase with "Hey Siri..."

**Make a Keeper Record**

* Make a Keeper record
* Make a Keeper password
* Keeper record
* New Keeper record
* Make a record in Keeper
* Create a Keeper record
* Create a Keeper password
* Create a record in Keeper
* Add Keeper record
* Add a Keeper password
* Add a record in Keeper

**Display Keeper Verification Codes**

* Display Keeper verification codes
* Show me Keeper verification codes
* Show me my Keeper verification codes
* Display Keeper authentication codes
* Launch Keeper verification codes
* Launch Keeper authentication codes
* Open Keeper verification codes
* Open Keeper TOTP codes
* Open Keeper TOTP
* Launch Keeper TOTP codes
* Launch Keeper TOTP
* Display Keeper TOTP codes
* Display Keeper TOTP
* Show me my Keeper TOTP codes
* Show me my Keeper TOTP

**Display Keeper Shared Records**

* Display Keeper shared records
* Display my Keeper shared records
* Launch Keeper shared records
* Launch my Keeper shared records
* Show me my Keeper shared records
* Open Keeper shared records
* Open my Keeper shared records

{% hint style="info" %}
You must be logged into Keeper to use the shortcuts (otherwise Siri will prompt you to login). Currently, Siri Shortcuts are only available in English.
{% endhint %}

To view the shortcuts currently available for Keeper, from the **Account** screen tap **shortcuts**.

<figure><img src="https://914511346-files.gitbook.io/~/files/v0/b/gitbook-x-prod.appspot.com/o/spaces%2F-LSGVtOTYUIkVBoYtFvK%2Fuploads%2FGN1tzSZHWWnpyt43ZW48%2Frename-this-image%20(12).png?alt=media&#x26;token=c1785404-3cb8-4d72-86d4-3244483f43f6" alt=""><figcaption><p>Keeper Shortcuts</p></figcaption></figure>

## Biometric Login

Both Touch and Face ID must be set up in your device's settings before they can be used to login into Keeper. Once that is complete, from Keeper's **Settings** screen, toggle "Biometric Login" on.

You can now log into Keeper with your fingerprint using Touch ID or with face recognition using Face ID. Tap on the **Touch ID** or **Face ID** **symbol** to initiate biometric login.

{% hint style="info" %}
Biometric login such as Touch and Face ID on iOS are a time saving & convenience feature and are not a replacement for two-factor authentication.
{% endhint %}

![Biometric Login](https://914511346-files.gitbook.io/~/files/v0/b/gitbook-x-prod.appspot.com/o/spaces%2F-LSGVtOTYUIkVBoYtFvK%2Fuploads%2FegsTpDFnoPSFaVvhvXOg%2Frename-this-image%20\(14\).png?alt=media\&token=4e5278f1-2597-4efc-bed6-4e78bb73bec2)

{% hint style="info" %}
Upon your first login, Keeper will ask you if you want to use Face ID to login. If you decline this feature, you can re-enable it under your device's **Settings > Keeper** and toggle **Face ID** on.
{% endhint %}

## Keeper Widget

The Keeper widget provides an account security overview that is displayed on your device's home screen. To add Keeper's iOS widget to your home screen, follow the steps below:

(1) In Keeper, tap **Settings** then toggle "Enable Keeper Widget" on.

![Enable Keeper Widget](https://914511346-files.gitbook.io/~/files/v0/b/gitbook-x-prod.appspot.com/o/spaces%2F-LSGVtOTYUIkVBoYtFvK%2Fuploads%2FOXRTFoGFwuCW1asdA66f%2Frename-this-image%20\(15\).png?alt=media\&token=465e38f9-019c-4820-9aa8-750536995090)

(2) From your device's home screen, press and hold on any empty area until the apps icons move.

(3) Tap the **"+" add icon** from the upper left corner of your screen.

(4) Select or search for the Keeper widget.

(5) Choose a size by swiping through the three options and tap **Add Widget**.

(6) Tap **Done**.

<figure><img src="https://914511346-files.gitbook.io/~/files/v0/b/gitbook-x-prod.appspot.com/o/spaces%2F-LSGVtOTYUIkVBoYtFvK%2Fuploads%2FQLaPMSCsrCgtFrQjN3Ay%2Frename-this-image%20(79).png?alt=media&#x26;token=5511da4d-be31-4e31-b786-e310c15e5473" alt=""><figcaption><p>Keeper iOS Widget</p></figcaption></figure>

## FIDO2 WebAuthn Security Keys

Keeper now supports a wider range of hardware security keys on iOS through Apple’s security key framework. This allows for seamless two-factor authentication (2FA) with various compatible devices.

**Supported Keys:**

Keeper is compatible with any hardware security key that is supported by Apple's security key framework, including a wide range of FIDO2-compliant devices. This includes:

* NFC-compatible keys
* USB-C keys
* Lightning-compatible keys

For a complete list of certified keys from the FIDO Alliance, visit the [FIDO Certified Showcase](https://fidoalliance.org/fido-certified-showcase/).

<figure><img src="https://914511346-files.gitbook.io/~/files/v0/b/gitbook-x-prod.appspot.com/o/spaces%2F-LSGVtOTYUIkVBoYtFvK%2Fuploads%2FcczGPyuB0pjK8ZT6D54D%2FiOS%20Security%20Key%20Visual%201.png?alt=media&#x26;token=8a0e918c-2182-49e9-a4d6-ad0c20bf2b68" alt=""><figcaption></figcaption></figure>

{% hint style="info" %}
Ensure you are using the latest version of Keeper on iOS for optimal compatibility and performance.
{% endhint %}

### **Setup and Configuration**

(1) Before you add a security key, a two-factor authentication method must be in place as a backup.

(2) Navigate to **Settings > Two-Factor Authentication**, tap the field under "Security Keys".

(3) Tap **Add New** and enter a name for the key.

(4) Select a duration and tap **Register**.

(5) Choose your security key activation method: **NFC** or **Insert and Touch**, depending on the type of key.

(5) Tap the key on the back of your device or touch the sensor on your hardware key.

(6) Your security key has been registered, tap **OK** to finish.

A user can register up to 5 security keys. Any one of those keys will unlock the account. To delete a security key, swipe left on the registered key in the "Security Key" page and tap **Delete**.

***

<figure><img src="https://914511346-files.gitbook.io/~/files/v0/b/gitbook-x-prod.appspot.com/o/spaces%2F-LSGVtOTYUIkVBoYtFvK%2Fuploads%2Ff4R5L6UhUMDvo0nO9V0V%2FiOS%20Security%20Key%20Visual%201%20(1).png?alt=media&#x26;token=6f07521c-20c8-47ef-95d4-00eaaa5bf72f" alt=""><figcaption><p>Register FIDO Security Key for 2FA</p></figcaption></figure>

### **Prompt Frequency & Offline Access**

The FIDO2 WebAuthn device will be required for login based on the configuration of the *first* 2FA method. For example:

* If the first 2FA method is set to "Prompt Every Login", then your hardware key will be required on every login, and offline login will be *disabled*.
* If the first 2FA method is set to "Every 30 days", then your hardware key will be required every 30 days, and offline login will be *disabled*.
* If the first 2FA method is set to "Remember Forever", then your hardware key will only be required one time on each new device. Offline vault login will be *enabled*.

### Known Issues with Hardware Keys on iOS

If you're encountering issues with hardware security keys on your iOS device, such as problems with PINs, autofill, or NFC key support, you may be experiencing one of the following known issues:

* [**YubiKey FIDO PIN Loop**](/user-guides/troubleshooting/hardware-security-keys-on-mobile#yubikey-fido-pin-loop): Users with certain YubiKeys may experience repeated PIN prompts, even after entering the correct PIN.
* [**Long-Tap Autofill Compatibility**](/user-guides/troubleshooting/hardware-security-keys-on-mobile#long-tap-autofill-and-hardware-security-keys): The new long-tap autofill feature in iOS 18+ does not work with accounts secured by hardware security keys.
* [**NFC Key Support**](/user-guides/troubleshooting/hardware-security-keys-on-mobile#can-i-use-nfc-hardware-keys-on-ios-devices): NFC hardware keys are supported on iOS devices, but NFC functionality does **not** work on iPads.

For more detailed information & troubleshooting, please refer to our [Hardware Key Troubleshooting Guide](/user-guides/troubleshooting/hardware-security-keys-on-mobile).

## Account Switching

Have more than one Keeper account? Keeper supports the use of multiple vaults on the same device and makes it easy to seamlessly switch between your personal and business accounts without having to log out of your current session.

To switch accounts, **Account** at the bottom of your screen next tap the **dropdown menu icon** to the right of your email address.

Select the account you would like to switch to or tap **Add Account** to register another account on that device.

<div><figure><img src="https://914511346-files.gitbook.io/~/files/v0/b/gitbook-x-prod.appspot.com/o/spaces%2F-LSGVtOTYUIkVBoYtFvK%2Fuploads%2FoZaPDoV8LziSNX2dWpWr%2FVault%20-%20Account%20switched.png?alt=media&#x26;token=9f15a201-43aa-4cd7-8b7a-43bb445497b7" alt="" width="200"><figcaption><p>Account Menu</p></figcaption></figure> <figure><img src="https://914511346-files.gitbook.io/~/files/v0/b/gitbook-x-prod.appspot.com/o/spaces%2F-LSGVtOTYUIkVBoYtFvK%2Fuploads%2F49144LkyhiojTtgTHwXM%2FAccount%20-%20Account%20Menu%20(1).png?alt=media&#x26;token=dbc245b1-3da7-4d9a-92a7-e47f44bddb09" alt="" width="200"><figcaption><p>Account Switch/Add</p></figcaption></figure></div>

{% hint style="info" %}
Quick account switching only works for active sessions where you've already logged in.
{% endhint %}

Easily remove unwanted accounts from the device by swiping left on an account email then tapping the **remove icon**.

<figure><img src="https://914511346-files.gitbook.io/~/files/v0/b/gitbook-x-prod.appspot.com/o/spaces%2F-LSGVtOTYUIkVBoYtFvK%2Fuploads%2F74bsxIknn6wJsvIR0aY7%2FRemove%20Account%20(2).png?alt=media&#x26;token=bf430886-2e37-43d1-a66c-7723e53b07ec" alt="" width="200"><figcaption><p>Remove Account from Device</p></figcaption></figure>

{% hint style="info" %}
You can also switch and add accounts from the Keeper login screen.
{% endhint %}

## Session Management

Session Management allows you to view and manage all device sessions connected to your account. From this interface, you can see detailed information for each registered device, such as the model name, operating system and last log in time.

From the **Account** tab, select **Manage Sessions**. Here you can view all existing session; active sessions are marked with a green status indicator.

<div><figure><img src="/files/JElL88Mv4UV7ITWDfjKr" alt=""><figcaption></figcaption></figure> <figure><img src="/files/V4fO8wmSi3SMSPFuBrvp" alt=""><figcaption></figcaption></figure> <figure><img src="/files/mOYiC2LqEIgpomPwlgBm" alt=""><figcaption></figcaption></figure></div>

You now have the power to remotely **lock** sessions, **log out** of active sessions, or completely **remove** old or inactive sessions to keep your vault secure.

You can *unlock* a previously locked session from another registered device.

<div><figure><img src="/files/u4taxXUfZQnb1bRnvKGl" alt=""><figcaption><p>Lock Session</p></figcaption></figure> <figure><img src="/files/4HqgJyGuwDMiRoTUzVLH" alt=""><figcaption><p>Log Out Session</p></figcaption></figure> <figure><img src="/files/214oom5BxMevxWpDDOAS" alt=""><figcaption><p>Remove Session</p></figcaption></figure></div>

## 2FA Prompting Behavior & Offline Access

When 2FA is activated on an account, it protects the user on all devices and all platforms because 2FA is protecting access to the backend cloud system.

By definition, two-factor authentication protects access to the cloud and access to online accounts. Therefore, it requires an online connection to be prompted for 2FA. 2FA is triggered when a request is made from the client device to the server. Logging into a new device, syncing new information on an existing device or performing any other cloud-based features.

By default, the native Keeper app for iOS, Android, Mac and Windows allow users to login quickly with their master password (offline mode) to access their vault. After entering their master password or using Biometric Login, the user decrypts the data locally, then the app sends a sync request to the server at which time the user may be prompted for their 2FA code. Depending on the speed of the Internet connection, the 2FA prompt may be received a couple seconds after logging into the native application because the local decryption of data occurs much faster.

Offline authentication and vault access is permitted by all consumer customers. Enterprise customers may restrict the use of offline access for their employees.

## 2FA Token Retention & Timing

When activating 2FA on your iOS device for the first time, the user selects how often they want to be prompted. Users can be prompted for 2FA every login, once every 30 days or only one time per device. It's important to understand that 2FA is always enabled on the Keeper servers. After a successful login on a device, a "token" is generated from the 2FA code and stored locally on the device as long as it's deemed valid by the server. This is why you are still able to login to the same device over and over without being re-prompted. By default, consumer customers will be prompted only one time per device. Enterprise customers may enforce users to be prompted every time for a new code.

Currently, the 2FA token retention timing on iOS will default to "only one time" on a device if the 2FA was initially set up on the Web Vault or Desktop App. To change this behavior, turn 2FA off and then re-activate 2FA on the iOS device.

## Debug Logging

Enable Debug Logging to capture logs and send error reports to Keeper's Support Team. This will make it easier to troubleshoot issues without requiring a special application build. Once enabled, debug logs can be viewed, shared and deleted.

<figure><img src="https://914511346-files.gitbook.io/~/files/v0/b/gitbook-x-prod.appspot.com/o/spaces%2F-LSGVtOTYUIkVBoYtFvK%2Fuploads%2FEgSR82CEEjdnJ7IoZMWK%2FTap%20Debug%20Logging.png?alt=media&#x26;token=e7305f37-410d-4fe9-9f3c-8e1701a29911" alt="" width="200"><figcaption><p>Account > Help > Debug Logging</p></figcaption></figure>

{% hint style="warning" %}
Once debug logging is enabled, please completely close and relaunch the app. Then, reproduce the bug or error you are experiencing to capture it in the logs.
{% endhint %}

Once enabled, you can access your logs different ways depending on what issue you are experiencing.

* To view your overall app log, open the left navigation menu and tap **Debug Logs**.
* To view a record specific log, open the record, tap the **info icon** and select **Record Logs**.
* If you are having trouble logging into Keeper, tap **Need Help?** from the login screen and select **Debug Logs**.

<div><figure><img src="https://914511346-files.gitbook.io/~/files/v0/b/gitbook-x-prod.appspot.com/o/spaces%2F-LSGVtOTYUIkVBoYtFvK%2Fuploads%2FuEbw9QNhXKUldFBbZ3iY%2FDebug%20Logs%20-%20Added%20to%20left%20menu.png?alt=media&#x26;token=4790619f-6830-448f-b52b-7c10497761a6" alt="" width="200"><figcaption><p>From Main Menu</p></figcaption></figure> <figure><img src="https://914511346-files.gitbook.io/~/files/v0/b/gitbook-x-prod.appspot.com/o/spaces%2F-LSGVtOTYUIkVBoYtFvK%2Fuploads%2FB6eFwsCxF8LdMpWfgBj6%2FRecord%20Detail%20Menu.png?alt=media&#x26;token=1f6ca300-bc52-4890-a7c1-7f1bee0935c3" alt="" width="200"><figcaption><p>From Record Detail</p></figcaption></figure> <figure><img src="https://914511346-files.gitbook.io/~/files/v0/b/gitbook-x-prod.appspot.com/o/spaces%2F-LSGVtOTYUIkVBoYtFvK%2Fuploads%2F8Uepz7uheq6PA3J9UMa0%2Flogin%20help%20menu%20-%20Debug%20logs%20added.png?alt=media&#x26;token=c74cb825-5547-4c07-9107-f3c5dbd1de02" alt="" width="200"><figcaption><p>From Login Screen</p></figcaption></figure></div>

{% hint style="info" %}
For optimal app performance, we recommend enabling Debug Logging only *temporarily* when needed.
{% endhint %}

## Import & Export

#### Importing Passwords

**iOS Version 26+**

If you are running iOS version 26 or higher, you can import your passwords, passkeys and two-factor codes directly into Keeper from Apple Passwords or another supported password manager.

{% hint style="info" %}
*The export always begins in the app you are importing from, and the exact steps may differ by app.*
{% endhint %}

To begin, open the password manager you want to import from and start its export. In most apps this is found in the app's settings or toolbar menu under an option such as **Export** or **Export Data to Another App**.

<div><figure><img src="/files/KBgK8sTJLxYGiFnNpySx" alt="" width="188"><figcaption></figcaption></figure> <figure><img src="/files/9htPac4tCpFynSpTE6rH" alt="" width="188"><figcaption></figcaption></figure></div>

Select the logins you would like to export and tap **Continue**. When prompted to choose a destination, select **Keeper** from the list of compatible apps and continue into Keeper.

<div><figure><img src="/files/pBvswQdhZfGe0R4UmhhS" alt="" width="188"><figcaption></figcaption></figure> <figure><img src="/files/hLKOkRujrn81r3ce2UvV" alt="" width="188"><figcaption></figcaption></figure> <figure><img src="/files/5qgHLv9g87die1ZvdVs9" alt="" width="188"><figcaption></figcaption></figure></div>

Once you've authenticated to Keeper, you will see the **Import Records** confirmation asking to import the records into Keeper. Tap **Import** to continue.

<div><figure><img src="/files/XE91wK249alUViTz35zz" alt="" width="200"><figcaption></figcaption></figure> <figure><img src="/files/k3ck0wyAU6Ku392WyzFx" alt="" width="200"><figcaption></figcaption></figure></div>

When the import is complete, your records are saved to a new Keeper folder named after the app you imported from (for example, "Apple Passwords" or "1Password"). Tap **Open Folder** to view them right away.

<figure><img src="/files/LNrJCdjmoUJ4F2BtuX0q" alt="" width="200"><figcaption></figcaption></figure>

**iOS 18 and Below**

Importing passwords is not available on the iOS app for versions 18 and below. Please use the Keeper Web Vault or Desktop App on a desktop computer to import your passwords.

For detailed instructions on importing passwords from web browsers and other password managers to your Keeper Web Vault, click [here](/user-guides/import-records-1/import-overview).

#### Exporting Passwords

To export data from your Keeper Vault, visit the Keeper [Web Vault](/user-guides/web-vault) or download [Keeper Desktop](https://www.keepersecurity.com/download.html?t=d) for your computer.

## Uninstall & Account Reset

#### **Uninstall Keeper:**

{% hint style="danger" %}
Uninstalling Keeper will delete the data from Keeper on the local device. Data stored in Keeper's Cloud Security Vault is NOT erased.
{% endhint %}

![Uninstall Keeper](https://914511346-files.gitbook.io/~/files/v0/b/gitbook-x-prod.appspot.com/o/spaces%2F-LSGVtOTYUIkVBoYtFvK%2Fuploads%2FCa1Nltt0EnNH6wOOTmtb%2Frename-this-image%20\(19\).png?alt=media\&token=399ec03a-5192-47b7-8c2d-203c2d5b0ecb)

1. On your device, long press on the **Keeper App icon**.
2. Tap **Remove App** **>** **Delete** **App > Delete**. (For older iOS systems, long press on the Keeper App icon until all the apps start to shake. Tap the "**X**" that appears in the upper left corner of the Keeper App icon. To confirm, tap **Delete**).

#### **Account Reset:**

{% hint style="danger" %}
Resetting Keeper will erase all records from all Keeper accounts stored locally on your device. Data stored on Keeper's Cloud Security Vault is NOT erased.
{% endhint %}

From Keeper's Vault Login screen

1. Select **Need Help?** > **Reset Keeper**
2. Tap **Reset Keeper** again to confirm

<figure><img src="https://914511346-files.gitbook.io/~/files/v0/b/gitbook-x-prod.appspot.com/o/spaces%2F-LSGVtOTYUIkVBoYtFvK%2Fuploads%2F43smpzSMUplvs35GU0K4%2FNeed%20Help%20menu.png?alt=media&#x26;token=9d0f3b04-e08e-4391-978d-c1799e7f6dcd" alt="" width="200"><figcaption><p>Need Help? > Reset Keeper</p></figcaption></figure>

You can also reset Keeper from your device's Settings menu.

1. Open your device's **Settings** app, scroll down and select **Apps > Keeper**.
2. Toggle "Reset Keeper" on.

![Reset Keeper](https://914511346-files.gitbook.io/~/files/v0/b/gitbook-x-prod.appspot.com/o/spaces%2F-LSGVtOTYUIkVBoYtFvK%2Fuploads%2FxVG5yz0N6olU1sUVuFM9%2Frename-this-image%20\(20\).png?alt=media\&token=f773cd76-a1f0-483d-a58f-2ea4338b84c8)

## Helpful Links

Customer Support Form: <https://keepersecurity.com/support.html>

Business Customers: <business.support@keepersecurity.com>

System Status: <https://statuspage.keeper.io>


# Autofill & Passkey Setup for iOS

Setup guide for Keeper's autofill & passkey features, KeeperFill for Apple iOS (iPhone, iPad) devices.

## Overview

Keeper is fully integrated into the login experience of every website and app using the **Passwords** button that appears above your device's keyboard.

Autofill supports the following features:

* Passwords
* Two-Factor (TOTP) codes
* Passkeys

{% embed url="<https://vimeo.com/585568801>" %}
KeeperFill iOS Overview
{% endembed %}

## Setup

### iOS 18 and Above

With the update of iOS 18, you can enable KeeperFill directly from the Keeper app in one quick step. From the **Settings** menu, tap **Enable KeeperFill** **> Turn On**.

<div><figure><img src="https://914511346-files.gitbook.io/~/files/v0/b/gitbook-x-prod.appspot.com/o/spaces%2F-LSGVtOTYUIkVBoYtFvK%2Fuploads%2F90uVQQPApwyBC4YbUzyq%2FiOS%20Settings%20-%20Autofill%20Off.png?alt=media&#x26;token=33c61c61-075d-47d6-b5c4-a2c043cd37f1" alt="" width="200"><figcaption><p>Settings Menu</p></figcaption></figure> <figure><img src="https://914511346-files.gitbook.io/~/files/v0/b/gitbook-x-prod.appspot.com/o/spaces%2F-LSGVtOTYUIkVBoYtFvK%2Fuploads%2FQxOPbFIv6VvF8Bd4fqyw%2FAutofill%20Throttle%20Messaging%20-%20settings.png?alt=media&#x26;token=6eabd39d-fbe8-463d-bf81-212daa22e594" alt="" width="200"><figcaption><p>Enable KeeperFill</p></figcaption></figure></div>

### iOS 17 and Below

Before you can utilize KeeperFill's autofill features, you will first need to perform a few simple setup steps:

1. Open your device's **Settings** app.
2. Scroll down and select **Passwords**.
3. Tap **Password Options** and ensure "AutoFill Passwords" is toggled on.
4. Select **Keeper** below both "Allow filling from" and "Set up Verification Codes using"
5. Follow the prompt and uncheck all other password managers (including keychain).

<figure><img src="https://914511346-files.gitbook.io/~/files/v0/b/gitbook-x-prod.appspot.com/o/spaces%2F-LSGVtOTYUIkVBoYtFvK%2Fuploads%2FB0sui3rtmX3dHT8Ri8Yv%2Fspaces_-LSGVtOTYUIkVBoYtFvK_uploads_2s66ONql2eWXwp4aM21N_rename-this-image%20(1).webp?alt=media&#x26;token=4e714048-81be-433b-87e6-4f5e5cfc29a5" alt=""><figcaption><p>Keeper Selected in Password AutoFill Options</p></figcaption></figure>

{% hint style="info" %}
To learn how to set up 2FA for websites and apps, click [here](/user-guides/ios#2fa-for-websites-and-apps).
{% endhint %}

## Autofill

Once the setup steps are complete, you will see a **Passwords** button appear above the keyboard when logging into an app or website. Tapping **Passwords** will launch KeeperFill.

{% hint style="info" %}
If you subscribe to iCloud+, you may need to tap the **key icon** to the right of "Hide My Email" to open KeeperFill.
{% endhint %}

KeeperFill will present a matching record from your vault. Alternatively, you can search for a record or create a new record. If there is a record match, tap **Fill** to autofill your login credentials.

Two-factor codes will be automatically copied to your clipboard when possible. To copy a code manually, tap the **copy icon** next to the code and when prompted paste the code into the field provided.

<figure><img src="https://914511346-files.gitbook.io/~/files/v0/b/gitbook-x-prod.appspot.com/o/spaces%2F-LSGVtOTYUIkVBoYtFvK%2Fuploads%2FaJbpKtZBQKZQJoaHLv65%2Fspaces_-LSGVtOTYUIkVBoYtFvK_uploads_yDRdlMPseEU7Znp3ScRm_rename-this-image%20(8).webp?alt=media&#x26;token=8b8d1164-25b0-4d47-91b6-548f815617bb" alt=""><figcaption><p>Passwords > Fill</p></figcaption></figure>

## Passkey Setup

{% hint style="info" %}
Passkey Setup follows the same steps as turning on autofill however, the settings page on your device running **iOS17+** will have updated verbiage to reflect the latest options.
{% endhint %}

* Launch the **Settings** app on your iOS device and select **Passwords.**
* Next, choose **Password Options**.
* Toggle ON **AutoFill Passwords and Passkeys.**
* Then tap **Keeper** so a blue tick appears. If you have used Autofill before, **iCloud Passwords & Keychain** may have a blue tick as well. For optimal accuracy when using Keeper for Passkeys, make sure to tap **iCloud Passwords & Keychain** to remove it as an option.

<figure><img src="https://914511346-files.gitbook.io/~/files/v0/b/gitbook-x-prod.appspot.com/o/spaces%2F-LSGVtOTYUIkVBoYtFvK%2Fuploads%2FE4U4IZJNelkITHweY8Sf%2FiOS%20Passkey%20Setup.png?alt=media&#x26;token=6449ab9f-7813-4269-bae3-fbc5ce89a7e8" alt=""><figcaption><p>Enable Passkeys on iOS</p></figcaption></figure>

## Passkeys

Once the setup steps are complete, websites or applications that support passkeys will either prompt you to create a passkey or will provide a setting in your account section to setup a passkey login.

* Creating a passkey for a website or app is a simple process on your iOS device.
* Tapping **Create Passkey** on a site or app will trigger Keeper to intercept the request. Keeper then prompts you to create a passkey for your associated login and saves it to your vault.
* Returning to sites or apps where you have a stored passkey you will either be prompted to sign in with passkey or will be able to select **Sign in with Passkey**. Keeper does the rest!

<figure><img src="https://914511346-files.gitbook.io/~/files/v0/b/gitbook-x-prod.appspot.com/o/spaces%2F-LSGVtOTYUIkVBoYtFvK%2Fuploads%2FFlgrAoJHPqU6quOsFGVY%2FiOS%20Passkey%20CreateUse.png?alt=media&#x26;token=073c81a1-40aa-4983-9600-9e1b0bd3f0c2" alt=""><figcaption><p>Create &#x26; Sign in with passkey.</p></figcaption></figure>


# Android Phone & Tablet

Comprehensive guide for Keeper on Android phones and tablets.

## Your Keeper Vault

With Keeper, your passwords, logins and other personal information are saved in a private, digital vault. It is here where you can view and edit all of your website login credentials and details, as well as store important files and photos.

<div><figure><img src="https://914511346-files.gitbook.io/~/files/v0/b/gitbook-x-prod.appspot.com/o/spaces%2F-LSGVtOTYUIkVBoYtFvK%2Fuploads%2FWizqTxNUZc9KbH5ZiWMF%2FSide%20Menu.png?alt=media&#x26;token=9d1347db-d2dd-4058-9d92-e032d84d152f" alt="" width="188"><figcaption><p>Left Menu</p></figcaption></figure> <figure><img src="https://914511346-files.gitbook.io/~/files/v0/b/gitbook-x-prod.appspot.com/o/spaces%2F-LSGVtOTYUIkVBoYtFvK%2Fuploads%2FLvCkxP2zSvr5XJzgtkFH%2FMy%20Vault.png?alt=media&#x26;token=8d14289e-abcd-4c13-a459-cc7e19ac7d6e" alt="" width="188"><figcaption><p>My Vault</p></figcaption></figure></div>

## Account Creation & Login

Signing up for Keeper's Android mobile app is easy. Simply visit the [Google Play Store](https://play.google.com/store/apps/details?id=com.callpod.android_apps.keeper) on your device and install the **Keeper Password Manager.** Watch the video below to learn more about account creation and login.

{% embed url="<https://vimeo.com/585561067>" %}
Account Creation and Login
{% endembed %}

#### New Users

To create your Keeper account, first enter your email address then you will be asked to create and confirm a **Master Password** which will be the only password you have to remember. We recommend that you choose a strong Master Password that is only used for Keeper — don't forget your Master Password!

To finalize your account and proceed to your vault, you will be asked to enter the security **verification code** that was sent to your email.

{% hint style="info" %}
Enterprise users who log in with SSO do not require selection of a Master Password.
{% endhint %}

<div><img src="https://914511346-files.gitbook.io/~/files/v0/b/gitbook-x-prod.appspot.com/o/spaces%2F-LSGVtOTYUIkVBoYtFvK%2Fuploads%2F1bxzN5n6m3y4uwGg5MlK%2Fwelcome.png?alt=media&#x26;token=a536b418-5e83-4e8d-aacf-693a9c4c8581" alt="Welcome to Keeper" width="188"> <figure><img src="https://914511346-files.gitbook.io/~/files/v0/b/gitbook-x-prod.appspot.com/o/spaces%2F-LSGVtOTYUIkVBoYtFvK%2Fuploads%2FnMvVcZMEkgCo1yeWMBIq%2Fcreate_account.png?alt=media&#x26;token=0c7f00c7-d05c-4b58-b2a7-7531a196f57b" alt="" width="188"><figcaption><p>Create Account</p></figcaption></figure></div>

#### Existing Users <a href="#existing-users" id="existing-users"></a>

If you are an existing user, tap **Login** and enter your email address. If you are attempting to log in on an unrecognized device, a device approval must take place before you can proceed to your Keeper Vault. Users have three methods of approval to choose from:

* Email Verification
* Keeper Push
* Two-Factor Method

Keeper Push is Keeper’s proprietary notification-based device approval system that sends a push notification to an existing, recognized device.

If you select **Send Keeper Push**, a notification (push) will appear in your Keeper Vault in an alternate, approved device or browser.

<img src="https://914511346-files.gitbook.io/~/files/v0/b/gitbook-x-prod.appspot.com/o/spaces%2F-LSGVtOTYUIkVBoYtFvK%2Fuploads%2FUf4jcoavhbesJpi91MTY%2FApprove%20Device.png?alt=media&#x26;token=16e17d25-92ce-459c-aeb6-3472c32a3b3f" alt="Send Keeper Push for Device Approval" width="188">

On the alternate device, log in to Keeper and tap **Yes** to approve the new device. You must be actively logged in on an approved device to receive the notification.

![Device Approval Request in Web Vault](https://914511346-files.gitbook.io/~/files/v0/b/gitbook-x-prod.appspot.com/o/spaces%2F-LSGVtOTYUIkVBoYtFvK%2Fuploads%2FMMEkJE9hFuyyy0yodjO7%2FPush%20Notification.jpeg?alt=media\&token=b68c763d-4040-48e0-b5e7-e1688e383e26)

Once your device has been approved, you will be prompted for 2FA (if enabled) and asked to enter your master password to proceed to your vault.

## Enterprise SSO Login <a href="#enterprise-sso-login" id="enterprise-sso-login"></a>

If you are an Enterprise customer using SSO Login, you can enter your email address and tap **Next** to login through SSO. Alternatively, you can tap **Use Enterprise SSO Login** and enter the enterprise domain provided by your Keeper administrator and tap **Connect**.

<div><img src="https://914511346-files.gitbook.io/~/files/v0/b/gitbook-x-prod.appspot.com/o/spaces%2F-LSGVtOTYUIkVBoYtFvK%2Fuploads%2Fd7lBRpBagafdgsgOUNSc%2Flogin%20(9).png?alt=media&#x26;token=99ce91a0-81d3-4220-bcbf-a76eca6f2abb" alt="Enterprise SSO Login" width="188"> <figure><img src="https://914511346-files.gitbook.io/~/files/v0/b/gitbook-x-prod.appspot.com/o/spaces%2F-LSGVtOTYUIkVBoYtFvK%2Fuploads%2FzLAPbonqVHuwdEBtcOlR%2Fsso_login.png?alt=media&#x26;token=746e9203-e135-4d32-8be8-589a698c3b48" alt="" width="188"><figcaption><p>Enter Your Enterprise Domain</p></figcaption></figure></div>

Next, you will be directed to the Safari browser for web-based SSO Enterprise authentication. After you have successfully entered your SSO credentials and two-factor authentication code (if enabled), you will be returned to Keeper to complete the login. You may be required to approve your device using Keeper Push or administrator approval after the SSO login process has been completed.

{% hint style="info" %}
For more information about Enterprise SSO login, click [here](/user-guides/enterprise-end-user-setup-sso#create-your-keeper-account).
{% endhint %}

## Importing Passwords

When you first log in to your vault, Keeper will prompt you with two options: **Import Passwords** or **Later**. If you choose **Import Passwords**, you can import directly from Google via a CSV file upload.

Importing from other password managers is still supported via the Keeper Web Vault. If you're not near a desktop computer, you can select **Later** to perform the import at a later time using the Keeper Web Vault. Password Import is always available from the left menu.

<figure><img src="https://914511346-files.gitbook.io/~/files/v0/b/gitbook-x-prod.appspot.com/o/spaces%2F-LSGVtOTYUIkVBoYtFvK%2Fuploads%2FtPzhFgNp9hFx0XhWZNZx%2FSide%20Menu.png?alt=media&#x26;token=aab02dc1-9758-44b7-ad59-dbe73cd51ae1" alt="" width="188"><figcaption><p>Import Passwords</p></figcaption></figure>

### Import from Google

<div><figure><img src="https://914511346-files.gitbook.io/~/files/v0/b/gitbook-x-prod.appspot.com/o/spaces%2F-LSGVtOTYUIkVBoYtFvK%2Fuploads%2FpeeV3YXq5SrcgkKtol4j%2FLeft%20Menu.png?alt=media&#x26;token=8541512b-7661-4852-8704-c559aa8d448c" alt="" width="188"><figcaption><p>Left Menu > Import Passwords</p></figcaption></figure> <figure><img src="https://914511346-files.gitbook.io/~/files/v0/b/gitbook-x-prod.appspot.com/o/spaces%2F-LSGVtOTYUIkVBoYtFvK%2Fuploads%2FTv1LJDUxQi5DfxJGyWCQ%2FGoogle%20import.png?alt=media&#x26;token=c757c642-cdef-4b4b-825b-d42c020d732c" alt="" width="188"><figcaption><p>Import from Google</p></figcaption></figure></div>

1. **Open the Keeper App**: Launch the Keeper app on your Android device.
2. **Access the Menu**: Tap on the **Hamburger Menu** (three horizontal lines) in the top-left corner.
3. **Select Import Passwords**: From the menu, choose **Import Passwords**.
4. **Choose Import Source**: In the import options, select **Import from Google**.
5. **Export Passwords**: You will be redirected to **passwords.google.com/options**. Here, select **Export passwords**. -- *If you have multiple Google accounts, make sure to confirm you are logged into the proper account.*
6. **Confirm Export**: An **Export Passwords Dialog** will appear. Tap on **Export** to begin downloading your passwords CSV file.
7. **Download Confirmation**: Once the file is downloaded, you will see a confirmation message letting you know your file has been saved to your device.
8. **Select the Downloaded File**:
   * The download confirmation prompt has an "Open" option, clicking this will display the "Open With:" dialog at the bottom of your screen, select Keeper to continue importing from your CSV.
   * If using the back button: Choose **Upload a CSV** in the Keeper app to locate and select your downloaded file.
   * You can also navigate to the file manager: Locate the exported CSV file and select it to open with the Keeper app. This will take you directly to the **Selected File** screen.
9. **Import in Progress:** Keeper will display a screen showing the progress of the import and encryption of your passwords.
10. **Import Complete:** A notification in your Vault will be displayed letting you know how many passwords have been successfully imported.

<div><figure><img src="https://914511346-files.gitbook.io/~/files/v0/b/gitbook-x-prod.appspot.com/o/spaces%2F-LSGVtOTYUIkVBoYtFvK%2Fuploads%2FZJH8ypPi4mhznqCeOjEX%2Fimport%20in%20progress.png?alt=media&#x26;token=76346d5a-ff01-4f9b-98b4-6ffd77de7ac5" alt="" width="188"><figcaption><p>Import in Progress</p></figcaption></figure> <figure><img src="https://914511346-files.gitbook.io/~/files/v0/b/gitbook-x-prod.appspot.com/o/spaces%2F-LSGVtOTYUIkVBoYtFvK%2Fuploads%2FaozNDLhUkKK3rFr927qk%2Frecords%20imported.png?alt=media&#x26;token=20963f71-d9db-4d0e-b0f8-5d1516ed3f86" alt="" width="188"><figcaption><p>Passwords Imported</p></figcaption></figure></div>

### Import from a CSV File

If you already have your Google Password CSV file on your Android device:

1. **Open the Keeper App**: Launch the Keeper app on your device.
2. **Select Import Passwords**: Go to the **Hamburger Menu** and choose **Import Passwords**.
3. **Choose CSV Import**: When prompted, select the **Upload CSV File** option. This will open the Files app, filtering to show only CSV files.
4. **Select the CSV File**: Browse through your files and select the desired CSV file for import.
5. **Import in Progress:** Keeper will display a screen showing the progress of the import and encryption of your passwords.
6. **Import Complete:** A notification in your Vault will be displayed letting you know how many passwords have been successfully imported.

<div><figure><img src="https://914511346-files.gitbook.io/~/files/v0/b/gitbook-x-prod.appspot.com/o/spaces%2F-LSGVtOTYUIkVBoYtFvK%2Fuploads%2Fzhfqd2ZecwvTkMxfzVsz%2FGoogle%20import%20-%20file%20selected.png?alt=media&#x26;token=2f284407-a8e8-4d18-8507-80dbfd9f652c" alt="" width="188"><figcaption><p>Import from Google</p></figcaption></figure> <figure><img src="https://914511346-files.gitbook.io/~/files/v0/b/gitbook-x-prod.appspot.com/o/spaces%2F-LSGVtOTYUIkVBoYtFvK%2Fuploads%2FsejzIzgXHiEuRBQMHONq%2Frecords%20imported%20(1).png?alt=media&#x26;token=8fab17c8-5813-4187-b490-119dbde5d67c" alt="" width="188"><figcaption><p>Passwords Imported</p></figcaption></figure></div>

{% hint style="info" %}
Keeper on Android directly supports importing from Google Password Manager via CSV file. While CSV files from other sources *may* work, their compatibility can vary based on formatting—only Google’s export is guaranteed to function seamlessly.
{% endhint %}

### Import from Other Password Managers

If you're importing from another password manager:

* Keeper will ask you to navigate to [keepersecurity.com/setup](https://keepersecurity.com/setup) on your desktop computer to begin the process of importing your passwords.
* For detailed instructions on importing passwords from web browsers and other password managers to your Keeper Web Vault, click [here](/user-guides/web-vault#importing-passwords).

## Creating New Records

Your passwords, logins, credit card numbers, bank accounts and other personal information are saved in your private digital vault (as "Records") and are encrypted on your device using 256-bit AES.

Tap the **create icon (+)** select **Create New Record**.

<div><figure><img src="https://914511346-files.gitbook.io/~/files/v0/b/gitbook-x-prod.appspot.com/o/spaces%2F-LSGVtOTYUIkVBoYtFvK%2Fuploads%2FMvTqMuzlKm5vaOdSoGkO%2FMy%20Vault.png?alt=media&#x26;token=62ca77e5-6768-4012-80ed-70c19257eb65" alt="" width="188"><figcaption><p>Create from My Vault Screen</p></figcaption></figure> <figure><img src="https://914511346-files.gitbook.io/~/files/v0/b/gitbook-x-prod.appspot.com/o/spaces%2F-LSGVtOTYUIkVBoYtFvK%2Fuploads%2FdbSdv3IfycXh8tixGwjl%2FFAB%20Menu.png?alt=media&#x26;token=dcc7f591-ea10-4623-97a0-00d9ecf5329a" alt="" width="188"><figcaption><p>Create New Record</p></figcaption></figure></div>

* Enter a Title for the record
* Choose a [Record Type](/user-guides/record-types) from the dropdown menu ("Login" is the default type). Depending on the record type you select, the default record fields will vary.
* Enter the Username
* Enter the Password or tap the **dice icon** to generate one (more on that [here](/user-guides/web-vault#password-generator))
* Enter the Website Address (if one wasn't already entered for you)
* Enter Notes, add [Files & Photos](/user-guides/web-vault#secure-file-storage), a [Two-Factor Code](/user-guides/web-vault#two-factor-codes-for-totp) and [Custom Fields](/user-guides/web-vault#custom-fields)
* Tap **Save** to finish

<div><img src="https://914511346-files.gitbook.io/~/files/v0/b/gitbook-x-prod.appspot.com/o/spaces%2F-LSGVtOTYUIkVBoYtFvK%2Fuploads%2FXlJ9BQ66ETBIVqvXkSyW%2FRecord%20Edit%20Actions%20-%20Default.png?alt=media&#x26;token=97f62b15-2780-43bd-aa93-eba87027d975" alt="Record Creation" width="188"> <figure><img src="https://914511346-files.gitbook.io/~/files/v0/b/gitbook-x-prod.appspot.com/o/spaces%2F-LSGVtOTYUIkVBoYtFvK%2Fuploads%2FHEEJ5MEUXmBbdw3jA2nY%2FLogin%20(1).png?alt=media&#x26;token=57320f6b-82e8-4d3b-80cb-a4a36fe0b015" alt="" width="188"><figcaption><p>Record Saved</p></figcaption></figure></div>

{% embed url="<https://vimeo.com/585569056>" %}
Records
{% endembed %}

## Organization <a href="#creating-folders-and-subfolders" id="creating-folders-and-subfolders"></a>

With Keeper you can organize your records into folders and subfolders. To create a folder, tap **the create icon (+)** and select **Create New Folder**, then enter a name for the folder.

To add records to the folder, Tap **+** and **Add Existing Record** or you can tap **Create New Record** to add a new record to the folder. To create a subfolder within the folder, tap **+** and **Create New Folder**.

<div><figure><img src="/files/JjtoxVNTmptcUrStRN3k" alt="" width="188"><figcaption><p>Create from My Vault Screen</p></figcaption></figure> <figure><img src="/files/iEdDBqhr8Z1l777te3ad" alt="" width="188"><figcaption><p>Create New Folder</p></figcaption></figure> <figure><img src="/files/6mzpiUXEaTtuflCYU6X5" alt="" width="188"><figcaption><p>Add Records to a Folder</p></figcaption></figure></div>

<figure><img src="/files/Aj6qEfr35QSNt8jVT07W" alt="" width="188"><figcaption><p>Add Existing Record(s) to a Folder</p></figcaption></figure>

{% embed url="<https://vimeo.com/585566607>" %}
Folders
{% endembed %}

{% hint style="info" %}
Please note, once created, regular folders cannot be converted to a shared folder. To learn how to create a shared folder, click [here](#share-a-folder).
{% endhint %}

### Moving & Shortcuts

Keeper makes it easy to move records around within your vault. Individual or multiple records and folders can be moved and shortcuts can be created. Shortcuts, like alias files, can exist in two or more places and when edited, change together.

To move or shortcut a folder, record or multiples thereof, long press on the record or folder and select any additional folder(s) or record(s) you would like to move or shortcut. Next, select the action you would like to perform by selecting an icon located in the upper right corner of your screen. The options include:

* Create a Shortcut
* Move to a New Folder
* Move to an Existing Folder
* Change the record(s) "Type"
* Delete

<div><figure><img src="https://914511346-files.gitbook.io/~/files/v0/b/gitbook-x-prod.appspot.com/o/spaces%2F-LSGVtOTYUIkVBoYtFvK%2Fuploads%2F6vvILnIqIbzJLs6VIfJq%2FMulti%20Select.png?alt=media&#x26;token=0143874a-7ac9-48bb-9f66-213b2a2313f0" alt="" width="188"><figcaption><p>Shortcut, Move and More</p></figcaption></figure> <figure><img src="https://914511346-files.gitbook.io/~/files/v0/b/gitbook-x-prod.appspot.com/o/spaces%2F-LSGVtOTYUIkVBoYtFvK%2Fuploads%2F4FpCUlaXR6Yv9rSKIFjY%2FMulti%20Select.png?alt=media&#x26;token=e8463492-be83-4189-ab68-34e3a3150f44" alt="" width="188"><figcaption><p>Move, Change Type and Delete</p></figcaption></figure></div>

You can select **Create Shortcut, Create Duplicate,** or **Move** a record from the **Options** menu within the record detail screen.

<img src="https://914511346-files.gitbook.io/~/files/v0/b/gitbook-x-prod.appspot.com/o/spaces%2F-LSGVtOTYUIkVBoYtFvK%2Fuploads%2Fzgpwu6IItGSHCwifIXGq%2FTap%20Create%20Duplicate.png?alt=media&#x26;token=7aa55aa9-266a-4d4c-a4b1-e5438cf7ce84" alt="Shortcut, Duplicate or Move a Record" width="188">

### Favorites

Adding a record to your Favorites list is an easy way to locate your most frequently used records and websites. You can add a record to your vault Favorites or [Watch Favorites (for Wear OS)](#keeper-for-wear-os) from the **Options** menu within the record detail screen.

<img src="https://914511346-files.gitbook.io/~/files/v0/b/gitbook-x-prod.appspot.com/o/spaces%2F-LSGVtOTYUIkVBoYtFvK%2Fuploads%2FxzR47fK7iTaOWJHBpfSW%2FLogin%20(4).png?alt=media&#x26;token=0644a8ec-c78c-49a9-adff-32b97dae6667" alt="Add to Favorites" width="188">

## Sharing

Securely create, share and manage records and folders with other Keeper users such as friends, family, friends and colleagues.

{% embed url="<https://vimeo.com/585566830>" %}
Sharing
{% endembed %}

### Share a Record

Open the record you would like to share and tap **Share > Share with User**. Enter the user's email address, then use the toggle switches to select permissions (Can Edit, Can Share, Make Owner) then tap the **checkmark** **icon** to save.

If this is the first time you are sharing with this person, you will first need to establish a "sharing relationship". The user will receive an email prompting them to login to Keeper and either accept or deny the share request. Once you establish a sharing relationship, the user will appear in the email dropdown list.

<div><figure><img src="https://914511346-files.gitbook.io/~/files/v0/b/gitbook-x-prod.appspot.com/o/spaces%2F-LSGVtOTYUIkVBoYtFvK%2Fuploads%2Fr8YTi70Loub0EvuVo4xs%2FLogin%20(6).png?alt=media&#x26;token=7dc6f940-db71-422b-86eb-b471439faf5a" alt="" width="188"><figcaption><p>Share a Record</p></figcaption></figure> <figure><img src="https://914511346-files.gitbook.io/~/files/v0/b/gitbook-x-prod.appspot.com/o/spaces%2F-LSGVtOTYUIkVBoYtFvK%2Fuploads%2F1jj7TRdwvIgNFGKq6xeU%2FRecord%20Share.png?alt=media&#x26;token=13d38e9d-30a9-45de-a5b6-7fa699dbf0d9" alt="" width="188"><figcaption><p>Recipient's Email and Permissions</p></figcaption></figure></div>

### One-Time Share <a href="#one-time-share" id="one-time-share"></a>

Keeper's One-Time Share feature provides time-limited secure sharing of a record with anyone even if they don't have a Keeper account. One-Time Share is the most secure way to send confidential information to a friend, family member or co-worker without exposing information over email, text message or messaging. Access is time-limited, viewable on one device only and read only.

Open a record then tap **Share > One-Time Share > Create Share Link**.

<div><figure><img src="/files/VyKm3r0AqCngTDvJM9r1" alt="" width="188"><figcaption><p>Share > One-Time Share Link</p></figcaption></figure> <figure><img src="/files/k11TxN2vAWd86msxpxZ0" alt="" width="188"><figcaption><p>Create Share Link</p></figcaption></figure></div>

2. Tap the **share icon** in the lower right corner of your screen.
3. Select a record access expiration from the provided options or select a custom date and time.
4. Once the share link has been created, tap **Share**, **Copy Link** (to paste into a message) or the recipient can scan the provided QR code to view the record. When the recipient of the share link opens the record, it will open in their web browser and will be bound to their device. The record access will automatically expire after the set amount of time.

<figure><img src="/files/8Q2G7tjqDDPCwaFCWazh" alt="" width="188"><figcaption><p>Expiration &#x26; Bidirectional Sharing<br>Options</p></figcaption></figure>

Once the share link has been created, tap **Share** or **Copy Link** (to paste into a message); additionally, the recipient can scan the provided QR code to view the record.

<figure><img src="/files/GvcDNYC7JeD7yqTRBBwb" alt="" width="188"><figcaption><p>Share or Copy Link</p></figcaption></figure>

{% hint style="info" %}
Click [here](/user-guides/sharing/one-time-share) for more information on Keeper's One-Time Share feature.
{% endhint %}

### Share a Folder

{% hint style="info" %}
This guide covers Keeper's "Classic" Folder System, if you would like more information about our new Nested Share System, click [here](/user-guides/sharing/nested-shared-subfolders).
{% endhint %}

Shared folders allow you to share multiple records at once with others and new records can be added to the folder as needed.

#### Create a Shared Folder & Share with Others

1. Tap the **create icon (+)** and select **Create Shared Folder**.

<div><figure><img src="https://914511346-files.gitbook.io/~/files/v0/b/gitbook-x-prod.appspot.com/o/spaces%2F-LSGVtOTYUIkVBoYtFvK%2Fuploads%2FB0vf4aiVORjFyIlwBRcU%2FMy%20Vault.png?alt=media&#x26;token=497275e2-3d10-4103-b6b3-0bdd341d48fe" alt="" width="188"><figcaption><p>Create from My Vault Screen</p></figcaption></figure> <figure><img src="https://914511346-files.gitbook.io/~/files/v0/b/gitbook-x-prod.appspot.com/o/spaces%2F-LSGVtOTYUIkVBoYtFvK%2Fuploads%2FLy6ilbVGLohGX2EfODWw%2FFAB%20Menu.png?alt=media&#x26;token=770b886b-c489-488d-a05b-a91150e65b00" alt="" width="188"><figcaption><p>Create a Shared Folder</p></figcaption></figure></div>

2. Enter a name for the folder and tap **Save**.
3. Tap the **options icon** in the upper right corner of your screen and select **Manage Users & Records**.

<figure><img src="https://914511346-files.gitbook.io/~/files/v0/b/gitbook-x-prod.appspot.com/o/spaces%2F-LSGVtOTYUIkVBoYtFvK%2Fuploads%2FfZXtQmsnGltYNzTOZrsU%2FShared%20Folder%20Overflow%20Menu.png?alt=media&#x26;token=a8e94e0c-c838-4cff-b9f5-9b557acbea5c" alt="" width="188"><figcaption><p>Manage Users &#x26; Records</p></figcaption></figure>

4. Tap **Add Users** and enter the **email addresses of the user(s)** (or Team name for Enterprise users) you would like to share the folder with and tap the **checkmark** to save.
5. You can assign permissions for each user by tapping on their email address under the "Users" tab (Can Manage Users, Can Manage Records).

<div><figure><img src="https://914511346-files.gitbook.io/~/files/v0/b/gitbook-x-prod.appspot.com/o/spaces%2F-LSGVtOTYUIkVBoYtFvK%2Fuploads%2FWXy8o59NPleL3jMbweQz%2FUsers.png?alt=media&#x26;token=d015e6b0-93bf-4a94-adcf-e704588ccad3" alt="" width="188"><figcaption><p>Share Folder with Other Users</p></figcaption></figure> <figure><img src="https://914511346-files.gitbook.io/~/files/v0/b/gitbook-x-prod.appspot.com/o/spaces%2F-LSGVtOTYUIkVBoYtFvK%2Fuploads%2Fcdt3VffsZDGdVIZ0O9BJ%2FAdd%20Users.png?alt=media&#x26;token=e9441ea0-cabd-4556-9724-14a1265cfe32" alt="" width="188"><figcaption><p>Enter User Email(s)</p></figcaption></figure></div>

#### Add Records

1. To add records to the folder, switch to the "Records" tab and tap **Add Records**.

<figure><img src="https://914511346-files.gitbook.io/~/files/v0/b/gitbook-x-prod.appspot.com/o/spaces%2F-LSGVtOTYUIkVBoYtFvK%2Fuploads%2FDuLYOJZq0uiabdYkOg9R%2FRecords.png?alt=media&#x26;token=7da0af23-50ca-460a-a673-6fcc05eac779" alt="" width="188"><figcaption><p>Add Records to a Shared Folder</p></figcaption></figure>

2. Select the record(s) you would like to add to the shared folder and tap the **checkmark icon** to save.

<figure><img src="https://914511346-files.gitbook.io/~/files/v0/b/gitbook-x-prod.appspot.com/o/spaces%2F-LSGVtOTYUIkVBoYtFvK%2Fuploads%2FdaV2dio8xekS4IcdXWi8%2FAdd%20records.png?alt=media&#x26;token=ec148af4-da5f-4d41-87f3-8c37d05a0bed" alt="" width="188"><figcaption><p>Record Selection</p></figcaption></figure>

3. Once a record has been added, select it from the list to assign permissions (Can Edit, Can Share).

<figure><img src="https://914511346-files.gitbook.io/~/files/v0/b/gitbook-x-prod.appspot.com/o/spaces%2F-LSGVtOTYUIkVBoYtFvK%2Fuploads%2FPR8XLWdgkJeT0nXutgxY%2FRecord%20Permissions.png?alt=media&#x26;token=6bd8f25a-0859-414a-b1d4-39f189aa1a2f" alt="" width="188"><figcaption><p>Assign Record Permissions</p></figcaption></figure>

## Identity & Payments

Identity & Payments is the place for you to store your personal contact/address information and credit card numbers safely.

Payment cards can also be stored in your vault as records using the "Payment Card" record type which allows them to be shared with other users. See our [Record Types](/user-guides/record-types) Guide for more information.<br>

<div><img src="https://914511346-files.gitbook.io/~/files/v0/b/gitbook-x-prod.appspot.com/o/spaces%2F-LSGVtOTYUIkVBoYtFvK%2Fuploads%2FSXfTSfQ5oP2j79mZVz87%2FLeft%20Menu%20(1).png?alt=media&#x26;token=2fd1e7cd-4950-4d3d-be26-db79a2bee10a" alt="Left Menu > Identity &#x26; Payments" width="188"> <figure><img src="https://914511346-files.gitbook.io/~/files/v0/b/gitbook-x-prod.appspot.com/o/spaces%2F-LSGVtOTYUIkVBoYtFvK%2Fuploads%2F6bXkfqm5aHEmeB1MRNaC%2FIdentity%20%26%20Payments.png?alt=media&#x26;token=9c5f4aa6-8a68-410e-abdf-f218b23baced" alt="" width="188"><figcaption><p>Personal Info &#x26; Payment Cards</p></figcaption></figure></div>

## Key Features

### Password & Passphrase Generators

Long, random passwords that are created for each account help protect your information and reduce your exposure to data breaches. Alternatively, by combining multiple words, *passphrases* are an even more secure alternative to traditional passwords.

Keeper's password generator can create and securely store strong, random passwords or passphrases for all of your sites and apps.

**Generate a Password**

To begin, tap the **dice icon** within a new or existing record. You can customize your password by character length (8-99 characters) and choose to include lowercase and uppercase letters, numbers and symbols.

Check the box at the bottom of your screen if you'd like to make your selections the default setting for all passwords moving forward. Tap **Use Password** to update the record or **Copy Password** to copy it to your device's clipboard.

<div><figure><img src="https://914511346-files.gitbook.io/~/files/v0/b/gitbook-x-prod.appspot.com/o/spaces%2F-LSGVtOTYUIkVBoYtFvK%2Fuploads%2FzgChnFmbQoTPT8ulAmME%2FRecord%20Edit.png?alt=media&#x26;token=b85bba35-4902-4877-b78f-7a2257d9d148" alt="" width="188"><figcaption></figcaption></figure> <figure><img src="https://914511346-files.gitbook.io/~/files/v0/b/gitbook-x-prod.appspot.com/o/spaces%2F-LSGVtOTYUIkVBoYtFvK%2Fuploads%2FvbNXpM0i0wEdxbCuFyIM%2FPassword.png?alt=media&#x26;token=23436350-933a-4965-be81-8bae15a37d6b" alt="" width="188"><figcaption></figcaption></figure></div>

#### Generate a Passphrase

Tap the **dice** **icon** and from the dropdown menu next to "Type" and select **Passphrase**.

You can customize your passphrase by setting the length, including capital letters and numbers in the passphrase and choosing from various symbols to separate the words.

Passphrases can be up to 20 words long, with a minimum length of 5 words and each word including at least 3 characters.

Check the box at the bottom of your screen if you'd like to make your selections the default setting for all passphrases moving forward. Tap **Use Passphrase** to update the record or **Copy Passphrase** to copy it to your device's clipboard.

<div><figure><img src="https://914511346-files.gitbook.io/~/files/v0/b/gitbook-x-prod.appspot.com/o/spaces%2F-LSGVtOTYUIkVBoYtFvK%2Fuploads%2FIE9Or0ztMqGYg1V7U1zx%2Ftype%20menu.png?alt=media&#x26;token=04b92a1e-46d2-4ef8-82e8-2736af905335" alt="" width="188"><figcaption></figcaption></figure> <figure><img src="https://914511346-files.gitbook.io/~/files/v0/b/gitbook-x-prod.appspot.com/o/spaces%2F-LSGVtOTYUIkVBoYtFvK%2Fuploads%2FNDIxY6NJStwhn8ivNsP4%2FPassphrase.png?alt=media&#x26;token=a1a7ee14-0a47-4dd8-8a37-5fdeb2a907c9" alt="" width="188"><figcaption></figcaption></figure></div>

{% hint style="warning" %}
This will NOT automatically change the website's existing login password. You must still visit the corresponding website's "Change Password" form to update the old password to match the new, stronger password. Click [here ](/user-guides/tips-and-tricks/password-changing-with-keeperfill)to learn how to easily change your password with KeeperFill.
{% endhint %}

To generate a password or passphrase from your vault home screen, tap the yellow **create icon (+)**&#x61;nd select **Generate Password**. Select either password or passphrase next to "Type". You can either use the password/passphrase to create a new record or copy it to your device’s clipboard to use elsewhere.

<div><figure><img src="https://914511346-files.gitbook.io/~/files/v0/b/gitbook-x-prod.appspot.com/o/spaces%2F-LSGVtOTYUIkVBoYtFvK%2Fuploads%2FzFWo36jjbSQav7d03joF%2FMy%20Vault.png?alt=media&#x26;token=81deab6e-4781-470d-a33e-00d9c485507b" alt="" width="188"><figcaption><p>Create from My Vault</p></figcaption></figure> <figure><img src="https://914511346-files.gitbook.io/~/files/v0/b/gitbook-x-prod.appspot.com/o/spaces%2F-LSGVtOTYUIkVBoYtFvK%2Fuploads%2F58dowrRZekdBCOoV5wQD%2FFAB%20Menu.png?alt=media&#x26;token=0fffe7eb-5d33-40be-a7d6-769b9919ca26" alt="" width="188"><figcaption><p>Generate Password/Passphrase</p></figcaption></figure></div>

#### Generator History

To view your password/passphrase history, tap **Generate Password** from either your vault home screen or create one within a record and tap the **clock icon**. You can delete your generator history at any time by tapping on the **trash icon**.

<div><figure><img src="https://914511346-files.gitbook.io/~/files/v0/b/gitbook-x-prod.appspot.com/o/spaces%2F-LSGVtOTYUIkVBoYtFvK%2Fuploads%2FhGFLj566qOKA6HupLYDT%2FPassword%20Generator.png?alt=media&#x26;token=55878dee-6724-4eea-bca3-a5c36a6dcf50" alt="" width="188"><figcaption><p>Select Generator History</p></figcaption></figure> <figure><img src="https://914511346-files.gitbook.io/~/files/v0/b/gitbook-x-prod.appspot.com/o/spaces%2F-LSGVtOTYUIkVBoYtFvK%2Fuploads%2FOou17ZARhjIQgHczkWGG%2FGenerator%20history.png?alt=media&#x26;token=ca3c48b3-d184-40f6-a2d1-65c0058b3040" alt="" width="188"><figcaption><p>Generator History</p></figcaption></figure></div>

#### Password Zoom

To produce a zoomed-in view of a record's password or passphrase, tap the **eye icon** then long press on the **password field**. An enlarged view of your password/passphrase will appear at the bottom of the screen. Any numbers and symbols can be easily identified by blue and red color-coding.

<div><figure><img src="https://914511346-files.gitbook.io/~/files/v0/b/gitbook-x-prod.appspot.com/o/spaces%2F-LSGVtOTYUIkVBoYtFvK%2Fuploads%2FvwAuYFLf9khVamRRZ5LA%2FRecord%20Detail%20-%20Long%20hold%20visible%20password.png?alt=media&#x26;token=11a5ffd7-bbd3-4861-896f-f0bcad59c451" alt="" width="188"><figcaption><p>Long Press on Password Field</p></figcaption></figure> <figure><img src="https://914511346-files.gitbook.io/~/files/v0/b/gitbook-x-prod.appspot.com/o/spaces%2F-LSGVtOTYUIkVBoYtFvK%2Fuploads%2FEZlOGtG6gdFiUW2UYryY%2FPassword%20Zoom.png?alt=media&#x26;token=2a1f9a33-1515-4ff4-9ad7-8e9b02488500" alt="" width="188"><figcaption><p>Password Zoom</p></figcaption></figure></div>

#### Password Enforcement Policies (Business/Enterprise Users)

The password generator on end-user vaults will adhere to the minimum character length, minimum number of lowercase/uppercase/numbers/symbols and allowed list of symbols as defined by your Keeper Administrator.

The passphrase generator on end-user vaults is enabled by default, but can be disabled by your admin. Passphrases will adhere to the minimum number of words and can be configured to include capital letters and numbers. The separators between words will be selected from the list of allowed symbols.

For more information on record password enforcement policies, please see our [Enterprise Guide](/enterprise-guide/roles/enforcement-policies#password-generator).

### **Wi-Fi Record Type with QR Code**

Keeper's "WiFi Login" record type simplifies creating and sharing Wi-Fi passwords. This record type includes the ability to generate a shareable QR code that can be scanned by others to automatically join the Wi-Fi network.

To create a Wi-Fi login record, select **WiFi Login** from the "Record Type" dropdown and enter the record details.

To generate a Wi-Fi network QR code, ensure the "Network Name (SSID)" and "Password" fields are entered.

<figure><img src="https://914511346-files.gitbook.io/~/files/v0/b/gitbook-x-prod.appspot.com/o/spaces%2F-LSGVtOTYUIkVBoYtFvK%2Fuploads%2F6Awd0Lebrgha8LmbWBO9%2FQR%20Code%20Full%20Screen%20Dialog.png?alt=media&#x26;token=f111fe28-b3ab-436f-a276-ea009ccaad82" alt="" width="188"><figcaption><p>QR Code for Automatic Network Access</p></figcaption></figure>

### **Security Audit**

Security Audit gives your passwords an overall security score and lets you clearly see what passwords are weak from a password strength visual indicator (red being the weakest, green being the strongest).

If a record is indicated as having a high risk password, Keeper recommends changing the password at the affected site immediately and updating the corresponding record in your Keeper Vault.

<div><img src="https://914511346-files.gitbook.io/~/files/v0/b/gitbook-x-prod.appspot.com/o/spaces%2F-LSGVtOTYUIkVBoYtFvK%2Fuploads%2Fbpa3XbOGbr6WaLcX15nb%2FLeft%20Menu.png?alt=media&#x26;token=5d08b734-bada-4caa-8984-d00f6abbe651" alt="Left Menu > Security Audit" width="188"> <figure><img src="https://914511346-files.gitbook.io/~/files/v0/b/gitbook-x-prod.appspot.com/o/spaces%2F-LSGVtOTYUIkVBoYtFvK%2Fuploads%2FMxUZYWiLDMWyMa4NywvY%2FSecurity%20Audit.png?alt=media&#x26;token=84c26b51-0e67-47ff-a1f7-42028a7ac6b3" alt="" width="188"><figcaption><p>Security Audit</p></figcaption></figure></div>

### Record History

Users also have the ability to conveniently restore previous versions of a record. While viewing a record, tap the **menu icon** in the upper right corner of your screen and select **Record History**.

To restore a record back to a previous state, tap on the version you would like to restore. Review the record information by tapping the **info icon** then tap **Restore**.

<div><img src="https://914511346-files.gitbook.io/~/files/v0/b/gitbook-x-prod.appspot.com/o/spaces%2F-LSGVtOTYUIkVBoYtFvK%2Fuploads%2FdwbtnEpuBgJ64Z3UDNCn%2FOptions%20Menu.png?alt=media&#x26;token=60450a48-0c01-481f-ac30-654635f7f68f" alt="Options > Record History" width="188"> <figure><img src="https://914511346-files.gitbook.io/~/files/v0/b/gitbook-x-prod.appspot.com/o/spaces%2F-LSGVtOTYUIkVBoYtFvK%2Fuploads%2F7qvGICmC2GqHLKPkj1Ee%2Frecord%20history.png?alt=media&#x26;token=1fb1addc-1e6a-4478-9e3a-909e4375b749" alt="" width="188"><figcaption><p>Record History</p></figcaption></figure></div>

A few notes on Record History:

* Restoring a record does not place it back into the original folder structure.
* Record History is only available as part of the paid consumer and business plans.
* Deleted records can be reviewed and restored by visiting "Deleted Items" in the left navigation menu.

### Notification Center

The Notification Center creates a secure, in-app hub for viewing and managing notifications. This streamlined system ensures you never miss a time-sensitive update. Types of notifications you can expect to receive include:

* **Security Alerts** - Notifies users in real-time about suspicious login attempts or changes to their account settings.
* **Access Requests** - Notifies users when someone requests access to shared files or records, enabling quick approval or denial.
* **Device Management** - Alerts users to new device logins or provides reminders to review active device sessions.
* **Record Reminders** - Notifies users about time-sensitive actions related to stored records, like expiring passwords or access keys.
* **Master Password Updates** - Reminds users to update their master password or provide notifications about password reset requests.
* **Subscription Reminders** - Informs users about upcoming subscription renewals or expired payment methods.
* **Product Updates** - Seamlessly delivers product updates without interrupting the user experience.

Tap the **bell icon** to open your Notifications Center. Quickly review and respond to actionable events such as device approvals and sharing requests with one click and further simplify your view with the "Unread" and "Requests" filters.

<div><figure><img src="/files/mXHHpVzcOHuq9kHelTWA" alt="" width="188"><figcaption><p>Open Notifications Center</p></figcaption></figure> <figure><img src="/files/v2pFdIj8K17KNNl5Fh69" alt="" width="188"><figcaption><p>Filter Unread Notifications</p></figcaption></figure></div>

{% hint style="success" %}
To learn more about the Notification Center, click [here](#notification-center).
{% endhint %}

### Custom Fields

Custom Fields allow you to store additional data within a record, such as the answer to a site's security question or a passport number. Any record created with one of Keeper's Record Types can be further enhanced with various custom field options.

Custom field labels can be edited and, if you are creating multiple custom fields, they can be reordered by holding and dragging them into your preferred order.

{% hint style="info" %}
To learn more about Record Types, click [here](/user-guides/record-types).
{% endhint %}

While creating or editing a record, tap **Add Custom Field**.

<figure><img src="/files/OZYFGkGLIEIAl0mc3FLi" alt="" width="188"><figcaption></figcaption></figure>

Select the custom field type you would like to add to the record.

<figure><img src="/files/NS1T9i7K44xp3YcD9r7P" alt="" width="188"><figcaption></figcaption></figure>

Available Custom Fields:

* Text
* Email
* Name
* Address (new or linked)
* Pin Code
* Password
* Payment Card (new or linked)
* Phone Number
* Hidden Field
* Date
* URL (website address) used for Autofill
* Security Question & Answer
* Multi-line Text

Enter the field values and tap **Save** to finish.

## KeeperFill

Use KeeperFill to quickly autofill passwords into web browsers such as Chrome, Firefox, Edge, Brave, DuckDuckGo and all other native apps like banking and social media. Once enabled, KeeperFill login prompts and fill results are seamlessly integrated into your device's keyboard.

{% hint style="info" %}
KeeperFill is currently supported for Android versions 9 and above.
{% endhint %}

### Setup

To enable KeeperFill, navigate to Keeper's **Settings** menu, then toggle "KeeperFill" **on**.

<div><img src="https://914511346-files.gitbook.io/~/files/v0/b/gitbook-x-prod.appspot.com/o/spaces%2F-LSGVtOTYUIkVBoYtFvK%2Fuploads%2FC0C4rlJGPQBdG8Gx9V6s%2FAvatar%20Menu.png?alt=media&#x26;token=3760803c-274d-4456-ae39-daff4b929cb8" alt="Settings Menu" width="188"> <figure><img src="https://914511346-files.gitbook.io/~/files/v0/b/gitbook-x-prod.appspot.com/o/spaces%2F-LSGVtOTYUIkVBoYtFvK%2Fuploads%2FcGdndx3XLCZwgoyXtrsu%2Fsettings%20-%20Keeperfill.png?alt=media&#x26;token=17af2cbb-ad6e-4b19-b082-534aeb3146ca" alt="" width="188"><figcaption><p>Enable KeeperFill</p></figcaption></figure></div>

You will then prompted to enable various settings on your device including:

* Selecting Keeper as the Autofill service
* Enabling KeeperFill in Chrome by selecting "**Autofill using another service"** (if Chrome is set as the default browser on your device)

<div><img src="https://914511346-files.gitbook.io/~/files/v0/b/gitbook-x-prod.appspot.com/o/spaces%2F-LSGVtOTYUIkVBoYtFvK%2Fuploads%2FwTmX6TBowuaUPllqbrRA%2FKeeperFill%20Set%20Up%20continued.png?alt=media&#x26;token=6bf33d06-7870-41c8-bcc5-ce7a115fbeb2" alt="Select Autofill Service" width="188"> <figure><img src="https://914511346-files.gitbook.io/~/files/v0/b/gitbook-x-prod.appspot.com/o/spaces%2F-LSGVtOTYUIkVBoYtFvK%2Fuploads%2FYS6eeBWSZhKYZPzpORhO%2FSelect%20Preferred%20service.png?alt=media&#x26;token=42f90ba2-8d33-4cdf-bbba-bd29ec6dbbac" alt="" width="188"><figcaption><p>Select Keeper as Preferred Service</p></figcaption></figure></div>

### Autofill for Apps & Web Browsers

From the app or website login screen, tap **Sign in to Keeper** located above the keyboard and enter your Keeper master password.

<img src="https://914511346-files.gitbook.io/~/files/v0/b/gitbook-x-prod.appspot.com/o/spaces%2F-LSGVtOTYUIkVBoYtFvK%2Fuploads%2FuyTn8bYAnC9ut62rMBHt%2FAutofill%20-%20Logged%20Out.png?alt=media&#x26;token=e7445632-f28c-443b-ae64-fcec5711b711" alt="Sign in to Keeper" width="188">

If Keeper identifies a record match, your login will then be displayed. Simply tap on your **login** next to the Keeper icon to autofill your credentials and log in.

{% hint style="info" %}
Some apps and sites have more than one login screen and may require you to tap your login on each screen.
{% endhint %}
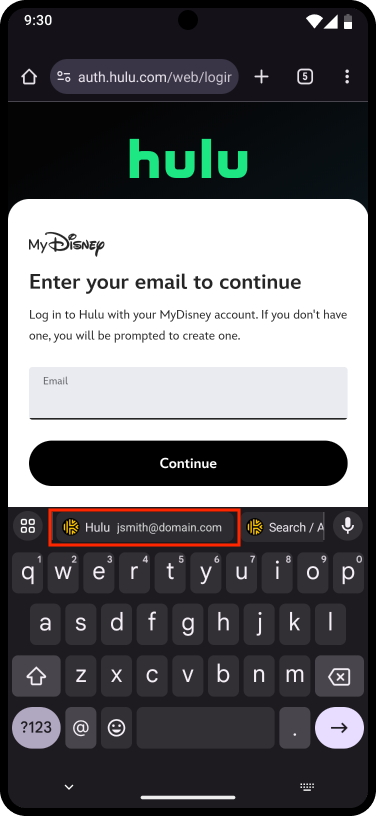
<div><img src="https://914511346-files.gitbook.io/~/files/v0/b/gitbook-x-prod.appspot.com/o/spaces%2F-LSGVtOTYUIkVBoYtFvK%2Fuploads%2F8b8aKMKR1AZV1i08RPRB%2Fselect%20Search-Add.png?alt=media&#x26;token=0d8b0e7f-e77b-4d26-8b7b-debaca565695" alt="KeeperFill Integration" width="188"> <figure><img src="https://914511346-files.gitbook.io/~/files/v0/b/gitbook-x-prod.appspot.com/o/spaces%2F-LSGVtOTYUIkVBoYtFvK%2Fuploads%2FIqwGCQJ3hBEMGOhFkxY8%2FFilled%20(1).png?alt=media&#x26;token=0c573c30-8768-4ae6-a2d8-a40415eac425" alt="" width="188"><figcaption><p>Login Filled</p></figcaption></figure></div>

{% hint style="info" %}
If your device's keyboard does not support autofill, KeeperFill's appearance and location will vary like in the example below.
{% endhint %}

<div><figure><img src="https://914511346-files.gitbook.io/~/files/v0/b/gitbook-x-prod.appspot.com/o/spaces%2F-LSGVtOTYUIkVBoYtFvK%2Fuploads%2FCv516x5065IoZKTBw6s4%2Fautofill%20-%20menu.png?alt=media&#x26;token=a822244f-0f86-4357-a4a0-4f8d0f8c3e0c" alt="" width="188"><figcaption><p>Sign In to Keeper</p></figcaption></figure> <figure><img src="https://914511346-files.gitbook.io/~/files/v0/b/gitbook-x-prod.appspot.com/o/spaces%2F-LSGVtOTYUIkVBoYtFvK%2Fuploads%2F5S7ylxLJbzq4YI0TVnSW%2Fautofill%20-%20menu%20(1).png?alt=media&#x26;token=2c458b43-3db1-443f-af9c-3dbbcaa4b335" alt="" width="188"><figcaption><p>KeeperFill Variation</p></figcaption></figure></div>

## Passkeys on Android

Passkeys on Android devices, a highly anticipated feature for enhanced security and convenience, is now available on Android devices running **Android 14+**. This update marks a significant enhancement in our mobile applications capabilities, offering users an even more secure and streamlined experience. To learn more about Passkeys with Keeper, click [HERE](/user-guides/passkeys).

{% hint style="info" %}
Passkeys work on websites and applications that have been specifically built to support them. Keeper maintains a passkey directory, which can be found [HERE](https://www.keepersecurity.com/passkeys-directory/).
{% endhint %}

<div><figure><img src="https://914511346-files.gitbook.io/~/files/v0/b/gitbook-x-prod.appspot.com/o/spaces%2F-LSGVtOTYUIkVBoYtFvK%2Fuploads%2FNcF1rKnwxqp3yTF9hxe4%2FSign%20in%20with%20Passkey.png?alt=media&#x26;token=94bb2909-a5f4-4d49-b449-8005e09d694f" alt="" width="188"><figcaption><p>Create a Passkey</p></figcaption></figure> <figure><img src="https://914511346-files.gitbook.io/~/files/v0/b/gitbook-x-prod.appspot.com/o/spaces%2F-LSGVtOTYUIkVBoYtFvK%2Fuploads%2FEHJksrFUaMf9RQaQwaKw%2FCreate%20Passkey.png?alt=media&#x26;token=ea88243b-b756-418b-9563-3b71037ef5c2" alt="" width="188"><figcaption><p>Sign In With Passkey</p></figcaption></figure></div>

* Creating a passkey for a website or app is a simple process on your Android device.
* Tapping **Create Passkey** on a site or app will triggerKeeper to intercept the request. Keeper then prompts you to create a passkey for your associated login and saves it to your vault.
* Returning to sites or apps where you have a stored passkey you will either be prompted to sign in with passkey or will be able to select **Sign in with Passkey**. Keeper does the rest!

{% hint style="warning" %}
Passkey functionality is not enabled by default on Android devices. To enable passkeys with Keeper follow the steps below.
{% endhint %}

## Passkey Setup

Some Android devices do not have passkeys enabled by default. To enable passkeys on your device follow these steps:

1. Open Chrome or Chromium based browser on your Android device.
2. Enter **chrome://flags** into the address bar.
3. Next, enter **"Passkeys"** in the search bar.
4. Under "Android Credential Management for passkeys" select **Enabled for Google Password Manager and 3rd Party Passkeys** from the dropdown menu, then click the **Relaunch** button that appears at the bottom of the browser.

<figure><img src="https://914511346-files.gitbook.io/~/files/v0/b/gitbook-x-prod.appspot.com/o/spaces%2F-LSGVtOTYUIkVBoYtFvK%2Fuploads%2F4wVJiFDu5ZN32FVrWWDw%2FEnable%20Passkeys%20on%20Android%205.29.24.gif?alt=media&#x26;token=12de0432-927c-4d14-a210-0106137a0e32" alt="Passkey Setup" width="480"><figcaption><p>Passkey Setup</p></figcaption></figure>

### Record Search & Creation

If you would like to search for a record in your vault or create a new record, tap the **Search/Add** button above your keyboard.

You can then tap **Create New Record**, enter the record details, then **Fill & Save** to save the record to your vault and autofill the newly created login into the app or site.

<div><figure><img src="https://914511346-files.gitbook.io/~/files/v0/b/gitbook-x-prod.appspot.com/o/spaces%2F-LSGVtOTYUIkVBoYtFvK%2Fuploads%2F5fTDHGaWW3Sl06Iz9aDk%2Fselect%20Search-Add.png?alt=media&#x26;token=fb21385d-097e-42cf-bf6e-5bbb5cb09cba" alt="" width="188"><figcaption><p>Search/Add Record</p></figcaption></figure> <figure><img src="https://914511346-files.gitbook.io/~/files/v0/b/gitbook-x-prod.appspot.com/o/spaces%2F-LSGVtOTYUIkVBoYtFvK%2Fuploads%2F0B6F35AJzX2RXR5vKRwB%2FRecords.png?alt=media&#x26;token=c3ad5e90-8157-4c2e-9eb0-57cb9cc662c2" alt="" width="188"><figcaption><p>Create a New Record</p></figcaption></figure> <figure><img src="https://914511346-files.gitbook.io/~/files/v0/b/gitbook-x-prod.appspot.com/o/spaces%2F-LSGVtOTYUIkVBoYtFvK%2Fuploads%2FKu7Oz9aPyb83QJhzO8X2%2FCreate%20New%20Record%20-%20Empty.png?alt=media&#x26;token=dc16d649-0066-4d50-a1cc-9e536ba400a9" alt="" width="188"><figcaption><p>Enter the Record Details and Autofill</p></figcaption></figure></div>

Or if you'd like to search for an existing record, select the record from your records list and tap **Fill** to autofill the login into the app or site.

<div><figure><img src="https://914511346-files.gitbook.io/~/files/v0/b/gitbook-x-prod.appspot.com/o/spaces%2F-LSGVtOTYUIkVBoYtFvK%2Fuploads%2Fbqb9mOf5LV0L9L7Q47b8%2FRecord%20Selected.png?alt=media&#x26;token=5067cd2e-2f65-4f6e-b712-ca327ec0a65f" alt="" width="188"><figcaption><p>Select Record > Fill</p></figcaption></figure> <figure><img src="https://914511346-files.gitbook.io/~/files/v0/b/gitbook-x-prod.appspot.com/o/spaces%2F-LSGVtOTYUIkVBoYtFvK%2Fuploads%2Flv4FLBTiPcjGDwL5U8s2%2FFilled.png?alt=media&#x26;token=a5fb29a6-b974-4eb2-9bf4-b3f9e57fc87b" alt="" width="188"><figcaption><p>Autofill Your Login</p></figcaption></figure></div>

## Keeper for Wear OS

Available for download in the [Google Play Store](https://play.google.com/store/apps/details?id=com.callpod.android_apps.keeper\&hl), Keeper's smartwatch app for Wear OS provides users with quick access to their favorite records as well as a convenient two-factor method for logging in to your Keeper Vault.

{% hint style="info" %}
For the best experience, the Keeper Wear OS app requires a phone running Android 9.0 (API level 28) or newer and a watch running Wear OS 5.0 or greater.
{% endhint %}

<figure><img src="https://914511346-files.gitbook.io/~/files/v0/b/gitbook-x-prod.appspot.com/o/spaces%2F-LSGVtOTYUIkVBoYtFvK%2Fuploads%2FLMiv6jduArarZR9pNYmn%2FHome%20Screen.png?alt=media&#x26;token=5a25bec4-6bee-4986-b322-61ca00be46b4" alt=""><figcaption><p>Keeper Home Screen</p></figcaption></figure>

#### Two-Factor Authentication

To setup two-factor authentication for you Keeper Vault using Keeper for Wear OS as your second factor, first ensure your smartwatch is paired with your mobile phone.

On your phone, navigate to Keeper's **Settings** menu and tap **Two-Factor Authentication**. **F**rom the "Authentication Method" dropdown menu, select **Smartwatch** then follow the prompts to verify your identity.

<div><figure><img src="https://914511346-files.gitbook.io/~/files/v0/b/gitbook-x-prod.appspot.com/o/spaces%2F-LSGVtOTYUIkVBoYtFvK%2Fuploads%2FpGKM9V2GY0Jgl7cjIroE%2FSettings%20(4).png?alt=media&#x26;token=5a0cea1e-823f-4438-946f-1f65681dedce" alt="" width="188"><figcaption><p>Enable 2FA</p></figcaption></figure> <figure><img src="https://914511346-files.gitbook.io/~/files/v0/b/gitbook-x-prod.appspot.com/o/spaces%2F-LSGVtOTYUIkVBoYtFvK%2Fuploads%2FOiMokDgmPIRd7xFhvcn3%2F2FA%20Menu%20(1).png?alt=media&#x26;token=3b3c88c0-b883-4855-a991-7922fef76f42" alt="" width="188"><figcaption><p>2FA with Smartwatch</p></figcaption></figure></div>

{% hint style="info" %}
If you don't receive notifications, they may not be enabled for Keeper. To turn on notifications, from your phone, navigate to **Settings** > **Notifications** > **Keeper** and toggle "Allow Notifications" on.
{% endhint %}

Next time you login to Keeper, you will receive a push verification request on your smartwatch to approve or deny the login attempt.

<div align="center"><figure><img src="https://914511346-files.gitbook.io/~/files/v0/b/gitbook-x-prod.appspot.com/o/spaces%2F-LSGVtOTYUIkVBoYtFvK%2Fuploads%2F6LkIUxpWO8vwhRrBUeM5%2FVerification%20Request.png?alt=media&#x26;token=330cea37-d307-49cb-89aa-5cceee0fa292" alt=""><figcaption><p>Login Verification Request</p></figcaption></figure> <figure><img src="https://914511346-files.gitbook.io/~/files/v0/b/gitbook-x-prod.appspot.com/o/spaces%2F-LSGVtOTYUIkVBoYtFvK%2Fuploads%2FmIQMEPeLoAXh3uKwbvpH%2Fw4.png?alt=media&#x26;token=ff1f1d6f-982d-4865-a073-6f9359618557" alt="" width="265"><figcaption><p>Request Verified</p></figcaption></figure></div>

Alternatively, you can enter the time-based verification code from the Keeper app home screen. This is especially useful in cases where the Keeper Push notification times out.

<figure><img src="https://914511346-files.gitbook.io/~/files/v0/b/gitbook-x-prod.appspot.com/o/spaces%2F-LSGVtOTYUIkVBoYtFvK%2Fuploads%2FzKHwwPCbZWdVwHnY1McZ%2FVerification%20Code.png?alt=media&#x26;token=5edfdec7-11fa-4ed4-bf0b-795aab56ca4b" alt=""><figcaption><p>Verification Code</p></figcaption></figure>

## Secure Add-Ons

### Secure File Storage

Keeper offers Secure File Storage to protect your confidential files, photos and videos. Securely upload and store files such as passport photos, medical cards, drivers licenses, tax and loan documents, videos and any other private file to your Keeper Vault.

You can either add an attachment to any existing record or create a new record (optionally using the "File Attachment" record type). Tap **Attach Files, Photos & Videos** to upload your file.

<figure><img src="https://914511346-files.gitbook.io/~/files/v0/b/gitbook-x-prod.appspot.com/o/spaces%2F-LSGVtOTYUIkVBoYtFvK%2Fuploads%2FOeDBZkfJbk62IMlO5k41%2FRecord%20Edit%20Actions%20-%20Default%20(1).png?alt=media&#x26;token=4a936aa5-c723-400e-9eb3-9125603a7414" alt="" width="188"><figcaption><p>Attach Files, Photos &#x26; Videos to a Record</p></figcaption></figure>

{% hint style="info" %}
To learn more about Secure File Storage, click [here](/user-guides/secure-file-storage).
{% endhint %}

### BreachWatch

BreachWatch is a powerful, secure add-on feature that monitors the internet and dark web for breached accounts matching records stored within your Keeper Vault. BreachWatch alerts you so that you can take immediate action to protect yourself against hackers. Once activated, BreachWatch continuously monitors for compromised credentials and notifies you if any of your records are at risk.

To start your BreachWatch scan, tap **BreachWatch** in the lower menu of your screen tap then **Let's Begin > Scan**.

BreachWatch will then scan your records and report any risks associated with them. Resolving the risk requires you to change the password at the affected website. Once you have done that, be sure to update the corresponding record in your Keeper vault with the same password.

If you tap **Ignore**, then that record will be skipped on future scans until the password is reset. You may also do nothing (deferring a response) and leave the risky password unchanged and thus still at risk.

<img src="https://914511346-files.gitbook.io/~/files/v0/b/gitbook-x-prod.appspot.com/o/spaces%2F-LSGVtOTYUIkVBoYtFvK%2Fuploads%2FeIrTdWsowRoKxy2bS81m%2FBreachWatch.png?alt=media&#x26;token=8d8d85b0-3116-4507-9daf-ad20d9216fe7" alt="BreachWatch Scan Results" width="188">

{% hint style="info" %}
To learn more about BreachWatch, click [here](/user-guides/breachwatch).
{% endhint %}

## Settings

The Settings menu allows you to customize the display, personalization and security features of the application, including:

* Dark Mode
* Theme
* Login Options (Two-Factor Authentication, Biometric Login, Allow Offline Access, Stay Logged In, Auto-Logout)
* Security (Enable Self-Destruct)
* Fast Login Mode
* KeeperFill
* Auto-Approve Devices from Recognized IP Address(es)
* Prevent Screenshots
* Clipboard Expiration
* Hide Passwords
* Show Numbers in List View
* Sort Record Types
* Change Email Address
* Account Recovery
* Reset Master Password

{% hint style="info" %}
Please note that some security settings may be enforced by your Keeper Administrator if you are part of a Keeper Business account.
{% endhint %}
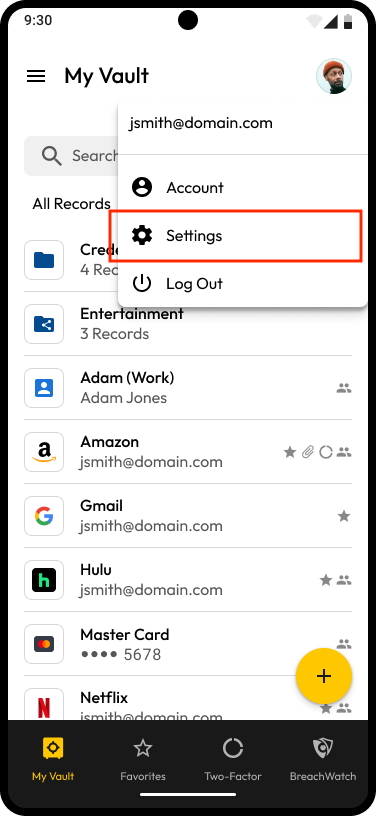
<div><img src="https://914511346-files.gitbook.io/~/files/v0/b/gitbook-x-prod.appspot.com/o/spaces%2F-LSGVtOTYUIkVBoYtFvK%2Fuploads%2F8Aoe5r3RV8j8iNrr5bjH%2FMy%20Vault.png?alt=media&#x26;token=b80a32d6-463a-44fa-ab90-6d036554899c" alt="Account > Settings" width="188"> <figure><img src="https://914511346-files.gitbook.io/~/files/v0/b/gitbook-x-prod.appspot.com/o/spaces%2F-LSGVtOTYUIkVBoYtFvK%2Fuploads%2FeYiENsYPfb5TkDvMPAsD%2FSettings%20(5).png?alt=media&#x26;token=1d2782b9-7bcf-41f5-a7e5-257ec590828e" alt="" width="188"><figcaption><p>Settings Menu</p></figcaption></figure> <figure><img src="https://914511346-files.gitbook.io/~/files/v0/b/gitbook-x-prod.appspot.com/o/spaces%2F-LSGVtOTYUIkVBoYtFvK%2Fuploads%2Fsbx3xh2mpvVJFJcNfj12%2FSettings%20-%20Option%20to%20show%20numbers%20in%20list%20view.png?alt=media&#x26;token=bbf30c73-2803-4101-a636-0f1c4d56422b" alt="" width="188"><figcaption><p>Settings Menu Continued</p></figcaption></figure></div>

### Dark Mode

You can enable Dark Mode from the Settings menu. Tap the **Match System** dropdown menu to turn Dark Mode for Keeper on or off. By default, the app will match your device's system display settings.

<div><figure><img src="https://914511346-files.gitbook.io/~/files/v0/b/gitbook-x-prod.appspot.com/o/spaces%2F-LSGVtOTYUIkVBoYtFvK%2Fuploads%2FAnfXKOVZQC2dh6e8t2ez%2FSettings.png?alt=media&#x26;token=ac2dff26-cb90-47ed-8d3c-b7320dd56dd9" alt="" width="188"><figcaption><p>Dark Mode Setting</p></figcaption></figure> <figure><img src="https://914511346-files.gitbook.io/~/files/v0/b/gitbook-x-prod.appspot.com/o/spaces%2F-LSGVtOTYUIkVBoYtFvK%2Fuploads%2FeYzlikHF7KAufCmO5nxE%2FMy%20Vault.png?alt=media&#x26;token=c7f04da8-5fba-4d18-8f24-4c4857ce810f" alt="" width="188"><figcaption><p>Dark Mode on Android</p></figcaption></figure></div>

### Account Recovery

If you forget your master password, Account Recovery will help you quickly regain access.

1. **Settings > Account Recovery**
2. Confirm your Master Password and tap **Generate New Phrase**.
3. Once your recovery phrase has been generated, be sure to store it in a safe place. For added convenience, you will be given the option to copy or download it.
4. Check the confirmation box to confirm that you've stored your Recovery Phrase.
5. Tap **Set Recovery Phrase**.

### Reset Master Password

1. **Settings > Reset Master Password**.
2. Enter your current master password.
3. Create and confirm a new master password.

{% hint style="info" %}
If you have Biometric Login enabled, you won't be required to enter your current master password.
{% endhint %}

{% hint style="danger" %}
If you are unable to login with your current master password, and you've set a recovery phrase, go to [Forgotten Master Password & Account Recovery](/user-guides/troubleshooting/reset-your-master-password#forgotten-master-password-and-account-recovery) to recover your account.
{% endhint %}

## Two-Factor Authentication

Two-Factor authentication (2FA) provides an extra layer of security when logging into your Keeper Vault or another site or application by requiring a secondary passcode upon logging in.

{% hint style="success" %}
Enabling two-factor authentication is especially advised for highly valuable or sensitive accounts (e.g. banking, medical and social media accounts).
{% endhint %}

Keeper offers two ways to take advantage of 2FA:

* To log into your Keeper Vault.
* To log into any site or application from your Keeper Vault by embedding a TOTP (time-based one-time password) into your records.

### 2FA for Your Keeper Vault

To enable 2FA for your Keeper Vault, tap **Settings > Two-Factor Authentication**, tap the dropdown menu under "Primary Method" and select a method from the list of options.

<img src="https://914511346-files.gitbook.io/~/files/v0/b/gitbook-x-prod.appspot.com/o/spaces%2F-LSGVtOTYUIkVBoYtFvK%2Fuploads%2FWVhQZDQCALJx6IDoUkLk%2FSettings%20(2).png?alt=media&#x26;token=e4539d8d-257c-47be-93c4-2c0a99f39f2b" alt="Enable Two-Factor Authentication" width="188">

#### Text Message Setup:

1. Select a Region (US+1 by default), enter your 10 digit phone number including your area code and tap the **checkmark icon** to save.
2. Select how long you want the two-factor method to be valid for (not again for the device, every 30 days, 24 hours, 12 hours or at every login).

{% hint style="info" %}
Business customers may be required to enter the code every login as determined by their Keeper Administrator.
{% endhint %}

3. Enter the **code** that was sent to the phone number you provided then tap the **checkmark icon** to save. Codes will only last for a minute; if you need another code sent, tap **Send a new code.**
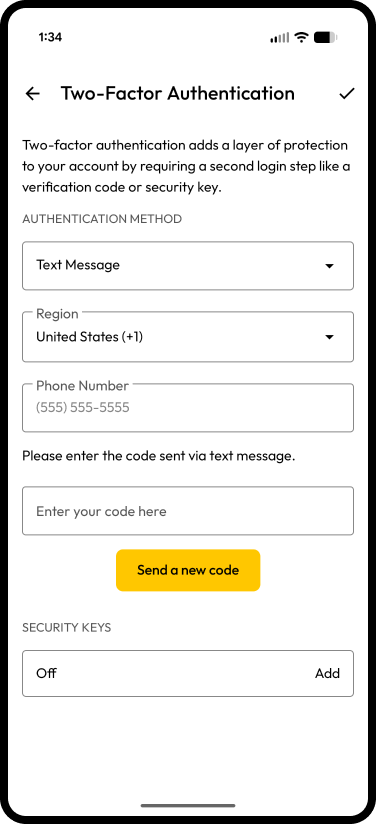
<figure><img src="https://914511346-files.gitbook.io/~/files/v0/b/gitbook-x-prod.appspot.com/o/spaces%2F-LSGVtOTYUIkVBoYtFvK%2Fuploads%2FaYam1yhgpVfIdiq4xkhI%2FSMS%202FA%20Setup.png?alt=media&#x26;token=280ac22c-5dd4-4338-9a17-da5073823a48" alt="" width="188"><figcaption><p>Enter Code</p></figcaption></figure>

4. Backup codes will be shown next. If you are unable to receive two-factor codes via the phone number you entered, you can enter one of the backup codes listed instead. Tap one of the listed options to confirm you saved the codes somewhere safe.

{% hint style="warning" %}
If you are not receiving SMS messages from Keeper, please use the TOTP method or submit a support ticket at <https://www.keepersecurity.com/support.html>.
{% endhint %}

#### Authenticator App (TOTP) Setup:

1. Once you select "Authenticator App" tap the **checkmark icon** to save.
2. Select how long you want the two-factor method to be valid for (not again for the device, every 30 days, 24 hours, 12 hours or at every login).

{% hint style="info" %}
Business customers may be required to enter the code every login as determined by their Keeper Administrator.
{% endhint %}

3. You will be prompted to scan the QR code or enter your secret key into your authenticator or TOTP app. If you don’t have an authenticator app installed, the app will show the QR code for you to scan directly. If you already have one or more authenticator apps installed on your Android device, a menu will appear at the bottom of the screen, allowing you to select the app you wish to use.

* **If you have multiple authenticator apps installed:**\
  Choose the app you want to use. The selected app will open and ask you if you want to add the token.
* **If you only have one authenticator app installed:**\
  The installed app will automatically open, and you'll be asked if you want to add the token.
* **Save the Token in Your Authenticator App**

  * **For a single app:** The authenticator app will automatically prompt you to add the token. Tap to confirm.
  * **For multiple apps:** After selecting your authenticator app, the app will prompt you to add the token. Tap to confirm.

  **Important:** After registering the token in your authenticator app, there is no obvious "Go back to Keeper" button. You will need to manually switch back to Keeper by either:

  * Using the "Recent Apps" button to switch back to Keeper, or
  * Using the swipe gesture (depending on your device settings) to return to Keeper.

4. Once the token is registered in your authenticator app, return to Keeper and enter the TOTP code provided by your app to complete the setup.

<img src="https://914511346-files.gitbook.io/~/files/v0/b/gitbook-x-prod.appspot.com/o/spaces%2F-LSGVtOTYUIkVBoYtFvK%2Fuploads%2FNnGFDu9BVlJ4KsL5yPZu%2FTOTP%20Set%20Up.png?alt=media&#x26;token=d899e027-85e8-48ae-9417-397da2e97072" alt="Enter Code" width="188">

5. Backup codes will be shown next. If you are unable to receive two-factor codes via the phone number you entered, you can enter one of the backup codes listed instead. Tap one of the listed options to confirm you saved the codes somewhere safe.

{% hint style="info" %}
In order for Azure MFA (using the Microsoft Authenticator app) to be utilized as a TOTP, the Azure Administrator needs to allow the verification method "Verification code from mobile app or hardware token" when setting up MFA in Azure.
{% endhint %}

#### Keeper for Wear OS Setup:

To setup two-factor authentication for you Keeper Vault using Keeper for Wear OS as your second factor, first ensure your smartwatch is paired with your mobile phone.

On your phone, navigate to Keeper's **Settings** menu and tap **Two-Factor Authentication**. **F**rom the "Authentication Method" dropdown menu, select **Smartwatch** then follow the prompts to verify your identity.

<div><figure><img src="https://914511346-files.gitbook.io/~/files/v0/b/gitbook-x-prod.appspot.com/o/spaces%2F-LSGVtOTYUIkVBoYtFvK%2Fuploads%2FiqxvcV6QJY2lK36oXmvm%2FSettings%20(3).png?alt=media&#x26;token=1a1b7761-0900-44a0-8342-74f75244e296" alt="" width="188"><figcaption><p>Enable Two-Factor Authentication</p></figcaption></figure> <figure><img src="https://914511346-files.gitbook.io/~/files/v0/b/gitbook-x-prod.appspot.com/o/spaces%2F-LSGVtOTYUIkVBoYtFvK%2Fuploads%2FyDFyHNr6oAllo6X1Kzjs%2F2FA%20Menu.png?alt=media&#x26;token=6a1e0c5c-ad87-4dc4-b02a-25af5ca9b05b" alt="" width="188"><figcaption><p>Setup for Smartwatch</p></figcaption></figure></div>

Next time you login to Keeper, you will receive a push verification request on your smartwatch to approve or deny the login attempt. Alternatively, you can enter the time-based verification code from the Keeper app home screen. This is especially useful in cases where the Keeper Push notification times out.

<div><figure><img src="https://914511346-files.gitbook.io/~/files/v0/b/gitbook-x-prod.appspot.com/o/spaces%2F-LSGVtOTYUIkVBoYtFvK%2Fuploads%2Fe3CYLZClgWSzJ9BpTx9K%2Fan3.avif?alt=media&#x26;token=3a187153-6cad-4f85-8e91-8bd8a171613d" alt=""><figcaption><p>Login Verification Request</p></figcaption></figure> <figure><img src="https://914511346-files.gitbook.io/~/files/v0/b/gitbook-x-prod.appspot.com/o/spaces%2F-LSGVtOTYUIkVBoYtFvK%2Fuploads%2F7S2XawSj7pUqRHmSkV7W%2Fan2.avif?alt=media&#x26;token=358b4d50-1762-4e45-98f9-7cd86ddcb5d6" alt="" width="265"><figcaption><p>Request Verified</p></figcaption></figure></div>

{% hint style="info" %}
For more information about the Keeper WearOS app, click [here](#keeper-for-wear-os).
{% endhint %}

### 2FA Frequency

You can manage how often you are prompted to sign in on your device with your selected two-factor method at any time. Once you have set up two-factor authentication for your vault (following the steps above), the 2FA Frequency setting will be available within the "Settings" menu. Tap **2FA Frequency** and select from: every login, every 12 hours, every 24 hours, every 30 days, or don't ask again on this device.

<div><figure><img src="https://914511346-files.gitbook.io/~/files/v0/b/gitbook-x-prod.appspot.com/o/spaces%2F-LSGVtOTYUIkVBoYtFvK%2Fuploads%2FVKlCHB479nhBc4eWUhl9%2FSettings%20-%202FA%20Frequency.png?alt=media&#x26;token=bf6e204a-dfed-4a1e-ad08-e96ee6cd6098" alt="" width="188"><figcaption><p>Modify 2FA Frequency</p></figcaption></figure> <figure><img src="https://914511346-files.gitbook.io/~/files/v0/b/gitbook-x-prod.appspot.com/o/spaces%2F-LSGVtOTYUIkVBoYtFvK%2Fuploads%2FFEfECkfI1wvua4COnZd8%2F2FA%20Frequency%20Menu.png?alt=media&#x26;token=44a9317a-daef-4640-aa32-b19a4a79c6a1" alt="" width="188"><figcaption><p>Select Frequency</p></figcaption></figure></div>

### 2FA for Websites & Apps

Keeper can fill 2FA codes on any website or application that supports TOTP by scanning a QR code to generate a code (requires a second device).

1. Open and edit the Keeper record on your mobile device and tap **Add Two-Factor Code** (this will open your device's camera).

{% hint style="info" %}
In order to open your device's camera you must first "allow" Keeper permission when prompted.
{% endhint %}

<div><img src="https://914511346-files.gitbook.io/~/files/v0/b/gitbook-x-prod.appspot.com/o/spaces%2F-LSGVtOTYUIkVBoYtFvK%2Fuploads%2FLbDBit3whN8usg6Absmd%2FRecord%20Edit%20Actions%20-%20Default%20(2).png?alt=media&#x26;token=7f7aca30-37c8-48b2-8f41-fbaedb0dfb7d" alt="Add Two-Factor Code" width="188"> <figure><img src="https://914511346-files.gitbook.io/~/files/v0/b/gitbook-x-prod.appspot.com/o/spaces%2F-LSGVtOTYUIkVBoYtFvK%2Fuploads%2F0ONzKKGrX70j9b0qRBfz%2FRecord%20Edit%20Actions%20-%20TOTP%20Added.png?alt=media&#x26;token=de7c4c91-6523-4c1f-ba2f-a4fb125daf42" alt="" width="188"><figcaption><p>Two-Factor Code Populated</p></figcaption></figure></div>

2. On a secondary device (e.g. tablet, computer), navigate to the corresponding record's 2FA set up screen to retrieve the site's QR code.
3. Scan the QR code with your mobile device. You will see the code has been added to the record.
4. Tap the **checkmark icon** to save, then tap the code to copy it to your device's clipboard.
5. Return to the site to paste the code to complete the setup.

## Biometric Login

From the Settings menu, toggle "Biometric Login" on.

{% hint style="warning" %}
For security reasons, Android has designated only certain biometric authentication methods as secure. Samsung face biometric is considered *insecure* by the Android operating system (because it can be [fooled by a photo](https://www.theregister.com/2023/05/19/2d_photograph_facial_recog/)). Keeper Security does not permit insecure biometric access to the vault.
{% endhint %}

<figure><img src="https://914511346-files.gitbook.io/~/files/v0/b/gitbook-x-prod.appspot.com/o/spaces%2F-LSGVtOTYUIkVBoYtFvK%2Fuploads%2F6QcNDz2ovxvMJVmFsmEI%2FSettings%20(1).png?alt=media&#x26;token=683a6984-27c1-45a4-b814-5d647adf043b" alt="" width="188"><figcaption><p>Settings > Biometric Login</p></figcaption></figure>

Once enabled, at the Keeper login screen, tap **Biometric Login** and touch the fingerprint sensor when prompted (or use Face/Iris Authentication where available).

<figure><img src="https://914511346-files.gitbook.io/~/files/v0/b/gitbook-x-prod.appspot.com/o/spaces%2F-LSGVtOTYUIkVBoYtFvK%2Fuploads%2FSfyqqXRqJKctA4AkjsgU%2FLogin%20Screen%20(1).png?alt=media&#x26;token=f2fa99b0-fbdb-4749-ba33-663cec6da493" alt="" width="188"><figcaption><p>Biometric Login to Keeper</p></figcaption></figure>

{% embed url="<https://vimeo.com/585563712>" %}
Biometric Login
{% endembed %}

## FIDO2 WebAuthn Security Keys

Keeper provides two-factor authentication (2FA) on Android with compatible hardware keys such as the [**YubiKey 5 NFC**](https://www.yubico.com/product/yubikey-5-nfc/), [**YubiKey 5C NFC**](https://www.yubico.com/product/yubikey-5c-nfc/) and [**YubiKey 5Ci**](https://www.yubico.com/product/yubikey-5ci). Listed below are supported physical keys on Android.

| Supported Physical Keys | NFC Support | Plug-in Support |
| ----------------------- | ----------- | --------------- |
| Yubikey 5 NFC           | ✅           | ❌               |
| YubiKey 5C NFC          | ✅           | ✅               |
| YubiKey 5Ci             | ❌           | ✅               |
| Identiv uTrust NFC      | ✅           | ❌               |
| Feittian ePass K9 NFC   | ✅           | ❌               |
| GoTrust Idem NFC        | ❌           | ✅               |
| Thetis Pro NFC          | ✅           | ✅               |

{% hint style="info" %}
Keeper is committed to enhancing the security and flexibility of your experience. Support for more plug-in style physical keys will come with a future release.
{% endhint %}

### Setup & Registration

1. Before you add a security key, a two-factor authentication method must be in place as a backup.
2. Navigate to **Settings > Two-Factor Authentication** and tap **Add** next to "Security Keys".
3. Tap **+** **Add Key** and enter a name for the security key, then tap **REGISTER**.
4. Select **NFC Security key** from the list of devices.
5. Hold your key flat against the back of your device until it stops vibrating.

Your security key has been registered. You can register up to 5 security keys. Any one of those keys will unlock the account.

<div><figure><img src="https://914511346-files.gitbook.io/~/files/v0/b/gitbook-x-prod.appspot.com/o/spaces%2F-LSGVtOTYUIkVBoYtFvK%2Fuploads%2Fy9cJ6wcl1sEDiAcXq2Kx%2FSecurity%20Key%20Set%20Up.png?alt=media&#x26;token=4d2fdfd3-af60-4dfa-9f4c-026d5f65523d" alt="" width="188"><figcaption><p>Register Security Key for 2FA</p></figcaption></figure> <figure><img src="https://914511346-files.gitbook.io/~/files/v0/b/gitbook-x-prod.appspot.com/o/spaces%2F-LSGVtOTYUIkVBoYtFvK%2Fuploads%2FsOZZqz3NUIslRsaQz22M%2FSecurity%20Key%20Set%20Up%20-%20Connect%20Key.png?alt=media&#x26;token=615665db-4ba9-4fc2-a259-b8708186f4ec" alt="" width="188"><figcaption><p>Connect Your Key</p></figcaption></figure></div>

### **Prompt Frequency & Offline Access**

The FIDO2 WebAuthn device will be required for login based on the configuration of the first 2FA method. For example:

* If the first 2FA method is set to "Prompt Every Login", then the Yubikey will be required on every login, and offline login will be *disabled.*
* If the first 2FA method is set to "Every 30 days", then the Yubikey will be required every 30 days, and offline login will be *disabled.*
* If the first 2FA method is set to "Remember Forever", then the Yubikey will only be required one time on each new device. Offline vault login will be *enabled.*

## Account Switching <a href="#account-switching-and-vault-selection" id="account-switching-and-vault-selection"></a>

Have more than one Keeper account? Keeper supports the use of multiple vaults on the same device and makes it easy to seamlessly switch between your personal and business accounts without having to log out of your current session.

To switch accounts, navigate to the "Account" menu by tapping on your **user icon** in the upper right corner of the screen and selecting **Account**. Next, tap the **dropdown menu icon** to the right of your email address.

Select the account you would like to switch to or tap **Add Account** to login into and register another account on that device.

<div><img src="https://914511346-files.gitbook.io/~/files/v0/b/gitbook-x-prod.appspot.com/o/spaces%2F-LSGVtOTYUIkVBoYtFvK%2Fuploads%2FKFoEPRiHCz7aReTofwBK%2FMy%20Vault.png?alt=media&#x26;token=3e395a5a-4e78-4a65-9884-998e52ea8e4e" alt="Account Menu" width="188"> <figure><img src="https://914511346-files.gitbook.io/~/files/v0/b/gitbook-x-prod.appspot.com/o/spaces%2F-LSGVtOTYUIkVBoYtFvK%2Fuploads%2FKvVlHhkIxcNI6S8BKOIx%2FAccount%20-%20Account%20Menu.png?alt=media&#x26;token=fc3b689a-9442-4b73-8603-892d8578299f" alt="" width="188"><figcaption><p>Account Switch/Add</p></figcaption></figure></div>

{% hint style="info" %}
Quick account switching only works for active sessions where you've already logged in.
{% endhint %}

Easily remove unwanted accounts from the device by swiping left on an account email then tapping the **remove icon**.

<figure><img src="https://914511346-files.gitbook.io/~/files/v0/b/gitbook-x-prod.appspot.com/o/spaces%2F-LSGVtOTYUIkVBoYtFvK%2Fuploads%2F3JBgnwDLzgC5CIhhKly6%2FRemove%20Account%20(1).png?alt=media&#x26;token=5f5d3ea3-d379-424d-a23b-e8a8380c9ece" alt="" width="188"><figcaption><p>Remove Account from Device</p></figcaption></figure>

{% hint style="success" %}
You can also switch and add accounts from the Keeper login screen.
{% endhint %}

## 2FA Prompting Behavior & Offline Access

When 2FA is activated on an account, it protects the user on all devices and all platforms because 2FA is protecting access to the backend cloud system.

By definition, two-factor authentication protects access to the cloud and it protects access to online accounts. It therefore requires an online connection to be prompted for 2FA. 2FA is triggered when a request is made from the client device to the server. For example when logging into a new device, syncing new information on an existing device or performing any other cloud-based features.

By default, the native Keeper app for iOS, Android, Mac and Windows allow users to login quickly with their master password (offline mode) to access their vault. After typing in the master password or using biometric login, the user decrypts the data locally, then the app sends a sync request to the server at which time the user may be prompted for their 2FA code. Depending on the speed of the Internet connection, the 2FA prompt may be received a couple seconds after logging into the native application because the local decryption of data occurs much faster.

Offline authentication and vault access is permitted by all consumer customers. Enterprise customers may restrict the use of offline access for their employees.

## 2FA Token Retention & Timing

When activating 2FA on your Android device for the first time, the user selects how often they want to be prompted. Users can be prompted for 2FA at every login, once every 12 hours, every 24 hours, every 30 days, or only one time per device. It's important to understand that 2FA is always enabled on the Keeper servers. After a successful login on a device, a "token" is generated from the 2FA code and stored locally on the device as long as it's deemed valid by the server. This is why you are still able to login to the same device over and over without being re-prompted. By default, consumer customers will be prompted only one time per device. Enterprise customers may enforce users to be prompted every time for a new code.

Currently, the 2FA token retention timing on Android will default to "only one time" on a device if the 2FA was initially set up on the Web Vault or Desktop App. To change this behavior, please turn 2FA off and then re-activate 2FA on the iOS device.

## Import & Export

To import and export data from your Keeper vault, visit the Keeper Web Vault or download Keeper Desktop for your computer.

Keeper Web Vault: <https://keepersecurity.com/vault>

All Downloads: <https://keepersecurity.com/download>

## Uninstall & Account Reset

The instructions below apply to the latest OS. Third party operating system instructions may differ.

#### Uninstall Keeper:

{% hint style="danger" %}
Uninstalling Keeper will delete the data from Keeper on the local device. Data stored in Keeper's Cloud Security Vault is NOT erased.
{% endhint %}

1. Open your device's **Settings menu**.
2. Tap **Apps** or **Application Manager** (depending on device).
3. Navigate to the **Keeper App**.
4. Tap **Uninstall**.
5. Confirm by tapping **OK** when prompted.

#### Account Reset:

{% hint style="danger" %}
Resetting Keeper will erase all records from all Keeper accounts stored locally on your device. Data stored on Keeper's Cloud Security Vault is NOT erased.
{% endhint %}

1. Open your device's **Settings menu**.
2. Tap **Apps** or **Application Manager** (depending on device).
3. Navigate to the **Keeper App > Storage**.
4. Tap **Clear data** and **Clear cache**.
5. Confirm by tapping **OK** when prompted.

## Privacy

Keeper's mobile apps do not contain any trackers. All mobile apps go through vulnerability testing with Keeper's 3rd party testers and the Bugcrowd Bug Bounty Program.

Exodus Privacy is an organization that monitors the applications that perform user tracking. Keeper's Android application showing zero trackers is listed below:

<https://reports.exodus-privacy.eu.org/en/reports/com.callpod.android_apps.keeper/latest/#trackers>

## Helpful Links <a href="#helpful-links" id="helpful-links"></a>

Customer Support Form: <https://keepersecurity.com/support.html>​​

Business Customers: <business.support@keepersecurity.com>​

System Status: [https://statuspage.keeper.io](https://statuspage.keeper.io/)


# Autofill & Passkey Setup for Android

How to Set Up Autofill on Android

Keeper is available from the [Google Play Store](https://play.google.com/store/apps/details?id=com.callpod.android_apps.keeper) or from the [Keeper Download page.](https://www.keepersecurity.com/download.html?t=v) Use KeeperFill to quickly create and autofill passwords and passkeys into apps and web browsers.

{% embed url="<https://vimeo.com/585568378?share=copy>" %}
AutoFill Logins With KeeperFill
{% endembed %}

## Compatibility

KeeperFill is available on Android 9 and newer. For the best experience, please update your Android device to the latest version.

#### The Best Mobile Browsers with Full Autofill Support

* **Firefox** - [**Install**](https://play.google.com/store/apps/details?id=org.mozilla.firefox)
* **Firefox Focus** - [**Install**](https://play.google.com/store/apps/details?id=org.mozilla.focus)
* **Microsoft Edge -** [**Install**](https://play.google.com/store/apps/details?id=com.microsoft.emmx)
* **DuckDuckGo -** [**Install**](https://play.google.com/store/apps/details?id=com.duckduckgo.mobile.android)
* **Brave -** [**Install**](https://play.google.com/store/apps/details?id=com.brave.browser\&hl=en_US\&gl=US)
* **Chrome -** [**Install**](https://play.google.com/store/apps/details?id=com.android.chrome)

## Autofill Set Up

1. To enable KeeperFill, navigate to Keeper's **Settings** menu, then toggle **"KeeperFill" on** and tap **Set Up > Open Autofill Settings**.

<div><figure><img src="/files/hCJ8pRx11Sd4vjaop886" alt="" width="188"><figcaption><p>Settings</p></figcaption></figure> <figure><img src="/files/LsKHpzMhycp4vEIGPvOI" alt="" width="188"><figcaption><p>Enable KeeperFill</p></figcaption></figure> <figure><img src="/files/hRvroHN4mVXj5ZCdoDJh" alt="" width="188"><figcaption><p>Set Up</p></figcaption></figure></div>

2. You’ll be redirected to your device Settings to select Keeper as your "Preferred service for passwords, passkeys & autofill".

<figure><img src="/files/8o3gPr08GjIE75utTzNX" alt="" width="188"><figcaption><p>Select Keeper as Preferred Service</p></figcaption></figure>

3. You will then prompted to enable various settings on your device including:

* Selecting Keeper as the "Autofill service"
* Enabling KeeperFill in Chrome by selecting **Autofill using another service >** **Restart Chrome** (if Chrome is set as the default browser on your device).

4. Navigate back to Keeper and tap **Done**. You are now ready to start using KeeperFill.

{% hint style="info" %}
Android also supports “Additional Autofill Services” which create pop-ups via Google Credential Manager, a separate autofill option. Enabling Keeper as an additional service is not recommended as it will not trigger the fill options above your keyboard which provides the most reliable and seamless autofill experience.
{% endhint %}

## Autofill in Apps & Web Browsers

From the app or website login screen, tap **Sign in to Keeper** located above the keyboard and authenticate to Keeper.

![Sign In to Keeper](/files/rPyY7jvxxMIEaTxp2WSr)

If Keeper identifies a record match, your login will be displayed. Simply tap on your **login** next to the Keeper icon to autofill your credentials. Some apps and sites have more than one login screen and may require you to tap your login on each screen.

<div><figure><img src="/files/DcQ3HQTthgsV40TkIX7H" alt="" width="188"><figcaption><p>Select Record Match</p></figcaption></figure> <figure><img src="/files/0HP1EaSnp8pGEN7ZFXIS" alt="" width="188"><figcaption><p>Login Autofilled</p></figcaption></figure></div>

## Record Search & Creation

If you would like to search for a record in your vault or create a new record, tap the **Search/Add** button above your keyboard.

Then tap **Create New Record**, enter the record details, then **Fill & Save** to save the record to your vault and autofill the newly created login into the app or site.

<div align="center" data-full-width="true"><figure><img src="/files/TeVz9Qnza7Z4lgzLMxI9" alt="" width="188"><figcaption><p>Search/Add Record</p></figcaption></figure> <figure><img src="/files/bdamNdRE7KnSJRwigF5c" alt="" width="188"><figcaption><p>Create a New Record</p></figcaption></figure> <figure><img src="/files/DDLBM1FLGHuI8Z9gBrM0" alt="" width="188"><figcaption><p>Enter the Record Details and Autofill</p></figcaption></figure></div>

Or if you'd like to search for an existing record, select the record from your records list and tap **Fill** to autofill the login into the app or site.

<div><figure><img src="/files/986ZlZsUSqv2dICrw5H8" alt="" width="188"><figcaption><p>Select Record > Fill</p></figcaption></figure> <figure><img src="/files/LeDOqrBJ2STNHmLsYCco" alt="" width="188"><figcaption><p>Login Autofilled</p></figcaption></figure></div>

## Logging in With Passkeys <a href="#passkey-login-on-websites-or-apps" id="passkey-login-on-websites-or-apps"></a>

Keeper supports the use of FIDO2 passkeys for any supported websites and applications. By leveraging KeeperFill, users can conveniently authenticate without passwords, enhancing security and usability.

To ensure that your device uses Keeper for passkey login, from your device Settings menu, navigate to "Passwords, passkeys and data services" and select Keeper as your preferred service.

<div><figure><img src="/files/4ogEhMXkRVZkGvp8SKR9" alt="" width="188"><figcaption><p>Create Passkey</p></figcaption></figure> <figure><img src="/files/8cjwcqt26Uyb9nIzqPCS" alt="" width="188"><figcaption><p>Log In with Passkey</p></figcaption></figure></div>

* Passkeys work on websites and applications that have been specifically built to support them.
* Upon tapping **Create Passkey** on a site or app, Keeper will intercept the request to create and save a passkey to your vault.
* Returning to sites or apps where you have a stored passkey you will either be prompted to sign in with passkey or will be able to select **Sign in with Passkey**. Keeper does the rest!

{% hint style="warning" %}
Passkeys are available on Android devices running **Android 14+** and work on websites and applications that have been specifically built to support them. Keeper maintains a passkey directory, which can be found [HERE](https://www.keepersecurity.com/passkeys-directory/).
{% endhint %}

## Troubleshooting

Common autofill issues and solutions for Android are covered below.

<details>

<summary>"My passwords aren't appearing at all."</summary>

**Solution 1:** Confirm Keeper is selected as your "Preferred service for passwords, passkeys, & autofill" by revisiting our setup steps [here](#setup).

**Solution 2:** Disable and re-enable KeeperFill in Keeper's Settings menu.

{% hint style="warning" %}
Some apps or websites (like certain banking apps, streaming services, or complex login flows) use unique coding that can make autofill challenging. We're constantly working to improve Keeper's detection across all platforms, but sometimes specific sites may require a manual fill.
{% endhint %}

</details>

<details>

<summary><strong>"Keeper doesn't immediately appear when I open an app or website."</strong></summary>

**Solution 1:** Tap on the username or password field to prompt your keyboard to display Keeper's autofill suggestions.

**Solution 2:** Close and then re-open the app or website to refresh the page and try again.

**Solution 3:** Ensure your keyboard app is updated to its latest version via the Google Play Store. Temporarily switch to a different keyboard app (if you have one installed) to see if the issue persists. This can help determine if the problem is with your current keyboard.

**Solution 4:** When using the latest Chrome browser, you can also long press on the field you are attempting to fill and select "Autofill". This should trigger autofill suggestions above of your keyboard.

<figure><img src="/files/kqC9BB6bVWzMqSb6vI58" alt="" width="188"><figcaption></figcaption></figure>

</details>

<details>

<summary>"Keeper is autofilling the wrong field."</summary>

This can happen when apps or websites don't follow Google's coding standards, which can confuse the autofill service.

**Solution 1:** f you run into a scenario like this, [contact our support team](https://www.keepersecurity.com/support.html) with the specific app/website details so our team can investigate and make improvements or suggestions.

**Solution 2:** Open the Keeper app and manually copy-paste your login credentials directly into the website or app.

</details>

<details>

<summary>"My Passkeys are not appearing for Keeper."</summary>

**Solution:** Go to your device **Settings** > **"Passwords, passkeys and accounts"** (or similar) and confirm Keeper is selected as your passkey provider. You may need to reselect Keeper after Android OS updates.

{% hint style="warning" %}
Remember, passkeys work on **Android 14+** and only on websites/apps specifically built to support them.
{% endhint %}

</details>

<details>

<summary>"My Samsung device isn't automatically clearing items copied to my clipboard."</summary>

**Solution:** Keeper can clear your clipboard automatically, but Samsung devices override this due to system behavior. To manually clear your clipboard, tap the **clipboard icon** at the top of your keyboard (Gboard, Samsung Keyboard, etc.) and select the option to delete all items.

<div><figure><img src="/files/yODCTHJsQxII9rM79LPS" alt="" width="188"><figcaption><p>Clipboard Icon</p></figcaption></figure> <figure><img src="/files/ct5eU7YyR6izQDez1KJj" alt="" width="188"><figcaption><p>Delete Items in Clipboard</p></figcaption></figure></div>

</details>

#### **Keep Your Chrome Browser Updated**

To ensure the best autofill performance, always keep your Chrome or Chromium based browser updated to the latest version. Most recent autofill inconsistencies on Android were resolved in Chrome version 141 and higher.

Updating your browser is the most effective way to receive official fixes and performance improvements directly from Google.

#### How to Update Chrome

1. Open the Google Play Store app.
2. Tap your profile icon at the top right.
3. Tap Manage apps & device.
4. Find Google Chrome under "Updates available" and tap Update.

#### Other Reasons You Might Experience Autofill Inconsistencies

Android's diverse ecosystem (different manufacturers, OS versions, keyboards, and updates) can cause inconsistent autofill behavior across devices and apps.

* **System Updates:** Major Android updates can temporarily affect autofill performance until password managers adapt.
* **App/Website Design:** If login fields aren't coded to Android standards, any autofill service may struggle to recognize them.
* **Browser Behavior:** Some browsers prioritize their built-in password managers or lag behind updates, causing inconsistencies. We recommend Chrome or Chromium-based browsers for best results.

#### Still Having Trouble?

If you've gone through these troubleshooting steps and are still experiencing issues, please reach out to our [support team](https://www.keepersecurity.com/support.html).

Keeper is dedicated to continuously monitoring any changes and improving our autofill detection. When you report a specific website or app that isn't working, our team investigates the cause and reports bugs directly to Google. Your feedback helps us ensure a permanent fix is included in future updates!


# Record Types

How to create and manage new types of records in your vault

![](/files/-MknJ8TcfG_7nnkKPaCz)

A Keeper Record Type is a structured template that can contain any type of information such as logins, payment cards, bank accounts, and many more. There are several out-of-the-box record types available for users.

## Overview

{% embed url="<https://vimeo.com/828471207?share=copy>" %}
Record Types
{% endembed %}

## Default Record Types

Below are the list of available record types for all consumer and business customers. Business customers should note that your Keeper Administrator may restrict the use of some record types.

<figure><img src="/files/WuHWV5JS6PpHE7G5ydJa" alt=""><figcaption><p>Create New Record > Record Type Dropdown</p></figcaption></figure>

| Record Type       | Description                                                                                                                                       |
| ----------------- | ------------------------------------------------------------------------------------------------------------------------------------------------- |
| Login             | The set of data needed to successfully login to a website.                                                                                        |
| Payment Card      | Credit card information, used in autofilling of forms. Payment cards can also be "linked" to other records, to reduce duplication of data.        |
| Contact           | Identity information about a particular person. We recommend you create one with your information, used in autofilling of forms.                  |
| Address           | Address information used to identify a physical location. Address records can also be "linked" to other records, to reduce duplication of data.   |
| Bank Account      | Banking information, such as account number and routing numbers.                                                                                  |
| File Attachment   | One or more files can exist in a file record.                                                                                                     |
| Photo             | One or more photos can exist in a photo record.                                                                                                   |
| Driver's License  | Drivers license information, such as name, number and expiration. We recommend you store pictures of both the front and back in this record type. |
| Birth Certificate | Birth information such as date of birth and name. We recommend you store a high quality scan of your birth certificate in this record type.       |
| Database          | Database information such as Type, hostname and port. Can be used to rotate database credentials in Commander.                                    |
| Server            | Server information such as hostname and login info. Can be used to rotate or connect to servers in Commander.                                     |
| Health Insurance  | Health insurance information such as account number and the insured's contact info.                                                               |
| Membership        | Membership information including account information and name. We recommend you store a scan of membership the barcodes in this record type.      |
| Secure Note       | Secure information that is masked when the record is viewed. The record contents can be unmasked at will.                                         |
| Passport          | Passport information such as number and expiration. We recommend you store a high quality scan of your main passport page in this record type.    |
| Identity Card     | Identity information such as number and expiration. We recommend you store a high quality scan of your ID card in this record type.               |
| Software License  | Software license information such as the license number and purchase date.                                                                        |
| SSH Key           | SSH information, such as public and private key strings. We recommend you attach any relevant key files in this record type.                      |
| Custom            | Business customers can create custom types that will appears for users.                                                                           |
| WiFi              | WiFi records help securely store and easily access the details needed to connect to a wireless network.                                           |

## Custom Fields

{% embed url="<https://vimeo.com/585563561>" %}
Custom Fields
{% endembed %}

There are a variety of Custom Fields available that can be added to any record.

![Custom Fields](/files/oto9stgTtEffGN6hldFq)

**Available Custom Fields**

* Text
* URL (website address) used for Autofill
* Security Question & Answer
* Multi-line Text
* Date
* Email
* Name
* Address (new or linked)
* Pin Code (4-digit numeric)
* Phone Number
* Payment Card (new or linked)
* Hidden Field

## Custom Record Types

Keeper Admins can create custom types that fit the needs of your organization. Custom types can be created for all users, or users within specific roles. If you are not seeing a particular record type, or if you would like to have a new type of record, please ask your Keeper Administrator.

To learn more about the Keeper Business product, click here:\
<https://www.keepersecurity.com/business.html>\
\
To suggest new default templates for all consumers, please send an email to <feedback@keepersecurity.com>.

## Sharing

Record Types can be shared to other users, either direct sharing or within a Shared Folder, just like any other record. This now includes Payment Cards and Contact record types.

{% hint style="info" %}
The Payment Cards stored in the "Identity & Payments" section of the vault is separate, and cannot be shared to other users. To make a Payment Card available for sharing, please create the record within the Vault section. Migration from data stored in Identity & Payments is planned for a future release.
{% endhint %}

![Payment Cards](/files/H5JPM3ef8Arn9fz9vEnS)

To create Payment Cards that can be shared to other users, click on **Create New** > **Record**, then select the **Payment Card** type.

## Migration Notes

* The "General" record type is Keeper's legacy record version.
* Both newly created records and "General" record versions can be converted between types.
* The new Custom Field types can only be added to new Record Type records.


# Sharing

With Keeper's powerful record sharing capabilities, users can securely share their records and folders with family, friends, co-workers and others across all devices, with ease.

![](/files/JOC6II4gothU1yQ0dIQm)

## Overview

Do you need to share confidential documents with a family member? Or maybe you want to share your Wi-Fi password with a friend. Sharing is one the most common use cases of password managers. Keeper offers various easy-to-use sharing solutions with a range of accessibility permissions to fit all of your sharing needs.

## Types of Sharing

* **Share a Record** — easily share a single record with another Keeper user and choose from various permission types to control access (can edit, can share, can edit & share, view only and transfer ownership).
* **Share a Folder** — share multiple records at once by sharing a folder with another Keeper user or users. Set permissions that govern the records and users within the folder. Keeper currently allows users to choose between two folder systems:
  * **Nested Share Folders**: Keeper's new folder model, supports nested hierarchies up to five levels deep, role-based permissions and independent sharing configurations at every level. To request access and learn more click [here](/user-guides/sharing/nested-shared-subfolders#introducing-nested-share-subfolders).
  * **Classic Folders**: Keeper’s original folder, sharing and permissions model remains fully functional to support existing workflows.
* **Share a File** — securely share files with other Keeper users via record or folder sharing.
* [**One-Time Share**](/user-guides/sharing/one-time-share) — provides time-limited secure sharing of a record to anyone, even if they don't have a Keeper account.
* [**Time-Limited Access**](/user-guides/sharing/time-limited-access) — share records and folders with other Keeper users on a temporary basis.
* [**Self Destructing Records**](/user-guides/sharing/self-destructing-records) — share records with user's outside of Keeper, while automatically deleting the record from your vault and disabling the share link at specified time.

## Share a Record

Click the **Share** button.

![Share a Record](/files/hpmQlsWhzpDoih3b7Fxm)

From the "Add People" tab, click within the **email address field** and enter the email address of the Keeper user you would like to share the record with.

Click the dropdown arrow to set their permission level (can edit, share, edit & share, view only and transfer ownership) and click **`Add`**.

{% hint style="success" %}
Continue reading to learn more about "User Permissions".
{% endhint %}

![User Search Bar](/files/NMMFe55uBSz7wFJt5Wwr)

If this is the first time you are sharing with this person, you will first need to establish a "sharing relationship". The user will receive an email prompting them to login to Keeper and either accept or deny the share request. Once you establish a sharing relationship, the user will appear in the email dropdown list.

Business and Enterprise users within the same tenant already have an established sharing relationship and don't require additional verification.

![Send Invite Prompt](/files/uqj4qcRj4sjJlHJHTvY2)

![Keeper Sharing Request Email](/files/JsdsVFJ6ljzigouG0P0l)

The list of users the record is shared with will now appear in the record's sharing screen. You can make changes to the User Permissions at any time by clicking on the **dropdown arrow** next to the user's email.

![User Permissions Dropdown](/files/GeNskkLNc37ByFkfH0ku)

![User Permissions Menu](/files/047y9MhxZMcFDWcSf5Cm)

### User Permissions

User Permissions are designed to control the permissions a user has over the record that is shared with them.

| Permission Name    | Permission Level                                                          |
| ------------------ | ------------------------------------------------------------------------- |
| Can Edit           | User can edit this record                                                 |
| Can Share          | User can share this record                                                |
| Can Edit & Share   | User can edit and share this record                                       |
| View Only          | User can only view the record                                             |
| Transfer Ownership | User will obtain ownership of the record and control the user permissions |

## Share a Folder

{% hint style="info" %}
This guide covers Keeper's "Classic" Folder System, if you would like more information about our new Nested Share System, click [here](/user-guides/sharing/nested-shared-subfolders).
{% endhint %}

Shared folders allow you to share multiple records at once and new records can be added to the folder as needed.

#### Create a Shared Folder

To create a Shared Folder, click **Create New > Shared Folder**.

![Create New > Shared Folder](/files/oO1jdmuhjzW0eAUMPH69)

Choose where you would like to nest the folder using the dropdown menu and enter a name for the folder. Set the User and Folder Permissions and click **Create**.

<figure><img src="/files/djXQWpJlSGSzf9vGSE3k" alt=""><figcaption><p>New Shared Folder Creation</p></figcaption></figure>

{% hint style="success" %}
"User and Record Permissions" will be covered in the subsequent sections of this guide.
{% endhint %}

#### Add Records to a Shared Folder

You can add records to the folder by a simple drag-and-drop or you can click **Edit** and add the records using the record search bar.

![Add Records to a Folder via Drag-and-Drop](/files/rq4VBe28fKNdRFogQTMe)

![Records Search Bar](/files/D0DRon11FOprSx8X19zV)

Set the record(s) permissions by clicking on the **dropdown arrow** next to the record.

![Permissions Menu](/files/t2ia4PoFGVzXeaj8pRqf)

### Record Permissions

Record Permissions are used to govern folder members' (users) interactions with each individual *record* in the folder. You can access these permissions from the "Records" tab and click on the dropdown next to the record name.

| Permission       | Description                                        |
| ---------------- | -------------------------------------------------- |
| Can Edit         | Users in the folder can edit this record           |
| Can Share        | Users in the folder can share this record          |
| Can Edit & Share | Users in the folder can edit and share this record |
| View Only        | Users in the folder can only view this record      |

#### Share a Folder with Other Users

From the "Users" tab, click within the email address field and enter the email address of the Keeper user you would like to share the folder with.

You may need to establish a "sharing relationship". The user will receive an email prompting them to login to Keeper and either accept or deny the share request. Once you establish a sharing relationship, you can share the record and the user's email will appear in the email dropdown list.

Business and Enterprise users within the same tenant do not need to approve a sharing relationship.

![Add Users to a Folder via the Users Search Bar](/files/e9Zs88fJZKs75dyIHWAh)

Set the User Permissions by clicking on the **dropdown arrow** next the user's email.

![User Permissions Menu](/files/w8f8ByANxzUdv6qCF8Ph)

### User Permissions

User Permissions are used to govern each individual user's ability to *add or remove records and other users to the folder.* You can access User Permissions from the "Users" tab and click the dropdown next to the user's email.

| Permission                 | Description                                                                     |
| -------------------------- | ------------------------------------------------------------------------------- |
| Can Manage Users           | The user can add or remove other users in the folder                            |
| Can Manage Records         | The user can add or remove records in the folder                                |
| Can Manage Users & Records | The user can add or remove other users and records in the folder                |
| No User Permissions        | The user will have no permissions over the other users or records in the folder |

### Subfolders

To create a Subfolder within a Shared Folder, right-click on a **Shared Folder** and select **New Folder**. Enter the name of the Subfolder and add records via drag-and-drop or using the record search bar.

<figure><img src="/files/uv2OI5rd00U1XEix2pTG" alt=""><figcaption><p>Right-Click to Create a Subfolder</p></figcaption></figure>

While viewing the records within a Shared Folder, click **Edit** and check the box next to “Show subfolder records" located in the Records tab to include those records in view or leave it unchecked to collapse them from view.

<figure><img src="/files/mV6EZdXVMudYPA2lrMEU" alt=""><figcaption><p>Show Subfolder Records</p></figcaption></figure>

### Default Shared Folder Settings

Default Shared Folder Settings are configured in order to easily set folder permissions for all users and records within the folder and subfolder(s). These are selected upon the initial creation of the Shared Folder but you can change them at any time by clicking the **edit icon** in the upper right corner of the shared folder.

<figure><img src="/files/7kxD6SgghC6grBYmxyDZ" alt=""><figcaption><p>Edit Shared Folder</p></figcaption></figure>

If you would also like to apply the permissions change to your subfolder records, you must first check the box next to "Show subfolder records" located within the "Records" tab.

<figure><img src="/files/j51JM6PgWxfFog7RGtD6" alt=""><figcaption><p>Show Subfolder Records Configuration</p></figcaption></figure>

Next, select the "Settings" tab and click each dropdown arrow to set your default "User" and "Record" permissions for the folder.

<figure><img src="/files/P2d8gHqekJfmggi35Zba" alt=""><figcaption></figcaption></figure>

Optionally, check the box next to "Apply permissions to existing \[x] records" to apply the changes to any existing folder records. You can also check the box next "Apply permissions to all subfolders (\[x] records)".

<figure><img src="/files/aL5fynoBmwnmWiVeVcLN" alt=""><figcaption><p>Options to Apply Permissions to Existing Folder and Subfolder Records</p></figcaption></figure>

{% hint style="warning" %}
If the default folder settings are not set properly, users who add records to the Shared Folder will find that the records are "View Only" by other members of the Shared Folder, even if those users have "Can Manage Records" permission. If you would like all folder members to have edit rights over all records that are added to the folder, set the **Record Permissions** setting to **"Can Edit"**

The "Can Manage Record&#x73;**"** User Permissions setting only allows users the ability to add or remove records, it does NOT give them record permissions.
{% endhint %}

Once the default folder settings are configured, it will only affect users added after the change was made. To edit permissions for the users added prior to the default settings change, edit them individually or through a bulk change from the "Users" tab.

A bulk change can be achieved by checking the box next to "Name" and clicking the "Permissions" dropdown to make your selection.

<figure><img src="/files/fC8d49BKeOL7mMsLLPs4" alt=""><figcaption><p>Bulk Permissions Change to Shared Folder Users</p></figcaption></figure>

Once all changes have been made, click **Save**.

### Granular Shared Folder Permissions

Record edit rights are defined by record-level permissions (which can be set by default on the folder settings tab). In a situation where teams must have different rights to the same records inside a folder, there are two solutions:

* Using view-only teams:

From the Admin Console, users can be added to view-only teams, which are teams with the "Disable record edits" flag enabled:

<figure><img src="/files/qJGMyVaCcyR4fGGsLLoC" alt="" width="478"><figcaption></figcaption></figure>

These teams can then be added to the Shared Folder's Users tab to grant different rights to the folder's content:

<figure><img src="/files/k7ztR3ujjcQrtHN9SLCm" alt=""><figcaption></figcaption></figure>

* Using separate Shared Folders and shortcuts:

If view-only teams are not feasible for any reason, different Shared Folders can be created with different record-level permissions, with specific users/teams added to either Shared Folder. In order to keep the same records across all Shared Folder copies, shortcuts should be created:

<figure><img src="/files/9b37oio93QlNcfwqbGBW" alt=""><figcaption></figcaption></figure>

### Deleting & Leaving a Shared Folder

A user with access to a Shared Folder has the option to remove themselves from the Shared Folder. If the user has been granted the **Can Manage Users & Records** permission, the user also has the ability to delete the Shared Folder.

![Leave Shared Folder vs. Delete Shared Folder](/files/UQdj1LR4byqSIxza0raO)

{% hint style="info" %}
When a Shared Folder is deleted, the records stored in the Shared Folder will be moved to the "Deleted Items" section of the vault, for the owner of each record.
{% endhint %}

## Share a File

Keeper offers Secure File Storage to protect your confidential files, photos, and videos. Securely upload and share files such as passport photos, medical cards, drivers licenses, tax and loan documents, videos and any other private files.

To share a file you can either create a New Record or Shared Folder or add a file to an existing record or shared folder.

To upload a file to a new or existing record, click **Files or Photos** or simply drag-and-drop the file directly into the record.

![Secure File Upload via Files or Photos Button](/files/dbFw0c9CuBCSaDGy4lix)

![Secure File Upload via Drag-and-Drop](/files/GBn0KphCicXhwXsoeCea)

Now you can share the record like you would any other record by clicking the **Share** button (more on that [here](#share-a-record)).

![Share a Record](/files/qQqZJvZ9VPDcgSe9OLpi)

{% hint style="info" %}
If you are an Enterprise user, file sharing may be restricted by your Keeper Administrator.
{% endhint %}

## One-Time Share

Keeper "One-Time Share" provides time-limited secure sharing of a record to anyone who doesn't have a Keeper account. One-Time Share is the most secure way to send confidential information without exposing information over email, text message or messaging.

{% embed url="<https://vimeo.com/701772231>" %}
Keeper One-Time Share
{% endembed %}

{% hint style="info" %}
To learn more about Keeper One-Time Share, click [here](/user-guides/sharing/one-time-share).
{% endhint %}

## Sharing Security

Record sharing utilizes Elliptic Curve (EC) encryption. To learn more about Keeper's sharing encryption model, click [here](/enterprise-guide/keeper-encryption-model#sharing).

![](/files/BfhOgZptnt40Tb2HNSLD)

* Keeper is a zero-knowledge security provider. Zero-knowledge is a system architecture that guarantees the highest levels of security and privacy. Encryption and decryption of data always occurs locally on the user's device.
* Just like our password encryption technology, Keeper protects your confidential files with 256-bit AES encryption using record-level keys.
* The encryption model implemented for one-time sharing uses the same technology as [Keeper Secrets Manager](https://docs.keeper.io/keeperpam/), a zero-knowledge and zero-trust platform for protecting cloud infrastructure.


# Nested Shared Folders

Guide to Keeper's nested shared folders with role-based permissions and inherited access controls.

<figure><img src="/files/Syf7O074ro3XoGWyuxVx" alt=""><figcaption></figcaption></figure>

## Introducing Nested Shared Folders

Keeper is redefining how users and teams organize, share and protect their most sensitive records. With the introduction of **Nested Shared Folders with Role-Based Folder Permissions**, we’ve rebuilt the vault’s folder, sharing and permissions model from the ground up, delivering a more flexible and scalable experience for every user and team.

During this transition, the new Nested Shared Folder system will exist alongside the existing Classic folder system and permission model, with two distinct folder icons to help users easily differentiate between them.

To maintain clarity and prevent compatibility issues, the Classic and Nested Shared Folder systems cannot coexist or be mixed in the same folder structure. Existing workflows remain unaffected while organizations adopt the new experience at their own pace. In the future, we plan to support conversion between the two systems — for now, they remain separate.

{% hint style="info" %}
This feature is currently available by invitation only. To request access or learn more, please contact your Keeper representative or visit [keepersecurity.com/contact](https://www.keepersecurity.com/contact.html).
{% endhint %}

<figure><img src="/files/LcRx5o5uc7m6szyUQts3" alt=""><figcaption><p>Nested Shared Folders</p></figcaption></figure>

## Key Features

* **Hierarchical organization up to five levels deep** — Create folders and subfolders with independent sharing configurations at each level, enabling logical organization that scales with your team structure.
* **Role-based folder permissions** — Assign granular permissions at both the folder and record level, giving every user exactly the access their role requires. Permissions can be applied through inheritance (flowing automatically from parent to child folders), direct folder assignment, or direct record assignment.
* **Permission inheritance with targeted overrides** — Broad access policies apply consistently across a folder structure, with the flexibility to make precise exceptions at any level. When multiple permission paths apply, precedence rules ensure the most specific assignment wins — record-level permissions override folder-level ones, which override inherited permissions from a parent.
* **Access management controls** — Share managers can add users and teams, perform bulk permission changes, and set access expiration dates or revoke access entirely at the folder or record level. Users cannot grant permissions higher than their own access level.

## Permissions & Access Model

Role-Based Folder Permissions give administrators granular control over exactly who can view, edit, share and manage content at every level of the folder hierarchy — whether you're an individual user, managing a small team, or operating across a global enterprise.

Permissions can be applied in three ways:

* **Inherited access** — permissions flow down automatically from a parent folder through all nested subfolders and records within it, so broad access policies apply consistently without manual effort
* **Direct folder permissions** — a specific permission level is assigned to a user or team on a particular folder
* **Direct record permissions** — a specific permission level is assigned to a user or team on an individual record

When multiple paths apply, precedence rules determine the effective access level — enabling administrators to set broad policies at the top of a structure while making precise exceptions wherever needed. User roles define the scope of what each individual can do, ranging from record-level work to administrative control across the organization.

{% hint style="info" %}
To learn more about precedence rules, keep reading or click [here](#how-precedence-rules-work).
{% endhint %}

## Permission Types

| Permission Type           | Permissions                                                      | Limitations                                                                                                   |
| ------------------------- | ---------------------------------------------------------------- | ------------------------------------------------------------------------------------------------------------- |
| Viewer                    | Can view content and participants                                | Cannot edit content, share with others, or manage permissions                                                 |
| Share Manager             | Can manage share permissions, invite others and approve requests | Cannot grant higher access than they have, share linked objects, or raise their own permissions               |
| Content Manager           | Can edit and add content                                         | Cannot manage sharing or permissions                                                                          |
| Content and Share Manager | Can manage content and share permissions                         | Cannot grant higher access than they have, share linked objects, or permanently delete records from the vault |
| Full Manager              | Can edit, share and manage ownership                             | Cannot manage organization-wide admin settings                                                                |

#### Important Notes About Permissions

* Sharing limits apply to the sharer's own access level. Users who manage sharing cannot grant permissions higher than what they themselves have. For example, a Share Manager cannot elevate someone else to Full Manager.
* Removing a record from a folder is not the same as deleting it. Some roles can remove records from a folder without the ability to permanently delete them from the Vault entirely.

## How Precedence Rules Work

When a user has permissions from multiple sources — for example, an inherited role from a parent folder *and* a direct role on a specific record — precedence rules determine which one applies.

The logic is straightforward:

* **Direct permissions override inherited ones.** A user who inherits "Viewer" access but is explicitly granted "Content Manager" on a specific record will have "Content Manager" access on that record.
* **More specific assignments win.** Record-level permissions override folder-level ones, which override inherited permissions from a parent.

## End-User Experience

#### Create a Folder

To create a new folder, click **Create New** > **Folder —** no need to decide between a regular or nested shared folder, you will have the opportunity to share the folder once its been created. Select the folder location from the dropdown menu and enter the folder name.

<figure><img src="/files/EMvTLzCNj9jBD3tmGE7T" alt=""><figcaption><p>Create a Folder</p></figcaption></figure>

Here you will have the option to use the Classic permission model by checking the box. This will limit sharing to basic access levels and can be used for compatibility with older workflows.

<figure><img src="/files/fT1mlsliE71zdSKGl5wp" alt=""><figcaption><p>Classic Permission Model Checkbox</p></figcaption></figure>

Classic and Nested Shared folders are easily distinguished by two distinct folder icons — Nested Folders display as solid in color, while Classic folders appear with a transparent icon

<figure><img src="/files/JgwubGLZfbs5R3SN9AGE" alt=""><figcaption><p>Nested Shared Folders vs. Classic Folder Icons</p></figcaption></figure>

#### **Create Nested Folders**

To create subfolders, right click on the parent folder and select **New Folder,** enter the folder name and click **Create**. You can create subfolders up to 5 levels deep with independent sharing configurations at each level.

<figure><img src="/files/B95UHQU3Eax1kklNt0gB" alt=""><figcaption><p>Create Subfolders</p></figcaption></figure>

#### **Add Records**

Once you've created the folder and any subfolders, you can begin adding records.

Add records by clicking the **edit icon** on the folder and adding them from the search bar dropdown menu.

<figure><img src="/files/vAN1Qa1G5zTCZMDVgIuN" alt=""><figcaption><p>Edit Folder to Add Records</p></figcaption></figure>

<figure><img src="/files/bZYEhdsvnPrDamZXU9Wk" alt=""><figcaption><p>Record Selection from Search Bar</p></figcaption></figure>

#### **Share & Set Permissions**

To share at the record or folder level, with the record/folder selected, click the **Share** button and add users or teams from the search bar.

<figure><img src="/files/56DRkuJwJjk6v2PKgxeY" alt=""><figcaption><p>Share Button on Selected Folder</p></figcaption></figure>

<figure><img src="/files/btoeTadJ21MIMh6DDB53" alt=""><figcaption><p>Add Users Or Teams to Folder</p></figcaption></figure>

You can now begin assigning permissions to each user/team as you add them by right clicking on the dropdown icon next to each. Click [here](#introducing-nested-shared-folders) to learn about each permission type.

In addition to setting the permissions you can also take the following actions:

* **Set Expiration**: Set a date after which record/folder access is automatically revoked
* **Remove Access**: Immediately revoke a user's record/folder access entirely

<figure><img src="/files/xiNo3jQvXpEsACLdP86P" alt=""><figcaption><p>Select Permissions, Set Expiration and Remove Access</p></figcaption></figure>

Achieve a bulk permission change by checking the box next to the users/teams, clicking the **Options** dropdown menu that will appear and selecting the desired permission.

Click on a record within a folder to view all "Users with Access" and all "Shared Folders" the record resides in. This clarifies whether the record is shared from a parent folder through inheritance and/or from an individual folder lower in the hierarchy.

<figure><img src="/files/pPcLKj4UY3L38BthfQPv" alt=""><figcaption><p>Users With Access and Shared Folder Detail</p></figcaption></figure>

## Nested Shared Folders on Mobile

Nested Shared Folders are also supported on Keeper's iOS and Android mobile apps, with an end-user experience consistent with the Web Vault.

### iOS

To create a new folder on iOS, tap the **Create button** and select **Create New Folder**. Enter a folder name and select the folder location from the dropdown menu. Once you tap **Create Folder** you can begin adding records.

{% hint style="info" %}
When creating a new folder, a checkbox allows you to use the Classic permission model. This will limit sharing to basic access levels and can be used for compatibility with older workflows.
{% endhint %}

<div><figure><img src="/files/c1MUO1NX9gZZkLhDZuYp" alt="" width="200"><figcaption><p>Create Button > Create New Folder</p></figcaption></figure> <figure><img src="/files/DCilSkCnkU54sVAv1jtU" alt="" width="200"><figcaption><p>New Folder Creation</p></figcaption></figure> <figure><img src="/files/mWMyc8mWbQQnWmYIqgek" alt="" width="200"><figcaption><p>Add Records to Folder</p></figcaption></figure></div>

To share the folder, tap the **overflow menu (⋮)** and select **Share** to add users and/or teams. Next, select any user or team to adjust their permission level or remove access.<br>

<div><figure><img src="/files/7DobDi4UxqOyWXrZAymt" alt="" width="200"><figcaption><p>Folder Overflow Menu</p></figcaption></figure> <figure><img src="/files/THnU3n35Wl8d7ECi3H0T" alt="" width="200"><figcaption><p>Search for Users &#x26; Teams</p></figcaption></figure> <figure><img src="/files/Zt5WdAekCiH97exxgbck" alt="" width="200"><figcaption><p>Set User Permissions</p></figcaption></figure></div>

To create a subfolder within an existing Nested Shared Folder, open the folder, click the **Create button** and select **Create New Folder**. You can then repeat the same process of adding records and and sharing with other users and teams.

<div><figure><img src="/files/jcTTDNH0dWU9lT4kP33N" alt="" width="200"><figcaption><p>Create Button > Create New Folder</p></figcaption></figure> <figure><img src="/files/Wg9tVW4xVfEqPRcOcO5k" alt="" width="200"><figcaption><p>Create New Subfolder</p></figcaption></figure></div>

### Android

To create a new folder on Android, tap the **Create button** and select **Create New Folder**. Enter a folder name and select the folder location from the dropdown menu. Once you tap **Create Folder** you can begin adding records.

{% hint style="info" %}
When creating a new folder, a checkbox allows you to use the Classic permission model. This will limit sharing to basic access levels and can be used for compatibility with older workflows.
{% endhint %}

<div><figure><img src="/files/5rySh5i1POYPoVNRYVDW" alt="" width="282"><figcaption><p>Create Button</p></figcaption></figure> <figure><img src="/files/eViNwDaWqf4pduONVsqj" alt="" width="282"><figcaption><p>Create New Folder</p></figcaption></figure> <figure><img src="/files/WJWSB0maReIjGcXPLAsp" alt="" width="282"><figcaption><p>New Folder Creation</p></figcaption></figure> <figure><img src="/files/DGmDXWhtvn8NcGcTjAua" alt="" width="282"><figcaption><p>Add Records to Folder</p></figcaption></figure></div>

To share the folder, tap the **overflow menu (⋮)** and select **Share** to add users and/or teams. Next, select any user or team to adjust their permission level or remove access.

<div><figure><img src="/files/rYADTpRmNNIDMbDUnazu" alt="" width="188"><figcaption><p>Folder Overflow Menu</p></figcaption></figure> <figure><img src="/files/7c24lIg1vooQ81vHb3AA" alt="" width="188"><figcaption><p>Search for Users &#x26; Teams</p></figcaption></figure> <figure><img src="/files/AqrOyuJpXzoUhaFvgIYe" alt="" width="188"><figcaption><p>Set User Permissions</p></figcaption></figure></div>

To create a subfolder within an existing Nested Shared Folder, open the folder, click the **Create button** and select **Create New Folder**. You can then repeat the same process of adding records and and sharing with other users and teams.

<div><figure><img src="/files/665GvG1naEK5zmokbrNX" alt="" width="188"><figcaption><p>Create Button</p></figcaption></figure> <figure><img src="/files/uDQn1jvfFtbuq9SPIj5p" alt="" width="188"><figcaption><p>Create New Folder</p></figcaption></figure> <figure><img src="/files/utEy3rFkP5VDBpsVMosC" alt="" width="188"><figcaption><p>Create New Subfolder</p></figcaption></figure></div>

## Record Deletion

Record deletion follows the same role-based permissions that control all other access in the vault. Only users with the appropriate permission level can delete records — ensuring that who can remove a record is governed by their role, not the folder system they're working in.

## Rollout Approach

The rollout of Nested Shared Folders is designed to minimize disruption and maximize flexibility:

* The Classic folder system remains fully supported and operational during the transition period
* The Nested Shared Folder system is available by request only at this time
* There is NO forced migration
* There is currently NO automatic conversion between Classic folders and Nested Shared Folders
* Both systems can operate in parallel during the transition

This approach gives organizations the freedom to move at their own pace, while exploring Nested Shared Folders when ready, without any pressure to abandon their existing vault workflows.

## Roadmap <a href="#roadmap" id="roadmap"></a>

The Nested Shared Folder feature is available through a "feature flag" that can be enabled by the Keeper support team. Over the coming weeks, we plan to gather customer feedback and roll out critical capabilities which include:

* Vault Transfer Policy
* Deletion and Restore
* Moving records
* Import
* One-Time Share
* Drag-and-Drop
* Migration from Classic shared folders
* iOS, Android, Browser Extension end-user application support
* Secrets Manager SDKs and integrations

## Frequently Asked Questions

<details>

<summary><strong>Can I grant a role that exceeds my own permission level?</strong></summary>

No. You can only grant roles up to and including your own permission level.

</details>

<details>

<summary><strong>What is the difference between Content Manager and Content and Share Manager?</strong></summary>

Content Manager can edit and create records, but cannot manage who has access to the folder. Content and Share Manager combines content management with the ability to invite users and control sharing.

</details>

<details>

<summary><strong>Does removing someone's access to a folder affect the records inside it?</strong></summary>

Yes. If a user's access to a folder is removed, they will also lose access to the records within that folder unless they have direct permissions on individual records.

</details>

<details>

<summary><strong>What happens when I set an expiration date?</strong></summary>

Access is automatically revoked on the expiration date. No manual action is needed. This is useful for temporary access scenarios (e.g. contractor access or time-limited projects).

</details>


# Time-Limited Access

Time-Limited Access allows you to securely share records and folders with other Keeper users on a temporary basis.

<figure><img src="/files/B9aaXDaFG725GQXXrlz5" alt=""><figcaption></figcaption></figure>

## Overview

Time-Limited Access allows you to securely share credentials or secrets with other Keeper users on a temporary basis, automatically revoking access at a specified time. Time-Limited Access prevents long standing privileges and ensures that information is removed from the recipient’s vault, greatly reducing the risk of unauthorized access.

{% embed url="<https://vimeo.com/930338779>" %}
Time-Limited Access
{% endembed %}

## Share a Record

Select the record from your vault and click **Share**, entering their email address or selecting it from your contacts list. Set their permission level and click **Add**.

<figure><img src="/files/pQ7D5TOgKujmBubQaQft" alt=""><figcaption><p>Share a Record</p></figcaption></figure>

<figure><img src="/files/ykBhx36VmqIh0g07uKmf" alt=""><figcaption><p>Add User and Set Permissions</p></figcaption></figure>

Select the “Permissions” dropdown and click **Set Expiration**. Here you can select one of the default expirations or click **custom date and time** to set your own. Next, check the box if you would like the record owner, such as yourself, or users with edit access to be notified via email when the recipient's record access expires. Click **Done** to save.

<figure><img src="/files/nti8fv33Of2JUkU07Vt0" alt=""><figcaption><p>Permissions and Option to Add Expiration</p></figcaption></figure>

<figure><img src="/files/2AE4VpPNLZ9KvDcWP0K7" alt=""><figcaption><p>Set Expiration and Email Notification</p></figcaption></figure>

<figure><img src="/files/Rhn0T6GZUKr0aZ8dXNec" alt=""><figcaption><p>Access Expiration Applied to User</p></figcaption></figure>

{% hint style="info" %}
The recipient of a shared record with time-limited access may have "view" and "edit" permissions but will not be able to share the record. If "share" permissions are applied, the expiration will be removed.
{% endhint %}

## Share a Folder

Open the shared folder from your vault and click the **edit icon** and from the “Users” tab, add the user or team you would like to share the folder with.

<figure><img src="/files/OgTHxMaq2mWOMEf08nzZ" alt=""><figcaption><p>Edit Shared Folder</p></figcaption></figure>

Set their permissions and from the dropdown menu click **Set Expiration**, following the same steps you would for a single record share (described above).

<figure><img src="/files/1QKQlZodUiJJXvy96KWO" alt=""><figcaption><p>Permissions and Option to Add Expiration</p></figcaption></figure>

Next, check the box if you would like users with "can manage records" permissions over the folder to be notified via email when the recipient's record access expires. Click **Done** to save.

<figure><img src="/files/keyqUsxBy0PEDWLOcGez" alt=""><figcaption><p>Set Expiration and Email Notification</p></figcaption></figure>

{% hint style="info" %}
The recipient of a shared folder with time-limited access may have "can manage records" permissions, but the ability to "manage users" is restricted. If these permissions are applied, the expiration will be removed.
{% endhint %}


# One-Time Share

Time-limited secure sharing of a record with anyone even if they don't have a Keeper account.

![](/files/FEb5sotYn4xk1z1DigbJ)

## Overview

Keeper "One-Time Share" provides time-limited secure sharing of a record to anyone without requiring them to create a Keeper account. One-Time Share is the most secure way to send confidential information to a friend, family member or co-worker without exposing information over email, text message or messaging.

![Create a One-Time Share in the Web Vault](/files/E1Ngaf5oKebGoRcZ4WGr)

One-Time Shares are secure by design, utilizing Keeper's Zero-Knowledge encryption. The record data is decrypted locally on the recipient's device using 256-bit AES and all requests to the server are signed with elliptic-curve cryptography (ECDSA).

Share links automatically expire at a time of your choosing, and they can only be used on one device. Even if you forget to un-share the record, it will expire and access will be revoked. As an additional layer of security, One-Time Shares are device-locked which means that only the original recipient is able to access the data. If the link is later opened up by a third party, or your email account is compromised, the link cannot be accessed, except on the original device.

{% embed url="<https://vimeo.com/701772231/d3c4fc9712>" %}
Keeper One-Time Share
{% endembed %}

## Use Cases

#### Consumer Use Cases

* Share your wi-fi password to a guest
* Share an encrypted file with a family member
* Provide time-limited access to payment cards

#### Business Use Cases

* Share access credentials with a contractor
* Share an encrypted file with a co-worker
* Provide secure documentation or instructions

## Delivery Options

* QR Code
* Airdrop
* Email
* SMS
* Other out-of-band channels

The applications and uses for this are virtually endless. Any time you have a need to securely deliver data to a non-Keeper user, One-Time Shares are the perfect choice.

## Create a One-Time Share

To generate a One-Time Share link, within the selected record, click **Share > One-Time Share > Create a One-Time Share**.

![Share a Record](/files/octKbNZGMGBmsxBaEqc9)

<figure><img src="/files/Zt4PIXb7UvfAwZH1pssr" alt=""><figcaption><p>Create a One-Time Share</p></figcaption></figure>

{% hint style="info" %}
One-Time Share is only available on records created after April 26, 2021 when we published Record Types. If you're not seeing the One-Time Share feature, try creating a new record.

If you are an Enterprise user, the use of One-Time Share may be restricted by your Keeper Administrator.
{% endhint %}

Next, select when you would like the share link to expire from the dropdown menu and click **Create Link**.

<figure><img src="/files/hS8J7NcudQlC4jyi0dcn" alt=""><figcaption></figcaption></figure>

{% hint style="success" %}
If you would like to learn how to enable bidirectional functionality for the share, allowing the recipient to edit and upload files to the record, click [here](#bidirectional-sharing).
{% endhint %}

To share the link you can either provide the URL , copy the pre-written invitation (for sending additional contextual information to the recipient), or you can provide a QR code to the recipient to scan and view the record.

![Copy the One-Time Share Link, Invite or Provide a QR Code](/files/gMvKjGATV57gq184inlD)

When the recipient of the share link opens the record, it will open in their web browser and be bound to their (one) device. The record access will automatically expire after the set amount of time.

![One-Time Share Recipient View](/files/W6IAjAkWCffEShMb1cQ6)

After the record access has expired or if the sender has deleted it, the link will no longer be valid, and existing devices will no longer load the information.

![Expired Access](/files/KyFgq5JCGZYkQUadzZMR)

## Delete a One-Time Share

To delete a One-Time Share, click the **trash icon** next to the share. This will immediately disable the share link. Expired shares will appear under the "Expired" tab.

<figure><img src="/files/WU1IcbXk0p4YZOmAZYse" alt=""><figcaption><p>Delete a One-Time Share</p></figcaption></figure>

## Bidirectional Sharing

Keeper's upgraded One-Time Share feature enables two-way sharing between Keeper users and non-users, providing a secure way of exchanging confidential information and files.

Bidirectional one-time sharing encourages seamless collaboration with the ability to collect signed documents, feedback or sensitive files and information from clients, contractors, legal times and anyone else without requiring them to create a Keeper account.

{% embed url="<https://vimeo.com/1106264709?share=copy>" %}
Introducing Keeper's Bidirectional One-Time Share
{% endembed %}

To utilize the bidirectional one-time sharing feature, begin by creating a one-time share as you normally would. Within the selected record, click **Share > One-Time Share > Create a One-Time Share**.

<figure><img src="/files/yUpjKrO7ObgMXYEJWwM8" alt=""><figcaption><p>Share a Record</p></figcaption></figure>

{% hint style="info" %}
The sender can enter any customized instructions for the recipient within the record "Notes" field.
{% endhint %}

To enable the bidirectional sharing capabilities for the record, check the box next to "Allow recipient to edit record fields and upload files". Use the dropdown menu to select when you would like the share to expire and click **Create Link**.

<figure><img src="/files/Y9p14qhW4S2sBnR8qih5" alt=""><figcaption><p>Allow Recipient to Edit and Upload</p></figcaption></figure>

{% hint style="info" %}
If you are an Enterprise customer, the use of Bidirectional One-Time Sharing may be restricted by your Keeper Administrator.
{% endhint %}

Once the recipient receives the secure share link, they can then **Click to Open** to view the contents of the shared record.

<figure><img src="/files/9AirZkhiNJ9MWBFATB7w" alt=""><figcaption><p>Click to Open the Record Details</p></figcaption></figure>

<figure><img src="/files/CeKljqPettw0Pbs2muQy" alt=""><figcaption><p>Recipient's View of the Record Details</p></figcaption></figure>

The recipient can upload file attachments and enter any other requested information or notes.

<figure><img src="/files/moDN6rwaZySL6dSHq3n8" alt=""><figcaption><p>Editable One-Time Share with File Attachments</p></figcaption></figure>

Once the recipient clicks **Save**, the original record will automatically update within the sender's vault with the added files/information. The sender and recipient can continue to edit the record until the share link expires or once access is revoked.

<figure><img src="/files/JGZdZQJxOSdZ0mLuWJqd" alt=""><figcaption><p>One-Time Share Record Details</p></figcaption></figure>

## iOS

Keeper One-Time Share with bidirectional sharing capabilities is also available for iOS.

Open a record then tap **Share > One-Time Share > Create a Share Link**.

<figure><img src="/files/IChcKT6WrT9wInFDS90B" alt="" width="188"><figcaption><p>Create Share Link</p></figcaption></figure>

From the dropdown menu, select when you would like the share link to expire and check the box if you want to allow bidirectional sharing capabilities (allowing the recipient to edit record fields and upload files), then click **Create Link**.

<figure><img src="/files/NUY3pKOMS4mRs5epJAw1" alt="" width="188"><figcaption><p>Expiration &#x26; Bidirectional Sharing<br>Options</p></figcaption></figure>

Once the share link has been created, tap **Share** or **Copy Link** (to paste into a message); additionally, the recipient can scan the provided QR code to view the record.

<figure><img src="/files/gXLkSi8OF9q5nXdzZUxP" alt="" width="188"><figcaption><p>Share or Copy Link</p></figcaption></figure>

{% embed url="<https://vimeo.com/705443423>" %}
Keeper One-Time Share for iOS
{% endembed %}

## Android

Keeper One-Time Share is also available for Android.

1. Open the record you would like to share then tap **Share > One-Time Share.**
2. Tap the **add share icon** in the lower right corner of your screen.
3. Select a record access expiration from the provided options or select a custom date and time.
4. Once the share link has been created, tap **Share**, **Copy Link** (to paste into a message) or the recipient can scan the provided QR code to view the record. When the recipient of the share link opens the record, it will open in their web browser and will be bound to their device. The record access will automatically expire after the set amount of time.

Keeper One-Time Share with bidirectional sharing capabilities is also available for Android.

Open a record then tap **Share > One-Time Share > Create Share Link**.

<div><figure><img src="/files/VyKm3r0AqCngTDvJM9r1" alt="" width="188"><figcaption><p>Share > One-Time Share Link</p></figcaption></figure> <figure><img src="/files/k11TxN2vAWd86msxpxZ0" alt="" width="188"><figcaption><p>Create Share Link</p></figcaption></figure></div>

From the dropdown menu, select when you would like the share link to expire and check the box if you want to allow bidirectional sharing capabilities (allowing the recipient to edit record fields and upload files), then click **Create Link**.

<figure><img src="/files/8Q2G7tjqDDPCwaFCWazh" alt="" width="188"><figcaption><p>Expiration &#x26; Bidirectional Sharing<br>Options</p></figcaption></figure>

Once the share link has been created, tap **Share** or **Copy Link** (to paste into a message); additionally, the recipient can scan the provided QR code to view the record.

<figure><img src="/files/GvcDNYC7JeD7yqTRBBwb" alt="" width="188"><figcaption><p>Share or Copy Link</p></figcaption></figure>

{% embed url="<https://vimeo.com/725743762>" %}
Keeper One-Time Share for Android
{% endembed %}

## Security

To learn more about the security and encryption model powering One-Time Shares, [read our security and encryption documentation here](/enterprise-guide/keeper-encryption-model#one-time-share-encryption-model).


# Self-Destructing Records

Self-Destructing Records allow you to share records with users outside of Keeper, while automatically deleting the record from your vault and disabling the share link at specified time.

<figure><img src="/files/yUtWSqc8CSTf3aSE2nap" alt=""><figcaption></figcaption></figure>

## **Overview**

Self-Destructing Record’s utilize Keeper’s existing One-Time Share technology which allows time-limited, secure sharing of a record to anyone, even if they don’t have a Keeper account.

Self-Destructing Records take our One-Time Share feature even further by automatically deleting the record from your vault once the share link is disabled and the recipient’s access is revoked. This reduces your workload to revoke record access and removing it from your vault at a later time.

{% embed url="<https://vimeo.com/935970269>" %}
Self-Destructing Records
{% endembed %}

## Create a Self-Destructing Record

To create a Self-Destructing Record, create a new record as you normally would. Enter the record details and click **Add Self-Destruct**.

<figure><img src="/files/yP2Vkqwxv17gmh6Tsgd7" alt=""><figcaption><p>Add Self-Destruct to a Record</p></figcaption></figure>

From the menu that is now presented, select when you want the share link to expire.

<figure><img src="/files/BsXkEnTFcPY661s9bUOH" alt=""><figcaption><p>Expiration Options</p></figcaption></figure>

Once you've made your selection, click **Save & Share** to generate a One-Time Share link.

<figure><img src="/files/KxbDJqRxULpFmOoQwFyv" alt=""><figcaption><p>Save &#x26; Share Record</p></figcaption></figure>

You have the option to copy the link directly, or send it in an invite or QR code format.

<figure><img src="/files/moK1I1J3OJW8pqGkTstE" alt=""><figcaption><p>Copy OTS Link</p></figcaption></figure>

The recipient of a Self-Destructing Record simply clicks on the provided link and is instantly presented with the shared record in their web browser. One-Time Share links are bound to a single device, further strengthening security and preventing unauthorized distribution or viewing on multiple devices. The link will expire at the specified time or once the recipient has viewed the record for five minutes, whichever comes first.

<figure><img src="/files/fvdDv4fD0vGAkFfVDdUM" alt=""><figcaption><p>One-Time Share Link</p></figcaption></figure>

## Securely Share Files Using Self-Destruct

Keeper's Self-Destructing Records allow you to securely share records with file attachments that self-destruct at a specified time.

Create a record as you normally would and click **Add Attachments** to upload your file, or simply drag and drop the file directly into your vault.

<figure><img src="/files/B7ZonFc0tNrLHtjHyN1a" alt=""><figcaption><p>Add Attachment to a Record</p></figcaption></figure>

Click **Add Self-Destruct**, select when you want the share link to expire, then click **Save & Share** to generate a One-Time Share link.

<figure><img src="/files/FjACy7dG8InUhSG251Zn" alt=""><figcaption><p>Add Self-Destruct to a Record</p></figcaption></figure>

<figure><img src="/files/QRlrWyEyTBW4xWN9bDs7" alt=""><figcaption><p>Self-Destructing Record With File Attachment</p></figcaption></figure>

The recipient of a Self-Destructing Record simply clicks on the provided link and is instantly presented with the shared record in their web browser. They can then click on the file to download it to their local device.

<figure><img src="/files/RXBCpaULrviP6PXBXkXL" alt=""><figcaption><p>One-Time Share Link With File Attachment</p></figcaption></figure>

## Delete a Self-Destructing Record

You can delete a Self-Destructing Record at any time, thus disabling the share link by clicking **Delete Now**. Deleted Self-Destructing Records will appear in your vault's “Deleted Items” with the option to "Restore".

<figure><img src="/files/5ANAvJjplURcyNPncxCY" alt=""><figcaption><p>Option to Delete Self-Destructing Record</p></figcaption></figure>


# Vault Offline Access

Offline access is a common use case for users who require vault access in poor network conditions.

<figure><img src="https://914511346-files.gitbook.io/~/files/v0/b/gitbook-x-prod.appspot.com/o/spaces%2F-LSGVtOTYUIkVBoYtFvK%2Fuploads%2FU5ihYBsZInGyVW2uHWvm%2FVault%20Offline%20Access.jpg?alt=media&#x26;token=05bfbf82-7930-4878-aa18-b4b512ca0751" alt=""><figcaption></figcaption></figure>

## **Overview**

Offline Mode allows users access to their vaults from any device when they are not able to connect online to Keeper. Offline access is available with all Keeper plans (except "Keeper Free") on Keeper Web Vault, Windows Desktop App, Mac Desktop App, Linux Desktop App and conditional offline access on mobile platforms.

This capability works by making a copy of your encrypted vault to your local device. The vault data is stored in an encrypted format which is only accessible if the user provides their master password or biometric authentication.

Multiple users can share a single device (e.g. a laptop PC) and all will have their vault stored safely on that PC when offline.

## Platforms That Support Offline Access

| Platform    | Version                                                             |
| ----------- | ------------------------------------------------------------------- |
| Desktop     | Keeper Desktop App (Mac, Windows, Linux)                            |
| Web Browser | [Web Vault](/user-guides/web-vault) (Chrome, Safari, Firefox, Edge) |
| Mobile      | iOS \| Android                                                      |

## Work Offline with an SSO Enabled Account

#### Web Vault & Desktop

If your organization's SSO is not available (e.g. is offline), click **Work Offline** in the lower right corner of your screen then click the **Enterprise SSO Login** dropdown and select **Master Password** to gain access to your vault offline.

From the login screen, enter your Master Password as usual to login offline.

![Work Offline](https://914511346-files.gitbook.io/~/files/v0/b/gitbook-x-prod.appspot.com/o/spaces%2F-LSGVtOTYUIkVBoYtFvK%2Fuploads%2FyBb9LSpegdAlcHN1bJKu%2FScreen%20Shot%202022-06-24%20at%2010.00.19%20AM.png?alt=media\&token=9d433423-047c-4629-999b-1d3a72d95c46)

![SSO Master Password for Offline Login](https://914511346-files.gitbook.io/~/files/v0/b/gitbook-x-prod.appspot.com/o/spaces%2F-LSGVtOTYUIkVBoYtFvK%2Fuploads%2F7hSY2vixYWykfRK33tKE%2FScreen%20Shot%202022-06-24%20at%2012.04.18%20PM.png?alt=media\&token=bb68a2ee-ccf3-49b6-bb65-cb0a36a1bfdd)

For users who normally login with SSO and do not also have a master password setup, you must first configure one in order to login to Keeper when offline. Simply visit your vault Settings Menu and clicking **Setup** next to "Master Password".

![Account Dropdown > Settings > Setup](https://914511346-files.gitbook.io/~/files/v0/b/gitbook-x-prod.appspot.com/o/spaces%2F-LSGVtOTYUIkVBoYtFvK%2Fuploads%2FM4YJpWPShzSyHrUusVA2%2FSettings%20Image.png?alt=media\&token=60b04dd3-e585-4810-a980-eae795c463ad)

{% hint style="info" %}
If this option is unavailable to you, please request this feature from your Keeper Administrator who can activate the capability from the Keeper Admin Console.
{% endhint %}

## Offline Setup

To access Offline Mode, your device will need to be “primed” with a local copy of your vault by logging in with an online connection at least once. Moving forward, you will have access to all of the records in your vault and you can create new records and edit existing records, all without requiring a network connection.

Users can confirm their Keeper Vault is available offline via a **lightning bolt icon** and **"Available Offline"** text which indicates your vault data has been loaded onto that device (the same will apply for Keeper on iOS and Android devices). If the availability indicator is not present, you will need to login to your vault at least once while online.

![Offline Availability on Web and Desktop](https://914511346-files.gitbook.io/~/files/v0/b/gitbook-x-prod.appspot.com/o/spaces%2F-LSGVtOTYUIkVBoYtFvK%2Fuploads%2FhNlOs6d5xpobKZJW6G6D%2FScreen%20Shot%202023-09-27%20at%2012.59.20%20PM.png?alt=media\&token=41870f6f-5359-43aa-b21e-8c50cc85c63a)

## Enable Offline Access

### Web Vault & Desktop App

By default, Offline Access will be turned off. To allow Offline Access, click on your email address in the upper-right corner of your vault home screen and select **Settings > Security**. Next click the dropdown menu next to "Allow Offline Access". You will then be asked to re-authenticate to Keeper in order to proceed.

<figure><img src="https://914511346-files.gitbook.io/~/files/v0/b/gitbook-x-prod.appspot.com/o/spaces%2F-LSGVtOTYUIkVBoYtFvK%2Fuploads%2FihVrfLdFNjOyR2NW1z2T%2FClick%20Offline%20Access%20dropdown.png?alt=media&#x26;token=10efed0e-d4e3-46d3-ab24-d60c6080d159" alt=""><figcaption><p>Settings > Security > Allow Offline Access</p></figcaption></figure>

Once you've entered your master password, you can choose for how long you would like Offline Access to be available (Always, 30 days, 14 days, 7 days or 1 day).

<figure><img src="https://914511346-files.gitbook.io/~/files/v0/b/gitbook-x-prod.appspot.com/o/spaces%2F-LSGVtOTYUIkVBoYtFvK%2Fuploads%2FQUsIHAGU4cOSRODfqnic%2FClick%2030%20Days.png?alt=media&#x26;token=20ff0208-5685-4f39-93de-b8b073fdad84" alt=""><figcaption><p>Set Offline Access Duration</p></figcaption></figure>

### Android

To allow Offline Access on your Android device, navigate to Keeper's **Settings** menu (Settings are located under your Avatar in the upper right corner of the app).

Next, tap **Allow Offline Access** and choose your preferred offline duration (Always, 30 Days, 14 Days, 7 Days, or 1 Day). Lastly re-authenticate to Keeper when prompted.

<div><figure><img src="https://914511346-files.gitbook.io/~/files/v0/b/gitbook-x-prod.appspot.com/o/spaces%2F-LSGVtOTYUIkVBoYtFvK%2Fuploads%2FXrsHUOJdea2ZteN7pFO4%2Foffline%20acces.png?alt=media&#x26;token=1ab35ef7-8642-4299-a85c-094121304f3b" alt="" width="375"><figcaption><p>Enable Offline Access</p></figcaption></figure> <figure><img src="https://914511346-files.gitbook.io/~/files/v0/b/gitbook-x-prod.appspot.com/o/spaces%2F-LSGVtOTYUIkVBoYtFvK%2Fuploads%2F2Z7yn1K17tfDsmWATGqR%2Fimage.png?alt=media&#x26;token=72ec5fb8-5110-4a88-8f42-6e417e8def60" alt="" width="375"><figcaption><p>Select Offline Access Duration</p></figcaption></figure> <figure><img src="https://914511346-files.gitbook.io/~/files/v0/b/gitbook-x-prod.appspot.com/o/spaces%2F-LSGVtOTYUIkVBoYtFvK%2Fuploads%2FBbxjx7aprqXiBmYyQGPV%2Fimage.png?alt=media&#x26;token=30672a4e-f649-4f8e-9e62-38f58cfbbb2d" alt="" width="375"><figcaption><p>Re-authenticate to Keeper</p></figcaption></figure></div>

### **iOS**

To allow Offline Access on your iOS device, navigate to Keeper's **Settings** menu. Scroll down and select **Allow Offline Access**.

Next, choose your preferred offline duration (Off, Always, 30 days, 14 days, 7 days, or 1 day). Lastly re-authenticate to Keeper when prompted.

<div><figure><img src="https://914511346-files.gitbook.io/~/files/v0/b/gitbook-x-prod.appspot.com/o/spaces%2F-LSGVtOTYUIkVBoYtFvK%2Fuploads%2FtoOM9V2icpAp7Qv0G7YD%2FTap%20Off.png?alt=media&#x26;token=fb41ac3f-7c9f-4392-af05-1406cda671e3" alt="" width="200"><figcaption><p>Settings > Allow Offline Access</p></figcaption></figure> <figure><img src="https://914511346-files.gitbook.io/~/files/v0/b/gitbook-x-prod.appspot.com/o/spaces%2F-LSGVtOTYUIkVBoYtFvK%2Fuploads%2F4FkkyBU3b3HQnJaYC1OE%2FSelect%2030%20Days.png?alt=media&#x26;token=eae28caf-7a76-428c-a502-7f1ddbcf701d" alt="" width="200"><figcaption><p>Choose Duration</p></figcaption></figure> <figure><img src="https://914511346-files.gitbook.io/~/files/v0/b/gitbook-x-prod.appspot.com/o/spaces%2F-LSGVtOTYUIkVBoYtFvK%2Fuploads%2FOIT1UZ7MGhGIdbLIKUdW%2FMaster%20Password%20Input%20Dialog%20-%20Empty.png?alt=media&#x26;token=01ff1fcd-2da6-41b2-96f8-b967e643b77d" alt="" width="200"><figcaption><p>Re-autheticate</p></figcaption></figure></div>

## **2FA and Offline Mode**

If **2FA** is enabled on your account, a warning will appear informing you that 2FA will be bypassed when accessing your vault in Offline Mode. This ensures that users are aware of the potential reduction in security when accessing their vault offline.

## **Re-authentication for Offline Access Changes**

You will be required to re-authenticate whenever you toggle the offline access on, including selecting a specific offline duration (e.g., Always Allowed or 30 Days). No re-authentication is needed when changing between the available "on" options (e.g., from 30 days to 14 days).

## **Admin Control Over Offline Mode**

For enterprise users, administrators may restrict offline access according to company policy. If offline mode is disabled by an administrator, a disclaimer will appear in the settings to explain why offline access is unavailable.

## Work Offline

To activate Offline Mode from the vault login screen or from within your vault on Keeper Web or Desktop, click **Work Offline** in the lower right corner of your screen. On iOS and Android devices, Offline Mode will automatically be initiated when logging in if you aren't connected to the internet.

![Activate Offline Mode](https://914511346-files.gitbook.io/~/files/v0/b/gitbook-x-prod.appspot.com/o/spaces%2F-LSGVtOTYUIkVBoYtFvK%2Fuploads%2F6UCgYlGSAG3dYhQWqSkS%2FScreen%20Shot%202022-06-24%20at%2010.00.19%20AM.png?alt=media\&token=5ae513d9-9395-4bba-a223-a05436beec98)

The "**Offline Mode"** indicator will appear at that top of your vault window.

{% hint style="info" %}
You can resume a session online at anytime (provided you have a stable network connection) by clicking **Go Online** in the upper right corner of your vault window.
{% endhint %}

## Offline Features

Keeper's offline capabilities are central to a user's ability to retrieve important data even in the poorest of network conditions. Key vault features that are available offline include:

* Creating new records
* Editing records
* Viewing your Security Audit score
* Viewing Deleted Items (Web and Desktop)

A notice will appear if you attempt to perform an action that is not available while offline.

![Feature Unavailable in Offline Mode](https://914511346-files.gitbook.io/~/files/v0/b/gitbook-x-prod.appspot.com/o/spaces%2F-LSGVtOTYUIkVBoYtFvK%2Fuploads%2FBuymD7qqcBqOxFLP09Jz%2FScreen%20Shot%202023-09-27%20at%201.05.21%20PM.png?alt=media\&token=95f94b7d-908f-4f6d-b24e-a47c636244e0)

If a device is being used temporarily (e.g. a borrowed PC), then the stored offline vault can be deleted from that device.

From the Keeper login screen, click the **dropdown icon** in the email address field, then click the "**X**" to the right of your email address to delete all offline data associated with that vault from the device. This action can be similarly performed on all Keeper platforms.

![Deleting Offline Data](https://914511346-files.gitbook.io/~/files/v0/b/gitbook-x-prod.appspot.com/o/spaces%2F-LSGVtOTYUIkVBoYtFvK%2Fuploads%2FyaEkwyI6IQ5kohFf3RzR%2FScreen%20Shot%202022-06-24%20at%2010.32.43%20AM.png?alt=media\&token=aa50d3af-4a6d-40af-8f7f-043cd32f2480)

## Troubleshooting

There are scenarios where Offline Mode might not function for you, based on configuration.

* If you are receiving error messages regarding the network connection, switch your device wi-fi or network connection completely off, and try to login again.
* If you are using the Keeper Web Vault, ensure that you are loading the vault from one of the URLs listed below. Offline Mode on the Web Vault requires that you load the vault login page directly (instead of navigating to the Keeper website first).
* If you are using Keeper through your employer, the offline mode may be disabled based on your administrator’s security settings.

{% hint style="info" %}
When logging in offline on a Web Browser (Chrome, Firefox, Safari, Edge), the user must navigate to this *exact* URL:\
\
US Data Center:\
<https://keepersecurity.com/vault>\
\
EU Data Center:\
<https://keepersecurity.eu/vault>

\
AU Data Center:\
<https://keepersecurity.com.au/vault>\
\
CA Data Center:\
<https://keepersecurity.ca/vault>\
\
JP Data Center:\
<https://keepersecurity.jp/vault>\
\
US Public Sector / GovCloud:\
<https://govcloud.keepersecurity.us/vault>
{% endhint %}


# Security Audit

Security Audit provides password security strength reporting in your vault.

<figure><img src="https://914511346-files.gitbook.io/~/files/v0/b/gitbook-x-prod.appspot.com/o/spaces%2F-LSGVtOTYUIkVBoYtFvK%2Fuploads%2F6O1w7iW2KO564k80HziE%2Fsecurity%20audit.jpg?alt=media&#x26;token=64ceb7d4-70de-4a6b-8ffe-8d2e11bb11ae" alt=""><figcaption></figcaption></figure>

## Overview

The Security Audit screen gives the passwords stored in your vault an overall security score based on password strength. You can clearly view information about each record's password strength and reuse from this screen.

{% embed url="<https://vimeo.com/585500006>" %}
Security Audit
{% endembed %}

## Calculation of Security Score

The calculation of password strength and reuse is performed continuously from your vault across all platforms including Keeper Desktop, Web Vault, iOS and Android devices.

<figure><img src="https://914511346-files.gitbook.io/~/files/v0/b/gitbook-x-prod.appspot.com/o/spaces%2F-LSGVtOTYUIkVBoYtFvK%2Fuploads%2FhnbQVgjyNZRYcrgFBHVK%2FScreen%20Shot%202023-07-18%20at%2012.11.39%20PM.png?alt=media&#x26;token=696e3fe9-e622-4bba-ad50-89c2f3109b88" alt=""><figcaption><p>Security Audit</p></figcaption></figure>

Keeper's password "strength" is a calculated score based on the complexity of the password, with a score rating between 0 and 100 according to the metrics below:

Very Weak: < 20\
Weak: 20-40\
Good: 40-60\
Strong: 60-80\
Very Strong: 80+

For more information on how Security Scores are calculated, visit the following page:

{% content-ref url="/spaces/-LO5CAzpxoaEquZJBpYz/pages/1rTSmBdFb1VN9Pmxn4xB" %}
[Security Audit Score Calculation](/enterprise-guide/security-audit/security-audit-score-calculation)
{% endcontent-ref %}

You can easily view a record that contains a high-risk password by clicking on it from the provided list. To resolve the risk, you will be directed to change the password at the record's website and then update the corresponding record in your vault.

<figure><img src="https://914511346-files.gitbook.io/~/files/v0/b/gitbook-x-prod.appspot.com/o/spaces%2F-LSGVtOTYUIkVBoYtFvK%2Fuploads%2FRSoeGOjvRatpNTQ8uusu%2FScreen%20Shot%202023-07-18%20at%2012.11.56%20PM.png?alt=media&#x26;token=0505e798-9c36-4b72-b255-c1743131134c" alt=""><figcaption><p>Resolve a High-Risk Password</p></figcaption></figure>

{% hint style="info" %}
Click [here](/user-guides/web-vault#changing-passwords-with-keeperfill) to learn how to easily change your passwords using Keeper's browser extension, KeeperFill.
{% endhint %}


# BreachWatch

User guide for BreachWatch on Keeper's Web Vault, Desktop App and Browser Extension.

<figure><img src="https://914511346-files.gitbook.io/~/files/v0/b/gitbook-x-prod.appspot.com/o/spaces%2F-LSGVtOTYUIkVBoYtFvK%2Fuploads%2FyZDKjZLcLCUbBcWtcuqm%2FBreachWatch.jpg?alt=media&#x26;token=d644562e-da19-4a42-bd77-7f90c211f8d4" alt=""><figcaption></figcaption></figure>

## Overview

BreachWatch is a powerful, secure add-on feature that monitors the internet and dark web for breached accounts matching records stored within your Keeper Vault. BreachWatch delivers the most in-depth monitoring available to the public with a database of over a billion records while upholding Keeper's state-of-the-art, zero-knowledge security architecture.

BreachWatch alerts you so that you can take immediate action to protect yourself against hackers. Once activated, BreachWatch continuously monitors for compromised credentials and notifies you if any of your records are at risk.

![BreachWatch Results](https://914511346-files.gitbook.io/~/files/v0/b/gitbook-x-prod.appspot.com/o/spaces%2F-LSGVtOTYUIkVBoYtFvK%2Fuploads%2F6LhwQi3dDthKC6s9zSKg%2FScreen%20Shot%202023-07-18%20at%2012.15.09%20PM.png?alt=media\&token=b9a52fb9-a2a5-464b-9a38-c406dbca920d)

{% embed url="<https://vimeo.com/618249967>" %}
BreachWatch Overview
{% endembed %}

## Benefits & Features

* BreachWatch performs unlimited security scans of your passwords on all devices.
* Users are automatically alerted to take action if any of the passwords in their vault have been used in a publicly known breach that could leave them vulnerable to a credential stuffing attack, or an account takeover.
* BreachWatch continuously monitors for compromised credentials. Tracking over a billion known passwords while continuously adding new information as breaches are discovered on the dark web.
* Keeper reports the latest scan date and time as well as tracks the resolution history of every breached password for historical auditing.

## Activate BreachWatch

To sign up for BreachWatch from Keeper's Web Vault or mobile app, navigate to the BreachWatch screen and follow the on-screen prompts. You can also purchase BreachWatch directly from the [Keeper Security website](https://keepersecurity.com/checkout). After signing up, BreachWatch performs a local scan of passwords that are currently stored in your Keeper vault.

Once activated, BreachWatch will prompt the user on their device to **Resolve** the high risk password by changing it at the affected site *and* updating the corresponding record in their Keeper vault. If you **Ignore** the notification, then that record will be skipped on future scans until the password is reset. The user may also do nothing (deferring a response) and leave the risky password unchanged and thus still at risk.

## How it Works

To start your BreachWatch scan, click **BreachWatch** in the left navigation menu, then click **Let's Begin > Scan**.

![BreachWatch Activation on Web Vault](https://914511346-files.gitbook.io/~/files/v0/b/gitbook-x-prod.appspot.com/o/spaces%2F-LSGVtOTYUIkVBoYtFvK%2Fuploads%2FfpFRtxyZHTzJe4nZS2PS%2FScreen%20Shot%202023-04-28%20at%2012.17.59%20PM.png?alt=media\&token=02b76b58-83fc-4491-bb6f-685470e4040e)

BreachWatch will then scan your records and report any risks associated with them. Clicking each record listed will allow you to view the steps needed to **Resolve** each risk. Resolving the risk requires you to change the password at the affected website. Once you have done that, be sure to *update the corresponding record in your Keeper Vault with the same password.*

<figure><img src="/files/o6ji7q9JiGmsPcnzHHwb" alt=""><figcaption></figcaption></figure>

BreachWatch is also supported on the Keeper Browser Extension, alerting you when you have a high-risk password.

<div><figure><img src="/files/X0iv2BUdc64MIWoSowki" alt="" width="372"><figcaption><p>Ignore or Resolve HIgh-Risk Password</p></figcaption></figure> <figure><img src="/files/iPVywMdqqwe2oALWJ9bh" alt="" width="372"><figcaption><p>BreachWatch Detects High-Risk Password</p></figcaption></figure></div>

{% hint style="info" %}
BreachWatch is also available for [iOS](/user-guides/ios#breachwatch) and [Android](/user-guides/android#breachwatch).
{% endhint %}


# Secure File Storage

User guide for Keeper's Secure File Storage for Web Vault & Desktop App, iOS and Android.

<figure><img src="https://914511346-files.gitbook.io/~/files/v0/b/gitbook-x-prod.appspot.com/o/spaces%2F-LSGVtOTYUIkVBoYtFvK%2Fuploads%2FgV0oaFAJE6jdeIkuHCg1%2FSecure%20File%20Storage.jpg?alt=media&#x26;token=31ecfb13-f9e4-4923-a727-ebc4068a0134" alt=""><figcaption></figcaption></figure>

## Overview

Keeper offers Secure File Storage to protect your confidential files, photos, and videos. Securely upload and store files such as passport photos, medical cards, drivers licenses, tax and loan documents, videos and any other private file to your Keeper vault.

Files are encrypted during the upload process and the user holds the encryption key for complete privacy and security. Users also have the ability to securely share files with other Keeper users via record sharing, making Secure File Storage the best way to save and transfer the most sensitive of information.

## Benefits & Features

* Just like our password encryption technology, Keeper protects your confidential files with 256-bit AES encryption using record-level keys.
* Secure file storage is available across all of your devices as a Secure Add-on, including iOS, Android, Web Vault and Desktop App.
* Files can be easily and securely shared with other Keeper users, from vault-to-vault.
* Like your other Keeper records, you can set sharing permissions for records that contain your secure files (can edit, can share, can edit & share, and read only).
* File sizes are supported up to 100MB for Web Vault, 5GB for Desktop App, Android and iOS.

## Web Vault & Desktop App

From within the vault, users can either create a new record or add an attachment to an existing record. While editing a record, click **Add Attachments** to upload your file, or simply drag and drop the file directly into your vault. Once the upload is complete, click **Save**.

![Add Attachments to a Record](https://914511346-files.gitbook.io/~/files/v0/b/gitbook-x-prod.appspot.com/o/spaces%2F-LSGVtOTYUIkVBoYtFvK%2Fuploads%2F9n3cX1RvbpFyrxyGXAdd%2FAdd%20Attachments.png?alt=media\&token=ea2bed35-ef16-411c-9c95-3f36171ba3b3)

![Upload Files via Drag-and-Drop](https://914511346-files.gitbook.io/~/files/v0/b/gitbook-x-prod.appspot.com/o/spaces%2F-LSGVtOTYUIkVBoYtFvK%2Fuploads%2FNIgpDoVGdxBHaAIbFZym%2FScreen%20Shot%202023-09-28%20at%2010.15.44%20AM.png?alt=media\&token=d4e37abf-ff7a-46d4-bcbc-921639d71b87)

By clicking the **download icon** next to the file or photo within a record, you can quickly **View** or **Download** it.

![](https://914511346-files.gitbook.io/~/files/v0/b/gitbook-x-prod.appspot.com/o/spaces%2F-LSGVtOTYUIkVBoYtFvK%2Fuploads%2FA7iCTVg5VhD1op9bO39e%2FScreen%20Shot%202023-09-28%20at%2010.18.59%20AM.png?alt=media\&token=2f75076e-1262-4c32-a59a-a4469925300d)

Users also have the ability to securely share files with other Keeper users via record sharing, making Secure File Storage the best way to save and transfer the most sensitive of information. Within the record click **Share,** then enter the email address(es) of the other Keeper user(s) you would like to share the record with.

{% hint style="info" %}
To learn more about sharing, click [here](/user-guides/sharing).
{% endhint %}

## iOS & Android

Secure File Storage is also available for iOS and Android. You can either add an attachment to any existing record or create a new record using the "File Attachment" record type. Within the record, tap **Add Files or Photos** to upload your file.

Users also have the ability to securely share files with other Keeper users via record sharing, making Secure File Storage the best way to save and transfer the most sensitive of information. While viewing the record, tap **Share > Share with User** and enter the email address(es) of the Keeper users you would like to share the record with.

![Add Files or Photos to a Record on Mobile](https://914511346-files.gitbook.io/~/files/v0/b/gitbook-x-prod.appspot.com/o/spaces%2F-LSGVtOTYUIkVBoYtFvK%2Fuploads%2FJQPv6WL2UQYNTXcKAz5o%2Fspaces_-LSGVtOTYUIkVBoYtFvK_uploads_TGjkxryRbNe8JUw5GJmf_rename-this-image%20\(3\).webp?alt=media\&token=f348504d-1e36-44e6-840a-3594375729e8)

{% hint style="info" %}
**For more information about uploading files to Keeper on mobile devices, see the user guides for Keeper's** [**iOS**](/user-guides/ios#send-a-file-to-keeper) **and** [**Android**](/user-guides/android#secure-file-storage) **apps.**
{% endhint %}

### Understanding Attachment Status Icon

When viewing a record with file attachments, you may see an icon next to a file if it hasn't fully synced to your Keeper Vault.

* File Not Yet Uploaded / Sync Pending

<figure><img src="https://914511346-files.gitbook.io/~/files/v0/b/gitbook-x-prod.appspot.com/o/spaces%2F-LSGVtOTYUIkVBoYtFvK%2Fuploads%2F6FtPPojEgV08ymUPQ4rX%2Fimage.png?alt=media&#x26;token=a33f261e-b35a-462c-a208-2262112d5e9a" alt="" width="200"><figcaption></figcaption></figure>

* If you see this icon (a cloud symbol with a line through it), it means that this specific file attachment has not yet successfully uploaded or synced to your Keeper Vault's cloud storage. The file is currently only stored locally on the device from which you attempted the upload.
* File attachments require an active internet connection to upload. If you are offline, attachments cannot be added or uploaded. If this icon appears, it typically signifies an unexpected issue or an interruption (e.g., a lost internet connection, an error during transfer) that prevented the file from reaching the cloud.
* While the icon is present, the file is not yet backed up to the cloud and may not be accessible from other devices or the Keeper Web Vault.
* To ensure your file is securely backed up and accessible across all your devices, please verify your internet connection.


# Emergency Access

Give trusted family and friends access to your Keeper Vault.

<figure><img src="/files/bhUkntXjtIHRqrcLIWrd" alt=""><figcaption></figcaption></figure>

Give trusted family and friends access to your Keeper Vault in the event of an emergency or loss of life. You can designate up to five emergency contacts and decide how much time should pass before their access is granted.

{% hint style="info" %}
Please note, the Emergency Access feature is only available for consumer accounts.
{% endhint %}

{% embed url="<https://vimeo.com/817048166>" %}
Emergency Access
{% endembed %}

From the Account Dropdown Menu (your email address), select **Account > Emergency Access**.

Click **Trusted Users** and enter the email addresses of up to five contacts (Keeper users). Optionally, select a "Delay Access" duration from the dropdown menu for each user, then click **Send**.

The amount of time between your request to provide emergency access and access granted can be set up to three months per contact. If a delay is configured, the countdown begins the moment the trusted user attempts to login to your vault.

<figure><img src="/files/d9cUwS37VDJDxGyHEfSb" alt=""><figcaption><p>Account > Emergency Access > Trusted Users</p></figcaption></figure>

In order for the recipient to accept the request, you must first establish a "sharing" relationship if one hasn't already been established through Keeper's record/folder sharing features.

If prompted, click **Send Invite**.

<figure><img src="/files/uqe0oxs1xIZG1pBI9H7f" alt=""><figcaption><p>Send Invite to Establish a Sharing Relationship</p></figcaption></figure>

<figure><img src="/files/DAaA4xQXKEKaJmfSZZhV" alt=""><figcaption><p>Recipient's Sharing Invite via Email</p></figcaption></figure>

{% hint style="info" %}
If the recipient is not an existing Keeper user, they will receive an email inviting them to sign up for a Keeper account. Once they sign up and login to their account, they can accept the sharing relationship request.
{% endhint %}

Once the recipient accepts your sharing request, you will need to invite them to be your emergency contact once more from the “Emergency Access” section of your vault. This step is not necessary if a sharing relationship has previously been established.

#### Emergency Contact Workflow

Once a sharing relationship has been established, the recipient will notice a red notification indicator has appeared in the "Emergency Access" section of their Account screen. By clicking **My Access** they can **Accept** or **Decline** emergency access to your account.

<figure><img src="/files/6cIF6SznS8gwK0Jhzfod" alt=""><figcaption><p>Recipient's Account Access Notification</p></figcaption></figure>

Once accepted, clicking **Login** will allow them to access the account they have been granted access to (once the access delay has passed, if enabled).

<figure><img src="/files/sZu4ReyRUU5uyaGdFIpM" alt=""><figcaption><p>Recipient's Account Access Login</p></figcaption></figure>

#### View Status of Invites & Edit Contacts

To view the status of your emergency access invites click **Account > Emergency Access > Trusted Users**. From here, you can also delete your emergency contacts at any time.

<figure><img src="/files/J4hJ9FAdoG38vWvT3nEc" alt=""><figcaption><p>View and Delete Your Emergency Contacts</p></figcaption></figure>


# Keeper Family Plan

This guide provides an overview of Keeper's Family Plan, including how to sign up, invite family members and accept account invitations.

<figure><img src="https://914511346-files.gitbook.io/~/files/v0/b/gitbook-x-prod.appspot.com/o/spaces%2F-LSGVtOTYUIkVBoYtFvK%2Fuploads%2FlqyWnm8jQceuPPDzMGAK%2FKeeper%20Family%20Plan.jpg?alt=media&#x26;token=39ca9ca7-2886-4ff8-835f-a731d9b3b1bb" alt=""><figcaption></figcaption></figure>

## Overview & Benefits

Families share nearly everything – documents, photos, videos, website accounts, bank info, social media, security system codes and personal identification numbers. Keeper Family Plan allows you to securely store and share this information between family members with ease.

The major features and benefits that are included with the Keeper Family Plan:

* Up to 5 Family Members with Private Vaults
* Minimum 10GB Secure File Storage
* Unlimited Password Storage
* Unlimited Devices & Sync
* Secure Record Sharing

## Signing Up

Signing up for Keeper Family Plan is easy and can be done by visiting our [Family Plan page](https://www.keepersecurity.com/family-plan.html), simply click "Buy Now" to get started. You will then be asked to enter your email address which will be used to create and login to your Keeper account.

At the checkout page, you can make the following customizations to your plan:

* Subscription Term
* Base Plan
* Recommended Add-Ons: [Secure File Storage](/user-guides/secure-file-storage) (10GB, 50GB, 100GB), [KeeperChat](https://www.keepersecurity.com/keeperchat.html?tab=personal\&t=p) and [BreachWatch](/user-guides/breachwatch)

Upon submitting payment, check your inbox for an email from Keeper Security inviting you to create your Keeper account.

## Invite Family Members

Once you have logged into your Keeper account, inviting family members to join is easy and can be done from a desktop (Web Vault, Desktop App) or mobile device (iOS, Android).

From your Account Dropdown click **Account > Subscription > Manage**.

{% hint style="info" %}
Your available/remaining number of family invites will be listed on this screen.
{% endhint %}

<figure><img src="https://914511346-files.gitbook.io/~/files/v0/b/gitbook-x-prod.appspot.com/o/spaces%2F-LSGVtOTYUIkVBoYtFvK%2Fuploads%2FhzIHmuPJgqfeOnjQEH6m%2FScreen%20Shot%202023-09-28%20at%201.18.04%20PM.png?alt=media&#x26;token=fe05e3bc-4c64-4145-95db-1b722f23237a" alt=""><figcaption><p>Invite Family Members to Keeper</p></figcaption></figure>

Enter the email(s) of the family member(s) you would like to invite, then click **Send**. This will generate an email inviting the user to setup their private Keeper account.

![](https://914511346-files.gitbook.io/~/files/v0/b/gitbook-x-prod.appspot.com/o/spaces%2F-LSGVtOTYUIkVBoYtFvK%2Fuploads%2FrvwXHJ6cadOAtZp93dkM%2FScreen%20Shot%202023-09-28%20at%201.41.01%20PM.png?alt=media\&token=827ffcd7-10f9-4d8a-88be-1b6b3ac4b23c)

Once sent, you can view the status of each invite and click the **more options icon** (three horizontal dots) to resend or delete the invite.

![More Options (Resend, Delete)](https://914511346-files.gitbook.io/~/files/v0/b/gitbook-x-prod.appspot.com/o/spaces%2F-LSGVtOTYUIkVBoYtFvK%2Fuploads%2FNokjKHeSQD6sgqFS6qnM%2FScreen%20Shot%202023-09-28%20at%201.41.09%20PM.png?alt=media\&token=d4397906-9e1f-4c2d-b97b-a5cd43958fcb)

## Accept a Keeper Invite

If someone in your family has invited you to join Keeper, will receive an email from Keeper Security, (Subject: Keeper Invitation) inviting you to set up your own, private account.

To set up your account, click **Get Started**.

![Recipient Invitation via Email](https://914511346-files.gitbook.io/~/files/v0/b/gitbook-x-prod.appspot.com/o/spaces%2F-LSGVtOTYUIkVBoYtFvK%2Fuploads%2FWJiwJnRNDb8yvEp7ztKS%2FScreen%20Shot%202023-09-28%20at%201.48.18%20PM.png?alt=media\&token=a82dbd18-7bf2-4070-84c6-48a947320a42)

You will then be directed to Keeper's "Create Your Keeper Account" page.

To create your Keeper account, first enter your email address then you will be asked to create and confirm a **Master Password** which will be the only password you have to remember. We recommend that you choose a strong Master Password that is only used for Keeper -- don't forget your Master Password!

To finalize your account and proceed to your vault, you will be asked to enter the security **verification code** that was sent to your email.

{% hint style="info" %}
Once you have created your account, use our [Quick Start Guides](/user-guides/quick-start-guides) to help you set up your new Keeper account.
{% endhint %}

## Share Records

Once an invited family member has created a Keeper account, records can be shared with them.

To share a record, simply click **Share**.

![Share a Record](https://914511346-files.gitbook.io/~/files/v0/b/gitbook-x-prod.appspot.com/o/spaces%2F-LSGVtOTYUIkVBoYtFvK%2Fuploads%2F2hQg7HFVqTSJ82hlhd6i%2FScreen%20Shot%202023-09-28%20at%201.42.38%20PM.png?alt=media\&token=63bdd8e5-4db0-415f-8d55-c1ff83d5432c)

Enter the email address(es) of the family member(s) you would like to share the record with or select their **email(s) from the dropdown menu**.

![Select/Enter Email Address](https://914511346-files.gitbook.io/~/files/v0/b/gitbook-x-prod.appspot.com/o/spaces%2F-LSGVtOTYUIkVBoYtFvK%2Fuploads%2FSC9z1rC9e45ag7qUgF3U%2FScreen%20Shot%202023-09-28%20at%201.42.23%20PM.png?alt=media\&token=2b167c6d-548d-427f-bd9f-ce3a45c8c5c2)

{% hint style="info" %}
To learn more about Sharing, click [here](/user-guides/sharing).
{% endhint %}

## Keeper for Business

While Keeper Family Plan is perfect for families, Keeper Business Plan is best suited for your business organization. Keeper has purposefully created different plans to fit the unique needs of all types of users. That is why Keeper has a dedicated Business Plan, specializing in protecting companies of all sizes across every industry.

Only Keeper for Business/Enterprise offers the following world-class features, specifically designed for business environments:

* Shared Team Folders
* Enforcement Policies
* Security Audit
* Role-Based Access
* Activity Reporting
* Team Management
* Unlimited Users (billed per user)

{% hint style="info" %}
To learn more about Keeper for Business click [here](https://www.keepersecurity.com/business.html).
{% endhint %}


# KeeperChat

This guide provides a look at the benefits and features of KeeperChat, Keeper's secure messaging solution.

## Overview

Keeper's secure messaging solution, KeeperChat, allows you to chat with friends, family member and colleagues with peace of mind knowing you are in control of the content you share and who you share it with. KeeperChat has best-in-class security with end-to-end encryption for messages at rest and in transit. KeeperChat runs on a variety of devices and platforms including Android, iOS, Windows, and Mac OS. Download KeeperChat from the [Google Play](https://play.google.com/store/apps/details?id=com.keepersecurity.chat\&hl=en_US) or [App Store](https://apps.apple.com/us/app/keeperchat/id1216446440).

![KeeperChat on Android](/files/HQ1eUp5iXNB1wRthZWri)

## Benefits & Features

* Like your passwords, your private messages are stored in a secure, digital vault which can be accessed using the same credentials or biometric login method (Fingerprint or Face ID) you use to login to Keeper Password Manager.
* For increased security, two-factor authentication is available, providing an extra layer of protection against unauthorized access.
* Just like our password encryption technology, Keeper protects your messages with zero knowledge, 256-bit AES encryption security architecture.
* Self-destruct timer and message retraction remove unwanted or sensitive messages and files without a trace.
* Message history and chat threads automatically sync across all your devices.
* Securely share sensitive photos and videos with complete privacy. Photos and videos are saved to your private gallery without leaving a trace on your camera roll.

## User Experience & Preview of Features

KeeperChat is free to use with all features. To access additional storage, unlimited self-destructs, and unlimited message retraction, upgrade to [KeeperChat Plus](https://www.keepersecurity.com/keeperchat.html?tab=personal\&t=p).

### Biometric Login & 2FA

Access Two-Factor Authentication and Biometric Login Settings by navigating to **KeeperDNA**.

![KeeperDNA on iOS](/files/JeAq2qW7uvJ9ZNZec1J6)

![KeeperDNA on Android](/files/lHe7ih41e07iWaNjhbeP)

### Self-Destruct & Retract

Before sending your message, tap the **timer icon** and use the slider to set the self-destruct timer.

![](/files/Do0VDE6Yr2fj6PdYS9Kc)

To retract, edit or set the self-destruct timer for a message that has already been sent, **long press (or click) on the message** and make a selection from the generated menu.

![](/files/V90kSm2pclTxBoJacxnX)

### Private Media Gallery

Navigate to the **Gallery** to upload and securely share sensitive photos and videos.

![](/files/YbxhyxDAyQUcvqA67Vfs)

### Group Chats

Select the **create chat icon** and then select **Start a Group Chat** to add contacts.

![Create a Contact & Start a Group Chat on iOS](/files/SNqjk5Pk3LEoWP8HHtcS)

Privately communicate and collaborate with groups of friends, family members and coworkers.

![Create a Contact & Start a Group Chat on Android](/files/h6mwHGGCGEljcCsaDFiB)

![Group Chat](/files/vUsy9gdayk7X4uhbS3x3)

{% hint style="info" %}
For Business & Enterprise customers, KeeperChat supports team messaging and is integrated into the team management from the Admin Console.
{% endhint %}


# Notification Center

The notification center consolidates important in-app messages for the Keeper platform

## Overview

The **Notification Center** is a secure, in-app hub in the Vault where you can view and manage important account, security, and product updates - without relying solely on email. Notifications appear directly in the Vault and can also be delivered through native OS or browser notifications. Clicking a native notification will take you straight to the corresponding notification in the Vault.

After logging into the Vault, you’ll see a **bell icon** in the upper-right corner next to your profile. This is your Notification Center. The bell also shows how many unread notifications you have at a glance.

<figure><img src="/files/41iCS2oMEYsvhe2R7iru" alt=""><figcaption></figcaption></figure>

Inside the Notification Center, you can **filter notifications** and respond to **actionable events** such as device approvals and sharing requests. Next to each notification’s timestamp, you’ll see a small **dot**—clicking this dot marks the notification as read. You can also use the **overflow menu** (three dots) on each notification to mark it as read.

<figure><img src="/files/ccpe7JaXEOth37gR0qoS" alt=""><figcaption><p>Notification Center Alerts</p></figcaption></figure>

<figure><img src="/files/t8KQnP5Bo9ygBjed2Ca1" alt="" width="375"><figcaption><p>Notification Filters</p></figcaption></figure>

## Features

With Notification Center, you can receive and review key alerts directly inside Keeper, including:

* **Security alerts** – Suspicious login attempts, account setting changes, and other security-related events.
* **Subscription reminders** – Upcoming renewals and expired payment methods so you can act quickly.
* **Product and growth updates** – In-app promotions and product announcements that don’t interrupt your workflow.
* **Access requests** – Requests to access shared records or files, with quick paths to approve or deny.
* **Device management alerts** – Notifications about new device logins and reminders to review active device sessions.
* **Master Password notifications** – Reminders to update your master password or confirm password reset activity.
* **Record reminders** – Alerts for time-sensitive items such as expiring passwords or access keys.
* **PAM workflow notifications** – Updates about PAM approvals, check-in/check-out status, access control requests, and automatic credential rotation events.

The Notification Center keeps all of these updates in one place, making it easier to stay aware of what’s happening with your account and resources.

***

## Setup

On desktop and mobile devices, you may be asked to approve system notifications upon accessing the Keeper Vault for the first time. Click "Allow" to receive the notifications at the system level.

<figure><img src="/files/RvZAxHtnuJDGraBCp24D" alt=""><figcaption></figcaption></figure>

If you clicked "Block" by mistake, you can re-enable this from your system settings. In order for system notifications to appear, you may need to enable them in 3 places: the website permission, browser notification permissions, and your OS/app notification settings.

## OS/App Settings

Make sure your OS allows notifications for the web browser you're using.

#### **macOS**

Go to System Settings → Notifications → choose your Browser → Allow Notifications

#### **Windows**

Go to Settings → System → Notifications → turn on for your browser

<figure><img src="/files/u2gn5IEft3EeyvJpo98r" alt="" width="375"><figcaption></figcaption></figure>

***

### Chrome on Mac/PC/Linux

#### Allow notifications in Chrome (global)

* Open Chrome → go to **chrome://settings/content/notifications**
* Make sure: **Sites can ask to send notifications** is **ON** (recommended)
* Ensure the Keeper domain is **allowed to send notification**

<figure><img src="/files/3lQiiTea3bTEdzRxY99e" alt=""><figcaption></figcaption></figure>

<figure><img src="/files/vEmD73DfQHNe5VXhGScG" alt=""><figcaption></figcaption></figure>

#### Allow notifications for a specific site

* Go to the site/web app
* Click the **lock icon** (left of the URL) → **Site settings**
* Find **Notifications** → set to **Allow**
* Reload the page, then use the app/site’s “Enable notifications” button (or wait for the prompt)

***

### Safari on Mac

* Go to **Safari → Settings…** (or **Preferences…** on older macOS)
* Click **Websites**
* In the left sidebar, click **Notifications**
* Make sure **“Allow websites to ask for permission to send push notifications”** is checked.
* Ensure that keepersecurity.com (or keepersecurity.eu, .com.au, .ca, .jp, etc) is allowed

<figure><img src="/files/sjlVpU1mex8ymxMYgqFN" alt=""><figcaption></figcaption></figure>

#### Allow notifications for the specific site

* Stay in **Safari → Settings… → Websites → Notifications**
* Find the site in the list
* Set it to **Allow** (instead of Deny).
* Refresh the site and use the app/site’s “Enable notifications” flow if it has one.

***

### Firefox on Mac/PC/Linux

#### Allow notifications in Firefox

* Open **Firefox Settings**
  * Windows/Linux: ☰ → **Settings**
  * Mac: ☰ → **Settings** (or **Firefox → Settings**)
* Go to **Privacy & Security**
* Scroll to **Permissions → Notifications**
* Click **Settings…**
* Make sure the site isn’t set to Block
* Ensure **“Block new requests asking to allow notifications”** is **unchecked** (if you want sites to be able to ask)

#### Allow notifications for the specific site

* Go to the site/app in Firefox
* Click the **lock icon** (left of the address bar) → **Connection secure / Permissions**
* Set **Notifications** to **Allow** (or remove any existing block)
* Then use the site’s “Enable notifications” button to trigger the prompt

<figure><img src="/files/WyM0p0eR2vDCmpVzOSBb" alt="" width="375"><figcaption></figcaption></figure>

***

### Chrome on Android

* Go to **Android Settings → Apps → Chrome → Notifications** → turn **On**
* In Chrome: Go to **Settings → Site settings → Notifications** → allow

***

### Firefox on Android

1. **Android Settings → Apps → Firefox → Notifications** → turn **On**
2. In Firefox: ☰ → **Settings → Site permissions → Notifications** → allow
3. Visit the site and accept the notification prompt

***

### Safari on iPhone/iPad

On iOS/iPadOS, web push notifications work for Home Screen web apps (added via “Add to Home Screen”), introduced with **iOS/iPadOS 16.4+**.

**To enable:**

* Open the site in Safari
* Share icon → **Add to Home Screen**
* Open it from the Home Screen (as an app)
* When prompted, tap **Allow** for notifications (and ensure notifications aren’t disabled in iOS settings for that web app).


# Passkeys

How to store and manage your passkeys with Keeper

<figure><img src="/files/L3HkAA6JArLuMk1pQ4L5" alt=""><figcaption></figcaption></figure>

## What's a Passkey?

A passkey is a cryptographic key that lets you log in to your accounts and apps without having to enter a password or a second factor. Passkeys are phishing-resistant.

Storing passkeys in your Keeper Vault allows them to be used across different browsers and operating systems. They can also be shared with other users like any other record in your vault.

{% embed url="<https://vimeo.com/834054866>" %}

## Supported Websites

Passkeys only work on websites and applications that have been specifically built to support them. [The list of supported sites](https://www.keepersecurity.com/passkeys-directory/) is pretty small right now, but it will grow over time.

## Creating a Passkey

To create and save a passkey for a site, typically you'll need to visit the "Security" or "Account Settings" screen of the website. In the below example, we'll be showing Best Buy.

<figure><img src="/files/1fME6MCOrkhVW2jNmuho" alt=""><figcaption><p>Visit account settings of a website that supports passkeys</p></figcaption></figure>

When clicking the "Create a Passkey" button, Keeper will intercept the request and ask you to save the passkey to your vault.

<figure><img src="/files/LxfQCH7wz0bBBHi1mr9H" alt=""><figcaption><p>Create Passkey</p></figcaption></figure>

## Logging In With a Passkey

The next time you visit a website that supports passkey login, locate the "Sign in with a Passkey" or similar action button on the site, then click **Use Passkey** in the KeeperFill window to login. Sometimes you'll first need to enter your email address and the site will prompt you for a passkey login selection.

In the case of Best Buy, clicking on "Sign in with a Passkey" initiates the passkey login process with Keeper. Click on "Use Passkey" and you'll be logged in.

<figure><img src="/files/cC6iZopWnipV06fkbD08" alt=""><figcaption><p>Log In with Passkey</p></figcaption></figure>

That's it! Using a passkey with Keeper and supported websites is very straightforward for sites that support it.

## Vault Storage

In the Keeper Vault, you will see a Passkey field attached to the record. The Passkey field contains several pieces of information:

* Date the passkey was created
* Username
* Relying party (website or app)

Passkey records can be managed in your vault, placed in folders or shared with other users.

<figure><img src="/files/kcf4adTFp6T7UtCTsIzh" alt=""><figcaption><p>Keeper Record With Passkey</p></figcaption></figure>

## Using Passkeys on Mobile Devices

Passkeys on mobile devices, a highly anticipated feature for enhanced security and convenience, is now available on Android devices running **Android 14** and Apple devices running **iOS 17**. This update marks a significant enhancement in our mobile applications capabilities, offering users an even more secure and streamlined experience.

{% embed url="<https://vimeo.com/927624329>" %}
Passkey Support for Across KeeperFill, iOS and Android
{% endembed %}

{% hint style="success" %}
Passkeys are available on Android 14+ and iOS 17+
{% endhint %}

### Passkey Setup for Android

1. Launch the **Settings** app on your Android device and select **Passwords, passkeys & accounts**.
2. **Set Keeper as your Preferred Autofill Service**
   1. If Keeper hasn’t already been enabled through the Keeper app, tap on "**Change**" and select **Keeper** from the list of available services.
      1. If you had already enabled KeeperFill in the Keeper app, it should already be set as your autofill service.

<figure><img src="/files/4oTAG5hQGtu9MA1zaZht" alt=""><figcaption></figcaption></figure>

### Passkey Setup for iOS

1. Launch the **Settings** app on your iOS device and select **Passwords.**
2. Next, choose **Password Options**.
3. Toggle ON **AutoFill Passwords and Passkeys.**
4. Then tap **Keeper** so a blue tick appears. If you have used Autofill before, **iCloud Passwords & Keychain** may have a blue tick as well. For optimal accuracy when using Keeper for Passkeys, make sure to tap **iCloud Passwords & Keychain** to remove it as an option.

<figure><img src="/files/cLwhPs9HY8jHptQr6Z3S" alt=""><figcaption></figcaption></figure>

## The Future of Passkeys

We're excited about the future of passkeys. Here's our plan for passkeys this year:

* Support on desktop web browsers is now live
* Launch of Web Vault and Desktop App support for passkey management is now live

{% embed url="<https://vimeo.com/779639636>" %}

## Have Questions?

We would love to hear your feedback on passkeys. Please email our team at <feedback@keepersecurity.com>.<br>


# Keeper Forcefield

End-user guide for Keeper Forcefield - Windows Endpoint Protection for Sensitive Data

<figure><img src="https://914511346-files.gitbook.io/~/files/v0/b/gitbook-x-prod.appspot.com/o/spaces%2F-LSGVtOTYUIkVBoYtFvK%2Fuploads%2FOACV6aY1mKyQ3YWtT3tq%2Fforcefield-user.png?alt=media&#x26;token=d7ce2cf2-f695-47f9-909f-6adc08436908" alt=""><figcaption></figcaption></figure>

## Keeper Forcefield: Windows Endpoint Protection

### Overview

Keeper Forcefield is an advanced endpoint security feature for Microsoft Windows that protects sensitive applications and processes from unauthorized access. It is specifically designed to defend against threats such as infostealers and password-stealing malware installed from phishing or other attacks.

Forcefield is bundled with the Keeper Desktop application for Windows and operates silently in the background to ensure data protection without impacting performance or usability.

{% hint style="info" %}
This is the end-user guide for Keeper Forcefield. The [Enterprise Guide](/enterprise-guide/keeper-forcefield) includes more advanced deployment options for administrators.
{% endhint %}

***

### Getting Started

#### Installing Keeper Forcefield via Keeper Desktop

To activate Forcefield from the Keeper Desktop application, install the latest [Keeper Desktop App](https://www.keepersecurity.com/download.html).

After installation:

* Navigate to **Settings > Security** in Keeper Desktop
* Visit the **Forcefield** screen and activate the service.

Once enabled, Forcefield will immediately begin protecting your computer.

<figure><img src="https://914511346-files.gitbook.io/~/files/v0/b/gitbook-x-prod.appspot.com/o/spaces%2F-LSGVtOTYUIkVBoYtFvK%2Fuploads%2FafkM9YuUaYvfWd4dCRB2%2FScreenshot%202025-05-20%20at%203.04.58%E2%80%AFPM.png?alt=media&#x26;token=5bf1c53a-58a5-4458-a4b7-8572e1943fdf" alt=""><figcaption><p>Keeper Forcefield screen in the Desktop App</p></figcaption></figure>

**Standalone Installation**

The installation of the standalone version of Keeper Forcefield is available through an MSI installer based on the architecture.

**x86/64-bit**

<https://download.keepersecurity.com/forcefield/x64/keeperforcefield.msi>

**ARM/64-bit**

<https://download.keepersecurity.com/forcefield/arm64/keeperforcefield.msi>

***

### Status and Updates

The system tray provides a Forcefield status icon and the ability to check for a new version. Keeper will check on a daily basis for a new version, but the update must be explicitly installed by the user.

<figure><img src="https://914511346-files.gitbook.io/~/files/v0/b/gitbook-x-prod.appspot.com/o/spaces%2F-LSGVtOTYUIkVBoYtFvK%2Fuploads%2F0g4P5fFFkn4sUCzqBhkK%2FScreenshot%202025-05-20%20at%203.05.11%E2%80%AFPM.png?alt=media&#x26;token=17e417a8-b806-49a4-98c8-1464a6aae9c9" alt=""><figcaption><p>Forcefield Status</p></figcaption></figure>

<figure><img src="https://914511346-files.gitbook.io/~/files/v0/b/gitbook-x-prod.appspot.com/o/spaces%2F-LSGVtOTYUIkVBoYtFvK%2Fuploads%2FxKyaGZxYqSsKwFmBjTo4%2FScreenshot%202025-05-20%20at%203.05.22%E2%80%AFPM.png?alt=media&#x26;token=84ef0b87-bf0f-4992-974c-f360a4f041ab" alt=""><figcaption><p>Checking for Updates</p></figcaption></figure>

***

### Applications Protected by ForceField

Forcefield is built to protect designated applications by verifying their process name, file name, and code signature. The following applications are secured using this validation approach:

**Keeper Applications**:

* Keeper Desktop
* Keeper Secrets Manager
* Keeper Commander
* Keeper Gateway
* Keeper Bridge
* KeeperChat
* Keeper Importer

**Web Browsers**:

* Chrome
* Microsoft Edge
* Firefox
* Brave
* Opera
* Vivaldi

If you would like Keeper Forcefield to protect additional applications, please email us at **<forcefield@keepersecurity.com>** and we'll review your request.

***

### Quick Testing

To verify that Keeper Forcefield is protecting your machine:

1. Open Task Manager.
2. Right-click on a protected process.
3. Choose **Create memory dump file**.
4. The `.dmp` file should be 0 bytes if blocked.

{% hint style="info" %}
Forcefield is designed to protect specific applications. Contact us at **<forcefield@keepersecurity.com>** to request additional applications.
{% endhint %}

***

### Advanced Documentation

For more in-depth information regarding Keeper Forcefield including technical specs and IT Admin rollout, see the Enterprise Guide:

* [Keeper ForceField for Enterprise Admins](/enterprise-guide/keeper-forcefield)


# Troubleshooting

This guide provides basic troubleshooting solutions to some of the more common questions users may have.

The proceeding pages in this section are dedicated to various troubleshooting guides. Have a suggestion? Email our team at <feedback@keepersecurity.com>.


# Reporting Autofill Issues

How to report autofill issues to Keeper

## Overview

Starting with version 17.1 of the Keeper Browser Extension, we have drastically increased the speed at which we can resolve autofill issues while also training Keeper's Machine Learning models to safeguard autofill accuracy across the web.

We've introduced a new "Snapshot Tool" in the Keeper Browser Extension that greatly simplifies the process of fixing autofill issues on customer-owned websites or internal tools that were previously difficult for our engineers to access. By submitting a snapshot to our team, we can turn around site-specific autofill improvements in a matter of minutes.

### Reporting Autofill Issues with the Snapshot Tool

To report an Autofill Issue, there are 2 locations to access this feature: From the on-page form fill and the browser extension toolbar.

#### On-Page Form Fill

From the on-page form filling screen, click on the **overflow menu** > **Report an Autofill Issue**

<figure><img src="/files/xuTLW00XYeLr16uh36Up" alt=""><figcaption></figcaption></figure>

#### Browser Extension Toolbar

From the browser extension toolbar window, click on the **overflow menu** > **Report an Autofill Issue**.

<figure><img src="/files/7JqvCMrLV4nd3xamw7mC" alt=""><figcaption></figcaption></figure>

## Submitting Snapshots & Reporting Issues

Next, click **Take Snapshot** to take a screen capture of your browser window.

If you are having trouble with a website's login page, simply select **Report an Autofill Issue** from the extension Options menu or from the fill tool.

<figure><img src="/files/xdS1VenAMHWqUiu7G06M" alt="" width="375"><figcaption><p>Report Issue from the Extension Toolbar</p></figcaption></figure>

<figure><img src="/files/crQXKDfz6Sr9unsLslIK" alt="" width="563"><figcaption><p>Report Issue from the Fill Tool</p></figcaption></figure>

Click **Take Snapshot** to take a screen capture of your current browser window. Click **Next: Preview** to review exactly what data will be sent to Keeper, ensuring there is no confidential information included before you proceed.

<div><figure><img src="/files/HVz7qPNWffB1IZxXuSz5" alt="" width="308"><figcaption><p>Take Snapshot</p></figcaption></figure> <figure><img src="/files/9vJvpioxAPccXeM4UW5k" alt="" width="308"><figcaption><p>Next: Preview</p></figcaption></figure></div>

Next, select from the provided list of autofill issues or describe your own.

Keeper will NOT send credentials or confidential information. We only send the screenshot and HTML page structure exactly as displayed in the preview window.

<figure><img src="/files/IALsk2z6AZ3cRs5PbSwP" alt=""><figcaption></figcaption></figure>

Click **Report Issue** to send the information to the Keeper Team.

<figure><img src="/files/8UYC4yLWSWETk2VO1XV6" alt=""><figcaption></figcaption></figure>

{% hint style="info" %}
If you need to re-submit an issue for a website, return to the extension toolbar or fill tool and click **Report an Autofill Issue > Retake**.
{% endhint %}

### Snapshot Resolution

The Keeper team will promptly receive the necessary information to diagnose and resolve the filling issue. Once a solution is implemented, an update will be released to all customers. You will receive an email notification confirming the update. In many cases, site-specific fixes can be turned around within the same day.


# Troubleshoot Extension Issues

Steps to provide Keeper Support with Browser Extension debug information.

### Autofill Issues

See the [Reporting Autofill Issues](/user-guides/troubleshooting/autofill-issues) page to request a fix for a website that isn't filling properly. Our team can process fixes on the same day.

### Check for Extension Updates (Chrome)

To experience the latest KeeperFill updates and features, you want to make sure you running the latest version of the Keeper Browser Extension. To update KeeperFill, follow the steps below:

1. In your browser's search bar, navigate to **chrome://extensions**.
2. In the upper right corner, toggle "Developer mode" on.
3. In the list of your current browser extensions, locate the "Keeper Password Manager & Digital Vault" extension and click **Details**.
4. In the upper left corner, click **Update**.

### Check for Extension Updates (Firefox)

To update KeeperFill in Firefox, follow the steps below:

1. In your browser's search bar, navigate to **about:addons**.
2. In the upper right corner, click the gear icon and select "Check for Updates"
3. Ensure that Keeper is updated to the latest version.

### Capturing Error Messages (Chrome)

If you are experiencing an error, it is helpful to provide Keeper support with any console errors that might be occurring. To capture the errors, follow the steps below.

* In your browser's search bar, navigate to **chrome://extensions**.
* In the upper right corner, toggle "Developer mode" on.
* In the list of your current browser extensions, locate the "Keeper Password Manager & Digital Vault" extension and click on **"**&#x62;ackground.htm&#x6C;**"**
* Click on the "Console" tab. Check for any errors in red. Take a screenshot of any error messages and send them to support.

### Conflicting Extensions

Sometimes, other browser extensions or software installed on the computer can conflict with Keeper. Common examples are products which filter web content, block popups or perform any sort of website traffic manipulation.

If you are experiencing a strange issue with your KeeperFill browser extension, we recommend turning off all of your other 3rd party extensions to determine if there is a conflict. If you find a conflict, please provide this information to Keeper support.

### Troubleshooting Video

This video explains how to capture errors from the KeeperFill extension when working with the support team.

{% embed url="<https://vimeo.com/798848657/c9d7736690>" %}

### Resetting the Chrome Extension

If you are unable to login to the KeeperFill Chrome extension, a reset of the extension may be required. To reset your KeeperFill Chrome extension, follow the below steps:

* Open Chrome and select **Chrome > Settings > Extensions**
* From the Keeper extension, select **Details > Extension Options**
* Click on "**Clear All Storage**"
* Restart Chrome

### Resetting the Safari Extension

If you are unable to login to the KeeperFill Safari extension, a reset of the extension may be required. To reset your KeeperFill Safari extension, follow the below steps:

* Open Safari and select **Safari > Settings**
* From the Keeper extension, select **Settings**
* Click on "**Clear All Storage**"
* Restart Safari


# Troubleshooting Vault Issues

Troubleshooting instructions for troubleshooting vault issues.

Please follow the steps below to provide Keeper Support with information to assist vault related errors.

(1) Using Chrome browser, open the Web Vault at:\
<https://keepersecurity.com/vault>

\
(2) Click on **View** > **Developer** > **Developer Tools**.

![](/files/-M7QTRqjgeCzRSuHlozc)

(3) Login to your Keeper Vault.<br>

(4) On the Developer Tools window, click on the "Console" tab and check for any errors in red.<br>

(5) If there are errors, take a screenshot and/or copy-paste the information for the Keeper Team.

![](/files/-M7QVo7vxcAC7qkg6mpN)


# Master Password Reset & Account Recovery

How to recover your Keeper account

## Overview

Keeper is a zero-knowledge platform. Please note that if you forget your master password and lose your recovery phrase, you will not be able to login to your vault and Keeper Support will be unable to help you regain access.

**Consumer and Family Plan customers**: If you have forgotten your master password and have lost your recovery phrase, please create a new account. To create a new account with the same email address, please reach out to <deleteme@keepersecurity.com> for assistance. If you still need assistance, open[ a support ticket](https://www.keepersecurity.com/personal-support/) with our consumer support team.

**Enterprise and MSP end-users**: Business accounts may login to Keeper using a Single Sign-On product, and there is no master password involved. If you are an end-user in a business account, please contact your Keeper administrator for assistance. If you still need help, [open a ticket](https://keepersecurity.servicenowservices.com/csm?id=csm_index).

**Enterprise Admins**: Please [open a ticket](https://keepersecurity.servicenowservices.com/csm?id=csm_index) with Keeper support.

### What to do if you forget your Master Password

* From the Web Vault or Desktop App, click on **Need Help** > **Forgot Master Password** to begin the account recovery process. If you forgot your master password and you lost your recovery phrase, Keeper support cannot help you.
* If you are able to login with biometrics (Face ID, Touch ID) on a mobile or desktop device, simply login and then visit the Settings > Reset Master Password screen.
* If you exceeded the number of failed attempts, please contact support and we'll reset the throttling system for you to try again.
* Once you recover your account, make sure to back up your Master Password and Recovery Phrase somewhere safe, so this doesn't happen again.

## Account Recovery

Keeper provides account recovery using a randomly generated 24-word recovery phrase. The recovery phrase can be used to regain access to your Keeper Vault in case you forget your Master Password.

Keeper implements recovery phrases using the industry-standard BIP39 word list, which is a set of 2,048 words used to generate an encryption key with 256 bits of entropy. Each word in the BIP39 list is carefully chosen to improve legibility and make the recovery process less error-prone.

The recovery phrase is generated locally on the user's device using the BIP39 word list. Keeper's backend systems **do not** have access to this recovery phrase, nor do any employees of Keeper. Keeper is a zero-knowledge platform and we cannot assist in the recovery process.

{% embed url="<https://vimeo.com/585500674>" %}
Vault Recovery Phrase
{% endembed %}

### Resetting Your Master Password

#### Web Vault & Desktop App

If you would like to change your master password from the Web Vault & Desktop App, click the account dropdown menu (your email), select **Settings** and next to "Master Password" click **Reset Now**. You will then be prompted to enter your current master password and create and confirm a new master password.

*If you are able to log into Keeper's mobile app using Biometrics, you can reset your master password without having to enter your current master password. Navigate to **Settings > Reset Master Password** and authenticate with Biometrics.*

<figure><img src="/files/br7bnTHZ5pKPRpfX5eza" alt=""><figcaption><p>Reset Your Master Password</p></figcaption></figure>

#### iOS and Android Mobile App

To change your master password on iOS and Android devices, from **Settings**, scroll down and tap **Reset Master Password**. You will then be prompted to enter your current master password (unless Biometrics is enabled and you are authenticated), then create and confirm a new master password.

![Reset Master Password on iOS](/files/NR8AC6Z8sqE7k47YEQ4V)

![Reset Master Password on Android](/files/F5dtOtb9szPHupcnWeth)

### Account Recovery Setup

Upon initial vault login, new users will be prompted to set up Account Recovery. Click **Generate Recovery Phrase** to begin.

<figure><img src="/files/hiTdWpHMD3JRWHR0Bc1D" alt=""><figcaption><p>Generate Recovery Phrase</p></figcaption></figure>

Once your recovery phrase has been generated, be sure to store it in a safe place. For added convenience, you will be given the option to copy or download it. Check the box to acknowledge you have stored it in a safe place and click **Set Recovery Phrase** to complete the setup.

<figure><img src="/files/CFnWaMeHKrQVLyxtn6Y8" alt=""><figcaption><p>Copy or Download Recovery Phrase</p></figcaption></figure>

### Reset Recovery Phrase

If you know your master password and would simply like to setup Account Recovery, from the account dropdown menu (your email) select **Settings** **>** **Recovery Phrase**.

<figure><img src="/files/9sTOwG9ugZB76hdbKi6Y" alt=""><figcaption><p>Set or Reset Recovery Phrase</p></figcaption></figure>


# Hardware Security Keys on Mobile

Support for FIDO2 security keys on Keeper for mobile devices.

This guide covers everything you need to know about using a hardware security key with Keeper on iOS and Android. It includes setup instructions, PIN behavior, device compatibility, and how to work through common issues.

{% hint style="warning" %}
Always make sure you're running the latest version of Keeper before setting up a hardware security key. Older app versions may not support all key types or firmware versions.
{% endhint %}

### Supported Hardware Keys

#### iOS

Keeper works with any FIDO® Certified security key on iOS. For a complete list of certified keys, visit the [FIDO® Certified Showcase](https://fidoalliance.org/fido-certified-showcase/).

A few things to know before getting started:

* **NFC keys** are supported on most iPhone models. iPads do not support NFC hardware keys. Only keys that plug in directly (via Lightning or USB-C) will work on iPad.
* **NFC keys do not work in KeeperFill**, the autofill extension on iOS. See the [NFC Keys and KeeperFill](#nfc-keys-and-keeperfill-on-ios) section below for a workaround.
* USB-C keys require **Keeper version 16.12.0 or later**.

**iOS Version Compatibility**

|    **iOS Version**    | **Keeper App (Main)** | **Autofill**    |
| :-------------------: | --------------------- | --------------- |
| **iOS 16 or earlier** | ✅ Supported           | ❌ Not Supported |
|       **iOS 17**      | ✅ Supported           | ✅ Supported     |
|       **iOS 18**      | ✅ Supported           | ✅ Supported     |
|      **iOS 26+**      | ✅ Supported           | ✅ Supported     |

#### Android

Keeper supports any FIDO2 certified hardware key on Android. Compatibility may vary depending on the key manufacturer and Google's FIDO library. For a complete list of certified keys, visit the [FIDO® Certified Showcase](https://fidoalliance.org/fido-certified-showcase/).

A few things to know before getting started:

* Most FIDO2 keys with NFC support will work over NFC on Android.
* If you run into issues with a specific key, try registering it over USB instead of NFC, or register it from the Keeper Web Vault and it will sync to your mobile device.

***

### Setting Up a Security Key

Before adding a security key on either platform, you need at least one other two-factor authentication method already active on your account. This acts as your backup in case the key is unavailable.

{% hint style="info" %}
You can register up to 5 security keys on your account. Any one of them will work to log in.
{% endhint %}

#### On iOS

1. Open the Keeper app and go to **Settings > Two-Factor Authentication**.
2. Tap **Add** next to "Security Keys", then tap **+ Add Key**.
3. Give your key a name and tap **Register**.
4. Follow the on-screen prompt. Either plug your key in or tap it against the back of your iPhone.
5. If your key has a PIN, you will be prompted to enter it.
6. When registration is complete, tap **OK** on the confirmation screen.

#### On Android

1. Open the Keeper app and go to **Settings > Two-Factor Authentication**.
2. Tap **Add** next to "Security Keys", then tap **+ Add Key**.
3. Enter a name for your key and tap **Register**.
4. Select **NFC Security key** or **USB Security key** from the list of options.
5. Hold your key flat against the back of your device (for NFC) or insert it into the USB-C port.
6. Keep the key in place until the app confirms registration on screen.

{% hint style="warning" %}
**Have a YubiKey with firmware 5.7 or newer?** These keys ship with NFC turned off by default. You need to plug the key into a USB port for about 3 seconds before NFC will function. You only need to do this once. See the [Known Issues](#known-issues) section below for full details.
{% endhint %}

***

### Login Frequency

How often you are asked to use your security key depends on your two-factor authentication frequency setting.

* **Every Login:** your key is required every time you open Keeper and log in.
* **Every 12 Hours:** your key is required once every 12 hours.
* **Every 24 Hours:** your key is required once every 24 hours.
* **Every 30 Days:** your key is required once every 30 days.
* **Don't ask again on this device:** your key is only required once per device.

You can change this at any time in **Settings > Two-Factor Authentication > 2FA Frequency**.

{% hint style="info" %}
When two-factor authentication is enabled on your account, offline vault access is turned off by default. If you have offline access enabled and then add a security key or other 2FA method, you will see a notice that two-factor authentication will be bypassed during offline login.
{% endhint %}

***

### PINs and Hardware Security Keys

You can set a PIN on your hardware security key using the manufacturer's software, such as [Yubico Authenticator](https://www.yubico.com/products/yubico-authenticator/). A PIN adds an extra layer of protection if your key is ever lost or stolen, but it is optional.

**On iOS:** If a PIN is set on your key, iOS will ask you to enter it every time the key is used. There is no way to skip the PIN prompt; this is enforced at the iOS system level.

**On Android:** PIN behavior can vary depending on your device manufacturer. If you are running into problems during setup or login, try registering the key without a PIN first to rule out PIN-related compatibility issues.

{% hint style="warning" %}
If you enter the wrong PIN 6 times in a row, your key will lock. You will need to reset it using the manufacturer's software (such as Yubico Authenticator) before it can be used again.
{% endhint %}

***

### iPad and Hardware Security Keys

Hardware security keys do work on iPad, with one important limitation: no iPad model supports NFC. Only keys that physically connect to your device will work:

* Lightning connector keys for older iPad models
* USB-C keys for newer iPad models (requires Keeper **16.12.0** or later)

Combination keys that support both NFC and plug-in, like the YubiKey 5C NFC, are compatible with iPad via the plug-in connection only.

***

### Known Issues

#### NFC Not Working on New YubiKeys (Firmware 5.7+)

**Affects:** YubiKeys with firmware 5.7.0 or newer, on both iOS and Android

Starting with firmware 5.7, all new NFC-capable YubiKeys ship with NFC intentionally disabled. This is a Yubico security measure called Restricted NFC, designed to prevent tampering while the key is still in packaging.

When you tap one of these keys against your phone for the first time, your browser may open to a Yubico setup page (yubico.com/getting-started) instead of completing the registration. This means NFC has not been activated yet.

**To activate NFC on a firmware 5.7+ YubiKey:**

Plug your key into any USB port (a computer, charger, or USB hub) and leave it connected for about 3 seconds. You only need to do this once, and NFC will work normally from that point on.

{% hint style="info" %}
Not sure what firmware version your YubiKey is running? Download [Yubico Authenticator](https://www.yubico.com/products/yubico-authenticator/), plug in your key, and the firmware version will appear on the home screen.
{% endhint %}

***

#### YubiKey NFC Registration Fails on Android (Error code 28)

**Affects:** Android, YubiKey firmware 5.7.1 specifically

Some users with a YubiKey running firmware version 5.7.1 see the following error when trying to register the key over NFC on Android:

> "Something went wrong with your Security Key, please try again. (Error code 28)"

The error typically appears at the very end of the registration process, sometimes right after a screen that says the registration was successful. Keys running firmware 5.4.3 and 5.7.4 register without issue. This appears to be specific to firmware 5.7.1.

**Workarounds:**

1. **Register using USB instead.** Connect your YubiKey to your Android device via USB-C and select the plug-in option during registration. Once registered over USB, the key can typically be used over NFC for logins going forward.
2. **Register using the Web Vault.** Log in to your vault from a desktop browser (Chrome or Edge) and add the key from there. Once added to your account, it will be available on your mobile device.
3. **Register a different key first.** If you have access to another YubiKey on firmware 5.4.3 or 5.7.4 or newer, registering that key over NFC first and then retrying your 5.7.1 key has resolved the issue for some users.

***

#### NFC Keys and KeeperFill on iOS

**Affects:** iOS, NFC hardware keys

NFC hardware keys do not work with the KeeperFill autofill extension on iOS. This is a system-level limitation. iOS does not allow third-party extensions to initiate NFC key interactions.

**Workaround:** Enable **Stay Logged In** in the Keeper app settings. With this on, your session stays active and KeeperFill can fill your credentials without needing to re-authenticate with your hardware key each time.

***

#### Long-Tap Autofill and Hardware Security Keys on iOS

**Affects:** iOS 18 and later

iOS 18 introduced a long-tap autofill feature that lets you fill saved credentials into apps and websites directly from your password manager. When your Keeper account is protected by a hardware security key, this flow will not complete as expected. The system needs to interact with the hardware key, which is not compatible with how long-tap autofill works.

**Workaround:**

1. Enable **Stay Logged In** in the Keeper app settings.
2. Log in to the main Keeper app on your device first.
3. You can then use the long-tap autofill feature as normal.

***

#### YubiKey FIDO PIN Loop on iOS

**Affects:** iOS 18.1 and iPadOS 18.1, resolved in iOS 18.2

Users on iOS or iPadOS 18.1 with a YubiKey running firmware 5.7 could get stuck in a PIN loop. The key would accept the PIN and then immediately ask for it again, preventing login from completing.

Apple resolved this issue in iOS 18.2 and iPadOS 18.2. Update your device via **Settings > General > Software Update** to resolve this.

If you continue to experience issues after updating, try removing your security key from your account and re-registering it. For additional details, visit [Yubico's support page](https://support.yubico.com/hc/en-us/articles/16726447752732).

***

### Helpful Links

* Check your YubiKey firmware version: [Yubico Authenticator](https://www.yubico.com/products/yubico-authenticator/)
* Full list of FIDO Certified keys: [FIDO® Certified Showcase](https://fidoalliance.org/fido-certified-showcase/)
* Contact Keeper support: [keepersecurity.com/support.html](https://www.keepersecurity.com/support.html)


# Clearing Your Browser Cache

Clear the browser and extension cache to reset Keeper on your device using Keeper's browser extension tool.

If you would like to reset Keeper on your web browser follow the steps below:

1. Navigate to the "Extensions" page in your preferred browser and select "Keeper Password Manager & Digital Vault".
2. Click "Extension options".

<figure><img src="/files/pjlgr7xmmfvW9spwDeFH" alt=""><figcaption><p>Keeper Extension Options in Chrome</p></figcaption></figure>

3. You will then have the option to clear local storage, IndexedDB storage or, all storage.

![Extension Options Menu](/files/qvrnV6WndKL7uPTtFTlt)


# Website Developers

Helpful info for website developers

If you are a website developer and your users are experiencing a compatibility issue with Keeper's browser extension, please follow the steps below.

### Keeper Icon Appearing in Wrong Field

![Form Field Icon](/files/O1ChMiEpdKHpmfofH54S)

Keeper uses pattern matching to determine if a field should display a lock icon. If a lock icon is showing on a form field in error, you can supply a CSS class of `keeper-ignore` to your form element. For example:

```
<input id="user_field" type="text" class="keeper-ignore my_class"/>
```


# Tips & Tricks

This guide provides access to our top "tips & tricks" and assists users in optimizing their experience with Keeper on both desktop and mobile devices.

The proceeding pages in this section are dedicated to various FAQs, site-specific guides and other tips & tricks. Have a suggestion? Email our team at <feedback@keepersecurity.com>.


# Protecting your Keeper Vault

Recommendations for protecting access to your vault

## Overview

At the foundation, Keeper is an encryption platform with policies and controls in place to protect customer data. In this security model, the customer is also responsible for protecting access to their vault by following recommended security practices. This document outlines key recommendations that will help you secure the data stored within your vault.

### Create a Strong Master Password

For customers who login to Keeper with a Master Password, the key to decrypt and encrypt the Data Key is derived from the Master Password using the password-based key derivation function (PBKDF2), with 1,000,000 iterations by default. All customers who login to the vault are automatically migrated to 1,000,000 iterations.

After the user types their Master Password, the key is derived locally and then unwraps the user's 256-bit AES Data Key. After the Data Key is decrypted, it is used to unwrap the individual 256-bit AES record keys and folder keys. The Record Key then decrypts each of the stored record contents locally.

Keeper implements several mitigations against unauthorized access, device verification, throttling and other protections in the Amazon AWS environment. Enforcing a strong Master Password complexity significantly reduces any risk of offline brute force attack on a user's encrypted vault.

The National Institute of Standards and Technology (NIST) provides password guidelines in: [Special Publication 800-63B](https://pages.nist.gov/800-63-3/sp800-63b.html). The guidelines promote a balance between usability and security; Or in other words, passwords should be easy to remember but hard to guess. The NIST instruction recommends an eight character minimum but a higher value will ultimately result in a harder to guess/crack password. Keeper enforces a minimum of 12 character master passwords.

### Enable 2FA on Your Keeper Account

2FA can be added to any consumer or business account. Business customers can enforce the use of 2FA with various levels of control and security options. The 2FA step comes before the Master Password entry. Performing the device verification and 2FA step prior to the Master Password entry phase offers mitigation of several attack vectors including brute force attack, password testing and account enumeration.

To activate Two-Factor Authentication, visit the Settings screen of the Keeper Web App, Desktop App or mobile application.

Keeper also supports FIDO2-compatible WebAuthn hardware-based security key devices such as YubiKey and Google Titan keys as a second factor. Security keys provide a convenient and secure way to perform two-factor authentication.

### Enable 2FA on Your Email Account

Access to your email account is a key component in the overall security of your personal information. Ensure that your email account uses a strong auto-generated password created by Keeper. And ensure that you are protecting your email account with multi-factor authentication. Follow the steps provided by your email provider to lock down your account with the most restrictive methods possible.

We recommend that customers protect email accounts using a hardware-based Yubikey or Google Titan key when possible. If this is not available from your email provider, or if you don't own a Yubikey device, the next best thing is using a TOTP code generator.

Keeper supports the ability to store TOTP codes for logging into your email account or other service. To learn more about protecting TOTP codes in your Keeper Vault, [click here](/user-guides/tips-and-tricks/protecting-totp-codes).

While using SMS as a two-factor authentication setting is better than having nothing at all, we don't recommend relying on SMS due to well documented [SIM swapping attacks](https://en.wikipedia.org/wiki/SIM_swap_scam).

### Be Careful of Browser Extensions

As a general security practice, we recommend that our customers be very cautious with installation of 3rd party browser plugins / browser extensions, such as ad blockers, coupon tools and other "helpful" utilities. Many browser extensions request elevated permissions which have the ability to access any information within any website or browser-based application that you visit. Make sure you fully trust the company who developed the browser extension, and look for their security certifications before you install it.

If you have any other security related questions, feel free to email our team at <security@keepersecurity.com>.


# Stay Logged In

This guide reviews how to enable the new Stay Logged In feature and extend your Logout Timer setting.

## Overview

By default, users are logged out of Keeper if their browser closes, or if their computer restarts. Keeper's "Stay Logged In" feature allows you to instead remain logged into for a configurable duration. Continue reading to learn how to enable `Stay Logged In` in the Keeper Web Vault, Desktop App and the KeeperFill Browser Extension.

## Web Vault & Desktop App

Sign in to the Keeper Web Vault or Desktop App and click the **Account Dropdown Menu** **(your account email)** **>** **Settings > Security** and turn "Stay Logged In" on.

![Enable Stay Logged In](https://914511346-files.gitbook.io/~/files/v0/b/gitbook-x-prod.appspot.com/o/spaces%2F-LSGVtOTYUIkVBoYtFvK%2Fuploads%2F8MLNIlSyJ8N4yayyPYOM%2FScreen%20Shot%202023-09-29%20at%2010.40.42%20AM.png?alt=media\&token=c53e58fa-cda4-40f9-905c-ae82412b776a)

Keeper will then recommend that you also enable the "Auto-Logout" setting, to protect your account if you walk away from your device. Also known as the "Inactivity Logout Timer", this automatically logs you out of Keeper after a period of inactivity. You can set this timer to the duration you prefer and it will continue to count down if you close your browser.

If you've downloaded the KeeperFill Browser Extension, you can manage the Auto-Logout setting from the extension's security settings menu (more on this in the section below).

{% hint style="info" %}
Business customers should note that your Keeper Administrator may disable or limit this feature based on the security settings of your organization.
{% endhint %}

## Browser Extension

If you've downloaded the KeeperFill Browser Extension you can enable both the Stay Logged In and Logout Timer features from the extension's security menu.

Click **Settings > Security** and enable (or disable) "Stay Logged In Between Sessions" and set a "Inactivity Logout Timer".

{% hint style="info" %}
For security reasons, we recommend setting a reasonable logout timer duration when Stay Logged In is enabled.
{% endhint %}

![Logout Timer & Stay Logged In Settings](https://914511346-files.gitbook.io/~/files/v0/b/gitbook-x-prod.appspot.com/o/spaces%2F-LSGVtOTYUIkVBoYtFvK%2Fuploads%2FxqUz0KbNe2JwJCq3osiy%2FScreen%20Shot%202024-06-04%20at%2010.28.07%20AM.png?alt=media\&token=97b08f38-0a17-4c06-b791-56d06fc1e9af)

## Android

To enable Stay Logged In on your Android device, navigate to Keeper's Settings menu and toggle "Stay Logged In" on. Once enabled, the setting will apply to all of your devices.

<figure><img src="https://914511346-files.gitbook.io/~/files/v0/b/gitbook-x-prod.appspot.com/o/spaces%2F-LSGVtOTYUIkVBoYtFvK%2Fuploads%2F0c32iuasP5rOU9Li1mRp%2FSettings%20(5).png?alt=media&#x26;token=9240563f-c210-453e-b913-b7fc398ba6d5" alt="" width="188"><figcaption><p>Enable Stay Logged In</p></figcaption></figure>

## Security

Keeper's Stay Logged In feature uses [Login API V3](/enterprise-guide/developer-tools/login-api). The user's Master Password is **NOT** stored on the device or computer when using the Stay Logged In feature. Keeper utilizes advanced encryption, session management tokens and device authorization capabilities to protect your vault.


# Protecting TOTP Codes

Keeper protects TOTP codes for multi-factor authentication into sites and services.

In today’s digital world, securing your online accounts is crucial. Multi-factor authentication (MFA) adds an extra layer of protection by requiring something you know (your password) and something you have (a time-based one-time password or TOTP) to access your accounts. Keeper helps you store and autofill these TOTP codes, making the authentication process faster and more secure.

{% embed url="<https://vimeo.com/356075220>" %}
Two-Factor Codes Integration (Twitter/X)
{% endembed %}

### Storing TOTP Codes in Keeper

Keeper supports time-based one-time passwords (TOTP) to enhance your security for two-factor authentication (2FA). By integrating TOTP codes into Keeper, you can safely store them within your records, alongside your login credentials. This integration allows you to easily retrieve these codes for websites or services that require them, streamlining the login process.

For example, when you enable MFA on a service like Office 365 or Google Workspace, you’ll typically be asked to scan a QR code or enter a secret key into an authenticator app. With Keeper, you can save these TOTP keys directly in your vault. Simply scan the QR code or enter the secret key into Keeper, and you’ll have your TOTP code securely stored and ready for use whenever you need it.

<div><figure><img src="https://914511346-files.gitbook.io/~/files/v0/b/gitbook-x-prod.appspot.com/o/spaces%2F-LSGVtOTYUIkVBoYtFvK%2Fuploads%2FeGD3X0bdk7lCKXT5tER7%2Fimage.png?alt=media&#x26;token=0647e02f-1aca-4b54-a2a6-a8309a843c62" alt="" width="188"><figcaption><p>Set up Two-Factor Code</p></figcaption></figure> <figure><img src="https://914511346-files.gitbook.io/~/files/v0/b/gitbook-x-prod.appspot.com/o/spaces%2F-LSGVtOTYUIkVBoYtFvK%2Fuploads%2FlOjkIxZ1twRHwi9xULnI%2Fimage.png?alt=media&#x26;token=e3998641-ea46-4c97-b85e-95bcac4d3a9a" alt="" width="188"><figcaption><p>Scan QR Code</p></figcaption></figure> <figure><img src="https://914511346-files.gitbook.io/~/files/v0/b/gitbook-x-prod.appspot.com/o/spaces%2F-LSGVtOTYUIkVBoYtFvK%2Fuploads%2FBGAJlAonqabQZesFdTsV%2Fimage.png?alt=media&#x26;token=cd47e88d-98b4-4c44-a331-e36464c16634" alt="" width="188"><figcaption><p>Two-Factor added</p></figcaption></figure></div>

{% hint style="warning" %}
**Always** make sure to click save on your record after adding a Two-Factor Code.
{% endhint %}

## **Filling TOTP Codes with KeeperFill**

### **Browser Extension**

When you store login credentials and time-based one-time password(TOTP) codes within Keeper, the **Browser Extension** can automatically enter the appropriate TOTP code when you’re logging into a site that requires two-factor authentication (2FA). Here’s how it works:

**Automatic TOTP Code Entry**:

* If the website you're logging into has both login credentials and a TOTP code saved in your Keeper vault, Keeper will automatically detect the TOTP field and fill in the correct code for you.

**Context Menu:**

* Two-factor codes can also be selected and filled directly from the [**right-click context menu**](/user-guides/tips-and-tricks/keeperfill-right-click-menu). Right-click on the TOTP field, choose Keeper, and then select the proper record title and Two-Factor Code to fill into the field.

![Right-Click Context Menu](https://914511346-files.gitbook.io/~/files/v0/b/gitbook-legacy-files/o/assets%2F-LSGVtOTYUIkVBoYtFvK%2F-MCt0-Lj4b830ZR8sKGj%2F-MCt2-0X7RXAM5EYLDBR%2FScreen%20Shot%202020-07-21%20at%204.12.09%20PM.png?alt=media\&token=9c665dc8-7460-49e3-a912-eef22a3956ce)

#### **Accessing TOTP Codes from the Browser Extension Menu**:

* You can also click on your account in the **Keeper Extension menu** (found in your browser toolbar). The extension will display the most appropriate record associated with the webpage you're currently on, making it easier to retrieve the correct login details and two-factor code.
* From there, you can either autofill both the login credentials and the TOTP code, or copy the TOTP code manually to paste into the proper field.

![Record Details and Two-Factor Code in the Browser Extension](https://914511346-files.gitbook.io/~/files/v0/b/gitbook-x-prod.appspot.com/o/spaces%2F-LSGVtOTYUIkVBoYtFvK%2Fuploads%2F4vIVlxw39QJfkjgrt4lR%2FScreen%20Shot%202024-06-04%20at%2011.28.03%20AM.png?alt=media\&token=678aa800-f4ea-4b1f-8069-9f87b5fb4a38)

### **Mobile Apps**

Keeper’s mobile apps for both Android and iOS offer a smooth experience when managing your TOTP codes. Here's how it works:

* **iOS**
  * **Automatic TOTP Code Entry:**\
    When your login credentials and TOTP code are stored in your Keeper vault, Keeper’s autofilling browser extension, KeeperFill, will suggest the appropriate records at the top of your keyboard when you're logging into a website or app that requires it. If Keeper can't automatically match a record, you can manually launch the extension via the "Passwords" button or the key on the upper right of the keyboard. From there, you can search for the desired record.

<div><figure><img src="https://914511346-files.gitbook.io/~/files/v0/b/gitbook-x-prod.appspot.com/o/spaces%2F-LSGVtOTYUIkVBoYtFvK%2Fuploads%2F3tDIX21s3C8xHu9sIYYw%2Fimage.png?alt=media&#x26;token=57373c60-fc72-4793-9927-44ff20f5383d" alt="" width="188"><figcaption><p>Two-Step Verification Request</p></figcaption></figure> <figure><img src="https://914511346-files.gitbook.io/~/files/v0/b/gitbook-x-prod.appspot.com/o/spaces%2F-LSGVtOTYUIkVBoYtFvK%2Fuploads%2FRwcvtuxQjUGxgqaclKdP%2Fimage.png?alt=media&#x26;token=48a253b3-7ec5-4194-b90e-8de3ae9fb0d3" alt="" width="188"><figcaption><p>Automatic TOTP Entry via Keeper</p></figcaption></figure></div>

* **Copying a TOTP Code:**\
  When you view a record that contains a TOTP, you can tap the **Fill** button within the Keeper extension to automatically copy the code to your clipboard, ready for pasting into the appropriate field. Alternatively, you can tap the "two-factor code" field in the record itself, and this will copy the code to your device's clipboard.

<figure><img src="https://914511346-files.gitbook.io/~/files/v0/b/gitbook-x-prod.appspot.com/o/spaces%2F-LSGVtOTYUIkVBoYtFvK%2Fuploads%2FRRX4Iz4tABK5fMSp440Z%2Fimage.png?alt=media&#x26;token=3f498325-2551-44bf-8051-8d52f6a9026a" alt="" width="200"><figcaption><p>Selecting a TOTP Code in Keeper</p></figcaption></figure>

* **Android**
  * **Automatic TOTP Code Entry:**\
    Keeper will suggest the appropriate records at the top of your keyboard when you're logging into a website or app that requires a TOTP code, if you have a matching record stored in your vault.

<div><figure><img src="https://914511346-files.gitbook.io/~/files/v0/b/gitbook-x-prod.appspot.com/o/spaces%2F-LSGVtOTYUIkVBoYtFvK%2Fuploads%2FridmvXtfyfldZeaE0oDe%2Fimage.png?alt=media&#x26;token=9b984443-27f0-4584-883b-7b741327df12" alt="" width="188"><figcaption><p>Two-Step Verification Request</p></figcaption></figure> <figure><img src="https://914511346-files.gitbook.io/~/files/v0/b/gitbook-x-prod.appspot.com/o/spaces%2F-LSGVtOTYUIkVBoYtFvK%2Fuploads%2FfJB4FeZp2duRqjNQy8hq%2Fimage.png?alt=media&#x26;token=da850709-7834-46ec-8362-3f4d06ce2973" alt="" width="188"><figcaption><p>Automatic TOTP Entry via Keeper</p></figcaption></figure></div>

* **Copying the TOTP Code:**\
  If automatic copying of a two-factor code doesn't occur, you’ll need to tap the TOTP field within Keeper. After doing so, a notification will appear, letting you know that the code has been copied to your clipboard and is ready to be pasted.

<div align="center"><figure><img src="https://914511346-files.gitbook.io/~/files/v0/b/gitbook-x-prod.appspot.com/o/spaces%2F-LSGVtOTYUIkVBoYtFvK%2Fuploads%2FuKI2FSJyD2ezFX6hZrRJ%2Fimage.png?alt=media&#x26;token=11e8d8eb-7f9a-45d6-9210-229c8d3343ed" alt="" width="188"><figcaption><p>Keeper Record Containing Two-Factor Code</p></figcaption></figure></div>

## **Troubleshooting TOTP Code Discrepancies**

**Why TOTP Codes May Differ Between Devices:**

If you notice that the TOTP codes generated on your mobile device differ from those on your desktop or browser extension, this is often due to a time mismatch between the devices. Since TOTP codes are time-sensitive, even a few seconds of difference can result in codes that don’t match.

To resolve this:

1. Set Device Time to "Automatic": Ensure that both your mobile and desktop devices are set to automatically synchronize their time with a reliable time server. On most devices, this can be done by enabling the “Set Automatically” option in your date and time settings.
   1. **On iOS/Android:** Go to your device’s settings, find the Date & Time settings, and enable “Set Automatically.”
   2. **On Desktop:** Check your computer’s date and time settings to make sure they’re synced with the correct time zone and server.

This will ensure that your TOTP codes remain synchronized across all devices, allowing you to enter the correct code for login.

## **Security Best Practices for TOTP Codes**

While Keeper ensures your TOTP codes are securely stored and managed, here are some additional tips for maximizing your security:

* **Never Share Your TOTP Key**: Keep your TOTP secret keys private. Only store them within Keeper, and never share them with anyone.
* **Use Strong Master Passwords**: Your Keeper vault is only as secure as your master password. Use a strong, unique password to protect your vault.

\
By using Keeper to store and autofill your TOTP codes, you not only protect your accounts with an extra layer of security, but you also streamline the 2FA process. Keeper’s integration with your browser and mobile devices makes managing TOTP codes hassle-free, while keeping your credentials and codes safely protected.


# Using Keeper TOTP with Azure or Office 365

How to use Keeper to manage TOTP codes for protecting your Office 365 accounts.

## Microsoft 2FA Configuration

Keeper can protect Azure AD / Office 365 logins with our TOTP (time-based one-time password) feature. By default, Microsoft provides a different type of code which supports their push method. Below are the step by step instructions to setting up Office 365 TOTP code support properly.

**(1)** From your Microsoft Azure / Office 365 Profile Screen, visit your security settings screen. The Microsoft site seems to change often, so we won't add a hyperlink here. Click on "Add Method" to set up two factor authentication on your Microsoft account.

![](/files/-Ma0eoRhVgFxcf2kJrId)

**(2)** Select "I want to use a different authenticator app" as your preferred option

![](/files/-Ma0f2nSEgIZhPdmZQef)

The QR code will be generated and displayed:

![](/files/-Ma0fGKe3SjU8dDZ88_T)

**(3)** On Keeper from your record, click on "Add Two-Factor Code". Or if you're using the mobile app, you can tap on "Add Two-Factor Code" to scan it with the camera.

![](/files/-Ma0fYYy0g2Yg7dtENEZ)

![](/files/-Ma0ftjxaldR8FCGMZLs)

**(4)** Enter the verification code as displayed in your Keeper app

![](/files/-Ma0g0G3VjQd1DuyyeS2)

**(5)** Click Next and then Save the record in the Keeper vault.

{% hint style="success" %}
Make sure to **save** the Keeper record before exiting the setup
{% endhint %}

**(6)** To ensure that Autofill works with all the various Microsoft sites you may be using, we recommend adding several custom fields to your Keeper record similar to the screen below.

![Keeper vault record configuration](/files/-M3hDyjGjuCprnJZhN2_)

### Logging in with Two Factor Code

When logging into Microsoft Online, use Keeper's right-click menu as a simple way to fill the TOTP code.

![](/files/-M3hGxzOsW8HYRrvVmYp)


# Changing Passwords Using KeeperFill

KeeperFill provides unique features to help you change/rotate passwords on any website.

1. Login to the site using the KeeperFill browser extension
2. Visit the site's "Change Password" Page
3. Follow Keeper's on-screen instructions

See the below example video using Twitter.

{% embed url="<https://vimeo.com/736584776>" %}
Change Your Passwords with KeeperFill
{% endembed %}


# Free Family License for Personal Use

This guide provides an overview of how Enterprise and Business users can create a free, Keeper Family Plan and once created, how to easily switch between their Keeper accounts.

## Create a Free Family Plan from a Business or Enterprise Account

All Keeper Enterprise users can create a free, Keeper Family Plan for up to 5 family members with unlimited devices. To create your personal vault, follow the steps below:

{% hint style="danger" %}
**This vault is intended for&#x20;*****personal use*****&#x20;only. All business-related credentials must be stored within your company issued vault.**
{% endhint %}

(1) Log into the Keeper Web Vault or Desktop App.

(2) Click on the **Account Dropdown Menu** (your email address).

(3) Select **Account**.

![Account Dropdown Menu > Account](https://914511346-files.gitbook.io/~/files/v0/b/gitbook-x-prod.appspot.com/o/spaces%2F-LSGVtOTYUIkVBoYtFvK%2Fuploads%2FfAZcSoIJZ2PtDVLinTp7%2FScreen%20Shot%202023-09-29%20at%2010.50.45%20AM.png?alt=media\&token=650586e1-a71f-420a-bac9-68b70f5fd288)

(4) Enter your **personal email** within the "Keeper Family License for Personal Use" section and click **Send Email**.

![](https://914511346-files.gitbook.io/~/files/v0/b/gitbook-x-prod.appspot.com/o/spaces%2F-LSGVtOTYUIkVBoYtFvK%2Fuploads%2F6QrXi1PNAi0HzL2nJRsv%2FScreen%20Shot%202023-09-29%20at%2010.50.29%20AM.png?alt=media\&token=e1a0e75e-1380-46cb-8c52-2b48ce5ae196)

(5) Logout from your business vault on your browser by clicking on the **Account Dropdown Menu** > **Logout**.

## Create Family Account

(1) Open the Keeper invitation sent to your personal email and click **Verify Email Address**.

![Keeper Family Account Invitation via Email](https://914511346-files.gitbook.io/~/files/v0/b/gitbook-x-prod.appspot.com/o/spaces%2F-LSGVtOTYUIkVBoYtFvK%2Fuploads%2F79yLAt47R7dA6XCJQGKu%2FScreen%20Shot%202023-09-29%20at%2010.56.10%20AM.png?alt=media\&token=a39f44df-fae0-49f4-908a-4e0e85a1cb4a)

(2) You will then be redirected to **Sign Up** by creating a master password for your personal account.

![Sign Up for Personal Account](https://914511346-files.gitbook.io/~/files/v0/b/gitbook-x-prod.appspot.com/o/spaces%2F-LSGVtOTYUIkVBoYtFvK%2Fuploads%2Ffq7WrXvpwqIw27n1cNna%2FScreen%20Shot%202023-09-29%20at%2010.56.40%20AM.png?alt=media\&token=2416b0d2-f8e5-4a11-bae0-1d09d4d97c1b)

#### Important Note About Data Center Location

If you follow the link sent on your desktop computer, you'll be properly routed to the same geographic data center that is associated with your Keeper Business Vault. Therefore we recommend using your Desktop computer to create your personal Keeper Vault.

If you decide to use your mobile device for creating your personal vault, see the instructions below.

## Creating Account on Mobile

If you decide to create your personal account on an iOS or Android device, please ensure you are in the correct data center location.

If you set up your personal Keeper account in the wrong region, you'll need to contact Keeper support to delete and re-create your account.

![Data Center Selection](https://914511346-files.gitbook.io/~/files/v0/b/gitbook-x-prod.appspot.com/o/spaces%2F-LSGVtOTYUIkVBoYtFvK%2Fuploads%2FMUeX4d4znAnA8lUbxI4t%2FiOS_double.png?alt=media\&token=789c7ead-8454-4541-8a2e-68173e3ffebc)

## Confirming License Activation

After your personal account has been created, it will appear in your business vault Account Menu.

![Personal License Activation Status](https://914511346-files.gitbook.io/~/files/v0/b/gitbook-x-prod.appspot.com/o/spaces%2F-LSGVtOTYUIkVBoYtFvK%2Fuploads%2F6LL8KEnqq7Ut5LxmrqGH%2FScreen%20Shot%202023-09-29%20at%2011.01.26%20AM.png?alt=media\&token=9da5bc15-c81a-4452-befd-f844de3e8c71)

#### Important Notes Regarding Your Linked Personal Account

* Your linked personal account is licensed as a Keeper Family Plan account with 10GB of secure file storage and BreachWatch dark web monitoring.<br>
* The company managing your Business vault does not have any access rights or ability to decrypt information stored in your personal vault.<br>
* Your linked personal account will remain free on unlimited devices for as long as the business account is active.<br>
* If you leave the business, or if the business does not renew their subscription with Keeper, your Family license converts into a Keeper Free subscription. You may continue to use your personal license on one device, or purchase a Family or Unlimited subscription for all of the premium features.<br>
* Your Business Admin may remove the ability to share records from the business vault to the linked personal vault.

{% hint style="danger" %}
**This vault is intended for&#x20;*****personal use*****&#x20;only. All business-related credentials must be stored within your company issued vault.**
{% endhint %}

## Switch Between Accounts

You can easily switch between your business/enterprise and personal accounts on Keeper for Web Vault, iOS and Android.

From your Web Vault, click the **Account Dropdown Menu (your email address) > Account > Switch Account**.

You will then be redirected to sign into that account using your master password.

{% hint style="info" %}
If you have not already logged into the account you would like to switch to on the device you are using, you will first need to tap **Add Account** and enter your login credentials. Once added, it will appear in the list of accounts that you can switch between.
{% endhint %}

![Switch Account](https://914511346-files.gitbook.io/~/files/v0/b/gitbook-x-prod.appspot.com/o/spaces%2F-LSGVtOTYUIkVBoYtFvK%2Fuploads%2FbLvEcbwiX0RRRWKMQMQx%2FScreen%20Shot%202023-09-29%20at%2011.01.26%20AM.png?alt=media\&token=f3ea54ab-3ad5-400e-88b2-ef0468df4d1c)

{% hint style="info" %}
Account switching is also available on [iOS](/user-guides/ios#account-switching) and [Android](/user-guides/android#account-switching-and-vault-selection).
{% endhint %}


# One Record with Multiple URL Domains

## One Record with Multiple Domains

Some sites have more than one domain (website address) that require the same exact login/password. If this is the case for any of your records, rather than creating an entirely separate record, Keeper allows you to store multiple website domains within one record.

So no matter what domain you are logging in from, KeeperFill will recognize that domain as an alias and allow you to log in with the same stored credentials.

To store multiple website domains within a single record:

1. While viewing the record, click **Edit**.
2. Click the **+ Custom Field** button.
3. Select **URL** from the **Custom Field** types
4. In **Website Address**, enter the site's alternate domain name.
5. To finish, click **Save**.
6. You can continue to repeat this process for additional domain names by clicking the **+ Custom Field** button again.

![Add "URL" Custom Field to a Record](/files/mOmQ9hqbUzXv1rDsvV7i)

![Website Address URL Added to Record](/files/LnNbsvgb5td2OinDwB02)


# KeeperFill Right-Click Context Menu

## KeeperFill Right-Click Context Menu

If a website form field does not display the Keeper lock icon, users can right-click on the field to produce a context menu with KeeperFill features. The context menu offers the ability to fill logins, payment cards, addresses and create new passwords.

![Right-Click Context Menu](/files/-LlDxeA-UZawdX2yXtQJ)

The KeeperFill right-click context menu provides the following features:

* Filling record login fields
* Filling payment card fields
* Filling billing and address fields
* Filling TOTP Codes
* Creating a new record
* Opening the extension window
* Launching the Web Vault
* Logging out of your account


# Keyboard Shortcuts

## Keyboard Shortcuts

If you prefer to use keyboard shortcuts instead of mouse clicks to make the process of auto filling your passwords even more seamless, follow the steps below:

1. Navigate to the site you would like to log in to.
2. Type **command+shift+k** (for Mac OS) or **alt+k** (for Windows).
3. In the field provided, begin typing your search terms.
4. Use the **up and down arrows** on your keyboard to find and highlight the record you are searching for.
5. Use the **enter** key to quickly fill and log in to the site.


# Resetting Keeper Desktop App

Learn how to reset Keeper on Mac and Windows.

If you encounter an issue with the Keeper Desktop application and you need to reset the content and settings, follow the steps below.

### Mac & Windows

While in the Keeper Desktop App, navigate to **Help > Reset Keeper**.

<figure><img src="/files/kTZc47VwoCBMTyGySnw1" alt=""><figcaption><p>Reset Keeper on Windows</p></figcaption></figure>

<figure><img src="/files/du9x7Wby1zOpbG1Prygx" alt=""><figcaption><p>Reset Keeper on Mac</p></figcaption></figure>

### Mac Store Version

Additional information may need to be deleted manually if you installed Keeper from the Mac App Store. Open the "Terminal" application from your Applications > Utilities menu then run the below command:

```
rm -rf ~/Library/Application\ Support/Keeper\ Password\ Manager/
```


# Log In to Keeper With Windows Hello

How to configure Keeper Desktop with Windows Hello biometric login.

### Windows Hello Login <a href="#windows-hello-login" id="windows-hello-login"></a>

Keeper is compatible with Windows Hello, a biometrics-based technology that allows users to authenticate and log into their Windows device using biometric facial recognition, fingerprint reader, or pin (available on Windows 10). If Windows Hello is configured on a user's device and enabled in Keeper, this eliminates the requirement for users to enter their master password at the Keeper login screen, further expediting the login process.

Enable Windows Hello:

1. Open the **Account Dropdown Menu**.
2. Click **Settings > Security**.
3. Toggle "Windows Hello Login" on.
4. Once you have read the warning notification, click **Enable** to accept.

![Enable Windows Hello Login](/files/69ENOAVxQQ73pnZPdn3Q)

#### Windows Hello Setup <a href="#windows-hello-setup" id="windows-hello-setup"></a>

If Windows Hello is not yet configured on your device, you will receive a prompt to open your Windows Settings to configure it. Once you have configured Windows Hello, close out of the Settings window and return to your Vault to proceed with steps 3 & 4 above (Enabling Windows Hello).

#### Authentic With Windows Hello <a href="#logging-in-with-windows-hello" id="logging-in-with-windows-hello"></a>

Next time you log in to Keeper, Windows Hello will first attempt to authenticate your identity. Once authenticated, your vault will be decrypted and you will be automatically logged into Keeper.

By clicking **Cancel** you will be returned to the login screen to log in with your Master Password instead.

![Windows Hello Prompt](/files/v9LH8uyyrFqPILBQGGJH)

{% hint style="info" %}
Windows Hello login became available in March 2020 in our new unified App Installer when Keeper Desktop is installed from the download page of our website or the Microsoft Store. Customers on a prior version will not receive the Windows Hello feature until they install the proper version.\
\
**The Windows Hello-compatible version of Keeper can be installed one of two ways:**

**1. Via the** [**App Installer**](https://www.keepersecurity.com/desktop_electron/packages/KeeperPasswordManager.appinstaller) **link on our website download page**\
**2. From the** [**Microsoft Store**](https://www.microsoft.com/en-us/p/keeper-password-manager/9n040srq0s8c) **download site**
{% endhint %}


# Login to Keeper on macOS with Touch ID

How to login to Keeper with Touch ID on your Mac

### macOS Login With TouchID

Keeper is compatible with Touch ID on macOS, a biometrics-based technology that allows users to authenticate and log into their device using a fingerprint. If Touch ID is configured on a user's device and enabled in Keeper, this eliminates the requirement for users to use SSO or enter their Master Password at the Keeper login screen, further expediting the login process.

To enable Touch ID, click **Account Dropdown Menu** **>** **Settings > Security** and toggle "Touch ID" on.

<figure><img src="/files/9n1oNgvv3EmzTq3Foj60" alt=""><figcaption><p>Enable Touch ID</p></figcaption></figure>

#### Touch ID Setup

If Touch ID is not yet configured on your Mac, you will need to first enable the feature from your device settings. Once you have configured Touch ID , close out of the Settings window and return to your vault to proceed with the steps above.

#### Logging In with Touch ID

Next time you log in to Keeper, tap on the Touch ID icon from the login screen. Once authenticated, your vault will be decrypted and you will be automatically logged into Keeper.

By clicking **Cancel** you will be returned to the login screen to log in with your master password or SSO instead.

<figure><img src="/files/4QQUIKHw6m55kaCJTdy0" alt=""><figcaption><p>Touch ID Login</p></figcaption></figure>

<figure><img src="/files/h0P6LvMlkcS4QJ3d7wfc" alt=""><figcaption><p>Touch ID Prompt</p></figcaption></figure>


# Using Windows Hello or Touch ID with SSO

Logging in with Windows Hello to a vault tied to SSO.

Keeper supports the ability to login with Windows Hello or Touch ID on a vault that is tied to an SSO provider such as Microsoft Azure. To set this up, please follow the instructions below.

(1) Login to your vault using your SSO as usual, and click the **Account Dropdown Menu (your email) > Settings** **> Security**.

(2) Enable Windows Hello (or Touch ID if you're on a Mac). Note that if you previously tried using this setting, you should turn it OFF and ON in order to reset the master password storage in your device.

(3) The next time you login to the Keeper Desktop App, simply click the "Windows Hello" or "Touch ID" button.

(4) You will now be able to login seamlessly to your vault using Windows Hello or Touch ID, without having to constantly login using your SSO provider.

![Enable Windows Hello Login](/files/69ENOAVxQQ73pnZPdn3Q)

{% hint style="warning" %}
If you receive an error when attempting to login with Windows Hello or Touch ID, please turn the setting off then on.
{% endhint %}


# Logging in with DUO

User guide for Enterprise customers who login using DUO for Two-Factor Authentication.

If you are new to logging into Keeper using DUO for Two-Factor Authentication, the videos below will demonstrate the process for Web Vault, iOS, and Android users. To learn more about DUO's Two-Factor Authentication method for Enterprise, click [here](/enterprise-guide/two-factor-authentication#duo-security-setup).

{% hint style="info" %}
To login with DUO you must first activate it in your Keeper account's Two-Factor Authentication settings.
{% endhint %}

## Web Vault

{% hint style="warning" %}
To receive login requests from DUO, notifications must be turned on for both DUO and Keeper on your mobile device. If you use iOS, you must tap the DUO notification pull-down when it appears on you mobile device.
{% endhint %}

{% embed url="<https://vimeo.com/417302294>" %}

## iOS

{% hint style="warning" %}
To receive login requests from DUO, notifications must be turned on for both DUO and Keeper on your mobile device. To verify your identity, you must tap the DUO notification pull-down when it appears on you mobile device.
{% endhint %}

{% embed url="<https://vimeo.com/417301064>" %}

## Android

{% hint style="warning" %}
To receive login requests from DUO, notifications must be turned on for both DUO and Keeper on your mobile device.
{% endhint %}

{% embed url="<https://vimeo.com/417686948>" %}


# Social Media Management

This guide will review Keeper's most common use cases for social media management.

<figure><img src="/files/w37i7pktGpuhGHeHkAAw" alt=""><figcaption></figcaption></figure>

For the examples below, the site "X" (Twitter) will be used, however, Keeper works across all social media platforms.

## Create a Record

#### Web & Desktop App

To create a new record from Keeper's Web Vault or Desktop App, click the **Create New > Record**. Select a record type from the dropdown menu and enter a record "Title".

<figure><img src="/files/JlxXcIlBybRvPmOKhMhP" alt=""><figcaption><p>Create New > Record</p></figcaption></figure>

Enter the record details including your username, password and URL (if it wasn't auto-generated for you). Use Keeper's password generator by clicking on the **dice** to create a strong, random password or enter your existing password. Click **Save** when done.

<figure><img src="/files/oSddQnFwcI01Y8P93qNH" alt=""><figcaption><p>Enter the Record Details</p></figcaption></figure>

#### KeeperFill

You can also create new records using the KeeperFill Browser Extension, which allows you to autofill your passwords and save new login credentials to your vault. KeeperFill is available for every web browser. Download KeeperFill for your browser by visiting our [Downloads Page](https://www.keepersecurity.com/download.html?t=v).

To create a record while at the site's login page, click the **Add Record** button in the KeeperFill toolbar. This “quick add” functionality will auto-generate a record “Title” and “URL” based on the website you are visiting.

<figure><img src="/files/IfVmQjbJjTtL9ZPByVat" alt=""><figcaption><p>Add Record With KeeperFill</p></figcaption></figure>

Use Keeper's password generator by clicking on the **dice** to create a strong, random password or enter your existing password.

{% hint style="warning" %}
Using Keeper's password generator will NOT automatically change the website's existing login password. You must visit the website's "Change Password" page to update the old password to match the new, stronger password.
{% endhint %}

Make any necessary edits to the record details and click **Save** when done.

<figure><img src="/files/LJXnIZQcQXVE0n0vLzhY" alt=""><figcaption><p>New Record Details</p></figcaption></figure>

## Launch and Autofill Log In

Next time you need to log in to a site, you can quickly launch the record's website from your web or desktop vault, navigate to the site directly, or search for the record in your KeeperFill toolbar then autofill your login credentials by clicking the **fill icon**.

<figure><img src="/files/X09x1CTA9W6SaToYGcs2" alt=""><figcaption><p>Launch a Record's Website</p></figcaption></figure>

<figure><img src="/files/2i10Bj7BMR0hD4ZGjALM" alt=""><figcaption><p>Autofill a Record's Credentials Into a Login Form</p></figcaption></figure>

## Two-Factor Code Setup & Use

### Setup

For extra security on supported sites and apps, store two-factor authentication (2FA) codes for standard TOTP (Time-Based One-Time Passwords) in your Keeper records.

Navigate to the site's "security settings" or similar page to enable two-factor authentication. Of the methods listed, select "Authentication app" and follow the steps as directed.

<figure><img src="/files/xkMPw0WhBJm0VeqClToZ" alt=""><figcaption><p>Turn On Two-Factor Authentication</p></figcaption></figure>

Next you will be asked to link the authenticator app (Keeper) to your account.

<figure><img src="/files/b5lcH4T5Ere1CSYe312g" alt=""><figcaption><p>Link Account to Keeper</p></figcaption></figure>

Log in to the Keeper Desktop app, navigate to the corresponding record, click the **edit icon** and **Add Two-Factor Code**.

<figure><img src="/files/TKkSY6VChlvzRaCiXIHI" alt=""><figcaption><p>Edit > Add Two-Factor Code</p></figcaption></figure>

Click **Scan.** This will open a scan window.

{% hint style="info" %}
Please note, Keeper's scan feature is only available on the Keeper Desktop application, which you can download [here](https://www.keepersecurity.com/download.html?t=d).
{% endhint %}

<figure><img src="/files/OPAgUgxWoCr6ObGMnfN7" alt=""><figcaption><p>Open the Scan Window</p></figcaption></figure>

Return to the target site and drag the scan window over the QR code that is presented.

<figure><img src="/files/xE9xzs7sjvoZK1uDfQ87" alt=""><figcaption><p>Scan the QR Code</p></figcaption></figure>

Once the QR code is identified, it will automatically generate a two-factor code in the Keeper record. Hover next to the two-factor code and click the **copy icon** that will appear.

<figure><img src="/files/N6uFBsE4iCDSziM5sKdg" alt=""><figcaption><p>Copy the Two-Factor Code</p></figcaption></figure>

Paste the code into the field provided. Once confirmed, setup is complete.

<figure><img src="/files/8JM6KomEPUyl3hLYs7k8" alt=""><figcaption><p>Paste the Code</p></figcaption></figure>

### Autofill Two-Factor Codes

The next time you log in to a site or app where you have enabled two-factor authentication, copy the code from your Keeper vault or autofill it from the KeeperFill browser extension.

<figure><img src="/files/N6uFBsE4iCDSziM5sKdg" alt=""><figcaption></figcaption></figure>

Upon autofilling your username and password via KeeperFill, when prompted, the stored two-factor code will also be autofilled into the field provided.

Alternatively, you can click the **copy icon** next to the code and paste it into the field provided.

<figure><img src="/files/z7N0dk15DjPdeGnoL3oI" alt=""><figcaption><p>Autofilled Two-Factor Code</p></figcaption></figure>

## Changing Your Passwords

KeeperFill makes it easy to change your passwords. When visiting a site's "Change Password" page, you will receive a prompt from Keeper asking if you would like help changing your password. Keeper will then run a wizard that walks you through a few quick steps to change your password and simultaneously update the record in your vault.

To begin, navigate to the site's "Change Password" page, or similar. Once there, Keeper will recognize the page and ask if you would like help changing your password, click **Yes**.

<figure><img src="/files/ssWutxgxAqIzvvrmIHSZ" alt=""><figcaption><p>Keeper's Change Password Prompt</p></figcaption></figure>

Next, follow the steps provided that will guide you to click on the Keeper icons in each password field. This will create and fill a strong, random password using Keeper's password generator.

<figure><img src="/files/xfK8bn7VQ28alAFInZbN" alt=""><figcaption><p>Select the Keeper Icons When Prompted</p></figcaption></figure>

Once you submit the change on the site, you will have a chance to review the changes and save them to your vault.

<figure><img src="/files/vmcIU6DhRKyOSq1vZbHL" alt=""><figcaption><p>Save Changes to Your Vault</p></figcaption></figure>

If the change was successful, click **Yes**. If not, click **No - Revert Change** to revert the record back to its original state.

<figure><img src="/files/kxJLnEOeOsR9uaAsEGKd" alt=""><figcaption><p>Accept or Revert the Update</p></figcaption></figure>


# Use Cases

This document covers the most common use cases for the Keeper Enterprise product.

## End-User Vault

Upon deployment of the Keeper Enterprise product, each user is provided a secure, private Keeper Vault. Keeper works on all device types, platforms and operating systems to enable users to:

* Create and manage strong passwords across all device types
* Securely store files and other private information
* Autofill passwords across web browsers, apps and mobile devices
* Share confidential information between users and teams

### Deploy a Zero-Knowledge Vault to Employees

Keeper zero-knowledge, secure vault is protected with multiple layers of encryption. Each user’s vault is protected by a Master Password which is used to encrypt and decrypt data on the local device. Additionally, Two-Factor Authentication protects cloud access. Below are some of the key vault security features:

* A user's Master Password is used to derive an encryption key using PBKDF2, which will encrypt and decrypt their vault.
* Each password and file stored in the vault are protected with a separate, strong 256-bit AES key.
* Users who login with Keeper SSO Connect integration don’t require a master password, since the encryption keys are managed by the Enterprise. For convenience, Admins can permit Biometric Login to the vault (Face ID/Touch ID, Windows Hello, etc.).

![Windows Hello Login](/files/bNSFebaFx0KIMGvIVwTH)

### Generate Strong Passwords

Creating strong, randomly generated login passwords for each website is critical in protecting against data breaches, password stuffing and password spraying attacks. Keeper’s password generator and auditing capabilities ensure password compliance company-wide.

![Password Generator](/files/qhw6hmRGmIqWfkd33cHV)

### Protect All Platforms and Devices

Keeper protects passwords and private information on all devices and operating systems. Deployment options are available through the Keeper Security website and every major app store. SCCM deployments and virtual environments (e.g. Citrix) are fully supported.

#### **Keeper® Desktop App**

Keeper's fully-featured desktop application for fast and secure access to your Keeper vault.

![](/files/-LfavGnAuZ2SmlXwZzQP)

#### **KeeperFill®**

The KeeperFill browser extension quickly autofills your login credentials into your favorite websites.

![](/files/-Lfaw650E0A1hyFuayCm)

#### **Keeper® Mobile App**

Keeper's fully-featured mobile application for fast and secure access to your Keeper Vault.

![](/files/-LfawUL-9KYvbkjY5By0)

### Autofill Website Passwords with KeeperFill®

KeeperFill for web browsers provides a powerful and easy-to-use autofill feature. Various paths and scenarios are covered by the browser extensions, including the following:

* Filling a login and password
* Selecting from multiple passwords on the same website
* Autofilling a login, password and two-factor code
* Prompting to fill or manual click to fill
* Saving new passwords to the vault as you type

The ability to customize the behavior of the browser extension can be configured from the extension's Settings Menu.

![](/files/nHeuIDEFUfbVG0eRPSj7)

### Change Passwords and Monitor Security with KeeperFill

KeeperFill makes it easy to change your passwords. When visiting a site's "Change Password" form, you will receive a prompt from Keeper asking if you would like help changing your password. By agreeing, Keeper will walk you through a few quick steps to change your password and simultaneously update the record in your vault. Additionally, using Keeper’s Security Audit feature within the vault, users can identity which accounts contain weak passwords and take the necessary steps to change them.

### Autofill Native Desktop Applications with KeeperFill for Apps

KeeperFill for Apps is a convenient tool used to further enhance your experience with the fully-featured Keeper Desktop App. Used in conjunction with your desktop applications, KeeperFill for Apps provides a simple login solution and quick access to your vault records.

Additionally, KeeperFill for Apps provides a unique and powerful native app form fill capability using simple hotkey commands. IT admins who are accessing remote services can make use of this capability without having to resort to “copy” and “paste”. By storing all of your passwords in the vault and using KeeperFill for Apps, you can rest assured that even your application passwords aren't left vulnerable in plain text.

KeeperFill for Apps works across Mac and PC platforms with popular native applications such as:

* Skype, Slack, Evernote and other productivity apps
* Custom and/or proprietary applications
* Remote Desktop, VNC, Terminal and other command-line utilities

KeeperFill for Apps can be configured via Settings > KeeperFill within the Keeper Desktop App. Once opened, it can be accessed through your computer's menu bar (MacOS) or system tray (Windows) via the familiar Keeper icon.

![KeeperFill for Apps](/files/-M5NdO-ZcydZ6LOjXI3z)

### Stay Organized and Efficient with Keeper’s Advanced User Interface Features

#### Folders & Subfolders

Folders and Subfolders (or folders within folders) provide greater control and organization over your private Keeper records and files. Subfolders also increase organization across teams and accounts types.

![Vault Folder and Subfolders](/files/S5EWMNgwnu19DRRayLxA)

#### Grid View Layout

Grid view allows you to view your records in a graphical, tile format which displays beautiful, curated logos for popular websites. To enter Grid view, simply click on the grid icon in your vault.

![Vault Records Grid View](/files/NI5AYz5aeHj0Y7kLnadx)

#### Record History

Every change made to a record creates a backup version that can be viewed and restored at any time. Similarly, deleted records can be recovered and there is no limit to the number of record versions that can be stored.

![Record History](/files/Vy1WJ9PrWNvVRlxxHydS)

#### Shortcuts

A record can exist outside of a folder, inside a folder or inside a shared folder. A record can also be linked to multiple folders or shared folders and is referred to as a “shortcut”. Shortcuts like alias files, can exist in two or more places and when edited, change together.

![Create Record Shortcut](/files/144xhxqEGHnJOnRgaK7x)

### Protect Confidential Files, Photos and Videos

Keeper offers Secure File Storage to protect your confidential files, photos, and videos. Keeper protects these files with 256-bit AES encryption using record-level keys, just like our password encryption technology. Users can easily drag-and-drop files directly into their vault and take pictures & videos directly from their mobile devices. These files can be easily and securely shared with other Keeper users, from vault-to-vault.

Examples of files that might be stored in the vault include:

* Customer Information
* Financial and Banking Documents
* Tax Returns
* Medical Photos and Videos

![Add Files or Photos to a Record](/files/UbExuqwNlOEg07swJHKE)

### Protect Secure Certificates and SSH Keys

The growing threat of trust-based attacks is opening security risks for IT organizations who rely heavily on access to critical systems via digital certificates and keys. Keeper protects certificates and keys with 256-bit AES zero-knowledge encryption. Examples of the types of certificates that can be stored include:

* SSL Certificates
* SSH Keys
* RSA Key Pairs
* Code Signing Certificates
* API Keys

![](/files/-MBkbSQIUtly-EQV75Tb)

Certificates and SSH keys can be stored in any Keeper vault record as either a custom field, note, or file attachment.

In addition to storing SSH keys, they can be used to securely establish connections.

[Keeper Commander](https://github.com/Keeper-Security/Commander), a command-line SDK and toolkit for DevOps users allows you to connect to remote systems using stored credentials or SSH keys.

{% hint style="info" %}
For more information on establishing connections using Keeper Commander, click [here](https://github.com/Keeper-Security/Commander#launching-and-connecting-to-remote-servers).
{% endhint %}

### Share a Password with a Colleague or Team

Keeper uses RSA encryption to share passwords and files. You can share passwords or files directly with another Keeper user or with a team. Behind the scenes, information is encrypted with the recipient’s public key and decrypted with their private key. Permissions (can edit, can share, can edit & share, and read only) can be assigned to individual users or to teams of users.

![](/files/2IQZ2eqyQtqubxbfNx9x)

View, edit and share permission sets can be applied to individual users. Shared folder permissions can provide control over the management of the folder, users and records.

Teams are created and managed in the Keeper Admin Console. Teams can also be provisioned automatically using our Active Directory Bridge software, SCIM protocols or the Keeper Commander SDK.

### Separate Business and Personal Information

Since Keeper Enterprise provides a mechanism for administrators to suspend and transfer end-user vaults, Keeper recommends that end-users keep business and personal vaults separate. This easily be achieved by using Keeper’s Account Switching features. Every platform supports the ability to easily switch between business and personal vaults.

![Account Switching](/files/DdK2RLlQ3GZbu5WrNooj)

### Log in with Existing Identity Providers

Through the use of Keeper SSO Connect technology, end-users can seamlessly log in to their Keeper Vault with any existing SAML 2.0 compatible identity provider such as Okta, Centrify, Microsoft AD FS / Azure, G-Suite, JumpCloud and F5 BIG-IP APN.

Once this capability is activated by the Keeper Administrator, logging in is seamless across all device types and platforms. Alternatively, users can first log in to their identity the provider and then launch their Keeper Vault.

## Administration and Deployment

Keeper Enterprise provides a web-based Admin Console application. The Admin Console allows administrators to:

* Onboard and offboard users
* Apply role-based enforcement policies
* Manage two-factor authentication
* Monitor the security score of the organization
* Customize the end-user experience

### Manage and Onboard Users

The Keeper Admin Console provides several solutions to deploy Keeper to users based on the size of the organization. Users can be provisioned through one of the following methods:

* Active Directory or LDAP sync via AD Bridge
* Single Sign-ON (SAML 2.0)
* SCIM and Azure AD
* Email Auto-Provisioning
* CSV File Upload
* Manual entry via the web interface
* Command Line Provisioning via Keeper Commander SDK

Different organization units (nodes) can be provisioned in different ways. For example, end-users within one organizational unit can onboard via Active Directory and another group of users can be provisioned with an identity platform like Microsoft Azure or Okta.

![User Provisioning Methods](/files/-MBofV0IaY6IOTPlo8fc)

![Configuration of Active Directory Bridge](/files/-MBogDY7iY5jhe7hUiPg)

![Manual Provisioning via the Admin Console Interface](/files/-MBoeaAlalBF3MM_Ulc0)

### Enforce Role-based Permissions

Keeper’s role-based enforcement policies provide organizations with the most flexibility to customize their solution to meet the needs of internal controls, this includes:

* Master password complexity rules
* Two-Factor Authentication channels
* Physical location, IP addresses and device platforms
* Sharing and data export rules
* Device biometrics

Administrative permissions are also applied at the role level. Any role with administrative permission can log in to the Keeper Admin Console and perform specific job functions.

![Role-based Permissions are Fully Customizable](/files/-MBoaVCKZc821OEzIMNr)

![Admin Permission Settings](/files/-MBobSZ-kJxP2dcBai8P)

### Transfer an Employee's Vault When They Leave the Organization

Retaining critical and confidential data is important when employees leave the organization, especially users that are in some administrative or management capacity.

Through the use of Keeper’s secure “Account Transfer” feature, a user’s vault can be locked and then transferred to another user within the organization. The process of account transfer remains fully zero-knowledge, and the responsibility of performing the account transfers can be limited based on roles within the organization. For example, only the Engineering Manager can transfer the vault of an Engineer or the Marketing Manager can only transfer the vault of a Marketing Coordinator.

Keeper’s security model is based on the least-privileged access, meaning, Keeper implements least-privileged policies, so when a user is a member of multiple roles, their net policy is most restrictive. Administration of groups can be delegated and restricted based on job function or any other criteria.

![Enabling Account Transfer From the Role Enforcements Screen](/files/-MBobyEG4ozk7NThVX9-)

Account Transfers are a one-directional action. Upon account transfer, the source account is deleted and the vault records are transferred to another user account.

![](/files/-MBp11dFd5LtQ1Hl0Ez_)

### Monitor the Security Score of the Company

The overall security score of the organization can be monitored by delegated Keeper administrators to ensure compliance with password policies. Detailed reports identify users who need to take corrective action. Record password strengths, master password strengths and two-factor authentication usage can all be monitored in the Security Audit tab and are what make up an organization's security score.

![](/files/-MBocr9kqGG1D-q0YIfN)

### Audit Event Logs and Perform Forensic Analysis

#### **Advanced Reporting & Alerts Module**

Keeper’s Advanced Reporting & Alerts Module (ARA Module) provides event logging and log event tracking for over 75 event types, the ability to send event based alerts and the capability to log events to an external system.

Admins can create customized reports by specifying what criteria to filter and present in each column. Reports can now be filtered and saved based on Event Types (Policy Changes, Sharing, Logins, etc), Users, and Attributes (Nodes, Devices, Location, etc).

Alerts can be triggered based upon any event criteria, such as role policy changes, privileged password access or other security events. Alerts can be sent via SMS or email and can also be viewed within the Admin Console interface.

The ARA Module integrates with 3rd party Security Information and Event Management (SIEM) tools for external logging. Integrations include the following:

* Splunk
* Sumo Logic
* Amazon S3
* IBM QRadar

The ARA Module supports over 75 event types (e.g. Expired Master Password, Changed Master Password, Shared Record, Disabled Two-Factor Authentication etc. ) that can be automatically pushed to popular SIEM products such as Splunk, Sumo and QRadar.

<div align="center"><img src="/files/-Lg9kMr_fMwapv-IpQbH" alt="Reporting with Sent Alert"></div>

#### **Recent Activity**

Keeper’s “Recent Activity” report provides event logging and forensic analysis capabilities to comply with corporate governance and audit requirements. Events are tracked throughout the system while maintaining zero-knowledge. Only privileged users with sharing or ownership rights to decrypt individual vault records are capable of viewing the stored vault information.

<div align="center"><img src="/files/-Lg-Wb6holaccOaaZ0FS" alt="Recent Activity Report"></div>


# Uninstall Keeper

Instructions for how to uninstall Keeper.

## Desktop App

### Mac

{% hint style="danger" %}
Removing Keeper Password Manager will also remove KeeperFill from Safari. Data stored in Keeper's Cloud Security Vault is NOT erased.
{% endhint %}

1. Drag the Keeper Password Manager app to the **Trash**.
2. Empty the Trash.

### Windows 10

![Uninstall Keeper Password Manager](/files/-M-zqFFS5UawWl7rCJ4n)

{% hint style="danger" %}
Uninstall will delete the data from Keeper on the local device. Data stored in Keeper's Cloud Security Vault is NOT erased.
{% endhint %}

1. Navigate to the **Windows Start Menu > Settings > Apps & Features**.
2. Under Apps & features, click the **Keeper Password Manager** application.
3. Click **Uninstall**.
4. You will be warned that the app and its related info will be uninstalled, click **Uninstall** to confirm.
5. User Account Control will ask you to confirm making changes to your device, confirm the changes by clicking **Yes**.

### Windows 8

1. On your desktop locate the Keeper App tile.
2. With your mouse, right-click and choose **Uninstall** from the options toolbar at the bottom of your screen.

If you are using a touchscreen:

1. Tap and hold the **Keeper tile** and drag it downward slightly, then release. A check mark will appear in the corner of the tile.
2. Tap **Uninstall** to remove Keeper.

### Windows 7

1. Click **Start** and then click **Control Panel**.
2. Under Programs, click **Uninstall a program.**
3. Select the **Keeper application**.
4. Click **Uninstall**.
5. To finish, accept any prompts that might appear while the software is being removed.

### Linux

#### For Debian/Ubuntu

Open up a command line and run the following command:

```
sudo apt-get remove keeperpasswordmanager
```

#### For Fedora/Red Hat/CentOS

Open up a command line and run the following command:

```
sudo yum remove keeperpasswordmanager
```

If your distribution uses the DNF Package Manager, run the following command:

```
sudo dnf remove keeperpasswordmanager
```

Alternatively, Linux systems also use a software manger/center system that can uninstall software for you:

**Debian/Ubuntu**

1. Click on the **Ubuntu Software icon** in the activities toolbar, this will open the Ubuntu Software Manager/Center.
2. Here you can search for and uninstall Keeper from your computer.
3. Click the **Installed tab** to list the applications.
4. Click the **Remove button** next to the Keeper listing.
5. Confirm you want to remove Keeper by clicking the **Remove button** and **enter the password** for Administrator or sudo user.
6. Finish by clicking **Authenticate**.

**Fedora/Red Hat/CentOS**

Users can use GNOME Software like Ubuntu's Software Manager/Center to uninstall Keeper.

## Older Microsoft Store App

![Uninstall Keeper](/files/-Lq8FH7nIa6EmpXwGrdr)

{% hint style="danger" %}
Uninstall will delete the data from Keeper on the local device. Data stored in Keeper's Cloud Security Vault is NOT erased.
{% endhint %}

1. Navigate to the **Windows Start Menu > Settings > Apps & Features**.
2. Under Apps & features, click the **Keeper** application.
3. Click **Uninstall**.
4. You will be warned that the app and its related info will be uninstalled, click **Uninstall** to confirm.
5. User Account Control will ask you to confirm making changes to your device, confirm the changes by clicking **Yes**.

## iOS

{% hint style="danger" %}
Uninstalling Keeper will delete the data from Keeper on the local device. Data stored in Keeper's Cloud Security Vault is NOT erased.
{% endhint %}

![Uninstall Keeper from iOS](/files/UjzPcJCMAeEhlKwOWdXg)

1. On your device, long press on the **Keeper App icon**.
2. Tap **Remove App** **>** **Delete** **App > Delete**. (For older iOS systems, long press on the Keeper App icon until all the apps start to shake. Tap the "**X**" that appears in the upper left corner of the Keeper App icon. To confirm, tap **Delete**).

## Android

The instructions below apply to the latest OS. Third party operating system instructions may differ.

{% hint style="danger" %}
Uninstalling Keeper will delete the data from Keeper on the local device. Data stored in Keeper's Cloud Security Vault is NOT erased.
{% endhint %}

1. Open your device's **Settings menu**.
2. Tap **Apps** or **Application Manager** (depending on device).
3. Navigate to the **Keeper App**.
4. Tap **Uninstall**.
5. Confirm by tapping **OK** when prompted.

## Chrome Browser Extension

![Uninstall Keeper Browser Extension from Chrome](/files/TDZ8AnR48U7ijGnGzsSo)

{% hint style="danger" %}
Uninstalling Keeper's Browser Extension from Chrome does not effect the data stored in Keeper's Cloud Security Vault.
{% endhint %}

1. Right click on the **Keeper extension icon** in the upper right corner of your browser.
2. Click **Remove from Chrome...**
3. When the pop-up menu appears, click **Remove**.

## Firefox Browser Extension

![Uninstall Keeper Browser Extension from Firefox](/files/-Lq7MAv12qSpAYY2gj2v)

{% hint style="danger" %}
Uninstalling Keeper's Browser Extension from Firefox does not effect the data stored in Keeper's Cloud Security Vault.
{% endhint %}

1. Right click on the **Keeper extension icon** in the top right corner of your browser.
2. Click **Remove Extension**
3. When the pop-up menu appears, click the **Remove** button.

## Safari Browser Extension

![Uninstall Keeper Browser Extension from Safari](/files/-Lq7fFKchvqP-U1svLmb)

{% hint style="danger" %}
To uninstall “KeeperFill”, you must remove the “Keeper Password Manager” desktop application.

Uninstalling Keeper's Browser Extension from Safari does not effect the data stored in Keeper's Cloud Security Vault.
{% endhint %}

1. Navigate to the **Safari Menu Bar > Preferences...** or **Safari Menu Bar > Settings...** (for macOS 13 and above).
2. Click **Extensions**.
3. Click **KeeperFill**.
4. Click the **Uninstall button**.
5. Click the **Show in Finder button** to locate the application.
6. Drag **Keeper Password Manager.app** to the Trash.
7. Empty the **Trash**.

## Internet Explorer Browser Extension

![Uninstalling Keeper's Browser Extension from Internet Explorer](/files/-Lq7RuHltwl7Zz4NW9nl)

{% hint style="danger" %}
Uninstalling Keeper's Browser Extension from Internet Explorer does not effect the data stored in Keeper's Cloud Security Vault.
{% endhint %}

1. Open the **Control Panel**.
2. Go to **Programs & Features** (Uninstall a program).
3. Select **Keeper for Internet Explorer** from the list
4. Right-click, select **Uninstall**.
5. On the first pop-up, select **Yes**.
6. On the second pop-up, select **Uninstall**.
7. On the third pop-up, select **Close the applications** and **Ok**.

## Edge Browser Extension

![Uninstall Keeper Browser Extension for Edge](/files/-Lq7VA7M0xfdkaFerZxV)

{% hint style="danger" %}
Uninstalling Keeper's Browser Extension from Edge does not effect the data stored in Keeper's Cloud Security Vault.
{% endhint %}

1. Open the **Overflow Menu**.
2. Click **Extensions**.
3. From the menu locate the **Keeper Browser Extension**.
4. Click the **gear icon** next to Keeper.
5. Click on the **Uninstall button**.
6. Click **Ok** to confirm.

## Opera Browser Extension

![Uninstall Keeper Browser Extension from Opera](/files/-Lq84q8sa8pljfhZ_6f-)

{% hint style="danger" %}
Uninstalling Keeper's Browser Extension from Opera does not effect the data stored in Keeper's Cloud Security Vault.
{% endhint %}

1. Right click on the **Keeper extension icon** in the toolbar.
2. Click **Manage Extension...**
3. Click **Remove Extension**.
4. Confirm by clicking **Remove**.

![Click Remove extension to remove Keeper's Browser Extension](/files/-Lq85fnDukYdEYyAwbHl)


# Import Overview

Import Passwords, Folders and Shared Folders into Keeper

![](https://914511346-files.gitbook.io/~/files/v0/b/gitbook-legacy-files/o/assets%2F-LSGVtOTYUIkVBoYtFvK%2F-MWI57zrRrbGJNb8Mq_Y%2F-MWI5FKrvz7k9ktUDew0%2Fimport-browsers-header.jpeg?alt=media\&token=8fe4dc86-49f9-475c-af77-31102e88a6c9)

## Import Methods

Keeper provides several methods of importing data into the vault. Each method is fully documented in the subsequent pages of this user guide. Records created on any platform will instantly sync to the your other devices. Records that are shared among users will receive updates in real time.

Watch the video below to learn how to import from web browsers, text files (.csv, .xls, .tsv) or another password manager.

{% embed url="<https://vimeo.com/1158911270?fe=ci&fl=sv&share=copy>" %}
Import Your Passwords With Keeper
{% endembed %}

#### Mobile Import

* [Import from Apple Passwords](/user-guides/ios#importing-passwords)
* [Import from Android](/user-guides/quick-start-guides/android#import-passwords)
* See the [Import from Mobile Apps](/user-guides/import-records-1/import-from-mobile-apps) page

#### Desktop Import

* [Import from Web Browsers](/user-guides/import-records-1/import-from-chrome-firefox-ie-edge-and-opera)
* [Import from Text File (.csv, .xls, .tsv)](/user-guides/import-records-1/import-a-.csv-file)
* [Import from Text File (.json)](/user-guides/import-records-1/import-json)
* [Import from Commander CLI](/user-guides/import-records-1/import-from-commander)

#### Import from the Desktop Vault

* [Import from 1Password](/user-guides/import-records-1/import-from-1password)
* [Import from Avast](/user-guides/import-records-1/import-from-avast)
* [Import from Bitwarden](/user-guides/import-records-1/import-from-bitwarden)
* [Import from CyberArk](/user-guides/import-records-1/import-from-cyberark)
* [Import from Dashlane](/user-guides/import-records-1/import-from-dashlane)
* [Import from EnPass](/user-guides/import-records-1/import-from-enpass)
* [Import from Kaspersky](/user-guides/import-records-1/import-from-kaspersky)
* [Import from KeePass (.kdbx)](/user-guides/import-records-1/import-from-keepass-kdbx)
* [Import from KeePass (.XML)](/user-guides/import-records-1/import-from-keepass)
* [Import from LastPass](/user-guides/import-records-1/import-from-lastpass)
* [Import from MacPass](/user-guides/import-records-1/import-from-macpass)
* [Import from ManageEngine](/user-guides/import-records-1/import-from-commander)
* [Import from mSecure](/user-guides/import-records-1/import-from-msecure)
* [Import from MyKi](/user-guides/import-records-1/import-from-myki)
* [Import from Passpack](/user-guides/import-records-1/import-from-passpack)
* [Import from Passportal](/user-guides/import-records-1/import-from-passportal)
* [Import from Password Boss](/user-guides/import-records-1/import-from-password-boss)
* [Import from Psono](/user-guides/import-records-1/import-from-psono)
* [Import from RoboForm](/user-guides/import-records-1/import-from-roboform)
* [Import from Safari](/user-guides/import-records-1/import-from-safari)
* [Import from SplashID](/user-guides/import-records-1/import-from-splashid)
* [Import from Sticky Password](/user-guides/import-records-1/import-from-sticky-password)
* [Import from Thycotic / Delinea](/keeperpam/commander-cli/command-reference/import-and-export-commands/delinea-thycotic-secret-server-import)
* [Import from True Key](/user-guides/import-records-1/import-from-true-key)
* [Import from ZOHO](/user-guides/import-records-1/import-from-zoho)


# Import from Mobile Apps

Keeper supports password import from iOS and Android devices.

## iOS

If you are running iOS version 26 or higher, you can import your passwords, passkeys and two- factor codes from Apple Passwords directly into Keeper.

To begin, open the Apple Passwords app on your mobile device and tap the **Options icon** **>** **Export Data to Another App**.

<div><figure><img src="/files/1BrMJvBC21cyMb9ZWosj" alt="" width="200"><figcaption><p>Apple Passwords Options</p></figcaption></figure> <figure><img src="/files/ifH6PQpuO377Jnyu5g9G" alt="" width="200"><figcaption><p>Export Data</p></figcaption></figure></div>

Select the logins you would like to export to Keeper and tap **Continue**. Select Keeper from the compatible apps listed and tap **Continue > Continue in "Keeper"**.

<div><figure><img src="/files/xpwR5FSQn2i2Tib7d7tc" alt="" width="200"><figcaption><p>Select Passwords to Export</p></figcaption></figure> <figure><img src="/files/XiF5y3n5w8odJ7SH3mA3" alt="" width="200"><figcaption><p>Choose Keeper as Destination</p></figcaption></figure></div>

Once you've authenticated to Keeper, tap **Import**. When the import is complete, you will be able to find all of your logins in the Keeper folder named "Apple Passwords".

<div><figure><img src="/files/v2kiWZAGyI5MTlsW44RZ" alt="" width="200"><figcaption><p>Import Into Keeper</p></figcaption></figure> <figure><img src="/files/b2qo3EmNijeY9mOZKM36" alt="" width="200"><figcaption><p>Import Complete</p></figcaption></figure></div>

## Android

From the Android app, select Import Passwords from the side menu to import directly from Google via a CSV file upload.

<div><figure><img src="/files/eL6ceYvYqVKFSu5iIfNr" alt="" width="188"><figcaption><p>Left Menu > Import Passwords</p></figcaption></figure> <figure><img src="/files/Cn9mloK8yk8lRUdICMXw" alt="" width="188"><figcaption><p>Import from Google</p></figcaption></figure></div>

1. **Open the Keeper App**: Launch the Keeper app on your Android device.
2. **Access the Menu**: Tap on the **Hamburger Menu** (three horizontal lines) in the top-left corner.
3. **Select Import Passwords**: From the menu, choose **Import Passwords**.
4. **Choose Import Source**: In the import options, select **Import from Google**.
5. **Export Passwords**: You will be redirected to **passwords.google.com/options**. Here, select **Export passwords**. -- *If you have multiple Google accounts, make sure to confirm you are logged into the proper account.*
6. **Confirm Export**: An **Export Passwords Dialog** will appear. Tap on **Export** to begin downloading your passwords CSV file.
7. **Download Confirmation**: Once the file is downloaded, you will see a confirmation message letting you know your file has been saved to your device.
8. **Select the Downloaded File**:
   * The download confirmation prompt has an "Open" option, clicking this will display the "Open With:" dialog at the bottom of your screen, select Keeper to continue importing from your CSV.
   * If using the back button: Choose **Upload a CSV** in the Keeper app to locate and select your downloaded file.
   * You can also navigate to the file manager: Locate the exported CSV file and select it to open with the Keeper app. This will take you directly to the **Selected File** screen.
9. **Import in Progress:** Keeper will display a screen showing the progress of the import and encryption of your passwords.
10. **Import Complete:** A notification in your Vault will be displayed letting you know how many passwords have been successfully imported.

<div><figure><img src="/files/Q6VByXYLxMBx372hRHdU" alt="" width="188"><figcaption><p>Import in Progress</p></figcaption></figure> <figure><img src="/files/paBlmczWwMzZjyfU8JXE" alt="" width="188"><figcaption><p>Passwords Imported</p></figcaption></figure></div>

### Import from a CSV File

If you already have your Google Password CSV file on your Android device:

1. **Open the Keeper App**: Launch the Keeper app on your device.
2. **Select Import Passwords**: Go to the **Hamburger Menu** and choose **Import Passwords**.
3. **Choose CSV Import**: When prompted, select the **Upload CSV File** option. This will open the Files app, filtering to show only CSV files.
4. **Select the CSV File**: Browse through your files and select the desired CSV file for import.
5. **Import in Progress:** Keeper will display a screen showing the progress of the import and encryption of your passwords.
6. **Import Complete:** A notification in your Vault will be displayed letting you know how many passwords have been successfully imported.

<div><figure><img src="/files/vZB8JZKaiexCT10LKpuG" alt="" width="188"><figcaption><p>Import from Google</p></figcaption></figure> <figure><img src="/files/pU5iORp2Hw6G23t6jHqT" alt="" width="188"><figcaption><p>Passwords Imported</p></figcaption></figure></div>

{% hint style="info" %}
Keeper on Android directly supports importing from Google Password Manager via CSV file. While CSV files from other sources *may* work, their compatibility can vary based on formatting—only Google’s export is guaranteed to function seamlessly.
{% endhint %}


# Import from Chrome, Firefox, Edge, Safari

Instructions on how to import your passwords from popular browsers.

![](https://914511346-files.gitbook.io/~/files/v0/b/gitbook-legacy-files/o/assets%2F-LSGVtOTYUIkVBoYtFvK%2F-MPBDaOOgqd_Hhjl0pf_%2F-MPBDiP46J1J2F9Uuv5G%2Fimport-browsers-header.jpg?alt=media\&token=4d25aeb6-882c-48f0-b33e-8f0377f0bb90)

## Overview

Keeper can automatically import unprotected passwords from web browsers such as Chrome, Firefox, Edge, and Safari, automatically from the Keeper Web Vault or Keeper Desktop Application using the Keeper Importer Tool.

{% hint style="info" %}
To import from Safari 17+ and macOS 14.0 Sonoma, [visit this page](/user-guides/import-records-1/import-from-safari)
{% endhint %}

## Import Instructions

1. To import passwords from your web browsers, you must first install the Keeper Import Tool. To begin the installation, from the **Account Dropdown Menu**, click **Settings**.

<figure><img src="https://914511346-files.gitbook.io/~/files/v0/b/gitbook-x-prod.appspot.com/o/spaces%2F-LSGVtOTYUIkVBoYtFvK%2Fuploads%2FSAyF0pTOwpYisXvU9x1P%2FScreenshot%202026-01-23%20at%202.39.35%E2%80%AFPM.png?alt=media&#x26;token=4308988e-a53e-4428-8589-4aa6c29819e3" alt=""><figcaption><p>Account Dropdown > Settings</p></figcaption></figure>

2. Click **Import > Import** (next to "From a Browser").

<figure><img src="https://914511346-files.gitbook.io/~/files/v0/b/gitbook-x-prod.appspot.com/o/spaces%2F-LSGVtOTYUIkVBoYtFvK%2Fuploads%2F7n5Oy6CfK0yiGJkb8h2N%2FSettings%20(8).png?alt=media&#x26;token=683a792a-6267-4c5a-a794-dcb2f4d883c4" alt=""><figcaption><p>Import from a Browser</p></figcaption></figure>

3. Click Install.

<figure><img src="https://914511346-files.gitbook.io/~/files/v0/b/gitbook-x-prod.appspot.com/o/spaces%2F-LSGVtOTYUIkVBoYtFvK%2Fuploads%2Fzuh8CfHWUkh4ZmEG5mcb%2Fimage%20(1).avif?alt=media&#x26;token=49536f69-2d98-4a9c-aa0b-796d7314c12b" alt=""><figcaption><p>Install the Keeper Import Tool</p></figcaption></figure>

4. Copy the code Keeper provides (you will need this later when prompted in the Keeper Importer).

<figure><img src="https://914511346-files.gitbook.io/~/files/v0/b/gitbook-x-prod.appspot.com/o/spaces%2F-LSGVtOTYUIkVBoYtFvK%2Fuploads%2FZBfqKfTr0wUnduOJYhUM%2Fimage%20(2).avif?alt=media&#x26;token=5193241d-1eba-4d3e-891b-bcb450eca39a" alt=""><figcaption><p>Copy Import Code</p></figcaption></figure>

5. **For** **PC**: click **Run** when prompted.\
   **For** **Mac**: double click the "KeeperImport.zip" file located in your downloads and double click on the "Keeper Import App" to start the import process. You will encounter a few Keychain permission windows that will require you to enter your computer password to allow Keeper to access your web browsers.
6. Keeper will then ask for the code you received from step one; paste the code and click **Import**. Keeper will then import your credentials across all of your web browsers at once.

<figure><img src="https://914511346-files.gitbook.io/~/files/v0/b/gitbook-x-prod.appspot.com/o/spaces%2F-LSGVtOTYUIkVBoYtFvK%2Fuploads%2FUbM6wk7quX7PGdjoWAVA%2FKeeper%20code%20input.png?alt=media&#x26;token=9adbac76-8c81-407e-9229-c29452a211b3" alt=""><figcaption><p>Paste the Code</p></figcaption></figure>

6\. Once you have imported your credentials using one of the methods above, you can customize how you would like the information to appear in your vault in the field mapping screen. Here you'll see standard field names across the top that “map” to the data below for each Keeper record.

To adjust these mappings:

* Click any field to open a dropdown menu
* Select the appropriate field name from the list. Repeat this process across each column as needed
* Click **Next** to finalize your selections.

<figure><img src="https://914511346-files.gitbook.io/~/files/v0/b/gitbook-x-prod.appspot.com/o/spaces%2F-LSGVtOTYUIkVBoYtFvK%2Fuploads%2F7UwenNtpvzaOuRfF1Cq7%2Fimage%20(3).avif?alt=media&#x26;token=cbee3e5d-8a41-4c76-8325-e12efdb22878" alt=""><figcaption><p>Review &#x26; Edit the Imported Data</p></figcaption></figure>

7. Next, a summary screen will display a preview of your vault, showing the folder structure of your imported records. Here you can adjust the folder structure and click into individual records to preview their details before finalizing the import.
8. Click **Confirm Import** to complete the import process.

<figure><img src="https://914511346-files.gitbook.io/~/files/v0/b/gitbook-x-prod.appspot.com/o/spaces%2F-LSGVtOTYUIkVBoYtFvK%2Fuploads%2FcXq2B3rTEEpXGA5KqvP3%2Fimage%20(4).avif?alt=media&#x26;token=102408a1-7d6b-412b-9e3d-41db8cbc080a" alt=""><figcaption><p>Summary of Import</p></figcaption></figure>

Once the import is complete, we highly recommend that you delete any unencrypted password files from your computer and disable any old password managers.

<figure><img src="https://914511346-files.gitbook.io/~/files/v0/b/gitbook-x-prod.appspot.com/o/spaces%2F-LSGVtOTYUIkVBoYtFvK%2Fuploads%2FN075CmhLSNQKkV2EcjIw%2Fimage%20(5).avif?alt=media&#x26;token=181747ac-5b71-431f-beec-0e23a6a5884d" alt=""><figcaption><p>Successful Import</p></figcaption></figure>

{% hint style="success" %}
We recommend turning off your Web Browsers' password saving and autofilling features. Visit the Settings or Preferences menu of your web browser to disable these features.
{% endhint %}


# Import from Chrome via Export

This guide details how to manually export saved passwords from Chrome and import them to Keeper.

{% hint style="warning" %}
IMPORTANT: Keeper can import password directly from your web browsers such as Chrome, using the automated import tool found in your Keeper Web Vault and Desktop App Settings. The import tool is an easy to use application that runs on your computer to quickly locate and import your passwords. Click [here](/user-guides/import-records-1/import-from-chrome-firefox-ie-edge-and-opera) for further instruction on how to automate the import of your passwords from a web browser such as Chrome.
{% endhint %}

If you have attempted to use Keeper's automated import tool and have been unsuccessful, or you are running Linux OS, follow the directions below to complete the process manually. You will first need to perform a manual export of your passwords from Chrome and then import the file to Keeper as a Text File (.csv).

### Export

1. Click the menu icon in the upper-right corner of your browser window (three vertical dots) and select **Passwords and Autofill > Google Password Manager**.

<figure><img src="https://914511346-files.gitbook.io/~/files/v0/b/gitbook-x-prod.appspot.com/o/spaces%2F-LSGVtOTYUIkVBoYtFvK%2Fuploads%2FCM7Mr4GshaBfpzKa0uwT%2FScreenshot%202026-01-26%20at%2012.36.51%E2%80%AFPM.png?alt=media&#x26;token=98396fe5-4f05-45ab-a9a3-cfa64e13fe79" alt=""><figcaption></figcaption></figure>

2. From the left menu select **Settings**.
3. Next to "Export Passwords" click **Download File**.
4. Save as a .csv file to you computer.

### Import

1. Log into the Keeper Web Vault or Desktop App.
2. From the **Account Dropdown Menu**, click **Settings**.
3. Click **Import > Import** (next to "Use Another Source") and from the dropdown menu select **Text File**.
4. Drag-and-drop the exported .csv file onto Keeper's "Drop a File Here" window or browse for the file on your computer. Check the box if your file includes column headers, otherwise, the first row will be treated as data.
5. Once you have imported your credentials using one of the methods above, you can customize how you would like the information to appear in your vault in the field mapping screen. Here you'll see standard field names across the top that “map” to the data below for each Keeper record.

   To adjust these mappings:

   * Click any field to open a dropdown menu
   * Select the appropriate field name from the list. Repeat this process across each column as needed
   * Click **Next** to finalize your selections.
6. Next, a summary screen will display a preview of your vault, showing the folder structure of your imported records. Here you can adjust the folder structure and click into individual records to preview their details before finalizing the import. Click **Confirm Import** to complete the import process.

{% hint style="warning" %}
Make sure to delete the local Chrome file from your computer.
{% endhint %}


# Import Text File (.csv, .xls, .tsv)

Instructions on how to import from a text file.

<figure><img src="https://914511346-files.gitbook.io/~/files/v0/b/gitbook-x-prod.appspot.com/o/spaces%2F-LSGVtOTYUIkVBoYtFvK%2Fuploads%2FiUkx8lvx84X0XZdz92NR%2FImport-Keeper-CSV.jpg?alt=media&#x26;token=fb35ab21-7e7d-4326-b0a2-47aba849067d" alt=""><figcaption></figcaption></figure>

## Import Instructions

Keeper can import your logins and passwords from a text file (.csv, .xls., .tsv).

1. To begin, from the **Account Dropdown Menu**, click **Settings**.

<figure><img src="https://914511346-files.gitbook.io/~/files/v0/b/gitbook-x-prod.appspot.com/o/spaces%2F-LSGVtOTYUIkVBoYtFvK%2Fuploads%2FSAyF0pTOwpYisXvU9x1P%2FScreenshot%202026-01-23%20at%202.39.35%E2%80%AFPM.png?alt=media&#x26;token=4308988e-a53e-4428-8589-4aa6c29819e3" alt=""><figcaption><p>Account Dropdown Menu > Settings</p></figcaption></figure>

2. Click **Import > Import** (next to "Use Another Source").

<figure><img src="https://914511346-files.gitbook.io/~/files/v0/b/gitbook-x-prod.appspot.com/o/spaces%2F-LSGVtOTYUIkVBoYtFvK%2Fuploads%2F7n5Oy6CfK0yiGJkb8h2N%2FSettings%20(8).png?alt=media&#x26;token=683a792a-6267-4c5a-a794-dcb2f4d883c4" alt=""><figcaption><p>Import From a File or Password Manager</p></figcaption></figure>

3. From the dropdown menu, select **Text File (.csv, .xls, and .tsv)**, then click **View Instructions**. Keeper's CSV import method supports advanced structure including folders, subfolders, shared folders and any number of custom fields.

<figure><img src="https://914511346-files.gitbook.io/~/files/v0/b/gitbook-x-prod.appspot.com/o/spaces%2F-LSGVtOTYUIkVBoYtFvK%2Fuploads%2FEBjTP8UbMloy7HsEZ6oN%2Fimage%20(6).avif?alt=media&#x26;token=262d18f6-f4e3-4eef-a43f-164e43c6f082" alt=""><figcaption><p>Import from Text File</p></figcaption></figure>

4. Once you have created the export file per the instructions, drag-and-drop the file onto Keeper's "Drop a File Here" window or browse for the file on your computer. Check the box if your file includes column headers, otherwise, the first row will be treated as data.

<figure><img src="https://914511346-files.gitbook.io/~/files/v0/b/gitbook-x-prod.appspot.com/o/spaces%2F-LSGVtOTYUIkVBoYtFvK%2Fuploads%2FJj50L1DIgox9PRB02Oxb%2Fimage%20(7).avif?alt=media&#x26;token=6ea6e723-a847-4782-b13c-96010402e333" alt=""><figcaption><p>File Uploaded</p></figcaption></figure>

5. Once you have imported your credentials using one of the methods above, you can customize how you would like the information to appear in your vault in the field mapping screen. Here you'll see standard field names across the top that “map” to the data below for each Keeper record.

To adjust these mappings:

* Click any field to open a dropdown menu
* Select the appropriate field name from the list. Repeat this process across each column as needed
* Click **Next** to finalize your selections.

<figure><img src="https://914511346-files.gitbook.io/~/files/v0/b/gitbook-x-prod.appspot.com/o/spaces%2F-LSGVtOTYUIkVBoYtFvK%2Fuploads%2F7UwenNtpvzaOuRfF1Cq7%2Fimage%20(3).avif?alt=media&#x26;token=cbee3e5d-8a41-4c76-8325-e12efdb22878" alt=""><figcaption><p>Review &#x26; Edit the Imported Information</p></figcaption></figure>

6. Next, a summary screen will display a preview of your vault, showing the folder structure of your imported records. Here you can adjust the folder structure and click into individual records to preview their details before finalizing the import. Click **Confirm Import** to complete the import process.

<figure><img src="https://914511346-files.gitbook.io/~/files/v0/b/gitbook-x-prod.appspot.com/o/spaces%2F-LSGVtOTYUIkVBoYtFvK%2Fuploads%2FcXq2B3rTEEpXGA5KqvP3%2Fimage%20(4).avif?alt=media&#x26;token=102408a1-7d6b-412b-9e3d-41db8cbc080a" alt=""><figcaption><p>Summary of Import</p></figcaption></figure>

Once the import is complete, we highly recommend that you delete any unencrypted password files from your computer and disable any old password managers.

<figure><img src="https://914511346-files.gitbook.io/~/files/v0/b/gitbook-x-prod.appspot.com/o/spaces%2F-LSGVtOTYUIkVBoYtFvK%2Fuploads%2FN075CmhLSNQKkV2EcjIw%2Fimage%20(5).avif?alt=media&#x26;token=181747ac-5b71-431f-beec-0e23a6a5884d" alt=""><figcaption><p>Successful Import</p></figcaption></figure>

## Troubleshooting

* If you only wish to share some of the folders, you will need to split the CSV file into two separate files prior to importing each accordingly.
* If you are getting corrupted characters in the import, ensure that the CSV file was saved/exported using UTF-8 or Unicode encoding.

***

## Advanced Field Mapping

Keeper's CSV import method also supports advanced structure including **Folders**, **Subfolders, Shared Folders, and any number of Custom Fields (CustomFieldName,CustomFieldValue).**

{% code title="Order of fields in CSV File" overflow="wrap" fullWidth="true" %}

```
Folder,Title,Login,Password,Website Address,Notes,Shared Folder,CustomField1Name,CustomField1Value
```

{% endcode %}

<table data-full-width="true"><thead><tr><th width="185">Folder</th><th width="97">Title</th><th width="191">Login</th><th width="217">Password</th><th width="171">Website Address</th><th>Notes</th><th width="139">Shared Folder</th><th width="159">Custom Field1 Name</th><th width="186">Custom Field1 Value</th><th>Custom Field2 Name</th><th>Custom Field2 Value</th><th>Custom Field3 Name</th><th>Custom Field3 Value</th><th width="73">Custom Field4 Name</th><th>Custom Field4 Value</th></tr></thead><tbody><tr><td>Folder1\subfolder</td><td>Google Account</td><td>user@example.com</td><td>liu.W241Q&#x3C;q$RGl9r;N1</td><td><a href="http://www.google.com/">www.google.com</a></td><td>main google account</td><td>TeamFolder</td><td>$oneTimeCode</td><td>otpauth://totp/?secret=ABC123ABC123ABC123ABC123ABC123</td><td>$type</td><td>login</td><td>$host</td><td>10.0.0.1</td><td>$url</td><td><a href="http://www.example.com/">www.example.com</a></td></tr></tbody></table>

• To specify Subfolders, use backslash "\\" between folder names\
• To make a Shared Folder specify the name or path to it in the 7th field

Here is a list of some record types (you may have more if you have custom record types, or less if you are restricting some record types):

<figure><img src="https://914511346-files.gitbook.io/~/files/v0/b/gitbook-x-prod.appspot.com/o/spaces%2F-LSGVtOTYUIkVBoYtFvK%2Fuploads%2FfutxI0asR1RJ7Fstu6uV%2FWindowsTerminal_wOnQKBPAAK.png?alt=media&#x26;token=3ee232a4-a43f-4257-8d9b-0714c034c137" alt=""><figcaption><p>Record Type can be defined using custom field name $type</p></figcaption></figure>

Here is a list of all possible field types (including custom fields):

<figure><img src="https://914511346-files.gitbook.io/~/files/v0/b/gitbook-x-prod.appspot.com/o/spaces%2F-LSGVtOTYUIkVBoYtFvK%2Fuploads%2FVIGQh9gDy9se7w9sL1aW%2FWindowsTerminal_myNZzFQtif.png?alt=media&#x26;token=f9324c06-f8c7-460d-98ea-22f2043d92a0" alt=""><figcaption><p>All Field Types</p></figcaption></figure>

**Example 1: Create a regular folder at the root level with 2 custom fields**

```
My Business Stuff,Twitter,marketing@company.com,123456,https://twitter.com,These are some notes,,API Key,5555,Date Created,2018-04-02
```

**Example 2: Create a shared subfolder with edit and re-share permission, inside a regular folder**

```
Personal,Twitter,craig@gmail.com,123456,https://twitter.com,,Social Media#edit#reshare
```

**Example 3: Create a shared folder with edit and re-share permission on the outside and a nested folder tree underneath.**

```
Personal\Financial\Home,Chase,craig@gmail.com,123456,https://chase.com,,Family Records#edit#reshare
```

In this 3rd example, the outer shared folder is called "Family Records" and underneath is a folder tree. The record is added to the nested folder 3 levels down.

To preview the import structure, drag and drop the file into the Import screen and click **Next**.

## Notes for Managing Folders and Subfolders

A Folder, Subfolder (nested folder) and Shared Folder are objects that are created independently of records. Folders are often used to categorize records of a similar type.

Keeper's implementation of folders is powerful and flexible and includes ease-of-use functionality such as drag-and-drop.

* A folder is a container of records and record references (shortcuts).
* A shared folder is a container of records, with flexible user and team sharing capability.
* A folder can be made up of personal records, shared records or other regular subfolders.
* Subfolders can be either shared or personal.
* You can create an unlimited number of folders and shared folders.
* A shared folder can be made up of an unlimited number of subfolders, each subfolder beneath a shared folder retains the permissions of the parent.
* There is no limit to the folder tree depth.
* Folders and subfolders contained within shared folders will inherit the permission of the shared Folder.
* A shared folder with just one user (nothing shared to anyone) is still a Shared Folder.
* A shared folder does not have to be shared with anyone else.

## Record Permissions

The permissions of records within a Shared Folder can be individually controlled with the following two permissions:

* **Can Edit -** when this permission is enabled, the record can be edited by **any user** with the shared folder.
* **Can Share** **-** when this permission is enabled, records can be shared by **any user** with the shared folder.

Keeper also supports advanced JSON structured file formats. We recommend using JSON files for import and export of structured data instead of CSV files. This is described in the [JSON Import page.](/user-guides/import-records-1/import-json)

## Commander CLI Import

The [Keeper Commander CLI](/keeperpam/commander-cli/command-reference/import-and-export-commands/import-export-commands) supports more advanced import capabilities with CSV and JSON files.


# Import/Export Keeper JSON

Instructions on how to import and export a Keeper JSON structured file

<figure><img src="https://914511346-files.gitbook.io/~/files/v0/b/gitbook-x-prod.appspot.com/o/spaces%2F-LSGVtOTYUIkVBoYtFvK%2Fuploads%2FM1Vide5ynu9LOd0Qgpg4%2FImport-Keeper-JSON.jpg?alt=media&#x26;token=ad379b62-89d3-4304-8020-fb16737f0f17" alt=""><figcaption></figcaption></figure>

Keeper supports importing a structured JSON file. You may use this, for example, if you have backed up a Keeper file from a different vault or if you are building a file from another data source. This is an advanced feature, typically used by Keeper Enterprise administrators or more technical customers. If that's not you, head over to [CSV import](/user-guides/import-records-1/import-a-.csv-file).

To begin, from the **Account Dropdown Menu**, click **Settings** **> Import > Import** (next to "Use Another Source"). From the dropdown menu, select **Keeper JSON**.

<figure><img src="https://914511346-files.gitbook.io/~/files/v0/b/gitbook-x-prod.appspot.com/o/spaces%2F-LSGVtOTYUIkVBoYtFvK%2Fuploads%2FGKX3CoZI2679NYoyNTXm%2FScreenshot%202026-01-27%20at%2012.11.40%E2%80%AFPM.png?alt=media&#x26;token=499a5559-9118-4256-bd4e-9f82f167c243" alt=""><figcaption></figcaption></figure>

The JSON file can be created in several ways:

* Exporting .JSON file from the Keeper Vault
* Exporting .JSON from Keeper Commander SDK
* Creating your own custom file

Once your JSON file is properly formatted, drag-and-drop the file onto Keeper's "Drop a File Here" window or browse for the file on your computer.

{% hint style="info" %}
JSON files must be UTF-8 encoded to ensure that all symbols and characters are imported properly.
{% endhint %}

### Creating .JSON file from a Keeper Vault (Export)

To create a .JSON file from your existing Keeper Vault, from the **Account Dropdown Menu**, click **Settings > Export**.

Select **JSON** and click **Export**. If prompted, enter your Master Password and click **Export Now**.

![Export Keeper Records to JSON File](https://914511346-files.gitbook.io/~/files/v0/b/gitbook-x-prod.appspot.com/o/spaces%2F-LSGVtOTYUIkVBoYtFvK%2Fuploads%2FYXnxKrRHqBTXOjkEzOfh%2FScreenshot%202026-01-27%20at%2012.12.33%E2%80%AFPM.png?alt=media\&token=5ea0e368-d6bb-426d-a2f3-df565fd728f7)

### Creating a JSON file from Keeper Commander

Keeper Commander is a developer / Admin tool that has many capabilities for managing your vault and Enterprise account.

Visit the Keeper Commander SDK repository here:\
<https://github.com/Keeper-Security/commander>

The command to export a vault in JSON format is demonstrated below:

```
$ keeper shell
  _  __  
 | |/ /___ ___ _ __  ___ _ _ 
 | ' </ -_) -_) '_ \/ -_) '_|
 |_|\_\___\___| .__/\___|_|
              |_|            

 password manager & digital vault

Enter password for demo@company.com
Password: 
Logging in...
Syncing...
Decrypted [318] record(s)

My Vault> export --format json my_export_file.json                                                                                         
Processing... please wait.
318 records exported
```

### Creating a Custom .JSON file for Import Into Keeper

When creating a custom JSON import file, Keeper supports an array of "records", "folders" and "shared\_folders". Several examples are included below that you can import into your vault for testing purposes.

Example JSON file: Records, Folders and Shared Folders

This file demonstrates several JSON import features including:

* Array of records
* Each record can have custom fields, notes and be added to folders
* Folders can be created as regular (private) or shared folders
* Records can also contain TOTP seeds (advanced feature, see Facebook entry in example below)

```
{
  "records": [
    {
      "title": "Dev Server 1",
      "login": "root",
      "password": "123123123",
      "login_url": "https://myserver.com",
      "notes": "These are some notes.",
      "custom_fields": {
        "Security Group": "Private"
      },
      "folders": [
        {
          "folder": "Private Folder 1"
        }
      ]
    },
    {
      "title": "Prod Server 1",
      "login": "root",
      "password": "kj949234723jhfs4jf7h",
      "login_url": "https://myprodserver.com",
      "notes": "These are some notes.",
      "custom_fields": {
        "Security Group": "Public",
        "IP Address": "12.45.67.8"
      },
      "folders": [
        {
          "folder": "Private Folder 2"
        },
        {
          "shared_folder": "My Shared Folder 1",
          "can_edit": true,
          "can_share": true
        }
      ]
    },
    {
      "title":"Google",
      "login": "testing",
      "password": "1234567890",
      "login_url": "https://google.com",
      "notes": "These are some notes.",
      "custom_fields": {
        "Favorite Food":"Cheetos"
      },
      "folders": [
        {
          "folder": "My Websites\\Online"
        }
      ]
    },
    {
      "title":"Facebook",
      "$type": "login",
      "login": "me@gmail.com",
      "password": "123123123123",
      "login_url": "https://facebook.com",
      "notes": "This is our corporate shared record.",
      "custom_fields": {
        "Facebook Application ID":"ABC12345",
        "$oneTimeCode":"otpauth://totp/Amazon:me@company.com?secret=JBSWY3DPEHPK3PXP&issuer=Amazon&algorithm=SHA1&digits=6&period=30"
      },
      "folders": [
        {
          "folder": "Social Media"
        },
        {
          "shared_folder": "Shared Social",
          "can_edit": false,
          "can_share": false
        }
      ]
    }
  ]
}

```

Here is a list of all possible field types (including custom fields):

<figure><img src="https://914511346-files.gitbook.io/~/files/v0/b/gitbook-x-prod.appspot.com/o/spaces%2F-LSGVtOTYUIkVBoYtFvK%2Fuploads%2FDWjqagCoJ6qbOJmfavRi%2FWindowsTerminal_myNZzFQtif.png?alt=media&#x26;token=e58b37b5-910a-43c2-a07b-96076a25b20c" alt=""><figcaption><p>All Field Types</p></figcaption></figure>

Here are some record types (you may have more if you created custom record types, or less if you are restricting some record types):

<figure><img src="https://914511346-files.gitbook.io/~/files/v0/b/gitbook-x-prod.appspot.com/o/spaces%2F-LSGVtOTYUIkVBoYtFvK%2Fuploads%2FMHXIXTWaoTC7Ha7y7ixC%2FWindowsTerminal_wOnQKBPAAK.png?alt=media&#x26;token=94c7f13e-0c77-4b59-b753-88d9b869316d" alt=""><figcaption><p>Record Types</p></figcaption></figure>

**Example JSON file: Shared Folders and Permissions - No Records**

The below JSON file demonstrates the ability to create a shared folder structure (without records) that has permissions configured.

Note: Example references to "UID", "Team UID", etc are placeholders that are specific to your vault.

```
{
  "shared_folders": [
    {
      "path": "My Shared Folder 1",
      "manage_users": true,
      "manage_records": true,
      "can_edit": true,
      "can_share": true,
      "permissions": [
        {
          "uid": "kVM96KGEoGxhskZoSTd_jw",
          "manage_users": true,
          "manage_records": true
        },
        {
          "name": "myusername@company.com",
          "manage_users": true,
          "manage_records": true
        }
      ]
    },
    {   
      "path": "Customer1\\My Shared Folder 2", 
      "manage_users": false,
      "manage_records": false,
      "can_edit": false,
      "can_share": false,
      "permissions": [
        {   
          "uid": "<TEAM UID HERE>",
          "manage_users": false,
          "manage_records": false
        },  
        {   
          "name": "<RECIPIENT EMAIL HERE>",
          "manage_users": true,
          "manage_records": true
        }   
      ]   
    },  
    {
      "path": "Customer2\\My Shared Folder 3",
      "manage_users": true,
      "manage_records": true,
      "can_edit": true,
      "can_share": true,
      "permissions": [
        {
          "uid": "<TEAM UID HERE>",
          "manage_users": true,
          "manage_records": true
        },
        {
          "name": "myusername@company.com",
          "manage_users": true,
          "manage_records": true
        }
      ]
    }
  ]
}
```

**Example JSON File: Both Private Records/Folders and Shared Records/Folders**

The below example JSON file combines several features - Shared Folders, Private Folders, Records and TOTP seeds.

Note: Example references to "UID", "Team UID", etc are placeholders that are specific to your vault.

```
{
  "shared_folders": [
    {
      "path": "My Customer 1",
      "manage_users": true,
      "manage_records": true,
      "can_edit": true,
      "can_share": true,
      "permissions": [
        {
          "uid": "kVM96KGEoGxhskZoSTd_jw",
          "manage_users": true,
          "manage_records": true
        },
        {
          "name": "user@mycompany.com",
          "manage_users": true,
          "manage_records": true
        }
      ]
    },
    {   
      "path": "Testing\\My Customer 2", 
      "manage_users": true,
      "manage_records": true,
      "can_edit": true,
      "can_share": true,
      "permissions": [
        {   
          "uid": "ih1CggiQ-3ENXcn4G0sl-g",
          "manage_users": true,
          "manage_records": true
        },  
        {   
          "name": "user@mycompany.com",
          "manage_users": true,
          "manage_records": true
        }   
      ]   
    }
  ],
  "records": [
    {
      "title": "Bank Account 1",
      "login": "customer1234",
      "password": "4813fJDHF4239fdk",
      "login_url": "https://chase.com",
      "notes": "These are some notes.",
      "custom_fields": {
        "Account Number": "123-456-789"
      },
      "folders": [
        {
          "folder": "Optional Private Folder 1"
        }
      ]
    },
    {
      "title": "Bank Account 2",
      "login": "mybankusername",
      "password": "w4k4k193f$^&@#*%2",
      "login_url": "https://amex.com",
      "notes": "Some great information here.",
      "custom_fields": {
        "Security Group": "Public",
        "IP Address": "12.45.67.8",
        "$oneTimeCode":"otpauth://totp/Amazon:me@company.com?secret=JBSWY3DPEHPK3PXP&issuer=Amazon&algorithm=SHA1&digits=6&period=30"
      },
      "folders": [
        {
          "folder": "Optional Private Folder 1"
        },
        {
          "shared_folder": "My Customer 1",
          "can_edit": true,
          "can_share": true
        }
      ]
    }
  ]
}
```


# Import from 1Password

Instructions on how to import your passwords from 1Password to Keeper

<figure><img src="https://914511346-files.gitbook.io/~/files/v0/b/gitbook-x-prod.appspot.com/o/spaces%2F-LSGVtOTYUIkVBoYtFvK%2Fuploads%2FXwzEgREkS9PLYA2EjBeg%2FImport-Keeper-1Password.jpg?alt=media&#x26;token=3633f1ca-6d88-44a0-97fe-cdc33ed93628" alt=""><figcaption></figcaption></figure>

## Export

To import from 1Password, you must first export your records from the 1Password application on MacOS or Windows.

### **MacOS**

1. Log into your 1Password account using a desktop computer.
2. Select the vault you want to export.
3. Choose **File > Export > Your Vault**

![Export from 1Password on Mac](https://914511346-files.gitbook.io/~/files/v0/b/gitbook-x-prod.appspot.com/o/spaces%2F-LSGVtOTYUIkVBoYtFvK%2Fuploads%2FFsdUqGmJMGJRcOwuhzl5%2Fexport.png?alt=media\&token=2b3c7053-6c56-490f-b043-e20e8aa08ad1)

4. Enter your login credentials for 1Password.
5. Choose the file format: 1PUX or CSV, then click **Export Data**. The 1PUX format is preferred since it contains all data.
6. Choose a location to save the export. Make sure to delete this file after the import is complete.

### **Windows**

1. Log into 1Password.
2. Select the vault you want to export.
3. Click on the 3 vertical dot menu and choose **Export > Your Vault**.

![Export from 1Password on WIndows](https://914511346-files.gitbook.io/~/files/v0/b/gitbook-x-prod.appspot.com/o/spaces%2F-LSGVtOTYUIkVBoYtFvK%2Fuploads%2FloF0bkiVePFQ2h4Ry3Lk%2Fexport%20vault.png?alt=media\&token=de2b80f4-7c7f-4f2a-8eda-4b2ea92f2b24)

4. Choose the file format: 1PUX or CSV, then click **Export Data**. The 1PUX format is preferred since it contains all data.
5. Choose a location to save the export file.

## Import

1. Log into the Keeper Web Vault or Desktop App.
2. From the **Account Dropdown Menu**, click **Settings**.
3. Click **Import > Import** (next to "Use Another Source") and from the dropdown menu select **1Password**.
4. Drag-and-drop the exported file onto Keeper's "Drop a File Here" window or browse for the file on your computer. Check the box if your file includes column headers, otherwise, the first row will be treated as data.
5. Once you have imported your credentials using one of the methods above, you can customize how you would like the information to appear in your vault in the field mapping screen. Here you'll see standard field names across the top that “map” to the data below for each Keeper record.

   To adjust these mappings:

   * Click any field to open a dropdown menu
   * Select the appropriate field name from the list. Repeat this process across each column as needed
   * Click **Next** to finalize your selections.
6. Next, a summary screen will display a preview of your vault, showing the folder structure of your imported records. Here you can adjust the folder structure and click into individual records to preview their details before finalizing the import. Click **Confirm Import** to complete the import process.

{% hint style="warning" %}
Make sure to delete the local 1Password .csv or .1pux file locally on your computer.
{% endhint %}

## CLI Import With Keeper Commander

Keeper Commander also supports a 1Password import that allows more configurable options, such as default folder permissions. See the below link for more details:

[Keeper Commander import command](/keeperpam/commander-cli/command-reference/import-and-export-commands#import-command)


# Import from Avast

Instructions on how to import your passwords from Avast Passwords to Keeper

## Export

To import from Avast, you must first export your records.

1. Log into your Avast account.
2. Select **Import/export data.**
3. Click **Export to File**.
4. Name the file and click **Save**

## Import

1. Log into the Keeper Web Vault or Desktop App.
2. From the **Account Dropdown Menu**, click **Settings**.
3. From your **Account Dropdown Menu**, click **Settings**.
4. Click **Import > Import** (next to "Use Another Source") and from the dropdown menu select **Avast**.
5. Drag-and-drop the exported file onto Keeper's "Drop a File Here" window or browse for the file on your computer. Check the box if your file includes column headers, otherwise, the first row will be treated as data.
6. Once you have imported your credentials using one of the methods above, you can customize how you would like the information to appear in your vault in the field mapping screen. Here you'll see standard field names across the top that “map” to the data below for each Keeper record.

   To adjust these mappings:

   * Click any field to open a dropdown menu
   * Select the appropriate field name from the list. Repeat this process across each column as needed
   * Click **Next** to finalize your selections.
7. Next, a summary screen will display a preview of your vault, showing the folder structure of your imported records. Here you can adjust the folder structure and click into individual records to preview their details before finalizing the import. Click **Confirm Import** to complete the import process.

{% hint style="warning" %}
Make sure to delete the local Avast file from your computer.
{% endhint %}


# Import from Bitwarden

Instructions on how to import your passwords from Bitwarden to Keeper

<figure><img src="/files/NLYVIk6upEV0uAKUJKEl" alt=""><figcaption></figcaption></figure>

## Export

To import from Bitwarden, you must export your records first. To export you have two options.

#### Option 1: From Windows & Mac <a href="#docs-internal-guid-b07dfd93-7fff-d829-5408-6cdb798703e0" id="docs-internal-guid-b07dfd93-7fff-d829-5408-6cdb798703e0"></a>

1. Launch the Bitwarden Desktop App and log in to your account.
2. Select **File > Export Vault**.

![File > Export Vault (Mac)](/files/-MhtDKyBSoaWiL0QgJOw)

![File > Export Vault on (Windows)](/files/-Mi3E0oTV_tPzZGTn-cx)

3. Select file format **.csv** from the dropdown and enter your **Master Password**.
4. Click **Submit** and **Export Vault**.
5. Select your destination for the .csv file and click **Save**.

#### **Option 2: From the Bitwarden Web Vault**

1. Click on **Tools > Export Vault**.
2. Select file format **.csv** from the dropdown and enter your **Master Password**.
3. Click **Export Vault** twice to confirm the action.
4. Open the file to save it. Select your destination for the .csv file and click **Save**.

![Save .csv file (Mac)](/files/-MhtFi1zeYJ6Us7bK0_x)

## Import

1. Log into the Keeper Web Vault or Desktop App.
2. From the **Account Dropdown Menu**, click **Settings**.
3. Click **Import > Import** (next to "Use Another Source") and from the dropdown menu select **Bitwarden**.
4. Drag-and-drop the exported file onto Keeper's "Drop a File Here" window or browse for the file on your computer. Check the box if your file includes column headers, otherwise, the first row will be treated as data.
5. Once you have imported your credentials using one of the methods above, you can customize how you would like the information to appear in your vault in the field mapping screen. Here you'll see standard field names across the top that “map” to the data below for each Keeper record.

   To adjust these mappings:

   * Click any field to open a dropdown menu
   * Select the appropriate field name from the list. Repeat this process across each column as needed
   * Click **Next** to finalize your selections.
6. Next, a summary screen will display a preview of your vault, showing the folder structure of your imported records. Here you can adjust the folder structure and click into individual records to preview their details before finalizing the import. Click **Confirm Import** to complete the import process.

{% hint style="warning" %}
Make sure to delete the local Bitwarden file from your computer.
{% endhint %}


# Import from CyberArk PACLI

Import Accounts from CyberArk Safes using Microsoft PowerShell and the CyberArk PACLI utility.

<figure><img src="https://914511346-files.gitbook.io/~/files/v0/b/gitbook-x-prod.appspot.com/o/spaces%2F-LSGVtOTYUIkVBoYtFvK%2Fuploads%2Fp1rub66SO3Rvd4Fod9Hh%2FImport-Keeper-Cyberark.jpg?alt=media&#x26;token=2dd2db77-c695-4c77-bcda-68974a31bdf0" alt=""><figcaption></figcaption></figure>

CyberArk includes a Command-Line Interface, PACLI, that communicates directly with the CyberArk Vault. It operates on "files" stored in "safes" in the vaul&#x74;*.* It can export CyberArk *account* data, which CyberArk clients like *PrivateArk* and *Password Vault Web Access (PVWA)* store as *files* in s*afes*.

The instructions below use a PowerShell script that uses PACLI to export all the files matching a pattern. Using the default pattern "\*," it exports all files from the Safe. It extracts the Username, Address, and password for each one; however, it can be configured to extract other fields if required. The script provides the exported files as objects, so ConvertTo-CSV is then used to transform them into a Comma-separated Value (CSV) format to import them into Keeper.

## Prerequisites

Three external components are required to use the script below:

1. CyberArk PACLI
2. A Vault.ini configuration file
3. A User.ini credential file

### CyberArk PACLI

The PACLI is available for download from the CyberArk Marketplace website. It is a zip file containing the `PACLI.exe` binary and some supporting files. The script will expect the path of the *directory* containing the binary.

### Vault.ini

The vault.ini file contains parameters PACLI needs to locate and log on to the vault. For example:

```ini
VAULT=CAMainVault
ADDRESS=10.11.12.13
PREAUTHSECUREDSESSION=YES
TRUSTSSC=YES
```

The VAULT can typically be left as "CAMainVault."

The ADDRESS is the hostname or IP address of the CyberArk Vault server.

The PREAUTHSECUREDSESSION and TRUSTSSC settings are required when the log-on user is authenticated via LDAP (Active Directory) or RADIUS. Otherwise, they may be omitted.

### User.ini

The User.ini file is in INI format. However, it is generated using the`CreateCredFile.exe` tool that CyberArk includes, along with some of its components. For example, generating a user.ini for *Myuser* in the *CORP* Active Directory domain:

```powershell
CreateCredFile.exe User.ini Password /Username Myuser /Password "MyPassw0rd!" /ExternalAuth /OSUsername CORP\Myusername
```

The latest version of the PACLI zip contains the tool. Running it with the `/?` parameter will explain the other options that are useful in other authentication scenarios.

## Export

Paste the following into a file ending with *.ps1*, e.g., *Export-CyberArkSafeFiles.ps1*

```powershell
<#
.SYNOPSIS
Exports 'files', i.e., CyberArk Account passwords from a CyberArk Safe using PACLI.

.DESCRIPTION
Uses CyberArk's PACLI command to export files from a CyberArk Safe.
It retrieves files, their categories, and contents and exports an object for each.
It uses filepattern=* to get all files in the safe by default.
The default categories are 'Address' and 'UserName'.
#>
param (
    # The name of the 'Vault' in CyberArk, e.g., 'CAMainVault'
    [Parameter(Mandatory = $true)][string]$VaultName,
    # The name of the 'Safe' in CyberArk
    [Parameter(Mandatory = $true)][ValidateNotNullOrEmpty()][string]$SafeName,
    # The CyberArk log on user (must match credentials in the User.ini)
    [Parameter(Mandatory = $true)][ValidateNotNullOrEmpty()][string]$Username,
    # The path to the PACLI directory containing PACLI.exe
    [Parameter(Mandatory = $true)]
    [ValidateScript({ Test-Path -PathType Leaf (Join-Path $_ 'PACLI.exe') })]
    [string]$PACLIPath,
    # Arguments `findfiles` uses to generate the list of files to export
    [string[]]$FindFilesArguments = 'filepattern=*',
    # The categories to export from the files
    [Parameter()][string[]]$Categories = @('Address', 'UserName'),
    # A CyberArk Vault.ini file
    [Parameter()][ValidateScript({ Test-Path $_ -PathType Leaf })]
    [string]$VaultIniPath = 'Vault.ini',
    # A CyberArk User.ini (or .cred) file as generated by CreateCredFile.exe
    [Parameter()][ValidateScript({ Test-Path $_ -PathType Leaf })]
    [string]$UserIniPath = 'User.ini',
    # The folder in the safe to export files from--most use 'Root'
    [string]$FolderName = 'Root',
    # The session ID to use for the underlying PACLI commands
    [Parameter()][ValidateNotNullOrEmpty()][string]$SessionId,
    # ErrorAction for retrievefile errors
    [Parameter()][ValidateSet('Stop', 'Continue', 'SilentlyContinue')]
    [string]$PACLIErrorAction = 'Continue'
)

$PACLI = Join-Path $PACLIPath 'PACLI.exe' -Resolve

function Invoke-PACLI {
    param (
        [Parameter(Mandatory = $True)][string]$Command,
        [Parameter(ValueFromRemainingArguments)][string[]]$Arguments
    )
    $Executable = ".\{0}" -f (Split-Path -Leaf $PACLI)
    $CommandLine = "$Executable $Command $($Arguments -join ' ')"
    try {
        Push-Location $(Split-Path -Parent $PACLI) -StackName 'PACLI'
        $Output = (& $Executable $Command $Arguments 2>$null)
        if ($LastExitCode -eq 0) {
            $Output
        }
        else {
            switch ($PACLIErrorAction) {
                'Continue' {
                    Write-Error "'$CommandLine' exited with code $LastExitCode"
                }
                'Stop' { throw "'$CommandLine' exited with code $LastExitCode" }
            }
        }
    }
    finally {
        Pop-Location -StackName 'PACLI'
    }
}

Invoke-PACLI init

$PACLIDefaults = "vault=$VaultName", "user=$Username", "safe=$SafeName", 
"folder=$FolderName"
if ($SessionId) {
    $PACLIDefaults += "sessionId=$SessionId"
}
Invoke-PACLI default @PACLIDefaults
Invoke-PACLI definefromfile vault=$VaultName parmfile=(Resolve-Path $VaultIniPath) |
Out-Null
Invoke-PACLI logon logonfile=(Resolve-Path $UserIniPath) | Out-Null
Invoke-PACLI opensafe | Out-Null

try {
    # Create a temporary file to store the file contents during processing
    $tempFile = [IO.Path]::GetTempFileName()
    # Split the tempFile path into the folder and the filename for 'retrievefile'
    $localFolder = Split-Path $tempFile
    $localFile = Split-Path -Leaf $tempFile

    # Get the list of files in the safe
    Invoke-PACLI findfiles $FindFilesArguments 'output(name)' |
    Where-Object { $_.Trim() -ne '' } |
    ForEach-Object {
        $file = @{ Name = $_ }
        # Retrieve the file and store the contents (the password) in the file object
        Invoke-PACLI retrievefile file=$_ localfolder=$localFolder localfile=$localFile
        if ($LastExitCode -ne 0) { return }
        $file.Password = (Get-Content $tempFile).TrimEnd([Char]0) # Can be null-padded
        # Get the list of categories for the file as a quoted CSV string
        Invoke-PACLI listfilecategories file=$_ 'output(all,enclose)' |
        ForEach-Object {
            # Get the category name and value and strip the quotes
            $category = ($_ -split ',' | ForEach-Object { $_.Trim('"') })[0..1]
            # Add the category to the file object if it is on the list
            if ($category[0] -in $Categories) {
                $file[$category[0]] = $category[1]
            }
        }
        [PSCustomObject]$file
    }
}
finally {
    Remove-Item -Path $tempFile -Force
}

Invoke-PACLI closesafe vault=$VaultName user=$Username safe=$SafeName | Out-Null
Invoke-PACLI logoff vault=$VaultName user=$Username | Out-Null
Invoke-PACLI term | Out-Null
```

Extract the PACLI.zip into the same directory or a sub-directory of the directory containing the script.

Open PowerShell and change to the directory containing the script.

Run the script and pipe the output into [Export-CSV](https://learn.microsoft.com/en-us/powershell/module/microsoft.powershell.utility/export-csv):

```powershell
.\Export-CyberArkSafeFiles.ps1 CAMainVault MySafe Myuser .\PACLI-Rls-v11.5.3 |
Export-CSV Records.csv -Delimiter "`t" -Encoding utf8 -NoHeader -UseQuotes Never
```

Note the use of use of tab characters instead of commas, the use of UTF-8 encoding, excluding a header and not quoting the data all help Keeper import the data properly.

### Transformation

PowerShell can help transform the data beyond just formatting it as CSV. This more advanced example creates the "login" field by combining the Username and Address fields and uses it as the "title" field as well.

```powershell
.\Export-CyberArkSafeFiles.ps1 CAMainVault MySafe Myuser .\PACLI-Rls-v11.5.3 |
Select-Object @{l='Folder';e={$_.Name -replace "-$($_.Address)-$($_.Username)", '' }},
 @{l='Login';e={'{0}@{1}' -f $_.Username, $_.Address}}, Password |
Select-Object Folder, @{l='Title';e={$_.Login}}, Login, Password |
Export-Csv Records.csv -Delimiter "`t" -Encoding utf8 -NoHeader -UseQuotes Never
```

## Import

Follow the instructions to [Import Text File (.csv, .xls, .tsv)](/user-guides/import-records-1/import-a-.csv-file).


# Import from Dashlane

Instructions on how to import your passwords from Dashlane to Keeper

<figure><img src="/files/d5LVsDSXx9RInCw91PQ9" alt=""><figcaption></figcaption></figure>

## Export

To import from Dashlane, you must first export your records. To export from Dashlane, you have two options.

### Option 1: DASH: Dashlane Secure Archive

1. Log into your Dashlane account.
2. From **My Account**, select **Settings > Export Data**.

![](/files/LsiP6ZcpPwbP7r8x02fw)

3\. Click on **Export to Dash.**

![](/files/aWO1XDuPGYfMbYKxO48q)

&#x34;**.** Create and confirm a password.

5\. Click on **Export data.**

6\. An export file titled **Dashlane Export.dash** will be created.

### Option 2: CSV

1. Log into your Dashlane account.
2. From **My Account**, select **Settings > Export Data**.

![](/files/LsiP6ZcpPwbP7r8x02fw)

3\. Click **Export to CSV** to create the export fil&#x65;**.**

![](/files/s7SqS49OVClHcw5nsRST)

## Import

1. Log into the Keeper Web Vault or Desktop App.
2. From the **Account Dropdown Menu**, click **Settings**.
3. Click **Import > Import** (next to "Use Another Source") and from the dropdown menu select **Dashlane**.
4. Drag-and-drop the exported file onto Keeper's "Drop a File Here" window or browse for the file on your computer. If you used the DASH method, enter the Dashlane password you created during export. Check the box if your file includes column headers, otherwise, the first row will be treated as data.
5. Once you have imported your credentials using one of the methods above, you can customize how you would like the information to appear in your vault in the field mapping screen. Here you'll see standard field names across the top that “map” to the data below for each Keeper record.

   To adjust these mappings:

   * Click any field to open a dropdown menu
   * Select the appropriate field name from the list. Repeat this process across each column as needed
   * Click **Next** to finalize your selections.
6. Next, a summary screen will display a preview of your vault, showing the folder structure of your imported records. Here you can adjust the folder structure and click into individual records to preview their details before finalizing the import. Click **Confirm Import** to complete the import process.

{% hint style="warning" %}
Make sure to delete the local Dashlane file from your computer.
{% endhint %}


# Import from EnPass

Instructions on how to import your passwords from EnPass to Keeper

## Export

To import from EnPass, you must first export your records.

**Mac**

1. Log into your EnPass account.
2. Click **File > Export**.

![](/files/-LuKFsO2eg7Dh9ZZHuwI)

2\. Select .**json** as your file format.

3\. Choose the location to save the file.

4\. Name the file and click **Save**.

<figure><img src="/files/y3fN8irumcDTUg87dOsQ" alt=""><figcaption></figcaption></figure>

#### Windows

1. Click on the **menu** in the upper-left side.
2. Click on **File > Export**.

![](/files/-LuKGPQJ0OJHdCpLmGQQ)

3. Select **.json** as your file format.
4. Choose the location to save the file.

## Import

1. Log into the Keeper Web Vault or Desktop App.
2. From the **Account Dropdown Menu**, click **Settings**.
3. Click **Import > Import** (next to "Use Another Source") and from the dropdown menu select **EnPass**.
4. Drag-and-drop the exported file onto Keeper's "Drop a File Here" window or browse for the file on your computer. Check the box if your file includes column headers, otherwise, the first row will be treated as data.
5. Once you have imported your credentials using one of the methods above, you can customize how you would like the information to appear in your vault in the field mapping screen. Here you'll see standard field names across the top that “map” to the data below for each Keeper record.

   To adjust these mappings:

   * Click any field to open a dropdown menu
   * Select the appropriate field name from the list. Repeat this process across each column as needed
   * Click **Next** to finalize your selections.
6. Next, a summary screen will display a preview of your vault, showing the folder structure of your imported records. Here you can adjust the folder structure and click into individual records to preview their details before finalizing the import. Click **Confirm Import** to complete the import process.

{% hint style="warning" %}
Make sure to delete the local EnPass file from your computer.
{% endhint %}


# Import from Kaspersky

Instructions on how to import your passwords from Kaspersky to Keeper

## Export

To import from Kaspersky, you must **export** your records first.

1. Log into your Kaspersky account.
2. Click **Settings > Import/Export**.
3. Export as .csv text file.

## Import

1. Log into the Keeper Web Vault or Desktop App.
2. From the **Account Dropdown Menu**, click **Settings**.
3. Click **Import > Import** (next to "Use Another Source") and from the dropdown menu select **Kaspersky**.
4. Drag-and-drop the exported file onto Keeper's "Drop a File Here" window or browse for the file on your computer. Check the box if your file includes column headers, otherwise, the first row will be treated as data.
5. Once you have imported your credentials using one of the methods above, you can customize how you would like the information to appear in your vault in the field mapping screen. Here you'll see standard field names across the top that “map” to the data below for each Keeper record.

   To adjust these mappings:

   * Click any field to open a dropdown menu
   * Select the appropriate field name from the list. Repeat this process across each column as needed
   * Click **Next** to finalize your selections.
6. Next, a summary screen will display a preview of your vault, showing the folder structure of your imported records. Here you can adjust the folder structure and click into individual records to preview their details before finalizing the import. Click **Confirm Import** to complete the import process.

{% hint style="warning" %}
Make sure to delete the local Kaspersky file from your computer.
{% endhint %}


# Import from KeePass (.kdbx)

Instructions on how to import passwords from KeePass encrypted .kdbx files to Keeper

<figure><img src="/files/PIh18mp1vbiVkcz4Vv8d" alt=""><figcaption></figcaption></figure>

## .KDBX File Import Overview

Keeper supports the ability to import directly from encrypted Keepass files in .kdbx file format. Keeper can import both password-protected and private key-protected formats. All versions of .kdbx files are supported.

This import will include passwords, folders, custom fields and file attachments.

{% hint style="info" %}
Importing records with **File Attachments** is restricted to Keeper customers with the Secure File Storage Add-On.
{% endhint %}

To import into Keeper, please locate your encrypted .kdbx file, and if you are protecting your Keepass file with a private Key File, that will be required for import as well.

## Import

1. Log into the Keeper Web Vault or Desktop App.
2. From the **Account Dropdown Menu**, click **Settings**.
3. Click **Import > Import** (next to "Use Another Source") and from the dropdown menu select **KeePass (.kdbx)**.

<figure><img src="/files/G8K9NwDCBEWi6nsAtsSZ" alt=""><figcaption><p>Select Keepass as Import Source</p></figcaption></figure>

4. Enter your KeePass password.
5. If one was used, click **Add Key File** and select the file from your computer.

<figure><img src="/files/nUsIlUsaKC3RRBPAiBt3" alt=""><figcaption><p>Enter KeePass Password and Add Key File</p></figcaption></figure>

6. Drag-and-drop the .kdbx file onto Keeper's "Drop a File Here" window or browse for the file on your computer. Check the box if your file includes column headers, otherwise, the first row will be treated as data. If the import is unsuccessful, you may need to update your KeePass application to a newer version, or export your KeePass database to a newer format.
7. Once you have imported your credentials using one of the methods above, you can customize how you would like the information to appear in your vault in the field mapping screen. Here you'll see standard field names across the top that “map” to the data below for each Keeper record.

   To adjust these mappings:

   * Click any field to open a dropdown menu
   * Select the appropriate field name from the list. Repeat this process across each column as needed
   * Click **Next** to finalize your selections.
8. Next, a summary screen will display a preview of your vault, showing the folder structure of your imported records. Here you can adjust the folder structure and click into individual records to preview their details before finalizing the import. Click **Confirm Import** to complete the import process.

{% hint style="warning" %}
Make sure to delete the local KeePass files from your computer.
{% endhint %}


# Import from KeePass .XML

Instructions on how to import your passwords from KeePass .XML to Keeper

{% hint style="info" %}
Keeper supports direct KeePass .kdbx file import which supports more content and file attachments. Please see those instructions [here](/user-guides/import-records-1/import-from-keepass-kdbx).
{% endhint %}

## Export

To import from KeePass, you must export your records first.

1. Log into your KeePass account.
2. Click **File > Export > KeePass XML File**. Use XML for KeePass 2.0 and above. XML supports folder organization. If you use KeePass 1.X, export as a CSV file. If you have a .kdbx file, use the [Import from KeePass KDBX](/user-guides/import-records-1/import-from-keepass-kdbx) instructions instead.

![](https://914511346-files.gitbook.io/~/files/v0/b/gitbook-legacy-files/o/assets%2F-LSGVtOTYUIkVBoYtFvK%2F-LuKLAfUI1EXYUYH9rvF%2F-LuKLKfBiAIOCWaYdxNG%2FExport.PNG?alt=media\&token=86074595-849c-48f9-8ae2-f5a22a7e8a50)

2\. Enter a file name and click **Save**.

![](https://914511346-files.gitbook.io/~/files/v0/b/gitbook-legacy-files/o/assets%2F-LSGVtOTYUIkVBoYtFvK%2F-LzJuc0VL0HDfych6V6h%2F-LzJvVbTo2of8E3LB_Pt%2FKeePass%20XML.PNG?alt=media\&token=7ec2aa5a-91d6-4cd7-b464-3010669def33)

## Import

1. Log into the Keeper Web Vault or Desktop App.
2. From the **Account Dropdown Menu**, click **Settings**.
3. Click **Import > Import** (next to "Use Another Source") and from the dropdown menu select **KeePass**.
4. Drag-and-drop the exported file onto Keeper's "Drop a File Here" window or browse for the file on your computer. Check the box if your file includes column headers, otherwise, the first row will be treated as data.
5. Once you have imported your credentials using one of the methods above, you can customize how you would like the information to appear in your vault in the field mapping screen. Here you'll see standard field names across the top that “map” to the data below for each Keeper record.

   To adjust these mappings:

   * Click any field to open a dropdown menu
   * Select the appropriate field name from the list. Repeat this process across each column as needed
   * Click **Next** to finalize your selections.
6. Next, a summary screen will display a preview of your vault, showing the folder structure of your imported records. Here you can adjust the folder structure and click into individual records to preview their details before finalizing the import. Click **Confirm Import** to complete the import process.

{% hint style="warning" %}
Make sure to delete the local KeePass file from your computer.
{% endhint %}


# Import from LastPass

Instructions on how to import your passwords from LastPass to Keeper

<figure><img src="https://914511346-files.gitbook.io/~/files/v0/b/gitbook-x-prod.appspot.com/o/spaces%2F-LSGVtOTYUIkVBoYtFvK%2Fuploads%2F0qADCS9Irsa9malnFPwD%2FImport-Keeper-LastPass.jpg?alt=media&#x26;token=815a724d-0719-4f19-9208-e330cd3f7b95" alt=""><figcaption></figcaption></figure>

Keeper supports multiple methods of importing your data from LastPass, both manual and automated. Choose one of the options below to begin.

### Option 1: Automated Import With the Keeper Desktop App

The Keeper Desktop Application supports an automated import of your LastPass records into Keeper, including:

* Passwords
* Folders
* Shared Folders
* Templates and Custom Fields (into Keeper Record Types)
* TOTPs
* File Attachments

1. First you must download the Keeper Desktop App [here](https://keepersecurity.com/download) and log in as usual.
2. From the **Account Dropdown Menu**, click **Settings > Import > Import** (next to "Use Another Source") and from the dropdown menu select **LastPass**.

<figure><img src="https://914511346-files.gitbook.io/~/files/v0/b/gitbook-x-prod.appspot.com/o/spaces%2F-LSGVtOTYUIkVBoYtFvK%2Fuploads%2FWKWLfmEvFpSlPrCWTGK2%2FScreenshot%202026-01-27%20at%2012.45.34%E2%80%AFPM.png?alt=media&#x26;token=ed572296-8567-40a2-9af2-5d191baed079" alt=""><figcaption><p>LastPass Automated Import</p></figcaption></figure>

3. Enter your login credentials for LastPass and click **Next**.

<figure><img src="https://914511346-files.gitbook.io/~/files/v0/b/gitbook-x-prod.appspot.com/o/spaces%2F-LSGVtOTYUIkVBoYtFvK%2Fuploads%2FDh9V97P4Pcac6Nnzcv2k%2FScreenshot%202026-01-27%20at%2012.39.39%E2%80%AFPM.png?alt=media&#x26;token=0f42c273-538c-44cc-b06a-227dade4f85b" alt=""><figcaption><p>Enter Your LastPass Email &#x26; Password</p></figcaption></figure>

{% hint style="info" %}
Direct communication to lastpass.com and keepersecurity.com must be allowed by your network firewall, if using a product such as Zscaler or other proxy.\
\
If you're using a Security Key with your LastPass account, switch to TOTP or an alternate MFA method first.
{% endhint %}

Review the import summary and check the box if you would like to import root level folders as shared, then click **Confirm Import**.

<figure><img src="https://914511346-files.gitbook.io/~/files/v0/b/gitbook-x-prod.appspot.com/o/spaces%2F-LSGVtOTYUIkVBoYtFvK%2Fuploads%2FVEpWvVlKBG1aRQ9YvBVP%2FScreenshot%202026-01-27%20at%2012.40.10%E2%80%AFPM.png?alt=media&#x26;token=dbcd1ed7-e51b-40c1-9fe4-e543b44a7a80" alt=""><figcaption><p>Review &#x26; Confirm the Import</p></figcaption></figure>

### Option 2: Automated Import With Keeper Commander

Keeper supports automatic import of your LastPass Vault using Keeper Commander, our CLI tool.

The Keeper Commander LastPass import feature supports:

* Transfer of all Passwords
* Transfer of Folders
* Transfer of Shared Folders
* Transfer of Shared Folder permissions (users and teams)
* Transfer of Templates and Custom Fields to Keeper Record Types
* Transfer of Record File Attachments

To learn more, click the link below.

[LastPass import with Keeper Commander](/keeperpam/commander-cli/command-reference/import-and-export-commands/lastpass-import)

### Option 3: Manual .csv File Export from LastPass to Keeper

If the automated methods are not available to you, follow instructions below by importing a .csv file to the Keeper Web Vault.

### Export

To import from LastPass, you must export your records first.

1. Log into the LastPass Web Vault, or, from the LastPass Browser Extension click on the **LastPass Extension Icon > Open My Vault**.
2. On the lower-left side, navigate to **Advanced Options** and under "Manage Your Vault" you will select **Export**. This will send you an email to confirm the export request.
3. Once confirmed, return to your LastPass Vault and select **Export** again.
4. If you are using the browser extension, it will depend if your LastPass Extension includes the [Binary Component](https://support.logmeininc.com/lastpass/help/what-is-the-binary-component-in-lastpass-lp010136).\
   \
   With Binary Component: Enter a file name for your export, then click **Save** to save the CSV export file.\
   \
   Without Binary Component: Your exported data will be displayed on a webpage, and also downloaded to your downloads folder as a .csv file named "lastpass\_vault\_export".

{% hint style="info" %}
Mac Users: Copy and paste the plain text output into TextEdit or any other text editor. On TextEdit select **Format > Make Plain Text**. Then save the file as a “.csv” plain text file with Unicode encoding.
{% endhint %}

### Import

1. Log into the Keeper Web Vault.
2. From the **Account Dropdown Menu**, click **Settings**.
3. Click **Import > Import** (next to "Use Another Source") and from the dropdown menu select **LastPass**.
4. Drag-and-drop the exported .csv file onto Keeper's "Drop a File Here" window or browse for the file on your computer. Check the box if your file includes column headers, otherwise, the first row will be treated as data.
5. Once you have imported your credentials using one of the methods above, you can customize how you would like the information to appear in your vault in the field mapping screen. Here you'll see standard field names across the top that “map” to the data below for each Keeper record.

   To adjust these mappings:

   * Click any field to open a dropdown menu
   * Select the appropriate field name from the list. Repeat this process across each column as needed
   * Click **Next** to finalize your selections.
6. Next, a summary screen will display a preview of your vault, showing the folder structure of your imported records. Here you can adjust the folder structure and click into individual records to preview their details before finalizing the import. Click **Confirm Import** to complete the import process.

{% hint style="warning" %}
Make sure to delete the local LastPass file locally on your computer.
{% endhint %}


# Import from MacPass

Instructions on how to import your passwords from MacPass to Keeper

## Export

To import from MacPass, you must export your records first.

**Mac**

1. Log into your MacPass account.
2. Click **File > Export as XML**.
3. Enter a name for the file and click **Save**.

![](/files/-LuYhyvMwPpaxUn-qnff)

## Import

1. Log into the Keeper Web Vault or Desktop App.
2. From the **Account Dropdown Menu**, click **Settings**.
3. Click **Import > Import** (next to "Use Another Source") and from the dropdown menu select **MacPass**.
4. Drag-and-drop the exported file onto Keeper's "Drop a File Here" window or browse for the file on your computer. Check the box if your file includes column headers, otherwise, the first row will be treated as data.
5. Once you have imported your credentials using one of the methods above, you can customize how you would like the information to appear in your vault in the field mapping screen. Here you'll see standard field names across the top that “map” to the data below for each Keeper record.

   To adjust these mappings:

   * Click any field to open a dropdown menu
   * Select the appropriate field name from the list. Repeat this process across each column as needed
   * Click **Next** to finalize your selections.
6. Next, a summary screen will display a preview of your vault, showing the folder structure of your imported records. Here you can adjust the folder structure and click into individual records to preview their details before finalizing the import. Click **Confirm Import** to complete the import process.

{% hint style="warning" %}
Make sure to delete the local MacPass file from your computer.
{% endhint %}


# Import from mSecure

Instructions on how to import your passwords from mSecure to Keeper

## Export

To import from mSecure, you must export your records first.

**Mac**

1. Log into your mSecure account.
2. Click **File > Export CSV**.

![](/files/-LuYkrPsI7cCywGFnF51)

2. Accept the warning by clicking **OK**.
3. Select **Export All Records**.
4. Enter a name for the file and click **Export**.

<div align="center"><img src="/files/-LuYlDMf9a5nYBwd280b" alt="" width="563"></div>

**Windows**

1. Log into your mSecure account.
2. Click on the **Settings** icon.

<div align="center"><img src="/files/-LuYs260xNunPPTHIuUM" alt="" width="563"></div>

3. Click on **Backups > Export**.

<div align="center"><img src="/files/-LuYxEBujsT2FfppSs0d" alt="" width="563"></div>

4. Enter a name for the file and click **Save**.

## Import

1. Log into the Keeper Web Vault or Desktop App.
2. From the **Account Dropdown Menu**, click **Settings**.
3. Click **Import > Import** (next to "Use Another Source") and from the dropdown menu select **mSecure**.
4. Drag-and-drop the exported file onto Keeper's "Drop a File Here" window or browse for the file on your computer. Check the box if your file includes column headers, otherwise, the first row will be treated as data.
5. Once you have imported your credentials using one of the methods above, you can customize how you would like the information to appear in your vault in the field mapping screen. Here you'll see standard field names across the top that “map” to the data below for each Keeper record.

   To adjust these mappings:

   * Click any field to open a dropdown menu
   * Select the appropriate field name from the list. Repeat this process across each column as needed
   * Click **Next** to finalize your selections.
6. Next, a summary screen will display a preview of your vault, showing the folder structure of your imported records. Here you can adjust the folder structure and click into individual records to preview their details before finalizing the import. Click **Confirm Import** to complete the import process.

{% hint style="warning" %}
Make sure to delete the local mSecure file from your computer.
{% endhint %}


# Import from MyKi

Instructions on how to import your passwords from MyKi to Keeper.

<figure><img src="/files/e5buc6IDjNsG7Jn6uWqR" alt=""><figcaption></figcaption></figure>

## Export

To import from MyKi, you must export your records first.

**On Windows**

1. Log into your MyKi account.
2. Click **Settings > Import/Export**.
3. Export to text file and Save.

**On Mac**

1. Log into your MyKi account.
2. Click on **File > Export CSV**
3. Select folder destination and Save.

## Import

1. Log into the Keeper Web Vault or Desktop App.
2. From the **Account Dropdown Menu**, click **Settings**.
3. Click **Import > Import** (next to "Use Another Source") and from the dropdown menu select **MyKi**.
4. Drag-and-drop the exported file onto Keeper's "Drop a File Here" window or browse for the file on your computer. Check the box if your file includes column headers, otherwise, the first row will be treated as data.
5. Once you have imported your credentials using one of the methods above, you can customize how you would like the information to appear in your vault in the field mapping screen. Here you'll see standard field names across the top that “map” to the data below for each Keeper record.

   To adjust these mappings:

   * Click any field to open a dropdown menu
   * Select the appropriate field name from the list. Repeat this process across each column as needed
   * Click **Next** to finalize your selections.
6. Next, a summary screen will display a preview of your vault, showing the folder structure of your imported records. Here you can adjust the folder structure and click into individual records to preview their details before finalizing the import. Click **Confirm Import** to complete the import process.

{% hint style="warning" %}
Make sure to delete the local MyKi file from your computer.
{% endhint %}


# Import from Passpack

Instructions on how to import your passwords from Passpack to Keeper.

## Export

To import from Passpack, you must export your records first.

1. Log into your Passspack account.
2. Click **Settings > Export**.
3. Click on **Download**.

![](/files/-LuYxEBujsT2FfppSs0d)

## Import

1. Log into the Keeper Web Vault or Desktop App.
2. From the **Account Dropdown Menu**, click **Settings**.
3. Click **Import > Import** (next to "Use Another Source") and from the dropdown menu select **Passpack**.
4. Drag-and-drop the exported file onto Keeper's "Drop a File Here" window or browse for the file on your computer. Check the box if your file includes column headers, otherwise, the first row will be treated as data.
5. Once you have imported your credentials using one of the methods above, you can customize how you would like the information to appear in your vault in the field mapping screen. Here you'll see standard field names across the top that “map” to the data below for each Keeper record.

   To adjust these mappings:

   * Click any field to open a dropdown menu
   * Select the appropriate field name from the list. Repeat this process across each column as needed
   * Click **Next** to finalize your selections.
6. Next, a summary screen will display a preview of your vault, showing the folder structure of your imported records. Here you can adjust the folder structure and click into individual records to preview their details before finalizing the import. Click **Confirm Import** to complete the import process.

{% hint style="warning" %}
Make sure to delete the local Passpack file from your computer.
{% endhint %}


# Import from Passportal

Instructions on how to import your passwords from Passportal to Keeper

## Export

To import from Passportal, you must export your records first.

1. Log into your Passportal account.
2. Click **Settings > Import/Export**.
3. Click **Export** and save the file.

## Import

1. Log into the Keeper Web Vault or Desktop App.
2. From the **Account Dropdown Menu**, click **Settings**.
3. Click **Import > Import** (next to "Use Another Source") and from the dropdown menu select **Passportal**.
4. Drag-and-drop the exported file onto Keeper's "Drop a File Here" window or browse for the file on your computer. Check the box if your file includes column headers, otherwise, the first row will be treated as data.
5. Once you have imported your credentials using one of the methods above, you can customize how you would like the information to appear in your vault in the field mapping screen. Here you'll see standard field names across the top that “map” to the data below for each Keeper record.

   To adjust these mappings:

   * Click any field to open a dropdown menu
   * Select the appropriate field name from the list. Repeat this process across each column as needed
   * Click **Next** to finalize your selections.
6. Next, a summary screen will display a preview of your vault, showing the folder structure of your imported records. Here you can adjust the folder structure and click into individual records to preview their details before finalizing the import. Click **Confirm Import** to complete the import process.

{% hint style="warning" %}
Make sure to delete the local Passportal file from your computer.
{% endhint %}


# Import from Password Boss

Instructions on how import your password from Password Boss to Keeper

## Export

To import from Password Boss, you must export your records first.

#### Mac & Windows

1. Log into your Password Boss account.
2. Click **File > Export Data**.
3. Choose **Password Boss JSON - Not Encrypted**.
4. Save the file.

![Mac (top) and Windows (bottom) Export Data Menus](/files/-LucsvrMKabebzE9m7df)

## Import

1. Log into the Keeper Web Vault or Desktop App.
2. From the **Account Dropdown Menu**, click **Settings**.
3. Click **Import > Import** (next to "Use Another Source") and from the dropdown menu select **Password Boss**.
4. Drag-and-drop the exported file onto Keeper's "Drop a File Here" window or browse for the file on your computer. Check the box if your file includes column headers, otherwise, the first row will be treated as data.
5. Once you have imported your credentials using one of the methods above, you can customize how you would like the information to appear in your vault in the field mapping screen. Here you'll see standard field names across the top that “map” to the data below for each Keeper record.

   To adjust these mappings:

   * Click any field to open a dropdown menu
   * Select the appropriate field name from the list. Repeat this process across each column as needed
   * Click **Next** to finalize your selections.
6. Next, a summary screen will display a preview of your vault, showing the folder structure of your imported records. Here you can adjust the folder structure and click into individual records to preview their details before finalizing the import. Click **Confirm Import** to complete the import process.

{% hint style="warning" %}
Make sure to delete the local Password Boss file from your computer.
{% endhint %}


# Import from Proton Pass

Instructions on how to import passwords from Proton Pass to Keeper

<figure><img src="/files/0bsFDxMmn11ekjcyu26o" alt=""><figcaption></figcaption></figure>

## Export

To import from Proton Pass, you must export your passwords first.

1. Open the Proton Pass browser extension for Chrome or Firefox and click **Settings**.

<figure><img src="/files/40XFnIpm9198IFnyD11k" alt=""><figcaption><p>Proton Pass Extension Settings</p></figcaption></figure>

2. Click on the **Export tab.** Ensure "Encrypt your Proton Pass data export file" is unchecked.

<figure><img src="/files/YCS90xUG6HaeH6hD1DFb" alt=""><figcaption><p>Settings > Export</p></figcaption></figure>

3. Click **Export.** A file title "Proton Pass\_export\_\[date].zip" will be saved to your computer's downloads.

## Import

1. Log into the Keeper Web Vault or Desktop App.
2. From the **Account Dropdown Menu**, click **Settings**.
3. Click **Import > Import** (next to "Use Another Source") and from the dropdown menu select **Proton Pass**.
4. Drag-and-drop the exported file onto Keeper's "Drop a File Here" window or browse for the file on your computer. Check the box if your file includes column headers, otherwise, the first row will be treated as data.
5. Once you have imported your credentials using one of the methods above, you can customize how you would like the information to appear in your vault in the field mapping screen. Here you'll see standard field names across the top that “map” to the data below for each Keeper record.

   To adjust these mappings:

   * Click any field to open a dropdown menu
   * Select the appropriate field name from the list. Repeat this process across each column as needed
   * Click **Next** to finalize your selections.
6. Next, a summary screen will display a preview of your vault, showing the folder structure of your imported records. Here you can adjust the folder structure and click into individual records to preview their details before finalizing the import. Click **Confirm Import** to complete the import process.

{% hint style="warning" %}
Make sure to delete the local Proton Pass file from your computer.
{% endhint %}


# Import from Psono

Instructions on how to import your passwords from Psono to Keeper

## Export

To import from Psono, you must export your records first.

1. Log into your Psono account.
2. Click your email address then select **Other**.
3. Click **Export** then select **JSON** and save the file.

## Import

1. Log into the Keeper Web Vault or Desktop App.
2. From the **Account Dropdown Menu**, click **Settings**.
3. Click **Import > Import** (next to "Use Another Source") and from the dropdown menu select **Psono.**
4. Drag-and-drop the exported file onto Keeper's "Drop a File Here" window or browse for the file on your computer. Check the box if your file includes column headers, otherwise, the first row will be treated as data.
5. Once you have imported your credentials using one of the methods above, you can customize how you would like the information to appear in your vault in the field mapping screen. Here you'll see standard field names across the top that “map” to the data below for each Keeper record.

   To adjust these mappings:

   * Click any field to open a dropdown menu
   * Select the appropriate field name from the list. Repeat this process across each column as needed
   * Click **Next** to finalize your selections.
6. Next, a summary screen will display a preview of your vault, showing the folder structure of your imported records. Here you can adjust the folder structure and click into individual records to preview their details before finalizing the import. Click **Confirm Import** to complete the import process.

{% hint style="warning" %}
Make sure to delete the local Psono file from your computer.
{% endhint %}


# Import from RoboForm

Instructions on how to import your passwords from RoboForm to Keeper

## Export

To import from RoboForm, you must export your records first.

**Mac**

1. Log into your RoboForm account.
2. Before proceeding, make sure you do not have your Passcards organized in folders in RoboForm.
3. Click **File > Print List > Logins or Identities or SafeNotes**.
4. Right-Click **HTML page** and choose **Save As...**
5. Select the format as Webpage, HTML Only.
6. Save the file to your computer.

**Windows App**

1. Click on the **RoboForm** dropdown menu in the upper left column.

<div align="center"><img src="/files/-LuZ2Zqk-Av6P3M20MQy" alt="" width="563"></div>

2. Choose **Options**, then **Account & Data**.
3. Choose **Export**.
4. Under "Format", select **CSV file**.
5. Browse the location to save and choose **Export**.

![](/files/-LuZ4ftTjb7oLpSKPIAW)

**Windows Extension**

1. Select the **RoboForm icon** on your taskbar or toolbar.
2. Click on the **Overflow Menu**.

<div align="center"><img src="/files/-LuZ4LtE6VbtF1oI6KSF" alt="" width="375"></div>

3. Choose **Options** then **Account & Data**.
4. Choose **Export**.

<div align="center"><img src="/files/-LuZ4bZxEZyylsW_OhCU" alt="" width="563"></div>

5. Under Format, select **CSV file**.
6. Browse the location to save and choose **Export**.

<div align="center"><img src="/files/-LuZ4ftTjb7oLpSKPIAW" alt="" width="563"></div>

## Import

1. Log into the Keeper Web Vault or Desktop App.
2. From the **Account Dropdown Menu**, click **Settings**.
3. Click **Import > Import** (next to "Use Another Source") and from the dropdown menu select RoboForm.
4. Drag-and-drop the exported file onto Keeper's "Drop a File Here" window or browse for the file on your computer. Check the box if your file includes column headers, otherwise, the first row will be treated as data.
5. Once you have imported your credentials using one of the methods above, you can customize how you would like the information to appear in your vault in the field mapping screen. Here you'll see standard field names across the top that “map” to the data below for each Keeper record.

   To adjust these mappings:

   * Click any field to open a dropdown menu
   * Select the appropriate field name from the list. Repeat this process across each column as needed
   * Click **Next** to finalize your selections.
6. Next, a summary screen will display a preview of your vault, showing the folder structure of your imported records. Here you can adjust the folder structure and click into individual records to preview their details before finalizing the import. Click **Confirm Import** to complete the import process.

{% hint style="warning" %}
Make sure to delete the local RoboForm file from your computer.
{% endhint %}


# Import from Safari via Export

This guide details how to manually export saved passwords from Safari and import them to Keeper.

{% hint style="warning" %}
Keeper can import password directly from your web browsers such as Safari using the automated import tool found in your Keeper Web Vault and Desktop App Settings. The import tool is an easy to use application that runs on your computer to quickly locate and import your passwords. Click [here](/user-guides/import-records-1/import-from-chrome-firefox-ie-edge-and-opera) for further instruction on how to automate the import of your passwords from a web browser such as Safari.
{% endhint %}

## Export

1. Open the **Passwords App**.
2. Navigate to **File > Export All Passwords to File...**
3. Click **Export Passwords**
4. Save as ".csv" file to your computer.

{% hint style="info" %}
If you are running an older version of macOS, you must export your files directly from Safari, **Settings > Passwords**.
{% endhint %}

<div align="center"><figure><img src="https://914511346-files.gitbook.io/~/files/v0/b/gitbook-x-prod.appspot.com/o/spaces%2F-LSGVtOTYUIkVBoYtFvK%2Fuploads%2FvfFvwmymu1U8sIXgo3x0%2FScreenshot%202026-01-26%20at%2011.51.35%E2%80%AFAM.png?alt=media&#x26;token=8c5f2e94-a18a-4a5f-bde2-1d776d6b50e2" alt=""><figcaption><p>Passwords App on macOS 15+</p></figcaption></figure></div>

## Import

1. Log into the Keeper Web Vault or Desktop App.
2. From the **Account Dropdown Menu**, click **Settings**.
3. Click **Import > Import** (next to "Use Another Source") and from the dropdown menu select **Text File**.
4. Drag-and-drop the exported .csv file onto Keeper's "Drop a File Here" window or browse for the file on your computer. Check the box if your file includes column headers, otherwise, the first row will be treated as data.
5. Once you have imported your credentials using one of the methods above, you can customize how you would like the information to appear in your vault in the field mapping screen. Here you'll see standard field names across the top that “map” to the data below for each Keeper record.

   To adjust these mappings:

   * Click any field to open a dropdown menu
   * Select the appropriate field name from the list. Repeat this process across each column as needed
   * Click **Next** to finalize your selections.
6. Next, a summary screen will display a preview of your vault, showing the folder structure of your imported records. Here you can adjust the folder structure and click into individual records to preview their details before finalizing the import. Click **Confirm Import** to complete the import process.

{% hint style="warning" %}
Make sure to delete the local Safari/Passwords file from your computer.
{% endhint %}


# Import from SplashID

Instructions on how to import your passwords from SplashID to Keeper

## Export

To import from SplashID, you must export your records first.

**Mac**

1. Log into your SplashID account.
2. Click **File > Export > CSV**.
3. Save the file to your computer.

![](/files/-LuZ6un7fAXAbv0_H-u8)

**Windows**

1. Log into your SplashID account.
2. Click the **SplashID Icon > Export > Export to CSV**.
3. Save the file to your computer.

<div align="center"><img src="/files/-LuZ8S3MEzW9VAj6wWH4" alt=""></div>

## Import

1. Log into the Keeper Web Vault or Desktop App.
2. From the **Account Dropdown Menu**, click **Settings**.
3. Click **Import > Import** (next to "Use Another Source") and from the dropdown menu select **SplashID**.
4. Drag-and-drop the exported file onto Keeper's "Drop a File Here" window or browse for the file on your computer. Check the box if your file includes column headers, otherwise, the first row will be treated as data.
5. Once you have imported your credentials using one of the methods above, you can customize how you would like the information to appear in your vault in the field mapping screen. Here you'll see standard field names across the top that “map” to the data below for each Keeper record.

   To adjust these mappings:

   * Click any field to open a dropdown menu
   * Select the appropriate field name from the list. Repeat this process across each column as needed
   * Click **Next** to finalize your selections.
6. Next, a summary screen will display a preview of your vault, showing the folder structure of your imported records. Here you can adjust the folder structure and click into individual records to preview their details before finalizing the import. Click **Confirm Import** to complete the import process.

{% hint style="warning" %}
Make sure to delete the local SplashID file from your computer.
{% endhint %}


# Import from Sticky Password

Instructions on how to import your passwords from Sticky Password to Keeper.

## Export

To import from Sticky Password, you must export your records first.

**Mac**

1. Log into your Sticky Passwords account.
2. Click on **File > Export > Unencrypted**.
3. Save the file to your computer.

![](/files/-LuZS0UIxDz2Q8s2zNYg)

**Windows**

1. Log into your Sticky Password account.
2. Click **Menu > Export**.

<div align="center"><img src="/files/-LuZV208T6Rty92lsinA" alt="" width="563"></div>

3. Click **Export All or Export only selected items**.

<div align="center"><img src="/files/-LuZVC1wzv2qpPTS7ur2" alt="" width="563"></div>

4. Select **Sticky Password 6 XML**.

![](/files/-LuZVIvqMC-D2had7vxv)

5. Click **Next**.
6. Save the file to your computer.

## Import

1. Log into the Keeper Web Vault or Desktop App.
2. From the **Account Dropdown Menu**, click **Settings**.
3. Click **Import > Import** (next to "Use Another Source") and from the dropdown menu select **Sticky Password**.
4. Drag-and-drop the exported file onto Keeper's "Drop a File Here" window or browse for the file on your computer. Check the box if your file includes column headers, otherwise, the first row will be treated as data.
5. Once you have imported your credentials using one of the methods above, you can customize how you would like the information to appear in your vault in the field mapping screen. Here you'll see standard field names across the top that “map” to the data below for each Keeper record.

   To adjust these mappings:

   * Click any field to open a dropdown menu
   * Select the appropriate field name from the list. Repeat this process across each column as needed
   * Click **Next** to finalize your selections.
6. Next, a summary screen will display a preview of your vault, showing the folder structure of your imported records. Here you can adjust the folder structure and click into individual records to preview their details before finalizing the import. Click **Confirm Import** to complete the import process.

{% hint style="warning" %}
Make sure to delete the local StickyPassword file from your computer.
{% endhint %}


# Import from True Key

Instructions on how to import your passwords from True Key to Keeper.

## Export

To import from True Key, you must export your records first.

#### Mac

1. Log into your True Key account.
2. Click on the **Settings icon**.
3. Click **App Settings > Export Data > Export**.

![](/files/-LuZXjRkp6aVhLsxtEKN)

4. After warning appears, click **Continue**.
5. Enter your Master Password.
6. Save the file to your computer.

![](/files/-LuZXtQ5xxthB0zDrLPn)

## Import

1. Log into the Keeper Web Vault or Desktop App.
2. From the **Account Dropdown Menu**, click **Settings**.
3. Click **Import > Import** (next to "Use Another Source") and from the dropdown menu select **True Key**.
4. Drag-and-drop the exported file onto Keeper's "Drop a File Here" window or browse for the file on your computer. Check the box if your file includes column headers, otherwise, the first row will be treated as data.
5. Once you have imported your credentials using one of the methods above, you can customize how you would like the information to appear in your vault in the field mapping screen. Here you'll see standard field names across the top that “map” to the data below for each Keeper record.

   To adjust these mappings:

   * Click any field to open a dropdown menu
   * Select the appropriate field name from the list. Repeat this process across each column as needed
   * Click **Next** to finalize your selections.
6. Next, a summary screen will display a preview of your vault, showing the folder structure of your imported records. Here you can adjust the folder structure and click into individual records to preview their details before finalizing the import. Click **Confirm Import** to complete the import process.

{% hint style="warning" %}
Make sure to delete the local True Key file from your computer.
{% endhint %}


# Import from ZOHO

Instructions on how to import your passwords from ZOHO to Keeper.

## Export

To import from ZOHO, you must export your records first.

1. Log into your ZOHO account.
2. Click the **Tools tab** and choose **Export Secrets** on the left panel.
3. You can either export all the secrets or export only the ones that belong to a particular secret type.
4. Choose **General CSV** and click **Export Secrets**.
5. Save the file to your computer.

![](/files/-LuZdQVBdKyh4lDy9eUB)

## Import

1. Log into the Keeper Web Vault or Desktop App.
2. From the **Account Dropdown Menu**, click **Settings**.
3. Click **Import > Import** (next to "Use Another Source") and from the dropdown menu select **ZOHO**.
4. Drag-and-drop the exported file onto Keeper's "Drop a File Here" window or browse for the file on your computer. Check the box if your file includes column headers, otherwise, the first row will be treated as data.
5. Once you have imported your credentials using one of the methods above, you can customize how you would like the information to appear in your vault in the field mapping screen. Here you'll see standard field names across the top that “map” to the data below for each Keeper record.

   To adjust these mappings:

   * Click any field to open a dropdown menu
   * Select the appropriate field name from the list. Repeat this process across each column as needed
   * Click **Next** to finalize your selections.
6. Next, a summary screen will display a preview of your vault, showing the folder structure of your imported records. Here you can adjust the folder structure and click into individual records to preview their details before finalizing the import. Click **Confirm Import** to complete the import process.

{% hint style="warning" %}
Make sure to delete the local ZOHO file from your computer.
{% endhint %}


# Import from Commander CLI

Automated import through the Keeper Commander CLI

The Keeper Commander SDK provides command-line or scripted capabilities to import records and folders into your Keeper Vault. Supported import formats are below:

* **JSON** import files can contain records, folders, subfolders, shared folders, default folder permissions and user/team permissions
* **CSV** import files contain records, folders, subfolders, shared folders and default shared folder permissions
* **delinea/thycotic** import includes private folders, shared folders, permissions, file attachments, TOTP codes
* **Keepass** files will transfer records, file attachments, folders and subfolders
* **lastpass** file format is supported, however for end-users we recommend the [automated LastPass import method](/keeperpam/commander-cli/command-reference/import-and-export-commands/lastpass-import) which supports folders, shared folders and file attachments.
* **lastpass** full enterprise import supports shared folders
* **myki** import method supports records and folders
* **1password** method supports records, folders and file attachments
* **manageengine** method supports records, folders and file attachments

Most features available in the Keeper Admin Console are available through Commander's interactive shell and SDK interface.

<figure><img src="https://914511346-files.gitbook.io/~/files/v0/b/gitbook-x-prod.appspot.com/o/spaces%2F-LSGVtOTYUIkVBoYtFvK%2Fuploads%2FHKeLdw1f35kQbxKaHrCx%2FScreen%20Shot%202022-09-02%20at%201.32.44%20PM.jpg?alt=media&#x26;token=7ed589f7-8b1d-4c70-bb30-0ab3884ffcae" alt=""><figcaption></figcaption></figure>

{% hint style="info" %}
Learn more about Keeper Commander import methods at [Keeper Commander import and export commands](/keeperpam/commander-cli/command-reference/import-and-export-commands).
{% endhint %}


# Microsoft Store App

This page has moved:

{% content-ref url="/pages/-M4QQUvMx3aqXCB6bDh4" %}
[Web Vault & Desktop App](/user-guides/quick-start-guides/quick-start-guide)
{% endcontent-ref %}


# Vault Export

Export and Reporting Capabilities

The Keeper Web Vault and Desktop application provide export and reporting capabilities. For consumer accounts, this is available for all users. On Enterprise accounts, this may be restricted by the Keeper Administrator.

{% hint style="info" %}
For Enterprise users, role policies must allow export.
{% endhint %}

<figure><img src="https://914511346-files.gitbook.io/~/files/v0/b/gitbook-x-prod.appspot.com/o/spaces%2F-LSGVtOTYUIkVBoYtFvK%2Fuploads%2FprnpCQkjBMbCoWmJa3HN%2FScreenshot%202025-01-19%20at%2012.50.02%E2%80%AFPM.png?alt=media&#x26;token=f10b6794-d67a-4891-a2e1-bfc06b6d6dcf" alt=""><figcaption><p>Access the Export screen from Settings</p></figcaption></figure>

<figure><img src="https://914511346-files.gitbook.io/~/files/v0/b/gitbook-x-prod.appspot.com/o/spaces%2F-LSGVtOTYUIkVBoYtFvK%2Fuploads%2FX5b5PKYFHDQjI10zhIkw%2FScreenshot%202025-01-19%20at%2012.49.34%E2%80%AFPM.png?alt=media&#x26;token=7f4a37d3-a596-4c01-943a-ae5ae3e3ac46" alt=""><figcaption><p>Export Options: CSV, JSON, PDF and KDBX</p></figcaption></figure>

## Export Options

### CSV

Keeper's CSV format supports Folders, Subfolders and Shared Folders. CSV files can be imported and exported with Keeper.

File Format:

***Folder,Title,Login,Password,Website Address,Notes,Shared Folder,Custom Fields***

{% hint style="info" %}
More information about Keeper's CSV format is available [here](/user-guides/import-records-1/import-a-.csv-file).
{% endhint %}

### JSON

The JSON format is structured as an array of Shared Folder objects, and an array of Record objects. The JSON format is compatible with Keeper's import tools and the Keeper Commander CLI.

![](https://914511346-files.gitbook.io/~/files/v0/b/gitbook-legacy-files/o/assets%2F-LSGVtOTYUIkVBoYtFvK%2F-MVKNN03_3rrs3wrpVvT%2F-MVKO2tPqOamPgdl0IoJ%2FScreen%20Shot%202021-03-08%20at%209.08.18%20PM.png?alt=media\&token=d3bc36c1-d5e4-46ab-bbac-93d8584f5df6)

{% hint style="info" %}
More information about Keeper's JSON format is available [here](/user-guides/import-records-1/import-json).
{% endhint %}

### PDF

For a printer-friendly version of records, the PDF version is also available.

![PDF Version](https://914511346-files.gitbook.io/~/files/v0/b/gitbook-legacy-files/o/assets%2F-LSGVtOTYUIkVBoYtFvK%2F-MVKNN03_3rrs3wrpVvT%2F-MVKOJA9o2-btdMRv1ut%2FScreen%20Shot%202021-03-08%20at%208.54.09%20PM.png?alt=media\&token=72f55b71-29f2-419a-82f3-dd1a5961c2ba)

To print the PDF, click on the printer icon at the bottom:

![Print the PDF output](https://914511346-files.gitbook.io/~/files/v0/b/gitbook-legacy-files/o/assets%2F-LSGVtOTYUIkVBoYtFvK%2F-MVKNN03_3rrs3wrpVvT%2F-MVKOVS2lBNdtmJEYBYL%2FScreen%20Shot%202021-03-08%20at%208.54.41%20PM.png?alt=media\&token=b93fae42-ceeb-47d4-a9b5-eb738db9852f)

### Encrypted Keepass (.kdbx)

#### Web Vault and Desktop App

Keeper supports encrypted KeePass export through the Web Vault, Keeper Desktop application and Keeper Commander CLI which is available to all customers.

From the Web Vault and Desktop App, select KDBX export format and you'll be asked to provide the desired KeePass Master Password. You can also provide a Key File to encrypt the KeePass file. The Master Password you provide here is used to encrypt the KeePass file - this is NOT your Keeper Master Password.

<figure><img src="https://914511346-files.gitbook.io/~/files/v0/b/gitbook-x-prod.appspot.com/o/spaces%2F-LSGVtOTYUIkVBoYtFvK%2Fuploads%2FUNwhcubdzGnF8Ppeetpw%2FScreenshot%202025-01-19%20at%2012.51.35%E2%80%AFPM.png?alt=media&#x26;token=c2aebe1f-4dbb-4d6a-af37-3ffdf81df1c5" alt=""><figcaption><p>KeePass File Credentials</p></figcaption></figure>

#### Commander

Keeper Commander, our Command-line CLI and SDK platform also provides a flexible KeePass export option.

To install Keeper Commander, visit this [link](/keeperpam/commander-cli/overview).

The command to run is the export command, documented at this [link](/keeperpam/commander-cli/command-reference/import-and-export-commands#export-command).

<figure><img src="https://914511346-files.gitbook.io/~/files/v0/b/gitbook-x-prod.appspot.com/o/spaces%2F-LSGVtOTYUIkVBoYtFvK%2Fuploads%2FwyY55Rwh2OJbI69cC0q2%2FScreenshot%202024-07-21%20at%2011.29.03%E2%80%AFAM.png?alt=media&#x26;token=a0a56e03-c477-4998-aa4c-c2d2d081ba35" alt=""><figcaption><p>Export with Keeper Commander CLI</p></figcaption></figure>


# Shared Records Report

Audit your Shared Records

Keeper's **Shared Records Report** is available from the Settings menu of the Web Vault and Desktop App.

{% hint style="info" %}
For Enterprise users, role policies must allow export.
{% endhint %}

The Shared Records Report provides you with an audit of each shared record (either direct share, or shared folder). The export contains the following fields:

* Record UID
* Record Title
* Shared To (email)
* Shared From (Shared Folder or Direct Share)
* Permissions (Read Only, Can Edit, Can Edit and Share)
* Folder Path

![Access from Settings](/files/-MVKM44EUP53WG9-HYID)

![Shared Records Report](/files/-MVKVue346K4HrM7Ox_s)

## Export Options

### CSV

File Format:

***Record UID,Record Title,Shared To,Shared From,Permissions,Folder Path***

### JSON

The JSON format is structured as an array of shared\_record objects.

![JSON Format](/files/-MVKXXkKsn7YY66Zl2pg)

### PDF

For a printer-friendly version of the report, the PDF version is also available.

![](/files/-MVKXkGLAaFKUtq42xM9)

To print the PDF, click on the printer icon at the bottom:

![Print PDF](/files/-MVKXvHGY_Sa5Sr1penr)

## Commander

Commander also provides a CLI for the Shared Records Report:\
\
Command: **shared-records-report** (or "**srr**")

```
My Vault> shared-records-report -h                                                                                                                                                                       
usage: shared-records-report|srr [-h] [--format {json,csv,table}] [name]

Report shared records for a logged-in user.

positional arguments:
  name                  file name

optional arguments:
  -h, --help            show this help message and exit
  --format {json,csv,table}
                        Data format output

```

Example output:

![](/files/-MVOGBILyt7KYHUoJ0mw)

## Admin-Level Access Permissions Report

For Enterprise customers, we provide an advanced enterprise-wide Access Report through the Keeper Compliance Reports feature.

Compliance Reports provide on-demand visibility to access permissions on records and credentials in your enterprise. These reports simplify the compliance auditing process for Sarbanes Oxley (SOX) and other regulations requiring periodic access control auditing.

To learn more about Keeper Compliance Reports, click here:

[Compliance Reports](/enterprise-guide/compliance-reports)


# Keeper Enterprise and MSP Guide

Keeper is the unified control plane for identity security - protecting every privileged action, secret, and machine identity in a zero-trust / zero-knowledge, AI-driven world.

<figure><img src="/files/OrKVCh5LIqAB4RAneDLR" alt=""><figcaption></figcaption></figure>

Congratulations on your decision to deploy Keeper to protect your organization. This guide will provide valuable information on how to onboard your users, deploy the application to end-user devices and manage the platform.

## Platform Overview

Keeper's platform provides the following high level capabilities:

* Password Management
* Privileged Session Management
* Endpoint Privilege Management
* Secrets Management
* Database Access Management
* Zero Trust Network Access
* Secure Vendor Access
* OT Security
* Remote Browser Isolation
* Admin Console
* Control Plane

## About this Guide

This Keeper Enterprise guide covers the deployment of the core password management platform to your users. Additional guides and documentation of advanced privileged access capabilities are covered in later sections.

Keeper’s platform:

* Provides each employee with a secure, encrypted digital vault in which to store their passwords, passkeys, files and other sensitive data. Employees can access their vault from any device and from all web browsers, automatically generate unique, complex passwords for all their accounts, and automatically fill their login credentials into all of their sites and apps.
* Provides IT administrators complete visibility into employee password practices, enabling them to monitor password use and enforce password security policies across the entire organization, including password complexity requirements, multi-factor authentication (MFA), role-based access control (RBAC), and other security policies.
* Provides DevOps and engineering teams with a fully managed cloud-based, zero-knowledge Secrets Management platform for securing infrastructure secrets such as privileged accounts, API keys, database passwords, access keys, certificates and any type of confidential data.
* Provides privileged session management through agentless connections, tunneling, remote browser isolation, and web-based access - with full session monitoring and recording across cloud and on-premise resources.


# Start Your Trial

This guide will help get your free trial up and running with Keeper Business, Enterprise or MSP.

Keeper Security provides customers with a fully functional trial version that provides all of the capabilities available in the Keeper platform including:

* Password Management
* Secrets Management
* Privileged Access Management
* To create your Keeper Enterprise or Keeper MSP Trial version, visit this page:\
  [https://keepersecurity.com/password-manager-free-trial-sign-up.html](https://www.keepersecurity.com/start-business-trial.html)<br>
* Or click on "**Try it Free**" from our homepage at:\
  <https://keepersecurity.com>

<figure><img src="/files/ZEbdQWznADBoWxXfr6qA" alt=""><figcaption></figcaption></figure>

* Select **Business and Enterprise** or **MSPs** version
* Fill out the form using your Business email address, and click **Start Free Trial**.

<figure><img src="/files/T1w0L7Buph8kgzCSL1Zx" alt=""><figcaption><p>Start Free Trial</p></figcaption></figure>

* On the next screen, you'll create your account (or if you're using an existing Keeper personal email address, you can select "Use an Existing Account").

{% hint style="warning" %}
**Important:** At this step, please ensure that you select your desired Geographic Data Center location.

* US, EU, AU, CA, JP data center locations are available.
* US GovCloud (FedRAMP Compliant) region is available on request.
  {% endhint %}

![](/files/-MctSjYwS5b7Kw3FJ3bW)

![](/files/-MctStsXFDIb4b4TvPcX)

{% hint style="info" %}
If you select the wrong data center region, please contact support to delete your trial and start over.
{% endhint %}

**(5)** Select your Administrator account Master Password. &#x20;

* Select your Administrator account Master Password. &#x20;

![Keeper Master Password](/files/-MTiQdhq5Sh4PssCDDlK)

Ensure you select a strong Master Password that is only used for managing Keeper. If you forget your Master Password, Keeper support cannot perform a password reset due to our Zero Knowledge architecture. We recommend activating Account Recovery (via a recovery phrase) after logging in and visiting the Settings screen.

**(6)** After verifying your email address and selecting a Master Password, you will be logged into the Keeper Admin Console.  Click on "**Admin**" to add users and begin your configuration.

* After verifying your email address and selecting a Master Password, you will be logged into the Keeper Admin Console.  Click on "**Admin**" to add users and begin your configuration.

![Admin Setup](/files/-MTiPLH8D9S0sWojyFX3)

* Click on "**Add Users**" to invite other users for your trial, or to set up additional admin accounts. Users who are manually invited will login with a self-selected Master Password.

![Add Users](/files/-MTiPP4EBocuiTktAR89)

* Proceed through this Enterprise Guide to learn about best practices for deploying Keeper, Single Sign On ("SSO") integration, Role enforcement policies, Teams, Advanced Administration and other important topics.


---

[Next Page](/llms-full.txt/1)