> For the complete documentation index, see [llms.txt](https://docs.keeper.io/llms.txt). Markdown versions of documentation pages are available by appending `.md` to page URLs; this page is available as [Markdown](https://docs.keeper.io/sso-connect-cloud/device-approvals/automator/azure-container-app.md).
# Azure Container App
Simple Deployment with Azure Container App
## Overview
This guide provides step-by-step instructions to publish Keeper Automator to the Azure Container App service. This provides a simple and straightforward way to host the Automator service in the cloud.
{% hint style="info" %}
For environments such as **Azure Government**, **GCC High** and **DoD**, use the [Azure App Services method](/sso-connect-cloud/device-approvals/automator/azure-app-services.md), since the Azure Container App service may not be available in those regions.
{% endhint %}
### (1) Create an Automator Config key
Open a command line interface and generate a 256-bit AES key in URL-encoded format using one of the methods below, depending on your operating system:
#### Generate a Key
{% tabs %}
{% tab title="Mac/Linux" %}
```
openssl rand -base64 32
```
{% endtab %}
{% tab title="Windows (PowerShell)" %}
```powershell
[Byte[]]$key = New-Object Byte[] 32; [System.Security.Cryptography.RNGCryptoServiceProvider]::Create().GetBytes($key); [System.Convert]::ToBase64String($key)
```
{% endtab %}
{% endtabs %}
Save the resulting value produced by this command for **Step (3)**.
Example of generated key value in Mac/Linux
Example of generated key value in PowerShell
{% hint style="info" %}
### AUTOMATOR\_CONFIG\_KEY provides stable encryption key material. It does not replace Automator’s saved configuration. The /usr/mybin/config directory must use persistent storage.
{% endhint %}
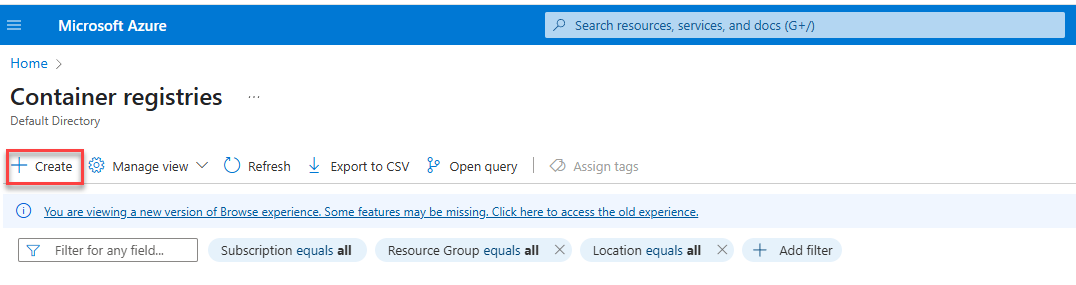
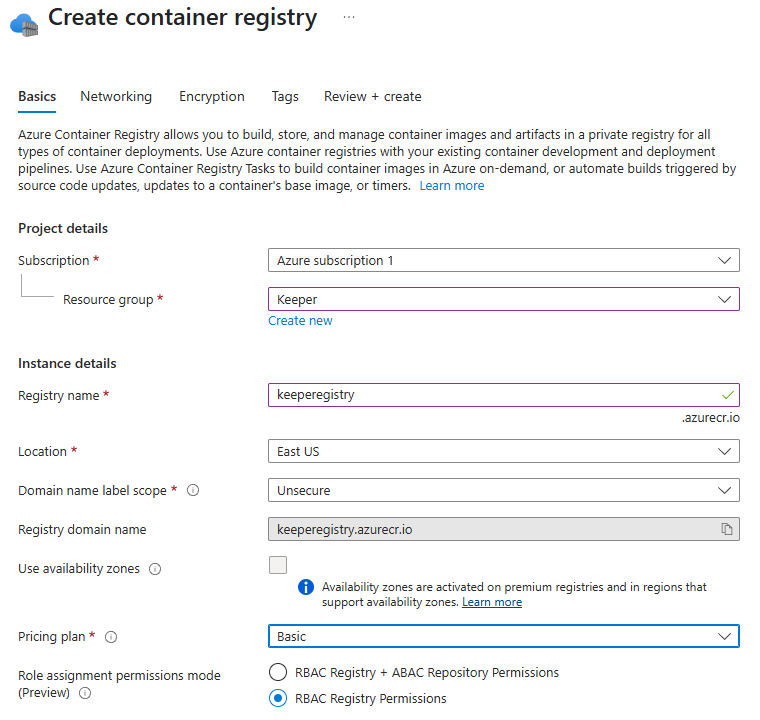
### (2) Create a Container Registry
If you do not already have a container registry, you must create one and configure as you see fit, see the example below.
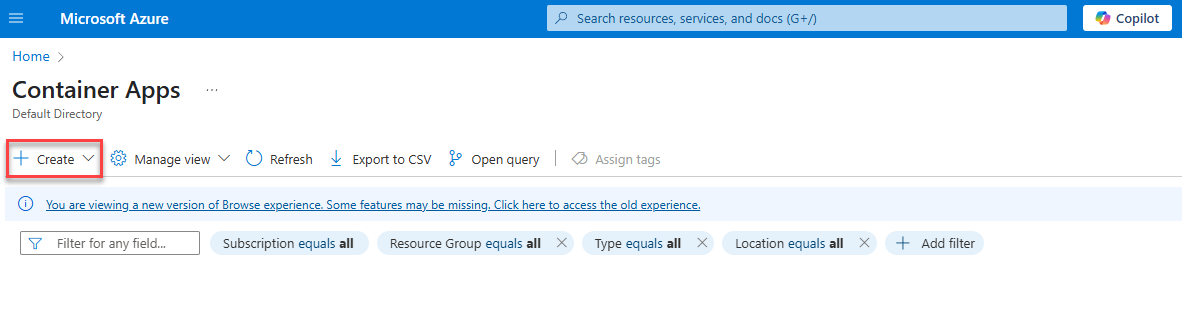
### (3) Create a Container App
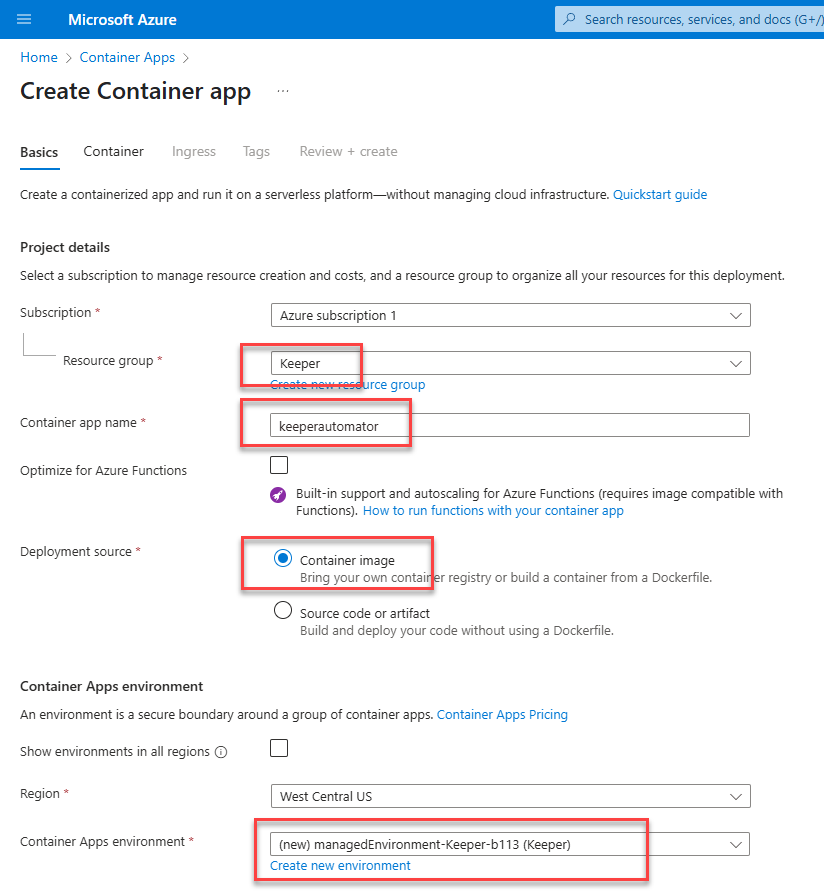
From Azure, create a new Container App.
* Select or create a new Resource Group
* Set the Container App Name to "keeperautomator" or whatever you prefer
* Select "**Container Image**" as the Deployment Source
* Select the region where you would like the service hosted
* Create a new Apps Environment or select an existing environment
* Click "**Next: Container"**
### (4) Setup Container Details
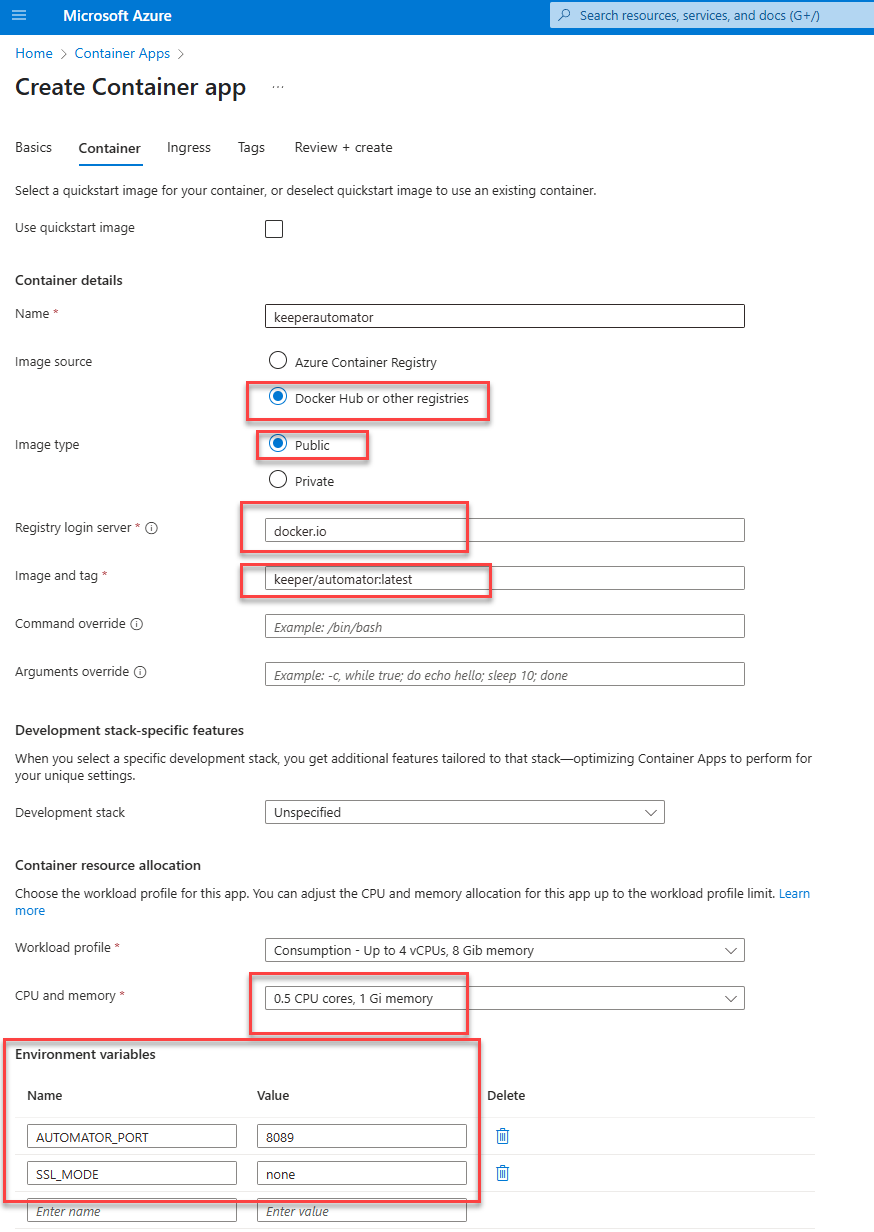
In the "Container" step, make the following selections:
* Uncheck the "**Use quickstart image**"
* Select "**Docker Hub or other registries**"
* Select "**Public**"
* Select Registry login server as **`docker.io`**
* Set the Image and tag as **`keeper/automator:latest`**
* Skip to "Container resource allocation"
* For CPU and Memory, **0.5 CPU** cores and **1Gi** memory is sufficient, but this can be updated based on your volume of new device logins.
* Create an environment variable called **`AUTOMATOR_CONFIG_KEY`** with the value from Step 1 above of the setup guide.
* Create an environment variable called **`AUTOMATOR_PORT`** with the value of **`8089`**
* Create an environment variable called **`SSL_MODE`** with the value of **`none`**
* Click "**Next : Ingress >"**
### (5) Ingress Setup
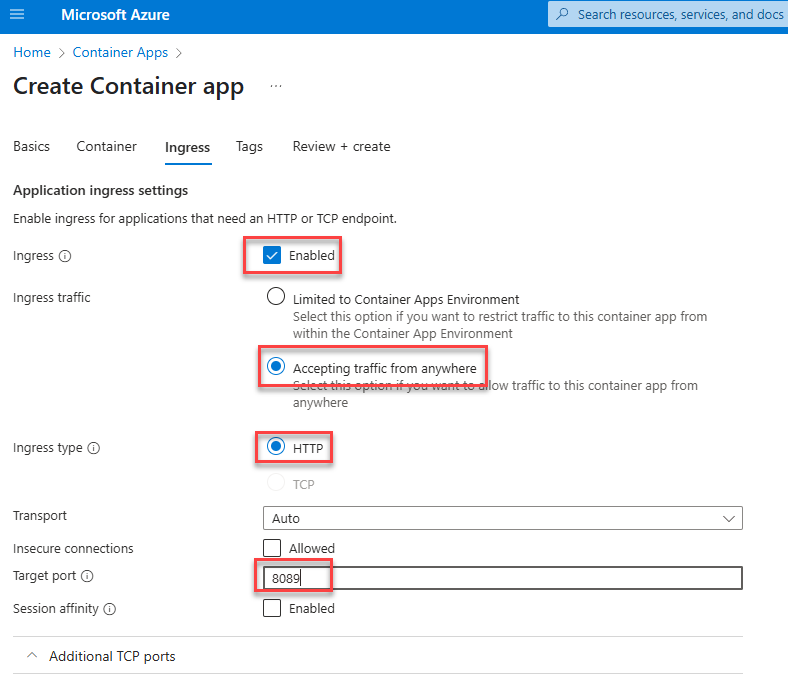
On the Ingress setup screen, select the following:
* Enable "**Ingress**"
* For Ingress traffic, select "**Accepting traffic from anywhere"** (we'll modify this in a later step)
* For Ingress type, select "**HTTP**"
* Set Target port to "**8089"**
### (6) Create Container App
Click "**Review + Create"** > "**Create"**
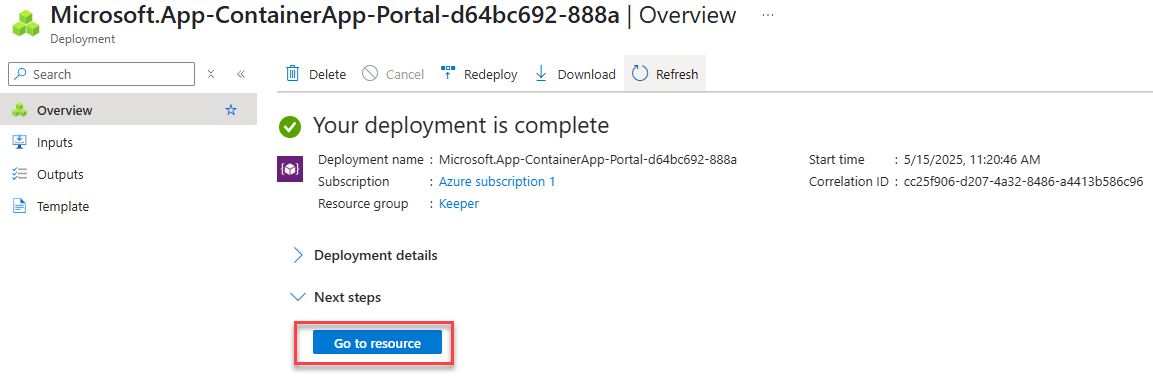
After a few minutes, the container app will be created and automatically start up.
Clicking on "**Go to Resource**" will take you to the container environment.
### (7) Finish the Ingress Setup
{% hint style="danger" %}
**Important**: The Keeper Automator service must be deployed with [inbound firewall rules](/sso-connect-cloud/device-approvals/automator/ingress-requirements.md) to ensure that all inbound traffic is restricted to **ONLY** Keeper's infrastructure.
{% endhint %}
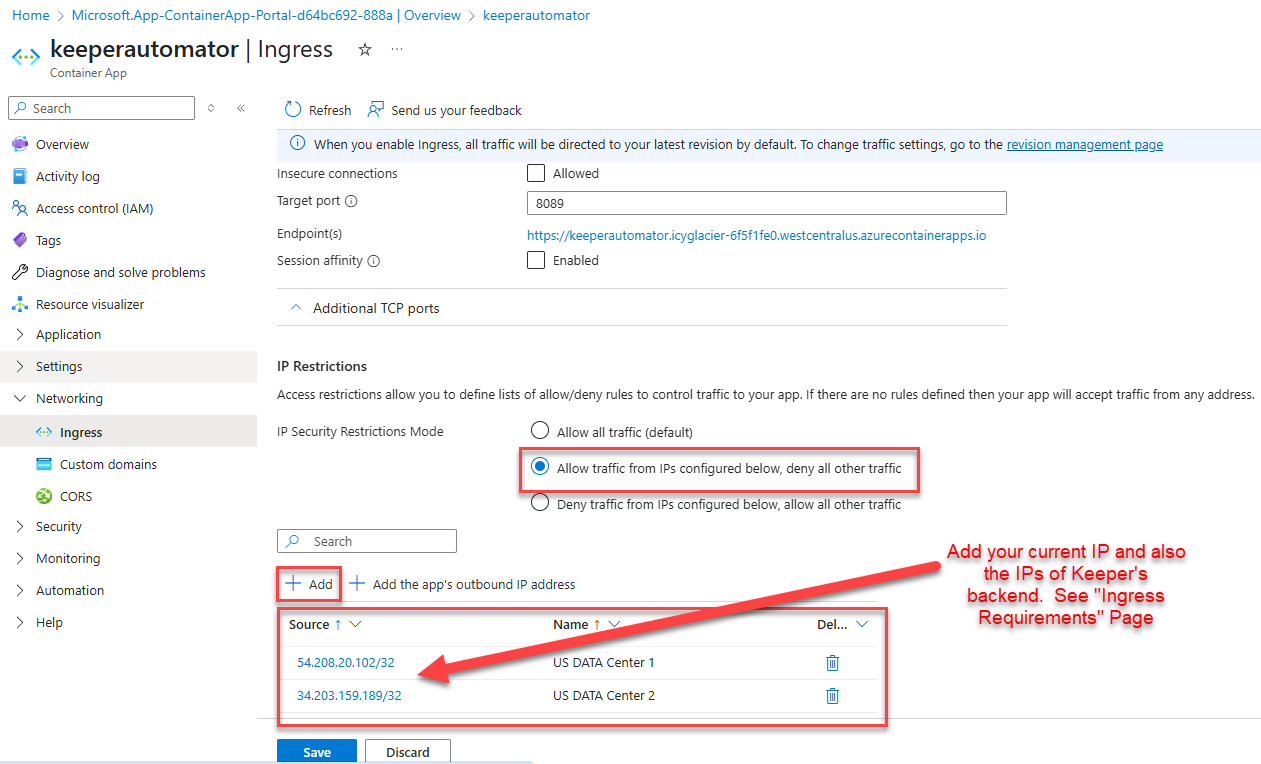
To restrict communications to the Keeper Automator service, click on the "Ingress" link on the left side of the screen under the "Network" section.
* Click on "**Ingress"**
* Select "**Allow traffic from IPs configured below, deny all other traffic**"
* Click "**Add**" to add [Keeper's IPs](/sso-connect-cloud/device-approvals/automator/ingress-requirements.md) as [documented here](/sso-connect-cloud/device-approvals/automator/ingress-requirements.md)
* Click "**Save"**
{% hint style="info" %}
If you want to be able to run a health check, then consider adding your own IP address. Find your IP address at
{% endhint %}
### (8) Set Scaling
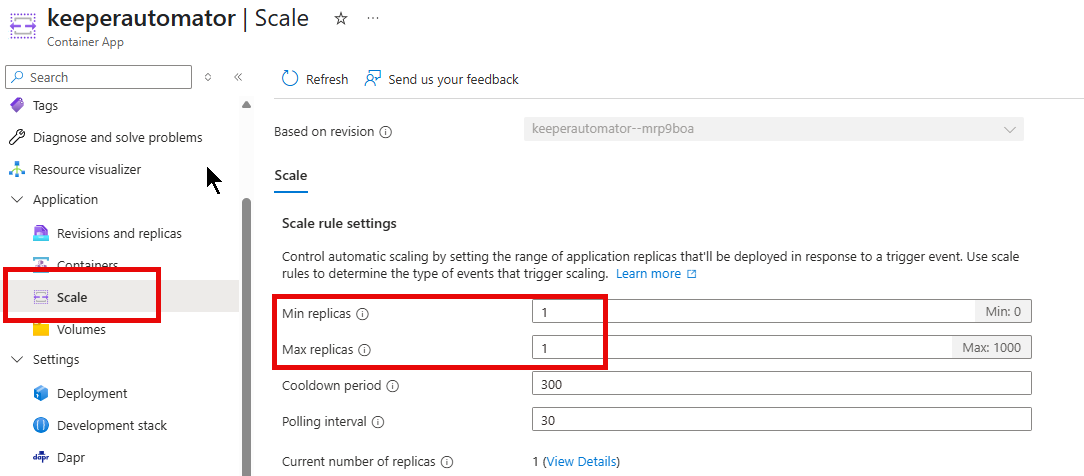
* Select "**Application > Scale**" and set min and max replicas to "**1**"
* Click "**Save as a new revision**"
### (9) Create or Select Azure Storage
{% hint style="warning" %}
Do not use Ephemeral Storage for /usr/mybin/config. If Automator loses this storage, device approval may fail and recovery may require automator setup and automator init. See [Troubleshooting](https://docs.keeper.io/sso-connect-cloud/device-approvals/automator/troubleshooting).
{% endhint %}
{% hint style="info" %}
If your organization already has a suitable storage account in the same Azure region, use that account and skip to Create the File Share - be sure to copy the access key from the storage account for step 11.
{% endhint %}
* Open the Storage accounts in the Azure Portal.
* Click "**Create"**.
* Select the same resource group and region as the Container Apps environment
* Select the redundancy, billing, and access tier required by your organization - what is shown is the minimum.
* Create the storage account - remaining default options are acceptable, but if additional hardening is required by your organization follow those policies
* In the storage account select "**Security + networking > Access keys**"
* Click "**Show"** next to "key1" and copy the Key value (Save this for step 11)
{% hint style="info" %}
For a Container Apps environment without custom VNet integration, leave the storage account public network access enabled so Azure Container Apps can mount the Azure Files share.
For production environments that require private storage access, configure the Container Apps environment with a custom VNet and restrict the storage account to the approved VNet or private endpoint. This requires additional Azure networking configuration.
{% endhint %}
### (10) Create the File Share
* Open the storage account
* Select "**Data Storage > Classic file share**"
* Click + "**Classic file Share"**
* Create a share for Automator configuration
* Use the smallest provisioned storage value allowed by the selected Azure Files configuration. The portal may require a larger minimum, such as 32 GiB. This share stores Automator config files and logs. Configure Backup according to your organization's policy.
### (11) Register the Azure Files Share
* Open your Container App (e.g., `keeperautomator`) in the Azure Portal.
* On the Overview page, in the Essentials section at the top, find "**Container Apps Environment**" and click the environment name link. This opens the environment resource.
* *Alternatively*: in the Azure Portal search bar at the top, search for “Container Apps Environments”, open the service, and select the environment created in Step 3.
* *Tip*: the environment is a separate resource in the same resource group, with the resource type “Container Apps Environment”.
* Select "**Settings > Volume mounts**"
* Click "**Add > Server Message Block (SMB)**"
* Provide a `Name`, the previously selected/created `Storage account name`, the previously saved `Storage account key`, and a `File share name`.
### (12) Attach Storage to Container App
* Back in the container app configuration, under Application > Volumes click 'Add'
* Select Azure file volume, and select the previously created file share name
* Click 'Save as a new revision'
### (13) Set up Health Probes and Volume Mount
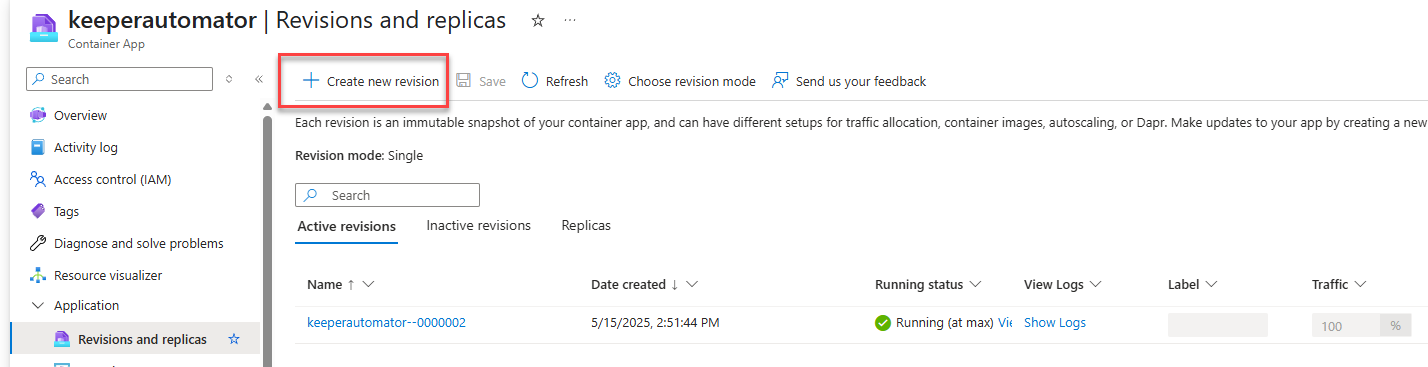
* Navigate to the "**Application > Revisions and Replicas**" section
* Click on "**Create new revision**"
* Click on "**Application > Revisions**" and replicas an observe a new revision being activated
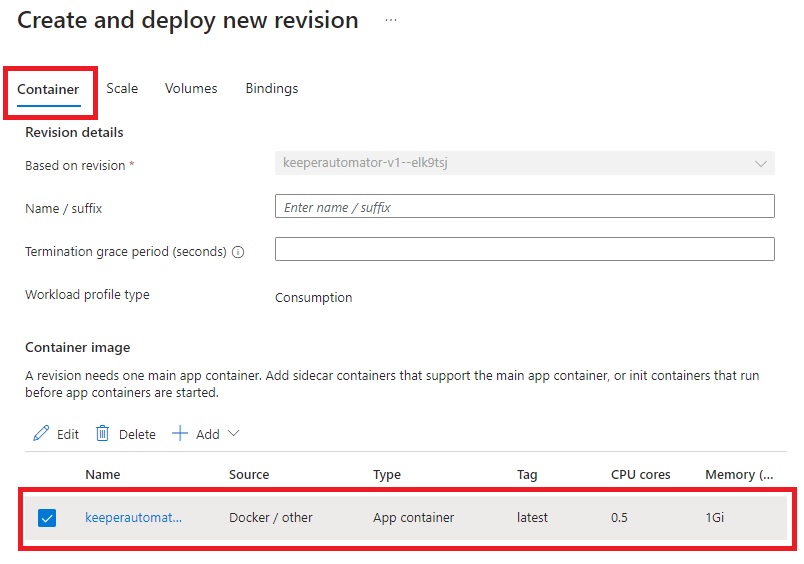
* Next, click on the "**Container**" tab
* Click on the container image name link, in this case "**keeperautomator**" at the bottom
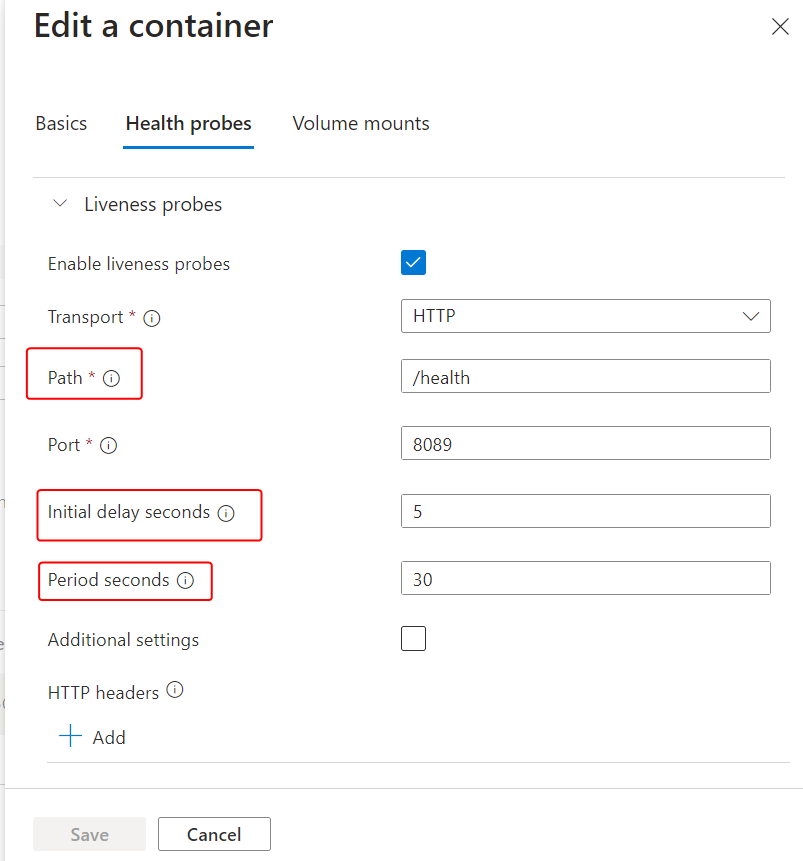
Navigate to Health Probes and enter the following under each section:
Under "Liveness probes"
* Enable "liveness probes"
* Transport: **HTTP**
* Path: **/health**
* Port: **8089**
* Initial delay seconds: **5**
* Period seconds: **30**
Liveness probes
Under "Startup probes":
* Enable startup probes
* Transport: HTTP
* Path: /health
* Port: 8089
* Initial delay seconds: 5
* Period seconds: 30
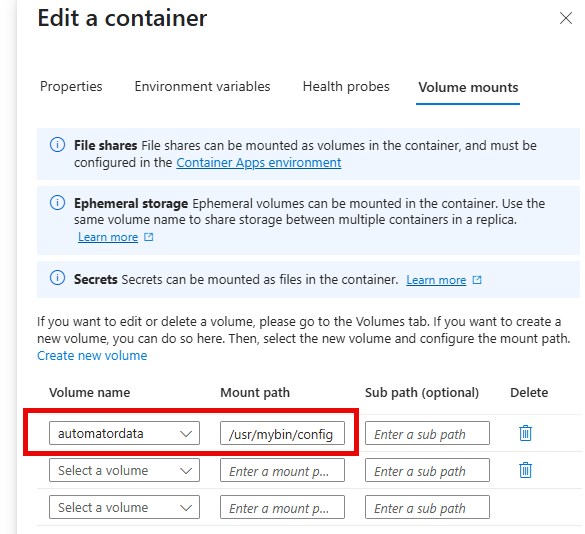
Under "Volume Mounts" tab:
* Select "**+ Add**"
* Select the volume you created in a previous step and Add Mount Path as "/usr/mybin/config"
**Finish the configuration**
* Click on "**Save**"
* Then click on "**Create**" to build the new configuration
* After a few minutes, the new containers should start up
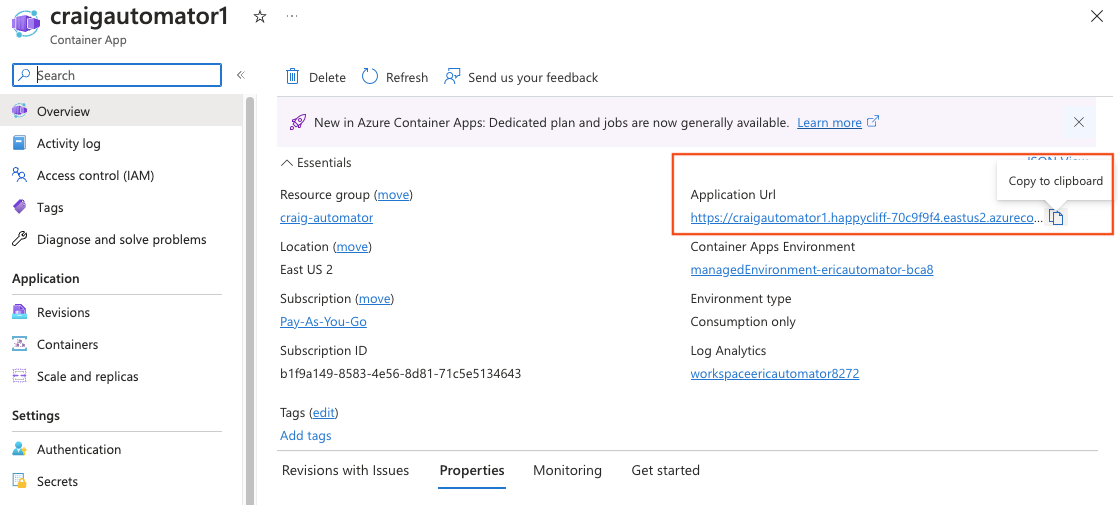
### (14) Retrieve the Application URL
* Wait until the revision is done activating.
* From the Overview section of the Container App, on the right side is the "Application URL" that was assigned. Copy that and use this Application URL in the next step. For example: -1234.azurecontainerapps.io
Retrieve the Application URL
### (15) Login to Keeper Commander
Keeper Commander is required to perform the final step of Automator configuration. This can be run from anywhere, it does not need to be installed on the server.
On your workstation or server, install Keeper Commander CLI. The installation instructions including binary installers are [here](/keeperpam/commander-cli/commander-installation-setup.md).\
\
After Commander is installed, launch Keeper Commander, or from an existing terminal you can type `keeper shell` to open the session, then login using the `login` command. In order to set up Automator, you must login as a Keeper Administrator, or an Admin with the ability to manage the SSO node.
```
$ keeper shell
My Vault> login admin@company.com
_ __
| |/ /___ ___ _ __ ___ _ _
| '
```
### (16) Create the Automator
Create the Automator using a series of commands, starting with `automator create` with your node name.
```
My Vault> automator create --name "My Automator" --node "Azure Cloud"
```
The Node Name (in this case "Azure Cloud") comes from the Admin Console UI as seen below.

The output of the command will display the Automator settings, including metadata from the identity provider.
```
Automator ID: 1477468749950
Name: My Automator
URL:
Enabled: No
Initialized: No
Skills: Device Approval
```
Note that the "URL" is not populated yet. This is the Application URL from Step 8.
Run the "automator edit" command as displayed below, which sets the URL and also sets up the skills (`team`, `team_for_user` and `device`).
{% code overflow="wrap" %}
```
automator edit --url https:// --skill=team --skill=team_for_user --skill=device "My Automator"
```
{% endcode %}
Next we exchange keys: The enterprise private key encrypted with the Automator public key is provided to Automator:
```
automator setup "My Automator"
```
Initialize the Automator with the new configuration
```
automator init "My Automator"
```
Enable the service
```
automator enable "My Automator"
```
At this point, the configuration is complete.
For external health checks, you can use the below URL:
https\://\/health
Example `curl` command:
```
$ curl https://craigautomator1.xyz.azurecontainerapps.io/health
OK
```
### Testing the User Experience
Now that Keeper Automator is deployed, you can test the end-user experience. No prompts for approval will be required after the user authenticates with the SSO identity provider.
The easiest way to test is to open an incognito mode window to the Keeper Web Vault and login with SSO Cloud. You will not be prompted for device approval.
### Advanced
Azure Container Apps have many advanced capabilities that are beyond the scope of this documentation. A few of the capabilities are provided below.
#### Scaling with Multiple Containers
If you would like to have multiple containers running the Keeper Automator service:
* Click on "**Scale and replicas**"
* Click "**Edit and deploy**"
* Click on the "**Scale**" tab
* Select the min and max number of containers. The minimum should be at least 1.
* Click **Create**
* After a minute, the new version will deploy
* Run `automator setup xxx` multiple times (one for each container)
* Run `automator init xxx` multiple times (one for each container)
#### Logging
The Keeper Automator logs can be viewed and monitored using the "Console" or "Log stream" section.
For example, to tail the log file of a running Automator service:
* Click on Console
* Select "/bin/sh"
* Click Connect
* At the prompt, type: `tail -f logs/keeper-automator.log`
#### Advanced Settings
Environment variables can be passed into the Container to turn on/off features of the runtime environment. The variables with their description can be found at the [Advanced Settings](/sso-connect-cloud/device-approvals/automator/advanced-settings.md) page.
---
# Agent Instructions
This documentation is published with GitBook. GitBook is the documentation platform designed so that both humans and AI agents can read, navigate, and reason over technical content effectively. Learn more at gitbook.com.
## Querying This Documentation
If you need additional information that is not directly available in this page, you can query the documentation by asking a question.
Perform an HTTP GET request on the following URL with the `ask` and `goal` query parameters:
```
GET https://docs.keeper.io/sso-connect-cloud/device-approvals/automator/azure-container-app.md?ask=&goal=
```
`ask` is the immediate question: it should be specific, self-contained, and written in natural language.
`goal` is what the user is ultimately trying to achieve, the reason they need the answer. Sharing it helps GitBook give you a better, more relevant answer. A goal is most helpful when it describes the outcome the user wants rather than restating the question. For example, with `ask=how do I create an API token`, a goal like `automate deployments from our CI pipeline` lets GitBook tailor the answer to that use case.
The response will contain a direct answer to the question and relevant excerpts and sources from the documentation.
Use this mechanism when the answer is not explicitly present in the current page, you need clarification or additional context, or you want to retrieve related documentation sections.