> For the complete documentation index, see [llms.txt](https://docs.keeper.io/llms.txt). Markdown versions of documentation pages are available by appending `.md` to page URLs; this page is available as [Markdown](https://docs.keeper.io/sso-connect-cloud/jp/device-approvals/automator/kubernetes-service.md).

# Kubernetesサービス

<figure><img src="https://1914737032-files.gitbook.io/~/files/v0/b/gitbook-x-prod.appspot.com/o/spaces%2F-Mfd2v-YT48Ljtykb8qm%2Fuploads%2FR1un6KfIP3dOW7EodsGK%2FKubernetes.jpg?alt=media&#x26;token=5fe7aaf2-8c13-4c35-a376-d80fec564888" alt=""><figcaption></figcaption></figure>

本ページでは、KeeperオートメーターをKubernetesサービスとして公開する手順を取り扱います。

{% hint style="info" %}
SSL証明書がすでに用意できていることをご確認ください。用意できていない場合は、[SSL証明書作成](/sso-connect-cloud/jp/device-approvals/automator/custom-ssl-certificate.md)のページの手順をご参照ください。
{% endhint %}

### 1. Kubernetesをセットアップ

Kubernetesのインストールとデプロイは本ページの主題ではありませんが、デモ目的で、プラットフォームに依存しない2つのEC2インスタンス (マスターとワーカー) を使用する非常に基本的な単一ノード環境について記載しています。K8環境がすでに整っている場合は、[手順2](#2-create-a-kubernetes-secret)へお進みください。

#### **Dockerのセットアップ**

Kubernetesはコンテナランタイムを必要とするため、Dockerを使用します。

```sql
sudo yum update -y
sudo yum install -y docker
sudo systemctl enable docker
sudo systemctl start docker
```

#### **kubeadm、kubelet、kubectlをインストール**

これらのパッケージは、マスターノードとワーカーノードの両方にインストールする必要があります。今回の例ではAWS Amazon Linux 2インスタンスタイプを使用しています。

```shell
cat <<EOF | sudo tee /etc/yum.repos.d/kubernetes.repo
[kubernetes]
name=Kubernetes
baseurl=https://pkgs.k8s.io/core:/stable:/v1.28/rpm/
enabled=1
gpgcheck=1
gpgkey=https://pkgs.k8s.io/core:/stable:/v1.28/rpm/repodata/repomd.xml.key
exclude=kubelet kubeadm kubectl cri-tools kubernetes-cni
EOF

sudo setenforce 0
sudo sed -i 's/^SELINUX=enforcing$/SELINUX=permissive/' /etc/selinux/config

sudo yum install -y kubelet kubeadm kubectl --disableexcludes=kubernetes

sudo systemctl enable --now kubelet
```

#### **マスターノードを初期化**

マスターノードとして使用するマシンで、以下を実行します。

```shell
sudo kubeadm init --pod-network-cidr=10.244.0.0/16
```

`--pod-network-cidr` 引数は、特定のネットワークプロバイダーで必要となります。ポッドに設定するIP範囲を置き換えてください。

`kubeadm init` が完了すると、ワーカーノードをマスターに参加させるために使用できるコマンドが表示されます。レスポンスと初期化コードをメモして、以下の手順で使用できるようにします。

ローカルのkubeconfigをセットアップします。

```shell
mkdir -p $HOME/.kube
sudo cp -i /etc/kubernetes/admin.conf $HOME/.kube/config
sudo chown $(id -u):$(id -g) $HOME/.kube/config
```

#### **ポッドネットワークをインストール**

クラスターが機能する前にポッドネットワークをインストールする必要があります。簡単に `flannel` を使用できます。

{% code overflow="wrap" %}

```shell
kubectl apply -f https://raw.githubusercontent.com/coreos/flannel/master/Documentation/kube-flannel.yml
```

{% endcode %}

#### **ワーカーノードを参加させる**

ワーカーノードとして追加する各マシンで、初期化コードを含む以下のコマンドを実行します。

```shell
sudo kubeadm join [your code from kubeadm init command]
```

セキュリティグループ内のワーカーノードとマスターノードの間でポート6443が開いている必要があります。

ワーカーが参加した後、Kubernetesクラスターが稼働します。マスター上で `kubectl get nodes` を実行すると、ノードのステータスを確認できます。

### 2. Kubernetes Secretを作成 <a href="#id-2-create-a-kubernetes-secret" id="id-2-create-a-kubernetes-secret"></a>

**AUTOMATOR\_CONFIG\_KEYの生成**

`AUTOMATOR_CONFIG_KEY` を設定すると、起動時に暗号キーがランダムに生成されるのではなく、その値から導出されます。ポッドを再起動しても同じキーが復元されるため、コマンダーで構成し直さなくても、Keeperクラウドの構成は有効なままです。

256ビットのキーを生成します。

```shell
openssl rand -base64 32
```

出力を保存してください。この値は、以下の手順でKubernetes Secretとして登録します。

**Secretの作成**

KeeperオートメーターのSSL証明書は、SecretとしてKubernetesサービスに登録します。[SSL証明書作成](/sso-connect-cloud/jp/device-approvals/automator/custom-ssl-certificate.md)のページで作成したSSL証明書とSSL証明書パスワードを保存するには、以下のコマンドを実行します。

```bash
kubectl create secret generic certificate-secret --from-file=ssl-certificate.pfx --from-file=ssl-certificate-password.txt
```

構成キーは証明書とは別のSecretに格納します。証明書とは独立して管理できます。

```bash
kubectl create secret generic automator-config-key --from-literal=AUTOMATOR_CONFIG_KEY='<your-generated-key>'
```

### 3. マニフェストを作成

以下は、`automator-deployment.yaml` として保存できるマニフェストファイルです。デプロイメントリソースとサービスリソースの両方の設定が含まれています。

* デプロイメントリソースはKeeperオートメーターDockerコンテナを実行します
* SSL証明書と証明書パスワードファイルは、マウントされたSecretとして参照されます
* Secretは初期化コンテナ内のポッドにコピーされます
* コンテナには、前の手順で作成したSecretから読み取った `AUTOMATOR_CONFIG_KEY` を環境変数として渡します
* オートメーターサービスはポート30000でリッスンし、コンテナーのポート443にルーティングします
* 本手順では、単一のコンテナ (`replicas: 1`) のみをデプロイしてコンテナを設定できるようにします。最後の手順でreplicasの数を増やします

{% code overflow="wrap" lineNumbers="true" fullWidth="false" %}

```yaml
apiVersion: apps/v1
kind: Deployment
metadata:
  name: automator-deployment
spec:
  replicas: 1
  selector:
    matchLabels:
      app: automator
  template:
    metadata:
      labels:
        app: automator
    spec:
      initContainers:
        - name: init-container
          image: busybox
          command: ['sh', '-c', 'cp /secrets/* /usr/mybin/config']
          volumeMounts:
            - name: secret-volume
              mountPath: /secrets
            - name: config-volume
              mountPath: /usr/mybin/config
      containers:
        - name: automator
          image: keeper/automator:latest
          env:
            - name: AUTOMATOR_CONFIG_KEY
              valueFrom:
                secretKeyRef:
                  name: automator-config-key
                  key: AUTOMATOR_CONFIG_KEY
          ports:
            - containerPort: 443
          volumeMounts:
            - name: config-volume
              mountPath: /usr/mybin/config
      volumes:
        - name: config-volume
          emptyDir: {}
        - name: secret-volume
          secret:
            secretName: certificate-secret
            items:
              - key: ssl-certificate.pfx
                path: ssl-certificate.pfx
              - key: ssl-certificate-password.txt
                path: ssl-certificate-password.txt
---
apiVersion: v1
kind: Service
metadata:
  name: automator-service
spec:
  type: NodePort
  ports:
  - port: 443
    targetPort: 443
    protocol: TCP
    nodePort: 30000
  selector:
    app: automator
```

{% endcode %}

本例では `NodePort` サービスを使用しているため、ノードのポート30000にアクセスできる必要があります。クラスターの構成や公開方法に応じて、`LoadBalancer` サービスやIngressコントローラーを使うこともできます。いずれの場合も、公開するアドレスとポートを、手順6でコマンダーに登録するURLと一致させてください。

### 4. サービスをデプロイ

```
kubectl apply -f automator-deployment.yaml
```

30秒以内にサービスが起動します。

### 5. サービスステータスを確認

ウェブブラウザでサービスが実行されていることを確認します (テストしている端末からポート30000へアクセスできる必要があります)。\
\
今回の場合、URLは<https://automator.example.com:30000/api/rest/statusです。>

自動ヘルスチェックには、以下のURLも使用できます。

**https\://\<server>/health**

以下は、curlコマンドの例です。

```
$ curl https://automator.example.com:30000/health
OK
```

単一ポッドのサービスが実行されているので、Keeperコマンダーを使用してオートメーターをご利用の環境に統合します。

### 6. コマンダーでポッドを設定

ポッドを設定してオートメーター機能を使うには、Keeperコマンダーが必要です。Keeperコマンダーはどこからでも実行できます。

ご利用のワークステーションにKeeperコマンダーCLIをインストールします。バイナリインストーラーを含むインストール手順については[こちら](/keeperpam/jp/commander-cli/commander-installation-setup.md)のページをご参照ください。

コマンダーをインストールした後、`keeper shell` と入力してセッションを開き、`login` コマンドを使用してログインできます。オートメーターを設定するには、Keeper管理者またはSSOノードを管理する権限を持つ管理者としてログインする必要があります。

```
$ keeper shell

My Vault> login admin@company.com

  _  __  
 | |/ /___ ___ _ __  ___ _ _ 
 | ' </ -_) -_) '_ \/ -_) '_|
 |_|\_\___\___| .__/\___|_|
 vxx.x.xx     |_|

Logging in to Keeper Commander

SSO user detected. Attempting to authenticate with a master password.
(Note: SSO users can create a Master Password in Web Vault > Settings)

Enter password for admin@company.com
Password: 
Successfully authenticated with Master Password
Syncing...
Decrypted [58] record(s)

My Vault>
```

\
Keeperコマンダーにログインし、`automator create` で始まる一連のコマンドを使用してオートメーターを有効化します。

```
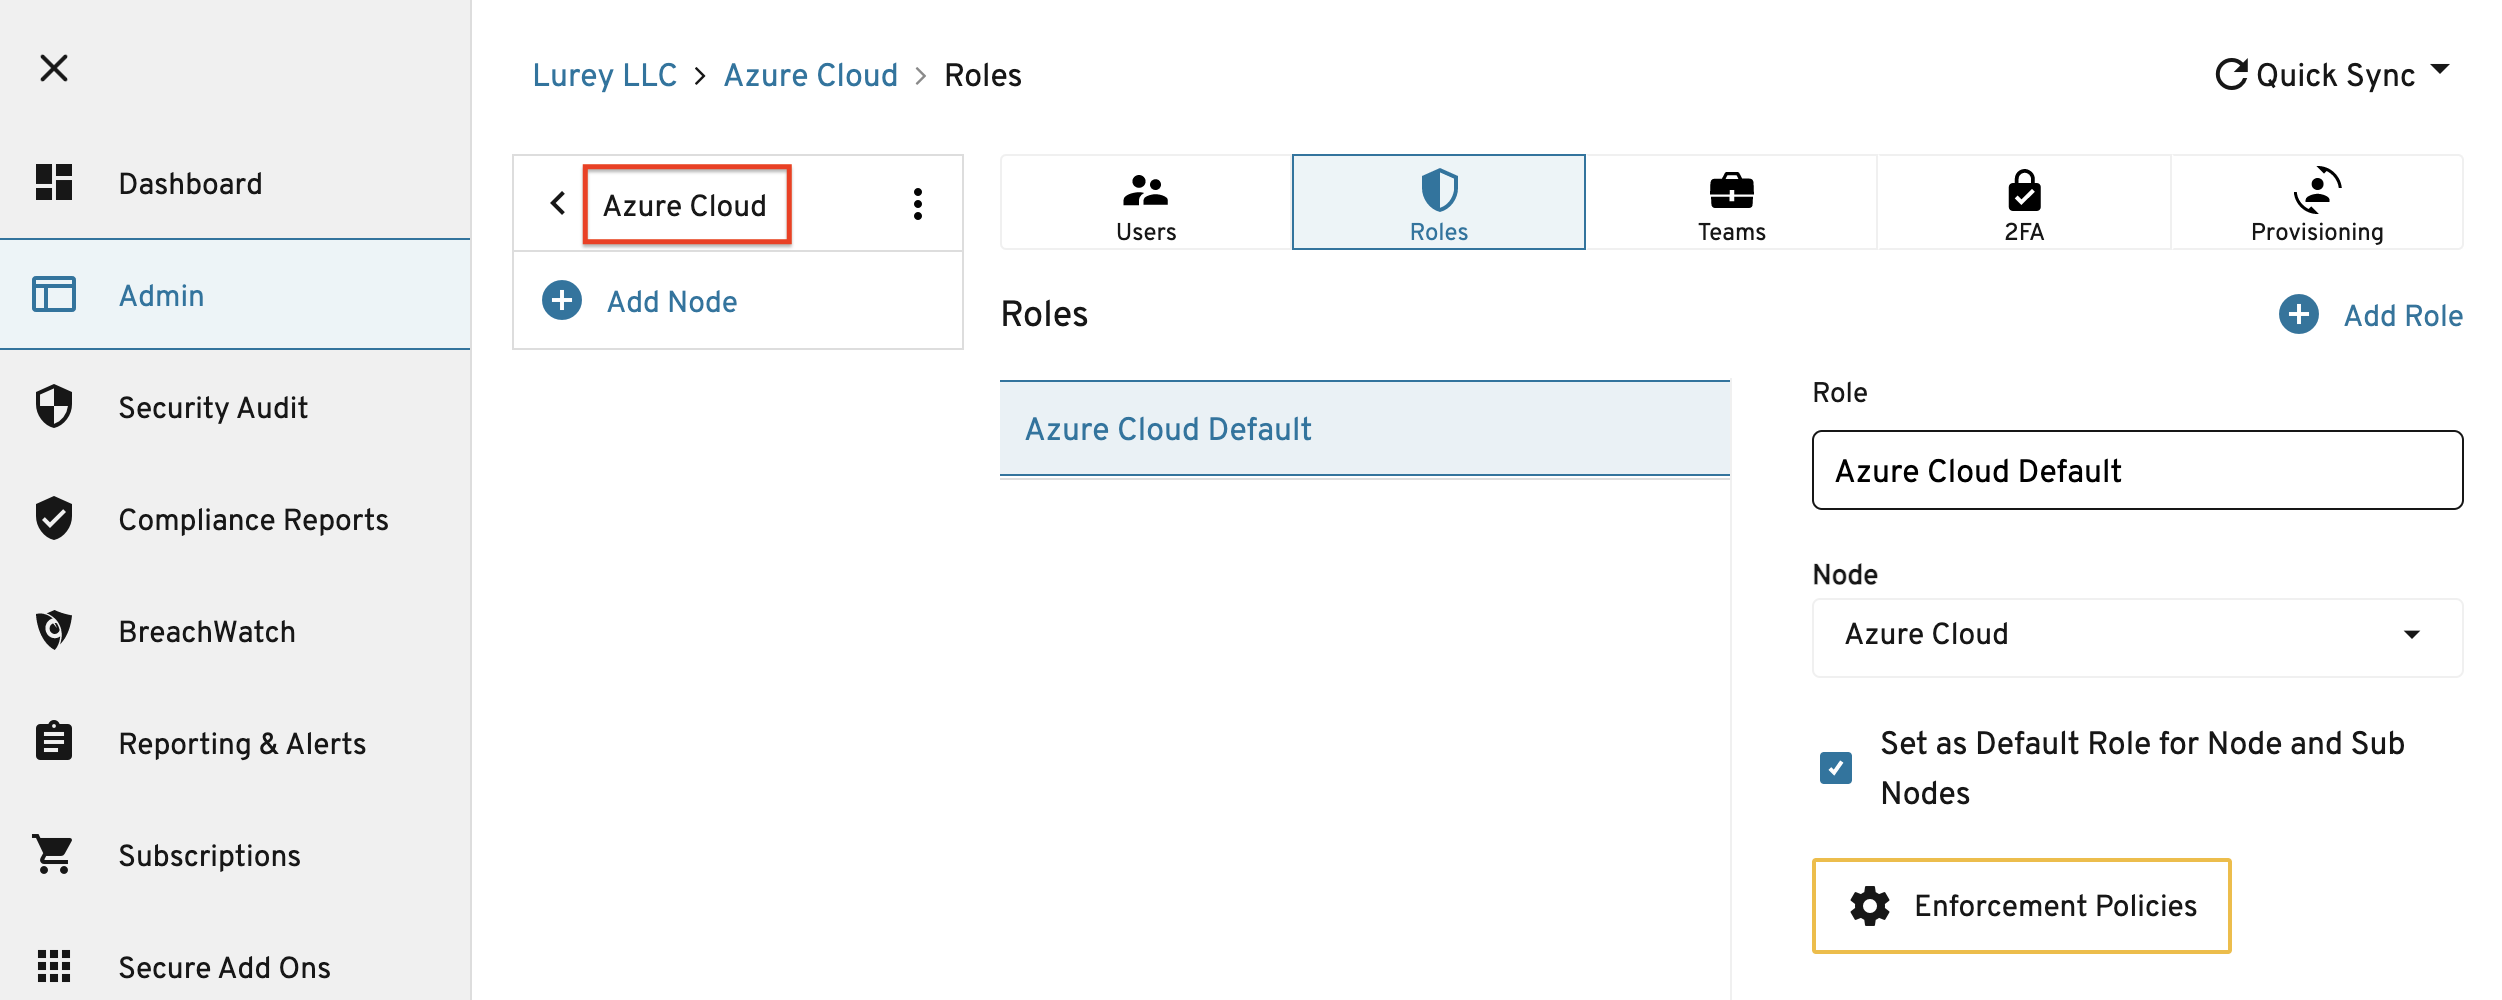
My Vault> automator create --name="My Automator" --node="Azure Cloud"
```

ノード名 (この場合は「Azure Cloud」) は、以下に示すように管理コンソールUIから取得します。

<figure><img src="https://1914737032-files.gitbook.io/~/files/v0/b/gitbook-x-prod.appspot.com/o/spaces%2F-Mfd2v-YT48Ljtykb8qm%2Fuploads%2FNdYz9XWKABSVqtIAV5Ff%2FScreen%20Shot%202021-09-10%20at%203.59.58%20PM.png?alt=media&#x26;token=3c897624-3ae2-465e-9749-c4357015dacc" alt=""><figcaption><p>オートメーターの作成</p></figcaption></figure>

コマンドの出力には、IDプロバイダからのメタデータを含むオートメーター設定が表示されます。

```
                    Automator ID: 1477468749950
                            Name: My Automator
                             URL: 
                         Enabled: No
                     Initialized: No
                          Skills: Device Approval
```

URLはまだ設定されていません。以下のように `automator edit` コマンドを実行します。これによりURLとスキルが設定されます (`team`、 `team_for_user`、`device`)。

{% code overflow="wrap" %}

```
automator edit --url https://automator.example.com:30000 --skill=team --skill=team_for_user --skill=device "My Automator"
```

{% endcode %}

続いてキーを交換します。オートメーター公開キーで暗号化されたエンタープライズ秘密キーがオートメーターへ渡されます。

```
automator setup "My Automator"
```

続いて、他のIdPメタデータをオートメーターに送信します。

```
automator init "My Automator"
```

オートメーターサービスを有効にします。

```
automator enable "My Automator"
```

この時点で設定は完了です。

### 7. ネットワークアクセスの制限

Keeperのサーバーおよび運用担当のワークステーションなど、必要な送信元だけがサービスに届くようネットワークアクセスを制限することを推奨します。許可するIPアドレスの一覧は、[イングレス要件](/sso-connect-cloud/jp/device-approvals/automator/ingress-requirements.md)をご参照ください。

### 8. オートメーターサービスをテスト

単一のポッドでオートメーターサービスが適切に動作していることを確認するには、以下の手順を行います。

* ブラウザのシークレットモードでウィンドウを開きます
* SSOユーザーアカウントを使用してKeeperウェブボルトにログインします
* SSOログインの成功後にデバイスの承認が必要ないことを確認します

### 9. ポッド設定を更新

この時点では、単一のポッド設定を実行しています。最初のポッドにオートメーターサービスがセットアップされKeeperクラウドに設定されたので、ポッドの数を増やせます。以下のように、YAMLファイル内の `replicas` ステートメントを実行したいポッドの数に更新します。

```
replicas: 3
```

続いて変更を適用します。

```
kubectl apply -f automator-deployment.yaml
```

複数のポッドが実行されている場合、コンテナはラウンドロビン方式のセットアップで負荷が分散されます。最初の承認リクエスト時に構成設定がKeeperクラウドからオートメーターポッドへ自動的かつ安全にロードされます。

### オートメーターサービスのトラブルシューティング

オートメーターサービスを実行しているログファイルでエラーを監視できます。ポッドのリストを取得するには、以下を実行します。

```
kubectl get pods
```

以下のコマンドを使用して、ターミナル経由でオートメーターコンテナに接続します。

```
kubectl exec -it automator-deployment-<POD> --container automator -- /bin/sh
```

ログファイルは `logs/` フォルダにあります。ターミナルに接続する代わりに、以下のコマンドからコンテナのログファイルを追跡することもできます。

```
kubectl exec -it automator-deployment-<POD> --container automator -- tail -f /usr/mybin/logs/keeper-automator.log
```


---

# Agent Instructions
This documentation is published with GitBook. GitBook is the documentation platform designed so that both humans and AI agents can read, navigate, and reason over technical content effectively. Learn more at gitbook.com.

## Querying This Documentation
If you need additional information that is not directly available in this page, you can query the documentation dynamically by asking a question.

Perform an HTTP GET request on the current page URL with the `ask` query parameter, and the optional `goal` query parameter:

```
GET https://docs.keeper.io/sso-connect-cloud/jp/device-approvals/automator/kubernetes-service.md?ask=<question>&goal=<endgoal>
```

`ask` is the immediate question: it should be specific, self-contained, and written in natural language.
`goal` is optional and describes the broader end goal you are ultimately trying to accomplish on behalf of the user. GitBook uses it to tailor the answer towards what is most useful for that goal.

The response will contain a direct answer to the question and relevant excerpts and sources from the documentation.

Use this mechanism when the answer is not explicitly present in the current page, you need clarification or additional context, or you want to retrieve related documentation sections.