> For the complete documentation index, see [llms.txt](https://docs.keeper.io/llms.txt). Markdown versions of documentation pages are available by appending `.md` to page URLs; this page is available as [Markdown](https://docs.keeper.io/sso-connect-cloud/jp/identity-provider-setup/duo.md).

# DUO SSO

{% hint style="success" %}
最初に[管理コンソールの設定](/sso-connect-cloud/jp/admin-console-configuration.md)の手順を完了してください。
{% endhint %}

<figure><img src="https://1914737032-files.gitbook.io/~/files/v0/b/gitbook-x-prod.appspot.com/o/spaces%2F-Mfd2v-YT48Ljtykb8qm%2Fuploads%2FQxu4cpKG68doyrRtjDew%2Fimage.png?alt=media&#x26;token=6a935f31-f425-4729-9963-dcaf88d90094" alt=""><figcaption></figcaption></figure>

## Duoのセットアップ

以下の手順では、Duoが有効化済みで、認証ソース (Active DirectoryまたはIdP) が設定済みであることを前提とします。Duo SSOを有効にするには、Duo Admin Panel (管理パネル) の **\[Single Sign-On]** セクションを開きます。

### 手順1. DUO SSOの設定

Duo Admin Panel (管理パネル) にログインし、左側のナビゲーションで **\[Protect an Application]** をクリックします。Keeperを検索し、保護タイプが「2FA with SSO hosted by Duo (Single Sign-On)」のKeeper Securityを選び、**\[Protect]** をクリックします。

<figure><img src="https://1914737032-files.gitbook.io/~/files/v0/b/gitbook-x-prod.appspot.com/o/spaces%2F-Mfd2v-YT48Ljtykb8qm%2Fuploads%2FaU0jAkSQvFll2fVT6ETp%2Fimage.png?alt=media&#x26;token=4106a921-ca5b-41c9-995b-053af15bb4e0" alt=""><figcaption><p>Keeper Security SSOタイプを保護</p></figcaption></figure>

### 手順2. メタデータ

**\[Download]** セクションで、SSOプロビジョニング方式にアップロードするSAMLメタデータファイルをダウンロードします。

<figure><img src="https://1914737032-files.gitbook.io/~/files/v0/b/gitbook-x-prod.appspot.com/o/spaces%2F-Mfd2v-YT48Ljtykb8qm%2Fuploads%2FaTF85pCD68eYNIYB7IGt%2Fimage.png?alt=media&#x26;token=40ac7d5d-e38a-49e6-acee-23ecda7dbc5a" alt=""><figcaption><p>DUOメタデータファイルをダウンロード</p></figcaption></figure>

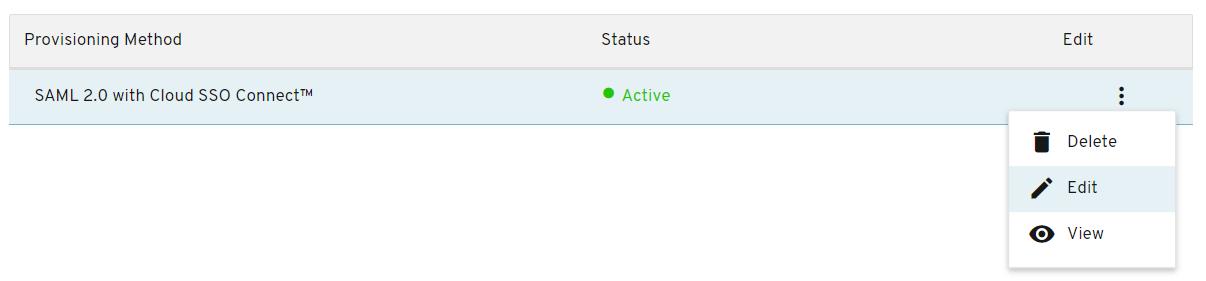
Keeper管理コンソールに戻り、Duo用のクラウドSSOコネクトプロビジョニング方式を見つけて **\[編集]** を選択します。

<figure><img src="https://1914737032-files.gitbook.io/~/files/v0/b/gitbook-x-prod.appspot.com/o/spaces%2F-Mfd2v-YT48Ljtykb8qm%2Fuploads%2FJKDDSDqBdPZtnIkix7Fq%2Fimage.png?alt=media&#x26;token=7243afff-75dd-4e14-8d46-5b3000001868" alt=""><figcaption><p>DUO SSOプロビジョニングメソッドを編集</p></figcaption></figure>

**\[IDプロバイダ]** セクションまでスクロールし、IDPタイプを **\[DUO SSO]** に設定して、**\[ファイルを参照]** を選択し、ダウンロードしたDuoメタデータファイルを選択します。

<figure><img src="https://1914737032-files.gitbook.io/~/files/v0/b/gitbook-x-prod.appspot.com/o/spaces%2F-Mfd2v-YT48Ljtykb8qm%2Fuploads%2FLUz2gwfjonxVwOQQ6x3B%2Fimage.png?alt=media&#x26;token=86325a1b-4dbf-473f-ba0b-8e78ecc17ed9" alt=""><figcaption></figcaption></figure>

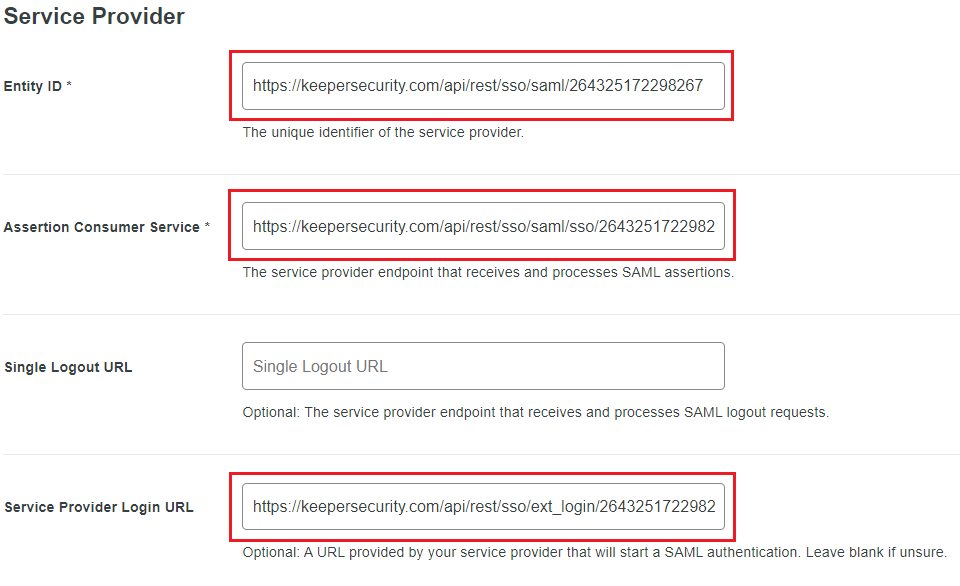
編集画面を閉じ、同じプロビジョニング方式で **\[表示]** を選択します。**\[サービスプロバイダ]** セクションに、**エンティティID**、**IDP起点ログインエンドポイント**、**アサーションコンシューマーサービス (ACS) エンドポイント** の値が表示されます。

{% hint style="info" %}
**シングルログアウトサービスエンドポイント**はオプションです。
{% endhint %}

<figure><img src="https://1914737032-files.gitbook.io/~/files/v0/b/gitbook-x-prod.appspot.com/o/spaces%2F-Mfd2v-YT48Ljtykb8qm%2Fuploads%2Fw9T736ARLGxk0J43JkDz%2Fimage.png?alt=media&#x26;token=facfc1bd-d5f0-4a92-91dd-13ab306ba33f" alt=""><figcaption><p>DUO SSOプロビジョニングメソッドを表示</p></figcaption></figure>

Duo Admin Panel (管理パネル) のアプリケーションページに戻り、**Entity ID** (エンティティID)、**Login Endpoint** (ログインエンドポイント)、**ACS Endpoint** (ACSエンドポイント) をコピーして、**\[Service Provider]** セクションに貼り付けます。

<figure><img src="https://1914737032-files.gitbook.io/~/files/v0/b/gitbook-x-prod.appspot.com/o/spaces%2F-Mfd2v-YT48Ljtykb8qm%2Fuploads%2FS4W76cqrykpPYDCqsNxC%2Fimage.png?alt=media&#x26;token=5cdea324-04b4-4fd7-bb45-8dc624d4294a" alt=""><figcaption><p>Keeperメタデータ情報</p></figcaption></figure>

### 手順3. ユーザー属性をマッピング

**\[SAML Response]** セクションで、**Map attributes** (属性をマッピング) までスクロールし、以下の属性をマッピングします。

{% hint style="info" %}
**First** (名)、**Last** (姓)、**Email** (メール) の3属性が、以下と同じスペルで設定されていることを確認してください。
{% endhint %}

<figure><img src="https://1914737032-files.gitbook.io/~/files/v0/b/gitbook-x-prod.appspot.com/o/spaces%2F-Mfd2v-YT48Ljtykb8qm%2Fuploads%2Frw6C64JlQmIXqNvOtqRv%2Fimage.png?alt=media&#x26;token=b1faf7ae-ac7d-4326-a772-e2382867715e" alt=""><figcaption><p>ユーザー属性</p></figcaption></figure>

### 手順4. ポリシー (任意)

**\[Policy]** セクションでは、ユーザーがこのアプリケーションにアクセスするときの認証のタイミングと方法を定義します。グローバルポリシーは常に適用されますが、カスタムポリシーでルールを上書きできます。

<figure><img src="https://1914737032-files.gitbook.io/~/files/v0/b/gitbook-x-prod.appspot.com/o/spaces%2F-Mfd2v-YT48Ljtykb8qm%2Fuploads%2FwNuxRpcOuNEFoRQPLrpu%2Fimage.png?alt=media&#x26;token=ec241ebc-5682-4644-a8d9-49b45e8b29b2" alt=""><figcaption><p>ユーザーまたはグループのポリシー</p></figcaption></figure>

### 手順5. グローバルポリシー

**\[Global Policy]** セクションでは、DuoまたはKeeperの管理者向けに表示されるグローバルポリシーを確認・編集できます。

{% hint style="success" %}
**Keeper Security EPM - Single Sign-On**の設定が完了しました。
{% endhint %}

## トラブルシューティング

Duo環境への **Keeper Security EPM - Single Sign-On** の実装についてご不明な点がある場合は、Keeperサポートまでお問い合わせください。

#### 既存のユーザー/初期管理者をSSO認証に移行

Duoでログインさせるユーザーは、Keeper管理コンソールのルートノード (最上位) からSSO対応ノードへ移行する必要があります。ユーザーがルートノードに残っている場合、ボルトや管理コンソールにアクセスするときにマスターパスワードの入力を求められます。

{% hint style="warning" %}
管理者は、SSOが有効になっているノードに自分自身を移動できません。この操作を行うには別の管理者が必要となります。
{% endhint %}

ユーザーをSSO対応ノードへ移動したあと、メールアドレスを入力して **\[次へ]** をクリックするだけでKeeperボルトにログインできます。動作しない場合は、メールドメイン (例: company.com) が[エンタープライズで予約されている](/enterprise-guide/jp/domain-reservation.md)こと、およびジャストインタイムプロビジョニングが有効であることを確認してください。

法人ドメインでオンボードする場合は、**\[法人SSOログイン]** を選択し、Keeper管理コンソールで設定した法人ドメインを入力します。

<figure><img src="https://1914737032-files.gitbook.io/~/files/v0/b/gitbook-x-prod.appspot.com/o/spaces%2F-Mfd2v-YT48Ljtykb8qm%2Fuploads%2FbFfZY4rbYjOifBvaah9Y%2FJP_EG_EnterpriseSsoLogin1.png?alt=media&#x26;token=3c39d50f-e749-4a05-8883-9afa927613f1" alt=""><figcaption><p>最初に[法人SSOログイン]を選択</p></figcaption></figure>

SSOで一度認証した以降は、メールアドレスだけでSSO認証を開始できます。

<figure><img src="https://1914737032-files.gitbook.io/~/files/v0/b/gitbook-x-prod.appspot.com/o/spaces%2F-Mfd2v-YT48Ljtykb8qm%2Fuploads%2FoaGsiuYsApEp4F3pzZDj%2FJP_EG_EnterpriseSsoLogin2.png?alt=media&#x26;token=f8c42ae7-f133-4690-bcbf-6c8e6b539eca" alt=""><figcaption></figcaption></figure>

メールアドレスを入力して **\[次へ]** をクリックしても目的のSSOにルーティングされない場合は、Keeper SSO設定でジャストインタイムプロビジョニングが有効であること、およびメールドメインがKeeperで予約されていることを確認してください。ルーティングとドメイン予約について詳しくは、[こちら](/enterprise-guide/jp/domain-reservation.md)をご参照ください。


---

# Agent Instructions
This documentation is published with GitBook. GitBook is the documentation platform designed so that both humans and AI agents can read, navigate, and reason over technical content effectively. Learn more at gitbook.com.

## Querying This Documentation
If you need additional information that is not directly available in this page, you can query the documentation dynamically by asking a question.

Perform an HTTP GET request on the current page URL with the `ask` query parameter, and the optional `goal` query parameter:

```
GET https://docs.keeper.io/sso-connect-cloud/jp/identity-provider-setup/duo.md?ask=<question>&goal=<endgoal>
```

`ask` is the immediate question: it should be specific, self-contained, and written in natural language.
`goal` is optional and describes the broader end goal you are ultimately trying to accomplish on behalf of the user. GitBook uses it to tailor the answer towards what is most useful for that goal.

The response will contain a direct answer to the question and relevant excerpts and sources from the documentation.

Use this mechanism when the answer is not explicitly present in the current page, you need clarification or additional context, or you want to retrieve related documentation sections.