> For the complete documentation index, see [llms.txt](https://docs.keeper.io/llms.txt). Markdown versions of documentation pages are available by appending `.md` to page URLs; this page is available as [Markdown](https://docs.keeper.io/user-guides/pl/import-records-1/import-json.md).
# Import i eksport w formacie Keeper JSON
Instrukcja importowania i eksportowania ustrukturyzowanego pliku Keeper JSON
Keeper obsługuje import ustrukturyzowanego pliku JSON. Możesz z niej skorzystać na przykład wtedy, gdy masz kopię zapasową pliku Keeper z innego sejfu albo tworzysz plik na podstawie danych z innego źródła. To zaawansowana funkcja, z której zwykle korzystają administratorzy Keeper Enterprise lub bardziej doświadczeni klienci. Jeśli to nie Twój przypadek, zajrzyj do instrukcji [importu z pliku CSV](https://docs.keeper.io/user-guides/pl/import-records-1/import-a-.csv-file.md).
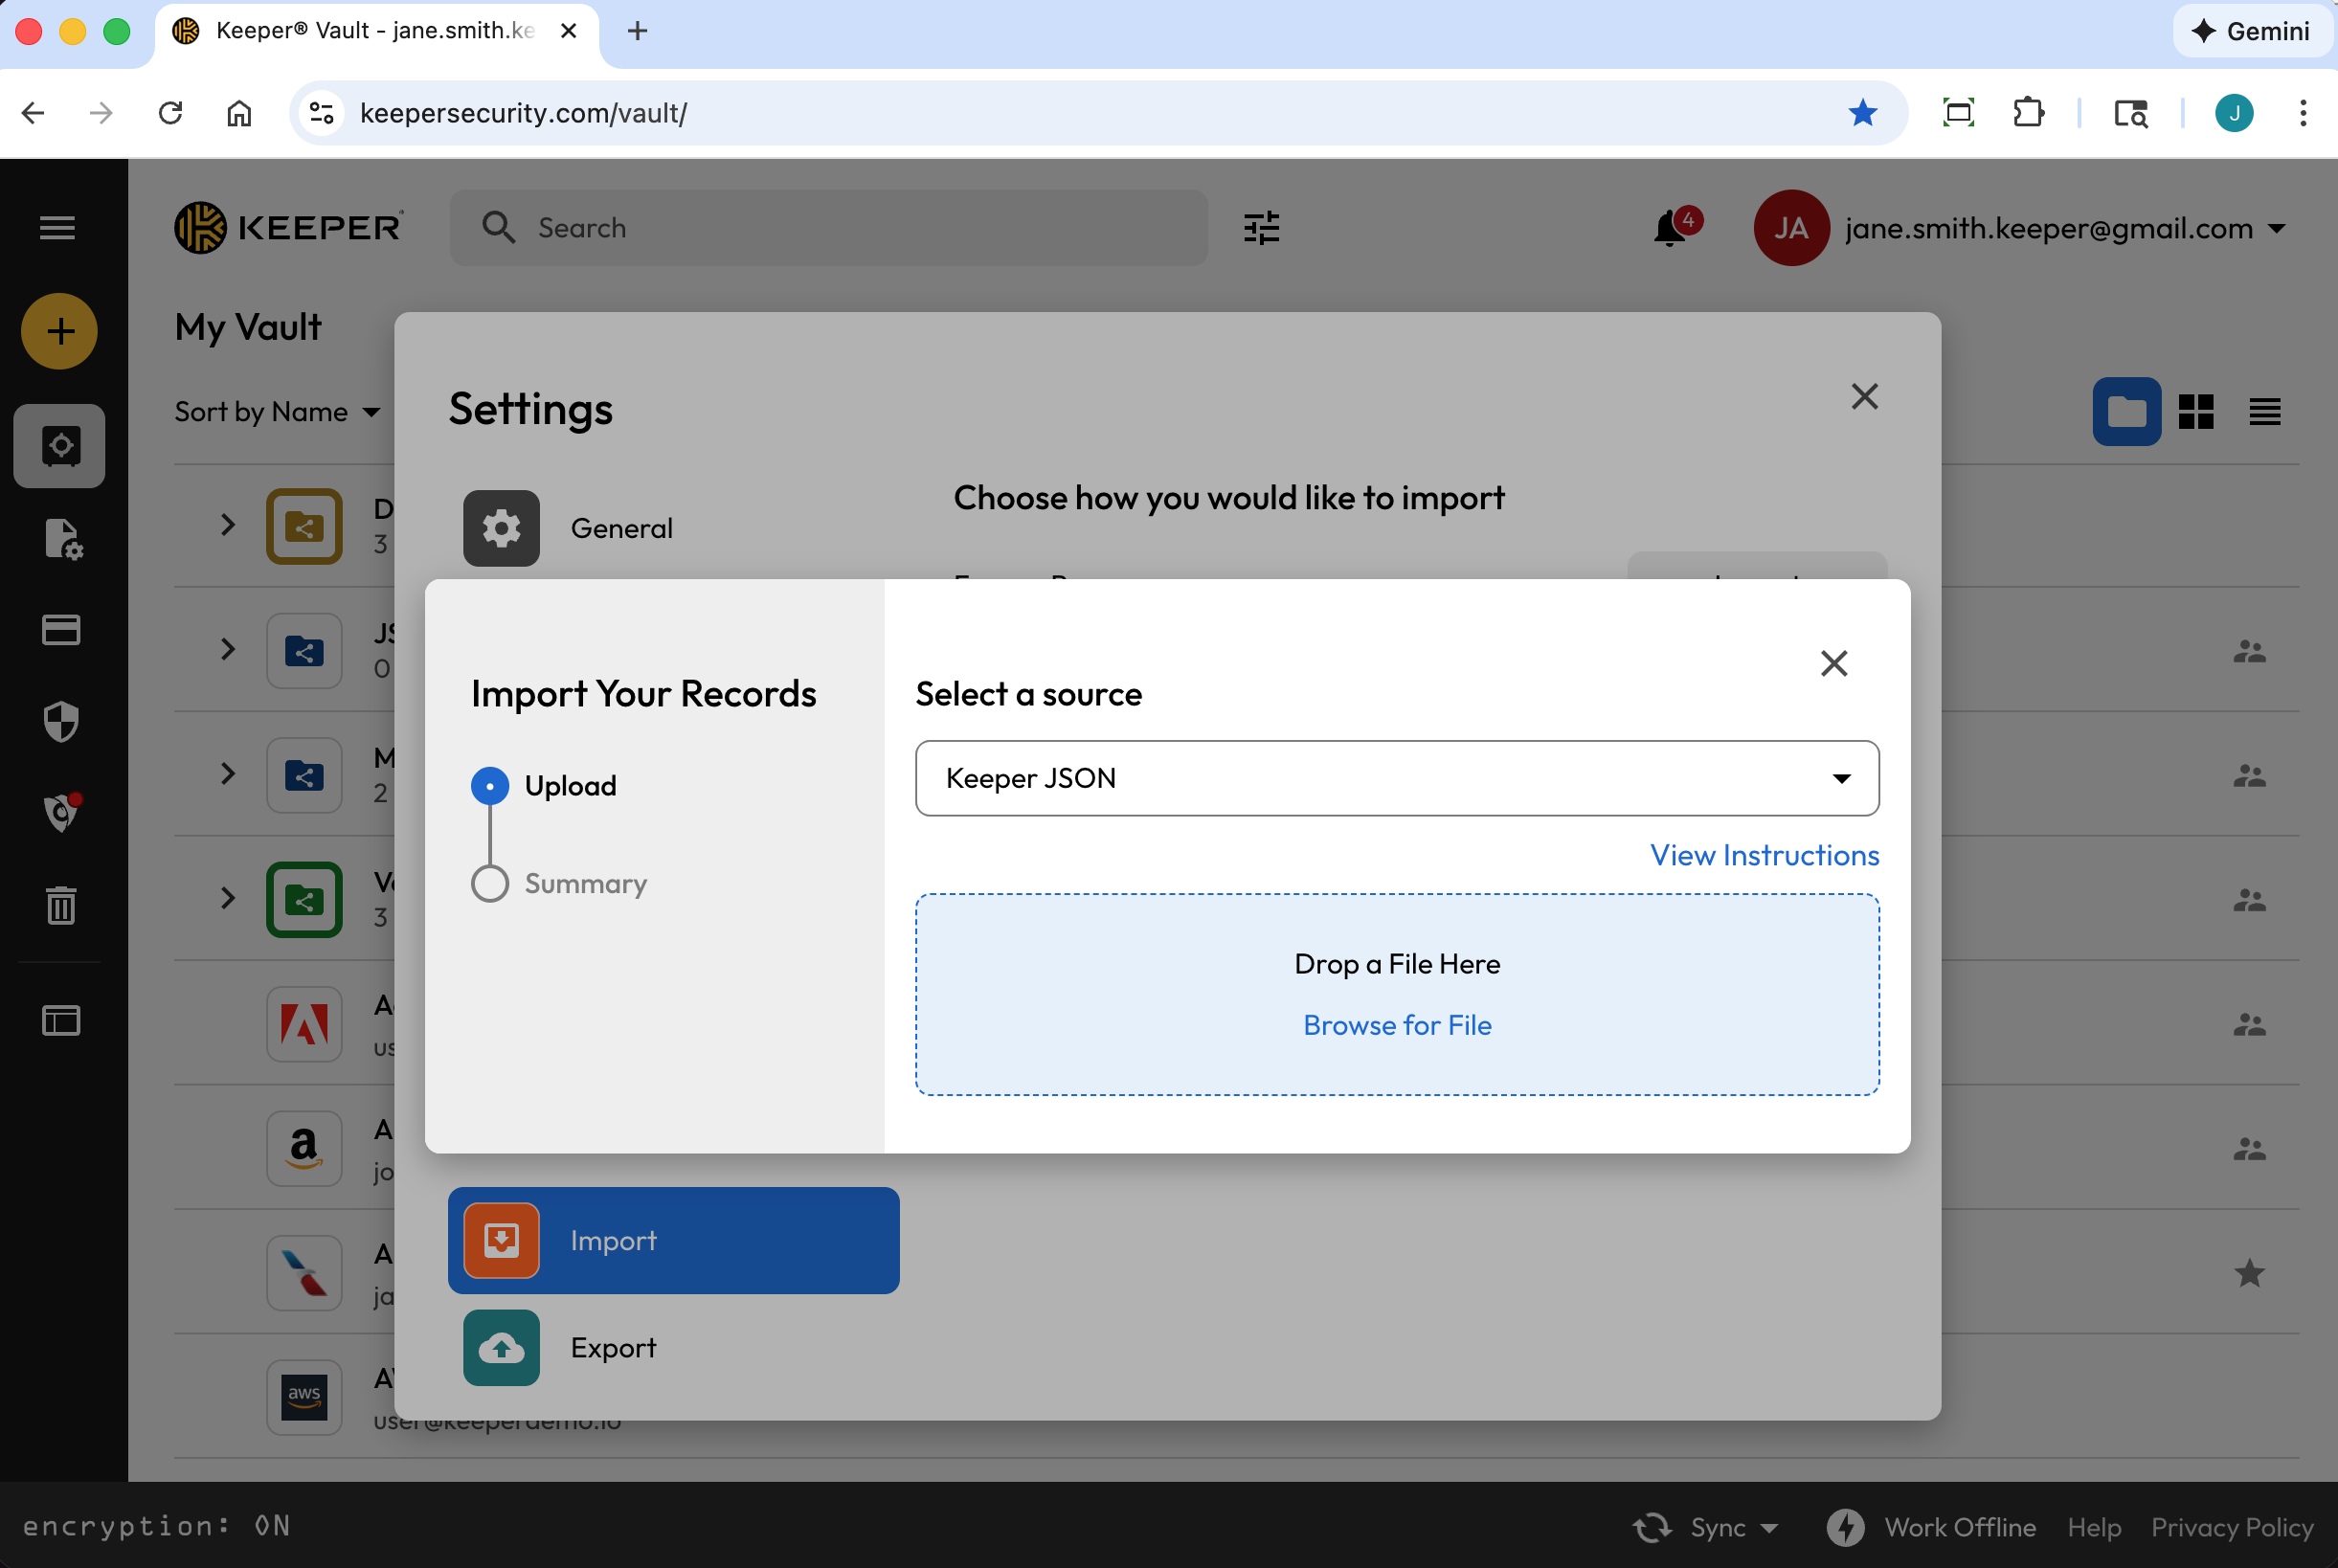
Aby rozpocząć, w menu rozwijanym **Konto** kliknij **Ustawienia** **> Importuj > Importuj** (obok pozycji „Użyj innego źródła”). W menu rozwijanym wybierz **Keeper JSON**.
Plik JSON można utworzyć na kilka sposobów:
* wyeksportować plik .JSON z sejfu Keeper,
* wyeksportować plik .JSON za pomocą narzędzia Keeper Commander SDK,
* utworzyć własny plik.
Gdy plik JSON ma poprawny format, przeciągnij go do okna „Przeciągnij plik w to miejsce” w aplikacji Keeper albo wskaż plik na komputerze.
{% hint style="info" %}
Pliki JSON muszą mieć kodowanie UTF-8, aby wszystkie symbole i znaki zostały zaimportowane poprawnie.
{% endhint %}
### Tworzenie pliku .JSON z sejfu Keeper (eksport)
Aby utworzyć plik .JSON z istniejącego sejfu Keeper, w menu rozwijanym **Konto** kliknij **Ustawienia > Eksportuj**.
Wybierz format **JSON** i kliknij **Eksportuj**. Jeśli pojawi się monit, wpisz hasło główne i kliknij **Eksportuj teraz**.

### Tworzenie pliku JSON za pomocą narzędzia Keeper Commander
Keeper Commander to narzędzie dla programistów i administratorów, które oferuje wiele możliwości zarządzania sejfem i kontem Enterprise.
Repozytorium Keeper Commander SDK znajdziesz pod adresem:\
Poniżej pokazano polecenie eksportujące sejf w formacie JSON:
```
$ keeper shell
_ __
| |/ /___ ___ _ __ ___ _ _
| ' export --format json my_export_file.json
Processing... please wait.
318 records exported
```
### Tworzenie niestandardowego pliku .JSON do zaimportowania w aplikacji Keeper
W niestandardowym pliku JSON do importu można używać tablic `records`, `folders` i `shared_folders`. Poniżej znajduje się kilka przykładów, które możesz zaimportować do sejfu w celach testowych.
Przykładowy plik JSON: wpisy, foldery i foldery udostępnione
Ten plik pokazuje kilka funkcji importu JSON, w tym:
* tablicę wpisów,
* możliwość dodania do każdego wpisu pól niestandardowych i notatek oraz umieszczenia go w folderach,
* tworzenie folderów zwykłych (prywatnych) lub udostępnionych,
* możliwość umieszczenia we wpisach kluczy TOTP (funkcja zaawansowana, zob. wpis Facebook w przykładzie poniżej).
```
{
"records": [
{
"title": "Dev Server 1",
"login": "root",
"password": "123123123",
"login_url": "https://myserver.com",
"notes": "These are some notes.",
"custom_fields": {
"Security Group": "Private"
},
"folders": [
{
"folder": "Private Folder 1"
}
]
},
{
"title": "Prod Server 1",
"login": "root",
"password": "kj949234723jhfs4jf7h",
"login_url": "https://myprodserver.com",
"notes": "These are some notes.",
"custom_fields": {
"Security Group": "Public",
"IP Address": "12.45.67.8"
},
"folders": [
{
"folder": "Private Folder 2"
},
{
"shared_folder": "My Shared Folder 1",
"can_edit": true,
"can_share": true
}
]
},
{
"title":"Google",
"login": "testing",
"password": "1234567890",
"login_url": "https://google.com",
"notes": "These are some notes.",
"custom_fields": {
"Favorite Food":"Cheetos"
},
"folders": [
{
"folder": "My Websites\\Online"
}
]
},
{
"title":"Facebook",
"$type": "login",
"login": "me@gmail.com",
"password": "123123123123",
"login_url": "https://facebook.com",
"notes": "This is our corporate shared record.",
"custom_fields": {
"Facebook Application ID":"ABC12345",
"$oneTimeCode":"otpauth://totp/Amazon:me@company.com?secret=JBSWY3DPEHPK3PXP&issuer=Amazon&algorithm=SHA1&digits=6&period=30"
},
"folders": [
{
"folder": "Social Media"
},
{
"shared_folder": "Shared Social",
"can_edit": false,
"can_share": false
}
]
}
]
}
```
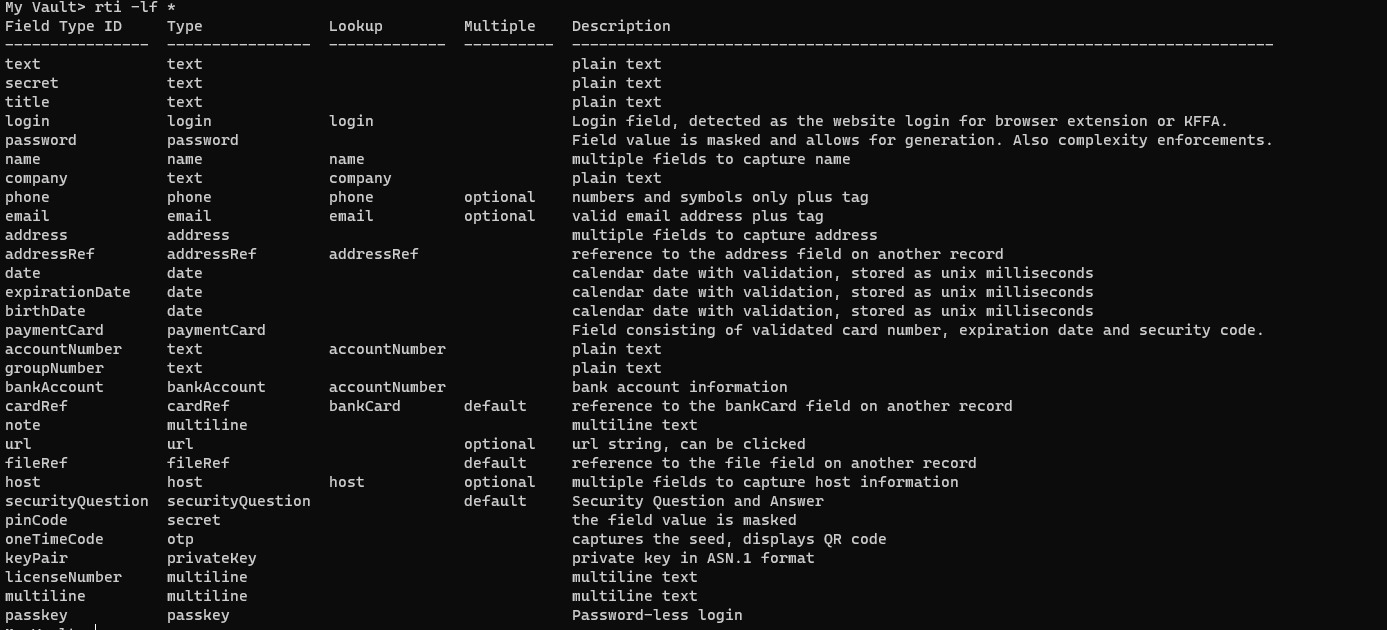
Poniżej znajduje się lista wszystkich możliwych rodzajów pól (łącznie z polami niestandardowymi):
Wszystkie rodzaje pól
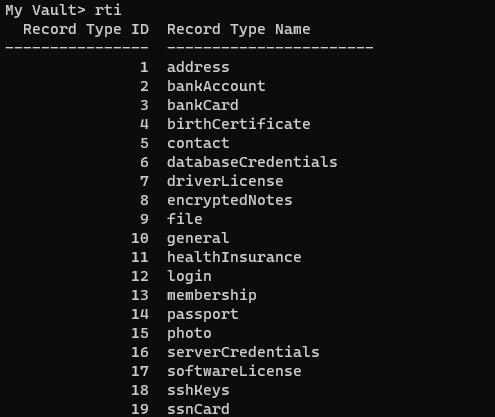
Poniżej wymieniono niektóre rodzaje wpisów. Na Twojej liście może ich być więcej (jeśli masz własne rodzaje) albo mniej (jeśli niektóre rodzaje są ograniczone):
Rodzaje wpisów
**Przykładowy plik JSON: foldery udostępnione i uprawnienia (bez wpisów)**
Poniższy plik JSON pokazuje, jak utworzyć strukturę folderów udostępnionych (bez wpisów) ze skonfigurowanymi uprawnieniami.
{% hint style="info" %}
Aby zaimportować puste foldery, użyj polecenia `import` w narzędziu [Commander CLI](https://docs.keeper.io/keeperpam/commander-cli/overview.md) (po angielsku).
{% endhint %}
Uwaga: odwołania w przykładach, takie jak „UID” czy „Team UID”, to symbole zastępcze właściwe dla Twojego sejfu.
```
{
"shared_folders": [
{
"path": "My Shared Folder 1",
"manage_users": true,
"manage_records": true,
"can_edit": true,
"can_share": true,
"permissions": [
{
"uid": "kVM96KGEoGxhskZoSTd_jw",
"manage_users": true,
"manage_records": true
},
{
"name": "myusername@company.com",
"manage_users": true,
"manage_records": true
}
]
},
{
"path": "Customer1\\My Shared Folder 2",
"manage_users": false,
"manage_records": false,
"can_edit": false,
"can_share": false,
"permissions": [
{
"uid": "",
"manage_users": false,
"manage_records": false
},
{
"name": "",
"manage_users": true,
"manage_records": true
}
]
},
{
"path": "Customer2\\My Shared Folder 3",
"manage_users": true,
"manage_records": true,
"can_edit": true,
"can_share": true,
"permissions": [
{
"uid": "",
"manage_users": true,
"manage_records": true
},
{
"name": "myusername@company.com",
"manage_users": true,
"manage_records": true
}
]
}
]
}
```
**Przykładowy plik JSON: prywatne i udostępnione wpisy oraz foldery**
Poniższy przykładowy plik JSON łączy kilka funkcji: foldery udostępnione, foldery prywatne, wpisy i klucze TOTP.
Uwaga: odwołania w przykładach, takie jak „UID” czy „Team UID”, to symbole zastępcze właściwe dla Twojego sejfu.
```
{
"shared_folders": [
{
"path": "My Customer 1",
"manage_users": true,
"manage_records": true,
"can_edit": true,
"can_share": true,
"permissions": [
{
"uid": "kVM96KGEoGxhskZoSTd_jw",
"manage_users": true,
"manage_records": true
},
{
"name": "user@mycompany.com",
"manage_users": true,
"manage_records": true
}
]
},
{
"path": "Testing\\My Customer 2",
"manage_users": true,
"manage_records": true,
"can_edit": true,
"can_share": true,
"permissions": [
{
"uid": "ih1CggiQ-3ENXcn4G0sl-g",
"manage_users": true,
"manage_records": true
},
{
"name": "user@mycompany.com",
"manage_users": true,
"manage_records": true
}
]
}
],
"records": [
{
"title": "Bank Account 1",
"login": "customer1234",
"password": "4813fJDHF4239fdk",
"login_url": "https://chase.com",
"notes": "These are some notes.",
"custom_fields": {
"Account Number": "123-456-789"
},
"folders": [
{
"folder": "Optional Private Folder 1"
}
]
},
{
"title": "Bank Account 2",
"login": "mybankusername",
"password": "w4k4k193f$^&@#*%2",
"login_url": "https://amex.com",
"notes": "Some great information here.",
"custom_fields": {
"Security Group": "Public",
"IP Address": "12.45.67.8",
"$oneTimeCode":"otpauth://totp/Amazon:me@company.com?secret=JBSWY3DPEHPK3PXP&issuer=Amazon&algorithm=SHA1&digits=6&period=30"
},
"folders": [
{
"folder": "Optional Private Folder 1"
},
{
"shared_folder": "My Customer 1",
"can_edit": true,
"can_share": true
}
]
}
]
}
```
---
# Agent Instructions
This documentation is published with GitBook. GitBook is the documentation platform designed so that both humans and AI agents can read, navigate, and reason over technical content effectively. Learn more at gitbook.com.
## Querying This Documentation
If you need additional information that is not directly available in this page, you can query the documentation by asking a question.
Perform an HTTP GET request on the following URL with the `ask` and `goal` query parameters:
```
GET https://docs.keeper.io/user-guides/pl/import-records-1/import-json.md?ask=&goal=
```
`ask` is the immediate question: it should be specific, self-contained, and written in natural language.
`goal` is what the user is ultimately trying to achieve, the reason they need the answer. Sharing it helps GitBook give you a better, more relevant answer. A goal is most helpful when it describes the outcome the user wants rather than restating the question. For example, with `ask=how do I create an API token`, a goal like `automate deployments from our CI pipeline` lets GitBook tailor the answer to that use case.
The response will contain a direct answer to the question and relevant excerpts and sources from the documentation.
Use this mechanism when the answer is not explicitly present in the current page, you need clarification or additional context, or you want to retrieve related documentation sections.