> For the complete documentation index, see [llms.txt](https://docs.keeper.io/llms.txt). Markdown versions of documentation pages are available by appending `.md` to page URLs; this page is available as [Markdown](https://docs.keeper.io/sso-connect-cloud/device-approvals/automator/azure-app-services.md).
# Azure App Services
## Overview
This guide provides step-by-step instructions to instantiate Keeper Automator as a Web App within Azure App Services. For environments such as GCC High and DoD, this service is available for hosting the Automator.
### (1) Create an Automator Config key
Open a command line interface and generate a 256-bit AES key in URL-encoded format using one of the methods below, depending on your operating system:
#### Generate a Key
{% tabs %}
{% tab title="Mac/Linux" %}
```
openssl rand -base64 32
```
{% endtab %}
{% tab title="Windows (PowerShell)" %}
```powershell
[Byte[]]$key = New-Object Byte[] 32; [System.Security.Cryptography.RNGCryptoServiceProvider]::Create().GetBytes($key); [System.Convert]::ToBase64String($key)
```
{% endtab %}
{% endtabs %}
Save the resulting value produced by this command for **Step (6)**.
Example of generated key value in Mac/Linux
Example of generated key value in PowerShell
### (2) Create a App Services Web App
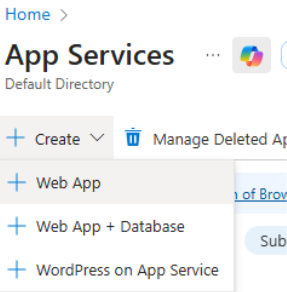
From the Azure portal, create a new Web App by selecting **App Services** in the search bar and then selecting **Create + Web App**
* Select or create a new Resource Group
* Set the Instance Name
* Set Publish to "Container"
* Set Operating System to "Linux"
* Select the region where you would like the service hosted
* Select your Linux Plan or create a new plan. Pricing plan at a minimum should be **Premium V3 P0V3**, but will also be dependent on the end user environment
* Proceed to the **Container** section
### (3) Setup Container Details
In the **Container** section, make the following selections:
* Image Source: "**Other container registries**"
* Access Type: "**Public**"
* Registry server URL: **""** (prefilled by default)
* Image and tag: **`keeper/automator:latest`**
* Proceed to the **Monitor + secure** section
### (4) Setup WebApp Monitoring
* Select "Enable Application Insights": Yes
* Select or create a new Application Insights workspace
* Proceed to the **Review + create** section
### (5) Create WebApp
Click "**Create"**
After a few minutes, the web app will be created and automatically start up.
Clicking on "Go to Resource" will take you to the container environment.
Make note of the **Default domain** value. This will be needed to setup and initialize the Automator service
### (6) Configure the WebApp
Go to the Configuration section and select "New application setting"
Or your environment variables settings may be in a different section of the UI under Environment variables.
Add the following application settings:
* Create the below environment variables with their respective values:
* **AUTOMATOR\_CONFIG\_KEY** -> "**value from Step 1 above of the setup guide**"
* **AUTOMATOR\_PORT** -> **8089**
* **SSL\_MODE** -> **none**
* **WEBSITES\_PORT** -> **8089**
* Click **Apply**
### (7) Set up Diagnostics
Select **Diagnostic settings** and then select "+ Add diagnostic setting"
* Give the diagnostic setting a name.
* Select "**App Service Console logs"**
* Select "**App Service Application logs"**
* Select "**Send to Log Analytics workspace**"
* Select or setup a new Log Analytics workspace
### (8) Set up Logs
Select Logs from the main menu. Click the "X" to close the Queries window.
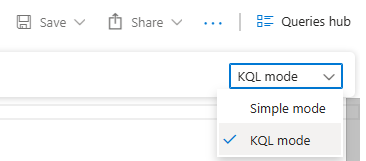
Switch from Simple mode to KQL mode to add new queries:
KQL query to see the Docker deployment and startup logs:
```powershell
AppServicePlatformLogs
project TimeGen=substring(TimeGenerated, 0, 19), Message
sort by TimeGen desc
```
KQL query to see the application error logs:
```powershell
AppServiceConsoleLogs
project TimeGen=substring(TimeGenerated, 0, 19), ResultDescription
sort by TimeGen desc
```
### (9) Set up App Service logs
Select **App Service Logs** from the main menu under the Monitoring section. Then select **File System** under Application logging and set a retention per user's preference
Click **Save**
### (10) View Log stream
Select **Log Stream** from the main menu under the Overview section to verify the Automator service is connected and logging correctly
### (11) Configure Health Check
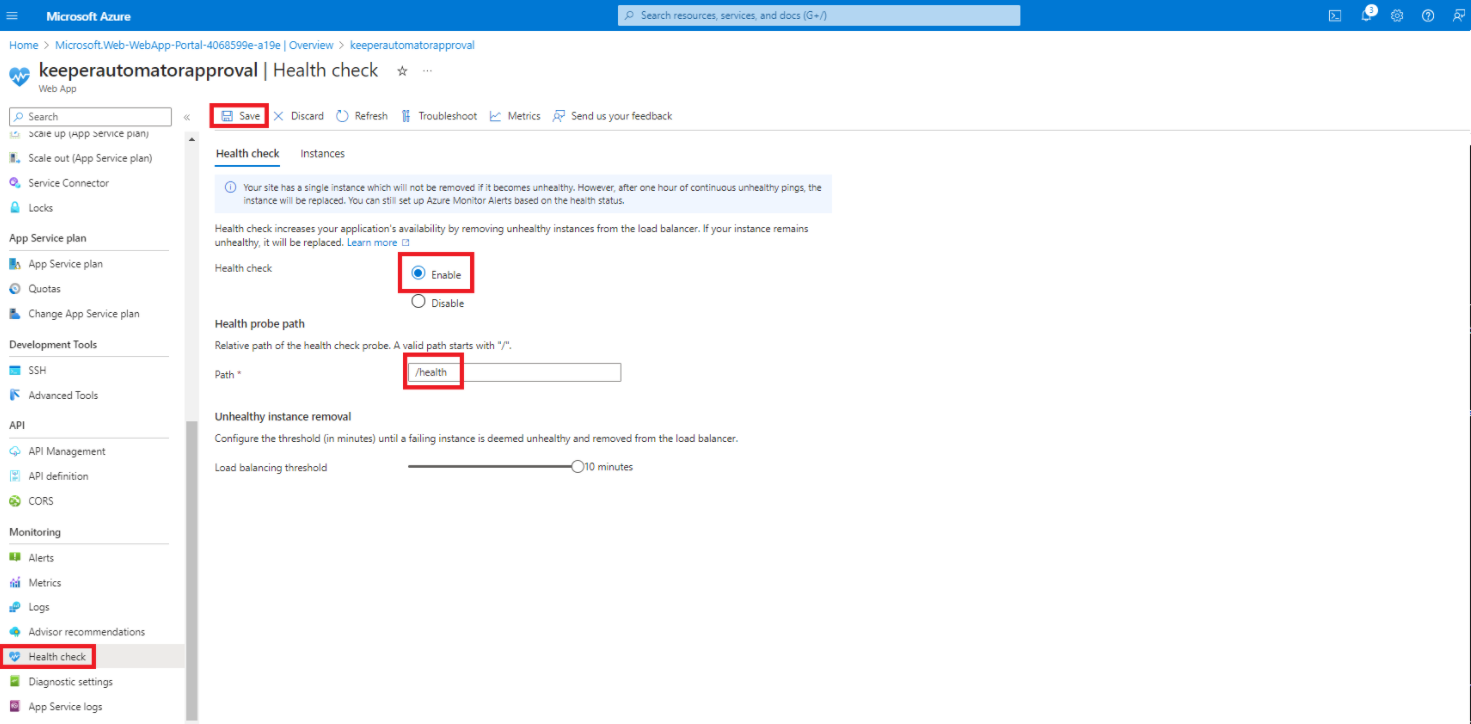
Select **Health check** from the main menu under the Monitoring section. Then Enable the health check function and set the Path value to "**/health**". Click **Save** to save the configuration, and Save again to confirm changes.
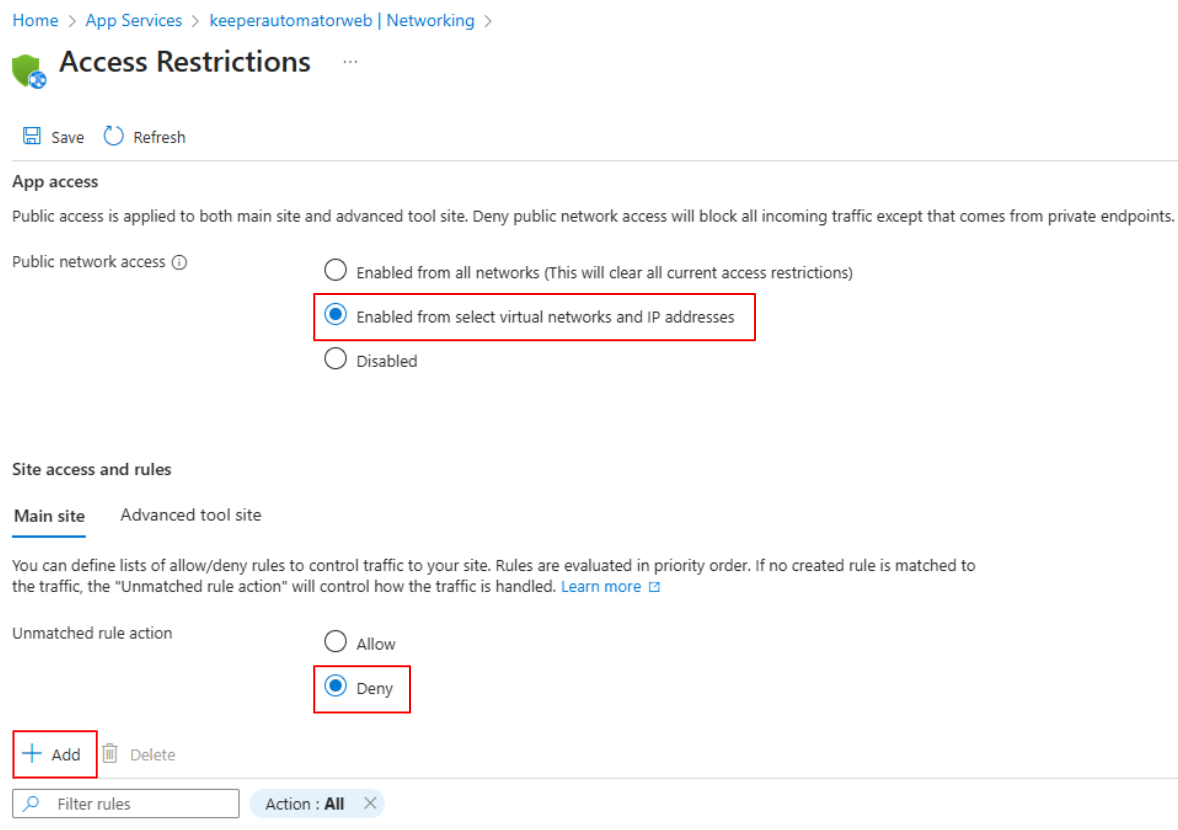
### (12) Configure Access Restrictions
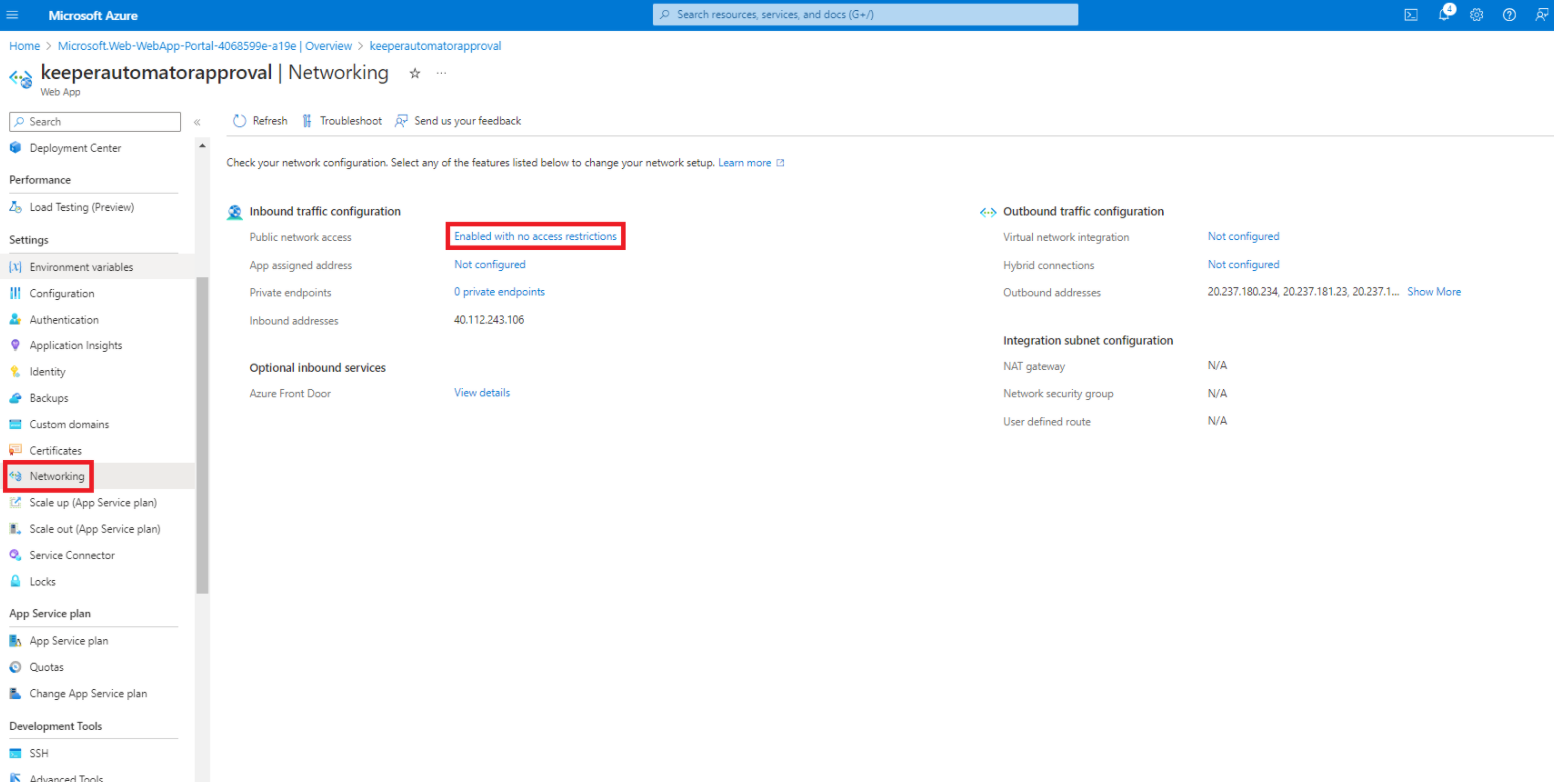
In the Networking section you can setup simple access rules or configure Azure Front Door.
Select **Networking** from the main menu and click on "**Enabled with no access restrictions**"
Under **Access Restrictions**, select "**Enabled from select virtual networks and IP addresses**" and "**Deny**" unmatched rule action. Click **+Add** to add inbound access rules.
Under Add Rule, add the inbound firewall rules. You should restrict traffic to the Keeper published IP addresses marked as "**Network Firewall Setup**" for your respective region per the page below
{% content-ref url="/pages/L7uldWMCf3BHHE7XIb4J" %}
[Ingress Requirements](/sso-connect-cloud/device-approvals/automator/ingress-requirements.md)
{% endcontent-ref %}
Click **Add Rule**
Click **Save** to save the configurations
### (13) Login to Keeper Commander
Keeper Commander is required to perform the final step of Automator configuration. This can be run from anywhere, it does not need to be installed on the server.
On your workstation or server, install Keeper Commander CLI. The installation instructions including binary installers are [here](/keeperpam/commander-cli/commander-installation-setup.md).
After Commander is installed, launch Keeper Commander, or from an existing terminal you can type `keeper shell` to open the session, then login using the `login` command. In order to set up Automator, you must login as a Keeper Administrator, or an Admin with the ability to manage the SSO node.
```
$ keeper shell
My Vault> login admin@company.com
_ __
| |/ /___ ___ _ __ ___ _ _
| '
```
### (14) Create the Automator
\
Create the Automator using a series of commands, starting with `automator create`
```
My Vault> automator create --name "My Automator" --node "Azure Cloud"
```
The Node Name (in this case "Azure Cloud") comes from the Admin Console UI as seen below.

The output of the command will display the Automator settings, including metadata from the identity provider.
```
Automator ID: 1477468749950
Name: My Automator
URL:
Enabled: No
Initialized: No
Skills: Device Approval
```
Note that the "URL" is not populated yet. This is the **Default Domain** value from [Step 5](#id-5-create-webapp).
Run the "automator edit" command as displayed below, which sets the URL and also sets up the skills (`team`, `team_for_user` and `device`).
{% code overflow="wrap" %}
```
automator edit --url https:// --skill=team --skill=team_for_user --skill=device "My Automator"
```
{% endcode %}
Next we exchange keys: The enterprise private key encrypted with the Automator public key is provided to Automator:
```
automator setup "My Automator"
```
Initialize the Automator with the new configuration
```
automator init "My Automator"
```
Enable the service
```
automator enable "My Automator"
```
At this point, the configuration is complete.
For external health checks, you can use the below URL:
https\://\/health
Example `curl` command:
```
$ [rainer@iradar keeper]$ curl -vk https://keeperapprovalautomator.azurewebsites.net/health
* About to connect() to keeperapprovalautomator.azurewebsites.net port 443 (#0)
* Trying 40.112.243.106...
* Connected to keeperapprovalautomator.azurewebsites.net (40.112.243.106) port 443 (#0)
* Initializing NSS with certpath: sql:/etc/pki/nssdb
* skipping SSL peer certificate verification
* SSL connection using TLS_ECDHE_RSA_WITH_AES_256_GCM_SHA384
* Server certificate:
* subject: CN=*.azurewebsites.net,O=Microsoft Corporation,L=Redmond,ST=WA,C=US
* start date: Oct 31 23:08:36 2023 GMT
* expire date: Jun 27 23:59:59 2024 GMT
* common name: *.azurewebsites.net
* issuer: CN=Microsoft Azure TLS Issuing CA 01,O=Microsoft Corporation,C=US
> GET /health HTTP/1.1
> User-Agent: curl/7.29.0
> Host: keeperapprovalautomator.azurewebsites.net
> Accept: */*
>
< HTTP/1.1 200 OK
< Content-Length: 2
< Content-Type: text/plain
< Date: Sat, 23 Mar 2024 05:08:13 GMT
< Server: Jetty(11.0.20)
< Strict-Transport-Security: max-age=31622400; includeSubDomains
<
* Connection #0 to host keeperapprovalautomator.azurewebsites.net left intact
```
### Testing the User Experience
Now that Keeper Automator is deployed, you can test the end-user experience. No prompts for approval will be required after the user authenticates with the SSO identity provider.
The easiest way to test is to open an incognito mode window to the Keeper Web Vault and login with SSO Cloud. You will not be prompted for device approval.
---
# Agent Instructions
This documentation is published with GitBook. GitBook is the documentation platform designed so that both humans and AI agents can read, navigate, and reason over technical content effectively. Learn more at gitbook.com.
## Querying This Documentation
If you need additional information that is not directly available in this page, you can query the documentation dynamically by asking a question.
Perform an HTTP GET request on the current page URL with the `ask` query parameter, and the optional `goal` query parameter:
```
GET https://docs.keeper.io/sso-connect-cloud/device-approvals/automator/azure-app-services.md?ask=&goal=
```
`ask` is the immediate question: it should be specific, self-contained, and written in natural language.
`goal` is optional and describes the broader end goal you are ultimately trying to accomplish on behalf of the user. GitBook uses it to tailor the answer towards what is most useful for that goal.
The response will contain a direct answer to the question and relevant excerpts and sources from the documentation.
Use this mechanism when the answer is not explicitly present in the current page, you need clarification or additional context, or you want to retrieve related documentation sections.