> For the complete documentation index, see [llms.txt](https://docs.keeper.io/llms.txt). Markdown versions of documentation pages are available by appending `.md` to page URLs; this page is available as [Markdown](https://docs.keeper.io/sso-connect-cloud/device-approvals/automator/aws-elastic-container-service.md).
# AWS Elastic Container Service
## Overview
This example demonstrates how to launch the Keeper Automator service in Amazon ECS in the most simple way, with as few dependencies as needed.
Requirements:
* A managed SSL certificate via the AWS
### (1) Create an Automator Config key
Generate a 256-bit AES key in URL-encoded format using one of the methods below, depending on your operating system:
#### Mac/Linux
```
openssl rand -base64 32
```
#### Windows
```
[Byte[]]$key = New-Object Byte[] 32; [System.Security.Cryptography.RNGCryptoServiceProvider]::Create().GetBytes($key); [System.Convert]::ToBase64String($key)
```
Save this value for the environmental variables set in the task definition.
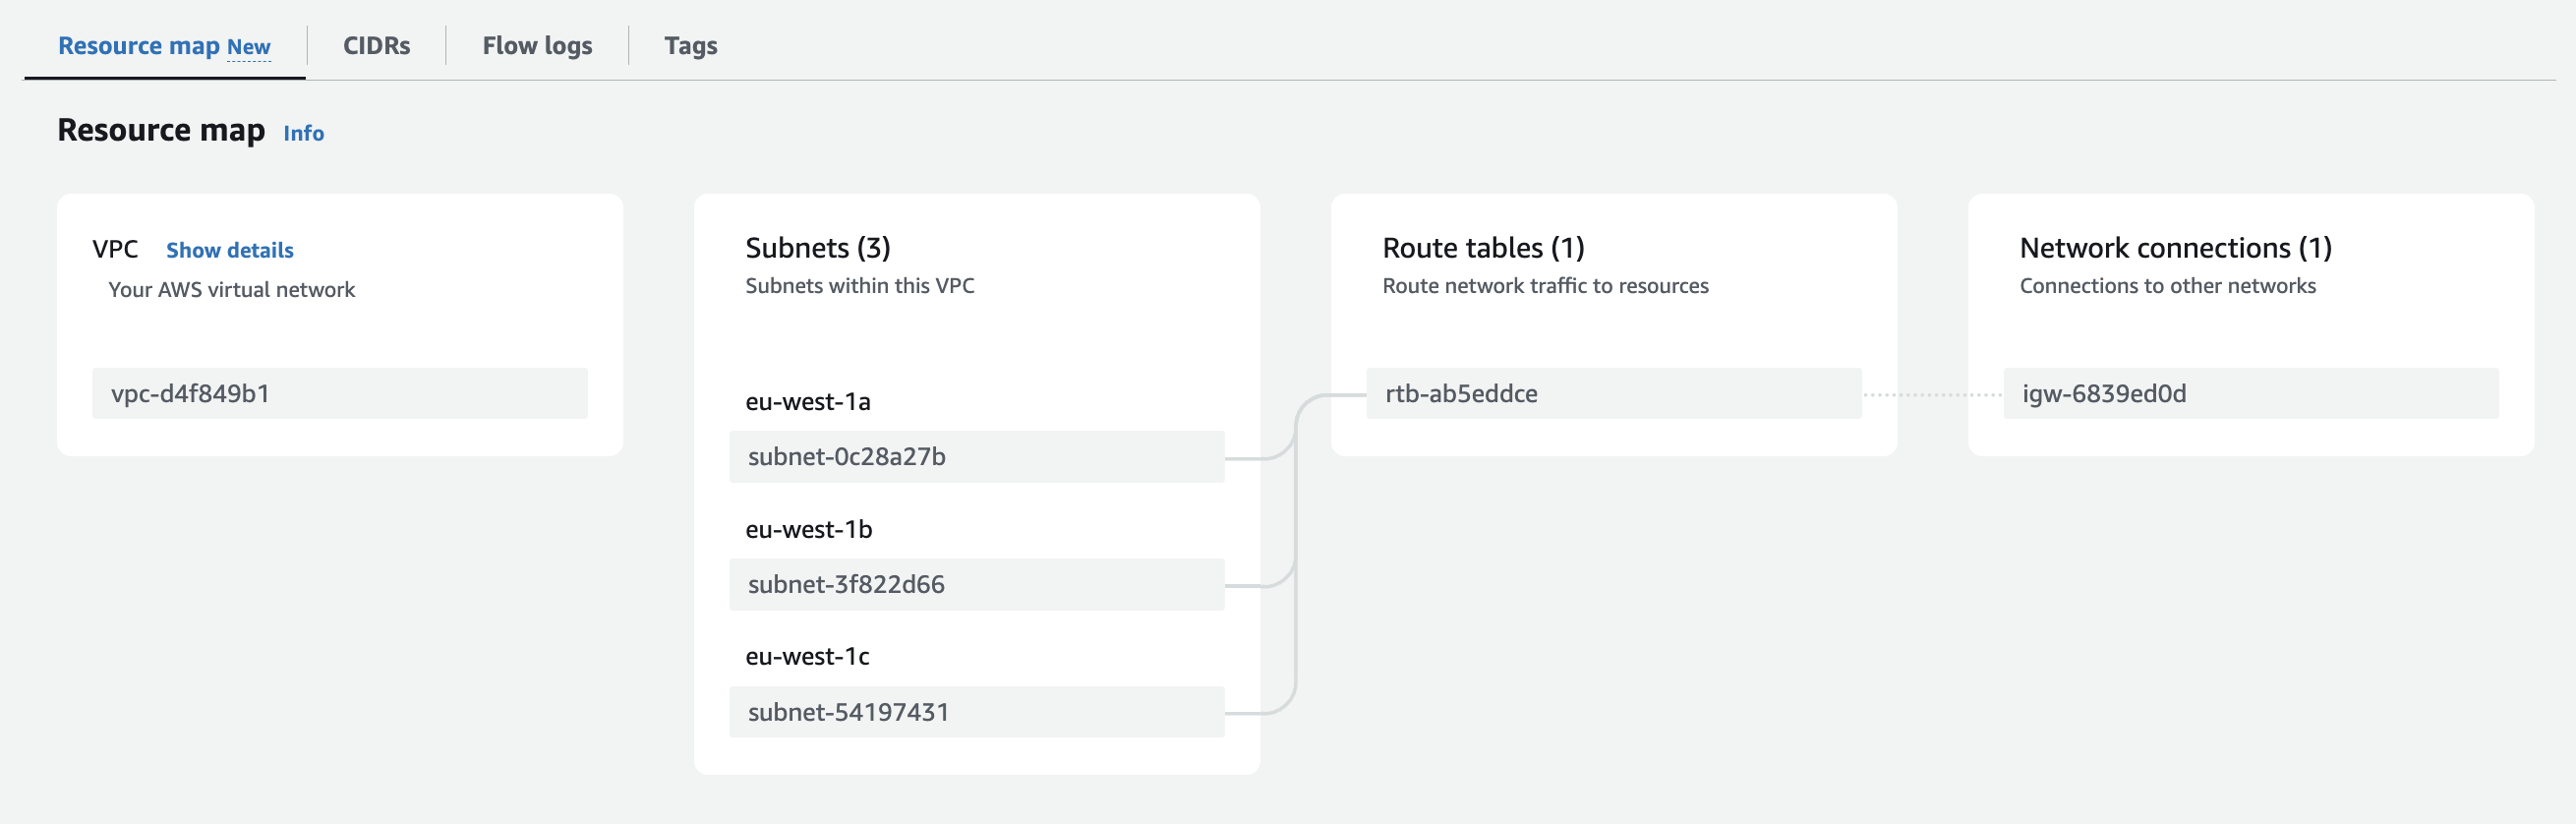
### (2) Create a VPC
If your VPC does not exist, a basic VPC with multiple subnets, a route table and internet gateway must be set up. In this example, there are 3 subnets in the VPC with an internet gateway as seen in the resource map below:
VPC Setup
### (3) Create CloudWatch Log Group
If you would like to capture logs (recommended), Go to CloudWatch > Create log group
Name the log group "automator-logs".
Create CloudWatch Log Group
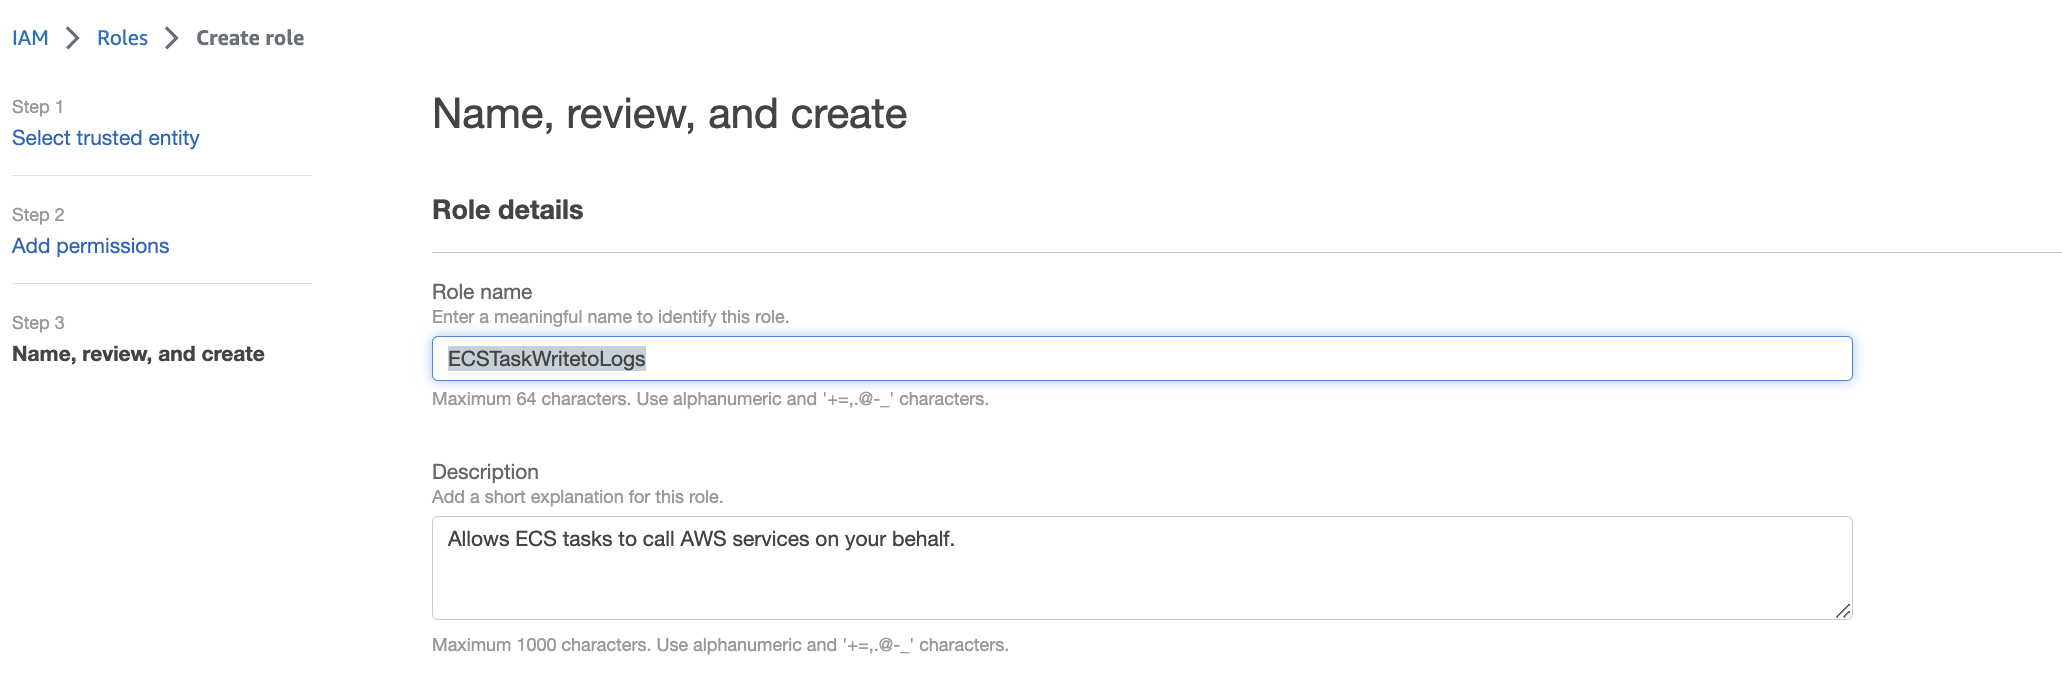
### (4) Create an Execution IAM Role
Go to IAM > Create role
Select AWS service
Then search for Elastic Container Service and select it.
Select "Elastic Container Service Task" and click Next
Add the "AmazonECSTaskExecution" policy to the role and click Next
Assign the name "**ECSTaskWritetoLogs**" and then create the role.
Make note of the ARN for this Role, as it will be used in the next steps.
In this example, it is **`arn:aws:iam::373699066757:role/ECSTaskWritetoLogs`**
Make note of ARN
### (5) Create a Security Group for ECS
Go to **EC2** > **Security Groups** and click on "**Create security group**"
Depending on what region your Keeper tenant is hosted, you need to create inbound rules that allow https port 443 from the Keeper cloud. The list of IPs for each tenant location is located below. In the example below, this is the US data center.
* We also recommend adding your workstation's external IP address for testing and troubleshooting.
Assign a name like "**MyAutomatorService"** and then click "Create".
Create ECS Security Group
| Keeper Tenant Region | IP1 | IP2 |
| -------------------- | ---------------- | ----------------- |
| US | 54.208.20.102/32 | 34.203.159.189/32 |
| US GovCloud | 18.252.135.74/32 | 18.253.212.59/32 |
| EU | 52.210.163.45/32 | 54.246.185.95/32 |
| AU | 3.106.40.41/32 | 54.206.208.132/32 |
| CA | 35.182.216.11/32 | 15.223.136.134/32 |
| JP | 54.150.11.204/32 | 52.68.53.105/32 |
{% hint style="info" %}
Remember to add your own IP which you can find from this URL:
{% endhint %}
### (6) Add the Security Group to the list of inbound rules
After saving the security group, edit the inbound rules again. This time, make the following additions:
* Add HTTP port 8089 with the Source set to the security group. This allows traffic from the ALB to the container inside the network and for processing health checks.
Custom TCP port 8089
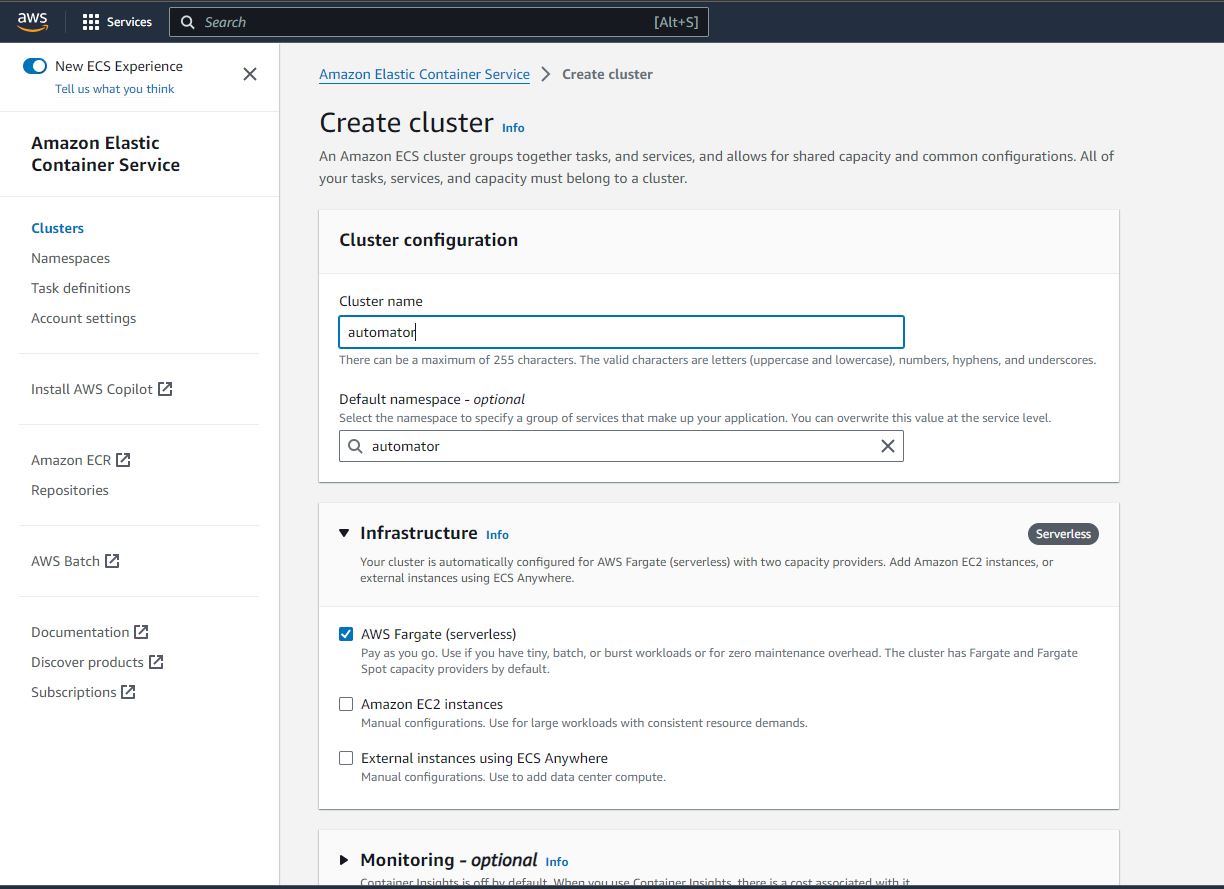
### (7) Create Elastic Container Service Cluster
Navigate to the Amazon Elastic Container Service.
Select "Create cluster" and assign the cluster name and VPC. In this example we are using the default "AWS Fargate (serverless)" infrastructure option.
* The Default namespace can be called "automator"
* The "Infrastructure" is set to AWS Fargate (serverless)
* Click Create
Create ECS Cluster with AWS Fargate
### (8) Create ECS Task Definition
In your favorite text editor, copy the below JSON task definition file and save it.
**Important:** Make the following changes to the JSON file:
* Change the **XXX (REPLACE THIS) XXX** on line 24 to the secret key created in Step 1 above.
* Replace lines **37-39** with the **name** and **location** of the log group from Step 3
* Change the **XXX** on line 44 for the role ID as specific to your AWS role (from Step 4, e.g. 373699066757)
{% code lineNumbers="true" %}
```json
{
"family": "automator",
"containerDefinitions": [
{
"name": "automator",
"image": "keeper/automator:latest",
"cpu": 1024,
"portMappings": [
{
"containerPort": 8089,
"hostPort": 8089,
"protocol": "tcp",
"appProtocol": "http"
}
],
"essential": true,
"environment": [
{
"name": "SSL_MODE",
"value": "none"
},
{
"name": "AUTOMATOR_CONFIG_KEY",
"value": "XXX (REPLACE THIS) XXX"
},
{
"name": "AUTOMATOR_PORT",
"value": "8089"
}
],
"mountPoints": [],
"volumesFrom": [],
"readonlyRootFilesystem": false,
"logConfiguration": {
"logDriver": "awslogs",
"options": {
"awslogs-group": "automator-logs",
"awslogs-region": "eu-west-1",
"awslogs-stream-prefix": "container-2"
}
}
}
],
"executionRoleArn": "arn:aws:iam::XXX:role/ecsTaskExecutionRole",
"networkMode": "awsvpc",
"requiresCompatibilities": [
"FARGATE"
],
"cpu": "1024",
"memory": "3072",
"runtimePlatform": {
"cpuArchitecture": "X86_64",
"operatingSystemFamily": "LINUX"
}
}
```
{% endcode %}
Next, go to **Elastic Container Service** > **Task definitions** > **Create Task from JSON**
Create task definition with JSON
Remove the existing JSON and copy-paste the modified JSON file into the box, then click **Create**.
This task definition can be modified according to your instance CPU/Memory requirements.
### (9) Upload SSL Cert to AWS Certificate Manager
In order for an application load balancer in AWS to serve requests for Automator, the SSL certificate must be managed by the AWS Certificate Manager. You can either import or create a certificate that is managed by AWS.
* From AWS console, open the "Certificate Manager"
* Click on **Request**
* Request a public certificate and click **Next**
* Enter the domain name for the automator service, e.g. automator.lurey.com
* Select your preferred validation method and key algorithm
* Click **Request**
* Click on the certificate request from the list of certs
If you use Route53 to manage the domain, you can click on the certificate and then select "**Create Records in Route53**" to instantly validate the domain and create the certificate. If you use a different DNS provider, you need to create the CNAME record as indicated on the screen.
Once create the CNAME record, the domain will validate within a few minutes.
This certificate will be referenced in Step 11 when creating the application load balancer.
### (10) Create a Target Group
Go to EC2 > Target Groups and click Create target group
* Select "IP Addresses" as the target type
* Enter the Target group name of "**automatortargetgroup**" or whatever you prefer
* Select HTTP Protocol with Port **8089**
* Select the VPC which contains the ECS cluster
* Select HTTP1
* Under Health checks, select the Health check protocol "**HTTP**"
* Type **`/health`** as the Health check path
* Expand the "**Advanced health check settings**"
* Select **Override** and then enter port **8089**
* Click **Next**
* Don't select any targets yet, just click **Create target group**
### (11) Create Application Load Balancer (ALB)
Go to **EC2** > **Load balancers** > **Create load balancer**
Select **Application Load Balancer** > **Create**
* Assign name such as "**automatornalb**" or whatever you prefer
* Scheme is "Internet-facing"
* IP address type: IPv4
* In the Network Mapping section, select the VPC and the subnets which will host the ECS service.
* In the Security groups, select "**MyAutomatorService**" as created in Step 4.
* In the Listeners and routing section, select HTTPS port 443 and in the target group select the Target group as created in the prior step (**automatortargetgroup**).
* In the Secure listener settings, select the SSL certificate "from ACM" that was uploaded to the AWS Certificate Manager in Step 9.
* Click **Create load balancer**
### (12) Create ECS Service
Go to Elastic Container Service > Task definitions > Select the task created in Step 8.
From this Task definition, click on Deploy > Create Service
Create service
* Select Existing cluster of "**automator**"
* Assign Service name of "**automatorservice**" or whatever name you prefer
* For the number of Desired tasks, set this to **1** for now. After configuration is complete, you can increase to the number of tasks you would like to have running.
* Under Networking, select the VPC, subnets and replace the existing security group with the ECS security group created in Step 4. In this case, it is called "**MyAutomatorService**".
* For **Public IP,** turn this **ON**.
* Under Load balancing, select Load balancer type "**Application Load Balancer**"
* Use an **existing** load balancer and select "**automatoralb**" created in Step 11.
* Use an **existing** listener, and select the 443:HTTPS listener
* Use an **existing** target group, and select the Target Group from Step 10
* Set the Health check path to "**/health**"
* Set the Health check protocol to "**HTTP**"
* Click **Create**
After a few minutes, the service should start up.
### (13) Update DNS
Assuming that the DNS name is hosted and managed by Route53:
Go to **Route53** > **Create** or Edit record
* Create an A-record
* Set as "**Alias**"
* Route traffic to "**Alias to Application and Classic Load Balancer**"
* Select AWS Region
* Select the "**automatoralb**" Application Load Balancer
* Select "**Simple Routing**"
* Select "**Save**"
The next step is to configure Automator using Keeper Commander while only having one task running.
### **(14) Install Keeper Commander**
At this point, the service is running but it is not able to communicate with Keeper yet.
On your workstation, server or any computer, install the Keeper Commander CLI. This is just used for initial setup. The installation instructions including binary installers are here:\
[**Installing Keeper Commander**](/keeperpam/commander-cli/commander-installation-setup.md)\
\
After Commander is installed, you can type `keeper shell` to open the session, then login using the `login` command. In order to set up Automator, you must login as a Keeper Administrator, or an Admin with the ability to manage the SSO node.
```
$ keeper shell
My Vault> login admin@company.com
.
.
My Vault>
```
### **(15) Initialize with Commander**
Login to [Keeper Commander](/keeperpam/commander-cli/overview.md) and activate the Automator using a series of commands, starting with `automator create`
```
My Vault> automator create --name="My Automator" --node="Azure Cloud"
```
The Node Name (in this case "Azure Cloud") comes from the Admin Console UI as seen below.

The output of the command will display the Automator settings, including metadata from the identity provider.
```
Automator ID: 1477468749950
Name: My Automator
URL:
Enabled: No
Initialized: No
Skills: Device Approval
```
Run the "automator edit" command as displayed below, which sets the URL and also sets up the skills (`team`, `team_for_user` and `device`).
{% code overflow="wrap" %}
```
automator edit --url https:// --skill=team --skill=team_for_user --skill=device "My Automator"
```
{% endcode %}
Next we exchange keys: The enterprise private key encrypted with the Automator public key is provided to Automator:
```
automator setup "My Automator"
```
Initialize the Automator with the new configuration
```
automator init "My Automator"
```
Enable the service
```
automator enable "My Automator"
```
At this point, the configuration is complete.
For automated health checks, you can use the below URL:
**https\://\/health**
Example `curl` command:
```
$ curl https://automator.lurey.com/health
OK
```
In this example setup, the load balancer will be forwarding /health checks to the target instances over HTTP port 8089.
### (16) Testing the User Experience
Now that Keeper Automator is deployed with a single task running, you can test the end-user experience. No prompts for approval will be required after the user authenticates with the SSO identity provider.
The easiest way to test is to open an incognito mode window to the Keeper Web Vault and login with SSO Cloud. You will not be prompted for device approval.


Assuming that the approval worked, you can now increase the number of tasks running.
### (17) Update Task Definition (Optional)
The Keeper Automator service can run quite well on a single container without any issue due to the low number of requests that it processes. However if you would like to have multiple containers running, please follow the below steps:
* Click on the "**automatorservice**" from the ECS services screen
* Click on "**Update service**"
* Select the checkbox on "**Force new deployment**"
* Ensure that the latest task revision is selected
* Set the **Desired Tasks** to the number of containers you would like running
* Click "**Update**"
* After a few minutes, the new containers will deploy. Wait until all containers are active.
* Launch Keeper Commander (or it might still be open)
For every container, the automator setup, automator init and automator enable must be executed.
For example, if there are 3 containers running:
```
automator setup "My Automator"
automator setup "My Automator"
automator setup "My Automator"
automator init "My Automator"
automator init "My Automator"
automator init "My Automator"
automator enable "My Automator"
automator enable "My Automator"
automator enable "My Automator"
```
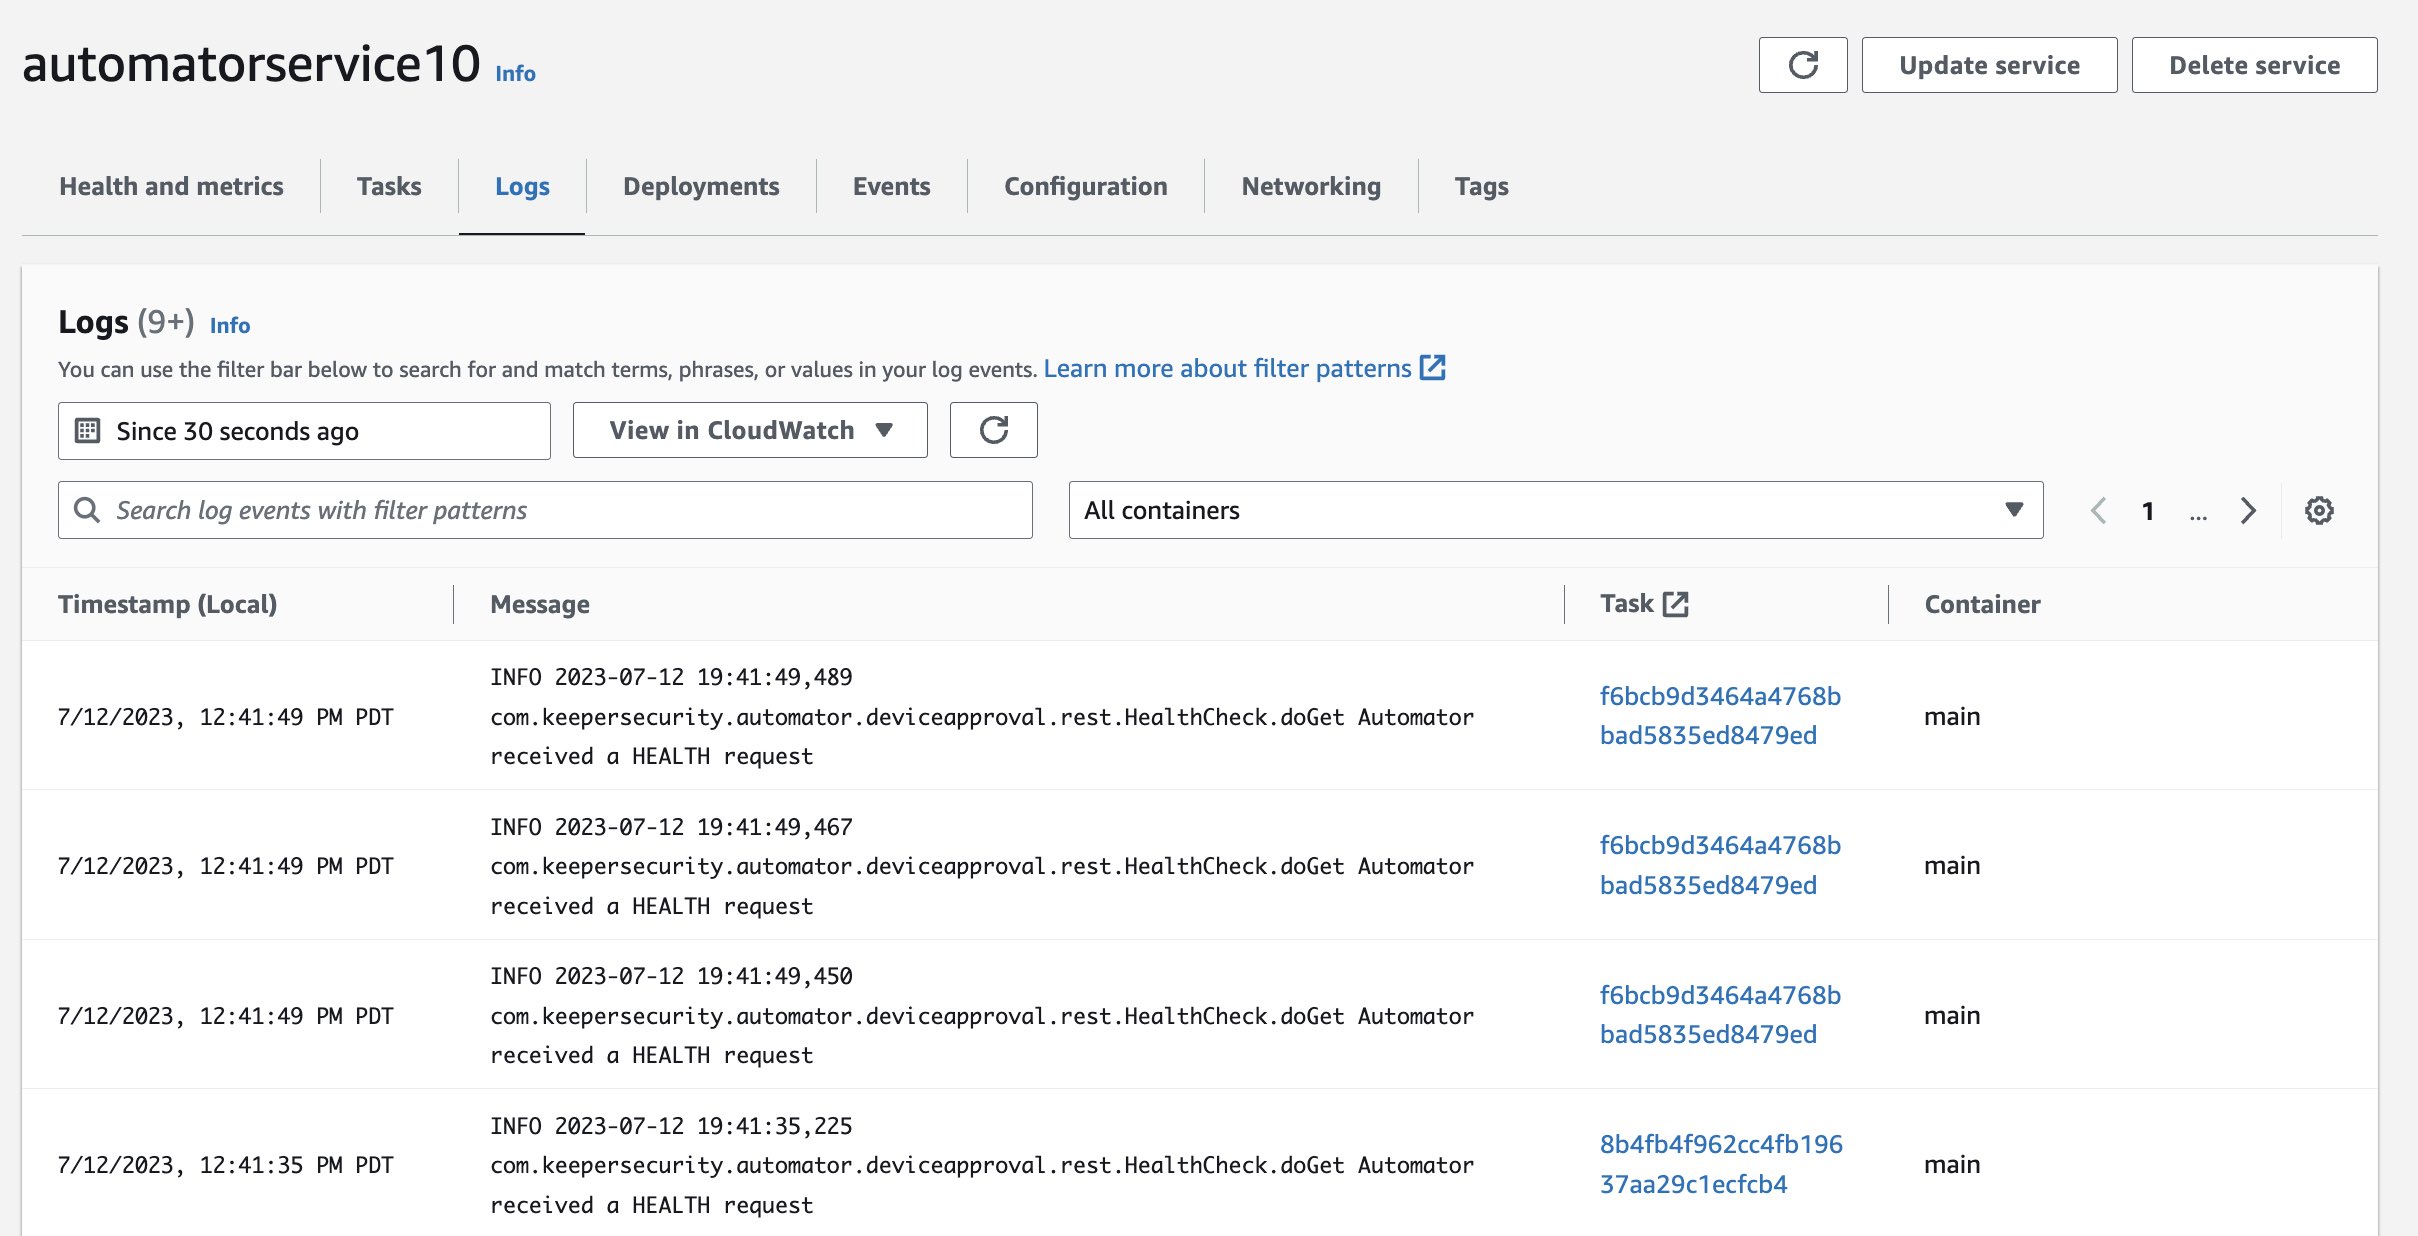
### Logging and Monitoring
The Automator logs can be searched and monitored in the "Logs" tab of the ECS service, or in CloudWatch.
Logging and Monitoring
---
# Agent Instructions
This documentation is published with GitBook. GitBook is the documentation platform designed so that both humans and AI agents can read, navigate, and reason over technical content effectively. Learn more at gitbook.com.
## Querying This Documentation
If you need additional information that is not directly available in this page, you can query the documentation dynamically by asking a question.
Perform an HTTP GET request on the current page URL with the `ask` query parameter, and the optional `goal` query parameter:
```
GET https://docs.keeper.io/sso-connect-cloud/device-approvals/automator/aws-elastic-container-service.md?ask=&goal=
```
`ask` is the immediate question: it should be specific, self-contained, and written in natural language.
`goal` is optional and describes the broader end goal you are ultimately trying to accomplish on behalf of the user. GitBook uses it to tailor the answer towards what is most useful for that goal.
The response will contain a direct answer to the question and relevant excerpts and sources from the documentation.
Use this mechanism when the answer is not explicitly present in the current page, you need clarification or additional context, or you want to retrieve related documentation sections.