> For the complete documentation index, see [llms.txt](https://docs.keeper.io/llms.txt). Markdown versions of documentation pages are available by appending `.md` to page URLs; this page is available as [Markdown](https://docs.keeper.io/keeper-connection-manager/vault-integration/installation.md).
# Connecting KCM to your Vault
To connect KCM to your vault, we utilize Keeper Secrets Manager (KSM). KSM must first be enabled in the role policy enforcement settings of the role you are a member of (from the Admin Console). Then, you will see the tab "Secrets Manager" in your vault on the left side.
## Network Configuration
This integration requires that your KCM server is able to communicate to the Keeper Secrets Manager (KSM) endpoint over TLS port 443 where your Keeper tenant is hosted.
**US**: keepersecurity.com\
**EU**: keepersecurity.eu\
**AU**: keepersecurity.com.au\
**CA**: keepersecurity.ca\
**JP**: keepersecurity.jp\
**US\_GOV**: govcloud.keepersecurity.us
## Vault Setup
Credentials for establishing connections are stored in Keeper shared folders. A Keeper Secrets Manager application is created and associated with the shared folder. A base64 device configuration is then created and [added to your Keeper Connection Manager server.](/keeper-connection-manager/installation/auto-docker-install.md#secrets-manager-integration)
{% hint style="warning" %}
Note: This integration works with the latest "typed" vault records such as Logins, SSH Keys, Databases, Servers, etc. The old Keeper "general" record types are not compatible with Keeper Secrets Manager or Keeper Connection Manager integrations. For more information on record types, [see this page](/enterprise-guide/record-types.md).
{% endhint %}
### Configuration Steps
**(1)** In the vault, create a shared folder and store credential records into this shared folder. For right now, the shared folder needs to be created and it can be populated later with credentials.
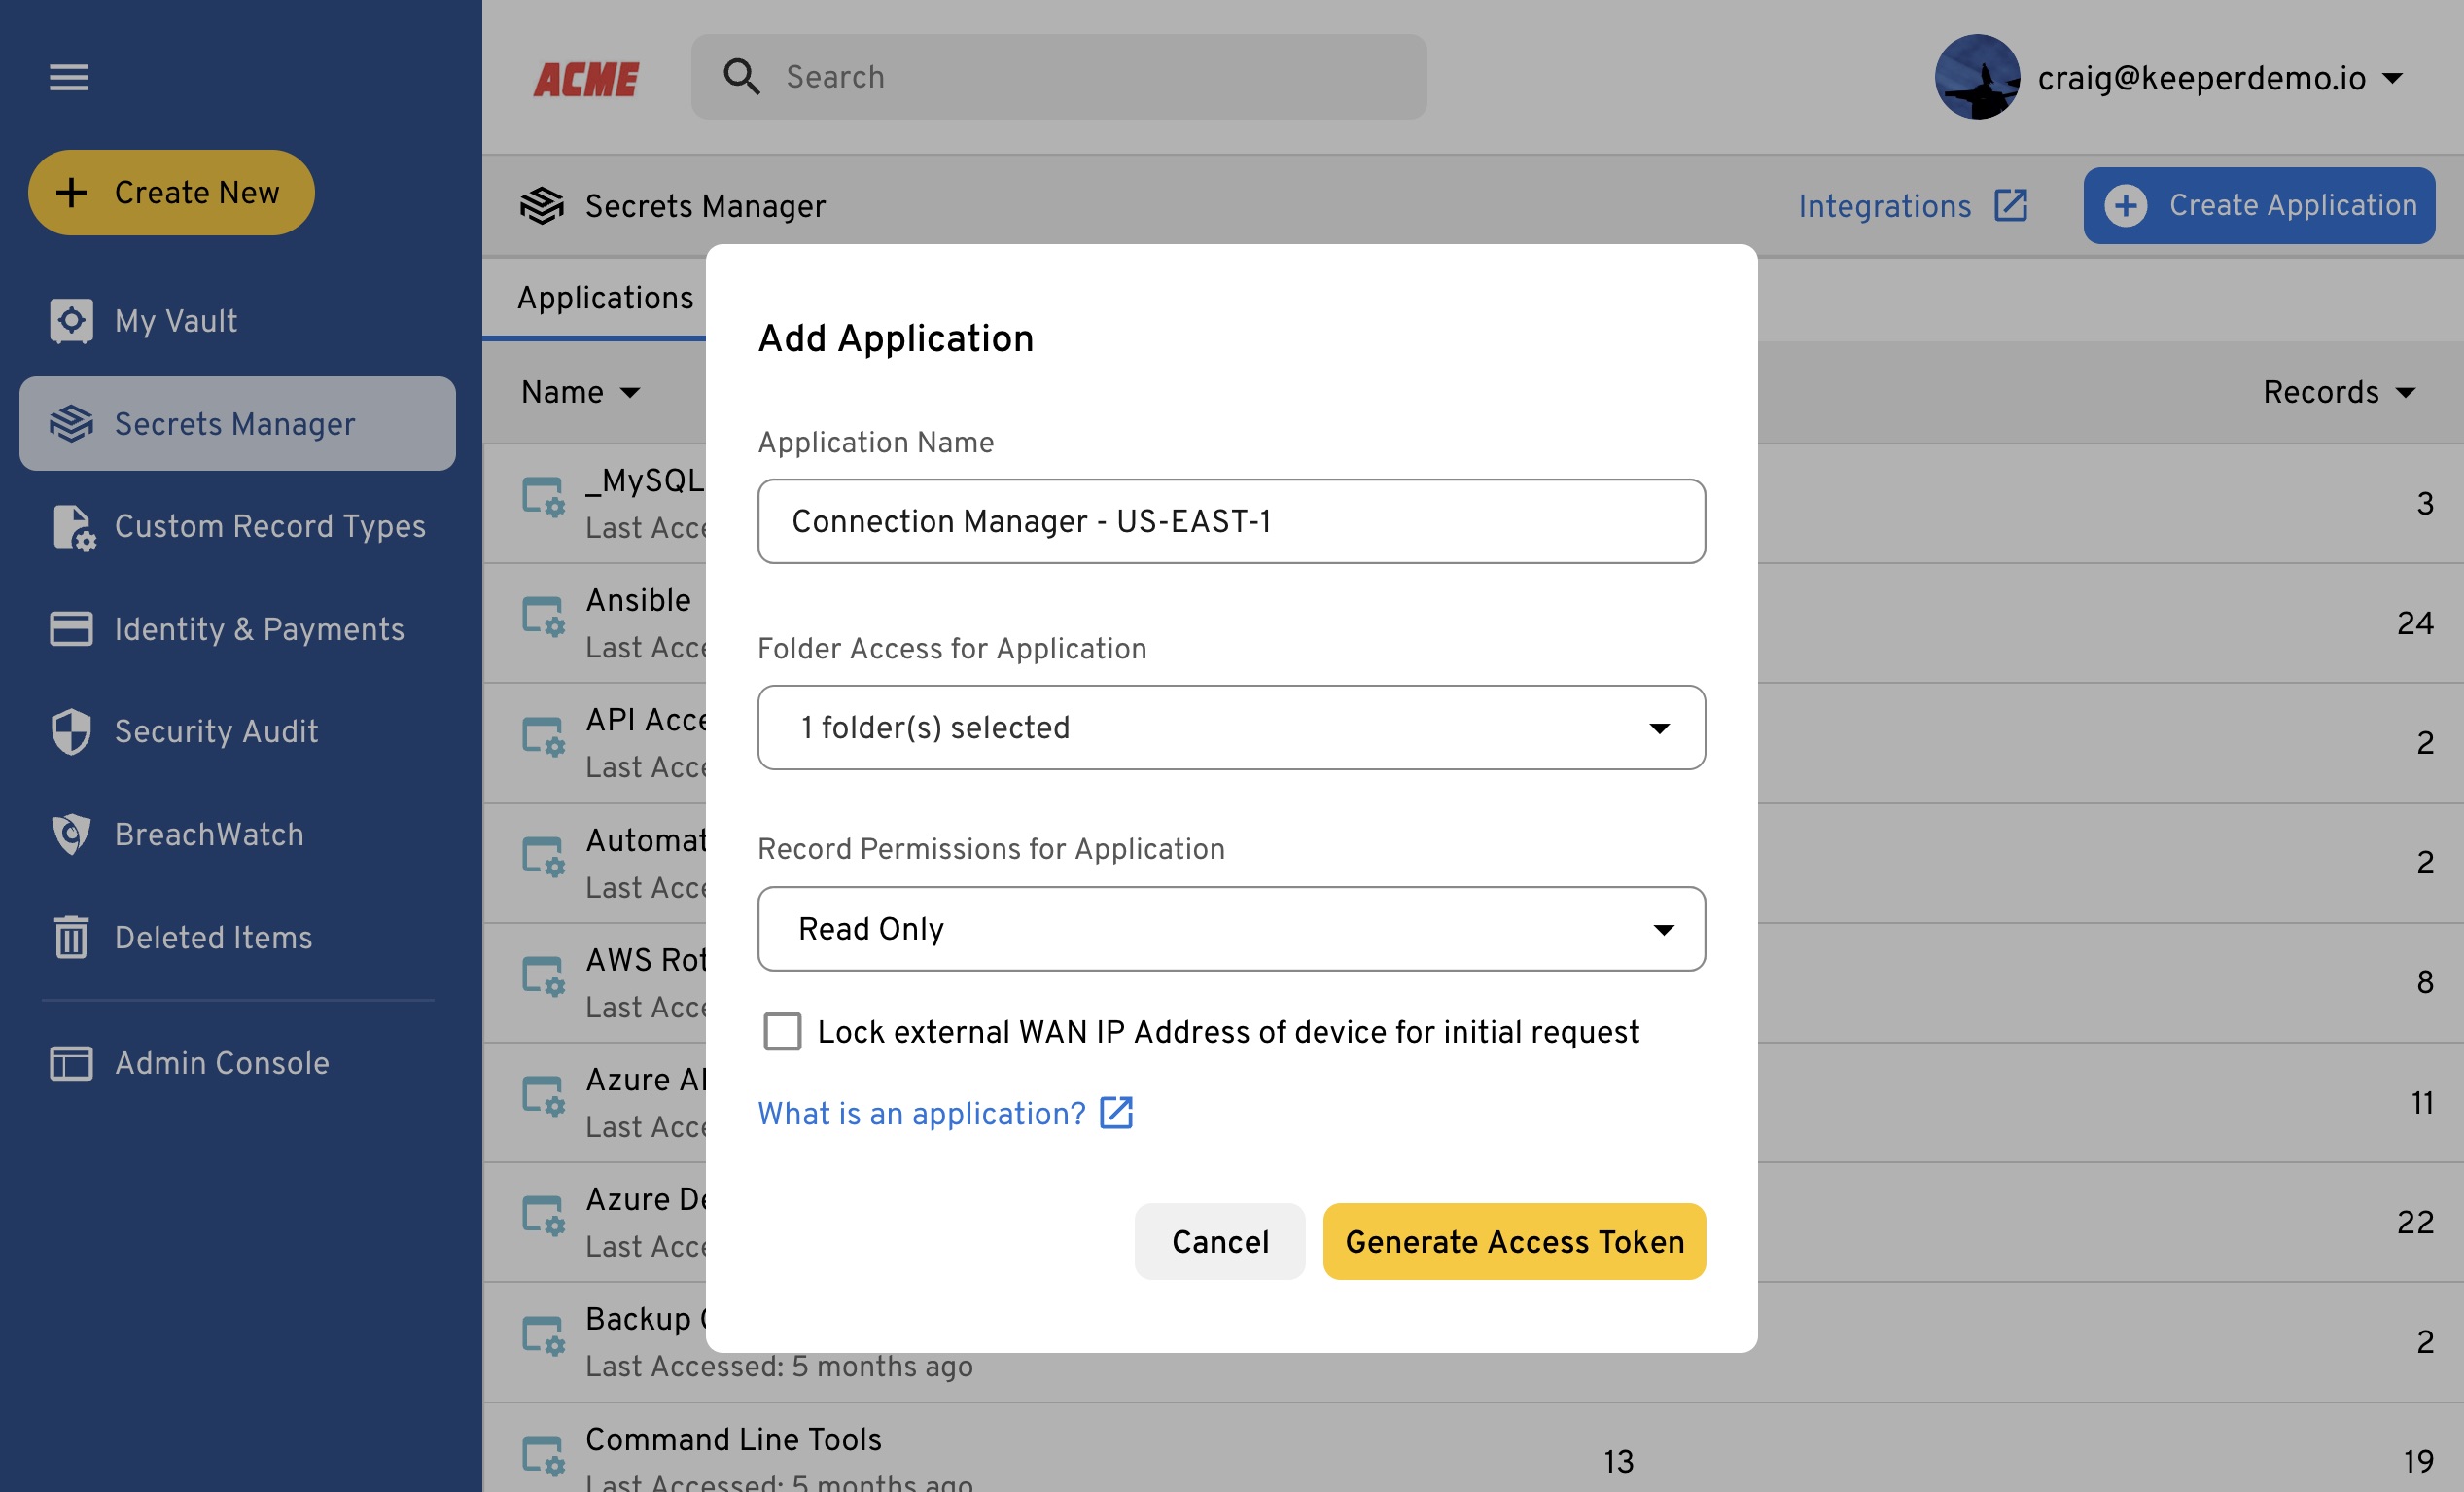
**(2)** From the Secrets Manager tab, create a Secrets Manager application and choose the shared folder which contains the credentials. A one-time access token is provided. You can use this one-time token, or go to Devices > Edit > Add Device > Method: Configuration File > Base64 and copy the base64 configuration string.
**(3)** If there have been no manual changes to your Docker Compose since original installation of KCM, you can run the reconfigure command to enter the Base64 configuration:
```bash
sudo ./kcm-setup.run reconfigure
```
{% hint style="warning" %}
Any changes made to your Docker Compose file will be lost when performing the "reconfigure" action
{% endhint %}
If you have changed the Docker Compose since the original installation it is recommended to manually edit the file `/etc/kcm-setup/docker-compose.yml` and adding the Base64 configuration into the "environment" section. For example:
```
guacamole:
image: keeper/guacamole:2
restart: unless-stopped
volumes:
- common-storage:/var/lib/guacamole
environment:
ACCEPT_EULA: "Y"
GUACD_HOSTNAME: "guacd"
MYSQL_HOSTNAME: "db"
MYSQL_DATABASE: "guacamole_db"
MYSQL_USERNAME: "guacamole_user"
MYSQL_PASSWORD: "xxxxxxx"
KSM_CONFIG: "paste Base64 here"
```
**(4)** Save the file and run the upgrade command to bring in the changes.
```bash
sudo ./kcm-setup.run apply
```
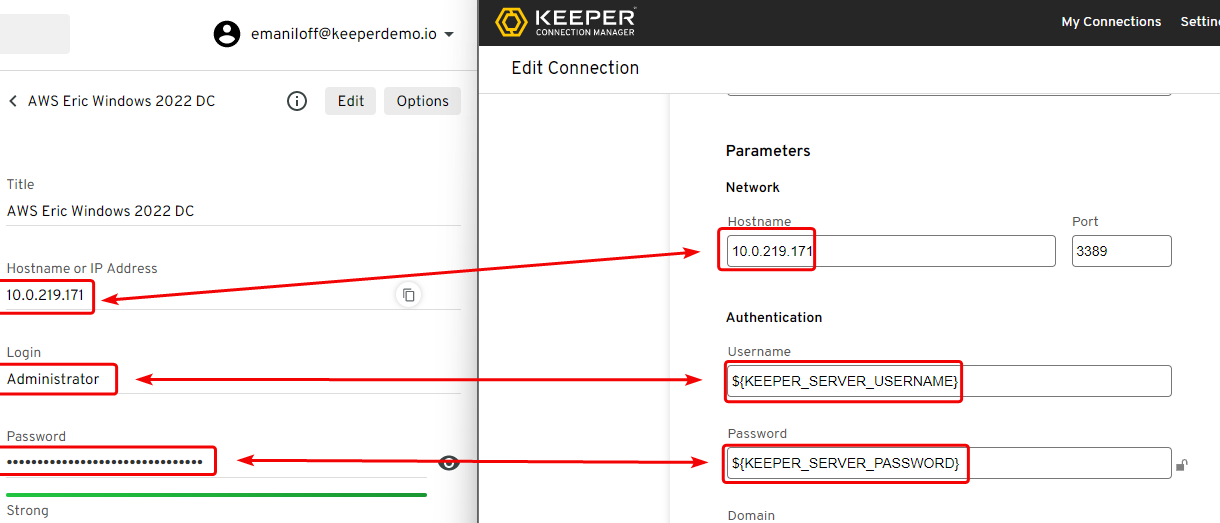
**(5)** From the Keeper Connection Manager interface, create a new connection. Now, we can use dynamic tokens to pull in the credentials by matching the hostname/IP in KCM with the hostname/IP in your record in the shared folder that is tied to this KSM application.
There are many options including `${KEEPER_SERVER_USERNAME}` and `${KEEPER_SERVER_PASSWORD}`.
Setup complete! Other matching capabilities and available variables are documented on the [dynamic tokens page](/keeper-connection-manager/vault-integration/dynamic-tokens.md).
## Command Line Setup
If you wish to use the Keeper Commander CLI for establishing the integration between Keeper Connection Manager and Keeper Secrets Manager, follow the steps below.
**(1) Set up your Keeper Vault**
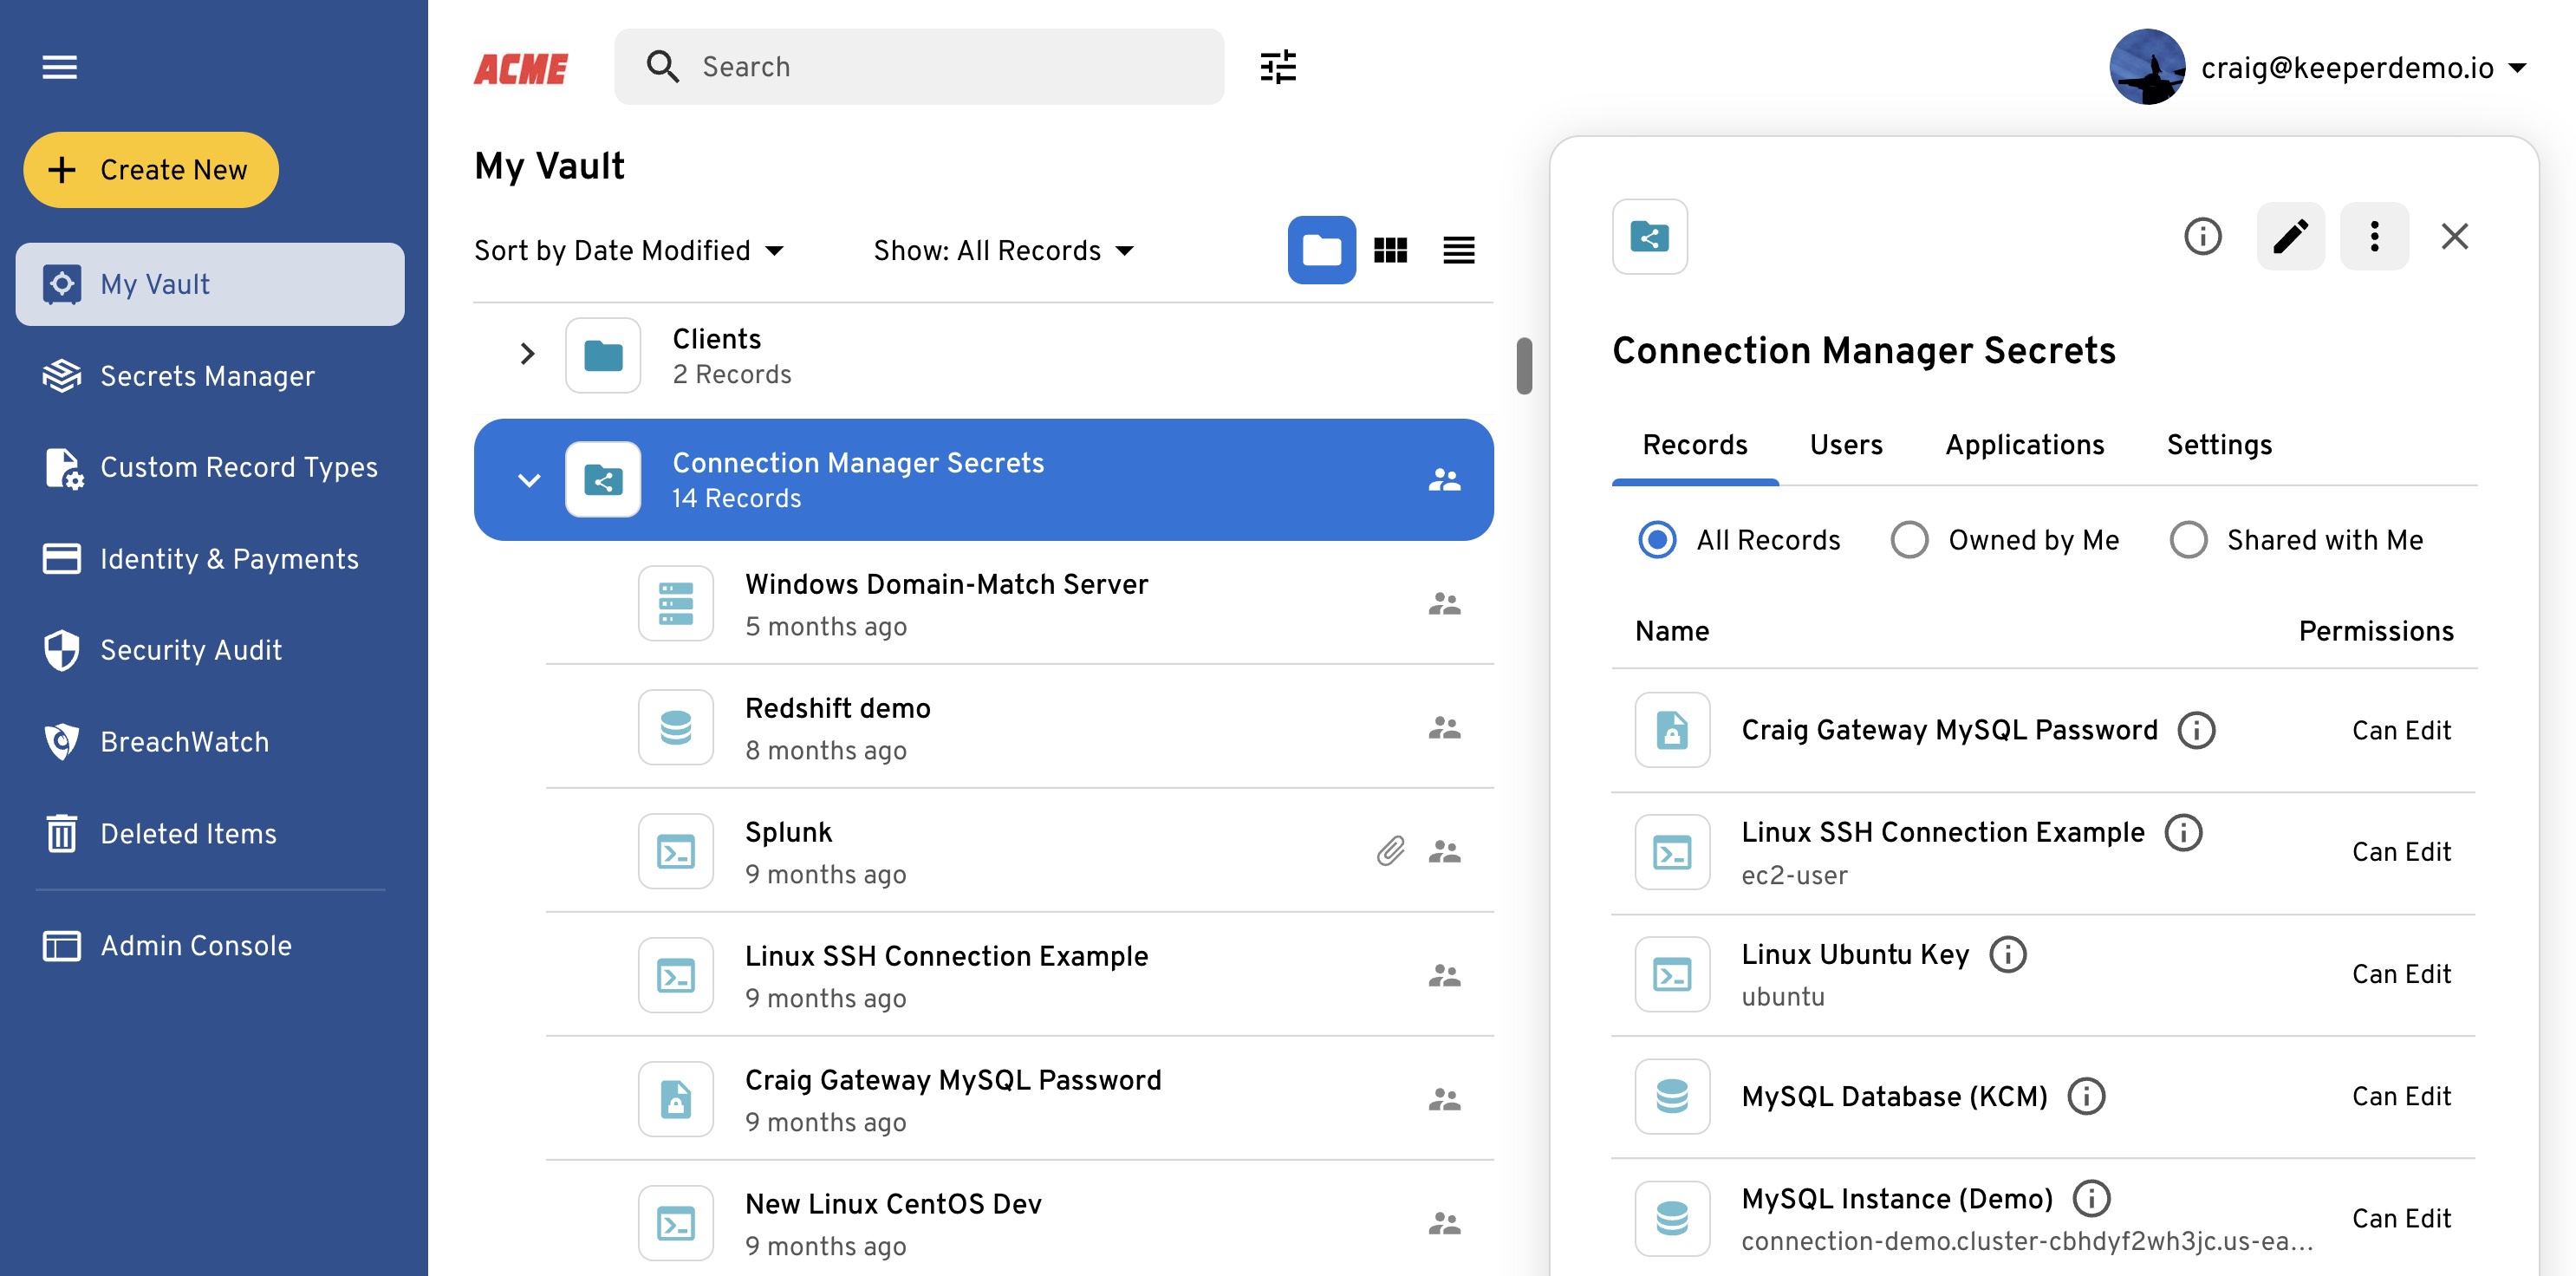
In your Keeper Vault, create a Shared Folder that is populated with credentials that will be used for making connections. In the example below you can see a shared folder called "Connection Manager Secrets" that includes a Windows 2022 Server password, SSH Key, MySQL Database, etc.

**(2) Install Keeper Commander CLI**
Our CLI tool will allow you to quickly set up the configuration.
There's a few ways to install Commander. We provide binary installers, pip3 packages or Python source code. The top level installation page is [here](/keeperpam/commander-cli/commander-installation-setup.md).
**(3) Login to Commander**
After installation of Commander, login to the CLI:
```
$ keeper shell
...
...
Not Logged In> login you@company.com
...
...
My Vault>
```
In the example screenshot below, I'm logging in with a Keeper admin account using a FIDO2 key and Master Password. Depending on your security settings, you may have to pass device verification, MFA and password entry.

**(4) Get the Shared Folder UID**
The command `lsf` will list the Shared Folders and display the UID.

In this example, the Shared Folder UID we're using is `zyMiCn8596yvMln4YwdEdA`
**(5) Create an Application**
A Secrets Manager application is created in the vault, which is assigned to the Shared Folder. An application is made up of one or more devices. Here we will create a Secrets Manager application and then retrieve the Application UID.
```
secrets-manager app create "Connection Manager Example"
secrets-manager app get "Connection Manager Example"
Secrets Manager Application
App Name: Connection Manager Example
App UID: YGHY7nWrvkzEzF0I2AuFfg
```
The resulting Secrets Manager App UID in this example is `YGHY7nWrvkzEzF0I2AuFfg`
**(6) Assign the Shared Folder to the Application**
In this step, we will assign our Shared Folder to the application.
{% code overflow="wrap" %}
```
secrets-manager share add --app "Connection Manager Example" --secret zyMiCn8596yvMln4YwdEdA
```
{% endcode %}
If successful, you will get the response "Successfully added secrets to app".
**(7) Generate a Client Configuration**
In this step, we will create a client device configuration. This client device configuration will be directly provided to the Connection Manager.
{% code overflow="wrap" %}
```
secrets-manager client add --app "Connection Manager Example" --config-init b64 --name "KCM Device" --unlock-ip
```
{% endcode %}

The "Initialized Config" section in green must now be added to the Keeper Connection Manager configuration file. The location of the configuration will depend on which method of installation, as described in the next section.
{% hint style="info" %}
Copy the token for the next section where it will be initialized
{% endhint %}
### Auto Docker Install Method
If you installed Keeper Connection Manager using the Auto Docker Install method, you will need to modify the auto-generated Docker Compose file to include the integration token.
**(1)** On the local instance, it is a good idea to stop the containers. You can do this using kcm-setup or using docker-compose directly.
```
sudo ./kcm-setup.run stop
```
or...
```
sudo su
cd /etc/kcm-setup/
docker-compose -p kcm stop
```
Using the simple docker method creates a `docker-compose.yml` file that is preconfigured for you. One change to this file will be needed to add KSM support.
**(2)** Edit the `/etc/kcm-setup/docker-compose.yml` file. You can use your favorite editor on the linux system such as nano or vim.
Look for the "guacamole" docker image and the "environment" section which defines environment variables. A sample file is listed below. Paste the token from step 6 above.
```
guacamole:
image: keeper/guacamole:2
restart: unless-stopped
volumes:
- common-storage:/var/lib/guacamole
environment:
ACCEPT_EULA: "Y"
GUACD_HOSTNAME: "guacd"
MYSQL_HOSTNAME: "db"
MYSQL_DATABASE: "guacamole_db"
MYSQL_USERNAME: "guacamole_user"
MYSQL_PASSWORD: "xxxxxxx"
KSM_CONFIG: "paste token here"
```
**(3) Save the File and Apply Changes**
Once the file changes have been saved, simply run:
```
$ sudo ./kcm-setup.run apply
```
**Test Login and Initialize Token**
Now that the KSM integration is completed, please ensure that you're able to login normally to Keeper Connection Manager and open connections. If errors occur, please check the log files.
{% hint style="info" %}
If you are unable to login or launch connections, see the [troubleshooting](/keeper-connection-manager/troubleshooting.md) section to learn how to check the log files.
{% endhint %}
### Custom Docker Install Method
If you installed Keeper Connection Manager using the Custom Docker Install method, you will need to modify your Docker Compose file to include the integration token. The instructions for activating the integration are below:
**(1)** On the local instance, stop the containers.
```
cd /path/to/docker-compose.yml
docker-compose stop
```
**(2)** Edit your `docker-compose.yml` file. Look for the "guacamole" docker image and the "environment" section which defines environmental variables. A sample file is listed below. Paste the token from step 6 above.
```
guacamole:
image: keeper/guacamole:2
restart: unless-stopped
volumes:
- common-storage:/var/lib/guacamole
environment:
ACCEPT_EULA: "Y"
GUACD_HOSTNAME: "guacd"
MYSQL_HOSTNAME: "db"
MYSQL_DATABASE: "guacamole_db"
MYSQL_USERNAME: "guacamole_user"
MYSQL_PASSWORD: "xxxxxxx"
KSM_CONFIG: "paste token here"
```
**(3) Save the File and Update Containers**
Once the file changes have been saved, simply update the containers:
```
sudo su
docker-compose up -d
```
**Test Login and Initialize Token**
Now that the KSM integration is completed, please ensure that you're able to login normally to Keeper Connection Manager and open connections. If errors occur, please check the log files.
{% hint style="info" %}
If you are unable to login or launch connections, see the [troubleshooting](/keeper-connection-manager/troubleshooting.md) section to learn how to check the log files.
{% endhint %}
---
# Agent Instructions
This documentation is published with GitBook. GitBook is the documentation platform designed so that both humans and AI agents can read, navigate, and reason over technical content effectively. Learn more at gitbook.com.
## Querying This Documentation
If you need additional information that is not directly available in this page, you can query the documentation dynamically by asking a question.
Perform an HTTP GET request on the current page URL with the `ask` query parameter, and the optional `goal` query parameter:
```
GET https://docs.keeper.io/keeper-connection-manager/vault-integration/installation.md?ask=&goal=
```
`ask` is the immediate question: it should be specific, self-contained, and written in natural language.
`goal` is optional and describes the broader end goal you are ultimately trying to accomplish on behalf of the user. GitBook uses it to tailor the answer towards what is most useful for that goal.
The response will contain a direct answer to the question and relevant excerpts and sources from the documentation.
Use this mechanism when the answer is not explicitly present in the current page, you need clarification or additional context, or you want to retrieve related documentation sections.